
Kappa 1.1cs - Freisprecheinrichtung Auto INFINITY - Kostenlose Bedienungsanleitung
Finden Sie kostenlos die Bedienungsanleitung des Geräts Kappa 1.1cs INFINITY als PDF.


| Produkttyp | Freisprecheinrichtung Auto |
| Marke | Infinity |
| Modell | Kappa 1.1cs |
| Abmessungen (ca.) | 100 x 60 x 30 mm |
| Gewicht (ca.) | 150 g |
| Stromversorgung | 12 V Kfz-Bordspannung über Zigarettenanzünder |
| Konnektivität | Bluetooth 5.0 |
| Reichweite | bis zu 10 m |
| Freisprechfunktion | Ja, mit integriertem Mikrofon und Lautsprecher |
| Rauschunterdrückung | Ja, Echo- und Geräuschunterdrückung |
| Anruffunktionen | Annehmen, Beenden, Lautstärkeregelung, Stummschaltung |
| Montage | Als Kfz-Halterung für Lüftungsschlitze oder Armaturenbrett |
| Betriebsanzeige | LED-Statusanzeige |
| Kompatible Geräte | Smartphones mit Bluetooth |
| Ladezeit (ca.) | 2 Stunden |
| Gesprächszeit (ca.) | 10 Stunden |
| Standby-Zeit (ca.) | 30 Tage |
| Betriebstemperatur | -20 °C bis 60 °C |
| Wartung | Mit einem weichen, trockenen Tuch reinigen; keine scharfen Reinigungsmittel |
| Sicherheitshinweise | Nicht während der Fahrt bedienen; nur als Freisprecheinrichtung nutzen |
| Lieferumfang | Kappa 1.1cs, Kfz-Ladekabel, Halterung, Bedienungsanleitung |
Häufig gestellte Fragen - Kappa 1.1cs INFINITY
Benutzerfragen zu Kappa 1.1cs INFINITY
0 Frage zu diesem Gerät. Beantworten Sie die, die Sie kennen, oder stellen Sie Ihre eigene.
Eine neue Frage zu diesem Gerät stellen
Laden Sie die Anleitung für Ihr Freisprecheinrichtung Auto kostenlos im PDF-Format! Finden Sie Ihr Handbuch Kappa 1.1cs - INFINITY und nehmen Sie Ihr elektronisches Gerät wieder in die Hand. Auf dieser Seite sind alle Dokumente veröffentlicht, die für die Verwendung Ihres Geräts notwendig sind. Kappa 1.1cs von der Marke INFINITY.
BEDIENUNGSANLEITUNG Kappa 1.1cs INFINITY

IMPORTANT: Installation of automotive stereo components can require extensive experience with a variety of mechanical and electrical procedures. Although these instructions explain how to install a Kappa Series 3-Way Component System in a general sense, they do not show the exact installation methods for your particular vehicle. If you do not feel you have the experience, do not attempt the installation yourself, but instead ask your Authorized Infinity Car Audio Dealer about professional installation options.
WARNING: Playing loud music in an automotive environment can permanently damage your hearing, as well as hinder your ability to hear traffic. The maximum volume levels achievable with Infinity speakers, combined with high power amplification, may exceed safe levels for extended listening. We recommend using low volume levels when driving. Infinity accepts no liability for hearing loss, bodily injury or property damage as a result of use or misuse of this product.
SPEAKER PLACEMENT
Kappa speakers are designed to be easily installed in stock speaker locations. While mounting your speakers in the original factory locations will, in most cases, provide excellent sonic results, the best sounding installations are a result of adherence to a few basic rules:
- For the most spacious stereo image, place the left and right speakers as far apart as possible.
- For enhanced center image, place the left and right speakers so they are equidistant from the listening position. If possible, try to place them as far forward as possible.
- For best treble response aim the tweeters toward the listening position, and be sure there are no obstructions between the tweeters and the listener.
INSTALLATION WARNINGS AND TIPS
• Always wear protective eyewear when using any tools.
- Turn off all audio systems and other electrical devices before you start. Disconnect the (−) negative lead from your vehicle's battery.
- Keep components in their package until final installation. When moving a speaker, always rest it with the cone or dome facing up. Never use force to install any speaker.
- Check clearances on both sides of a planned mounting surface before drilling any holes or installing any screws. Remember that the screws can extend behind the surface.
- At the installation sites, locate and make a note of all fuel lines, hydraulic brake lines, vacuum lines and electrical wiring. Use extreme caution when cutting or drilling in and around these areas.
CAUTION: In some cars, fuel tanks may be located directly beneath the rear deck. Check for adequate speaker basket clearance before considering this location!
- Before drilling or cutting holes, use a utility knife to remove unwanted fabric or vinyl, to keep material from snagging in a drill bit or saw.
- For door installations, check the clearance with the windows throughout the range of the window's travel, and verify that a mounted speaker will not interfere with the window crank or power window mechanism.
- If mounting components elsewhere, check for clearance around rear deck torsion bars, glove box or other structural elements.
- Do not mount components where they will get wet.
WIRE CODES
Single Stereo Amplifier
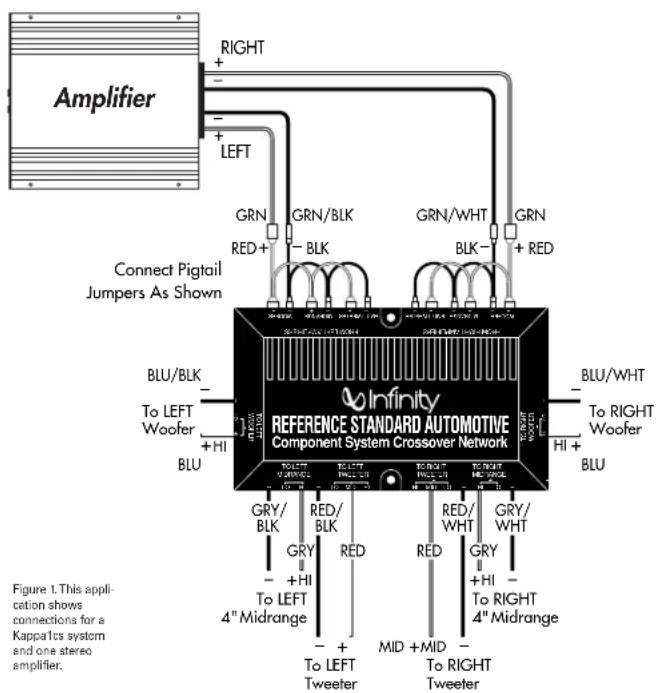
Bi-Amp
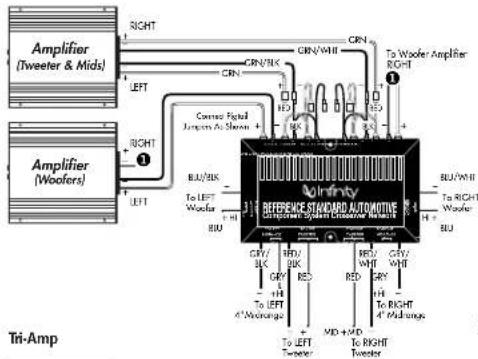
Figure 2. This application shows connections for a Kappa1cs system and two stereo amplifiers.
flowchart
graph TD
    A["Amplifier (Tweeters)"] -->|RIGHT| B["Reference Standard Automotive Component System Generator Network"]
    A -->|LEFT| B
    C["Amplifier (Midrange)"] -->|RIGHT| B
    C -->|LEFT| B
    D["Amplifier (Woofer)"] -->|RIGHT| B
    D -->|LEFT| B
    B -->|GRN/WHT| E["To Midrange Amplifier RIGHT"]
    B -->|GRN/WHT| F["To Wacker Amplifier RIGHT"]
    B -->|GRN/WHT| G["To RIGHT & Midrange"]
    B -->|GRN/WHT| H["To Left/Wooder"]
    B -->|GRN/WHT| I["To Right/Wooder"]
    B -->|GRN/WHT| J["To Left/Wooder"]
    B -->|GRN/WHT| K["To Right/Wooder"]
    B -->|GRN/WHT| L["To Left/Wooder"]
    B -->|GRN/WHT| M["To Right/Wooder"]
    B -->|GRN/WHT| N["To Left/Wooder"]
    B -->|GRN/WHT| O["To Right/Wooder"]
    B -->|GRN/WHT| P["To Left/Wooder"]
    B -->|GRN/WHT| Q["To Right/Wooder"]
    B -->|GRN/WHT| R["To Left/Wooder"]
    B -->|GRN/WHT| S["To Right/Wooder"]
    B -->|GRN/WHT| T["To Left/Wooder"]
    B -->|GRN/WHT| U["To Right/Wooder"]
    B -->|GRN/WHT| V["To Left/Wooder"]
    B -->|GRN/WHT| W["To Right/Wooder"]
    B -->|GRN/WHT| X["To Left/Wooder"]
    B -->|GRN/WHT| Y["To Right/Wooder"]
    B -->|GRN/WHT| Z["To Left/Wooder"]
    B -->|GRN/WHT| AA["To Right/Wooder"]
    B -->|GRN/WHT| AB["To Left/Wooder"]
    B -->|GRN/WHT| AC["To Right/Wooder"]
    B -->|GRN/WHT| AD["To Left/Wooder"]
    B -->|GRN/WHT| AE["To Right/Wooder"]
    B -->|GRN/WHT| AF["To Left/Wooder"]
    B -->|GRN/WHT| AG["To Right/Wooder"]
    B -->|GRN/WHT| AH["To Left/Wooder"]
    B -->|GRN/WHT| AI["To Right/Wooder"]
    B -->|GRN/WHT| AJ["To Left/Wooder"]
    B -->|GRN/WHT| AK["To Right/Wooder"]
    B -->|GRN/WHT| AL["To Left/Wooder"]
    B -->|GRN/WHT| AM["To Right/Wooder"]
    B -->|GRN/WHT| AN["To Left/Wooder"]
    B -->|GRN/WHT| AO["To Right/Wooder"]
    B -->|GRN/WHT| AP["To Left/Wooder"]
    B -->|GRN/WHT| AQ["To Right/Wooder"]
    B -->|GRN/WHT| AR["To Left/Wooder"]
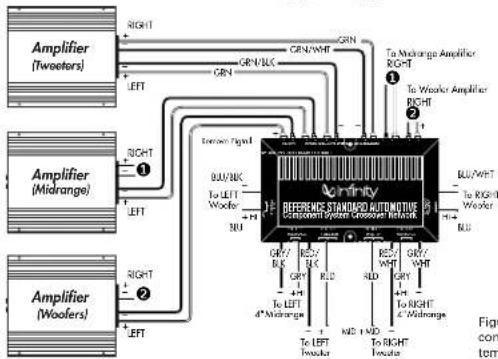
Figure 3. This application shows connections for a Kappa1cs system and three stereo amplifiers.
MIDRANGE INSTALLATION
natural_image
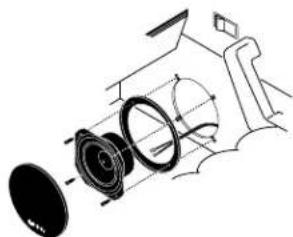
Technical line drawing of a camera with visible lens components and frame structure (no text or symbols)Figure 5. Installing a Kappa 1.1cs/653.1cs midrange driver in a door panel.
WOOFER INSTALLATION
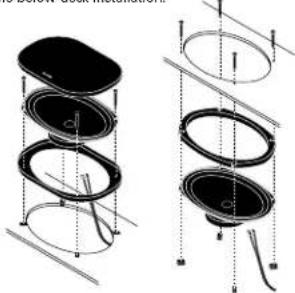
Figure 4. Installing a Kappa1.1cs/653.1cs woofer above a deck or (with the enclosed spacer) below a deck.
NOTE: Use the mounting clips as nuts to secure the below-deck installation.
natural_image
Technical diagram of a multi-layered cylindrical mechanical assembly with internal components and alignment lines (no text or symbols)TWEETER INSTALLATION
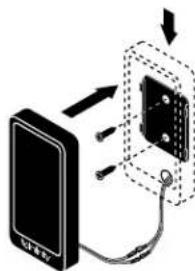
Figure 6. After installing the surface-mount plate, slide the Kappa1.1cs EMIT-N™ tweeter down on the plate to lock in place.
natural_image
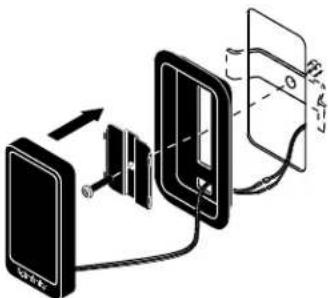
Diagram of a device assembly showing a battery connected to a panel and a switch (no text or symbols present)Figure 7. After sliding down the flush-mount clip onto the back of the Kappa1.1cs EMIT-N tweeter, use the supplied hardware to fasten the cup to the panel.
ADJUSTING THE SOUND
After you have connected all the speakers to the crossover according to the connection diagram, you may adjust the overall sound of the system to suit your taste.
The output of the woofers may be decreased by moving the woofer + connection at the crossover to the low position.
The output of the midrange may be decreased by moving the midrange + connection at the crossover to the low position.
The output of the tweeter may be increased by moving the tweeter + connection at the crossover to the high position or decreased by moving it to the low position.
A NOTE ON POWER HANDLING
The speakers used in Kappa Series 3-Way Component Systems are designed to produce reasonable volume levels with little amplifier power. However, the addition of an amplifier to drive your speakers and a subwoofer will enhance the dynamic range of your system, and help overcome the ambient noise in a moving vehicle. Kappa speakers are designed to handle the power of a dedicated amplifier driven at or below its rated power. If an amplifier is driven far above its rated power, the output signal will "clip," and the additional power present in a clipped signal can damage any speaker. Distorted or "fuzzy" sound from your speakers is an indication that the amplifier has exceeded its rated power, and you should reduce the volume level
GENERAL CARE
The loudspeaker grilles may be cleaned with a slightly damp cloth. Do not use any cleaners or solvents on the grilles or the speaker cones.
SPECIFICATIONS
653.1cs
Type: 6-1/2" 3-Way System
Speaker Impedance: 4 ohms
Power Handling: 120 watts per channel
Frequency
Response (±3dB): 50Hz \~ 45kHz
Sensitivity: 89Hz @ 2.83 V, 1 watt
Crossover Frequencies: Woofer
Hi terminal: 210Hz
Lo terminal: 130Hz
Midrange: 400Hz
Tweeter: 12.5kHz
Mounting Depth,
Drop-in Woofer: 2-1/2" (67.5 mm)
Cut-out
Diameter Woofer: 5-11/16" (149 mm)
Mounting Depth,
Drop-in Midrange: 1-13/16" (46 mm)
Cut-out
Diameter Midrange: 3-3/4" (96 mm)
Mounting
Depth Tweeter: 1" (25.4 mm)
Cut-out
Diameter Tweeter: 3-3/8" x 1-3/4"
(84.6 mm x 44.7 mm)
1.1cs
Type: 6" x 9" 3-Way System
Speaker Impedance: 4 ohms
Power Handling: 200 watts per channel
Frequency
Response (±3dB): 36Hz \~ 45kHz
Sensitivity: 89Hz @ 2.83 V, 1 watt
Crossover Frequencies: Woofer
Hi terminal: 210Hz
Lo terminal: 130Hz
Midrange: 400Hz
Tweeter:12.5kHz
Mounting Depth
Drop-in Woofer: 2-9/16" (65 mm)
Cut-out
Diameter Woofer: 5-11/16" x 8-3/4"
(149 mm x 223 mm)
Mounting Depth,
Drop-in Midrange: 1-13/16" (46 mm)
Cut-out
Diameter Midrange: 3-3/4" (96 mm)
Mounting
Depth Tweeter: 1" (25.4 mm)
Cut-out
Diameter Tweeter: 3-3/8" x 1-3/4"
(84.6 mm x 44.7 mm)
DECLARATION OF CONFORMITY
CE
Wo, Infinity Systems A&S
Kingsvejen 1948
HIG-FOD Birkamp DENMARK
tledare in own responsibility, that the product described in this owner's manual are in compliance with technical standards:
EN 50 081-101982 EN 50 081-101985
EC 0608219.1201

Siren Michaelsen
Infinity Systems AI
Erfelder, DENMARK, 210


Infinity Systems, Inc. • 250 Crossways Park Drive,
Woodbury, NY 11797 USA • (516) 496-3400 • FAX (516) 682-3583
Marke : INFINITY
Modell : Kappa 1.1cs
Kategorie : Freisprecheinrichtung Auto