
UT337A - Messung Uni-T - Kostenlose Bedienungsanleitung
Finden Sie kostenlos die Bedienungsanleitung des Geräts UT337A Uni-T als PDF.


| Produkttyp | Digitalmultimeter |
| Modell | UT337A |
| Marke | Uni-T |
| Abmessungen (L x B x H) | 110 mm x 55 mm x 28 mm |
| Gewicht (inkl. Batterie) | ca. 100 g |
| Stromversorgung | 1 x 9V Blockbatterie (6LR61) |
| Display | LCD mit Hintergrundbeleuchtung |
| Maximale Anzeige | 6000 Zähler |
| Gleichspannung (DC) | 600 mV / 6 V / 60 V / 600 V |
| Wechselspannung (AC) | 6 V / 60 V / 600 V |
| Gleichstrom (DC) | 600 µA / 6000 µA / 60 mA / 600 mA / 10 A |
| Widerstand | 600 Ω / 6 kΩ / 60 kΩ / 600 kΩ / 6 MΩ / 60 MΩ |
| Diodentest | Ja |
| Durchgangsprüfung (Summer) | Ja (bei < 50 Ω) |
| Automatische Bereichswahl | Ja |
| Datenhalt (Hold) | Ja |
| Sicherheitsstandard | CAT II 600 V |
| Zertifizierungen | CE, RoHS |
| Schutzart | IP20 |
| Reinigung | Mit trockenem Tuch abwischen; nicht in Wasser tauchen |
| Mitgeliefertes Zubehör | Messleitungen, Batterie, Bedienungsanleitung |
| Ersatzteile | Batterie (9V), Messleitungen |
Häufig gestellte Fragen - UT337A Uni-T
Benutzerfragen zu UT337A Uni-T
0 Frage zu diesem Gerät. Beantworten Sie die, die Sie kennen, oder stellen Sie Ihre eigene.
Eine neue Frage zu diesem Gerät stellen
Laden Sie die Anleitung für Ihr Messung kostenlos im PDF-Format! Finden Sie Ihr Handbuch UT337A - Uni-T und nehmen Sie Ihr elektronisches Gerät wieder in die Hand. Auf dieser Seite sind alle Dokumente veröffentlicht, die für die Verwendung Ihres Geräts notwendig sind. UT337A von der Marke Uni-T.
BEDIENUNGSANLEITUNG UT337A Uni-T
UT337A
Carbon Monoxide Meter Operating Manual
I. Introduction
UT337A is the portable carbon monoxide detector with wide range of detection, short response time, long term stability and extended service life. It provides audible and visual alarm, gas concentration readings, maximum value query and temperature display, suitable for carbon monoxide detection in the air of residential houses, dining places, indoor car park, residential heating applications and office building.
II. About Your Carbon Monoxide Detector
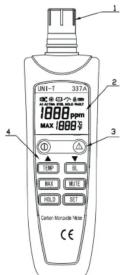
- Overall View
| 1 | Sensor | 3 | Alarm Indicator Light |
| 2 | LCD Display | 4 | Buttons |
2. LCD Display Instruction
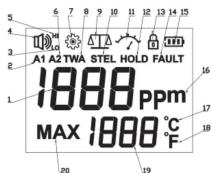
| No. | Meanings |
| 1 | Display for current gas concentration |
| 2 | A1 low level alarm |
| 3 | Low level alarm |
| 4 | Activation of buzzer |
| 5 | High level alarm |
| 6 | A2 high level alarm |
| 7 | Activation of shutdown timer |
| 8 | (TWA).35ppm 8-hour time-weighted average (TWA) concentration means the permissible limit for carbon monoxide in working environment is 35ppm. |
| 9 | Zero setting icon |
| 10 | A short-term exposure limit of 15-minute time-weighted average (STEL), i.e., the permissible limit for short-term work is 200ppm of carbon monoxide in air. |
| 11 | Calibration icon |
| 12 | Value display lock (hold) |
| 13 | Device lock |
| 14 | Fault icon |
| 15 | Battery life |
| 16 | Gas concentration unit |
| 17 | Celsius |
| 18 | Fahrenheit |
| 19 | Temperature display/peak level of gas concentration display |
| 20 | Peak level of gas concentration display |
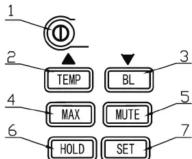
| No. | Function Of Button |
| 1 | Power switch(1) Long press the button to power on the device (when it is powered off); long press the button to power off the device (when it is powered on)(Note: the detector cannot be powered off when it is self-test.)(2) When setting and adjusting parameters, press the button to exit current operation screen. |
| 2 | [TEMP]/[▲] button.(1) When the device is under normal testing status, the button acts as [TEMP] button. Press the button, the sensor temperature in Celsius will be shown, and press the button again to show the sensor temperature in Fahrenheit will be shown.(2) When setting and adjusting parameters, the button acts as [▲] button. Press the button to increase values and long press the button to rapidly increase values. |
| 3 | [BL]/[▼] button(1) When the device is under normal detection status, the button acts as [BL], press the button to control the switch on and off of LCD backlight.(2) When setting and adjusting parameters, the button acts as [▼] button. Press the button to decrease values and long press the button to show the rapidly decrease values. |
| 4 | [MAX] buttonPress [MAX] to query the peak value of air concentration since start-up, long press MAX will reset the aforesaid peak value. |
| 5 | [MUTE] buttonWhen the user has learned the alarming condition, press the button to stop current alarm and the buzzer will stop working within 3 minutes. Long press the button will reactivate the buzzer. |
| 6 | [HOLD] buttonPress [HOLD] button to lock the current displayed readings; long press [HOLD] button to enter the settings for alarm set points A1 and A2. |
| 7 | [SET] button(1) Press SET under normal detection status to start sensor self-test.(2) When setting the alarm points or enter the calibration mode for zero setting and calibration, press SET to choose parameters and long press [SET] button to save the current set values. |
III. Operation Instruction
1. Power On/Off
A yellow button Ⓐ lies on the upper-left part of panel keypad. When the instrument is under shutdown status, it is able to turn on the instrument with a long press on the button and, when under startup status, the instrument can be shut down with a long press on the button (Note: shutdown is not allowed during self-checking of gas sensor). The instrument would automatically shut down in case of no operation or alarm action within about 20min.
Note: It is required to start up the instrument and perform startup countdown in clean air until there is the gas concentration unit (ppm icon) and during which, keep the instrument body stable and the sensor upward. Detection should be carried out after countdown.
2. Detection Method
Hold the instrument, keep sensor upward and near the position to be monitored, maintain the instrument body stable for monitoring at least 1min, then the instrument is capable of detecting if there exists high concentration of toxic gas (carbon monoxide) in the air around the measured position. The response time is T90<60S. The stable reading obtained 3-4min later is considered as the measured reading.
If any obvious change in the ambient temperature is observed, it is recommended to restart up the instrument in clean air when heat balance is reached between the instrument and the environment (>1 hour).
It is required to keep the instrument body stable and the sensor upward during startup and startup countdown so as to reduce error or zero jump caused by temperature variation or vibration.
3. Alarm
When the carbon monoxide concentration exceeds low alarm point A1 or TWA, the buzzer will sound and the light will flash at the frequency of 1Hz; when the carbon monoxide concentration exceeds high alarm point A2 or STEL, the buzzer will sound and the light will flash at the frequency of 2Hz.
When the user has confirmed the current alarming condition, the user can press [MUTE] button to stop the audible alarm. The buzzer will stop working temporarily and the icon in the upper left corner of LCD will disappear. After 3 minutes, the buzzer will start working and the icon will appear again; long press [MUTE] button when the buzzer stops working, the buzzer can be reactivated and the icon will appear immediately.
4. Sensor Self-Test
(1) The user should allow the device self-test at a regular basis (recommended once/24hr to once/month, frequent self-test is not recommended). After start-up, press [SET] button to allow the sensor self-test for 3 minutes. If the sensor is broken or wire breakage, short circuit, FAULT icon will flash in the upper right corner of LCD.
Please note that the sensor self-test cannot detect CO sensitivity loss caused by lack of gas diffusion when dust or water droplets cover the pin holes for gas diffusion. In addition, slight loss of CO sensitivity cannot be detected by self-diagnosis.
(2) If FAULT icon flashes during normal gas detection, it means the reverse drift of the sensor is excessive, it requires zero setting and calibration. Refer to11 for subsequent operation procedure.
5. Backlight Control
If the light is insufficient in the environment, press [BL] to turn on the backlight and press the button again to turn off the backlight.
- Check the Highest Value of Carbon Monoxide Concentration
Press [MAX] button to check the highest carbon monoxide concentration since start-up; long press [MAX] to reset the aforesaid value.
7. Check Temperature
Press [TEMP] to show the current sensor temperature. If the environment temperature changes obviously, the sensor will take relatively long time to approach the same temperature with the environment. The temperature value is for the temperature compensation of the sensor detection result.
8. Low Battery Warning
When the battery icon in the upper right corner is ☐ in LCD, it means the battery is sufficient; when the battery icon is ☐ and keeps flashing, it means the battery is insufficient, it requires new batteries, otherwise the device cannot work.
9. Lock the Current Display
Press "HOLD" button to lock the displayed readings on LCD, and press the button again to unlock.
10. Check and Setting of Alarm Point
The default value of low alarm point A1 is 35ppm and that of high alarm point A2 is 200ppm, users may set the alarm point. (Note: TWA is 35ppm and STEL is 200ppm, users may check the value but have no right to make alteration in case of wrong settings leading to potential danger).)
(1) Check alarm point
Long press [HOLD] button to enter A1 setting and current value will be shown (see Fig.4), press [SET] again to check current set value of the next parameter (A2/TWA/STEL). Press switch Ⓑ to exit current alarm point setting.
(2) Setting of low alarm point A1
Long press [HOLD] button to enter the A1 settings, LCD shows A1 icon and its current set value is flashing (see Fig. 4), the value can be adjusted by ▲ and ▼ button, and long press [SET] button to save the newly set value. "S-1" will be shown on the screen if the value is saved successfully (see Fig. 5).
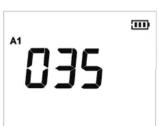
Fig. 4
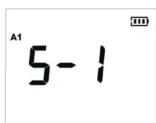
Fig. 5
(3) Setting of high alarm point A2
Long press [HOLD] button to enter the A2 settings and press [SET], then LCD shows A2 icon and its current set value is flashing (see Fig. 6), the value can be adjusted by ▲ and ▼ button, and long press [SET] button to save the newly set value. "S-1" will be shown on the screen if the value is saved successfully (see Fig. 7).
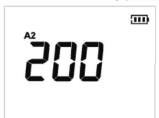
Fig. 6
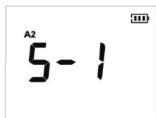
Fig. 7
11.Zero Setting and Calibration
The following calibration procedure requires usage of carbon monoxide (poisonous gas), so it should be done by professionals. Press [SET] button and long press switch button ① at the same time to power on the device, and the screen will show "U-C" (see Fig. 8), it means we have entered the calibration mode for zero setting and calibration.

Fig. 8
The zero setting and calibration of device should be done in room temperature (recommended 20±2^ ) when the device temperature is close to the room temperature (recommended after more than 1 hour) to reduce the error due to temperature difference.
Under calibration mode, [TEMP] button will act as ▲ button, press the button to get ascending values and long press the button to get rapid ascending values; [BL] button will act as ▼ button, press the button to get descending values and long press the button to get rapid descending values.
(1) Zero setting
Put the device in clean air and enter calibration mode through the above instruction and press [SET] to choose the parameter to be calibrated. Press the button to enter the zero setting interface. The ppm icon in the middle of the screen is flashing and the T icon will be shown, see Fig. 9.
After about 10 minutes, if the displayed reading is not 0 ppm, adjust the displayed reading to 0 ppm through the ▲ and ▼ button and long press [SET] to save the value. When the value is saved successfully, "S-1" will be shown on the screen, see Fig. 10, and the zero setting is completed.
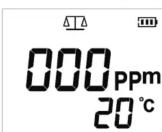
Fig. 9
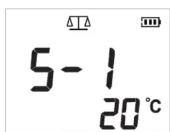
Fig. 10
(2) Calibration
When the zero setting is completed, press [SET] button to enter the calibration setting interface. The 4TB icon will disappear and the 7-icon will be shown with the Ppm icon flashing, see Fig. 11. The seal ring should be installed to the ring of groove at the bottom of sensor shield, and cover the calibration
shield to the sensor shield to allow calibrating CO gas of certain concentration (the air is the balance gas) to pass from the calibration shield to sensor shield at the flow rate of 300mL/min; if the displayed concentration value is inconsistent with calibrating gas concentration after 4 minutes, it should be adjusted through ▲ and ▼ buttons until it is consistent with the calibrating gas concentration; and long press "SET" to save the calibrated data. "S-1" will be shown on the screen if the data is saved successfully, see Fig. 12. Until then, the whole calibration procedure including zero setting and calibration is completed
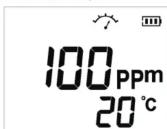
Fig. 1
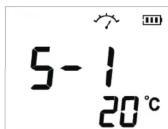
Fig. 12
Suggestions for selection of calibrating gas concentration: for maintenance inspection, the value of calibrated concentration can be around 220ppm; for low concentration alarm, the value of calibrated concentration can be around 53ppm. The inspection of professional institute can refer to the requirements of inspection rules JJG-915-2008 to choose 700ppm as the calibrated concentration value.
If users reckon the previous zero setting and calibrated data are not reliable, users can long press [MUTE] button under calibration mode and "dEF" is shown, then long press [SET] to make the previous operations effective when it shows "S-1". Now the calibration data is cleared, i.e., the device is under pre-calibration status, and it needs zero setting and calibration through the above procedures.
IV. Specifications
- Product Specifications
Gas detected: carbon monoxide
Detection range: 0-1000ppm
Error: 20±5°C, 50±20%RH: ----±5% or 5ppm (take the maximum value)
0℃\~50℃Range:----±10% or 10ppm (whichever is larger)
Resolution ratio: 1ppm
Response time: T90<60s
Sample mode:——Dispersive
Detection principle:——Electro-chemical cell
Sensor life expectancy:----5 years
Operation temperature:---- 0°C\~+50°C
Humidity range:----5\~99%RH (water vapor cannot condense)
Storage temperature:---- -20℃\~50℃
Battery:---- AAA battery (1.5V) X 4
Model size: 197mm×55mm×37mm
Qualification:----CMC. CE
- Product Features
- Imported sensor with high accuracy sensor, wide detection range, short
response time and long service life.
● With audible and visual alarm.
● With sensor self-inspection function.
- Start up the instrument after installing batteries. Automatic shutdown within
about 20min is intended to save power
- Portable
Stationary detection requires multiple installations of detectors, however the portable ones allow immediate detection anyway, it reduces the installation cost substantially.
- User can set the alarm point for carbon monoxide
● LCD displays current carbon monoxide concentration in the air, checking
of highest carbon monoxide concentration in history is available.
● With temperature display function
- LCD is equipped with backlight, operation in dark is applicable
● With low battery warning
V. Safety Warning
(1) Please don't use the product as a personal safety monitor.
The product can not be used in those places which require explosion-
proof devices, and can not be changed batteries in such places.
(2) Learn the carbon monoxide poisoning level
| Concentration of CO | Effect of Carbon Monoxide Poisoning and Regulations |
| 0-1 PPM | Normal background levels. |
| 9 PPM | ASHRAE Standard 62-1989 for living areas. |
| 35 PPM | Maximum 8 hours average exposure level per US OSHA workplace standards. |
| 50 PPM | OSHA enclosed space 8-hour average level. The CO content in any enclosed space shall be maintained at not more than 50 PPM (0.005%). |
| 100 PPM | Remove employees from enclosed space if the CO concentration exceeds 100 PP (0.01 %). |
| 200 PPM | Mild headache, fatigue, nausea and dizziness within 2-3 hours. |
| 800 PPM | Dizziness, nausea and convulsions. Death within 2 to 3 hours. |
VI. Maintenance Instruction
- Verification Requirements
Under normal temperature and humidity, the signal attenuation is minor, so stability can be maintained; according to the national regulation for carbon monoxide detection devices, the verification (including zero setting and calibration) period is one year. If user doubt the device's measurement reading, please verify the device (including zero setting and calibration).
The verification involves usage of poisoning carbon monoxide, so it should be done by professionals.
The product is not suitable to detect carbon monoxide concentration in the environment with frequently or drastically changed temperature and humidity.
- Change Battery
When the "☐" icon is flashing, please turn off the device and change the battery in time. Battery changing should follow the following steps:
(a) Unscrew the screws on the rear of the device and remove the battery
cover;
(b) Change 4 AAA batteries;
(c) Put the battery cover back in place and screw the screws tightly.
- Cleanness of Device
Please maintain the device properly, do not allow the pin holes of sensor blocked by foreign matters or dust. If the surface of the device is dirty and it requires cleaning, please clean it with wet soft cloth or sponge. Don't clean the device with water directly, in case of water seeping into the circuit board and damaging the device.
UNI-T
UNI-TREND TECHNOLOGY (CHINA) CO., LTD.
No6. Gong Ye Bei 1st Road.
Songshan Lake National High-Tech Industrial
Development Zone, Dongguan City,
Guangdong Province, China
Tel: (86-769) 8572 3888
http://www.uni-trend.com
- UT337A
- Carbon Monoxide Meter Operating Manual
- Introduction
- About Your Carbon Monoxide Detector
- LCD Display Instruction
- Operation Instruction
- Power On/Off
- Detection Method
- Alarm
- Sensor Self-Test
- Backlight Control
- Check Temperature
- Low Battery Warning
- Lock the Current Display
- Check and Setting of Alarm Point
- Check alarm point
- Setting of low alarm point A1
- Specifications
- Safety Warning
- Maintenance Instruction
- UNI-T
Marke : Uni-T
Modell : UT337A
Kategorie : Messung