
mC-Label3 - Etikettendrucker Star Micronics - Kostenlose Bedienungsanleitung
Finden Sie kostenlos die Bedienungsanleitung des Geräts mC-Label3 Star Micronics als PDF.


| Produkttyp | Etikettendrucker |
| Marke | Star Micronics |
| Modell | mC-Label3 |
| Druckverfahren | Thermodirekt |
| Kompatible Papierrollen | Linerless, Die-Cut, Endlos, Thermopapier |
| Schnittstellen | USB-C, LAN |
| Stromversorgung | Netzadapter (100-240V) |
| Lieferumfang | Drucker, Netzadapter, Netzkabel, USB-Kabel (C-C, C-A), LAN-Kabel, Sicherheitshinweise, Kurzanleitung |
| Besondere Funktionen | One-Touch-Label, Konfigurations-App (Star Quick Setup Utility), Cloud-Dienste (Device Monitor, Label Builder) |
| Reinigung | Regelmäßige Reinigung für optimale Druckqualität; LED zeigt Reinigungsbedarf an |
| Verbrauchsmaterialien | Platineneinheit, Schneideeinheit (toolless austauschbar) |
| Wartung | Austausch der Verbrauchsteile ohne Werkzeug möglich |
| Hersteller | Star Micronics Co., Ltd. |
Häufig gestellte Fragen - mC-Label3 Star Micronics
Benutzerfragen zu mC-Label3 Star Micronics
0 Frage zu diesem Gerät. Beantworten Sie die, die Sie kennen, oder stellen Sie Ihre eigene.
Eine neue Frage zu diesem Gerät stellen
Laden Sie die Anleitung für Ihr Etikettendrucker kostenlos im PDF-Format! Finden Sie Ihr Handbuch mC-Label3 - Star Micronics und nehmen Sie Ihr elektronisches Gerät wieder in die Hand. Auf dieser Seite sind alle Dokumente veröffentlicht, die für die Verwendung Ihres Geräts notwendig sind. mC-Label3 von der Marke Star Micronics.
BEDIENUNGSANLEITUNG mC-Label3 Star Micronics
80878872

Easy Setup Guide
mC-Label3
Introduction
This document explains the setup procedure for the mC-Label3. For further instructions, please refer to the mC-Label3 online manual. Please read the instructions before using the printer. You can also see FAQ from the QR code on the inside of the printer.
mC-Label3 online manual


What's Included
If contents are missing or damaged, please contact the reseller that sold you the printer.

MCL32CI

AC Adapter

Power Cable

USB Cables

LAN Cable

Safety Instructions

Easy Setup Guide
Before Use
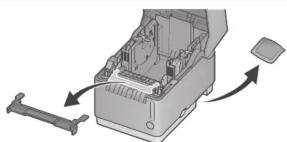
Please remove the protective part inside the printer and the silica gel on the bottom of the printer.
1 Connecting a Tablet or PC
Connect an appropriate cable to the connector on the printer according to your operating environment.
1 USB-C®

Android, Windows
You will need:
USB cable (C-C) included with the printer.
Plug for the mC-Label3

Windows

You will need:
USB cable (C-A) included with the printer.
2 Wired LAN
You will need:
LAN cable included with the printer.
Plug for the mC-Label3


2 Turning ON the Main Unit Power
Securely plug the power cable (for the AC adapter) fully into the AC adapter inlet ①.
Connect the AC adapter plug to the power connector of the printer. Be sure that it is oriented correctly ②.
Insert the power cable plug into the electrical outlet ③

Press the power switch on the side of the printer 4
During startup, the lighting and blinking pattern of the Power LED changes.
Confirm that the Power LED blinks red ⑤

3 Preparing/setting up the configuration app
You can complete the settings up to start using the printer from a tablet or PC by using the configuration app. Scan the QR code on the right side or search the app to access the download site.
Configuration app download site

iOS/Android
Star Quick Setup Utility

- Driver download site for Mac / Linux environment. (https://www.star-m.jp/supportsite-wsw.html)
① Install [ Star Quick Setup Utility ].
② Open the configuration utility, and select [ Start Guide (Initial Settings)] - [Search Printer].
③ Follow the instructions of the utility to connect and set up a tablet.
For a wired LAN connection, use the tablet that is connected to the same network as the mC-Label3.
Windows
Star Windows Software

Download [ Star Windows Software ].
② Extract the downloaded software and execute "Setup.exe".
③ Follow the wizard instructions and complete software installation.
① The Windows driver is included in the Star Windows Software. The Star Windows Software can be used to configure the printer settings and perform an operation test.
For the owners of other companies' trademarks mentioned in this document, see Trademarks in our website (https://www.star-m.jp/eng/trademarks.html).
Copyright 2023 Star Micronics Co., Ltd.
How to install the paper roll
[NO TEXT]
The following instructions are explained in detail in the configuration app that is mentioned in "3 Preparing/setting up the configuration app".
■ Types of paper roll that can be used
| Linerless label | Die cut label | Continuous label | Thermal paper |
 |  |  |  |
- Open the printer cover
Pull the cover opening lever toward you ① and open the printer cov-
er ②
● Adjusting the paper guide
While pinching the paper guide lever ③, slide it to the left and right sides ④. Adjust the guide to the position of the paper width to be used by referring to the scale.
● Installing the paper roll
Pay attention to the orientation of the paper roll to insert it in the direction that is indicated by the arrow ⑤ so that the paper guide shafts (on the left and right) are inserted into the paper roll tube.
① Be careful that the paper roll does not fall out of the paper guide shafts. If the paper roll falls into the printer, it is detected as a paper position error and you cannot print.


- Close the cover
Pull out the edge of the paper roll horizontally ⑥. While keeping the paper roll level, close the printer cover ⑦ For a linerless label, be careful that the adhesive side does not stick to the printer.
Remove the paper roll that exceeds the printer cover ⑧

When using a linerless label (without using black marks), now the paper loading is completed. If you use other paper, you need to continue to set up. For details, refer to the Online Manual.
Periodic Maintenance
○
Cleaning the printer periodically keeps the print quality and prevents dirt from adhering to the printed paper roll.
The information LED 📞 on the front of the printer notifies you when it is time to clean the printer. For details about how to clean the printer, refer to the Online Manual by scanning the QR code inside of the printer.
The "platen unit" and "cutter unit" inside the printer are consumable parts that need to be replaced depending on the amount of use.
Each of them can be replaced without using tools (toolless).

i Information LED
What Star Quick Setup Utility Can Do
● Initial settings (We recommend using Utility)
By using Utility, you will be guided through the printer settings that are suitable for the operating situation with animations.
● One Touch Label settings
You can register images such as store logos or others to the printer. After registration, you can easily print the registered original image on labels by simply pressing the Multi-function button ☐ on the front of the printer.
● Flexible connection settings
You can configure our original network connections such as StedyLAN or TetherLAN.
The printer that is connected via the LAN cable provides a stable wired network to mobile devices via a USB cable.
TetherLAN You can connect to the internet anywhere by using a device that has mobile communication.

Multi-function button
Sign Up for Star Micronics Cloud Services
[NO TEXT]
FREE services are available if you register mC-Label3 with Star Micronics Cloud Services.
① Connect the printer to the internet.
Refer to "Wired LAN" in Step 1 "Connecting a Tablet or PC".
② Scan the QR code from a smartphone or tablet to access the registration site for "Star Micronics Cloud Services".
③ Follow the procedures to register the printer with "Star Micronics Cloud Services" to start using the services.
Recommended Star Micronics Cloud Services for mC-Lable3
● Device Monitor
You can check the status of the printer and set email notifications for parts cleaning and replacement.
- Label Builder
It allows anyone to create label data intuitively.
The created data can be directly printed or registered to One Touch Label.
![graph TD A["Cloud"] --> B["Server"] B --> C["Label Builder and more"] C --> D["Service site"] style A fill:#f9f,stroke:#333 style B fill:#ccf,stroke:#333 style C fill:#cfc,stroke:#333 style D fill:#fcc,stroke:#333](/content/2026/05/842136/images/e28f78e5d0d76d067dc72587e785c3a9a8e024a10f7a16fdfe43dd6005cf34fe.jpg)
Registration site


- EASY SETUP GUIDE
- INTRODUCTION
- WHAT'S INCLUDED
- BEFORE USE
- 1 CONNECTING A TABLET OR PC
- 1 USB-C®
- 2 WIRED LAN
- 2 TURNING ON THE MAIN UNIT POWER
- 3 PREPARING/SETTING UP THE CONFIGURATION APP
- IOS/ANDROID
- WINDOWS
- HOW TO INSTALL THE PAPER ROLL
- PERIODIC MAINTENANCE
- WHAT STAR QUICK SETUP UTILITY CAN DO
- SIGN UP FOR STAR MICRONICS CLOUD SERVICES
Marke : Star Micronics
Modell : mC-Label3
Kategorie : Etikettendrucker