
CF-120-PRO-RGB - CPU-Kühler LC-Power - Kostenlose Bedienungsanleitung
Finden Sie kostenlos die Bedienungsanleitung des Geräts CF-120-PRO-RGB LC-Power als PDF.


| Produkttyp | CPU-Kühler (Lüfter) |
| Modell | CF-120-PRO-RGB |
| Marke | LC-Power |
| Lüftergröße | 120 mm |
| Abmessungen (L x B x H) | 120 x 120 x 25 mm |
| Gewicht | ca. 150 g |
| Stromversorgung | SATA-Stromanschluss (für RGB-Controller) + 3-Pin-Lüfteranschluss |
| RGB-Schnittstelle | 3-Pin-5V-ARGB (kompatibel mit Mainboard RGB-Software) |
| RGB-Steuerung | Fernbedienung oder Mainboard (Software) |
| Lüftergeschwindigkeit | 1000 - 1500 U/min (±10%) |
| Luftstrom | ca. 50 CFM |
| Geräuschpegel | ca. 25 dB(A) |
| Lagerart | Hydraulic Bearing |
| Material | Kunststoff (Rahmen) und Metall (Kern) |
| Kompatible Sockel | Universal (für diverse CPU-Sockel geeignet) |
| Anzahl der Lüfter | 1 (erweiterbar durch Daisy-Chain) |
| Anschlusstyp Lüfter | 3-Pin |
| Besondere Merkmale | Daisy-Chain-fähig (mehrere Lüfter in Reihe schaltbar), RGB-Beleuchtung mit Fernbedienung |
| Lieferumfang | Lüfter, RGB-Controller, Fernbedienung, SATA-Stromkabel, Adapterkabel für Mainboard |
| Reinigung | Staub mit Druckluft oder weichem Tuch entfernen; keinen Flüssigreiniger verwenden |
| Sicherheitshinweise | Gerät nur in trockenen Räumen verwenden; vor Reinigung vom Strom trennen; keine baulichen Veränderungen vornehmen |
Häufig gestellte Fragen - CF-120-PRO-RGB LC-Power
Benutzerfragen zu CF-120-PRO-RGB LC-Power
0 Frage zu diesem Gerät. Beantworten Sie die, die Sie kennen, oder stellen Sie Ihre eigene.
Eine neue Frage zu diesem Gerät stellen
Laden Sie die Anleitung für Ihr CPU-Kühler kostenlos im PDF-Format! Finden Sie Ihr Handbuch CF-120-PRO-RGB - LC-Power und nehmen Sie Ihr elektronisches Gerät wieder in die Hand. Auf dieser Seite sind alle Dokumente veröffentlicht, die für die Verwendung Ihres Geräts notwendig sind. CF-120-PRO-RGB von der Marke LC-Power.
BEDIENUNGSANLEITUNG CF-120-PRO-RGB LC-Power
LC-CF-PRO-RGB-COMBO
Installation instruction Control via remote control
Step 1 - PSU connection:
Connect the SATA PSU cable with the SATA receiver cable.

natural_image
Hand holding a small electronic component with a blue-tinted fan inside, against a dark background (no visible text or symbols)PSU

natural_image
Close-up of a black USB connector with gold contacts and a black cable (no visible text or symbols)Receiver cable
Step 2 - Receiver cable connection:
Connect the 3 pin receiver cable to the 3 pin fan cable.

natural_image
Close-up of a CPU fan with attached cable and connector, no visible text or symbols
natural_image
Close-up of two black cable connectors with a white arrow pointing to one (no text or symbols visible)Step 3 - LED stripe and fan connection:
Connect the 3 pin fan cable with the 3 pin LED stripe cable or another 3 pin fan cable. Repeat this step to connect multiple LED stripes and fans in a row.

natural_image
Three-panel image showing connected electronic components: a motor, a connector, and a cable (no text or symbols visible)Step 4 - Mainboard connection:
Connect the 3 pin fan cable to the mainboard.
Consult your mainboard manual to locate the position of the 3 pin fan connector on your mainboard.

natural_image
Two-panel image showing a computer fan with cooling effect and connected hardware components (no text or symbols visible)LC-CF-PRO-RGB-COMBO
Installation instruction Control via remote control
Step 5 - Controlling:
Press the "Power" button. Point the remote control at the sensor to operate it.

natural_image
Two-panel image: left shows a wireless device with colorful keypad and 'P42 Wireless' label; right shows a black handheld device with cable, no visible text or symbols.Mainboard controlling
Step 1 - Mainboard connection:
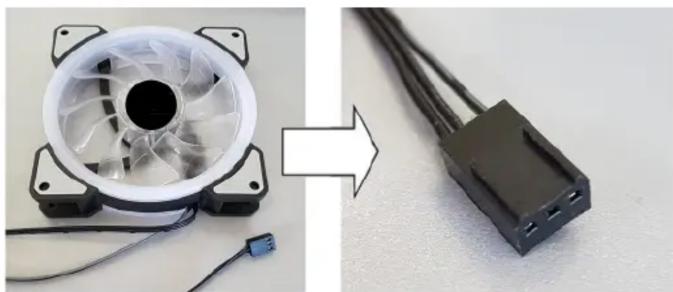
Connect the 3 pin fan cable to the mainboard.
Consult your mainboard manual to locate the position of the 3 pin fan connector on your mainboard.
natural_image
Close-up of a CPU fan with connected components and an external black connector, showing a transformation from fan-shaped to cable (no text or symbols visible)Step 2 - Mainboard RGB cable connection:
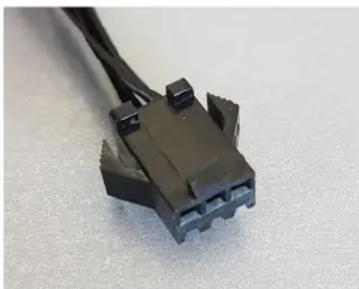
Connect the 3 pin RGB fan cable with the mainboard.
Consult your mainboard manual to locate the position of the RGB connector on your mainboard.
Additional LED stripes and fans can be connected in a row as explained on page 1, step 3.
Colours and modes can be controlled via the mainboard's RGB software.
natural_image
Close-up of a black plastic connector with three ports, attached to a white surface (no text or symbols visible)Note:
Some mainboards need this digital RGB adapter cable which must be connected between the 3 pin RGB fan cable and the mainboard itself.

natural_image
Two electronic components: a black cable with two terminal connectors and a black connector with three leads (no text or symbols visible)


- LC-CF-PRO-RGB-COMBO
- Installation instruction Control via remote control
- Step 1 - PSU connection:
- Step 2 - Receiver cable connection:
- Step 3 - LED stripe and fan connection:
- Step 4 - Mainboard connection:
- Step 5 - Controlling:
- Mainboard controlling
- Step 1 - Mainboard connection:
- Step 2 - Mainboard RGB cable connection:
Marke : LC-Power
Modell : CF-120-PRO-RGB
Kategorie : CPU-Kühler