
AXGT24FHTC-B - Klimaanlage FUJITSU - Kostenlose Bedienungsanleitung
Finden Sie kostenlos die Bedienungsanleitung des Geräts AXGT24FHTC-B FUJITSU als PDF.

| Produkttyp | Klimaanlage (Split-Gerät) |
| Marke | Fujitsu |
| Modell | AXGT24FHTC-B |
| Kühlleistung | 6,45 kW (22.000 Btu/h) |
| Energieeffizienz (EER) | 2,91 W/W |
| Stromversorgung | 230 V, 10 A, 50 Hz |
| Leistungsaufnahme (Kühlen) | 2,22 kW |
| Betriebsmodi | Kühlen, Trocknen, Lüften (ohne Heizen) |
| Timer-Funktionen | Ein-Timer, Aus-Timer, Schlaf-Timer |
| Abmessungen (Breite × Höhe × Tiefe) | 670 × 455 × 710 mm |
| Gewicht | 56 kg (Innengerät) |
| Kältemittel (R410A) | 1,10 kg |
| Schalldruckpegel | < 70 dB(A) (Innen- und Außengerät) |
| Luftfilter | Waschbarer Filter, Reinigung alle 2 Wochen empfohlen |
| Fernbedienung | Kabellos, Batterien AAA (2×) |
| Sicherheitsmerkmale | Fehlererkennung durch Blinkcodes, Überhitzungsschutz |
| Zubehör | Montageschrauben, Isolierung (620×40 mm) |
Häufig gestellte Fragen - AXGT24FHTC-B FUJITSU
Benutzerfragen zu AXGT24FHTC-B FUJITSU
0 Frage zu diesem Gerät. Beantworten Sie die, die Sie kennen, oder stellen Sie Ihre eigene.
Eine neue Frage zu diesem Gerät stellen
Laden Sie die Anleitung für Ihr Klimaanlage kostenlos im PDF-Format! Finden Sie Ihr Handbuch AXGT24FHTC-B - FUJITSU und nehmen Sie Ihr elektronisches Gerät wieder in die Hand. Auf dieser Seite sind alle Dokumente veröffentlicht, die für die Verwendung Ihres Geräts notwendig sind. AXGT24FHTC-B von der Marke FUJITSU.
BEDIENUNGSANLEITUNG AXGT24FHTC-B FUJITSU
Before using this product, read these instructions thoroughly and keep this manual for future reference.
Safety Precautions
To prevent personal injury, injury to others, or property damage, read this section carefully before you use this product, and be sure to comply following safety precautions.
Incorrect operation due to failure to follow the instructions may cause harm or damage, the seriousness of which is classified as follows:
WARNING
This mark warns of death or serious injury.
CAUTION
This mark warns of injury or damage to property.
WARNING
- Do not attempt to install this air conditioner by yourself.
● This unit contains no user-serviceable parts. Always consult authorized
● When moving, consult autho - When moving, consult aut and installation of the unit
- Do not become over-exposed to cold air by staying in the direct path of
the air flow of the air conditioner for extended periods of time. - Do not insert fingers or objects into the outlet port or intake grille
- Do not start and stop air conditioner operation by turning off the
electrical breaker or disconnecting the power supply plug and so on.
Take care not to damage the power supply cord. -
Do not modify the power cables, use extension cables, or use any branches in the wiring. Improper connections, insufficient insulation, or
branches in the wiring. Improper connections, insuff client insula exceeding the allowable current can cause electric shock or fire
● Do not bundle the power supply cable. -
In the event of a malfunction (burning smell, etc.), immediately stop
operation, turn off the electrical breaker or disconnect the power
● Always turn off the electrical breaker or disconnect the
● Always turn off the electrical breaker of disconnect the power supply plug whenever cleaning the air conditioner or the air filter. - This appliance is not intended for use by persons (including children).
- This appliance is not intended for use by persons (including children) with reduced physical, sensory or mental capabilities, or lack of
with focused physical, sensory of mental supervision, or lack of experience and knowledge, unless they have been given supervision
or instruction concerning use of the appliance by a person responsible
for their safety. Children should be supervised to ensure that they do
not play with the appliance. - If you see lightning or hear thunder, there might be a lightning strike.
To prevent electric shock hazard, turn off the air conditioner by using the remote controllers, and do not touch the unit or the power plug.
the remote controller, during thunderstorm.
CAUTION
● Provide occasional ventilation during use.
- Do not direct airflow at fi replaces or heating apparatus.
- Do not climb on, or place objects on the air conditioner.
- Do not hang objects from the unit.
- Do not set flower vases or water containers on top of air conditioners.
- Do not expose the air conditioner directly to water
- Do not operate the air conditioner with wet hands.
- Do not pull power supply cord.
● Turn off power source when not using the unit for extended periods.
- Check the condition of the installation stand for damage.
- Do not place animals or plants in the direct path of the airflow
- Do not drink the water drained from the air conditioners
- Do not drink the water drained from the air conditioner.
- Do not touch the aluminum fins of heat exchanger built in the indoor or
- DO NOT TOUCH THE ALUMINIUM IINS OF HEAT EXCHANGER BUILT-IN THE INDOOR OF outdoor unit to avoid personal injury when you install or maintain the
unit.
- Do not use in applications involving the storage of foods, plants or
animals, precision equipment, or art works. - Do not apply any heavy pressure to radiator fi ns.
● Operate only with air fi Iter installed. - Do not block or cover the intake grille and outlet port
● Ensure that any electronic equipment is at least 1 m away from the
unit. - Avoid installing the air conditioner near a fireplace or other heating apparatus.
apparatus. When inst - When installing the unit, take precautions to prevent access by infants.
- Do not use infl ammable gases near the air conditioner.
● Always turn off the electrical breaker or disconnect the now - Always turn off the electrical breaker or disconnect the power supply plug whenever cleaning the air conditioner or the air filter.
Power Supply
WARNING
- In order to enable efficient and trouble-free operation of your air conditioner, connect the power plug of your air conditioner through an exclusive
circuit, having a time delay fuse, to the correct power supply described on the rating plate - The circuit breaker with all pole disconnection must be incorporated in permanent wiring.
- If the power supply cord is damaged, it must be replaced by the manufacturer, its service agent, or similarly qualified persons in order to avoid a
hazard.
● This appliance shall be installed in accordance with national wiring regulations.
Connect BROWN line of the power supply cable to the "Live" terminal of the power outlet, and the earth (ground) line (GREEN and YELLOW) to the earth (ground) terminal.
Remaining line should be connected to the neutral terminal of the power outlet.
Preparation
Loading batteries (AAA/R03/LR03×2) on the remote controller
WARNING
Take precautions to prevent infants from accidentally swallowing batteries.
CAUTION
- When not using the remote controller for an extended period, remove the batteries to avoid possible leakage and damage to the unit
- If leaking battery fluid comes in contact with your skin, eyes, or mouth, immediately wash with copious amounts of water, and consult your physician.
- Dead batteries should be removed quickly and disposed of properly, either by placing in a public battery collection receptacle, or by returning to a properly equipped dealer.
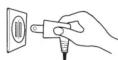
Turn on the power
Connect the power plug to an electrical point.
To use the remote controller
● The remote control unit must be pointed at signal receiver to operate correctly.
- When a signal is properly received by the air conditioner, a beeping sound will be heard
- If no beep is heard, press the remote control unit button again.

Basic Operations
Mode Operation (COOL, DRY, and FAN)
Cooling: Use to cool your room.
Drying: Use for gently cooling while dehumidifying your room.
● You cannot heat the room during drying mode.
- During drying mode, the unit will operate at low speed, in order to adjust room humidity, the unit's fan may stop from time to time. Also, the fan may operate at very low speed when detecting room humidity.
● The fan speed cannot be changed manually when drying mode has been selected.
Fan: Use to circulate air through your room without changing its
temperature.
● You cannot use the unit to heat and cool your room.
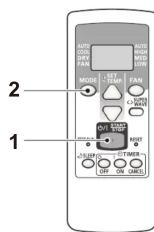
Each time the MODE button ○ is pressed, the mode will change in the following order.

About 3 seconds later, the entire display will reappear
Thermostat Setting
△ button: Press to raise the thermostat setting. ▽ button: Press to lower the thermostat setting.

1 Press and slide the battery compartment lid on the reverse side to open it.
Slide in the direction of the arrow while pressing the ▼ mark.
2 Insert batteries
Be sure to align the battery polarities (⊕/⊖) correctly
3 Close the battery compartment lid.
Notes:
● Never mix new and used batteries, or batteries of different types.
- Batteries should last about 1 year under normal use. If the remote controller's operating range becomes appreciably reduced, replace the batteries and press the reset button with the tip of a ballpoint pen or other small object.
Connect securely, without looseness.
In the case of direct line connections, turn on the breaker.
Notes:
● Signals will not be transmitted properly if a wall, curtain, or other object is between the air conditioner and the remote control unit.
● The air conditioner may fail to operate properly if strong direct light is allowed to strike the signal receiver. Use a curtain to shade strong sunlight from windows, and place strong lamps at a distance away from the signal receiver.
- Do not place the remote control unit in locations where it may be subjected to heat from direct sunlight or from heating apparatus.
● Do not subject the remote control unit to s
allow water or other liquids to splash on it.
- When the remote control unit is used in rooms furnished with instant-lighting type fl fluorescent lamps, the air conditioner may fail to receive control signals correctly. Consult with authorized service personnel when purchasing a new fl fluorescent lamp.
- If another electric appliance is operated by the remote control unit move the appliance away or consult with authorized service personnel.
The thermostat cannot be used to set room temperature during the FAN mode (the temperature will not appear on the remote controller's display.)
About 3 seconds later, the entire display will reappear.
Notes:
- In the following situation, the setting temperature will be 24^ even if
you set the setting temperature lower than 24°C. When changing the operation mode
—When changing the operation mode When stopping the operation once,
—When stopping the operation once, then restart the operation * . When you change the setting temperature higher than 24.8°C, the - When you change the setting temperature changed setting temperature will be saved.
Fan Speed Setting
Each time the button is pressed, the fan speed changes in the following

About 3 seconds later, the entire display will reappear.
When the FAN CONTROL is set to AUTO:
COOL: Operation begins and as the room temperature approaches that of the thermostat setting, the fan speed switches to the low setting.
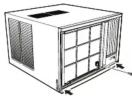
Unit Overview
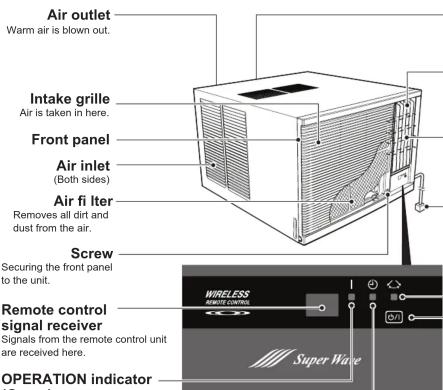
(Green)
● Lights when unit is operating.
● Flashes quickly for about 1 second when a signal is received from the remote control unit.
TIMER indicator (Orange)
Lights during ON TIMER, OFF TIMER, and SLEEP TIMER.
If the TIMER indicator fl ashes when the timer is operating, it indicates that a fault has occurred with the timer setting.
Drain tube
(At the bottom of the backside)
Moisture condensed from the air during cooling is drained here.
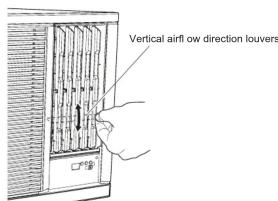
Horizontal airflow direction louvers
Control airflow in the horizontal (right-left) direction.
Vertical airfl ow direction louvers Control airfl ow in the vertical (up-down) direction.
Power supply plug
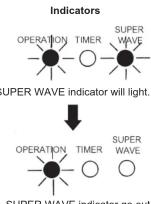
SUPER WAVE indicator (Green) Lights during SUPER WAVE working.
MANUAL AUTO button
● Pressed 10 seconds or less (AUTOMATIC mode)
- Fan speed will be set to "AUTO" and the
thermostat will be set for 24 °C.
• To stop operation, either press the MANUAL
AUTO button once again.
- Pressed 10 seconds of more (forced cooling)
- The forced cooling operation is used at the time of installation.
Only for authorized service personnel's use. When the forced cooling operation starts by any chance, press START/STOP button to stop the operation.
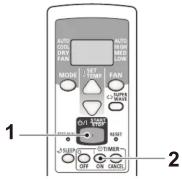
Remote Controller Overview
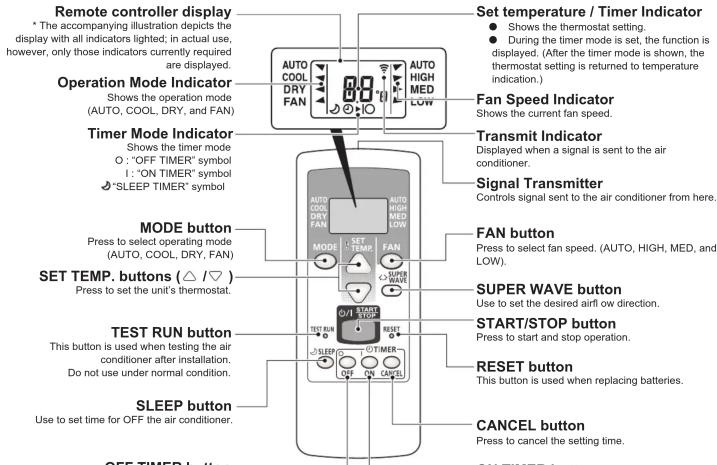
OFF TIMER button Use to set time for OFF the air conditioner.
Set temperature / Timer Indicator
● Shows the thermostat setting.
● During the timer mode is set, the function is
displayed. (After the timer mode is shown, the thermostat setting is returned to temperature indication.)
Fan Speed Indicator
Shows the current fan speed.
Transmit Indicator
Displayed when a signal is sent to the air
conditioner.
Signal Transmitter
Controls signal sent to the air conditioner from here.
FAN button
Press to select fan speed. (AUTO, HIGH, MED, and LOW).
SUPER WAVE button
Use to set the desired airflow direction.
START/STOP button
Press to start and stop operation.
- RESET button
This button is used when replacing batteries.
CANCEL button
Press to cancel the setting time.
ON TIMER button
Use to set time for ON the air conditioner.
Airflow Direction Adjustment
Vertical airfl ow direction louvers: Rotate the vertical airfl ow louvers upward, or downward.
Right-Left Airflow-direction Louvers:
Control airflow in the horizontal (right-left) direction.
When the SUPER WAVE button is pressed, the louvers move and blow air to the left and right.
To stop SUPER WAVE operation, press the button again.
Automatic Operation
- When Automatic operation first selected, the fan will operate at low speed for 1 minute, during which time the unit detects the room conditions and selects the proper operating mode.
If the difference between thermostat setting and actual room temperature is more than +2^ Cooling operation
If the difference between thermostat setting and actual room temperature is less than +2^ Dry operation - If the mode automatically selected by the unit is not what you wish, select one of the mode operation (COOL, DRY, and FAN.)
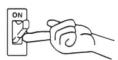
1 Press the START/STOP button. The air conditioner will start operation.
2 Press the MODE button to select AUTO.
The operating mode "AUTO" will appear alone in the display. The transmit indicator will flash to indicate the command has been sent, and about 3 seconds later the entire display panel will reappear.
Temperature and Humidity Range
Permissible ranges of temperature and humidity are as follows:
| Cooling Operation | Outdoor temperature: About 21 °C to 55 °C |
| Indoor temperature: About 18 °C to 35 °C | |
| Indoor humidity: About 80 % or less. If the unit is used for long periods under conditions of high humidity, water may humidity, water may condense on and drip from the surface of the unit. | |
| Drying Operation | Outdoor temperature: About 18 °C to 55 °C |
| Indoor temperature: About 18 °C to 35 °C | |
| Indoor humidity: If the unit is used for long periods under conditions of high humidity, water may condense on and drip from the surface of the unit. |
If the unit is used under higher temperature conditions than those noted here, the automatic protection circuit may operate, interrupting the operation. If the unit is used under lower temperature conditions than those noted here, the heat exchanger may freeze, causing water leakage or other malfunction. Do not use the air conditioner for any purpose other than room cooling, room drying or fan.
If the unit is used under higher temperature conditions than those noted here, the automatic protection circuit may operate, interrupting the operation. If the unit is used under lower temperature conditions than those noted here, the heat exchanger may freeze, causing water leakage or other malfunction. Do not use the air conditioner for any purpose other than room cooling, room drying or fan.
OFF TIMER (stops the air conditioner operation at the set time)
1 Press the START/STOP button.
(if the unit is already operating, proceed to step 2)
The unit's green OPERATION indicator will light.
2 Press OFF TIMER button to select desired times.
Press OFF TIMER button to change from temperature setting to timer indicator.
Each time the button is pressed, the time changes in the following order:
→ 0.5 → 1.0 → 1.5 → 2.0 → … → 9.0 → 9.5 → 10 → 11 → 12 (hour)
Set the time while the OFF TIMER indicator (○▶○) on the remote controller's display is fl ashing.
ON TIMER (begins the air conditioner operation at the set time)
1 Press the START/STOP button.
(If the unit is already operating, proceed to step 2.)
The unit's green OPERATION indicator will light.
2 Press ON TIMER button to set the expected time.
If ON TIMER button is pressed, it will be changed into time indication from temperature indication.
Each time the button is pressed, the time changes in the following order:
→ 6.0 → 6.5 → 7.0 → … → 9.0 → 9.5 → 10 → 11
5.5 ← 5.0 ← … … … ← 1.0 ← 0.5 ← 12(hour) ←
Set the time while the ON TIMER mark ( ⭕▶ | ) on the remote controller's display is flashing.
Note: When you set the setting temperature lower than 24 °C and activate the On timer, the setting temperature will be changed at 24 °C. You can change the setting temperature.
To Cancel the TIMER
Press the CANCEL button CANCEL
To Stop the Air Conditioner Operation while
the TIMER is Operating
Press the START/STOP button.
To Change the TIMER Settings
Press the ON TIMER button ○ on or OFF TIMER ○ off button as required.
To Change Operating Conditions
If you wish to change the operating conditions (mode, fan speed, thermostat setting), after making the timer setting, wait until the entire display reappears, then press the appropriate buttons to change to the desired operating condition.
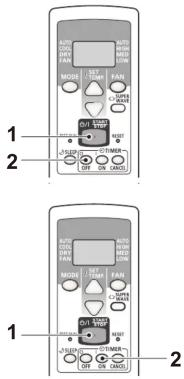
SLEEP TIMER Operation
Unlike other timer functions, the SLEEP timer is used to set the length of time until air conditioner operation is stopped.
About SLEEP TIMER
To prevent excessive warming or cooling during sleep, the SLEEP timer function automatically modifi es the thermostat setting in accordance with the time setting. When the time has elapsed, the air conditioner completely stops.
During Cooling/Dry operation:
When the SLEEP timer is set, the thermostat setting is automatically raised 1^ every 1 hour. When the thermostat has been raised a total of 2^ , the thermostat setting at that time is maintained until the set time has elapsed, at which time the air conditioner automatically turns off.
To Use the SLEEP TIMER
While the air conditioner is operating or stopped,
press the SLEEP button 🌐SLEEP
。
The SLEEP TIMER indicator (💡 ➕○) on the remote controller's display will light.
Within 3 seconds after the indicator lights, the time can be changed by pressing SLEEP button once again.
Each time the button is pressed, the time changes in the following order: → 1.0 → 2.0 → 3.0 → 5.0 → 7.0 → 9.0 (hour)
About 3 seconds later, the entire display will reappear.
The unit's OPERATION indicator (green) and the TIMER indicator (orange) light.

To Change the SLEEP TIMER Settings
Press the SLEEP button once to display the last setting time.
Press the SLEEP button again to change the time.
Each time the button is pressed, the time changes in the following order (Change from the last setting time):
→ 1.0 → 2.0 → 3.0 → 5.0 → 7.0 → 9.0 (hour) (RESET)
To Cancel the TIMER
Press the CANCEL button CANCEL
To Stop the Air Conditioner Operation while the TIMER is Operating
Press the START/STOP button.
Installation
Installation dimension
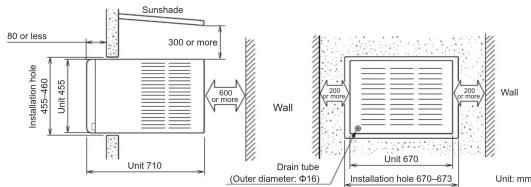
Typical installation
- When constructing a timber frame, arrange so that the outside rear of the air conditioner is between 5 and 10mm lower than the front of the unit. This allows condensed water to drain off outside the room. If the inside of the air conditioner is lower, condensed water and rain may flow into the room.
In the event of a malfunction (burning smell, etc.), immediately stop operation, disconnect the power plug, and consult authorized service personnel.
In the place where bears be sufficient to the weight of the air conditioner concerning installation, noise and vibration choose such place without increasing.
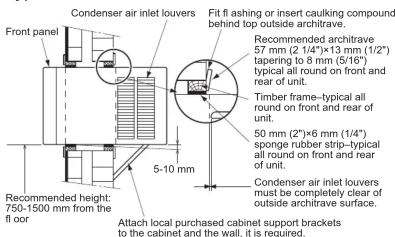
- For installation, avoid any places in direct sunlight. Combined installation with a sunshade is recommended; installing the unit under direct sunlight may cause low cooling performance or increasing of the electricity consumption.
- Consult the installation in a special place to a selling agent. Because sea breeze sometimes becomes to a cause of malfunction by corrosion etc., in the case that the place become use with machine oil, the place of many place etc., that occur, sulfuration gas such as a hot spring area that hits in a seashore area it buys and give consultation to that selling agent.
● Avoid the neighborhood that be discharged dust, a lampblack, steam, such as an exhaust port, a ventilation fan.
- It is place where do not give neighbors trouble about removal water or a wind and noise.
- Where practicable, locate the air conditioner with the lower edge of the cabinet approximately 0.75 m (29.5") to 1.5 m (59") from the floor. This usually gives the optimum air circulation pattern within the room for cooling and heating.
- When installing the attached insulation (620 mm x 40 mm, t12), insert it from the inside of the room so that the insulation fi lls up the gap between the rails on the inner bottom of the cabinet and bottom side of the base.
Error Codes
If you use a wireless remote controller, the lamp on the photodetector unit will output error codes by way of blinking patterns. See the Indicator blinking patterns and error codes in the table below. An error display is displayed only during operation.
| Error display | Description | ||
| OPERATION Indicator (green) | TIMER Indicator (orange) | SUPER WAVE Indicator (green) | |
| ●(3) | ●(5) | ◇ | Manual auto switch error |
| ●(4) | ●(1) | ◇ | Room temperature sensor error |
| ●(4) | ●(2) | ◇ | Heat exchanger temperature sensor error |
- Display mode ●: 0.5s ON / 0.5s OFF, ( ) : Number of flashing, ◇: 0.1s ON / 0.1s OFF
Care and MaintenanceTIMER Operation
CAUTION
● During maintenance, be sure to place the removed components in a safe place to avoid damage to them.
- Do not touch the aluminum fins of heat exchanger built-in the indoor or outdoor unit to avoid personal injury when you install or maintain the unit. Also, any attention not to be scratched or painted your head by inner pads.
Also, pay attention not to be scratched or pinched your hand by inner pants. Never use water better than 40 °C. The unit body may warm or change color
- Never use water hotter than 40 °C. The unit body may warp or change color.
- Do not use inflammable sprays such as lacquer or hair spray near the air conditioner.
The unit can be damaged by gasoline, benzine, thinners, insecticides and other chemical agents.
● Before cleaning the unit, be sure to turn it off and all the power supply has been disconnected.
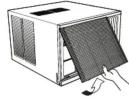
Cleaning the Air Filter
If dirt is allowed to collect in the air filter, the airflow will be reduced, leading to reduced performance, and increased operating noise. Be sure to clean the filters at the beginning of the operating season, and about every 2 weeks during periods of frequent operation.
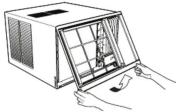
The air filter is attached to the front panel, and you need to remove the intake grille first, when you get access to the air filter.
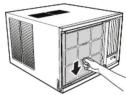
Intake grille removal
Push the bottom of the intake grille up with your hand, and pull it toward you.
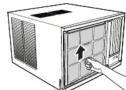
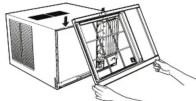
Air fi Iter removal
With lifting up small tabs on the air fi Iter, pull the fi Iter toward you.
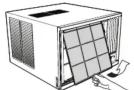
Air fi Iter cleaning
Use a vacuum cleaner to remove dust and dirt from the air filter, or wash in a synthetic detergent. After washing, dry in a shaded place, then reinstall.
Air fi Iter installation
To attach the fi liter to the front panel, with aligning the both sides of the fi liter to the front panel, insert the upper edge of the fi liter to the rail on the front panel. Then make sure that the lower edge of the fi liter is firmly inserted to the rail too.
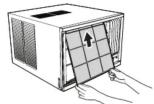
The air fi Iter can be installed either way up. After attaching the air fi Iter, reinstall the intake grille.
Cleaning the unit
Clean the unit by wiping with a cloth moisten with cool or warm water, then wipe with another soft, clean, and dry cloth.
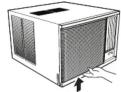
Front panel removal
- Remove one screw securing the front panel.
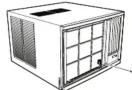
- Push the small projections on the bottom side of the front panel upward to unlatch the lower side. Then with holding up the front panel with your hands, remove it toward you.
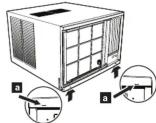
Front panel installation
- Hook the upper edge of the front panel (2 places) to the unit.
- Press the lower edge of the front panel, and secure it with the screw.
When not using the unit for extended periods (1 month or more)
Operate the unit on fan mode for about one-half day on a day with clear weather, to assure that the internal parts are dry. When not using the unit for extended periods, disconnect the power plug for safety.
Check the power cord
- Remove the built-up dirt and dust on the power plug and the electrical outlet periodically.
- Check the power cord occasionally to confirm that it is not damaged by cuts or abrasions. If you discover damage to the cord, consult authorized service personnel.
Inspections and repairs:
Depending on the conditions of use, the internal parts of an air conditioner will become dirty after about two or three season of use, and performance may be affected. For this reason, regular professional maintenance is recommended. Consult authorized service personnel.
Troubleshooting
Before requesting service, perform the following checks:
| Symptom Problem | ||
| NORMAL FUNCTIONS | Does not operate immediately: | ● If the unit is stopped and then immediately started again, the compressor will not operate for about 3 minutes, in order to prevent fuse blowouts. ● Whenever the power plug is disconnected and then reconnected to a power outlet, the protection circuit will operate for about 3 minutes, preventing unit operation during that period. |
| Noise is heard: | ● During operation and immediately after stopping the unit, the sound of water flowing in the air conditioner's piping may be heard. Also, noise may be particularly noticeable for about 2 to 3 minutes after starting operation (sound of coolant fl owing). ● During operation, a slight squeaking sound may be heard. This is the result of minute expansion and contraction of the front cover due to temperature changes. | |
| Smells: | ● Some smell may be emitted from the unit. This smell is the result of room smells (furniture, tobacco, etc.) which have been taken into the air conditioner. | |
| Mist or steam are emitted: | ● During cooling operation, a thin mist may be seen emitted from the unit. This results from the sudden cooling of room air by the air emitted from the air conditioner, resulting in condensation and misting. | |
| Poor cooling performance: | ● The setting temperature may change to the initial setting (24°C) automatically. In this case, set the temperature again. | |
| CHECK ONCE MORE | Does not operate at all: | ● Is the power plug disconnected from its outlet? ● Has there been a power failure? ● Has a fuse blown out, or a circuit breaker been tripped? ● Are the remote controller batteries loaded properly? ● Is the timer operating? |
| Poor cooling performance: | ● Is the air filter dirty? ● Are the air conditioner's intake grille or outlet port blocked? ● Did you adjust the room temperature settings (thermostat) correctly? ● Is there a window or door open? ● In the case of cooling operation, is a window allowing bright sunlight to enter? (Close the curtains.) ● In the case of cooling operation, are there heating apparatus or computers inside the room, or are there too many people in the room? | |
| Poor dry performance: | ● Set the thermostat to a temperature setting that is lower than the present room temperature. Dry modes will not operate if the thermostat is set higher than the actual room temperature. | |
| The unit operates differently from the remote controller setting: | ● Are the remote controller batteries dead? ● Are the remote controller batteries loaded properly? |
If the problem persists after performing these checks, or if you notice burning smells, or the TIMER indicator flashed, immediately stop operation, disconnect the power plug, and consult authorized service personnel.
AUTO Restart
In Event of Power Interruption
- The air conditioner power has been interrupted by a power failure. The air conditioner will then restart automatically in its previous mode when the power is restored.
● Operated by setting before the power failure.
- If a power failure occurs during TIMER operation, the timer will be reset and the unit will begin (or stop) operation at the new time setting. In the event that this kind of timer fault occurs the TIMER indicator will flash.
Specifications
| MODEL | AXGT18FHTC-B | AXGT24FHTC-B | |
| POWER | 230 V, 10, 50 Hz | ||
| REFRIGERANT (R410A) | [kg] | 1.10 | 1.10 |
| COOLINGTEST CONDITION:IEC60335-2-40 | CAPACITY [kW (Btu/h)] | 5.37 (18,300) | 6.45 (22,000) |
| CURRENT [A] | 8.2 | 9.9 | |
| POWER INPUT [kW] | 1.80 | 2.22 | |
| ENERGY EFFICIENCY RATIO [W/W] | 2.98 | 2.91 | |
| MAX. CURRENTTEST CONDITION : IEC60335-2-40 | [A] | 12.5 | 13.0 |
| MAX. PRESSURE | SUCTION [Mpa] | 1.2 | |
| DISCHARGE [Mpa] | 4.8 | ||
| DIMENSIONS (W×H×D) | [mm] | 670×455×710 | |
| WEIGHT | [kg] | 56 | 62 |
- Acoustic Noise Information: The maximum sound pressure level is less than 70 dB (A) for both indoor unit and outdoor unit.
According to IEC 704-1 and ISO 3744.
• COOLING CONDITION : INDOOR 27/19 °C (DB/WB) OUTDOOR 35/24 °C (DB/WB)


- Safety Precautions
- WARNING
- CAUTION
- Power Supply
- Preparation
- Turn on the power
- To use the remote controller
- Basic Operations
- Mode Operation (COOL, DRY, and FAN)
- Thermostat Setting
- Notes:
- Fan Speed Setting
- Unit Overview
- Power supply plug
- MANUAL AUTO button
- Remote Controller Overview
- Set temperature / Timer Indicator
- Fan Speed Indicator
- Transmit Indicator
- Signal Transmitter
- FAN button
- SUPER WAVE button
- START/STOP button
- - RESET button
- CANCEL button
- ON TIMER button
- Airflow Direction Adjustment
- Automatic Operation
- Temperature and Humidity Range
- OFF TIMER (stops the air conditioner operation at the set time)
- ON TIMER (begins the air conditioner operation at the set time)
- To Cancel the TIMER
- To Stop the Air Conditioner Operation while
- the TIMER is Operating
- To Change the TIMER Settings
- To Change Operating Conditions
- SLEEP TIMER Operation
- About SLEEP TIMER
- To Use the SLEEP TIMER
- To Change the SLEEP TIMER Settings
- To Stop the Air Conditioner Operation while the TIMER is Operating
- Installation
- Error Codes
- Care and MaintenanceTIMER Operation
- Cleaning the Air Filter
- Intake grille removal
- Air fi Iter removal
- Air fi Iter cleaning
- Air fi Iter installation
- Cleaning the unit
- Front panel removal
- Front panel installation
- When not using the unit for extended periods (1 month or more)
- Check the power cord
- Troubleshooting
- AUTO Restart
- In Event of Power Interruption
Marke : FUJITSU
Modell : AXGT24FHTC-B
Kategorie : Klimaanlage