
Hi-Hat Speed Cobra HH915D - Schlagzeugzubehör TAMA - Kostenlose Bedienungsanleitung
Finden Sie kostenlos die Bedienungsanleitung des Geräts Hi-Hat Speed Cobra HH915D TAMA als PDF.


| Produkttyp | Hi-Hat-Stativ |
| Modell | Speed Cobra HH915D |
| Marke | TAMA |
| Kategorie | Schlagzeugzubehör |
| Kupplungsart | Swing-Lock Clutch mit verstellbarem Klemmdruck |
| Federspannung | 6-stufig einstellbar |
| Duo-Spikes | Gummispitze und Stahlspitze, längenverstellbar |
| Fußplattenwinkel | Einstellbar über zwei Vierkantschrauben |
| Stabilisator | Längenverstellbar für mehr Standfestigkeit |
| Spring Seat (Federaufnahme) | Neigung des Beckenbodens einstellbar, mit Arretierung |
| Tilt-System | Stativ neigbar über T-Bolzen und Schieber |
| Schutzrohr | Austauschbar bei Verschleiß |
| Wartung | Trocken abwischen; Kette mit TAMA TOL2 Öl schmieren; Schrauben regelmäßig nachziehen |
| Enthaltener Schlüssel | Inbusschlüssel o.ä. (nicht näher bezeichnet) |
| Hersteller | HOSHINO GAKKI CO., LTD., Nagoya, Japan |
| Bedienungsanleitung | PDF, 2 Seiten, Deutsch/Englisch/Japanisch |
Häufig gestellte Fragen - Hi-Hat Speed Cobra HH915D TAMA
Benutzerfragen zu Hi-Hat Speed Cobra HH915D TAMA
0 Frage zu diesem Gerät. Beantworten Sie die, die Sie kennen, oder stellen Sie Ihre eigene.
Eine neue Frage zu diesem Gerät stellen
Laden Sie die Anleitung für Ihr Schlagzeugzubehör kostenlos im PDF-Format! Finden Sie Ihr Handbuch Hi-Hat Speed Cobra HH915D - TAMA und nehmen Sie Ihr elektronisches Gerät wieder in die Hand. Auf dieser Seite sind alle Dokumente veröffentlicht, die für die Verwendung Ihres Geräts notwendig sind. Hi-Hat Speed Cobra HH915D von der Marke TAMA.
BEDIENUNGSANLEITUNG Hi-Hat Speed Cobra HH915D TAMA
INSTRUCTION MANUAL
Please read through this instruction manual before starting to use your TAMA Hi-Hat Stand.
Thank you for your purchase of this TAMA Hi-Hat Stand. To ensure safe and efficient use of this product, please read through this manual before beginning assembly. Store this manual in a convenient place for future reference.
取扱説明書
ご使用になる前に、必ず説明書をお読み下さい。
この度はTAMAハイハットスタンドをお買い上げ頂き、誠にありがとうございました。製品の性能を十分に発揮し、安全にご使用頂くために、組み立て前に必ず本説明書をお読みください。また、本説明書は大切に保管して下さい。

Photo 1 写真 1
Assembly/組立方法
- Loosen the T-nut to remove the hi-hat clutch from the upper tube, and then pull the pull rod out of the tube.
- T型ナットを緩めハイハット・クラッチをシンバルロッドから外し、上段パイプ、クラッチ、シンバルロッドの三つに分解します。
- Loosen the T-bolt ②, extend the two legs outward, and stand the bottom section on the floor. Make sure the stand is perpendicular to the floor, and then tighten the T-bolt ②.
- Tボルト②を緩めて脚部を開き、スタンドと床面が垂直になる位置でTボルト②を締め、脚部を固定します。
- Screw the pull rod into the hex nut on top of the bottom section. The rod should be secured to prevent it from becoming loose while playing.
- 下段パイプの中にある六角ナットにシンバルロッドをネジ込みます。 演奏中に緩まないようにしっかりと締めて下さい。
- Fit the upper tube over the pull rod and into the lower tube, adjust to the desired height, and then fasten the T-nut ① and the square-headed bolt of the memory lock.
- 上段パイプを挿入し、好みの高さでTナット①を締めた後、メモリーロックも締めつけます。
- Set the bottom cymbal of the hi-hat (generally the thicker one) on the felt of the cymbal seat.
- ボトム側のハイハットシンバル(一般的に厚い方の一枚です)をシンバルシートのフェルトの上に載せます。
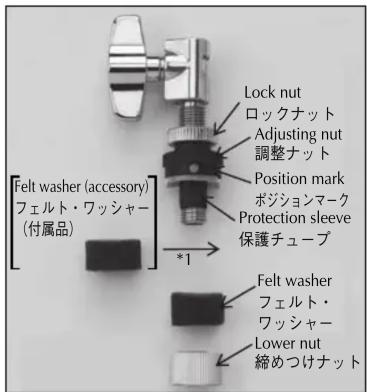

Fig.3 図.3
Photo2写真2
- Attach the top cymbal of the hi-hat to the clutch. First, remove the lower nut and the felt washer from the clutch (Photo 2), and then mount the cymbal, the felt washer and the nut. Make sure that the lower nut is firmly tightened. The Swing-lock clutch allows the top cymbal of the hi-hat to swing naturally due to the two projections on the underside of the adjusting nut. To adjust the tightness of the cymbal on the clutch, follow the procedure described below.
6-1. Turn the locknut counterclockwise to loosen it.
6-2. While checking the tightness of the cymbal, tighten the adjusting nut at the desired position.
Before tightening the locknut, check the positions of the position mark on the adjusting nut and the T-nut.
6-3. In order for the cymbal to swing more naturally, the position mark on the adjusting nut should face the tip of the drumstick, as shown in fig. 3. Also, make sure that the T-nut will not interfere with playing the hi-hat cymbal.
6-4. Tighten the locknut, then the T-nut of the clutch to secure the pull rod at the desired position.
*1: If you prefer the sound and feeling of the top cymbal held with two felt washers, use the accessory felt washer on the underside of the adjusting nut. When two felt washers are used, it is not necessary to check the direction of the position mark. The protection sleeve can be replaced when it becomes worn or stripped. To avoid damage to the cymbal, periodically check the condition of the sleeve.
- クラッチに上側のシンバルを取り付きます。締めつけナットとフェルトワッシャーを外し、調整ナットとフェルトワッシャーの間にトップシンバルを入れ、締めつけナットで固定します。締めつけナットは必ず締めきって下さい。 スイングロック・クラッチは、調整ナットの下部に設けられた二つの突起でトップシンバルをより自然に揺らす事が出来る構造です。トップシンバルの締め具合は下記手順で調整出来ます。
6-1. ロックナットを左に回して緩めます。
6-2. 好みの揺れ具合になるまで調整ナットを締めます。ロックナットを締めて固定する前に、ポジションマークとT型ナットの位置関係に注意して下さい。
6-3. よりシンバルを自然に揺らすには、図3のようにハイハットを叩くスティックの延長線上にポジションマークが来るようにセットします。また、クラッチのTナットが演奏の邪魔にならない位置になっている事を確認してから、ロックナットを締めて下さい。
6-4. トップとボトムシンバルの間を好みの間隔にしてTナットを締め、クラッチをシンバルロッドに固定します。
<注意>
*1: シンバルの上側も一般的なフェルトワッシャーで挟んだ音がお好みの場合は、付属のフェルトワッシャーを調整ナットの下に入れてご使用下さい。フェルトを使用される場合は、ポジションマークの向きを気にする必要はありません。 保護チューブが摩耗した場合はチューブ部分のみ交換する事が出来ます。シンバルを傷めないために時々状態を確認して下さい。
Adjustment / 各部の調整
Adjusting the spring tension (Photo 4)
The spring tension can be adjusted to any of 6 levels. Turning the adjuster clockwise increases the spring tension.
スプリングテンションの調整 (写真4)
テンション調整ダイアルを回す事で、6段階にスプリングテンションを調整出来ます。ダイアルを右に回すと踏み心地が重くなります。
Adjusting the duo spike length (Photo 5)
Each leg has a rubber tip and spike. When using a spike to keep the stand from walking, loosen the square-headed bolt (a), slide the spike to the desired length, and then retighten the square-headed bolt (a).
Duo spike の調整 (写真5)
二本の脚の先端は、床の状況に合わせてラバーとスパイクを選択できます。スパイクを出して使う場合は、角頭ボルト(a)を緩めて剣先を出し、好みの長さで再度締めつけ固定します。
Adjusting the footboard angle (Photo 6)
The angle of the footboard can be adjusted. Loosen the two square-headed bolts (b), slide the backside cover of the base frame up or down until the footboard is at the desired angle, and then retighten the bolts (b). Make sure the two bolts are parallel when they are tightened.
フットボード角度調整 (写真6) 二本の角頭ボルト(b) を緩め、背面カバーを上下にスライドさせる事でフットボードの角度を調整する事が出来ます。好みの角度が決まったら再びボルト(b)を締めて固定します。この時、二本のボルトが平行になっているか確認して下さい。
Adjusting the stabilizer length (Photo 7)
The stability of the stand can be adjusted by changing the length of the stabilizer.
First, fold up the footboard. Next, loosen the two square-headed bolts (c), pull the stabilizer rubber to the desired length, and then retighten the bolts (c).

Photo 4 写真 4

Photo 5 写真 5

Photo 6 写真 6

Photo 7 写真 7
スタビライザーの調整 (写真7)
スタビライザーの位置を調整する事で、演奏中のスタンド自体の安定感を高める事が出来ます。まず、フットボードを折りたたみ、二本の角頭ボルト (c) を緩め、ラバー部を引いて伸ばして下さい。
適当な位置で角頭ボルト (c) を再び締めて固定します。
Adjusting the Spring seat (Photo 8)
Using the small spring, the Spring seat causes the bottom cymbal of the hi-hat to tilt slightly when the hi-hat cymbals are opened. When they are closed, both the top and bottom cymbals are flattened by the compression of the spring. This works as an air deflector between the two cymbals. As a result, this will give you a tighter "foot close" sound.
To tilt the bottom cymbal more, turn the adjusting bolt counterclockwise. When you reach the desired angle for the desired sound, turn the locknut counterclockwise to lock the angle.
スプリングシートの調整 (写真8)
スプリングシートは従来のボトムシンバルの角度調整部にスプリングを入れる事で、オープン時はボトムシンバルが傾き、クローズするにつれてシンバルが水平になる事によって、シンバルを閉じる時の二枚のシンバル間の空気をスムーズに抜き、より明確にフットクローズ音を引き出す機構です。調整ボルトを左向きに回すと、よりボトムシンバルを傾ける事ができます。好みの傾き具合が決まったらロックナットを左向きに回してロックして下さい。
Adjusting the tilt (Photo 9)
The angle of the hi-hat cymbal can also be adjusted by tilting the stand itself. First, loosen the T-bolt ②, and then slide the slider to the desired angle. Retighten the T-bolt ② when the stand is at the desired angle.

Photo8写真8
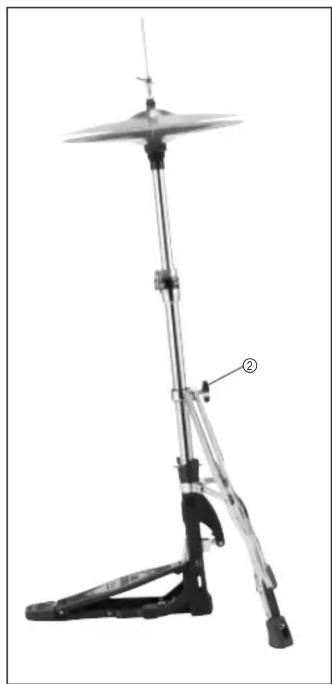
Photo 9 写真 9
ティルトシステム (写真9)
スタンド自体を傾けて、ハイハットシンバルの角度を調整する事が出来ます。Tボルト②を緩め、より脚を開くようにスライダを押し下げるにつれてスタンドが前傾します。好みの位置で再び②を締めて固定します。
Maintenance/メインテナンス
To ensure parts continue to move smoothly over time, periodically wipe off dust with a dry cloth and lubricate the chain with TAMA TOL2 tune-up oil. Please note that bearings and hinges do not require lubrication due to their lubrication-free design.
The fixing screws may become loose due to vibrations during playing or transport. Use the included wrench or a Phillips screwdriver to tighten them as necessary.
より長く滑らかなアクションをお楽しみ頂く為に。時々乾いた布でほこりや汚れを拭き取って下さい。チェーン部には錆を防ぐために時々オイル(TAMA チューンナップ・オイルTOL2)を差して下さい。ベアリングやヒンジ部は給油の必要が無い設計ですので、オイルを差す必要はありません。
HOSHINO GAKKI CO., LTD.
星野楽器株式会社
〒461-8717 愛知県名古屋市東区橦木町3-22
www.tama.com


- INSTRUCTION MANUAL
- 取扱説明書
- ASSEMBLY/組立方法
- ADJUSTMENT / 各部の調整
- ADJUSTING THE SPRING TENSION (PHOTO 4)
- スプリングテンションの調整 (写真4)
- ADJUSTING THE DUO SPIKE LENGTH (PHOTO 5)
- DUO SPIKE の調整 (写真5)
- ADJUSTING THE FOOTBOARD ANGLE (PHOTO 6)
- ADJUSTING THE STABILIZER LENGTH (PHOTO 7)
- スタビライザーの調整 (写真7)
- ADJUSTING THE SPRING SEAT (PHOTO 8)
- スプリングシートの調整 (写真8)
- ADJUSTING THE TILT (PHOTO 9)
- ティルトシステム (写真9)
- MAINTENANCE/メインテナンス
Marke : TAMA
Modell : Hi-Hat Speed Cobra HH915D
Kategorie : Schlagzeugzubehör