
Iron Cobra HP200P - Musikinstrument TAMA - Kostenlose Bedienungsanleitung
Finden Sie kostenlos die Bedienungsanleitung des Geräts Iron Cobra HP200P TAMA als PDF.


| Produkttyp | Bassdrum-Pedal |
| Marke | TAMA |
| Modell | Iron Cobra HP200P (auch HP200PTW als Doppelpedal) |
| Kategorie | Musikinstrument |
| Besonderheiten | Zweiflächiger Schlägel (Filz und Nylon), verstellbarer Schlägelwinkel und Fußbrettwinkel, Cobra Coil kompatibel, Doppelpedal-Version verfügbar |
| Hauptfunktionen | Schlägelhöhen- und winkelverstellung, Federspannungsregulierung, Winkelverstellung des Fußbretts, Befestigung am Bassdrum-Reifen, Montage einer Verbindungsstange (nur Doppelpedal) |
| Federspannungseinstellung | Über die untere Stellmutter; Locknut zur Fixierung; ca. 1/3 Umdrehung pro Rastung |
| Schlägelwinkeleinstellung | Über die obere Sechskantschraube am Kipphebel; auch unabhängig vom Fußbrettwinkel möglich (nur linkes Pedal beim Doppelpedal) |
| Befestigung am Bassdrum | Über eine Reifenklemme; Schraube lösen, Pedal auf den Reifen setzen, gerade ausrichten, Schraube festziehen |
| Reinigung und Wartung | Mit einem trockenen Tuch abwischen; keine Lösungsmittel verwenden |
| Sicherheitshinweise | Nicht barfuß spielen (Verletzungsgefahr); außerhalb der Reichweite von Kleinkindern aufbewahren; Pedal nur zum Trommelspiel verwenden |
| Zubehör (separat erhältlich) | Cobra Coil (Modell CC900S), eine Feder zur Unterstützung der Fußbrettrückstellung |
| Kompatible Modelle | HP200P und HP200PTW (nur mit Cobra Coil kompatiblem Loch in der Bodenplatte) |
Häufig gestellte Fragen - Iron Cobra HP200P TAMA
Benutzerfragen zu Iron Cobra HP200P TAMA
0 Frage zu diesem Gerät. Beantworten Sie die, die Sie kennen, oder stellen Sie Ihre eigene.
Eine neue Frage zu diesem Gerät stellen
Laden Sie die Anleitung für Ihr Musikinstrument kostenlos im PDF-Format! Finden Sie Ihr Handbuch Iron Cobra HP200P - TAMA und nehmen Sie Ihr elektronisches Gerät wieder in die Hand. Auf dieser Seite sind alle Dokumente veröffentlicht, die für die Verwendung Ihres Geräts notwendig sind. Iron Cobra HP200P von der Marke TAMA.
BEDIENUNGSANLEITUNG Iron Cobra HP200P TAMA
HP200P / HP200PTW INSTRUCTION MANUAL
Thank you very much for purchasing TAMA IRON COBRA drum pedal. For better understanding of its features and capabilities, please read through this manual before use. Store the manual in a convenient place for future reference.
Notes
- This equipment is for playing the drums only. Do not use it for any other purpose, as there is a risk of injury to other persons or damage to property.
● Take care to keep the drum pedal out of reach of small children.
● There is a risk of injury if the drum pedal is used barefoot. Please wear suitable footwear. - There is a risk of soiling or damaging floor surfaces. We recommend placing the drum set on carpeting or some other floor covering.
Installing the Beater
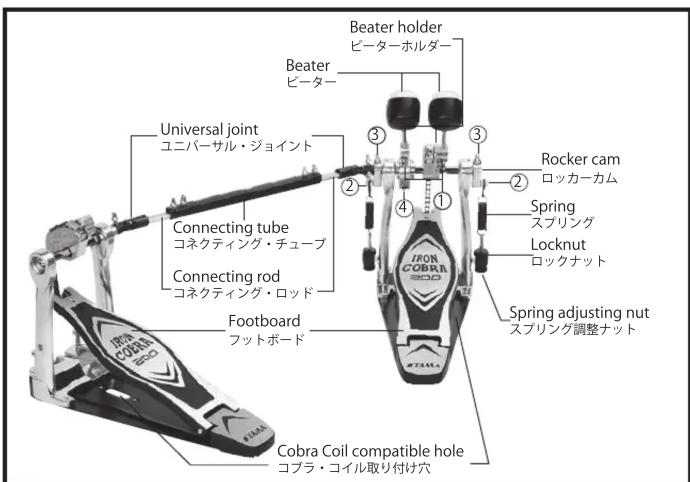
- Loosen the square-head bolt 1 Ⓞ the beater holder using a tuning key.
- Insert the beater shaft and adjust it to the desired height. Then tighten the bolt to secure it. The beater head is designed with two surfaces, one felt and one nylon, to be used at the performer's discretion. When securing the beater, attach the pedal to the bass drum and press the footboard so that the beater surface you have chosen makes contact with the drumhead. Then tighten the bolt to secure the beater in the correct position.
Attaching the Pedal Unit
- The pedal unit is attached to the bass drum. Loosen the bolt of the hoop clamp and fasten the clamp to the hoop on the bass drum. After making sure that it is fastened straight, tighten the bolt again to secure it.
Adjusting the Spring
- Hang the spring on the roller 2 of the rocker cam.
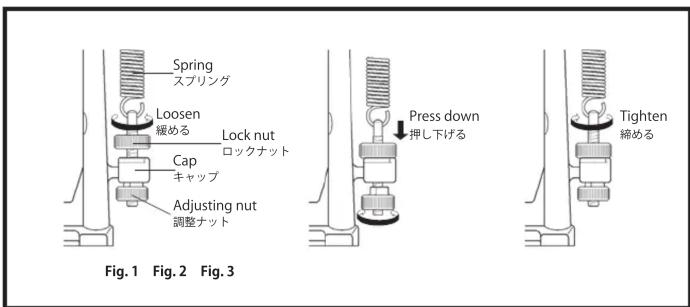
- Adjust the spring tension using the nut on the lower end. When adjusting the spring, first loosen the locknut, and then turn the adjusting nut while pressing down on the locknut as in Fig. 1\~2. Tightening the nut makes the pedal's resistance heavier, but the beater's return time is correspondingly faster.
- In order to prevent the spring from loosening while playing, the adjusting nut engages the cap attached to the unit roughly every 1/3 of a turn. Once the desired tension is reached, secure it by tightening the locknut as in Fig. 3.
Adjusting the Beater Angle
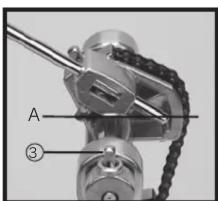
- The angle of the beater can be adjusted along with the angle of the footboard by loosening the square-headed bolt 3 on top of the rocker cam. As the angle of the beater is lowered, the footboard rises. Once the desired angle is reached, tighten the bolt firmly to secure it. The factory set-up position is that the bottom end of beater holder (A) is in parallel with the floor.
- The left side beater of the twin-pedal model (HP200PTW) may be a djusted in the same way. When a more de lica te a djus tmen t is ne ed ed, you can a dj us t the bea ter angle in depen dently of the foot board angle by loosening the bolt 4 below the beater holder. This fe ature is useful when y ou wish the footboard angles of both the hi-hat stand and the left pedal to match.
Attaching the Connecting Rod (HP200PTW)
- Attach the universal joints at the end of the connecting rod to the pedals. Make sure that the square-h eaded bolts for a taching the connecting rod are on top and on the drum side for the left pedal, and on top and on the near side for the right pedal.
- When as sembl ing the connecting rod and connecting tube, make sure that the widest flat side of connecting rod is facing up (toward the square headed bolt on top of the tube) as in the photo at right. After assembly, adjust the length as desired and re-tighten the bolts firmly.
Attaching the Cobra Coil (sold separately)
The Cobra Coil (CC900S) is a spring that assists the return of the footboard, allowing smoother and lighter pedal action. The Cobra Coil can be installed on HP200P or HP200PTW. (It can be installed only on models that have a Cobra Coil compatible hole in the center of the under plate.)
この度は、TAMA アイアンコプラ・sドラムペダルをお買い上げいただき、誠にありがとうございます。 製品の特徴をご理解いただき、性能を十分に発揮するため、ご使用前に必ず本説明書をお読みください。また、本説明書は大切に保管してください。
注意
- この製品はドラムセットを演奏するためのものです。他人にケガをさせたり、器物を損壊する恐れがありますので演奏以外の目的には使用しないでください。
- 小さなお子さんが手を触れないように十分に注意してください。 裸足で演奏することはケガの原因になる恐れがありますので避けてください。
- 床面を汚したり傷つけたりする恐れがありますので、カーペットなどを敷いた上にドラムをセットすることをお勧めします。
ビーターの取り付け
- ビーターホルダーの角頭ボルト①を付属のチューニングキーで緩めます。
● ピーターシャフトが適当な長さになるよう調整し、角頭ボルト①を締めて固定します。付属のビーターはフェルトとナイロン樹脂の二面の使い分けが出来る設計です。ビーターを固定するときには一旦バスドラムにベダルを取り付けた後フットボードを踏み込み、好みの面をバスドラムに押し付けるようにしながらボルトを締めると正しく固定できます。
ペダル本体の取り付け
- ペダル本体をバスドラムに取り付けます。フープクランプの固定ボルトを緩め、フープクランプがバスドラムのフープを挟み込むようにします。まっすぐに付いていることを確認したら、固定ボルトを再び締めて固定します。
スプリングの調整
- スプリングをロッカーカムのローラー②に掛けます。
- スプリングテンションは下側のナットで調整できます。スプリングの調整をするときにはまずロックナットを緩め(Fig. 1)たあと、Fig. 2 のようにロックナットを押し下げながら下側の調整ナットで調整してください。ナットを締めるにつれて踏み心地は重くなりますがビーターの戻りは速くなります。
● 調整ナットは約1/3回転ごとに本体に取り付けられたキャップにかみ合い、演奏中のスプリングの緩みを防止する構造になっています。好みのテンションが決まったらロックナットを締めて固定します(Fig. 3)。
ビーター角度の調整
● ロッカーカムの上側の角頭ボルト③を綴めるとビーターの角度とフットボードの角度を連動して調整することができます。ビーターの角度を倒すにつれてフットボードが上がります。好みの角度が決まったらボルトをしっかりと締め、固定します。ビーターホルダー端の平面(A)が地面と水平になる位置がメーカー出荷時の標準位置です。
● ツインベダル(HP200PTW)の左側のビーター角度も同様に調整できますが、より微妙な調整が必要な場合には左側のビーターホルダーの下側のボルト④を緩めることによってフットボードの角度とは無関係にビーター角度のみを調整することもでき、ハイットスタンドと左側のベダルとのフットボードの角度を合わせたいときに便利な設計になっています。
コネクティング・ロッドの取り付け (HP200PTW
- コネクティング・ロッドの端のユニバーサルジョイントをペダルに取り付けます。このとき取り付け用の角頭ボルトが左足側のペダルはドラム側と上側に、右足のペダルは手前側と上側になるよう注意してください。
- コネクティングロッドとコネクティング・チューブを連結する際は、六角棒の一番幅が広い面が上面(チューブの上に角頭ボルトがある面)になるように注意して下さい。取付け終わったら好みの長さに調整し、しっかりと固定して下さい。
コブラ・コイルの取り付け (別売)
Part Names / 各部の名称

HP200P
HP200PTW

Attaching the Connecting Rod コネクティング・ロッドの取り付け

CC900S
This manual is current as of November 2012. Because we are always working to improve our products, some features may change without notice.
■この取扱説明書は、2012年11月現在のものです。製品改良のため、予告なく仕様を変更することがありますので、あらかじめご了承ください。

HOSHINO GAKKI CO., LTD.
星野楽器株式会社 〒461-0014 愛知県名古屋市東区橦木町3-22 http://www.tama.com/


- HP200P / HP200PTW INSTRUCTION MANUAL
- NOTES
- INSTALLING THE BEATER
- ATTACHING THE PEDAL UNIT
- ADJUSTING THE SPRING
- ADJUSTING THE BEATER ANGLE
- ATTACHING THE CONNECTING ROD (HP200PTW)
- ATTACHING THE COBRA COIL (SOLD SEPARATELY)
- 注意
- ビーターの取り付け
- ペダル本体の取り付け
- スプリングの調整
- ビーター角度の調整
- コネクティング・ロッドの取り付け (HP200PTW
- コブラ・コイルの取り付け (別売)
Marke : TAMA
Modell : Iron Cobra HP200P
Kategorie : Musikinstrument