
XDP-766EQ - Freisprecheinrichtung Auto SONY - Kostenlose Bedienungsanleitung
Finden Sie kostenlos die Bedienungsanleitung des Geräts XDP-766EQ SONY als PDF.

Benutzerfragen zu XDP-766EQ SONY
0 Frage zu diesem Gerät. Beantworten Sie die, die Sie kennen, oder stellen Sie Ihre eigene.
Eine neue Frage zu diesem Gerät stellen
Laden Sie die Anleitung für Ihr Freisprecheinrichtung Auto kostenlos im PDF-Format! Finden Sie Ihr Handbuch XDP-766EQ - SONY und nehmen Sie Ihr elektronisches Gerät wieder in die Hand. Auf dieser Seite sind alle Dokumente veröffentlicht, die für die Verwendung Ihres Geräts notwendig sind. XDP-766EQ von der Marke SONY.
BEDIENUNGSANLEITUNG XDP-766EQ SONY
SONY ^®
3-800-145-21(1)
Digital Signal Processor
Operating Instructions
Before operating the unit, please read this manual thoroughly and retain it for future reference.
Owner's Record
The model and serial numbers are located on the bottom of the unit. Record the serial number in the space provided below. Refer to them whenever you call upon your Sony dealer regarding this product.
Model No.XDP-766EQ Serial No.____
For installation and connections, see the supplied installation/connections manual.
XDP-766EQ
©1995 by Sony Corporation
WARNING
This equipment has been tested and found to comply with the limits for a Class B digital device, pursuant to Part 15 of the FCC Rules. These limits are designed to provide reasonable protection against harmful interference in a residential installation. This equipment generates, uses, and can radiate radio frequency energy and, if not installed and used in accordance with the instructions, may cause harmful interference to radio communications. However, there is no guarantee that interference will not occur in a particular installation. If this equipment does cause harmful interference to radio or television reception, which can be determined by turning the equipment off and on, the user is encouraged to try to correct the interference by one or more of the following measures:
— Reorient or relocate the receiving antenna.
— Increase the separation between the equipment and receiver.
— Connect the equipment into an outlet on a circuit different from that to which the receiver is connected.
— Consult the dealer or an experienced radio/TV technician for help.
You are cautioned that any changes or modifications not expressly approved in this manual could void your authority to operate this equipment.
Features
The XDP-766EQ is a Sony BUS system compatible digital signal processor equipped with a spectrum analyzer. It is also equipped with sub woofer outputs for the reproduction of rich deep bass sound.
Spectrum analyzer display
- 13 band spectrum analyzer for displaying the variable input audio signal level in real time.
• Provided with seven spectrum analyzer display patterns.
DSP (Digital Signal Processor) file function
- Equipped with the Sony original preset DSP file with built-in effects including: Heavy, Mellow, Vocal, Dynamic, Disc Jockey, Relaxation and Loudness. A desired effect can be selected with a touch of a button to suit the kind of music you are playing. Also equipped with a user's memory function which can memorize up to seven customized DSP files.
- 7 band graphic equalizer enables precision adjustments of the tone quality.
- DRS (Dynamic Range Suppressor) function can compress the dynamic range of input signal to boost the average output level.
- With the DSP custom file function, you can enjoy the same DSP file every time you play the same disc.
- With the last sound memory function, you can always listen to the same program source with the same DSP file even after changing the program source or turning the unit on afresh.
Others
- Switchable LPF (low-pass filter) to suit the frequency response of the optional sub woofer(s).
- The illumination color of the operation buttons can be selected via the connected master unit between amber and green to match the illumination color of the master unit.
Precautions
Before operating this unit for the first time or after replacing the car battery, press the reset button on the master unit, and then start operating this unit.
- When you replace the car battery or press the reset button, the stored customized equalizing curves, the memorized file names and so on will be erased from the memory of the master unit. In such a case, you will need to store them again.
This unit is designed for negative ground 12 V DC operation only.
If your car was parked in direct sunlight resulting in a considerable rise in temperature inside the car, allow the unit to cool off before operating it.
If no power is being supplied to the unit, check the connections first. If everything is in order, check the fuse.
use Replacement
When replacing the fuse, be sure to use the one with the correct amperage which will be stated in the fuse case. Never use a fuse whose amperage rating exceeds the one supplied to the unit as this could cause a malfunction of the unit.
Table of Contents
Location and Function of Controls .... 4
Spectrum Analyzer Function
Changing the Spectrum Analyzer Displays .. 6
Listening Position Adjustment 9
Adjusting the Cutoff Frequency of the Sub Woofer(s) 11
DSP File Function
What is the DSP File Function? 12
Listening with the DSP File 13
Registering the DSP Files 14
Basic Procedure of Registering the DSP File 14
Registering the File Name....15
Adjusting the Sound with the Graphic Equalizer .... 16
Selecting the Surround Menu 18
Adjusting the DRS Effect Level 20
Memorizing the DSP File 21
Registering the DSP File onto Discs....22
Playing with the DSP Custom File Mode 23
Listening with the Same DSP File Mode Every Time 24
Troubleshooting Guide 25
Specifications 27
This unit can be connected and used with a master unit equipped with the DSP control function. However, even if the master unit is equipped with the DSP button, you cannot control the DSP function with the master unit. Therefore, do not operate the DSP button on the master unit.
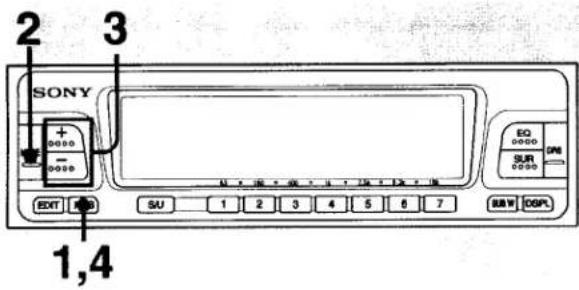
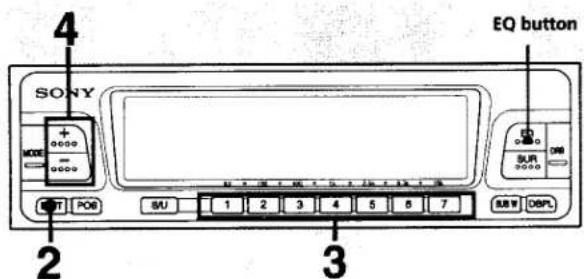
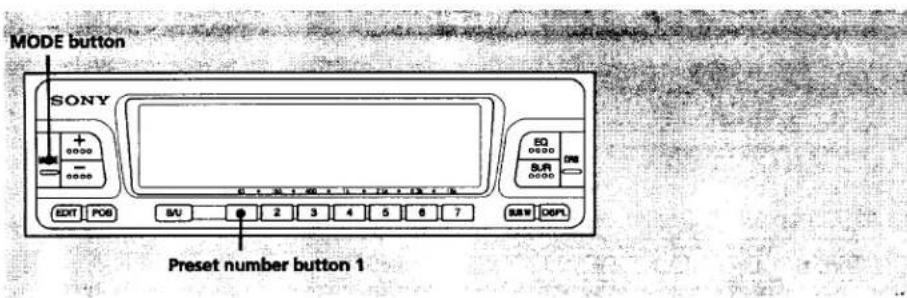
Location and Function of Controls
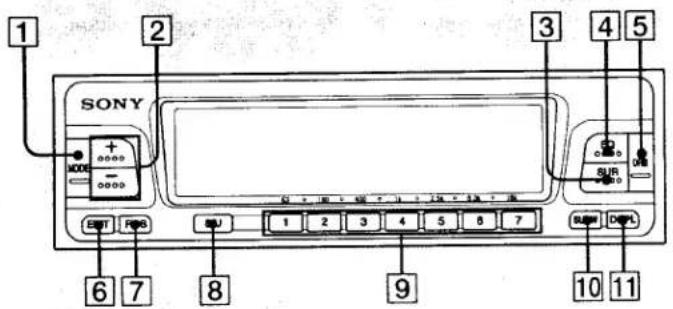
See the pages in ● for details.
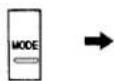
1 MODE button 7 10 15 19 23 24
Press to select the spectrum analyzer display patterns or the respective modes set by the sound image setting. Use this button for registering the DSP file name.
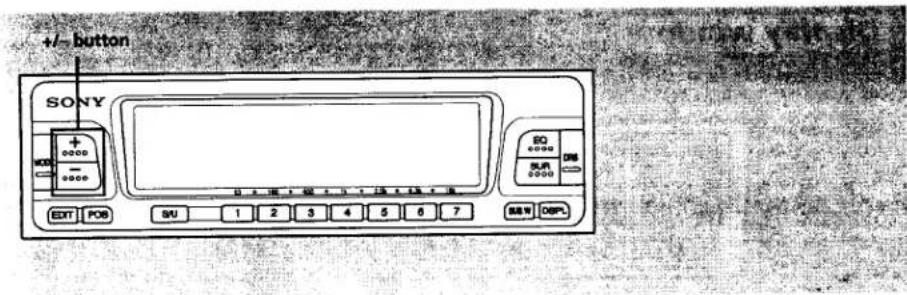
2 +/- (level adjust) button
67101517181920
Press to adjust each level, or select each mode in their respective settings.
③ SUR button 18
This button functions as the surround mode on/off button.
4 EQ button 16
Press to turn on/off the equalizing mode.
5 DRS button 20
Press to turn on/off the dynamic range suppressing mode.
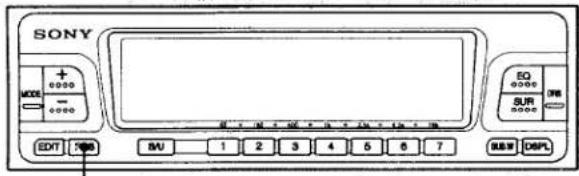
6 EDIT button 14 15 16 18 20 21
Press to register the DSP file or to select the adjusting mode while the DSP file is registering.
7 POS button 910
Press to adjust or change the desired listening position.
8 S/U (Sony original DSP file/user's DSP file select) button 13
Press to switch between the Sony original DSP file and the user's DSP file mode.
9 Preset number/frequency select buttons 13 16 21 23 24
Press to select the memorized DSP file or to register a DSP file.
10 SUB. W (sub woofer LPF cutoff frequency select) button ⑪
Press to select the LPF cutoff frequency of the sub woofer's output.
11 DSPL (spectrum analyzer display select) button 8
Press to change the spectrum analyzer display to either include the character indication or not.

2 POS display section
Displays the currently selected listening position. This section flashes while the unit is in the fine adjustment mode of the listening position.
3 Spectrum analyzer/equalizer sound curve display section
The character information or the file name is displayed on the upper section, and the spectrum analyzer or the graphic equalizer is displayed on the lower section of the display window.
14 DSP indicator display section
Indicates whether the respective DSP function is activated or not.
| Lights up while the graphic equalizer function is activated. Press EQ button to turn on/off the function. | |
| Lights up while the surround function is activated. Press SUR button to turn on/off the function. | |
| Lights up while the DRS function is activated. Press DRS button to turn on/off the function. |
Spectrum Analyzer Function
Changing the Spectrum Analyzer Displays
Adjusting the Sensitivity Level (SENS LEVEL) of the Spectrum Analyzer
Press the +/- button.
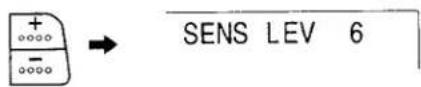
(The "SENS LEV" indication will appear on the display window.)
You can adjust the level of the oscillation in 11 steps. (The larger the figure of the SENS LEV becomes, the higher the sensitivity of the spectrum analyzer is.)
Note
If the "SENS LEV 0" indication appears on the display window, the spectrum analyzer will not be displayed.
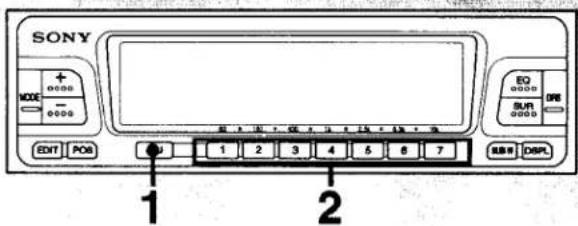
Changing the Display Patterns
1 Press the MODE button.
ANALYZER 1
2 Press either the + or - button, and select the desired display pattern.

You can choose from seven patterns.
Each time you press the button, the display pattern changes as follows:
spectrum analyzer display patterns
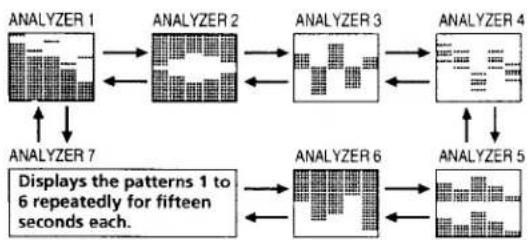
flowchart
graph TD
    A["ANALYZER 1"] --> B["ANALYZER 2"]
    B --> C["ANALYZER 3"]
    C --> D["ANALYZER 4"]
    D --> E["ANALYZER 5"]
    E --> F["ANALYZER 6"]
    F --> G["ANALYZER 7"]
    G --> H["Displays the patterns 1 to 6 repeatedly for fifteen seconds each."]
Changing the Spectrum Analyzer Displays
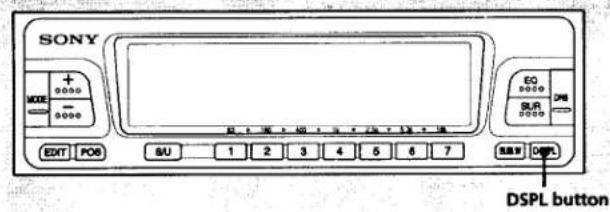
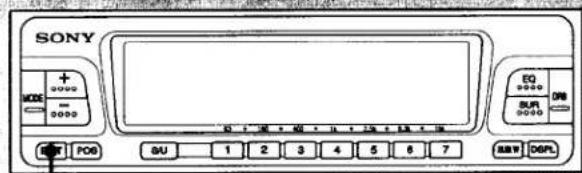
Erasing the Character Indication
Press the DSPL button

The character indication on the upper section of the display window goes out, then the display shows the full spectrum analyzer display.
To return to the display with the character indication, press the DSPL button again.
Changing the Colors of the Illumination
The illumination color of this unit is linked to the illumination color of the main unit. Therefore, use the master unit to select the color of the illumination.
Listening Position Adjustment
POS button
Even in an imperfect listening environment such as inside a car, it is possible to simulate a natural sound field so that a listener can feel as if he is sitting in the middle of the sound field regardless of his position inside the car.
Selecting the Listening Positions
Press the POS button, and select the desired listening position.

Each time you press the POS button, the indication on the display window changes cyclically as follows:
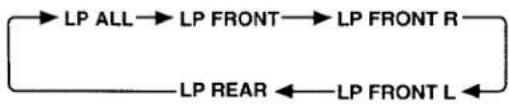
flowchart
graph LR
    A["LP ALL"] --> B["LP FRONT"]
    B --> C["LP FRONT R"]
    C --> D["LP FRONT L"]
    D --> E["LP REAR"]
    E --> D

| Display window | Center of sound field |
| LP ALL | Normal setting (1+2+3) |
| LP FRONT | Front part (1+2) |
| LP FRONT R | Front right (2) |
| LP FRONT L | Front left (1) |
| LP REAR | Rear part (3) |
Listening Position Adjustment
With each listening position, you can set the center of the sound field more specifically.
Setting the Listening Position More Specifically
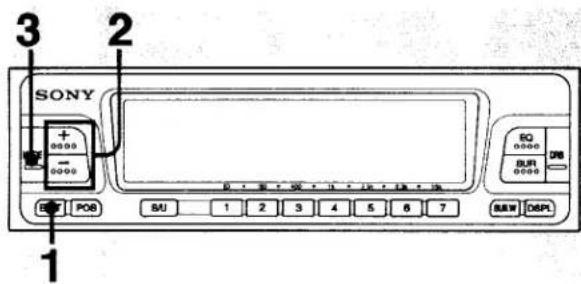
1 Press the POS button for more than two seconds, then the unit enters the fine adjustment mode.

2 Press the MODE button and select the desired position to be adjusted more finely.

| Display window | Contents of adjustment |
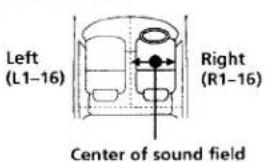
| LP LR. POS 0(Left and right adjustment) | The center of the sound field is adjusted finely to the left or to the right. (16 steps either way.) |
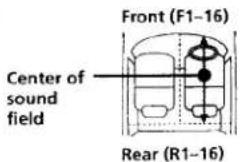
| LP FR. POS 0(Front and rear adjustment) | The center of the sound field is adjusted finely toward the front or toward the rear. (16 steps either way.) |
| LP L ..... III ..... R(Left and right-Balance) | The balance of the left and right speakers' levels is adjusted. (8 steps either way.) |
| LP F ..... III ..... R(Front and rear-Fader) | The balance of the front and rear speakers' levels is adjusted. (8 steps either way.) |
3 Press the + or - button to adjust the level.

4 Press the POS button for more than two seconds to complete the setting.

Note
Set the balance and fader controls on the master unit to the center position. If the setting of the balance or fader control is not set at the center position on the master unit, the sound may not come out of the speakers on both sides. The setting of the sound field may not become possible.
For example, to finely adjust the listening position between left and right with the "LP FRONT R" position, select and adjust the "LP LR. POS 0" indication on the display window.
For example, to finely adjust the listening position between front and rear with the "LP FRONT R" position, select and adjust the "LP FR. POS 0" indication on the display window.
Adjusting the Cutoff Frequency of the Sub Woofer(s)
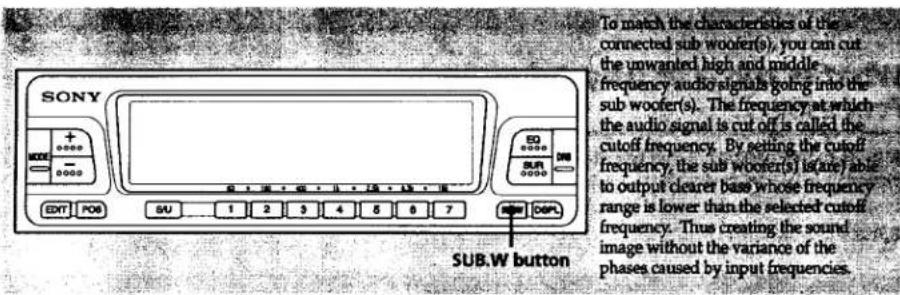
Press the SUB.W button

The current cutoff frequency is displayed.
Each time you press the SUB.W button, the cutoff frequency changes cyclically as follows:

*The factory-set value
DSP File Function
What is the DSP File Function?
You can put some sound effects on a tape, disc or radio sound with this unit.
What is the DSP (Digital Signal Processor)?
A built-in mechanism that converts the analog input sound to digital signals. With the DSP's high-speed computing process, the acoustic characteristics of the sound field can be freely altered while controlling the audio output.
What is the DSP File?
A collective file that includes the settings of the equalizer sound curve, the surround menu and the DRS effect level. There are seven factory-set Sony original DSP files available with this unit. Further seven customized user's DSP files can be registered as well.
DSP File Edit Mode
Set the following selecting / adjusting modes and register them with the user's DSP file menu. (See page 14 onward.)
- File name (See page 15.)
• Equalizer sound curve adjusting mode (See page 16.) - Surround menu selecting mode (See page 18.)
- DRS effect level adjusting mode (See page 20.)
Listening with the DSP File
A selection can be made from your own customized DSP files or the seven Sony original DSP files stored on the preset buttons.
(See the next page about how to register your own customized DSP file.)
1 Press the S/U button to select the desired DSP file from the Sony original DSP file menu (S1–S7) or the user's DSP file menu (U1–U7).
S/U
2 Press the preset number button on which the desired DSP file is stored.

(For example, when you have selected the preset number button 1 with the Sony original DSP file menu.)
Sony original DSP file menu
| S1 Heavy | Powerful sound with boosted bass and treble. |
| S2 Mellow | Soft and balanced sound featuring mid-bass. |
| S3 Vocal | Rhythmical sound featuring vocal. |
| S4 Dynamic | Wide range sound featuring vocal and bass. |
| S5 Disc Jockey | Studio-like sound with the human voice made easier to listen to. |
| S6 Relaxation | Warm and relaxing sound suitable for listening to background music. |
| S7 Loudness | Natural sound suitable to the human ear with bass and treble boosted even in low volume. |
When the TV tuner unit (sold separately) and the TV monitor (sold separately) are connected, the name of the selected DSP file will be displayed on the monitor. However, the name of the file will be displayed with capital letters.
Registering the DSP Files
2
A total of seven customized DSP files (file name, 10.2) equalizer sound curve, surround menu and DRS effect level) can be stored in memory, one each on the preset number buttons 1 to 7.
Basic Procedure of Registering the DSP File
1 Select a program source from tape, CD, MD, AUX, VIDEO, TV or radio with the master unit.
2 Press the EDIT button for more than two seconds to enter the DSP file edit mode.

Each time you press the EDIT button quickly, the indication on the display window changes cyclically as follows:

flowchart
graph LR
    A["File name"] --> B["Equalizer sound curve"]
    C["DRS effect level"] <--_D["Surround menu"]
    B --> C
Then store the file name, equalizer sound curve, surround menu and DRS effect level by following the procedures described on and after the next page.
Note
Do not use the DSP button on the master unit even if it is equipped with one. Use the buttons on this unit to operate.
Registering the File Name
1 Enter the DSP file edit mode by referring to steps 1 to 2 in "Basic Procedure of Registering the DSP File". (See the previous page.)

2 Press the + or - button to select a character or number for naming.

The character can be selected in the following order.


3 Press the MODE button to move the flashing part to the next character.
"U" denotes the user's customized memory.
Repeat steps 2 and 3. Up to ten characters can be input.
4 Press the EDIT button quickly to move on to the next setting procedure, or finish registering the DSP file by referring to page 21.
When you want to input a space, select " _ "(under-bar).
- If you press the MODE button while the furthest right character (10th character) is flashing, the flashing part moves to the furthest left character.
- When the TV tuner unit (sold separately) and the TV monitor (sold separately) are connected, the name of the selected DSP file will be displayed on the monitor. However, the name of the file will be displayed with capital letters.
Registering the DSP Files
You can adjust the tone quality in seven bands.
Adjusting the Sound with the Graphic Equalizer
1 Enter the DSP file edit mode by referring to steps 1 to 2 in "Basic Procedure of Registering the DSP File". (See page 14.)
2 Press the EDIT button quickly to enter the equalizer sound curve setting mode.

3 Press the preset number button (1 to 7) whose frequency you want to adjust.

| Preset number button | Frequency | |
| 1 | 63Hz | To adjust heavy bass |
| 2 | 160Hz | To clarify and boost bass. |
| 3 | 400Hz | To enhance the basic range of musical instruments and vocal. |
| 4 | 1kHz | To enhance vocal. |
| 5 | 2.5kHz | To enhance the brightness of brass instruments and the crispness of percussive instruments. |
| 6 | 6.3kHz | To enhance light touch. |
| 7 | 16kHz | To boost treble. |
Note
Ensure to turn on the equalizer function before adjusting the equalizer sound curve. (Check that the "EQ" indication is displayed on the display window.)
To turn on and off the graphic equalizer function, press the EQ button.
4
Press the + or - button to adjust the level of the selected frequency.

5
Press the EDIT button quickly to move on to the next setting procedure, or finish registering the DSP file by referring to page 21.
When the sound is distorted.
Depending on the frequency you adjust, the sound may become distorted when you increase the level too much. In such a case, press and hold the SEL button and then the preset number button 8 on the master unit. (Press the same buttons again to cancel the effect.) The volume may be lowered, but the distorted sound will be improved. At this time the oscillation of the spectrum analyzer may become lessened but you can adjust the sensitivity of the spectrum analyzer. (See "Adjusting the Sensitivity Level (SENS LEVEL) of the Spectrum Analyzer" on page 6.)
The equalizing level of the frequency can be adjusted in twelve steps either way using the + and - buttons.
Note
If "EQ" indication is not displayed when you finish registering the DSP file, the file will be memorized without the graphic equalizer effect.
Registering the DSP Files
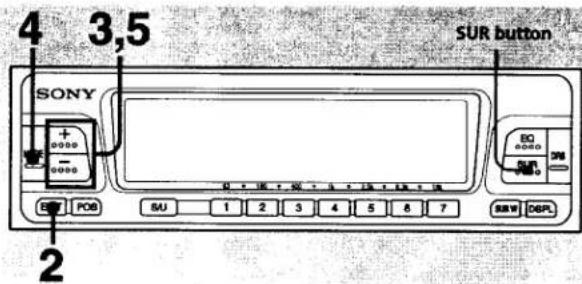
There are seven factory-set surround menus available with this unit. By selecting the surround menu which matches the type of music you play, you can enjoy the enhanced presence and ambience of the music even in an acoustically constricted space such as inside a car.
Selecting the Surround Menu
1 Enter the DSP file edit mode by referring to steps 1 to 2 in "Basic Procedure of Registering the DSP File". (See page 14.)
2 Press the EDIT button quickly to enter the surround menu setting mode.

3 Each time you press the + or - button, the surround menu changes cyclically as follows.

flowchart
graph LR
    A["DISCO"] --> B["THEATER"]
    B --> C["CHURCH"]
    C --> D["HALL"]
    E["STADIUM"] --> F["KARAOKE"]
    F --> G["STUDIO"]
    G --> E
The list of surround menu
| STADIUM | Atmosphere of an outdoor stadium. |
| DISCO | Atmosphere of a disco with hard walls and floor. |
| THEATER | Atmosphere of a movie theater. |
| CHURCH | Atmosphere of a church with a lot of reverberation. |
| HALL | Atmosphere of a concert hall. |
| STUDIO | Atmosphere of a recording studio with little reverberation. |
| KARAOKE | With decreased vocal. |
Note
Ensure to turn on the equalizer function before adjusting the equalizer sound curve. (Check that "SUR" indication is displayed on the display window.)
To turn on and off the surround function, press the SUR button.

natural_image
Low-resolution grayscale image with no discernible text, numbers, or symbols4 Press the MODE button to enter the surround effect level adjustment mode.


5 Press the + or - button to adjust the surround effect level.

If you press the MODE button, the display returns to the surround menu setting mode.
6 Press the EDIT button quickly to move on to the next setting procedure, or finish registering the DSP file by referring to page 21.
You can adjust the effect level in 10 steps. (The larger the figure becomes, the more effective the surround effect becomes.)
Note
If "SUR" indication is not displayed when you finish registering the DSP file, the file will be memorized without the surround effect.
Registering the DSP Files
DRS button The built-in DRS (Dynamic Range Suppressor)
compresses the dynamic range of input signal to increase the average output level without distortion. This function is useful for achieving dynamic sound with small output levels in a noisy environment such as inside a car.
Adjusting the DRS Effect Level
1 Enter the DSP file edit mode by referring to steps 1 to 2 in "Basic Procedure of Registering the DSP File". (See page 14.)
2 Press the EDIT button quickly to enter the DRS effect level adjustment mode.

3 Press the + or - button to adjust the DRS effect level.

The effect level can be adjusted in 10 steps. The larger the level becomes, the larger the compression ratio also becomes, and the difference between loud and low sound becomes lesser.
4 Press the EDIT button quickly to move on to the next setting procedure, or finish registering the DSP file by referring to page 21.
Note
Ensure to turn on the DRS function before adjusting the DRS. (Check that the "DRS" indication is displayed on the display window.)
To turn on and off the DRS function, press the DRS button.
line
| Input Level (dB) | Output Level (dB) | | ---------------- | ----------------- | | 0 | 0 | | 20 | 1 | | 40 | 2 | | 60 | 3 | | 80 | 4 | | 100 | 5 | | 120 | 6 | | 140 | 7 | | 160 | 8 | | 180 | 9 | | 200 | 10 |Note
If the "DRS" indication is not displayed when you finish registering the DSP file, the file will be memorized without the DRS effect.
EDIT button
Preset number button
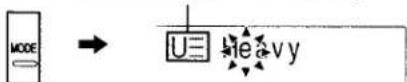
Memorizing the DSP File
When you have completed the settings mentioned in the previous pages, memorize the settings onto the preset number buttons.
Press one of the preset number buttons 1 to 7 on which you want to store the DSP file for more than two seconds.

For example, to memorize a file named "SONY" on preset number button 1.
The set sound field is memorized on the preset number button (U1 - U7), and the registration of the DSP file is completed.
If you do not want to memorize the preset number, press the EDIT button for more than two seconds.

U≡ SONY
The content of the setting will not be memorized.
To memorize the sound field currently played.
Just press one of the preset number buttons 1 to 7 for more than two seconds.
Notes
- The file name, equalizer sound curve, surround menu and DRS effect level are memorized as a set. You cannot memorize only a setting of an individual item such as the file name or equalizer sound curve. If you want to memorize a setting of an individual item only, register all the rest of the setting items with the respective effects turned off.
- You can alter the contents of the Sony original DSP files freely and reregister them as the customized user's DSP files.
- If you try to memorize a file onto a preset number button whose memory is already occupied, the previous memory will be erased.
Registering the DSP File onto Discs
Once you have registered the DSP file onto the discs, you can enjoy the same DSP file every time you play these discs.
Use the master unit to do this operation.
1 Play any disc.
2 Press the FILE or the LIST button on the master unit for more than two seconds to enter the name edit mode.
If "____" indication appears on the main display window of the master unit, put a title onto the disc by referring to "Displaying the Title of Each Disc" in the operating manual of the master unit.
3 Press the FILE or the LIST button on the master unit lightly twice to enter the DSP custom file registering mode.
4 Press the +/- buttons on the master unit to select the desired user's DSP file.
Each time you press the + or - button, the preset number and file name appear on the display window of this unit as follows (only the file name will appear on the window of the master unit):

→ …U1→U2→U3→U4→U5→U6→U7→NO ENTRY→U1…

→ ...U1→NO ENTRY→U7→U6→U5→U4→U3→U2→U1...
5 Press the FILE or the LIST button on the master unit for more than two seconds.
Notes
- Before registering the DSP custom file, make sure that you have put the titles onto the discs. (Refer to the operation instructions manual of the master unit.)
- You cannot use this function unless a CD changer equipped with the custom file function is connected to the master unit.
- The buttons on this unit do not function while you are registering the DSP custom file.
- DSP Custom File Function (With the Optional CD Changer(s) Connected)
Playing with the DSP Custom File Mode
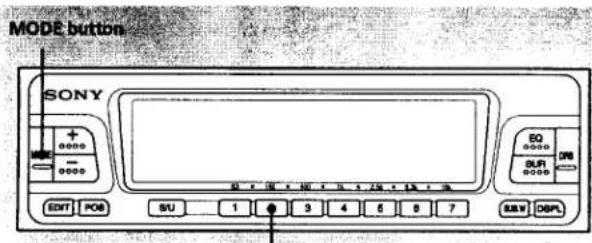
While playing a disc, press and hold the MODE button and then press the preset number button 1.

To return to the normal CD play mode, press and hold the MODE button and then the preset number button 1 again.
To change the registered DSP file
Select the disc whose preset number you wish to alter and repeat steps 2 to 5 on the previous page.
To erase the registered DSP file
Select "NO ENTRY" in step 4 on the previous page.
Note
Do not use the DSP button on the master unit even if it is equipped with one. Use the buttons on this unit to operate.
Listening with the Same DSP File Mode Every Time - LSM (Last Sound Memory) Function
Preset number button 2
What is the LSM (last sound memory) function?
This function memorizes the selected DSP file of each program source at all times. With this function, you can always listen to the same program source with the same DSP file even after changing the program source or turning the unit on afresh.
Playing with the LSM Function
Press and hold the MODE button and then press the preset number button 2.

If you wish to cancel the LSM function, press and hold the MODE button and then press the preset number button 2 again.
For example, you have listened to the sources in the following order; a disc in "S2" mode then a tape in "U3" mode and then the radio in "U2" mode. If you then listen to a disc again, the DSP file number changes to "S2" automatically. If you then listen to a tape after that, the DSP file number changes to "U3".
Notes
- While the LSM function is activated, if you play discs in the DSP custom file mode (page 22), the discs will be played in the respective user's DSP files automatically.
- The LSM button on the master unit does not function even if it is equipped with one. Use the buttons on this unit to operate the LSM function.
Troubleshooting Guide
The following check will assist you in the correction of most problems which you may encounter with your unit.
Before going through the check list below, refer back to the connection and operation procedures.
| Problem | Cause/Solution |
| The unit does not turn on | The fuse is blown Change the blown fuse with a new one. |
| The BUS cable is disconnected. The BUS cable is not connected properly. Connect it properly. (Refer to the Installation/ Connections manual of this unit.) | |
| The connected master unit is not turned on. Turn on the master unit. | |
| No sound | The RCA pin cords are disconnected. The RCA pin cords are not connected properly. Connect them properly. (Refer to the Installation/connections manual.) |
| LINE-OUT/IN SELECT switch on the master unit is set to “1” position. When you connect this unit to the master unit, set the LINE-OUT/IN SELECT switch on the master unit to “2” position. (Refer to the Installation/Connections manual of the master unit.) | |
| The sound output is too much. | The LINE-OUT/LINE-IN (EQ-IN) on the master unit is set to the LINE-OUT position. When connecting this unit to the master unit, set the LINE-OUT/LINE-IN (EQ-IN) on the master unit to the LINE-IN position. (Refer to the Installation/Connections manual of the master unit.) |
| No DSP effect | The DSP function is not activated. The effect level is not high enough. Use the EQ, SUR and DRS buttons to turn the respective functions on. Adjust the effect levels with the respective DSP files. |
| A user's DSP file number which has not been memorized is selected. Select one of the Sony original preset numbers or register the desired DSP file. (See the main text of this manual.) |
Continued to the next page.
Troubleshooting Guide
| Problem | Cause/Solution |
| The listening positions cannot be selected. | The setting of the BALANCE or the FADER control on the master unit is unbalanced. → Set the BALANCE and FADER controls on the main unit to the center position. |
| The DSP custom file cannot be set. | The DSP custom file can only be set when a custom-file compatible CD changer is connected to the main unit. |
| The sound is distorted when the graphic equalizer function is activated. | The sound is boosted too much with the equalizer function.→ Press and hold the SEL button and then press the preset number button 8 on the master unit. (Press these buttons again to cancel the effect.) If the sound is still distorted, lower the frequency band whose level has been set too high. (See pages 16 and 17.) |
| The oscillation of the spectrum analyzer is too much. | The sensitivity of the spectrum analyzer is set too high. → Lower the level. (See page 6.) |
| The output level of the source is too high. → Press and hold the SEL button and then press the preset number button 8 on the main unit. (Press these buttons again to cancel the effect.) | |
| The spectrum analyzer does not oscillate. | The sensitivity of the spectrum analyzer is set at "0" level. → Increase the level. (See page 6.) |
If the above mentioned solutions do not help to improve the situation, consult your nearest Sony dealer.
Specifications
| Center frequencies | 63 Hz, 160 Hz, 400 Hz, 1 kHz, 2.5 kHz, 6.3 kHz, 16 kHz | Current drain Dimensions | (Negative ground) 0.6 A Approx. 178 × 50 × 170 mm ( 7^1/_8 × 2 × 6^3/_4. in.) (w/h/d) not incl. projecting parts and controls |
| Boost/cut range | ±12 dB | ||
| Sub woofer LPF | Cutoff frequencies 78 Hz, 99 Hz, 125 Hz, 157kHz, 198kHz | Mounting dimensions | |
| Slope -48 dB/oct | Approx. 178 × 50 × 153 mm ( 7^1/_8 × 2 × 6^1/_8. in.) (w/h/d) not incl. projecting parts and controls | ||
| Frequency response | |||
| 20Hz - 20kHz( + 0 \ - 1 ) dB | |||
| Signal to noise ratio | Mass | Approx. 0.7 kg( 1 lb · 9oz) | |
| more than 85 dB | Supplied accessories | ||
| Distortion | 0.008% | Parts for installation and connections (1) | |
| Gain | 0 dB | ||
| Input | Line input | Optional accessories | |
| RCA pin jacks | BUS cable (RCA pin cord | ||
| Output | Line output | equipped) RC-61 (1m), RC-62(2m) | |
| RCA pin jacks | |||
| Power supply | 12 V DC car battery | RCA pin cord RC-63 (1 m), RC-64 (2 m), RC-65 (5 m) | |
Design and specifications subject to change without notice.