
STR-DE835 - Empfänger SONY - Kostenlose Bedienungsanleitung
Finden Sie kostenlos die Bedienungsanleitung des Geräts STR-DE835 SONY als PDF.


Benutzerfragen zu STR-DE835 SONY
0 Frage zu diesem Gerät. Beantworten Sie die, die Sie kennen, oder stellen Sie Ihre eigene.
Eine neue Frage zu diesem Gerät stellen
Laden Sie die Anleitung für Ihr Empfänger kostenlos im PDF-Format! Finden Sie Ihr Handbuch STR-DE835 - SONY und nehmen Sie Ihr elektronisches Gerät wieder in die Hand. Auf dieser Seite sind alle Dokumente veröffentlicht, die für die Verwendung Ihres Geräts notwendig sind. STR-DE835 von der Marke SONY.
BEDIENUNGSANLEITUNG STR-DE835 SONY
SONY®
3-866-969-12(1)
FM Stereo FM-AM Receiver
Operating Instructions
STR-DE935
STR-DE835
STR-SE591
© 1999 by Sony Corporation
WARNING
To prevent fire or shock hazard, do not expose the unit to rain or moisture.
text_image
AIR OF ELECTRIC SHOCK SO NOT OPEN CAUTION TO REDUCE THE RISK OF ELECTRIC SHOCK. DO NOT REMOVE COVER FOR SHOCK RECEIVER RESPONSIBLE PARTS INSIDE UNDER SERVICE TO QUALIFIED SERVICE PERSONNEL
This symbol is intended to alert the user to the presence of uninsulated "dangerous voltage" within the product's enclosure that may be of sufficient magnitude to constitute a risk of electric shock to persons.

This symbol is intended to alert the user to the presence of important operating and maintenance (servicing) instructions in the literature accompanying the appliance.
INFORMATION
This equipment has been tested and found to comply with the limits for a Class B digital device, pursuant to Part 15 of the FCC Rules.
These limits are designed to provide reasonable protection against harmful interference in a residential installation. This equipment generates, uses, and can radiate radio frequency energy and, if not installed and used in accordance with the instructions, may cause harmful interference to radio communications. However, there is no guarantee that interference will not occur in a particular installation. If this equipment does cause harmful interference to radio or television reception, which can be determined by turning the equipment off and on, the user is encouraged to try to correct the interference by one or more of the following measures:
- Reorient or relocate the receiving antenna.
- Increase the separation between the equipment and receiver.
- Connect the equipment into an outlet on a circuit different from that to which the receiver is connected.
- Consult the dealer or an experienced radio/TV technician for help.
CAUTION
You are cautioned that any changes or modification not expressly approved in this manual could void your authority to operate this equipment.
Note to CATV system installer:
This reminder is provided to call CATV system installer's attention to Article 820-40 of the NEC that provides guidelines for proper grounding and, in particular, specifies that the cable ground shall be connected to the grounding system of the building, as close to the point of cable entry as practical.
Owner's Record
The model and serial numbers are located on the rear of the unit. Record the serial number in the space provided below. Refer to them whenever you call upon your Sony dealer regarding this product.
Model No. STR-DE935/DE835/SE591 Serial No. ____
For the customers in Canada CAUTION
TO PREVENT ELECTRIC SHOCK, DO NOT USE THIS POLARIZED AC PLUG WITH AN EXTENSION CORD, RECEPTACLE OR OTHER OUTLET UNLESS THE BLADES CAN BE FULLY INSERTED TO PREVENT BLADE EXPOSURE.
Precautions
On safety
Should any solid object or liquid fall into the cabinet, unplug the receiver and have it checked by qualified personnel before operating it any further.
On power sources
- Before operating the receiver, check that the operating voltage is identical with your local power supply. The operating voltage is indicated on the nameplate at the rear of the receiver.
- The unit is not disconnected from the AC power source (mains) as long as it is connected to the wall outlet, even if the unit itself has been turned off.
- If you are not going to use the receiver for a long time, be sure to disconnect the receiver from the wall outlet. To disconnect the AC power cord, grasp the plug itself; never pull the cord.
• One blade of the plug is wider than the other for the purpose of safety and will fit into the wall outlet only one way. If you are unable to insert the plug fully into the outlet, contact your dealer. - AC power cord must be changed only at the qualified service shop.
On placement
- Place the receiver in a location with adequate ventilation to prevent heat buildup and prolong the life of the receiver.
- Do not place the receiver near heat sources, or in a place subject to direct sunlight, excessive dust or mechanical shock.
- Do not place anything on top of the cabinet that might block the ventilation holes and cause malfunctions.
On operation
Before connecting other components, be sure to turn off and unplug the receiver.
On cleaning
Clean the cabinet, panel and controls with a soft cloth slightly moistened with a mild detergent solution. Do not use any type of abrasive pad, scouring powder or solvent such as alcohol or benzine.
If you have any question or problem concerning your receiver, please consult your nearest Sony dealer.
About This Manual
The instructions in this manual are for models STR-DE935, STR-DE835 and STR-SE591. Check your model number by looking at the upper right corner of the front panel. In this manual, the STR-DE935 is used for illustration purposes unless stated otherwise. Any difference in operation is clearly indicated in the text, for example, "STR-DE935 only."
Type of differences
| Feature\Model | DE935 | DE835 | SE591 |
| 5 audio/video inputs | ● | ||
| 4 audio/video inputs | ● | ● |
Conventions
- The instructions in this manual describe the controls on the receiver. You can also use the controls on the supplied remote if they have the same or similar names as those on the receiver. For details on the use of your remote, refer to the separate operating instructions supplied with the remote.
- The following icon is used in this manual: Indicates hints and tips for making the task easier.
This receiver incorporates Dolby* Digital and Pro Logic Surround and the DTS** Digital Surround System.
* Manufactured under license from Dolby Laboratories.
"Dolby", "AC-3", "Pro Logic" and the double-D symbol ☐ are trademarks of Dolby Laboratories.
**Manufactured under license from Digital Theater Systems, Inc. US Pat. No. 5,451,942 and other worldwide patents issued and pending. "DTS" and "DTS Digital Surround" are trademarks of Digital Theater Systems, Inc. © 1996 Digital Theater Systems, Inc. All rights reserved.
Demonstration Mode
The demonstration will activate the first time you turn on the power. When the demonstration starts, the following message appears in the display twice:
"Now Demonstration Mode!! If you finish demonstration, please press POWER KEY while this message appears in the display. Thank you!"
To cancel the demonstration
Press I/O to turn the receiver off during the previous message. The next time you turn the receiver on, the demonstration will not appear.
To view the demonstration
Hold down SET UP and press I/① to turn on the power.
Note
Running the demonstration will clear the receiver's memory. For details on what will be cleared, see "Clearing the receiver's memory" on page 18.
TABLE OF CONTENTS
Hooking Up the Components 4
Unpacking 4
Antenna Hookups 5
Audio Component Hookups 6
Video Component Hookups 8
Digital Component Hookups 9
5.1CH Input Hookups 11
Other Hookups 12
Hooking Up and Setting Up the Speaker System 15
Speaker System Hookup 16
Performing Initial Setup Operations 18
Multi Channel Surround Setup 19
Before You Use Your Receiver 23
Location of Parts and Basic Operations 26
Front Panel Parts Description 26
Enjoying Surround Sound 31
Selecting a Sound Field 32
Understanding the Multi-Channel Surround Displays 36
Customizing Sound Fields 38
Receiving Broadcasts 43
Direct Tuning 44
Automatic Tuning 45
Preset Tuning 45
Other Operations 47
Naming Preset Stations and Program Sources 48
Recording 48
Using the Sleep Timer 49
Adjustments Using the SET UP Button 50
Additional Information 51
Troubleshooting 51
Specifications 53
Glossary 55
Tables of Settings Using SUR, LEVEL, EQ, and SET UP buttons 56
Index 58
Hooking Up
EJBAT
the
m
Components
2017年
This chapter describes how to connect various audio and video components to the receiver. Be sure to read the sections for the components you have before you actually connect them to the receiver.
cied by 2169 to no
- bruo2 baoomu2 privoln
12.
Unpacking
Check that you received the following items with the remote:
• FM wire antenna (1)
• AM loop antenna (1)
• Audio/video/control S connecting cord (1)
• Control S connecting cord (1)
• FM antenna adapter (1)
STR-DE935 only
- Remote commander RM-LJ302 (remote) (1)
• R6 (size-AA) alkaline batteries (3)
STR-DE835/SE591 only
- Remote commander RM-PP402 (remote) (1)
• R6 (size-AA) batteries (2)
Inserting batteries into the remote
Insert R6 (size-AA) batteries with the + and - properly oriented in the battery compartment. When using the remote, point it at the remote sensor ■ on the receiver. For details, refer to the operating instructions supplied with your remote.

When to replace batteries
Under normal conditions, the batteries should last for about 3 months (STR-DE935 only) or 6 months (STR-DE835/SE591 only). When the remote no longer operates the receiver, replace all batteries with new ones.
Notes
- Do not leave the remote in an extremely hot or humid place.
- Do not use a new battery with an old one.
- Do not expose the remote sensor to direct sunlight or lighting apparatuses. Doing so may cause a malfunction.
- If you don't use the remote for an extended period of time, remove the batteries to avoid possible damage from battery leakage and corrosion.
- This remote is designed for use with alkaline batteries only. not use a combination of different battery types (STR-DE935 only).
Before you get started
- Turn off the power to all components before making any connections.
- Do not connect the AC power cords until all of the connections are completed.
- Be sure to make connections firmly to avoid hum and noise.
- When connecting an audio/video cord, be sure to match the color-coded pins to the appropriate jacks of the components: yellow (video) to yellow; white (left) to white; and red (right, audio) to red.
Antenna Hookups
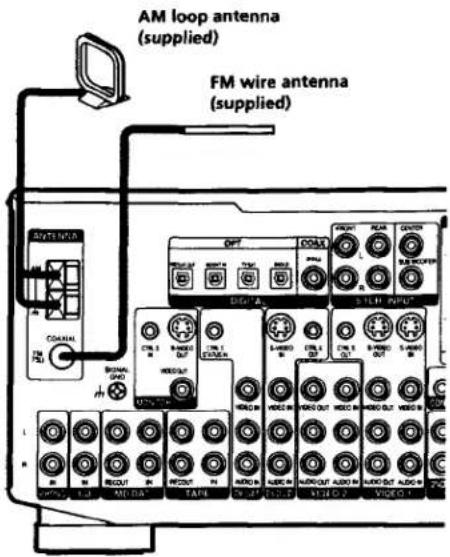
text_image
AM loop antenna (supplied) FM wire antenna (supplied)Terminals for connecting the anténnas
| Connect the | To the |
| AM loop antenna | AM terminals |
| FM wire antenna | FM 75Ω COAXIAL terminal |
Assembling the supplied FM antenna
The supplied FM wire antenna must be connected to the supplied FM antenna adaptor.
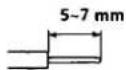
1 Strip insulation off one end of the wire antenna.
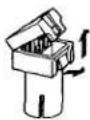
2 Open the antenna adaptor.
Pull up on the tab and pull the back away.
3 Insert wire antenna into adaptor and wedge stripped end between the forks.
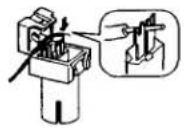
4 Close the adaptor.
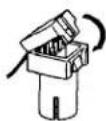
5 Attach the adaptor to the FM antenna terminal.
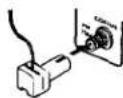
Notes on antenna hookups
• To prevent noise pickup, keep the AM loop antenna away from the receiver and other components.
- Be sure to fully extend the FM wire antenna.
• After connecting the FM wire antenna, keep it as horizontal as possible.

If you have poor FM reception
Use a 75-ohm coaxial cable (not supplied) to connect the receiver to an outdoor FM antenna as shown below.
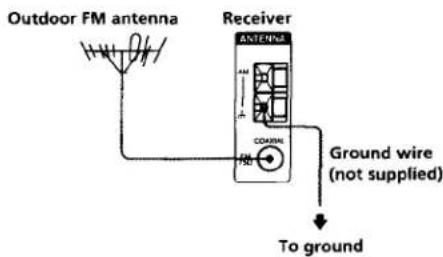
text_image
Outdoor FM antenna Receiver ANTENNA Ground wire (not supplied) To groundImportant
If you connect the receiver to an outdoor antenna, ground it against lightning. To prevent a gas explosion, do not connect the ground wire to a gas pipe.
Note
Do not use the SIGNAL GND h terminal for grounding the receiver.
Audio Component Hookups
STR-DE935
text_image
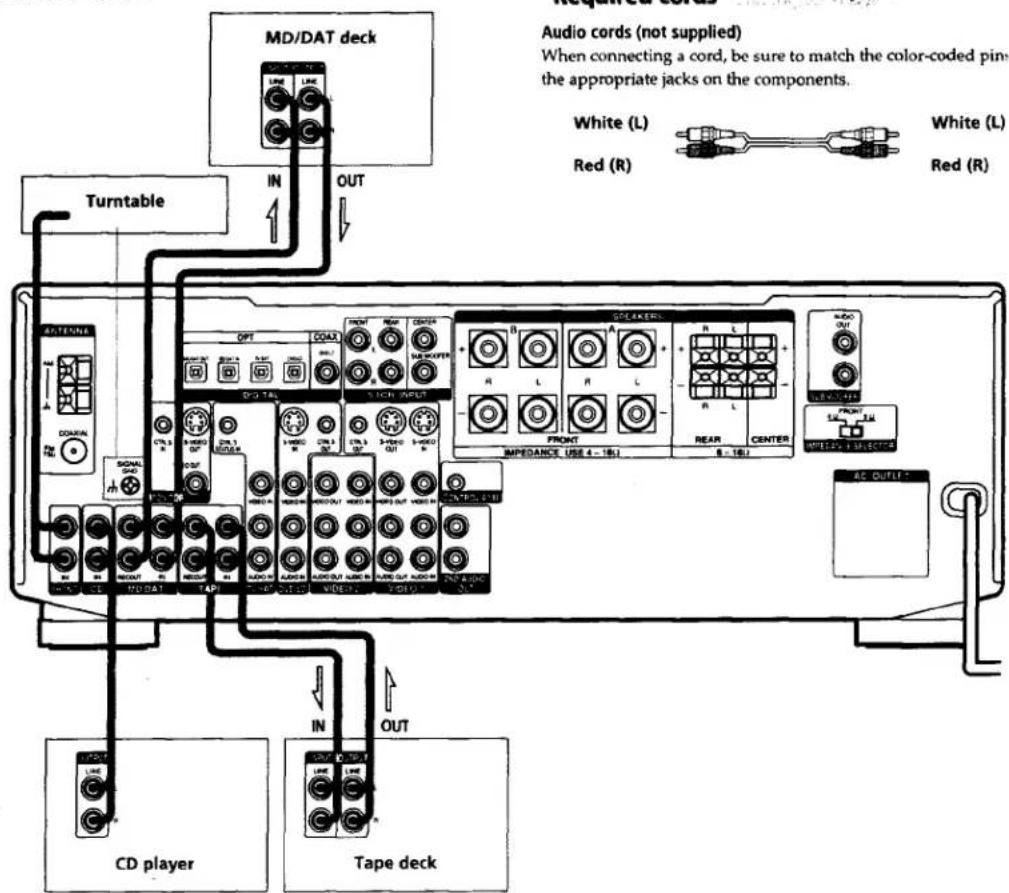
MD/DAT deck Turntable Audio cords (not supplied) When connecting a cord, be sure to match the color-coded pins the appropriate jacks on the components. White (L) Red (R) White (L) Red (R) CD player Tape deckJacks for connecting audio components
| Connect a | To the |
| Turntable | PHONO jacks |
| CD player | CD jacks |
| Tape deck | TAPE jacks |
| MD deck or DAT deck | MD/DAT jacks |
Note on audio component hookups
If your turntable has a ground wire, connect it to the 1m SIGNAL GND terminal on the receiver.
STR-DE835/SE591
text_image
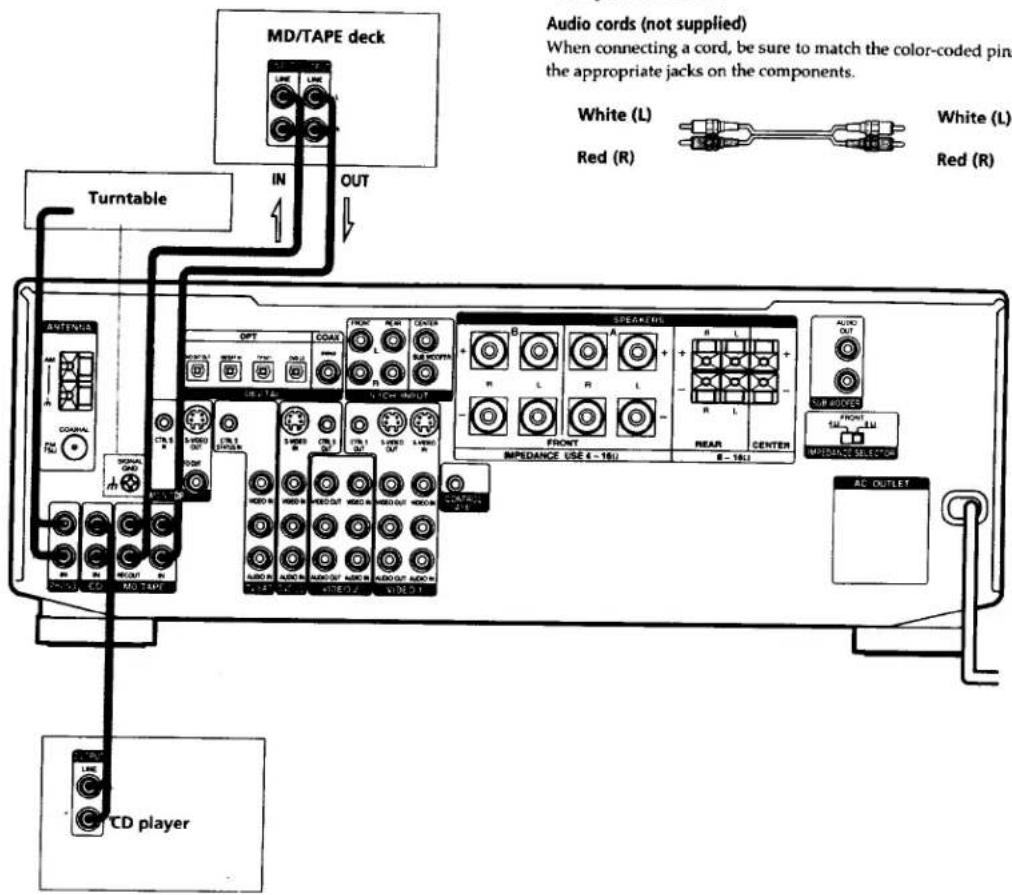
MD/TAPE deck Turntable Audio cords (not supplied) When connecting a cord, be sure to match the color-coded pins the appropriate jacks on the components. White (L) Red (R) White (L) Red (R) TRANSMI SPEAKERS AVIO OUT CONCER UP ROCVES FRONT IMPEDANCE USE 6 - 15U REAR CENTER AC-OUTLET CD playerRequired cords
Audio cords (not supplied)
When connecting a cord, be sure to match the color-coded pins to the appropriate jacks on the components.
White (L)
Red (R)
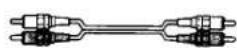
White (L)
Red (R)
Jacks for connecting audio components
| Connect a | To the |
| Turntable | PHONO jacks |
| CD player | CD jacks |
| MD deck or Tape deck | MD/TAPE jacks |
Note on audio component hookups
If your turntable has a ground wire, connect it to the 1m SIGNAL GND terminal on the receiver.
Video Component Hookups
Hooking up the Components
text_image
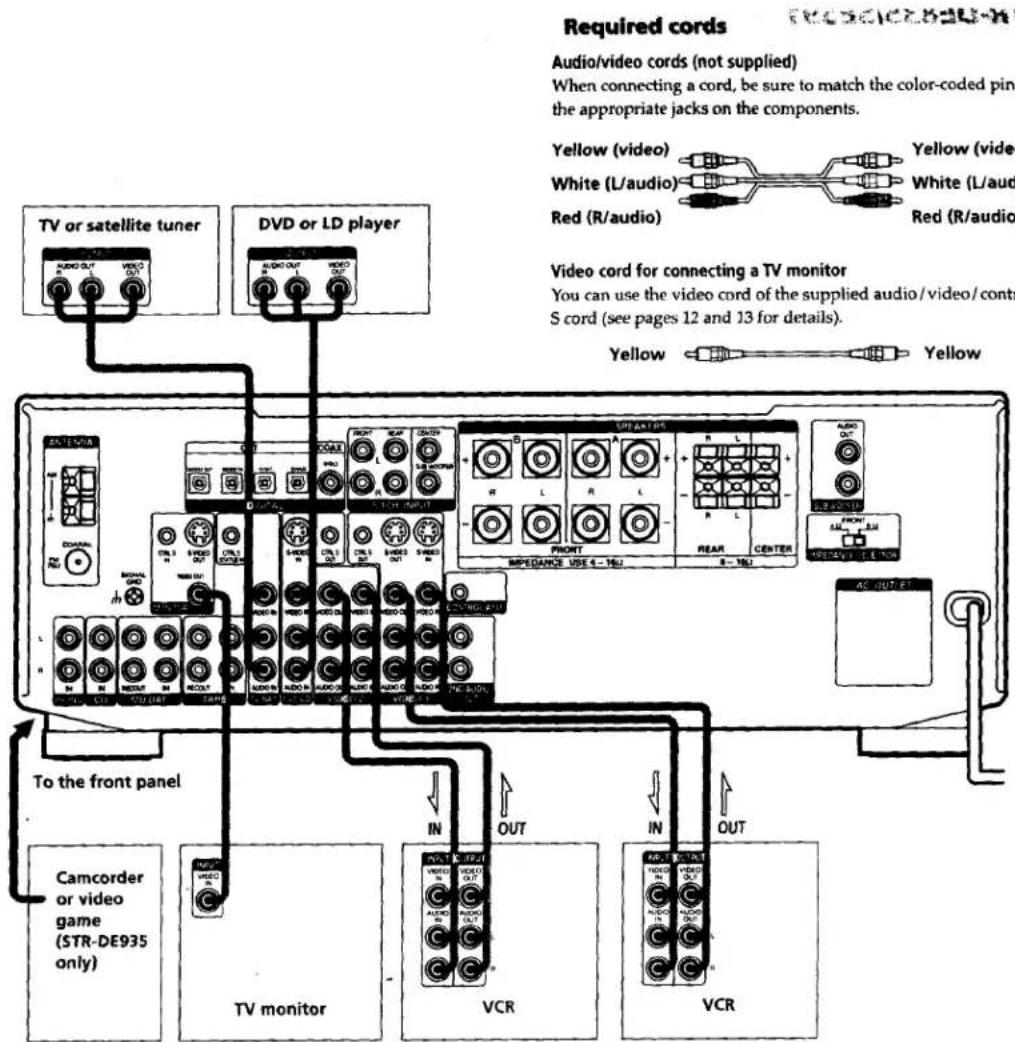
Required cords Audio/video cords (not supplied) When connecting a cord, be sure to match the color-coded pins the appropriate jacks on the components. Yellow (video) White (L/audio) Red (R/audio) Yellow (video) White (L/audio) Red (R/audio) Video cord for connecting a TV monitor You can use the video cord of the supplied audio/video/contr S cord (see pages 12 and 13 for details). To the front panel Camcorder or video game (STR-DE935 only) DVD or LD player TV or satellite tuner VCR VCR TV monitor IN OUT IN OUTJacks for connecting video components
| Connect a | To the |
| TV or satellite tuner | TV/SAT jacks |
| VCR | VIDEO 1 jacks |
| Additional VCR | VIDEO 2 jacks |
| DVD or LD player | DVD/LD jacks |
| TV monitor | MONITOR VIDEO OUT jack |
| Camcorder or video game | VIDEO 3 INPUT jacks on the front panel (STR-DE935 only) |
Note on video component hookups
You can connect your TV's audio output jacks to the TV/SAT AUDIO IN jacks on the receiver and apply sound effects to the audio from the TV. In this case, do not connect the TV's video output jack to the TV/SAT VIDEO IN jack on the receiver. If you are connecting a separate TV tuner (or satellite tuner), connect both the audio and video output jacks to the receiver as shown above.

When using the S-video jacks instead of the video jacks
Your monitor must also be connected via an S-video jack. S-video signals are on a separate bus from the video signals and will not be output through the video jacks.
Digital Component Hookups
Hooking Up the Components
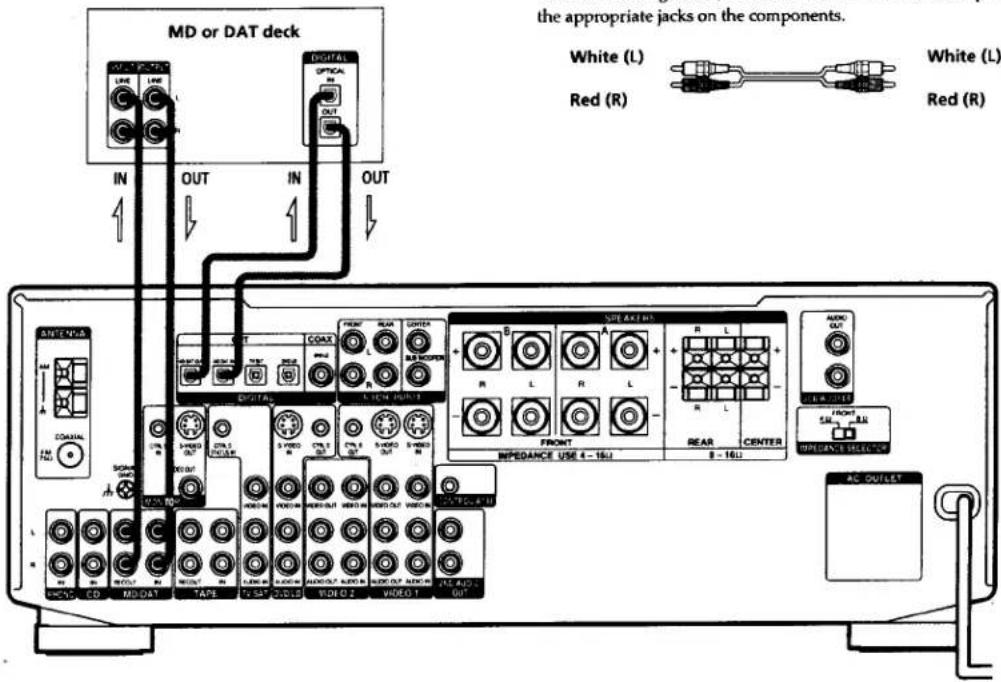
Connect the digital output jacks of your MD or DAT deck to the receiver's digital input jack and connect the digital input jacks of your MD or DAT deck to the receiver's digital output jack. These connections allow you to make digital recordings of a CDs played back through your DVD (or LD player) and satellite broadcasts.
Required cords
Optical digital cords (not supplied)

Audio cords (not supplied)
When connecting a cord, be sure to match the color-coded pins t the appropriate jacks on the components.

text_image
MD or DAT deck IN OUT IN OUT the appropriate jacks on the components. White (L) Red (R) White (L) Red (R) ANTENOWA COALAL DC SCAR WIRE TARE TAPE TV SAT COLD WIDE 2 VIDEO 1 OUT SWE AKTIWI FRONT REAR CENTER MRS COOPER R L R L R L R L R L R L R L R L R L R L R L R L R L R L R L R L R L R L R L R L R L R L R L R L R L R L R L R L R L R L R L R L R L R LNotes
- Please note that you cannot make a digital recording of a digital multi channel surround signal.
- To make a digital recording from your CD player, connect the CD player's digital output directly to the digital input on your MD or DA deck. Refer to the instructions supplied with your CD player and MD or DAT deck for details.
• The DVD/LD OPT and COAX jacks are compatible with 96 kHz, 48 kHz, 44.1 kHz and 32 kHz sampling frequencies. - The TV/SAT OPT jack and MD/DAT IN and MD/DAT OUT OPT jacks are compatible with 48 kHz, 44.1 kHz, and 32 kHz sampling frequencies.
- It is not possible to record analog signals to TAPE and VIDEO with only digital connections. To record analog signals, make analog connections. To record digital signals, make digital connections.
- Input signals with 96 kHz sampling frequencies to the DVD/LD OPT or COAX jacks. Using other jacks may result in intermittent sound
5.1CH Input Hookups
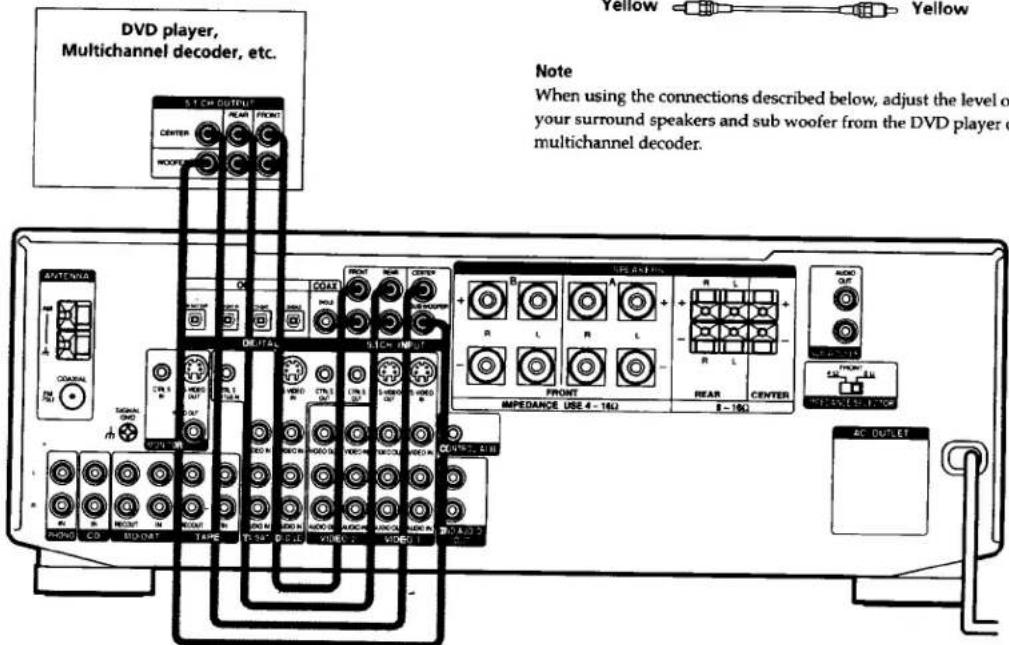
Although this receiver incorporates a multi channel decoder, it is also equipped with 5.1CH INPUT jacks. These connections allow you to enjoy multichannel software encoded in formats other than Dolby Digital (AC-3) and DTS. If your DVD player is equipped with 5.1CH OUTPUT jacks, you can connect them directly to this unit to enjoy the sound of the DVD player's multi channel decoder. Alternatively, the 5.1CH INPUT jacks can be used to connect an external multi channel decoder. To fully enjoy multi channel surround sound, you will need five speakers (two front speakers, two rear speakers, and a center speaker) and a sub woofer. Refer to the instruction manual supplied with your DVD player, multi channel decoder, etc., for details on the 5.1 channel input hookups.
Required cords
Audio cords (not supplied)
Two for the 5.1CH INPUT FRONT and REAR jacks
White (L)
Red (R)
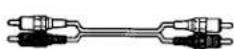
White (L)
Red (R)
Monaural audio cords (not supplied)
Two for the 5.1CH INPUT CENTER and SUB WOOFER jacks
Black

Black
Video cord (not supplied)
One for the DVD/LD VIDEO IN jacks (etc.)
Yellow

Yellow
text_image
DVD player, Multichannel decoder, etc. Note When using the connections described below, adjust the level of your surround speakers and sub woofer from the DVD player o multichannel decoder. A1 C#0 OUTPUT REAR FRONT CENTER WOOPER S 1 C#0 OUTPUT C O COAK R L R L R L R L R L R L R L R L R L R L R L R L R L R L R L R L R L R L R L R L R L R L R L R L R L R M E P E D A N T U S U S U S U S U S U S U S U S U S U S U S U S U S U S U S U S U S U S U S U S U S U S U S U S U S U S U S U S U S U S U S U S U S U S U S U S U S U S U S U S U S U S U S U S U S U S U S U S U S U S U.S AC OUTLETNote
When using the connections described below, adjust the level of your surround speakers and sub woofer from the DVD player or multichannel decoder.
Example of a DVD player hookup using the 5.1 INPUT jacks
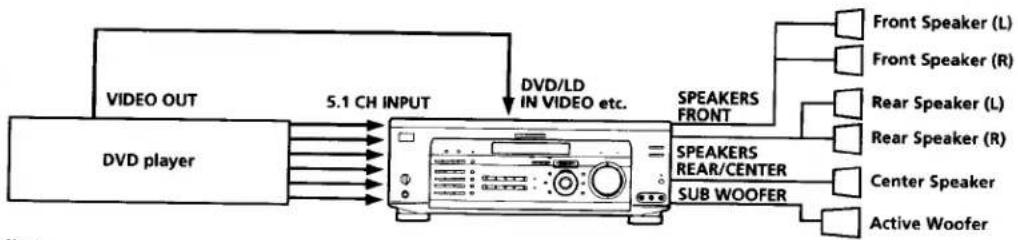
flowchart
graph LR
    A["VIDEO OUT"] --> B["DVD player"]
    B --> C["5.1 CH INPUT"]
    C --> D["DVD/LD IN VIDEO etc."]
    D --> E["SPEAKERS FRONT"]
    E --> F["FRONT Speaker (L)"]
    E --> G["FRONT Speaker (R)"]
    E --> H["Rear Speaker (L)"]
    E --> I["Rear Speaker (R)"]
    E --> J["Center Speaker"]
    E --> K["Active Woofer"]
    B --> L["SPEAKERS REAR/CENTER"]
    B --> M["SUB WOOFER"]
Note
See page 15 for details on speaker system hookup.
Other Hookups
Required cords
Audio cords (not supplied)
When connecting a cord, be sure to match the color-coded pins to the appropriate jacks on the components.
White (L)
Red (R)

White (L)
Red (R)
Audio/video/control S connecting cord (1)
Yellow (video)
White (L/audio)
Red (R/audio)
Black (control 5)
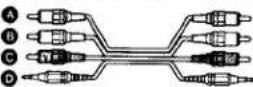
Yellow (video) A
White (L/audio) B
Red (R/audio)
Black (control S)
Control S connecting cord (1)
Black

Black E
text_image
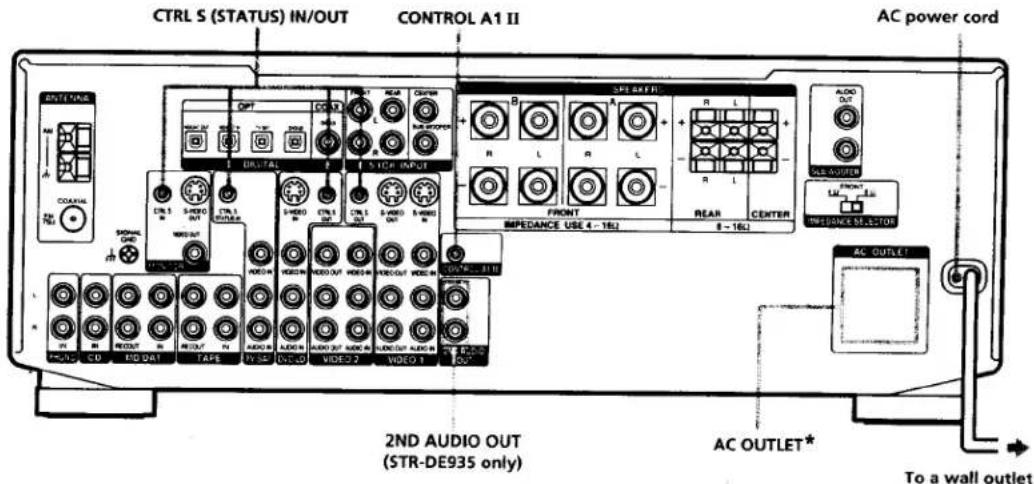
CTRL S (STATUS) IN/OUT CONTROL A1 II AC power cord OUTPUTING OFF CONTROL A1 II OUTPUTING ON/OFF ON/OFF ON/OFF ON/OFF ON/OFF ON/OFF ON/OFF ON/OFF ON/OFF ON/OFF ON/OFF ON/OFF ON/OFF ON/OFF ON/OFF ON/OFF ON/OFF ON/OFF ON/OFF ON/OFF ON/OFF ON/OFF ON/OFF ON/OFF ON/OFF ON/OFO ON/OFO ON/OFO ON/OFO ON/OFO ON/OFO ON/OFO ON/OFO ON/OFO ON/OFO ON/OFO ON/OFO ON/OFO ON/OFO ON/OFO ON/OFO ON/OFO ON/OFO ON/OFO ON/OFO ON/OFO ON/OFO ON/OFO ON/OFO ON/OFO ON/OFF ON/OFF ON/OFF ON/OFF ON/OFF ON/OFF ON/OFF ON/OFF ON/OFF ON/OFF ON/OFF ON/OFF ON/OFF ON/OFF ON/OFF ON/OFF ON/OFF ON/OFF ON/OFF ON/OFF ON/OFF ON/OFF ON/OFF ON/OFF ON/OF ON/OF ON/OF ON/OF ON/OF ON/OF ON/OF ON/OF ON/OF ON/OF ON/OF ON/OF ON/OF ON/OF ON/OF ON/OF ON/OF ON/OF ON/OF ON/OF ON/OF ON/OF ON/OF ON/OF ON/OF ON/OFO ON/OFO ON/OFO ON/OFO ON/OFO ON/OFO ON/OFO ON/OFO ON/OFO ON/OFO ON/OFO ON/OFO ON/COLO 20000000000000000000000000000000000000000000000000000000000000000000000000000000000000000000000000000- 2ND AUDIO OUT (STR-DE935 only) AC OUTLET* To a wall outlet* The configuration, shape, and number of AC outlets on the rear panel varies according to the model and country to which the receiver is shipped.
Example of a sub room hookup using the 2ND AUDIO OUT jacks (STR-DE935 only)
You can use the 2ND AUDIO OUT jacks to output audio signals to a stereo amplifier located in another room. Press 2ND AUDIO (8 on page 28) repeatedly to switch the audio signals output to the sub room.

flowchart
graph LR
    A["Main room"] -->|AUDIO OUT| B["Sub room"]
    B -->|AUDIO IN| C["Stereo amplifier"]
    C -->|SPEAKERS| D["R"]
    C -->|SPEAKERS| E["L"]
    style A fill:#f9f,stroke:#333
    style B fill:#ccf,stroke:#333
    style C fill:#cfc,stroke:#333
    style D fill:#fcc,stroke:#333
    style E fill:#fcc,stroke:#333
Note
This function is not available when 5.1CH INPUT is selected.
S-LINK CONTROL S hookup
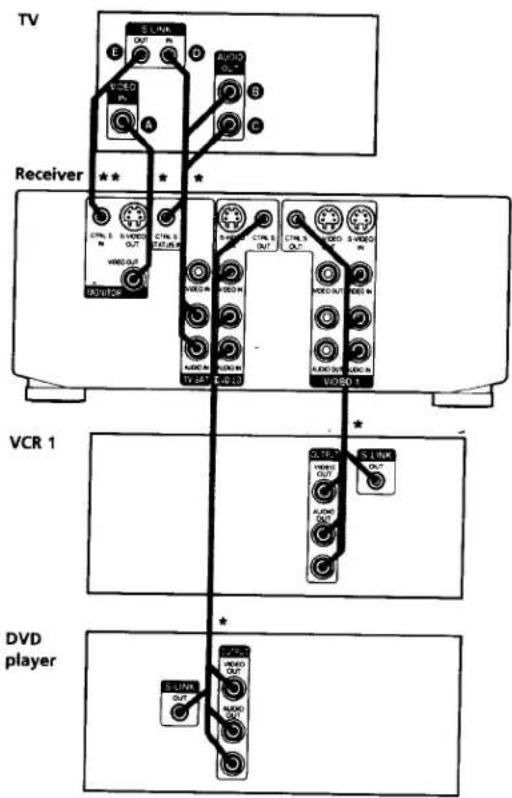
If you have a S-LINK CONTROL S-compatible Sony TV, satellite tuner, monitor, DVD player or VCR, use an audio/video/control S connecting cord (supplied) or a control S connecting cord (supplied) to connect the CTRL S (STATUS) IN (for TV, satellite tuner, or monitor) or OUT (for VCR, etc.) jack on the receiver to the appropriate S-LINK jack on the respective component. Refer to the operating instructions supplied with your TV, satellite tuner, monitor, VCR, etc., for details.
The following illustration is an example of S-LINK CONTROL S hookups between the receiver, a TV, a VCR, and a DVD player. When your TV is connected to the receiver as shown below, the TV input mode will change to video input whenever you turn on the receiver. When you connect the receiver as shown below, input mode of the receiver changes to VIDEO 1 or DVD/LD whenever you play your VCR or DVD.
The following connections also change the input mode of the receiver to TV whenever you operate your TV.
text_image
TV Receiver VCR 1 DVD player* Audio/video/control S connecting cord (Pull the video cord away from the supplied audio/video/control S cable for connection A.)
** Control S connecting cord
Note
Refer to the instructions supplied with your TV for details regarding the operations you can control from your TV.
CONTROL A1 II hookup
- If you have a CONTROL A1 II compatible Sony CD player, tape deck, or MD deck Use a CONTROL A1 cord (not supplied) to connect the CONTROL A1 II jack on the CD player, tape deck, or MD deck to the CONTROL A1 II jack on the receiver. Refer to the separate manual "CONTROL-A1 II Control System" and the operating instructions supplied with your CD player, tape deck, or MD deck for details.
Note
If you make CONTROL A1 II connections from the receiver to an MD deck that is also connected to a computer, do not operate the receiver while using the "Sony MD Editor" software. This may cause a malfunction.
- If you have a Sony CD changer with a COMMAND MODE selector
If your CD changer's COMMAND MODE selector can be set to CD 1, CD 2, or CD 3, be sure to set the command mode to "CD 1" and connect the changer to the CD jacks on the receiver. If, however, you have a Sony CD changer with VIDEO OUT jacks, set the command mode to "CD 2" and connect the changer to the VIDEO 2 jacks on the receiver.
Other Hookups
Connecting the AC power cord
Before connecting the AC power cord of this receiver to a wall outlet:
- Connect the speaker system to the receiver (see page 16).
- Turn the MASTER VOLUME control to the leftmost position (0).
Connect the AC power cord(s) of your audio/video components to a wall outlet.
If you connect other audio/video components to the AC OUTLET(s) on the receiver, the receiver will supply power to the connected component(s), allowing you to turn the whole system on or off when you turn the receiver on/off.
Caution
Make sure that the total power consumption of the component(s) connected to the receiver's AC OUTLET(s) does not exceed the wattage stated on the rear panel. Do not connect high-wattage electrical home appliances such as electric irons, fans, or TVs to this outlet.
Note
If the AC power cord is disconnected for about two weeks, the receiver's entire memory will be cleaned and the demonstration will start.
Hooking Up and Setting Up the Speaker System
This chapter describes how to hook up your speaker system to the receiver, how to position each speaker, and how to set up your speakers to enjoy multi channel surround sound.
text_image
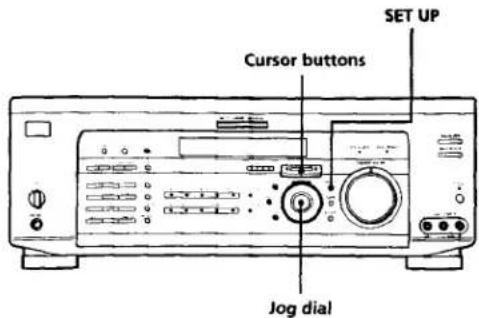
SET UP Cursor buttons Jog dialBrief descriptions of buttons and control used to set up the speaker system
SET UP button: Press to enter the setup mode when specifying speaker types and distances.
Cursor buttons (</>) : Use to select parameters after pressing the SET UP button.
Jog dial: Use to adjust the setting of each parameter.
Speaker System Hookup
Required cords
Speaker cords (not supplied)
One for each front, rear, and center speaker
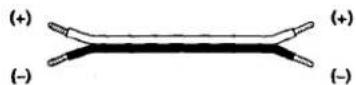
Monaural audio cord (not supplied)
One for an active sub woofer

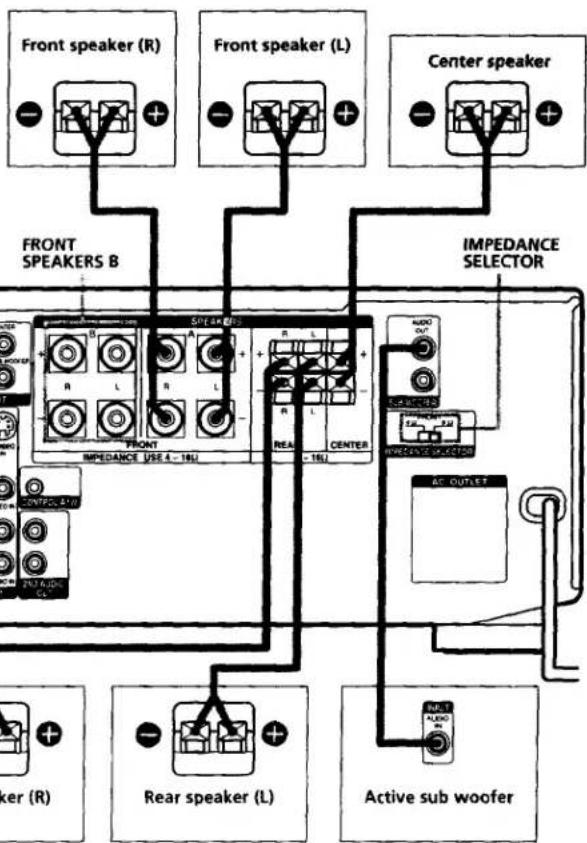
flowchart
graph TD
    A["Front speaker (R)"] --> B["FRONT SPEAKERS B"]
    C["Front speaker (L)"] --> D["FRONT SPEAKERS B"]
    E["Center speaker"] --> F["IMPEDANCE SELECTOR"]
    G["Rear speaker (L)"] --> H["Active sub woofer"]
    I["AMPEDANCE SELECTOR"] --> J["Audio Out"]
    K["AMPEDANCE SELECTOR"] --> L["REDAVING SOURCE"]
    M["AMPEDANCE SELECTOR"] --> N["AC OUTLET"]
    O["AMPEDANCE SELECTOR"] --> P["Ground"]
Terminals for connecting the speakers
| Connect the | To the |
| Front speakers (8 or 4* ohm) | SPEAKERS FRONT A terminals |
| Additional pair of front speakers (8 or 4* ohm) | SPEAKERS FRONT B terminals |
| Rear speakers (8 ohm) | SPEAKERS REAR terminals |
| Center speaker (8 ohm) | SPEAKERS CENTER terminals |
| Active sub woofer | SUB WOOFER AUDIO OUT jack** |
* See "Speaker impedance" on the next page.
** You can connect an active sub woofer to either of the two jacks. The remaining jack can be used to connect a second active sub woofer.
Notes on speaker system hookup
- Twist the stripped ends of the speaker cords about 2/3 inch (10 mm). Be sure to match the speaker cord to the appropriate terminal on the components: + to + and - to -. If the cords are reversed, the sound will be distorted and will lack bass.
- If you use front speakers with low maximum input rating, adjust the volume carefully to avoid excessive output on the speakers.
To avoid short-circuiting the speakers
Short-circuiting of the speakers may damage the receiver. To prevent this, make sure to take the following precautions when connecting the speakers.
Make sure the stripped ends of each speaker cord does not touch another speaker terminal or the stripped end of another speaker cord.
Examples of poor conditions of the speaker cord
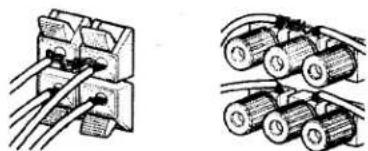
Stripped speaker cord is touching another speaker terminal.
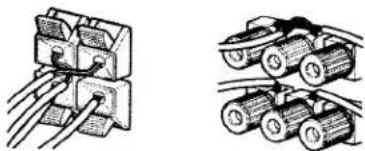
Stripped cords are touching each other due to excessive removal of insulation.
After connecting all the components, speakers, and AC power cord, output a test tone to check that all the speakers are connected correctly. For details on outputting a test tone, see page 22.
If no sound is heard from a speaker while outputting a test tone or a test tone is output from a speaker other than the one whose name is currently displayed on the receiver, the speaker may be short-circuited. If this happens, check the speaker connection again.
Speaker impedance

To enjoy multi channel surround, connect front, center, and rear speakers with a nominal impedance of 8 ohms or higher, and set the speaker IMPEDANCE SELECTOR to "8Ω." Check the instruction manual supplied with your speakers if you're not sure of their impedance. (This information is usually printed on a label on the back of the speaker.)
You may connect a pair of speakers with a nominal impedance between 4 and 8 ohms to the FRONT SPEAKERS terminals, if you set the IMPEDANCE SELECTOR to "4Ω." Speakers connected to the REAR and CENTER SPEAKERS terminals must have a nominal impedance of 8 ohms or higher (regardless of the setting of the IMPEDANCE SELECTOR).
Note
Be sure to connect front speakers with a nominal impedance of 8 ohms or higher if you want to select both sets (A+B) of front speakers (see page 27).
Performing Initial Setup Operations
Once you have hooked up the speakers and turned on the power, clear the receiver's memory. Then specify the speaker parameters (size, position, etc.) and perform any other initial setup operations necessary for your system.
Before turning on the receiver
Make sure that you have:
- Turned MASTER VOLUME to the leftmost position (0).
- Selected the appropriate front speakers (see "7 SPEAKERS selector" on page 27).
Clearing the receiver's memory
Before using your receiver for the first time, or when you want to clear the receiver's memory, do the following. This procedure is not necessary if the demonstration activates when you turn the power on.
natural_image
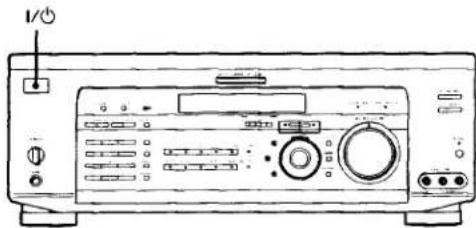
Line drawing of a vintage electronic device front panel with buttons and ports (no text or symbols)1 Turn off the receiver.
2 Hold down 1/0 for 5 seconds.
The currently selected function, then the demonstration message appears in the display. All of the following items are reset or cleared:
- All preset stations are reset or cleared.
- All sound field parameters are reset to their factory settings.
- All index names (of preset stations and program sources) are cleared.
- All adjustments made with the SET UP button are reset to their factory settings.
- The sound field memorized for each program source and preset stations are cleared.
Performing initial setup operations
Before using your receiver for the first time, use the SET UP button to adjust the setup parameters so that they correspond to your system. You can adjust the following items. For details on how to make adjustments, see the page in parenthesis.
- Speaker size and placement (pages 19\~21).
- Speaker distance (page 21).
- The video signal paired with the 5.1CH INPUT (page 50).
- Whether other components will turn on/off automatically via the CONTROL A1 II control system (page 50).
• STR-DE935 only: 2 way remote control system operation (page 50).
Multi Channel Surround Setup
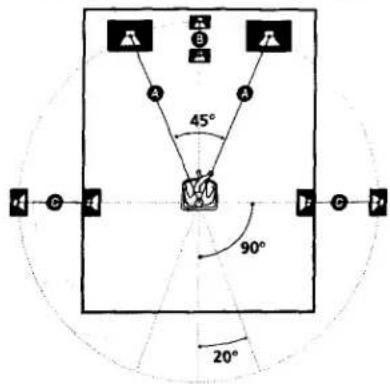
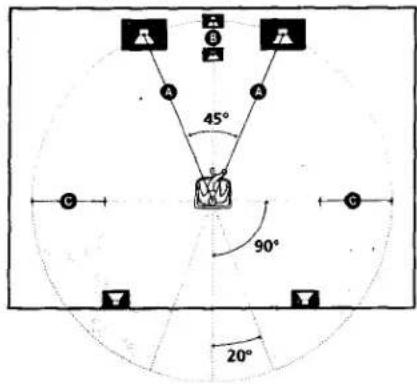
For the best possible surround sound all speakers should be the same distance from the listening position (A). (However, this unit lets you to place the center speaker up to 5 feet (1.5 meters) closer (B) and the rear speakers up to 15 feet (4.5 meters) closer (C) to the listening position. The front speakers can be placed from 3 to 40 feet (1.0 to 12.0 meters) from the listening position (A).)
You can place the rear speakers either behind you or to the side, depending on the shape of your room (etc.).
When placing rear speakers to your side
text_image
A B C 45° 90° 20°When placing rear speakers behind you
text_image
A B A 45° C 90° 20°Note
Do not place the center speaker farther away from the listening position than the front speakers.
Specifying the speaker parameters
1 Press I/⏻ to turn on the receiver.
2 Press SET UP.
3 Press the cursor buttons (< or >) to select the parameter you want to adjust.
4 Turn the jog dial to select setting you desire. The setting is entered automatically.
5 Repeat steps 3 and 4 until you have set all of the parameters that follow.
■ Front speaker size (FRONT)
Initial setting : LARGE (STR-DE935/DE835) SMALL (STR-SE591)
- If you connect large speakers that will effectively reproduce bass frequencies, select "LARGE". Normally, select "LARGE".
- If the sound is distorted, or you feel a lack of surround effects when using multi channel surround sound, select "SMALL" to activate the bass redirection circuitry and output the front channel bass frequencies from the sub woofer.
- When the front speaker is set to "SMALL", the center and rear speakers are also automatically set to "SMALL" (unless previously set to "NO").
Multi Channel Surround Setup
■ Center speaker size (CENTER)
Initial setting : LARGE (STR-DE935/DE835) SMALL (STR-SE591)
- If you a connect large speaker that will effectively reproduce bass frequencies, select "LARGE". Normally, select "LARGE". However, if the front speakers are set to "SMALL", you cannot set the center speaker to "LARGE".
- If the sound is distorted, or you feel a lack of surround effects when using multi channel surround sound, select "SMALL" to activate the bass redirection circuitry and output the center channel bass frequencies from the front speakers (if set to "LARGE") or sub woofer. *1
- If you do not connect the center speaker, select "NO". The sound of the center channel will be output from the front speakers. ^2
■ Rear speaker size (REAR)
Initial setting : LARGE (STR-DE935/DE835) SMALL (STR-SE591)
- If you connect large speakers that will effectively reproduce bass frequencies, select "LARGE". Normally, select "LARGE". However, if the front speakers are set to "SMALL", you cannot set the rear speakers to "LARGE".
- If the sound is distorted, or you feel a lack of surround effects when using multi channel surround sound, select "SMALL" to activate the bass redirection circuitry and output the rear channel bass frequencies from the sub woofer or other "LARGE" speakers.
- If you do not connect rear speakers, select "NO".*3
*1-*3 correspond to the following Dolby Pro Logic modes
^1 NORMAL
*2 PHANTOM
3 STEREO
About speaker sizes (LARGE and SMALL)
Internally, the LARGE and SMALL settings for each speaker determine whether or not the internal sound processor will cut the bass signal from that channel. When the bass is cut from a channel the bass redirection circuitry sends the corresponding bass frequencies to the sub woofer or other "LARGE" speaker. However, since bass sounds have a certain amount of directionality it best not to cut them, if possible. Therefore, even when using small speakers, you can set them to "LARGE" if you want to output the bass frequencies from that speaker. On the other hand, if you are using a large speaker, but prefer not to have bass frequencies output from that speaker, set it to "SMALL".
If the overall sound level is lower than you prefer set all speal to "LARGE". If there is not enough bass you can use the equalizer to boost the bass levels. To adjust the equalizer, see page 40.
■ Rear speaker position (REAR PL.)\*
Initial setting : BEHIND
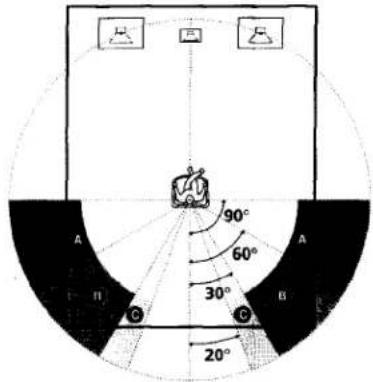
This parameter lets you specify the location of your real speakers for proper implementation of the Digital Cine Sound surround modes in the "VIRTUAL" sound field Refer to the illustration below.
- Select "SIDE" if the location of your rear speakers corresponds to section A.
- Select "MIDDLE" if the location of your rear speaker corresponds to section B.
- Select "BEHIND" if the location of your rear speaker corresponds to section C.
This setting only effects the surround modes in the "VIRTUAL" sound fields.
text_image
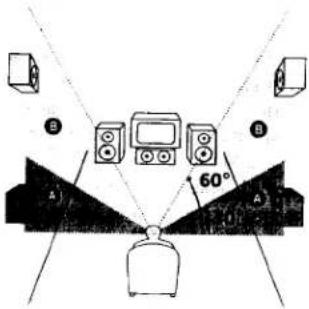
90° 60° 30° 20°■ Rear speaker height (REAR HGT.)\*
Initial setting : LOW
This parameter lets you specify the height of your rear speakers for proper implementation of the Digital Cinema Sound surround modes in the "VIRTUAL" sound fields. Refer to the illustration below.
- Select "LOW" if the location of your rear speakers corresponds to section A.
- Select "HIGH" if the location of your rear speakers corresponds to section B.
This setting only effects the surround modes in the "VIRTUAL" sound fields.
text_image
B 60° A A* These parameters are not available when "Rear speaker size (REAR)" is set to "NO".

About the rear speaker position (SIDE, MIDDLE, and BEHIND)
This setting is designed specifically for implementation of the Digital Cinema Sound modes in the "VIRTUAL" sound fields. With the Digital Cinema Sound modes, speaker position is not as critical as other modes. All of the modes in the "VIRTUAL" sound fields were designed under the premise that the rear speaker would be located behind the listening position, but presentation remains fairly consistent even with the rear speakers positioned at a rather wide angle. However, if the speakers are pointing toward the listener from the immediate left and right of the listening position, the "VIRTUAL" sound fields will not be effective unless the rear speaker position parameter is set to "SIDE".
Nevertheless, each listening environment has many variables, like wall reflections, and you may obtain better results using "BEHIND" or "MIDDLE" if your speakers are located high above the listening position, even if they are to the immediate left and right.
Therefore, although it may result in a setting contrary to the "Rear speaker position" explanation, we recommend that you playback multi channel surround encoded software and listen to the effect each setting has on your listening environment. Choose the setting that provides a good sense of spaciousness and that best succeeds in forming a cohesive space between the surround sound from the rear speakers and the sound of the front speakers. If you are not sure which sounds best, select "BEHIND" and then use the speaker distance parameter and speaker level adjustments to obtain proper balance.
■ Sub woofer selection (SUB WOOFER)
Initial setting : YES (STR-DE935/DE835) NO (STR-SE591)
- If you connect a sub woofer, select "YES".
- If you do not connect a sub woofer, select "NO". This activates the bass redirection circuitry and outputs the LFE signals from other speakers.
- In order to take full advantage of the Dolby Digital (AC-3) bass redirection circuitry, we recommend setting the sub woofer's cut off frequency as high as possible.
■ Front speaker distance (FRONT)
Initial setting : 16 feet
Set the distance from your listening position to the front (left or right) speaker (A on page 19).
- Front speaker distance can be set in 1 foot (0.1 meter) steps from 3 to 40 feet (1.0 to 12.0 meters).
- If both speakers are not placed an equal distance from your listening position, set the distance to the closest speaker.
■ Center speaker distance (CENTER)
Initial setting : 16 feet
Set the distance from your listening position to the center speaker.
- Center speaker distance can be set in 1 foot (0.1 meter) steps from a distance equal to the front speaker distance (④ on page 19) to a distance 5 feet (1.5 meters) closer to your listening position (⑤ on page 19).
- Do not place the center speaker farther away from your listening position than the front speakers.
■ Rear speaker distance (REAR)
Initial setting : 11 feet
Set the distance from your listening position to the rear (left or right) speaker.
- Rear speaker distance can be set in 1 foot (0.1 meter) steps from a distance equal to the front speaker distance (A on page 19) to a distance 15 feet (4.5 meters) closer to your listening position (C on page 19).
- Do not place the rear speakers farther away from your listening position than the front speakers.
- If both speakers are not placed an equal distance from your listening position, set the distance to the closest speaker.
Multi Channel Surround Setup

About speaker distances
This unit allows you to input the speaker position in terms of distance. However, it is not possible to set the center speaker farther away than the front speakers. Also, the center speaker can not be set more that 5 feet (1.5 meters) closer than the front speakers.
Likewise, the rear speakers can not be set farther away than from the listening position than the front speakers. And they can be no more than 15 feet (4.5 meters) closer.
This is because incorrect speaker placement is not conducive to the enjoyment of surround sound.
Please note that, setting the speaker distance closer than the actual location of the speakers will cause a delay in the output of the sound from that speaker. In other words, the speaker will sound like it is farther away.
For example, setting the center speaker distance 3–6 feet (1–2 m) closer than the actual speaker position will create a fairly realistic sensation of being "inside" the screen. If you cannot obtain a satisfactory surround effect because the rear speakers are too close, setting the rear speaker distance closer (shorter) than the actual distance will create a larger soundstage.
Adjusting these parameter while listening to the sound often results in much better surround sound. Give it a try!
■ Distance unit (DIST. UNIT)
Initial setting : feet
Lets you select either feet or meters as the unit of measure for setting distances. 1 foot corresponds to a 1 ms difference.
Adjusting the speaker volume
Use the remote while seated in your listening position to adjust the volume of each speaker.
Note
This unit incorporates a new test tone with a frequency center at 800 Hz for easier speaker volume adjustment.
1 Press I/⏻ to turn on the receiver.
2 Press TEST TONE on the supplied remote.
You will hear the test tone from each speaker in sequence.
3 Adjust the volume level so that the volume of the test tone from each speaker sounds the same when you are in your main listening position.
• To adjust the balance of the front right and front left speakers, use the front balance parameter in the LEVEL menu (see page 39).
• To adjust the balance of the rear right and rear left speakers, use the rear balance parameter in the LEVEL menu (see page 39).
- To adjust the volume level of the center speaker, press the LEVEL CENTER +/- buttons on the remote.
- To adjust the volume level of the rear speakers, pi the LEVEL REAR +/- buttons on the remote.
4 Press TEST TONE on the remote again to turn off the test tone.
Note
The test tone cannot be output when the receiver is set to 5.1C INPUT.

You can adjust the volume level of all speakers at the same
Rotate MASTER VOLUME on the main unit or press MASTER VOLUME +/- on the remote.
Notes
- The front balance, rear balance, center level, and rear level are shown in the display during adjustment.
- Although these adjustments can also be made via the front panel using the LEVEL menu (when the test tone is output, the receiver switches to the LEVEL menu automatically), we recommend you follow the procedure described above and adjust the speaker levels from your listening position using the remote control.

When setting the volume levels for each speaker
Let's assume that you have matched the sound levels of all the speakers using the test tone. Although this lays the foundation for high quality surround sound, it may be necessary to make further adjustments while listening to playback of actual software. This is because most software contains center and rear channels recorded at slightly lower levels than the two front channels.
When you actually playback software recorded in multi channel surround you will notice that increasing the center and rear speaker levels produces a better blend between the front and center speakers and greater cohesion between the front and rear speakers. Increasing the level of the center speaker about 1 dB, and the rear speakers about 1\~2 dB is likely to produce better results.
In other words, in order to create a more cohesive soundstage with balanced dialog we recommend that you make some adjustments while playing your software. Changes of only 1 dB can make a huge difference in the character of the soundstage.
Before You Use Your Receiver
Before turning on the receiver
[Unreadable]
Make sure that you have:
- Turned MASTER VOLUME to the leftmost position (0).
- Selected the appropriate front speakers (see "7 SPEAKERS selector" on page 27).
Checking the connections
After connecting all of your components to the receiver, do the following to verify that the connections were made correctly.

text_image
I/O Function buttons MASTER VOLUME1 Press I/⏻ to turn on the receiver.
2 Press a function button to select a component (program source) that you connected (e.g., CD player or tape deck).
3 Turn on the component and start playing it.
4 Rotate MASTER VOLUME to turn up the volume.
If you do not obtain normal sound output after performing this procedure, look for the reason in the checklist on the following page and take the appropriate measures to correct the problem.
Before You Use Your Receiver
There is no sound no matter which component is selected.
→ Check that both the receiver and all components are turned on.
→ Check that the MASTER VOLUME control is not set at 0.
→ Check that the SPEAKERS selector is not set to OFF or to a position for front speakers that are not connected to the receiver (see "7 SPEAKERS selector" on page 27).
→ Check that all speaker cords are connected correctly.
→ Press the MUTING button to turn off the indicator above the button.
There's no sound from a specific component.
→ Check that the component is connected correctly to the audio input jacks for that component.
→ Check that the cord(s) used for the connection is (are) fully inserted into the jacks on both the receiver and the component.
No sound is heard from one of the front speakers.
Connect a pair of headphones to the PHONES jack and set the SPEAKERS selector to OFF to verify that sound is output from the headphones (see "7 SPEAKERS selector" and "PHONES jack" on page 27).
If only one channel is output from the headphones, the component may not be connected to the receiver correctly. Check that all the cords are fully inserted into the jacks on both the receiver and the component.
If both channels are output from the headphones, the front speaker may not be connected to the receiver correctly. Check the connection of the front speaker which is not outputting any sound.
If you encounter a problem that is not included above, see "Troubleshooting" on page 51.
Location of Parts and Basic Operations
This chapter provides information about the locations and functions of the buttons and controls on the front panel. It also explains basic operations.
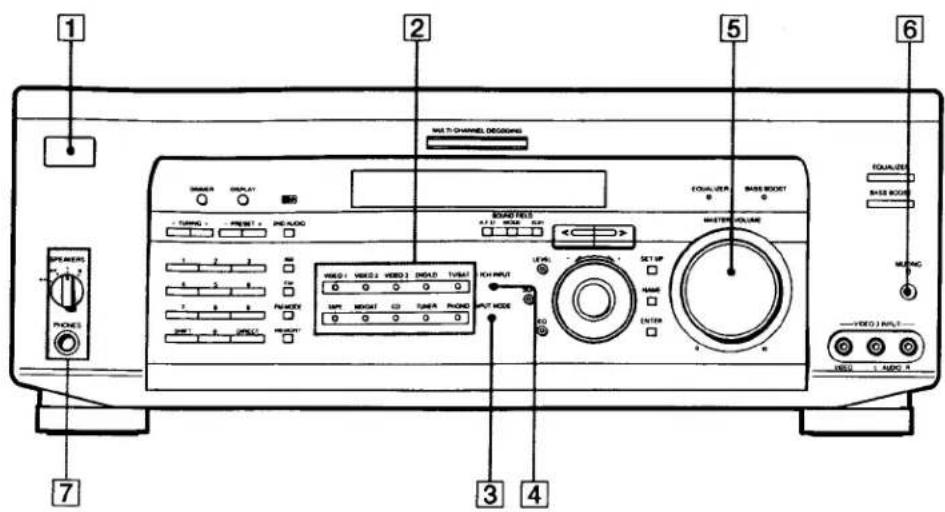
Front Panel Parts Description
① I/⏻ switch
Press to turn the receiver on and off.
- Before you turn on the receiver, make sure that you have turned the MASTER VOLUME control to the leftmost position to avoid damaging your speakers.
② Function buttons
Press one of the buttons to select the component you want to use.
| To select | Press |
| VCR | VIDEO 1 or VIDEO 2 |
| Camcorder or video game | VIDEO 3 (STR-DE935 only) |
| TV or satellite tuner | TV/SAT |
| DVD or LD player | DVD/LD |
| MD or Tape deckTape deck | MD/TAPE (STR-DE835/SE591)TAPE (STR-DE935) |
| MD or DAT deck | MD/DAT (STR-DE935 only) |
| CD player | CD |
| Built in tuner | TUNER |
| Turntable | PHONO |
After selecting the component, turn on the component you selected and play the program source.
- After selecting VCR, camcorder, video game, DVD player, or LD player, turn on the TV and set the TV's video input to match the component you selected.
text_image
1 2 5 6 MULTI CHANNEL DESIGNS DISPLAY TURING RESET PLEKADO BIARTEES A13 MODE OFF POWER VCCS 1 VCCS 2 VCCS 3 DREAD TURAV MINT MOUNT CD TUNER POND RINT R WSLC POWER MASTER VOLUME LEVEL SET UP NAME ENTER VIDEO MULTI WCC L Audio 4 EQUALIZE BASS MODE MULANG 7③ INPUT MODE button
Press to select the input mode for your digital components (DVD/LD, TV/SAT, and MD/DAT (STR-DE935) or MD/TAPE (STR-DE835/SE591)). Each press switches the input mode of the currently selected component.
| Select | To |
| AUTO | Give priority to digital signals when there are both digital and analog connections. If there are no digital signals, analog is selected |
| DIGITAL (OPTICAL) | Specify the digital audio signals input to the DIGITAL OPT input jacks |
| DIGITAL (COAXIAL) | Specify the digital audio signals input to the DIGITAL COAX input jacks (DVD/LD only) |
| ANALOG | Specify the analog audio signals input to the AUDIO IN (L and R) jacks |
4 5.1CH INPUT button
Press to enjoy the audio source connected to the 5.1CH INPUT jacks.
- When 5.1CH INPUT is selected, the equalizer, bass boost, and sound field effects do not function.
- To change the video input displayed when 5.1CH INPUT is selected, press SET UP (22) then press the cursor buttons (20) repeatedly to select "5.1CH V:" (see page 50 for details).
⑤ MASTER VOLUME control
After turning on the component you selected, rotate to adjust the volume.
6 MUTING button
Press to mute the sound. The indicator above the button lights up when the sound is muted.
7 SPEAKERS selector
Set according to the front speakers you want to drive.
| Set to | To select |
| A | The speakers connected to the FRONT SPEAKERS A terminals |
| B | The speakers connected to the FRONT SPEAKERS B terminals |
| A+B* | The speakers connected to both the FRONT SPEAKERS A and B terminals (parallel connection) |
| OFF | No speaker output |
* Do not set to A+B when a sound field is turned on.
PHONES jack
Connects headphones.
- To use the headphones, set the SPEAKERS selector to OFF to output sound to the headphones.
• To enjoy surround sound from the headphones, we recommend selecting the HEADPHONE THEATER sound field. Selecting other sound fields when the SPEAKERS selector is set to OFF automatically presents a 2 channel (stereo) downmix from the headphones.
Front Panel Parts Description
text_image
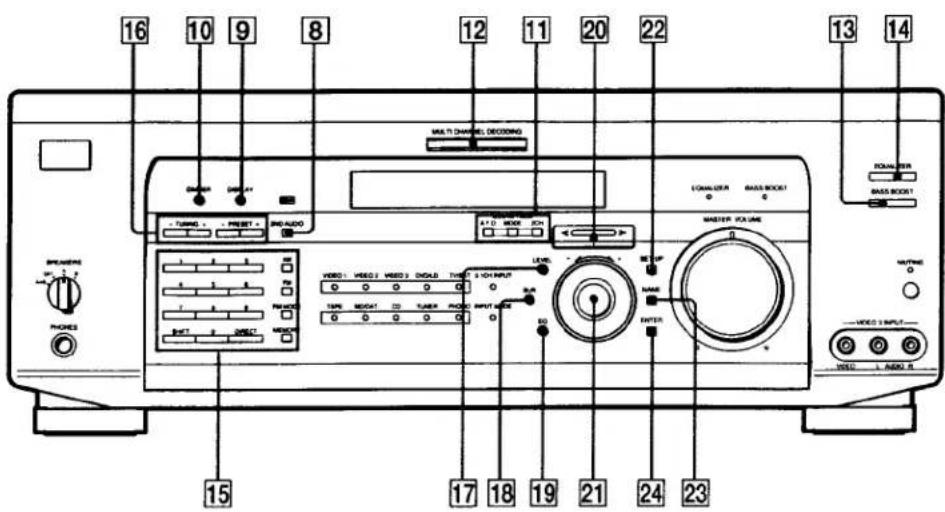
16 10 9 8 12 11 20 22 13 14 MULTI CHANNEL DECORING CHANNEL BASS SWITCH RUMBER GROUND WATER VOLUME VOCOLIER BASS SWITCH RUMBER GROSS SWITCH METHI RUMBER VOCOLIER BASS SWITCH RUMBER VOCOLIER METHI RUMBER VOCOLIER METHI RUMBER VOCOLIER METHI RUMBER VOCOLIER METHI RUMBER VOCOLIER METHI RUMBER VOCOLIER METHI RUMBER VOCOLIER METHI RUMBER VOCOLIER METHI METHI RUMBER VOCOLIER METHI METHI RUMBER VOCOLIER METHI METHI RUMBER VOCOLIER METHI METHI RUMBER VOCOLIER METHI METHI RUMBER VOCOLIER METHI METHI RUMBER METHI METHI RUMBER VOCOLIER METHI METHI RUMBER VOCOLIER METHI METHI RUMBER VOCOLIER METHI METHI RUMBER VOCOLIER METHI METHI RUMBER VOCOLIER METHI METHI METHI RUMBER VOCOLIER METHI METHI RUMBER VOCOLIER METHI METHI RUMBER VOCOLIER METHI METHI RUMBER VOCOLIER METHI METHI RUMBER VOCOLIER METHI METHI SUNTER MATHLETIONAL COLDING SYSTEMS & SWITCH INPUT Schematic: TYPE: BIOSAT CD TUNER POUCH INPUT MODE INPUT MODE RUN RUN RUN RUN RUN RUN RUN RUN RUN RUN RUN RUN RUN RUN RUN RUN RUN RUN RUN RUN RUN RUN RUN RUN RUN RUN RUN RUN RUN RUN RUN RUN RUN RUN RUN RUN RUN RUN RUN RUN RUN RUN RUN RUN RUN RUN RUN RUN RUN RUN SUNTER MATHLETIONAL COLDING SYSTEMS & SWITCH INPUT Schematic: TYPE: BIOSAT CD TUNER POUCH INPUT MODE INPUT MODE RUN RUN RUN RUN RUN RUN RUN RUN RUN RUN RUN RUN RUN RUN RUN RUN RUN RUN RUN RUN RUN RUN SUNTER MATHLETIONAL COLDING SYSTEMS & SWITCH INPUT Schematic: TYPE: BIOSAT CD TUNER POUCH INPUT MODE INPUT MODE RUN RUN RUN RUN RUN RUN RUN RUN RUN SUNTER MATHLETIONAL COLDING SYSTEMS & SWITCH INPUT Schematic: TYPE: BIOSAT CD TUNER POUCH INPUT MODE INPUT MODE RUN RUN RUN RUN RUN RUN SUNTER MATHLETIONAL COLDING SYSTEMS & SWITCH INPUT Schematic: TYPE: BIOSAT CD TUNER POUCH INPUT MODE INPUT MODE RUN RUN RUN RUN - MATHLETIONAL COLDING SYSTEMS & SWITCH INPUT Schematic: TYPE: BIOSAT CD TUNER POUCH INPUT MODE INPUT MODE - MATHLETIONAL COLDING SYSTEMS & SWITCH INPUT Schematic: 15 17 19 21 24 23 VIDEO 1. AUDIO 2.8 2ND AUDIO button
Press repeatedly to select 2 channel (stereo) audio signals for output to a stereo amplifier in another room (page 12). Each press selects another audio source (except PHONO) to be output from the 2ND AUDIO OUT jacks. "SOURCE" selects the same program source as the main function controls.
- Even if 2ND AUDIO is set to "SOURCE", no sound is output when the receiver is set to 5.1CH INPUT.
- Only signals from components connected to the analog inputs are output through the 2ND AUDIO OUT jacks. No signals are output from components connected to only the digital inputs.
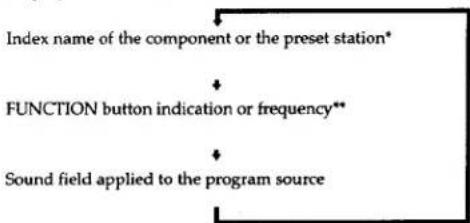
⑨ DISPLAY button
Press repeatedly to change the information on the display window as follows:
flowchart
graph TD
    A["Index name of the component or the preset station*"] --> B["FUNCTION button indication or frequency**"]
    B --> C["Sound field applied to the program source"]
* Index name appears only when you have assigned one to the component or preset station (see page 48). Index name does not appear when only blank spaces have been entered, or it is the same as the function button.
** Frequency appears only when the tuner is selected.
10 DIMMER button
Press repeatedly to adjust the brightness of the display.
11 Use the SOUND FIELD buttons to enjoy surround sound. For details, see "Enjoying Surround Sound" starting from page 31.
A.F.D. button / indicator
Press to set the receiver to automatically detect the type of audio signal being input and perform proper decoding (if necessary).
MODE button / indicator
Press to activate the sound field selection mode (page 32).
- Sound fields are not compatible with 96 kHz digital audio signals.
2CH button / indicator
Press to output sound from only the front (left and right) speakers.
12 MULTI CHANNEL DECODING indicator
This indicator lights when the unit is decoding signals recorded in a multi channel format.
13 BASS BOOST button
Press to increase the bass of the front speakers. The BASS BOOST indicator lights up when the function is turned on.
- The bass booster is not compatible with 96 kHz digital audio signals.
14 EQUALIZER button
Press to turn the equalizer on or off. The EQUALIZER indicator lights when the equalizer is turned on. When you adjust the equalizer using the EQ parameters (page 40) the settings are stored automatically and can be reproduced whenever you turn on the equalizer.
- The equalizer is not compatible with 96 kHz digital audio signals.
When you want to listen to an analog source without any digital processing
Do the following to bypass the sound field, equalization, and bass booster circuits.
1 Press BASS BOOST to turn off the BASS BOOST indicator.
2 Press EQUALIZER to turn off the EQUALIZER indicator.
3 Press 2CH.
The result will be a sound that is highly faithful to the program source.
15 The following buttons operate the built-in tuner. For details, see "Receiving Broadcasts" starting from page 43.
DIRECT button
Enables Direct Tuning (see page 44).
SHIFT button
Selects a memory page for preset stations.
Numeric buttons (1 to 0)
Inputs the numeric value.
AM button
Selects the AM band.
FM button
Selects the FM band.
FM MODE button
If "STEREO" flashes in the display and the FM stereo reception is poor, press this button. You will not have the stereo effect but the sound is improved.
MEMORY button
Press to memorize a preset station.
16 The following buttons operate the built-in tuner. For details, see "Receiving Broadcasts" starting from page 43.
TUNING +/- buttons
Scans all the available radio stations.
PRESET +/- buttons
Scans all preset stations.
17 LEVEL button
Press to activate the speaker level parameters (page 39). The indicator on the button lights up and you can adjust the various speaker level parameters (front balance, rear balance, etc.).
18 SUR button
Press to activate the surround parameters (page 38). The indicator on the button lights up and you can adjust the various surround parameters (effect level, wall type, etc.).
19 EQ button
Press to activate the equalizer parameters (page 40). The indicator on the button lights up and you can adjust the various equalizer parameters.
20 Cursor buttons ()
Press to select various speaker level, surround, and equalizer parameters (etc.).
21 Jog dial
Turn to adjust the selected speaker level, surround, and equalizer parameters (etc.).
Front Panel Parts Description
22 SET UP button
Press to activate the setup mode, then use the cursor buttons (20) to select any of the following parameters. You can then make various settings using the jog dial (21).
| When you select | You can |
| Speaker setup | Specify the front, center, rear speaker sizes, the rear speaker position, and whether or not you are using a sub woofer (page 19) |
| Speaker Distance | Specify the front, center, and rear speaker distances and the unit of measurement (page 19) |
| 5.1CH video input | Specify the video input to be used with the audio signals from the 5.1CH INPUT jacks. (page 50) |
| Auto Function | Specify wether or not Sony components connected via Control A1 cables will turn on or off when selected using the function buttons. (page 50) |
| 2 way remote (STR-DE935 only) | Turn on or off response to remote signals sent from the 2 way remote. (page 50) |
23 NAME button
Press to activate the name function and enter names for preset stations and program sources (page 48).
24 ENTER button
Press to enter individual characters for the preset station and program source names.
Enjoying Surround Sound
300M 22819
This chapter describes how to set up the receiver to enjoy surround sound. You can enjoy multi channel surround when playing back software encoded with Dolby Digital or DTS.
You can take advantage of surround sound simply by selecting one of the receiver's pre-programmed sound modes. They bring the exciting and powerful sound of movie theaters and concert halls into your home. You can also customize the sound modes to obtain the sound you desire by changing the various surround parameters.
The receiver contains a variety of different sound modes. The cinema sound modes are designed for use when playing back movie software (DVD, LD, etc.) encoded with multi channel surround sound or Dolby Pro Logic. In addition to decoding the surround sound, some of these modes also provide sound effects commonly found in movie theaters.
The virtual sound modes contain compelling applications of the Sony Digital Cinema Sound digital signal processing technology. They shift the sound away from the actual speaker locations to simulate the presence of several "virtual" speakers.
The music (etc.) sound modes are designed for use with standard audio sources and TV broadcasts. They add reverberation to the source signal to make you feel as if you were in a concert hall or stadium (etc.). Use these sound modes with two-channel sources like CD and stereo broadcasts of sports programs or musical concerts. For more information about the sound modes, see pages 33–35.
A.F.D.
The "Auto Format Decoding" sound mode presents the sound exactly as it was encoded, without adding any reverberation (etc.).
To fully enjoy surround sound, you must register the number and location of you speakers. See "Multi-Channel Surround setup" starting on page 19 to set the speaker parameters before enjoying surround sound.

text_image
SOUND FIELD buttons Cursor buttons EQUALIZER LEVEL EQ SUR Jog dialBrief descriptions of buttons used to enjoy surround sound
LEVEL button: Press to light and customize the level parameters.
SUR button: Press to light and customize the surround parameters in the current sound field.
EQ button: Press to light and customize the equalizer parameters in the current sound field.
Cursor buttons (</>) : Use to select parameters after pressing the LEVEL, SUR, or EQ buttons.
Jog dial: Use to adjust parameters and select sound fields (etc.).
SOUND FIELD buttons:
A.F.D. button: Press to set the receiver to automatically detect the type of audio signal being input and perform proper decoding (if necessary).
MODE button: Press to activate the sound field selection mode.
2CH button: Press to output sound from only the front (left and right) speakers.
EQUALIZER button: Turns the equalizer on or off.
Selecting a Sound Field
You can enjoy surround sound simply by selecting one of the pre-programmed sound fields according to the program you want to listen to.
1 Press MODE.
The current sound field is indicated in the display.
2 Turn the jog dial or press the cursor buttons (< or >) to select the sound field you want.
See the table starting on page 33 for information on each sound field.
To turn the sound field off
Press A.F.D. or 2CH (page 28).
The receiver memorizes the last sound field selected for each program source (Sound Field Link)
Whenever you select a program source, the sound field that was last applied is automatically applied again. For example, if you listen to CD with STADIUM as the sound field, change to a different program source, then return to CD, STADIUM will be applied again. With the tuner, sound fields are memorized separately for AM, FM, and all preset stations.
You can identify the encoding format of program software by looking at its packaging
Dolby Digital discs are labeled with the logo, and Dolby Surround encoded programs are labeled with the logo.
Note
When using sound fields, do not select both speakers (A+B) with the SPEAKERS selector.
| Sound field | Effect | Notes |
| NORMAL SURROUND | Software with multi channel surround audio signals is played according to the way it was recorded. Software with 2 channel audio signals, is decoded with Dolby Pro Logic to create surround effects. | |
| CINEMA STUDIO EX. A* | Reproduces the sound characteristics of the Sony Pictures Entertainment "Cary Grant Theater" cinema production studio using the 3D sound imaging of V. MULTI DIMENSION (page 34) to create 5 sets of virtual speakers surrounding the listener from a single pair of actual rear speakers. | This is a standard mode, great for watching most any type of movie. |
| CINEMA STUDIO EX. B* | Reproduces the sound characteristics of the Sony Pictures Entertainment "Kim Novak Theater" cinema production studio using the 3D sound imaging of V. MULTI DIMENSION (page 34) to create 5 sets of virtual speakers surrounding the listener from a single pair of actual rear speakers. | This mode is ideal for watching science-fiction or action movies with lots of sound effects. |
| CINEMA STUDIO EX. C* | Reproduces the sound characteristics of the Sony Pictures Entertainment scoring stage using the 3D sound imaging of V. MULTI DIMENSION (page 34) to create 5 sets of virtual speakers surrounding the listener from a single pair of actual rear speakers. | This mode is ideal for watching musicals or classic films where music is featured in the soundtrack. |
| SEMI-CINEMA STUDIO EX. A* | Reproduces the sound characteristics of the Sony Pictures Entertainment "Cary Grant Theater" cinema production studio using the 3D sound imaging of V. SEMI-M. DIMENSION (page 35) to create 5 sets of virtual speakers surrounding the listener from the sound of the front speakers (without using actual rear speakers). | 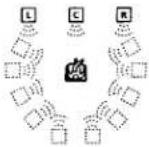 |
| SEMI-CINEMA STUDIO EX. B* | Reproduces the sound characteristics of the Sony Pictures Entertainment "Kim Novak Theater" cinema production studio using the 3D sound imaging of V. SEMI-M. DIMENSION (page 35) to create 5 sets of virtual speakers surrounding the listener from the sound of the front speakers (without using actual rear speakers). | |
| SEMI-CINEMA STUDIO EX. C* | Reproduces the sound characteristics of the Sony Pictures Entertainment scoring stage using the 3D sound imaging of V. SEMI-M. DIMENSION (page 35) to create 5 sets of virtual speakers surrounding the listener from the sound of the front speakers (without using actual rear speakers). | |
| NIGHT THEATER | Allows you to retain a theater like environment while listening at low volume levels, such as late at night. | |
| MONO MOVIE | Creates a theater like environment from movies with monaural soundtracks. | |
| STEREO MOVIE | Creates a theater like environment from movies recorded with stereo soundtracks | |
| HEADPHONE THEATER | Allows you to experience a theater like environment while listening through a pair of headphones. | Very effective with 5.1ch discreet signal sources like Dolby Digital and DTS. |
- "VIRTUAL" sound field: Sound field with virtual speakers. However, turning the SUR menu "VIR. SPEAKER" parameter off when using "CINEMA STUDIO EX.A-C" or "SEMI-CINEMA STUDIO A-C" reproduces the sound characteristics of each cinema production studio without virtual speakers.
Selecting a Sound Field
| Sound field | Effect | Notes |
| V. MULTI DIMENSION*(Virtual Multi Dimension) | Uses 3D sound imaging to create an array of virtual rear speakers positioned higher than the listener from a single pair of actual rear speakers. This mode creates 5 sets of virtual speakers surrounding the listener at approximately a 30^ angle of elevation. | SIDE*[IMAGE] |
| MIDDLE*[IMAGE] | ||
| BEHIND*[IMAGE]* See pag | ||
| V. MULTI REAR*(Virtual Multi Rear) | Uses 3D sound imaging to create 3 sets of virtual rear speakers from 1 set of actual rear speakers. | SIDE*[IMAGE] |
| MIDDLE*[IMAGE] | ||
| BEHIND*[IMAGE]* See pag | ||
| V. SEMI-M. DIMENSION*(Virtual Semi Multi Dimension) | Uses 3D sound imaging to create virtual rear speakers from the sound of the front speakers without using actual rear speakers. This mode creates 5 sets of virtual speakers surrounding the listener at a 30^ angle of elevation. | [IMAGE] |
* "VIRTUAL" sound field: Sound field with virtual speakers.
| Sound field | Effect | Notes |
| VIRTUAL ENHANCED A*(Virtual Enhanced Surround A) | Uses 3D sound imaging to create 3 sets of virtual rear speakers from the sound of the front speakers without using actual rear speakers. | |
| VIRTUAL ENHANCED B*(Virtual Enhanced Surround B) | Uses 3D sound imaging to create 1 set of virtual rear speakers from the sound of the front speakers without using actual rear speakers. | |
| SMALL HALL | Reproduces the acoustics of a small rectangular concert hall. | Ideal for soft acoustic sounds. |
| LARGE HALL | Reproduces the acoustics of a large rectangular concert hall. | |
| OPERA HOUSE | Reproduces the acoustics of an opera house. | Ideal for musicals and opera. |
| JAZZ CLUB | Reproduces the acoustics of a jazz club. | |
| DISCO/CLUB | Reproduces the acoustics of a discotheque/dance club. | |
| CHURCH | Reproduces the acoustics of a stone church. | |
| LIVE HOUSE | Reproduces the acoustics of a 300-seat live house. | Great for rock or pop music. |
| ARENA | Reproduces the acoustics of a 1000-seat concert hall. | |
| STADIUM | Reproduces the feeling of a large open-air stadium. | Great for sporting events or electric (amplified) music. |
| GAME | Obtains maximum audio impact from video game software. | Be sure to set the game machine to stereo mode when using game software with stereo sound capabilities. |
* "VIRTUAL" sound field: Sound field with virtual speakers.
Notes
• The effects provided by the virtual speakers may cause increased noise in the playback signal.
- When listening to sound fields that employ the virtual speakers, you will not be able to hear any sound coming directly from the rear speakers.
Use the buttons on the front panel to operate the following modes
| AUTO FORMAT DECODING(Press the A.F.D. button) | Automatically detects the type of audio signal being input (Dolby Digital, DTS, Dolby Pro Logic, or standard 2 channel stereo) and performs the proper decoding if necessary. This mode presents the sound as it was recorded/encoded, without adding any effects. | You can use this mode as a reference. Set the equalizer to OFF while using this mode to hear the source sound exactly as it was recorded. |
| 2 CHANNEL(Press the 2CH button) | Outputs the sound from the front left and right speakers only. Standard two channel (stereo) sources completely bypass the sound field processing. Multi channel surround formats are downmixed to two channels. | This allows you to play any source using only the front left and right speakers. |
Note
No sound is output from the sub woofer when the 2 CHANNEL mode is selected. To listen to two channel (stereo) sources using the front left and right speakers and a sub woofer, use the AUTO FORMAT DECODING mode.
Understanding the Multi-Channel Surround Displays
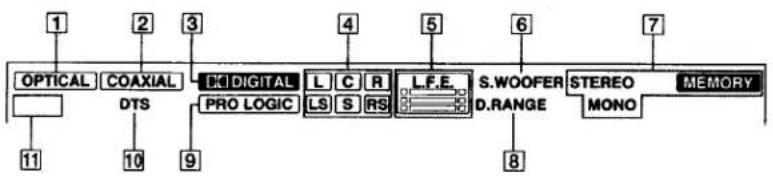
text_image
1 OPTICAL COAXIAL DTS 9 DIGITAL L C R PRO LOGIC LS S RS L.F.E. S.WOOFER D.RANGE STREEO MEMORY MONO 8① OPTICAL
Lights up when the source signal is a digital signal being input through the OPT terminal.
② COAXIAL
Lights up when the source signal is a digital signal being input through the COAX terminal.
3 DIGITAL
This indicator lights when a sound field other than 2 CHANNEL is selected and the unit is decoding signals recorded in the Dolby Digital (AC-3) format.
4 Playback channel indicators
The letters light to indicate the channels being played back.
L: Front Left R: Front Right
C: Center (monaural) LS: Left Surround
RS: Right Surround
S: Surround (monaural or the rear components obtained by Pro Logic processing)
The boxes around the letters light to indicate the speakers used to playback the channels.
• See the next page for details regarding the playback channel indicators.
5 L.F.E
The letters "L.F.E" light up when the disc being played contains the LFE (Low Frequency Effect) channel. When the sound of the LFE channel signal is actually being reproduced, the bars underneath the letters lights up to indicate the level. Since the LFE signal is not recorded in all parts of the input signal the bar indication will fluctuate (and may turn off) during playback.
6 S.WOOFER
Lights when sub woofer selection is set to "YES" at this unit detects that the disc being played does not contain the LFE channel signal. While this indicator lit, this unit creates a sub woofer signal based on the low frequency components of the front channels.
⑦ Tuner indicators
These indicators light when using the receiver to tu in radio stations, etc. See pages 43\~46 for tuner operations.
8 D. RANGE
Lights when dynamic range compression is active. : page 39 to adjust the dynamic range compression.
9 PRO LOGIC
Lights when this unit applies Pro Logic processing into two channel signals in order to output the center and surround channel signals.
10 DTS
Lights up when DTS signals are input.
Note
When playing a DTS format disc, be sure that you have m. digital connections and that INPUT MODE is NOT set to ANALOG (see 3 on page 27).
11 AC-3 or ☐ Lights when Dolby Digital (AC-3) signals are input.
Source sound displays
The letters (L, C, R, etc.) indicate the source sound. The boxes around the letters vary to show how the receiver downmixes the source sound (based on the speakers settings). When using music sound modes like LARGE HALL or SMALL HALL the receiver adds reverberation based on the source sound.
The following table shows how the indicators light when using AUTO FORMAT DECODING mode.
Although the table below shows almost all of the configurations available from multi channel surround signals, the ones marked "☆" are the most common.
| Recording Format(Front/Rear) | Input Channel Display | Source Sound and Output Channel Display | |||
| All speakers present | Rear speakers absent | Center speaker absent | Rear/centerspeakers absent | ||
| 1/0 | DOLBY DIGITAL [1/0]DTS [1/0] | DC DIGITALCDTS | DC DIGITALCDTS | DC DIGITAL□c□DTS | DC DIGITAL□c□DTS |
| 2/0* | DOLBY DIGITAL [2/0]DTS [2/0] | L RLDTS | L RDTS | L RDTS | L RDTS |
| 3/0 | DOLBY DIGITAL [3/0]DTS [3/0] | DC DIGITALLCRDTS | DC DIGITALLCRDTS | DC DIGITALLCRDTS | DC DIGITALLCRDTS |
| 2/1 | DOLBY DIGITAL [2/1]DTS [2/1] | DC DIGITALLRSDLTDS | DC DIGITALLRSDLTDS | DC DIGITALLRSDLTDS | DC DIGITALLRSDLTDS |
| 3/1 | DOLBY DIGITAL [3/1]DTS [3/1] | DC DIGITALLCRDSDTDS | DC DIGITALLCRDSDTS | DC DIGITALLCRDSDTS | DC DIGITALLCRDSDTS |
| 2/2 | DOLBY DIGITAL [2/2]DTS [2/2] | DC DIGITALLRSDLTDS | DC DIGITALLRSDLTDS | DC DIGITALLRSDLTDS | DC DIGITALLRSDLTDS |
| 3/2 | ☆ DOLBY DIGITAL [3/2]☆ DTS [3/2] | DC DIGITALLCRDSDTDS | DC DIGITALLCRDSDTS | DC DIGITALLCRDSDTS | DC DIGITALLCRDSDTS |
| 2/0** | ☆ DOLBY DIGITAL [2/0] | L C RPRO LOGICS | L C RPRO LOGICS | L C RPRO LOGICS | L R |
| ☆ DOLBY PROLOGIC | L C RPRO LOGICS | L C RPRO LOGICS | L C RPRO LOGICS | L R | |
| ☆ PCM XX kHz*** | L R | L R | L R | L R | |
* Signals with Dolby surround encoded flag OFF
**Signals with Dolby surround encoded flag ON
*** Sampling frequency is displayed
Notes
- The receiver performs Pro Logic decoding and the display conforms to 2/0^* when using the following movie sound modes with 2/0^ or STEREO PCM format signals. (CINEMA STUDIO EX. A, B, C, SEMI-CINEMA STUDIO EX. A, B, C, NIGHT THEATER, V. MULTI DIMENSION, V. MULTI REAR, V. SEMI-M. DIMENSION, VIRTUAL ENHANCED A, or VIRTUAL ENHANCED B)
- When using music sound modes like LARGE HALL or SMALL HALL with standard audio formats, like PCM, the receiver creates rear signals from the front L and R signals. In this case, sound is output from the rear speakers, but output channel indicators for the rear speakers do not light.
Adjusting the level parameters
The LEVEL menu contains parameters that let you adjust the balance and speaker volumes of each speaker. The settings available in this menu are applied to all sound fields.
1 Start playing a program source encoded with multi channel surround sound.
2 Press LEVEL.
The button lights up and the first parameter is displayed.
3 Press the cursor buttons (< or >) to select the parameter you want to adjust.
4 Turn the jog dial to select setting you desire. The setting is entered automatically.
Front balance (FRONT)
Initial setting : center
Lets you adjust the balance between the front left and right speakers.
• The balance can be adjusted ±8 dB in 1 dB steps.
- This settings can also be adjusted using the supplied remote. See "Adjusting the speaker volume" (page 22).
Rear balance (REAR)
Initial setting : center
Lets you adjust the balance between the rear left and right speakers.
• The balance can be adjusted ±8 dB in 1 dB steps.
- This settings can also be adjusted using the supplied remote. See "Adjusting the speaker volume" (page 22).
Rear level (REAR)
Initial setting : 0 dB
Lets you adjust level of the rear (left and right) speakers.
- The level can be adjusted in 1 dB steps from -10 dB to +10 dB.
- This settings can also be adjusted directly using the supplied remote. See "Adjusting the speaker volume" (page 22).
Center level (CENTER)
Initial setting : 0 dB
Lets you adjust the level of the center speaker.
- The level can be adjusted in 1 dB steps from -10 dB to +10 dB.
Sub woofer level (SUB WOOFER)
Initial setting : 0 dB
Lets you adjust the level of the sub woofer.
- The level can be adjusted in 1 dB steps from -10 dB to +10 dB.
LFE (Low Frequency Effect) mix level (LFE MIX) Initial setting : 0 dB
This parameter lets you attenuate the level of the LFE (Low Frequency Effect) channel output from the sub woofer without effecting the level of the bass frequencies sent to the sub woofer from the front, center or rear channels via the bass redirection circuitry.
- The level can be adjusted in 1 dB steps from -20.0 dB to 0 dB (line level). 0 dB outputs the full LFE signal at the mix level determined by the recording engineer.
- Selecting MUTING mutes the sound of the LFE channel from the sub woofer. However, the low frequency sounds of the front, center, or rear speakers are output from the sub woofer according to the settings made for each speaker in the speaker setup (page 19).
Dynamic range compressor (D. RANGE COMP)
Initial setting : OFF
Lets you compress the dynamic range of the sound track. This may be useful when you want to watch movies at low volumes late at night.
• OFF reproduces the sound track with no compression.
- STD reproduces the sound track with the dynamic range intended by the recording engineer.
- 0.1 \~ 0.9 allow you to compress the dynamic range in small steps to achieve the sound you desire.
- MAX provides a dramatic compression of the dynamic range.
Note
Dynamic range compression is not possible with DTS sources.

About the Dynamic Range Compressor
This parameter allows you to compress the dynamic range of the soundtrack based on the dynamic range information included in the Dolby Digital signal. "STD" is standard compression, but because many sources have only light compression, you may not notice much difference when using 0.1\~0.9.
Therefore, we recommend using the "MAX" setting. This greatly compresses the dynamic range and allows you to view movies late at night at low volumes. Unlike analog limiters, the levels are predetermined and provide a very natural compression.
Customizing Sound Fields
Adjusting the equalizer
The EQ menu lets you adjust the equalization (low, mid, and high frequencies) of the front, rear and center speakers. The equalizer settings are stored individually for each sound field.
1 Start playing a program source encoded with multi channel surround sound.
2 Press EQ.
The button lights up and the first parameter is displayed.
3 Press the cursor buttons (< or >) to select the parameter you want to adjust.
4 Turn the jog dial to select setting you desire. The setting is entered automatically.
You can turn off the equalization without erasing it The equalizer settings are stored separately for each sound field. Press the EQUALIZER button to turn the EQUALIZER indicator off.
Front speaker bass adjustment (Level/Frequency)
① Use the cursor buttons ( <//>) to select the level (dB) or frequency (Hz).
② Use the jog dial to adjust.
Repeat until you achieve the sound you desire.
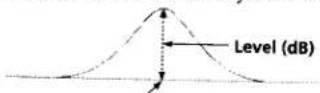
Frequency (Hz)
• The level can be adjusted ±10 dB in 1 dB steps.
• The frequency can be adjusted from 100 Hz to 1.0 kHz in 21 steps.
Front speaker midrange adjustment (Level/Frequency)
Adjust as described in "Front speaker bass adjustment".
• The level can be adjusted ±10 dB in 1 dB steps.
• The frequency can be adjusted from 500 Hz to 5 kHz in 21 steps.
Front speaker treble adjustment (Level/Frequency)
Adjust as described in "Front speaker bass adjustment".
• The level can be adjusted ±10 dB in 1 dB steps.
- The frequency can be adjusted from 1.0 kHz to 10 kHz in 21 steps.
Center speaker bass adjustment (Level/Frequency)
Adjust as described in "Front speaker bass adjustmer
• The level can be adjusted ±10 dB in 1 dB steps.
• The frequency can be adjusted from 100 Hz to 1.0 k in 21 steps.
Center speaker midrange adjustment (Level/Frequency)
Adjust as described in "Front speaker bass adjustment:
- The level can be adjusted ±10 dB in 1 dB steps.
- The frequency can be adjusted from 500 Hz to 5 kHz 21 steps.
Center speaker treble adjustment (Level/Frequency)
Adjust as described in "Front speaker bass adjustment
• The level can be adjusted ±10 dB in 1 dB steps.
- The frequency can be adjusted from 1.0 kHz to 10 kHz in 21 steps.
Rear speaker bass adjustment (Level/Frequency)
Adjust as described in "Front speaker bass adjustment"
• The level can be adjusted ±10 dB in 1 dB steps.
• The frequency can be adjusted from 100 Hz to 1.0 kHz in 21 steps.
Rear speaker midrange adjustment (Level/Frequency)
Adjust as described in "Front speaker bass adjustment"
• The level can be adjusted ±10 dB in 1 dB steps.
- The frequency can be adjusted from 500 Hz to 5.0 kHz in 21 steps.
Rear speaker treble adjustment (Level/Frequency
Adjust as described in "Front speaker bass adjustment"
• The level can be adjusted ±10 dB in 1 dB steps.
• The frequency can be adjusted from 1.0 kHz to 10 kHz in 21 steps.
Resetting customized sound fields to the factory settings
1 If the power is on, press I/① to turn off the power
2 Hold down MODE and press I/☐. "S.F Initialize" appears in the display and all sound fields are reset at once.
Adjustable parameters for each sound field: non-brain noise to 250mm x 1400.
| EFFECT LEVEL | WALL TYPE | REVERB TIME | SCREEN DEPTH | VIRTUAL SPEAKER | FRONT BAL. | REAR BAL. | REAR LEVEL | CENTER LEVEL | WOOFER LEVEL | LFE MIX | D.RANGE COMP. | |
| 2CH | ● | ● | ● | |||||||||
| A.F.D. | ● | ● | ● | ● | ● | ● | ● | |||||
| NORMAL SURROUND | ● | ● | ● | ● | ● | ● | ● | |||||
| CINEMA STUDIO EX. A | ● | ● | ● | ● | ● | ● | ● | ● | ● | ● | ||
| CINEMA STUDIO EX. B | ● | ● | ● | ● | ● | ● | ● | ● | ● | ● | ||
| CINEMA STUDIO EX. C | ● | ● | ● | ● | ● | ● | ● | ● | ● | ● | ||
| SEMI-CINEMA STUDIO EX. A | ● | ● | ● | ● | ● | ● | ● | ● | ||||
| SEMI-CINEMA STUDIO EX. B | ● | ● | ● | ● | ● | ● | ● | ● | ||||
| SEMI-CINEMA STUDIO EX. C | ● | ● | ● | ● | ● | ● | ● | ● | ||||
| NIGHT THEATER | ● | ● | ● | ● | ● | ● | ● | ● | ● | ● | ||
| MONO MOVIE | ● | ● | ● | ● | ● | ● | ● | ● | ● | ● | ||
| STEREO MOVIE | ● | ● | ● | ● | ● | ● | ● | ● | ● | ● | ||
| HEADPHONE THEATER | ● | ● | ● | |||||||||
| V. MULTI DIMENSION | ● | ● | ● | ● | ● | ● | ● | |||||
| V. MULTI REAR | ● | ● | ● | ● | ● | ● | ● | |||||
| V. SEMI-M. DIMENSION | ● | ● | ● | ● | ● | |||||||
| VIRTUAL ENHANCED A | ● | ● | ● | ● | ● | |||||||
| VIRTUAL ENHANCED B | ● | ● | ● | ● | ● | |||||||
| SMALL HALL | ● | ● | ● | ● | ● | ● | ● | ● | ● | ● | ||
| LARGE HALL | ● | ● | ● | ● | ● | ● | ● | ● | ● | ● | ||
| OPERA HOUSE | ● | ● | ● | ● | ● | ● | ● | ● | ● | ● | ||
| JAZZ CLUB | ● | ● | ● | ● | ● | ● | ● | ● | ● | ● | ||
| DISCO/CLUB | ● | ● | ● | ● | ● | ● | ● | ● | ● | ● | ||
| CHURCH | ● | ● | ● | ● | ● | ● | ● | ● | ● | ● | ||
| LIVE HOUSE | ● | ● | ● | ● | ● | ● | ● | ● | ● | ● | ||
| ARENA | ● | ● | ● | ● | ● | ● | ● | ● | ● | ● | ||
| STADIUM | ● | ● | ● | ● | ● | ● | ● | ● | ● | ● | ||
| GAME | ● | ● | ● | ● | ● | ● | ● | ● | ● | ● | ||
| 5.1CH INPUT | ● | ● |
Customizing Sound Fields
Adjustable parameters for each sound field (continued)
| FRONTEQ | CENTEREQ | REAREQ | |
| 2CH | ● | ||
| A.F.D. | ● | ● | ● |
| NORMAL SURROUND | ● | ● | ● |
| CINEMA STUDIO EX. A | ● | ● | ● |
| CINEMA STUDIO EX. B | ● | ● | ● |
| CINEMA STUDIO EX. C | ● | ● | ● |
| SEMI-CINEMA STUDIO EX. A | ● | ● | |
| SEMI-CINEMA STUDIO EX. B | ● | ● | |
| SEMI-CINEMA STUDIO EX. C | ● | ● | |
| NIGHT THEATER | ● | ● | ● |
| MONO MOVIE | ● | ● | ● |
| STEREO MOVIE | ● | ● | ● |
| HEADPHONE THEATER | |||
| V. MULTI DIMENSION | ● | ● | ● |
| V. MULTI REAR | ● | ● | ● |
| V. SEMI-M. DIMENSION | ● | ● | |
| VIRTUAL ENHANCED A | ● | ● | |
| VIRTUAL ENHANCED B | ● | ● | |
| SMALL HALL | ● | ● | ● |
| LARGE HALL | ● | ● | ● |
| OPERA HOUSE | ● | ● | ● |
| JAZZ CLUB | ● | ● | ● |
| DISCO/CLUB | ● | ● | ● |
| CHURCH | ● | ● | ● |
| LIVE HOUSE | ● | ● | ● |
| ARENA | ● | ● | ● |
| STADIUM | ● | ● | ● |
| GAME | ● | ● | ● |
| 5.1CH INPUT | |||
Receiving Broadcasts
This chapter describes how to receive FM or AM broadcasts and how to preset selected stations.
You can tune in stations on this receiver in the following ways:
Direct Tuning
You can enter a frequency of the station you want directly by using the numeric buttons (see page 44).
Automatic Tuning
If you don't know the frequency of the station you want, you can let the receiver scan all available stations in your area (see page 45).
Preset Tuning
After you have tuned in stations using Direct Tuning or Automatic Tuning, you can preset them to the receiver (see page 45). Then you can tune in any of the stations directly by entering its 2-character code (see page 46). Up to 30 FM or AM stations can be preset. The receiver will also scan all the stations that you have preset (see page 46).
Before you begin, make sure you have:
- Connected an FM and AM antenna to the receiver (see page 5).
- Selected the appropriate speaker system (see page 27).
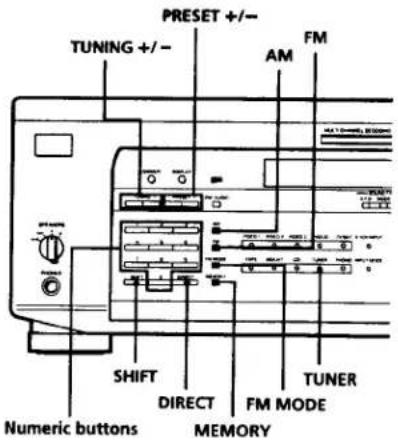
text_image
PRESET +/-- TUNING +/- - AM FM SHIFT DIRECT FM MODE TUNER Numeric buttons MEMORYBrief descriptions of buttons used to receive broadcasts
PRESET +/-: Press to scan all preset radio stations.
DIRECT: Press this button to enter a frequency directly using the numeric buttons.
Numeric buttons: Press to enter a numeric value when inputting the frequency directly, presetting radio stations, or tuning to preset stations.
TUNING +/-: Press to scan all available radio stations.
FM MODE: If "STEREO" flashes in the display and the FM stereo reception is poor, press this button to improve the sound. You will not be able to enjoy stereo effect but the sound will be less distorted.
Note
If "STEREO" does not appear at all even when the FM broadcast is received normally, press this button to turn on the "STEREO" indication.
FM: Press to select the FM band.
AM: Press to select the AM band.
MEMORY: Uses for memorizing preset stations.
SHIFT: Press to select a memory page (A, B, or C) for presetting radio stations or tuning to preset stations.
TUNER: Selects the tuner.
Direct Tuning
For details on the buttons used in this section, see "Brief descriptions of buttons used to receive broadcasts" on this page.
1 Press TUNER to light the button up. The last received station is tuned in.
2 Press FM or AM to select the FM or AM band.
3 Press DIRECT.
4 Press the numeric buttons to enter the frequency.
Example 1: FM 102.50 MHz
$$ \boxed {1} \rightarrow \boxed {0} \rightarrow \boxed {2} \rightarrow \boxed {3} \rightarrow \boxed {0} $$
Example 2: AM 1350 kHz
(You don't have to enter the last "0" when the tuning scale is set to 10 kHz.)

If you cannot tune in a station and the entered numbers flash
Make sure you've entered the right frequency. If not, repeat Steps 3 and 4.
If the entered numbers still flash, the frequency is not used in your area.
5 If you've tuned in an AM station, adjust the direction of the AM loop antenna for optimum reception.
6 Repeat Steps 2 to 5 to receive another station.
If you try to enter a frequency that is too precise for the tuning scale
The entered value is automatically rounded up or down.
Tuning scale for direct tuning is:
FM: 50 kHz
AM: 10 kHz (to change to 9 kHz, see page 54.)
Automatic Tuning
For details on the buttons used in this section, see "Brief descriptions of buttons used to receive broadcasts" on page 44.
1 Press TUNER to light the button up. The last received station is tuned in.
2 Press FM or AM to select the FM or AM band.
3 Press TUNING + or TUNING -.
Press the + button to scan from low to high; press the - button to scan from high to low.
When the receiver reaches either end of the band
Scanning is repeated in the same direction.
The receiver stops scanning whenever a station is received.
4 To continue scanning, press TUNING + or TUNING - again.
Preset Tuning
For details on the buttons used in this section, see "Brief descriptions of buttons used to receive broadcasts" on page 44.
Before tuning to preset stations, be sure to preset them by performing steps on "Presetting radio stations" below.
Presetting radio stations
1 Press TUNER to light the button up. The last received station is tuned in.
2 Tune in the station that you want to preset using Direct Tuning (page 44), or Automatic Tuning (this page).
3 Press MEMORY.
"MEMORY" appears in the display for a few seconds. Do Steps 4 and 5 before "MEMORY" goes out.
4 Press SHIFT to select a memory page (A, B or C). Each time you press SHIFT, the letter "A," "B" or "C" appears in the display.
5 Select a preset number by pressing it (0 to 9). If "MEMORY" goes out before you press the preset number, start again from Step 3.
6 Press MEMORY again to store the station.
If "MEMORY" goes out before you can store the station, start again from Step 3.
7 Repeat Steps 2 to 6 to preset another station.
To change a preset number to another station Do Steps 1 to 6 to preset the new station to the number
Note
If the AC power cord is disconnected for about two weeks, all the preset stations will be cleared from the receiver's memory, and you will have to preset the stations again.
Preset Tuning
Tuning to preset stations
You can tune the preset stations either of the following two ways.
Scanning the preset stations
1 Press TUNER to light the button up. The last received station is tuned in.
2 Press PRESET + or PRESET – repeatedly to select the preset station you want.
Each time you press the button, the receiver tunes in one preset station at a time, in the corresponding order and direction as follows:

Using the preset codes
1 Press TUNER to light the button up. The last received station is tuned in.
2 Press SHIFT to select a memory page (A, B or C), then press the preset number of the station you want using the numeric buttons on the front panel or the supplied remote.
Other
[Unreadable]
Operations
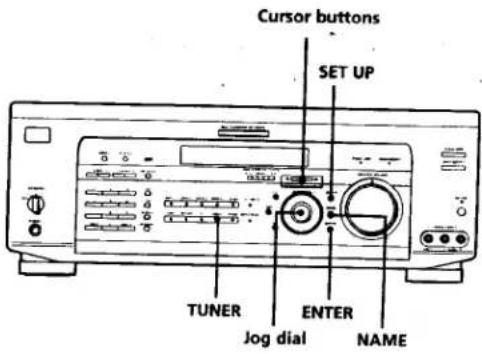
text_image
Cursor buttons SET UP TUNER ENTER Jog dial NAMEBrief descriptions of buttons that appear in this chapter
NAME button: Press to name preset stations or program sources.
Jog dial: Use to select characters when naming preset stations or program sources.
Cursor buttons (</>) : Use to move the cursor when naming preset stations or program sources.
TUNER button: Press to select the tuner.
SET UP button: Press to enter the set up mode.
ENTER button: Press to enter the completed name of the preset station or program source.
Naming Preset Stations and Program Sources
You can enter a name of up to 8 characters for preset stations and program sources. These names (for example, "VHS") appear in the receiver's display when a station or program source is selected.
Note that no more than one name can be entered for each preset station or program source.
This function is useful for distinguishing components of the same kind. For example, two VCRs can be specified as "VHS" and "8mm," respectively. It is also handy for identifying components connected to jacks meant for another type of component, for example, a second CD player connected to the MD/DAT jacks.
1 To index a preset station Press TUNER.
The last station you received is tuned in.
To index a program source
Select the program source (component) to be named, then go to Step 3.
2 Tune in the preset station you want to create an index name for.
If you are not familiar with how to tune in preset stations, see "Tuning to preset stations" on page 46.
3 Press NAME.
4 Create an index name by using the jog dial and cursor buttons:
Turn the jog dial to select a character, then press > to move the cursor to the next position.
To insert a space
Turn the jog dial until a blank space appears in the display (the space character is between "II" and "A").
If you've made a mistake
Press < or > repeatedly until the character to be changed flashes, then turn the jog dial to select the right character.
5 Press ENTER.
To assign index names to other stations
Repeat Steps 2 to 5.
Recording
Your receiver makes it easy to record to and from the components connected to it. You don't have to connect the playback and recording components directly to each other: once you select a program source on the receiver, you can record and edit as you normally would using the controls on each component.
Before you begin, make sure you've connected all components properly.
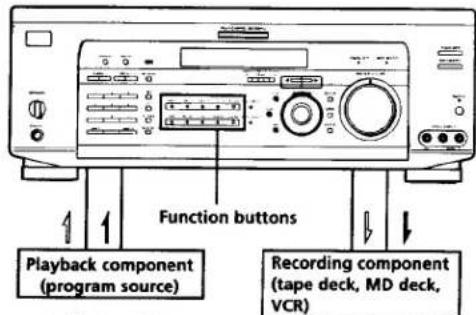
text_image
Function buttons Playback component (program source) Recording component (tape deck, MD deck, VCR)Audio signal flow Video signal flow
Recording on an audio tape or MiniDisc
You can record on a cassette tape or MiniDisc using the receiver. See the instruction manual of your cassette deck or MD deck if you need help.
1 Select the component to be recorded.
2 Prepare the component for playing.
For example, insert a CD into the CD player.
3 Insert a blank tape or MD into the recording deck and adjust the recording level, if necessary.
4 Start recording on the recording deck, then start playback on the playback component.
Notes
- You cannot record a digital audio signal using a component connected to the analog TAPE REC OUT or MD/DAT REC OUT jacks (STR-DE935) or the analog MD/TAPE REC OUT jacks (STR-DE835/SE591). To record a digital audio signal, connect a digital component to the DIGITAL MD/DAT OUT jacks (STR-DE935) or the DIGITAL MD/TAPE OUT jacks (STR-DE835/SE591).
- Sound adjustments do not affect the signal output from the TAPE REC OUT or MD/DAT REC OUT jacks (STR-DE935) or the MD/TAPE REC OUT jacks (STR-DE835/SE591).
Recording on a video tape
You can record from a VCR, a TV, or an LD player using the receiver. You can also add audio from a variety of audio sources when editing a video tape. See your VCR or LD player's instruction manual if you need help.
1 Select the program source to be recorded.
2 Prepare the component for playing.
For example, insert the laser disc you want to record into the LD player.
3 Insert a blank video tape into the VCR (VIDEO 1 or VIDEO 2) for recording.
4 Start recording on the recording VCR, then start playing the video tape or laser disc you want to record.
You can record the sound from any audio source onto a video tape while copying from a video tape or laser disc Locate the point where you want to start recording from another audio source, select the program source, then start playback. The audio from that source will be recorded onto the audio track of the video tape instead of the audio from the original medium.
To resume audio recording from the original medium, select the video source again.
Note
Please be sure to make both digital and analog connections to the TV/SAT and DVD/LD inputs. Analog recording is not possible if you only make digital connections.
Using the Sleep Timer
You can set the receiver to turn off automatically at a specified time.
Press SLEEP on the remote while the power is on. Each time you press SLEEP, the time changes as shown below.
$$ \boxed {\begin{array}{l}\rightarrow 2: 0 0: 0 0 \rightarrow 1: 3 0: 0 0 \rightarrow 1: 0 0: 0 0 \rightarrow 0: 3 0: 0 0 \rightarrow O F F\\hline\end{array}} $$
The display dims after you have specified the time.
You can freely specify the time
First, press SLEEP on the remote, then specify the time you want using the jog dial on the receiver. The sleep time changes in 1 minute intervals. You can specify up to 5 hours.
You can check the time remaining before the receiver turns off
Press SLEEP on the remote. The remaining time appears in the display.
Adjustments Using the SET UP Button
The SET UP button allows you to make the following adjustments.
Selecting the 5.1CH video Input
This parameter lets you specify the video input to be used with the audio signals from the 5.1CH INPUT jack. The 5.1CH video input is set to DVD/LD by default.
1 Press SET UP.
2 Press the cursor buttons (< or >) to select "5.1CH V:".
3 Turn the jog dial to select the video input you desire.
Adjusting the Control A1 II auto function
Turning on the Control A1 II auto function parameter lets you turn Sony components connected via Control A1 cords (see page 13) on automatically when you press the corresponding function button. Auto function is set to ON by default.
1 Press SET UP.
2 Press the cursor buttons (< or >) to select "AUTO FUNCTION."
3 Turn the jog dial to select "ON" or "OFF."
Setting up the 2 way remote (STR-DE935 only)
This receiver is shipped from the factory with the 2 way remote control system set to "ON." Normally, you can use the receiver as is.
However, if you want to use this receiver together with another component that is also compatible with the 2 way remote control system, be sure to perform the following operation to limit response to signals sent from the remote controls.
To use with the TA-E9000ES
Perform the following steps to turn OFF this unit's 2 way remote control system. Also, be sure the TA-E9000ES is turned on when using this unit.
To use with other components that have the logo
Turn OFF the other component's 2 way remote control system. For details, refer to the operating instructions supplied with your other components.
To use with Sony CD players CDP-CX260 or CDP-CX88ES
Turn OFF the remote control adapter switch on the CDP-CX260 or CDP-CX88ES. For details, refer to the operating instructions supplied with the CDP-CX260 or CDP-CX88ES.
Also when using several 2 way remote control system components together, be sure to place them close together in order to enable proper remote operation.
1 Press SET UP.
2 Press the cursor buttons (< or >) to select "2 WAY REMOTE."
3 Turn the jog dial to select "ON" or "OFF."
Additional Information
antrate c b
text_image
Scanned page of dense text with fragmented and low-resolution characters, likely from a historical or literary manuscript.
text_image
Scanned text of a document with Chinese characters, likely a formal or official form.
text_image
Scanned text of a document with Chinese characters and mathematical expressions, likely from a technical or academic paper.
text_image
Scanned text of a document with fragmented Chinese characters and possible OCR errors or partial sentences.Troubleshooting
If you experience any of the following difficulties while using the receiver, use this troubleshooting guide to help you remedy the problem. Also, see "Checking the connections" on page 23 to verify that the connections are correct. Should any problem persist, consult your nearest Sony dealer.
There's no sound or only a very low-level sound is heard.
→ Check that the speakers and components are connected securely.
→ Make sure that you've selected the correct component on the receiver.
→ Make sure that you've set the SPEAKERS selector correctly (see page 27).
→ Press MUTING on the remote if the MUTING indicator is lit.
The protective device on the receiver has been activated because of a short circuit. Turn off the receiver, eliminate the short-circuit problem and turn on the power again.
The left and right sounds are unbalanced or reversed.
→ Check that the speakers and components are connected correctly and securely.
→ Adjust front balance parameter in the LEVEL menu.
Severe hum or noise is heard.
→ Check that the speakers and components are connected securely.
→ Check that the connecting cords are away from a transformer or motor, and at least 10 feet (3 meters) away from a TV set or fluorescent light.
→ Move your TV away from the audio components.
→ Make sure you've grounded SIGNAL GND m terminal.
→ The plugs and jacks are dirty. Wipe them with a cloth slightly moistened with alcohol.
Intermittent sound from a digital source.
→ Make sure signals with 96 kHz sampling frequencies are input to the DVD/LD OPT or COAX jacks.
Troubleshooting
No sound is heard from the center speaker.
→ Make sure the sound field function is on (press SOUND FIELD — MODE).
→ Select a sound field containing the word "cinema" or "virtual" (see page 32\~35).
→ Adjust the speaker volume (see page 22).
→ Make sure the center speaker size parameter is set to either SMALL or LARGE (see page 20).
No sound or only a very low-level sound is heard from the rear speakers.
→ Make sure the sound field function is on (press SOUND FIELD - MODE).
→ Select a sound field containing the word "cinema" or "virtual" (see page 32\~35).
→ Adjust the speaker volume (see page 22).
→ Make sure the rear speaker size parameter is set to either SMALL or LARGE (see page 20).
The surround effect cannot be obtained.
→ Make sure the sound field function is on (press SOUND FIELD - MODE).
→ Make sure that the SPEAKERS selector is set to A or B (not A+B) if you connected two sets of front speakers.
Recording cannot be done.
→ Check that the components are connected correctly.
→ Select the source component with a FUNCTION button.
When recording from a digital component, make sure the input mode is set to ANALOG (see page 27) before recording with a component connected to the analog MD/DAT or TAPE terminals (STR-DE935) or the analog MD/TAPE terminals (STR-DE835/SE591).
→ When recording from a digital component, make sure the input mode is set to DIGITAL (see page 27) before recording with the component connected to the DIGITAL MD/DAT OUT terminals (STR-DE935) or the DIGITAL MD/TAPE OUT terminals (STR-DE835/SE591).
Radio stations cannot be tuned in.
→ Check that the antennas are connected securely. Adjust the antennas and connect an external antenna if necessary.
→ The signal strength of the stations is too weak (when tuning in with automatic tuning). Use direct tuning.
→ Make sure you set the tuning interval correctly (when tuning in AM stations with direct tuning) (see pages 44 and 54).
→ No stations have been preset or the preset stations have been cleared (when tuning by scanning preset stations). Preset the stations (see page 45).
→ Press DISPLAY so that the frequency appears in the display.
No picture or an unclear picture appears on the TV screen or monitor.
→ Select the appropriate function on the receiver.
→ Set your TV to the appropriate input mode.
→ Move your TV away from the audio components.
The remote does not function.
→ Point the remote at the remote sensor ☐ on the receiver.
→ Remove any obstacles in the path between the remote and the receiver.
→ Replace both batteries in the remote with new ones, if they are weak.
→ Make sure you select the correct function on the remote.
→ If the remote is set to operate the TV only, use the remote to select a source or component other than TV before operating the receiver or other component.
Reference sections for clearing the receiver's memory
| To clear | See |
| All memorized settings | page 18 |
| Customized sound fields | page 40 |
Specifications
| AUDIO POWER SPECIFICATIONS | Frequency response | Inputs (Digital) | ||
| PHONO: RIAA | DVD/LD (coaxial): | |||
| equalization curve ±0.5 dB | Sensitivity: - | |||
| POWER OUTPUT AND TOTAL HARMONIC DISTORTION: | Impedance: 75 ohms | |||
| CD, TAPE, MD/DAT, TAPE/MD, DVD/ LD, TV/SAT, | S/N: 100 dB (A, 20 kHz LPF) | |||
| With 8 ohm loads, both channels driven, from 20 - 20,000 Hz; rated 110 watts (STR-DE935) and 100 watts (STR-DE835/SE591) per channel minimum RMS power, with no more than 0.09% total harmonic distortion from 250 milliwatts to rated output (USA model only). | VIDEO 1, 2, and | DVD/LD, TV/SAT, MD/DAT (Optical): Sensitivity: - | ||
| VIDEO 3 (STR- DE935 only): | Impedance: - | |||
| 10 Hz - 50 kHz +0.5/-2 dB (with sound field, equalizer, and bass boost bypassed) | S/N: 100 dB (A, 20 kHz LPF) | |||
| Outputs | TAPE, MD/DAT TAPE/MD, (REC OUT); VIDEO 1, 2 (AUDIO OUT): Voltage: 150 mV, Impedance: 10 kilohms | |||
| Inputs (Analog) | SUB WOOFER: Voltage: 2 V | |||
| PHONO: | Impedance: 1 kilohms | |||
| Sensitivity: 2.5 mV | PHONES: | |||
| Impedance: 50 | Accepts low- and high-impedance headphones | |||
| kilohms | ||||
| S/Nb): 86 dB (A, 2.5 mVc)) | ||||
| 5.1CH INPUT, CD, DVD/LD, TAPE, | ||||
| Amplifier section | ||||
| POWER OUTPUT Stereo mode (8 ohms 20 Hz - 20 kHz, THD 0.09%) | MD/DAT, TAPE/ | |||
| MD, TV/SAT, | ||||
| STR-DE935: 110 W + 110 W | VIDEO 1, 2, and | |||
| STR-DE835/SE591: 100 W + 100 W | VIDEO 3 (STR- DE935 only): | |||
| Sensitivity: 150 mV | BASS BOOST | +6 dB at 70 Hz | ||
| Impedance: 50 | ||||
| kilohms | ||||
| Surround mode (8 ohms at 1 kHz, THD 0.8%) | S/Nb): 96 dB (A, 150 mVc)) | Sampling Frequency 48 kHz | ||
| STR-DE935: Front: 110W + 110W | b) INPUT SHORT | EQ | BASS: 100 Hz~1.0kHz (21 steps) | |
| Centera): 110W | c) Weighted network, input level | MID: 500 Hz~5.0kHz (21 steps) | ||
| Reara): 110W + 110W | TREBLE: 1.0 kHz~10kHz (21 steps) | |||
| STR-DE835/SE591: Front: 100W + 100W | Gain levels: ±10 dB, 1 dB step | |||
| Centera): 100W | ||||
| Reara): 100W + 100W | ||||
| a) Depending on the sound field settings and the source, there may be no sound output. | ||||
Dynamic power output
STR-DE935: 165 W + 165 W, 8 ohms
250 W + 250 W, 4 ohms
STR-DE835/SE591:
155 W + 155 W, 8 ohms
240 W + 240 W, 4 ohms
Specifications
| FM tuner section (dB) | AM tuner section | General | REVIEW CICU | ||
| Tuning range | 87.5 - 108.0 MHz | Tuning range | With 10-kHz tuning scale: | System | Tuner section:PLL quartz-locked digital synthesizer systemPreamplifier section:Low-noise NF type equalizerPower amplifier section:Pure-complementary SEPP |
| Antenna terminals75 ohms, unbalanced | 530 - 1710 kHz^d) With 9-kHz tuning scale: | ||||
| Sensitivity | Mono: 18.3 dBf,2.2 μV/75 ohmsStereo: 38.3 dBf,22.5 μV/75 ohms | Antenna | 531 - 1710 kHz^d) Loop antenna | ||
| Usable sensitivity11.2 dBf, 1 μV/75 ohms | Usable sensitivity50 dB/m (at 1,000 kHz or 999 kHz) | Power requirements120 V AC, 60 Hz | |||
| S/N | Mono: 76 dBStereo: 70 dB | S/N | 54 dB (at 50 mV/m) | Power consumptionSTR-DE935USA: 290 WCanada: 345 VASTR-DE835/SE591USA: 280 WCanada: 335 VA | |
| Harmonic distortion at 1 kHzMono: 0.3%Stereo: 0.5% | Harmonic distortion0.5 % (50 mV/m, 400 kHz) | ||||
| Separation | 45 dB at 1 kHz | Selectivity | At 9 kHz: 35 dBAt 10 kHz: 40 dB | ||
| Frequency response30 Hz - 15 kHz +0.5/-2 dB | d) You can change the AM tuning scale to 9 kHz. After tuning in any AM station, turn off the receiver. Hold down the TUNING + button and press the I/O button. All preset stations will be erased when you change the tuning scale. To reset the scale to 10 kHz, repeat the procedure. | AC outlets | 2 switched, total120 W/1A Max | ||
| Selectivity | 60 dB at 400 kHz | Dimensions | 430 × 376 × 157.5 mm (17 × 14^7/8 × 6^1/4 in.) including projecting parts and controls | ||
| Video section | |||||
| Inputs | Video: 1 Vp-p 75 ohmsS-video:Y: 1 Vp-p 75 ohmsC: 0.286 Vp-p75 ohms | Mass (Approx.)10.2 kg (22 lb 8 oz) | |||
| Supplied accessories | See page 4. | ||||
| Outputs | Video: 1 Vp-p 75 ohmsS-video:Y: 1 Vp-p 75 ohmsC: 0.286 Vp-p75 ohms | Design and specifications are subject to change without notice. | |||
Glossary
Surround sound
Sound that consists of three elements: direct sound, early reflected sound (early reflections) and reverberative sound (reverberation). The acoustics of the surrounding space affect the way these three sound elements are heard. Surround sound combines these sound elements in such a way that you actually can sense the size of the venue, as well as its type.
- Types of sound
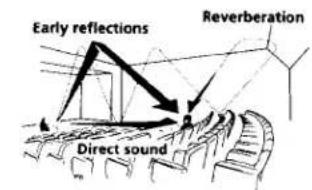
text_image
Early reflections Reverberation Direct sound• Transition of sound from rear speakers
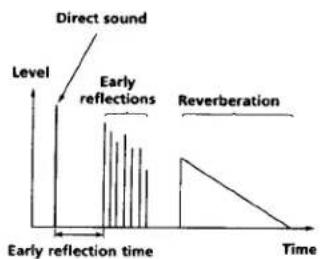
line
| Time Segment | Description | | --------------------- | ----------------------- | | Early reflections | Early reflections | | Early reflection time | Early reflection time | | Reverberation | Reverberation |Dolby Pro Logic Surround
As one method of decoding Dolby Surround, Dolby Pro Logic Surround produces four channels from two-channel sound. Compared with the former Dolby Surround system, Dolby Pro Logic Surround reproduces left-to-right panning more naturally and localizes sounds more precisely. To take full advantage of Dolby Pro Logic Surround, you should have one pair of rear speakers and a center speaker. The rear speakers output monaural sound.
Dolby Digital (AC-3)
This sound format for movie theaters is more advanced than Dolby Pro Logic Surround. In this format, the rear speakers output stereo sound with an expanded frequency range and a sub woofer channel for deep bass is independently provided. This format is also called "5.1" because the sub woofer channel is counted as 0.1 channel (since it functions only when a deep bass effect is needed). All six channels in this format are recorded separately to realize superior channel separation. Furthermore, since all the signals are processed digitally, less signal degradation occurs. The name "AC-3" comes from the fact that it is the third audio coding method to be developed by the Dolby Laboratories Licensing Corporation.
Digital Cinema Sound
This is the generic name of the surround sound produced by digital signal processing technology developed by Sony. Unlike previous surround sound fields mainly directed at the reproduction of music, Digital Cinema Sound is designed specifically for the enjoyment of movies.
Tables of Settings Using SUR, LEVEL, EQ, and SET UP buttons
You can make various settings using the LEVEL, SUR, EQ buttons, jog dial, and cursor buttons. The tables below show each of the settings that these buttons can make.
| Press and light | Press < or > to select | Turn jog dial to select | See page |
| SUR button | EFFECT LEVEL | depends on sound mode (in 21 steps) | 38 |
| WALL TYPE | between -8 to +8 (in 1 increment steps) | ||
| REVERBERATION TIME | -8 to +8 (in 1 increment steps) | ||
| SCREEN DEPTH | OFF, MID, DEEP | ||
| VIRTUAL SPEAKER | ON, OFF | ||
| LEVEL button | FRONT BALANCE | between -8 to +8 (in 1 increment steps) | 39 |
| REAR BALANCE | between -8 to +8 (in 1 increment steps) | ||
| REAR LEVEL | between -10 dB to +10 dB (in 1 dB steps) | ||
| CENTER LEVEL | between -10 dB to +10 dB (in 1 dB steps) | ||
| SUB WOOFER LEVEL | between -10 dB to +10 dB (in 1 dB steps) | ||
| LFE MIX LEVEL | MUTING, or -20 dB to 0 dB (in 1 dB steps) | ||
| DYNAMIC RANGE COMP | Off, 0.1 to 0.9 (in 0.1 dB steps), STD, or MAX | ||
| EQ button | FRONT BASS GAIN | between -10 dB to +10 dB (in 1 dB steps) | 40 |
| FRONT BASS FREQUENCY | between 100 Hz and 1.0 kHz (in 21 steps) | ||
| FRONT MID GAIN | between -10 dB to +10 dB (in 1 dB steps) | ||
| FRONT MID FREQUENCY | between 500 Hz and 5 kHz (in 21 steps) | ||
| FRONT TREBLE GAIN | between -10 dB to +10 dB (in 1 dB steps) | ||
| FRONT TREBLE FREQUENCY | between 1.0 kHz and 10 kHz (in 21 steps) | ||
| CENTER BASS GAIN | between -10 dB to +10 dB (in 1 dB steps) | ||
| CENTER BASS FREQUENCY | between 100 Hz and 1.0 kHz (in 21 steps) | ||
| CENTER MID GAIN | between -10 dB to +10 dB (in 1 dB steps) | ||
| CENTER MID FREQUENCY | between 500 Hz and 5 kHz (in 21 steps) | ||
| CENTER TREBLE GAIN | between -10 dB to +10 dB (in 1 dB steps) | ||
| CENTER TREBLE FREQUENCY | between 1.0 kHz and 10 kHz (in 21 steps) | ||
| REAR BASS GAIN | between -10 dB to +10 dB (in 1 dB steps) | ||
| REAR BASS FREQUENCY | between 100 Hz and 1.0 kHz (in 21 steps) | ||
| REAR MID GAIN | between -10 dB to +10 dB (in 1 dB steps) | ||
| REAR MID FREQUENCY | between 500 Hz and 5.0 kHz (in 21 steps) | ||
| REAR TREBLE GAIN | between -10 dB to +10 dB (in 1 dB steps) | ||
| REAR TREBLE FREQUENCY | between 1.0 kHz and 10 kHz (in 21 steps) |
Additional information
| Press | Press < or > to select | Turn jog dial to select | See page |
| SET UP | FRONT [XXX] | LARGE or SMALL | 19 |
| CENTER [XXX] | LARGE, SMALL, or NO | ||
| REAR [XXX] | LARGE, SMALL, or NO | ||
| REAR PL. [XXX] | SIDE, MIDDLE, or BEHIND | ||
| REAR HGT. [XXX] | LOW or HIGH | ||
| SUB WOOFER [XXX] | YES or NO | ||
| FRONT XX.X FEET | between 3 feet (1.0 meters) and 40 feet (12.0 meters) (in 1 foot (0.1 meter) steps) | ||
| CENTER XX.X FEET | between FRONT and 5 feet (1.5 meters) (in 1 foot (0.1 meter) steps) | ||
| REAR XX.X FEET | between FRONT and 15 feet (4.5 meters) (in 1 foot (0.1 meter) steps) | ||
| DIST. UNIT [XXX] | feet or meter | ||
| 5.1CH V: [XXX] | DVD/LD, TV/SAT, VIDEO 1, VIDEO 2,VIDEO 3 | 50 | |
| AUTO FUNCTION [XXX] | ON, OFF | ||
| 2 WAY REMOTE [XXX](STR-DE935 only) | ON, OFF |
Index
A
AC-3. See Dolby Digital (AC-3)
Adjusting
brightness of the display 28
equalizer 40
speaker volumes 22
surround parameters 38
Automatic tuning 45
B
Basic amplifier operations
26\~30
Battery 4
C
Changing
display 28
effect level 38
Checking the connections 23
Clearing receiver's memory 18
Connecting. See Hookups
Customizing sound fields 38
D
Digital Cinema Sound 55
Direct tuning 44
Dolby Digital (AC-3) 55
Dolby Pro Logic Surround 55
Dubbing. See Recording
E, F, G
Editing. See Recording
Effect level 38
EQ 40
H
Hookups
AC power cord 14
antennas 5
audio components 6,7
digital components 9,10
CONTROL A1 II 13
S-LINK CONTROL S 13
speaker system 15
video components 8
I, J, K
Indexing. See Naming
L M
Labeling. See Naming
N, O
Naming
preset stations 48
program sources 48
P, Q
Parameter 41, 56, 57
Preset stations
how to preset 45
how to tune 46
R
Receiving broadcasts
automatically 45
directly 44
preset stations 45
Recording
on an audio tape or MD 48
on a video tape 49
s
Scanning
preset stations. See Preset
tuning
radio stations. See Automatic
tuning
Selecting
component 26
front speaker system 27
sound field 32
Sleep timer 49
Sound field
adjustable parameters 41
customizing 38
pre-programmed 32\~35
resetting 40
selecting 32
Speakers
adjusting speaker volume 22
connection 15
front speakers (A/B) 27
impedance 17
placement 19
Supplied accessories 4
Surround sound 18\~24,31\~42
T
Test tone 22
Tuning
automatically 45
directly 44
preset stations 45
U, V, W, X, Y, Z
Unpacking 4