
TA-N611 - Empfänger SONY - Kostenlose Bedienungsanleitung
Finden Sie kostenlos die Bedienungsanleitung des Geräts TA-N611 SONY als PDF.


Benutzerfragen zu TA-N611 SONY
0 Frage zu diesem Gerät. Beantworten Sie die, die Sie kennen, oder stellen Sie Ihre eigene.
Eine neue Frage zu diesem Gerät stellen
Laden Sie die Anleitung für Ihr Empfänger kostenlos im PDF-Format! Finden Sie Ihr Handbuch TA-N611 - SONY und nehmen Sie Ihr elektronisches Gerät wieder in die Hand. Auf dieser Seite sind alle Dokumente veröffentlicht, die für die Verwendung Ihres Geräts notwendig sind. TA-N611 von der Marke SONY.
BEDIENUNGSANLEITUNG TA-N611 SONY
Stereo Power Amplifier
TA-N511/N611
Operating Instructions
Before operating the unit, please read this manual thoroughly and retain it for future reference.
Owner's Record
The model and serial numbers are located at the rear.
Record these numbers in the spaces provided below. Refer to them whenever you call upon your Sony dealer regarding this product.
Model No. ____ Serial No. ____
WARNING
To prevent fire or shock hazard, do not expose the unit to rain or moisture.
text_image
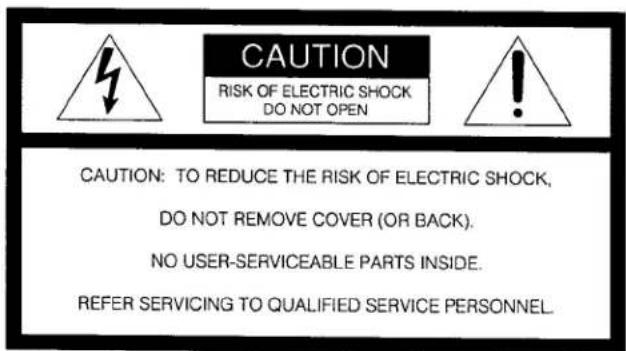
CAUTION RISK OF ELECTRIC SHOCK DO NOT OPEN CAUTION: TO REDUCE THE RISK OF ELECTRIC SHOCK, DO NOT REMOVE COVER (OR BACK). NO USER-SERVICEABLE PARTS INSIDE. REFER SERVICING TO QUALIFIED SERVICE PERSONNEL.
This symbol is intended to alert the user to the presence of uninsulated "dangerous voltage" within the product's enclosure that may be of sufficient magnitude to constitute a risk of electric shock to persons.
This symbol is intended to alert the user to the presence of important operating and maintenance (servicing) instructions in the literature accompanying the appliance.
• The graphical symbols are on the rear enclosure.
Precautions
On safety
- Operate the unit only on 120 V AC, 60 Hz.
- Should any solid object or liquid fall into the unit, unplug it and have it checked by qualified personnel before operating it any further.
- Unplug the unit from the wall outlet if it is not to be used for an extended period of time. To disconnect the cord, pull it out by grasping the plug. Never pull the cord itself.
- One blade of the plug is wider than the other for the purpose of safety and will fit into the power outlet only one way. If you are unable to insert the plug fully into the outlet, contact your dealer.
On installation
- Place the unit on a level surface.
- Do not install the unit in a location near heat sources such as radiators or air ducts, or in a place subject to direct sunlight, excessive dust, mechanical vibration or shock.
- Good air circulation is essential to prevent internal heat built-up in the unit. Place the unit in a location with adequate air circulation. Do not place the unit on a soft surface, such as a rug that would block the ventilation holes on the bottom.
- Do not place anything on top of the cabinet. The top ventilation holes must be unobstructed for the proper operation of the unit and to prolong the life of its components.
On cleaning the cabinet
Clean the cabinet, panel and controls with a soft cloth lightly moistened with mild detergent solution. Do not use any type of abrasive pad, scouring powder or solvent such as alcohol or benzine.
On repacking
Do not throw away the carton and the packing material. It makes an ideal container to transport the unit in.
If you have any question or problem concerning your unit, please consult your nearest Sony dealer.
For detailed precautions, see the leaflet "IMPORTANT SAFEGUARD".
Connections
- Connect the AC power cord last. Make sure power is off.
- Cord plugs and jacks are color coded. Red plugs and jacks are for right channel (R) and white ones for the left channel (L).
• The cable connectors should be fully inserted into the jacks. A loose connection may cause hum and noise. - The + and - cords of the speaker systems should be correctly connected to the + and - terminals of the amplifier respectively.
flowchart
graph TD
    A["Right"] --> B["TA-N611 only"]
    C["Left"] --> B
    D["Rear speakers (for enjoying Surround sound)"] --> B
    E["Front speakers"] --> F["TA-N511 TA-N611"]
    G["Power AMP CONTROL"] --> H["INPUT"]
    I["TOU OUT"] --> J["TOU OUT FRONT"]
    K["TOU OUT RAR"] --> L["TOU OUT REAR (for enjoying Surround sound and DRLC)"]
    M["Control amplifier TA-E511 TA-E611"] --> N["TA-E611 only"]
    O["TOU OUT"] --> P["TOU OUT FRONT"]
    Q["TOU OUT RAR"] --> R["TOU OUT REAR"]
    S["TOU OUT"] --> T["TOU OUT FRONT"]
    U["TOU OUT"] --> V["TOU OUT RAR"]
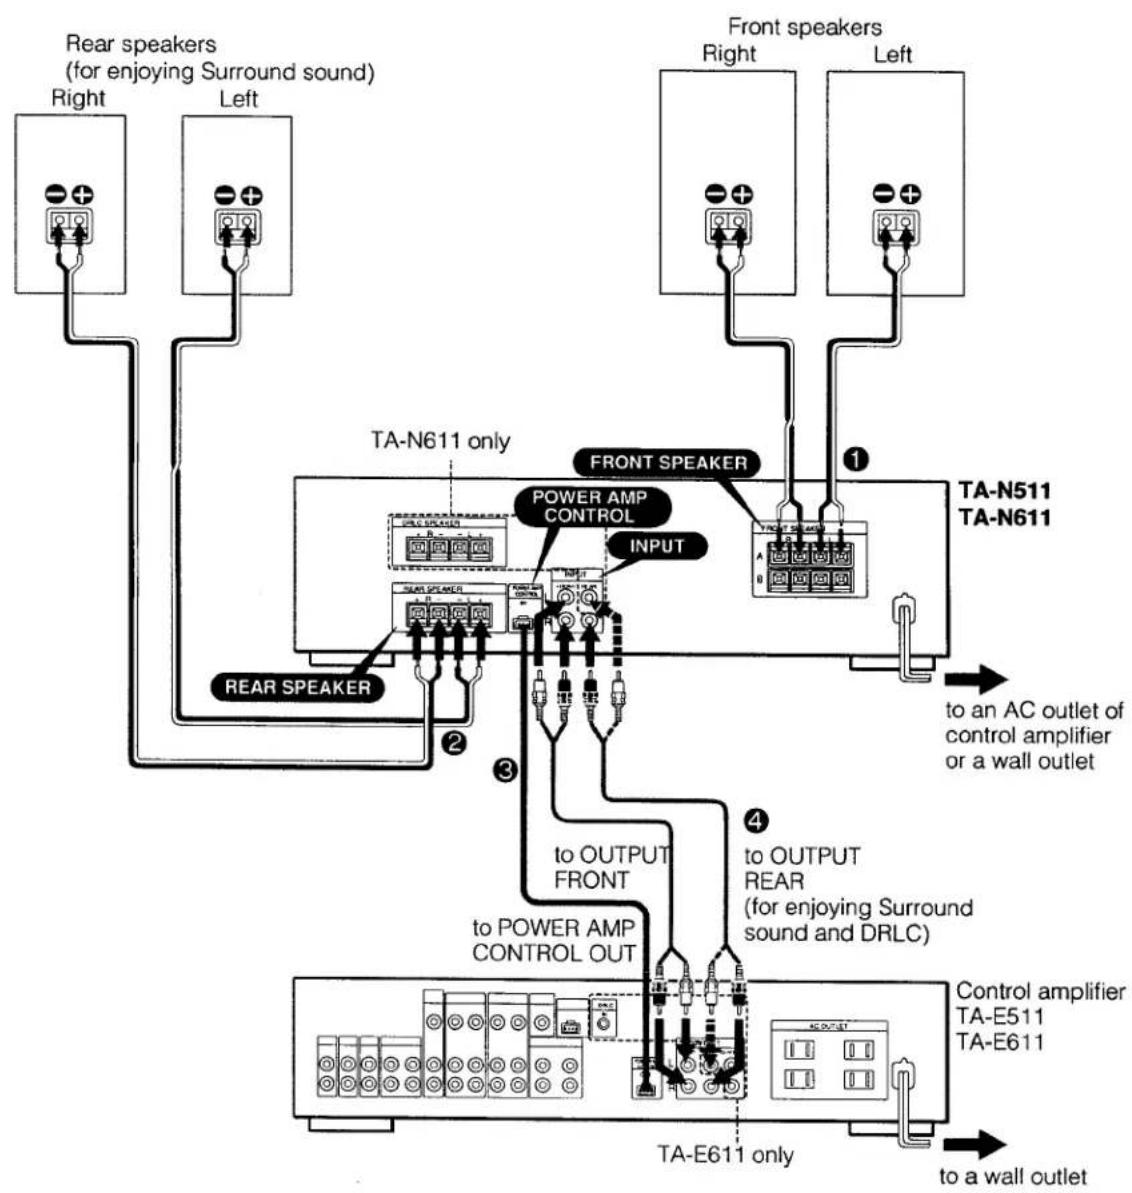
① Front speaker cords
You can connect two pairs of speaker systems: system A and system B.
They can be selected individually or simultaneously with the selector on the front panel.
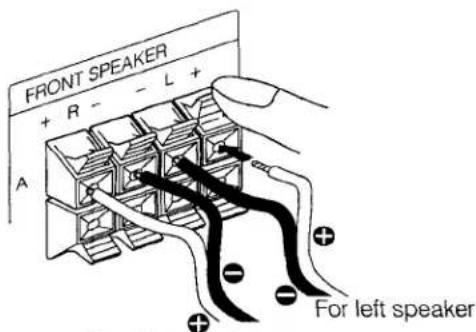
text_image
FRONT SPEAKER + R - - L + A For left speakerFor right speaker
② Rear speaker cords
Connect a pair of rear speaker systems for enjoying surround sound.
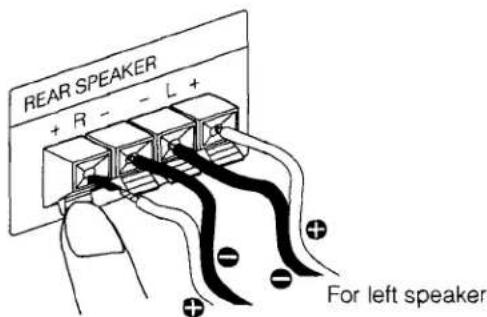
text_image
REAR SPEAKER + R - - L + For left speakerFor right speaker
③ Power amplifier control cord (not supplied)
Connect to the POWER AMP CONTROL OUT jack of the AV control amplifier TA-E511 or TA-E611 with the control cord.
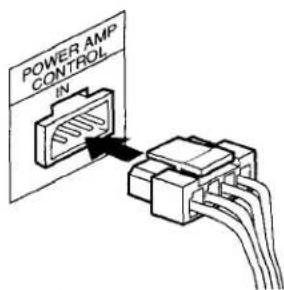
text_image
POWER AMP CONTROL INPush in until it clicks.

text_image
POWER AMP CONTROL INTo disconnect.
④ Audio connection cords
TA-N511 has one REAR INPUT terminal for rear speakers.
Connect to the REAR OUTPUT terminal of TA-E511 with a monocular connection cord.
TA-N611 has left and right REAR INPUT terminals.
Connect to the left and right REAR OUTPUT terminals of TA-E611 with a stereo connection cord respectively.
Connections for Dual Room Link Control Kit and Speakers (TA-N611 only)
The DRLC (Dual Room Link Control) allows you to "link" a second room to your main or primary listening room. When the Dual Room Link Control Kit RM-S2020K or RM-S2070K (optional) and optional speakers are connected to your audio system and they are placed in the second room, either the same program source being played in the main room or a different program source can be heard in the second room.
When using the RM-S2070K
Connect the control amplifier TA-E611 and the speakers for DRLC to the power amplifier, and connect the RM-S2070K to the control amplifier.
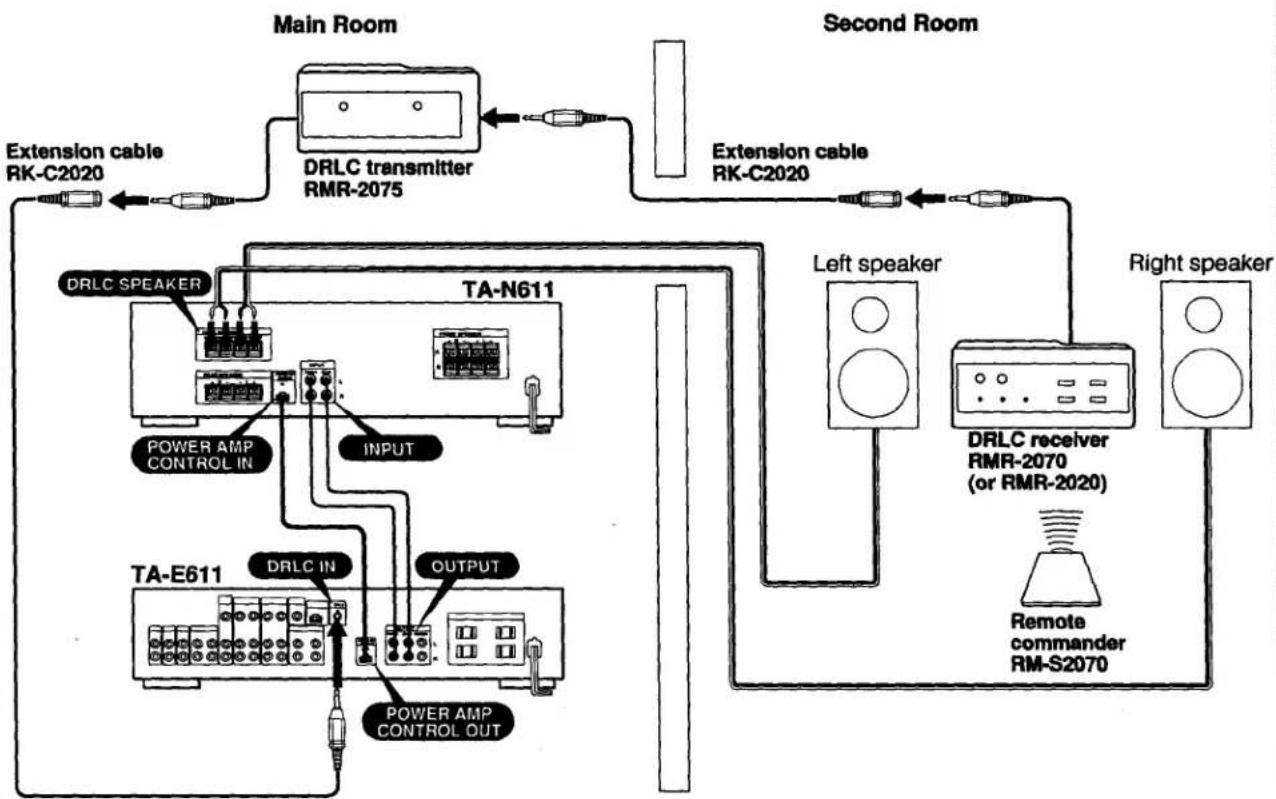
flowchart
graph TD
    A["Main Room"] --> B["DRLC transmitter RMR-2075"]
    B --> C["Extension cable RK-C2020"]
    B --> D["Second Room"]
    D --> E["Extension cable RK-C2020"]
    E --> F["TA-N611"]
    F --> G["POWER AMP CONTROL IN"]
    F --> H["INPUT"]
    F --> I["TA-E611"]
    I --> J["DRLC IN"]
    I --> K["OUTPUT"]
    I --> L["POWER AMP CONTROL OUT"]
    F --> M["Left speaker"]
    F --> N["Right speaker"]
    M --> O["DRLC receiver RMR-2070 (or RMR-2020)"]
    N --> P["Remote commander RM-S2070"]
Notes
- To select surround mode or DRLC function, be sure to connect POWER AMP CONTROL jacks.
- The surround system in the main room and DRLC function cannot be operated simultaneously.
For details, refer to the operating instructions of TA-E611 and RM-S2020K or RM-S2070K.
Function of Controls
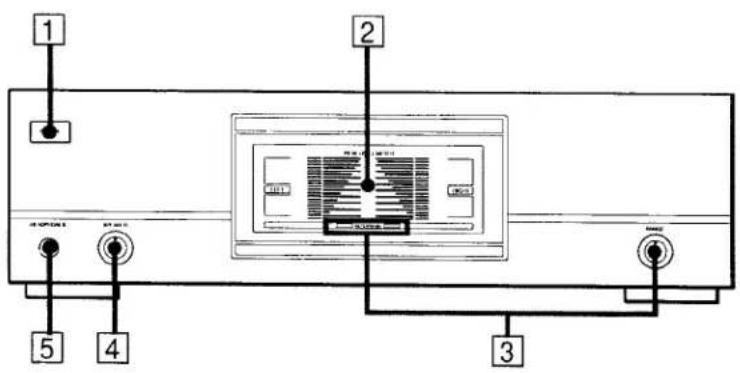
text_image
1 2 3 4 5 600V/1.0V 800V/1.0V RPG RPG RPG RPG1 POWER switch
Press to turn ON or OFF the unit.
To control the power of the unit with the power switch (SYSTEM POWER) of the control amplifier, connect the power cord of the unit to the switched AC outlet of the control amplifier and usually set the POWER switch of the unit to ON.
2 PEAK POWER METERS
Indicate the peak power levels of the LEFT and RIGHT channels independently.
3 RANGE selector and indicator
Select the range of the PEAK POWER METERS:
x1: Peak power level is indicated by the scales (for use when listening at the high volume level).
x1/10: Peak power level is indicated by 1/10 of the scales (for use when listening at the low volume level).
4 SPEAKERS selector
Select the speaker system to be used.
A: To drive speaker system A.
B: To drive speaker system B.
A+B: To drive both speaker systems A and B.
OFF: For headphones listening only.
Notes
- Speaker systems A and B are series connected. No sound can be heard if the SPEAKERS selector is set to A+B when only one speaker system is connected.
- The sound of the rear (surround) or DRLC (Dual Room Link Control) speakers can be heard only when surround mode or DRLC is selected on the control amplifier or DRLC units.
5 HEADPHONES jack (stereo phone jack)
Connect headphones for listening the sound of front speakers.
Notes
• After setting the volume level to minimum on the control amplifier, connect headphones.
- The sound of rear and DRLC speakers cannot be heard from headphones.
Troubleshooting
Before going through the check list below, first refer back to the connection and operating procedures. Should any problem persist after you have made these checks, consult your nearest Sony dealer.
| General | Remedy |
| No audio. | Check the power cord connection.Check the SPEAKERS selector setting.Check the connections.Check the speaker terminal connection and the speaker cord for a short. |
| No audio from one channel. | Check the speaker cord or connecting cord connection. |
| Lack of bass sound or obscure instrument position. | Check if the positive (+) speaker terminal on the amplifier is not connected to the negative (−) terminal of the speaker, and vise versa. |
Specifications
AUDIO POWER SPECIFICATIONS POWER OUTPUT AND TOTAL HARMONIC DISTORTION:
With 8-ohm loads, both channels driven, from 20 - 20,000 Hz; rated 135 watts (TA-N511) or 150 watts (TA-N611) per channel minimum RMS power, with less than 0.9% total harmonic distortion from 250 milliwatts to rated output.
Amplifier section
Power bandwidth (IHF)
7 Hz - 30 kHz (8 ohms)
Overall output (1 kHz, 8-ohm load)
TA-N511: 135 W + 135 W (front)
15 W + 15 W (rear)
TA-N611: 150 W + 150 W (front)
15 W + 15 W (rear/DRLC)
Harmonic distortion
TA-N511: Less than 0.9% (at 1 kHz, 8-ohm
load, front: 135 W + 135 W, rear: off)
TA-N611: Less than 0.9% (at 1 kHz, 8-ohm
load, front: 150 W + 150 W, rear/DRLC: off)
Intermodulation (IM) distortion (60 Hz : 7 kHz)
Less than 0.9 % at rated output
Frequency response
INPUT (FRONT/REAR): 10 Hz - 70 kHz ±3 dB
Input sensitivity 1 V (50 kohms)
Damping factor 40 (8 ohms, 1 kHz)
Signal-to-noise ratio
115 dB
Output FRONT SPEAKER, REAR SPEAKER, and
DRLC SPEAKER (TA-N611 only):
Accepts speakers of 8 - 16 ohms.
HEADPHONES: Accepts low and high
impedance headphones.
General
Power requirements
120 V AC, 60 Hz
Power consumption
TA-N511: 230 W
TA-N611: 250 W
Dimensions Approx. 430 x 130 x 345 mm (w/h/d)
(17 × 5 ^1 / 8 × 13 ^3 / 4 inches)
Weight TA-N511: Approx. 9.1 kg (20 lb 1 oz)
TA-N611: Approx. 10.0 kg (22 lb 1 oz)
Design and specifications subject to change without notice.