
SL-XP370 - CD-Player TECHNICS - Kostenlose Bedienungsanleitung
Finden Sie kostenlos die Bedienungsanleitung des Geräts SL-XP370 TECHNICS als PDF.


| Produkttyp | Tragbarer CD-Player |
| Modell | SL-XP370 |
| Marke | Technics |
| Abmessungen (B×H×T) | 130,1 × 28,7 × 156,5 mm |
| Gewicht (mit Batterien) | 305 g |
| Gewicht (ohne Batterien) | 265 g |
| Stromversorgung | DC 4,5 V (Netzadapter oder Batterien) |
| Batterietyp (wiederaufladbar) | Ni-Cd RP-BP60 / SH-CDB8D (2 Stück) |
| Batterietyp (Trockenbatterien) | 2 × LR6 (UM-3) Alkaline |
| Spielzeit (Akku, Anti-Shock AUS) | ca. 3 Stunden |
| Spielzeit (Akku, Anti-Shock EIN) | ca. 2 Stunden 30 Minuten |
| Spielzeit (Alkaline, Anti-Shock AUS) | ca. 8 Stunden |
| Spielzeit (Alkaline, Anti-Shock EIN) | ca. 6 Stunden |
| Ladezeit (Akku) | ca. 3 Stunden |
| Frequenzgang | 20 – 20.000 Hz (+0,5 dB / -1,5 dB) |
| Ausgangsspannung | 0,65 V (50 kΩ) |
| Signal-Rausch-Verhältnis | mehr als 96 dB |
| Kopfhörerausgang | max. 5 mW + 5 mW/16 Ω (einstellbar) |
| Digitalfilter | 8-fach-Überabtastung |
| DA-Wandler | 1 Bit, MASH |
| Lasertyp | Halbleiterlaser, 780 nm |
| Anti-Shock-Speicher | bis zu 3 Sekunden |
| DSP-Modi | Aus, Halle, Live, Kirche, S-XBS |
| Wiedergabemodi | Normal, Zufall, Programm (24 Titel), Wiederholung (1 Titel/alle), A-B-Wiederholung (nur SL-XP471C) |
| Zubehör im Lieferumfang | Netzadapter, Stereokopfhörer, Ohrhörer (je nach Region) |
| Besonderheiten | HOLD-Schalter, Batterieanzeige, automatische Abschaltung |
Häufig gestellte Fragen - SL-XP370 TECHNICS
Benutzerfragen zu SL-XP370 TECHNICS
0 Frage zu diesem Gerät. Beantworten Sie die, die Sie kennen, oder stellen Sie Ihre eigene.
Eine neue Frage zu diesem Gerät stellen
Laden Sie die Anleitung für Ihr CD-Player kostenlos im PDF-Format! Finden Sie Ihr Handbuch SL-XP370 - TECHNICS und nehmen Sie Ihr elektronisches Gerät wieder in die Hand. Auf dieser Seite sind alle Dokumente veröffentlicht, die für die Verwendung Ihres Geräts notwendig sind. SL-XP370 von der Marke TECHNICS.
BEDIENUNGSANLEITUNG SL-XP370 TECHNICS
Supplied Accessories
Check the packing carton for these accessories.
Common
AC adaptor 1 pc.
For United Kingdom (RFEA404B-W)
For Continental Europe (RFEA401E-1S)
For Australia and N.Z. (RFEA404A-W)
For others (RFEA402Z-W)
Power plug adaptor . 1 pc.
(RJP120ZDS-K)
(For areas except Continental Europe,
United Kingdom, Australia and N.Z.)
SL-XP370 ONLY
For areas Continental Europe and United Kingdom:
Stereo headphones ....1 pc.
(RP-HT103DTYS)
For others:
Stereo earphones (RFEV307A-KA) ... 1 pc.
SL-XP471C ONLY
Wireless remote controller .... 1 pc.
(RAK-SL916WK)
Dry cell batteries 2 pcs.
(R03UPE/2ST)
Car adaptor 1 pc.
(SH-CDC2/SH-CDC9)
Car stereo cassette adaptor ....1 pc.
(SH-CDM9/SH-CDM9D)
For your reference:
For SL-XP370 and SL-XP471C models, you can use the optional stereo earphones with remote controller
(RP-HV482). For details, contact your dealer. (See page 5 for their operation.)
SL-XP470 ONLY
Rechargeable Ni-Cd batteries ..... 2 pcs.
(RP-BP60)
Stereo connection cable 1 pc.
(RJL2P001X10)
Battery carrying case 1 pc.
(RFC0032-Q)
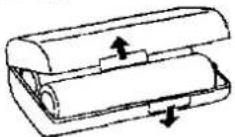
Remove the rechargeable batteries from their case before use.
For areas Continental Europe and United Kingdom:
Stereo earphones with remote
controller (RFEV124ACKS) ..... 1 pc.
For others:
Stereo earphones with remote
controller (RFEV123ACKS) ..... 1 pc.
Note (SL-XP470 ONLY)
Do not use any stereo earphones with remote controller except for the model supplied with this unit since this will cause problems in operation.
Technics
Portable CD Player
SL-XP370
SL-XP470
SL-XP471C
Operating Instructions
natural_image
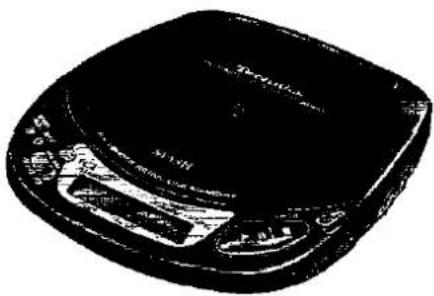
Black and white photo of a CD or DVD device (no visible text or symbols)The photograph shows model SL-XP470.
Note
The "EB" indication shown on the packing case indicates United Kingdom.
Before connecting, operating or adjusting this product, please read these instructions completely.

DIGITAL AUDIO


RQT2570-B
CAUTION:
The AC voltage is different according to the area.
Be sure to set the proper voltage in your area before use.
(For details, please refer to the attached sheet.)
WARNING:
TO REDUCE THE RISK OF FIRE OR ELECTRIC SHOCK, DO NOT EXPOSE THIS APPLIANCE TO RAIN OR MOISTURE.
ADVARSEL:
FOR AT REDUCERE RISIKOEN FOR BRAND OG ELEKTRISKE ST∅D MÅ DETTE APPARAT IKKE UDSÄETTES FOR REGN ELLER FUGT.
VAROITUS:
TULIPALO- JA SÄHKÖISKUVAA- RAN VÄLTTÄMISEKSI ÄLÄ SAATA TÄTÄ LAITETTA ALTTIIKSI SA- TEELLE TAI KOSTEUDELLE.
Marking sign is located on bottom of the unit.
CAUTION!
THIS PRODUCT UTILIZES A LASER. USE OF CONTROLS OR ADJUSTMENTS OR PERFORMANCE OF PROCEDURES OTHER THAN THOSE SPECIFIED HEREIN MAY RESULT IN HAZARDOUS RADIATION EXPOSURE.
DO NOT OPEN COVERS AND DO NOT REPAIR YOURSELF. REFER SERVICING TO QUALIFIED PERSONNEL.
SUOMI
VAROITUS!
LAITTEEN KÄYTTÄMINEN MUULLA KUIN TÄSSÄ KÄYTTÖOHJEESSA MAINITULLA TAVALLA SAATTAA ALTISTAA KÄYTTÄJÄN TURVAL- LISUUSLUOKAN 1 YLITTÄVÄLLE NÄKYMÄTTÖMÄLLE LASERSÄ- TEILYLLE.
ADVARSEL: USYNLIG LASERSTRÅLING VED ÅBNING, NÅR SIKKERHEDSAF-BRYDERE ER UDE AF FUNKTION. UNDGÅ UDSÄTTELSE FOR STRÅLING.
(Påsat under apparat)
DANSK
BEMAERK!
I DETTE APPARAT ANVENDES EN LASER.
BRUG AF BETJENINGSKNAPPER ELLER REGULERINGER ELLER FREMGANGSMÄDER UDOVER DE I DENNE BETJENINGSVEJLEDNING ANGIVNE, KAN MEDFÖRE FARE FOR BESTRÅLING.
ÅBN IKKE KABINETTET OG FORSOG IKKE AT UDFøre REPARATIONER SELV. REPARATIONER MÅ KUN FORETAGES AF KVALIFICEREDE TEKNIKERE.
NORSK
ADVARSEL!
DETTE PRODUKTET ANVENDER EN LASER.
BETJENING AV KONTROLLER, JUSTERINGER ELLER ANDRE INNGREP ENN DE SOM ER BESKREVENT I DENNE BRUKSANVISNING, KAN FÖRE TIL FARLIG BESTRÅLING.
DEKSLER MÅ IKKE ÅPNES, OG FORS∅K ALDRI Å REPARERE APPARATET PÅ EGENHÅND. ALT SERVICE OG REPARASJONSARBEID MÅ UTF∅RES AV KVALIFISERT PERSONELL.
DANGER-Invisible laser radiation when open and interlock defeated. AVOID DIRECT EXPOSURE TO BEAM.
(Bottom of the product)
VARO! Avattzessa ja suojaluklitus ohitettaessu olet sittülna näkymätön issersätelydle. Alä kalao sätssen.
VARNING! Osynlig laserstråning när denne del är öppned och spårren är urköpplad. Betrakta aj strålen.
ADVERSEL! Usyning lasersbrållng när dekaal lpnes og sikkerhedslje brytes. Unngå ekspønering for strålen.
(Tuetteen potjassa) (Apparatens undersida) (Produklets underside)
Power Supply Preparations
Refer to the specifications (page 8) for the duration of the play time provided when rechargeable or dry cell batteries are used.
Using rechargeable batteries
Make sure that the rechargeable batteries have been recharged before use.
Recharging procedure
1 Place the rechargeable batteries inside the unit.
(No batteries other than RP-BP60/SH-CDB8D can be recharged.)

natural_image
Two identical diagrams of a car interior showing internal components, possibly a vehicle or container, with no visible text or symbols.2 Connect the AC adaptor. DC IN jack (DC IN 4.5V ⊕ ⊕ ⊕)

Note
The configuration of the AC adaptor differs according to area.
It takes about 3 hours to fully recharge the batteries.
●A 2-tier recharging system is used under which the batteries can be used for about 2 hours (Anti-shock memory off.) with an hour or so of recharging.

3 Upon completion of the recharging, disconnect the AC adaptor from the DC IN jack and power outlet.
Removing the batteries
Push the batteries upward in the direction of the arrow to remove them.

If the battery compartment lid becomes disengaged, position it horizontally and press it back into position.

- The batteries can be used for about 10 months (300 times) if they are used every day. They will need to be replaced if the duration of their operation drops drastically.
●The batteries cannot be recharged during play or in the standby mode (see page 3).
●Recharging should be performed at 0°C -40°C.
●While recharging, the AC adaptor and rechargeable batteries may get warm. This is normal.
Using dry cell batteries (not included)
Disconnect the AC adaptor and then install two LR6 (UM-3) type alkaline batteries.
The batteries are inserted and removed in the same way as for the rechargeable batteries.

Bottom of the unit
Apparatens undersida
Produktets underside
Komponentens underside

LUOKAN 1 LASERLAITE KLASS 1 LASER APPARAT
Using the AC adaptor
Connect the AC adaptor supplied.
Refer to the section on "Using rechargeable batteries" for details on the connections.
Note
The unit is in the standby condition when the AC adaptor is connected. The primary circuit is always "live" as long as the AC adaptor is connected to an electrical outlet
Using a car adaptor
The SL-XP471C comes with a car adaptor. Be sure to use the adaptor specially designed for this model. (Refer to the separate installation instructions.)
Be sure to obtain the car adaptor (SH-CDC9), available as an optional accessory, for the SL-XP370 and SL-XP470.
The batteries can be recharged inside the car using the car adaptor.
Battery Indicator
This starts flashing when the batteries have run down, and after a short while the power is automatically cut off.
(The amount of time during which play continues after the indicator has started flashing differs slightly depending on the type of batteries used.)
| Type of battery | Action |
| Recharge-able batteries | Recharge the batteries again. |
| Dry cell batteries | Replace with new batteries. |
(The battery indicator may not flash if rechargeable batteries other than those designated by our company are used)
7 4958 _q
Battery indicator
Accidental Operation Prevention Function

SL-XP470 ONLY
For others
For Continental Europe and United Kingdom HOLD mode


This function prevents the unit from operating even if a control button is pressed in error. (The disc lid can still be opened and closed.)
Use the function to prevent the following situations:
Example 1:
While the unit is not in use, the power is inadvertently turned on and the batteries run down.
Example 2:
Play is interrupted while the unit is in use.
To use the accidental operation prevention function
Set HOLD to the HOLD position.
Before operating the buttons
Be absolutely sure to move HOLD to release the unit from the hold mode.
HOLD Indicator
If the unit is in the hold mode, the " h_0 /d" indicator appears when any of the unit's control buttons is pressed.
When the unit is turned off
The display appears only when ▶ III is pressed
[Unreadable due to severe distortion and noise]
[Unreadable due to severe distortion and noise]
1 Press OPEN to open the lid, and insert the disc.
Press the area near the center hole of the disc until it clicks into position
Label must face upward.

5 Press ▶ II.
Play now starts.
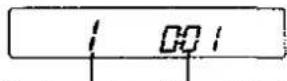
Track number Elapsed playing time of each track in play
Play stops automatically when all the tracks have been played.
6 Adjust the volume level.
(If the Unit has been connected to the car audio system, adjust the volume level on the system.)
2 Release the hold mode.

3 Set MODE to NORMAL.
4 SL-XP470/SL-XP370 ONLY
Connect the stereo earphones/headphones to the 🔉 jack.
(Plug in firmly)
SL-XP370 model (for areas except Continental Europe and United Kingdom), and SL-XP470 model.

Ear piece
Adjust the size to your ears.
Slide the fitting rings to the "large" position if the earphones jiggle about inside your ears; slide them to the "small" position if they fit too tightly for comfort.
| Operation | Button |
| Stopping play | ■ |
| Pause: press again to resume play. | ▶ II |
| Skip forward/backward (skip function): tap during play. | ▶: Forward direction◀◀: Backward direction |
| Rapid forward/backward (search function): keep depressed during play. |
Removing the disc
After the disc has stopped rotating, press PUSH and release the disc. (Do not open the lid during play.)

Skip and search functions
- During program play the tracks are skipped in the forward or backward direction in the programmed sequence.
- During program play, random play or 1-track repeat play, only the track being played is searched.
●During random play, it is not possible to skip to the track which has already been played.
Standby mode
Press ■/OPR OFF during play. Standby is a mode during which the disc stops rotating and the total number of tracks and the total playing time are displayed.
Total number of tracks Total playing time

Automatic Shut-OFF function
When the unit is left for about 10 minutes in the standby or pause mode, this function automatically shuts off the power in order to prevent the rechargeable batteries, etc. from discharging needlessly.
For your reference:
"no disc" display
This appears for about 30 seconds when a disc has not been inserted or when a disc has not been inserted properly and then ▶ II is pressed.
"OPEN" display
This appears for about 10 minutes after the lid is opened. (It does not appear when the unit is turned off.)
Indicators on the ▶ II and ■/OPR OFF buttons
| Model number | Lights up |
| SL-XP470/SL-XP471C | ○ |
| SL-XP370 | × |
Off: When the unit is turned off
On: During play
Flashes rapidly: ●When play is started from the OPR OFF mode
- When the skip function has been used
Flashes slowly: Pause/standby mode
SL-XP471C ONLY
When the AC adaptor or Car adaptor is used, all the buttons except OPEN and PUSH buttons light up.
If the hold mode is established when the unit is operated using rechargeable batteries or dry cell batteries, the indicators go off in order to conserve the batteries' charge.
For your reference:
(SL-XP470/SL-XP471C ONLY)
The backlight of the display comes on when the unit is operated using the car adaptor or AC adaptor.
Other Play Methods
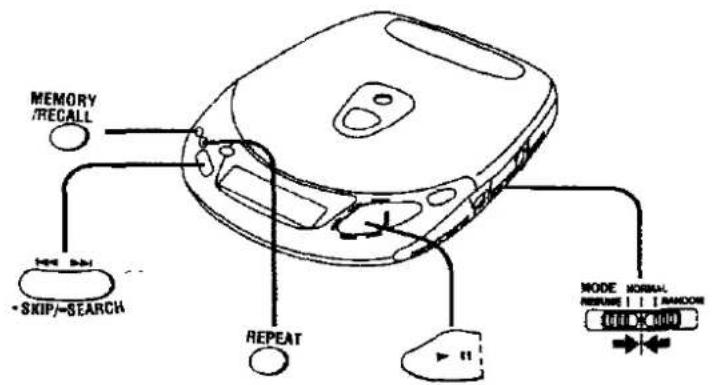

Random play
1 Set MODE to RANDOM.
2 Press ▶ II.
To cancel the random mode Set MODE to NORMAL.
For your reference:
The first track to be played can be changed by pressing ▶▶ in the standby mode. (All the tracks are played regardless of the track first played.)
Note
Program play is not possible in the RANDOM mode.
Resume play
Play can be resumed from the start of the track which was playing when the standby mode was last selected or when the power was last turned off.
This is useful when playing discs inside a car.
Set MODE to RESUME.
To cancel the resume mode Set MODE to NORMAL.
For your reference:
If MODE is set to RESUME while the unit is turned off, the all repeat function is automatically activated when play is started.
Notes
- If play is stopped near the end of a track, it may be resumed from the next track.
- When the unit is turned off during play and the disc is replaced, play will start at the same position midway through the corresponding track on the new disc since the position of the track which was previously played is still in the memory.
Program play
Up to 24 tracks can be programmed.
Preparation:
Set the unit to the standby mode. (See page 3.)
1 Set MODE to NORMAL.
2 Press -SKIP/-SEARCH to select the desired track number.
3 Press MEMORY/RECALL to store the number in the memory.
("M" appears on the display.)
4 Repeat steps 2 and 3 to program all the desired tracks.
5 Press ▶ II.
To program the same track repeatedly
Press MEMORY/RECALL repeatedly after step 3.
When "f" appears
No more tracks can be programmed.
To check what has been programmed
Press MEMORY/RECALL during play. (The display shows the programmed track numbers in the sequence you have entered.)
To cancel all the programming
Press ■/OPR OFF.
Skip play
Preparation:
Set the unit to the standby mode. (See page 3.)
1 Set MODE to NORMAL.
2 Press -SKIP/-SEARCH to select the desired track number.
3 Press ▶ II.
The tracks are played in sequence starting with the selected track until the last track, after which play is automatically stopped.
Repeat function
To repeat one track
Press REPEAT once in the standby mode or during play.

To repeat all the tracks
Press REPEAT twice in the standby mode or during play.

To cancel the repeat function
Press REPEAT once in the all repeat mode.
To repeat a particular section (A-B repeat)
SL-XP471C ONLY using the wireless remote controller
1 Press A-B REPEAT during play at the point where repeat play is to be started (point A).
2 Press A-B REPEAT at the point where repeat play is to be ended (point B).
To cancel the A-B repeat
Normal play is restored when A-B REPEAT is pressed again.
Note
A-B repeat play is not possible during program play or random play.
Inn-Shock Memory Function
This function minimizes sound interruptions due to vibration when listening to a disc while walking about or in a moving vehicle or train.

Once the anti-shock memory function has been activated, play data of up to 3 seconds can be stored in the memory.
Therefore, even if the unit sustains an external impact, the data stored in the memory is sent to minimize sound interruptions during play.
1 Set ANTI-SHOCK MEMORY to ON.
2 Press ▶ II.
The function starts to store the play data, and the MEMORY RESERVE indicator on the display shows how much data is stored.
Notes
●The ANTI-SHOCK MEMORY switch can be set during play but doing so will produce a slight gap in the sound due to a change in the disc speed.
- While the anti-shock memory function is on, the life span of the batteries is shortened and sound made by the rotation of the disc increases somewhat because the disc rotates faster and the play data is stored.
MEMORY RESERVE Indicator
| Unit mode | Play mode (play data mode) | MEMORY RESERVE mode |
| Stable | Sound is heard (sufficient data has been stored). | |
| Unit sustains a shock. | Sound is heard (stored data is used). | |
| Shock subsides. | Sound is heard (data storage commences). | |
| Unit sustains a continuous shock. | Sound is interrupted (no more data is stored). |
Chengting the tone

To change to the HIGH FILTER position
Set HIGH FILTER to ON.
This reduces noise leakage which is unpleasant to other passengers on trains or other public transport and fatigue to the ears when the unit is used for long periods of time.
Changing the sound quality/sound field setting
DSP: Digital signal processor
Press DSP
Each time this button is pressed, the setting changes in the sequence given below:
OFF→HALL→LIVE→Church→S-XBS
When DSP is used after the setting, the present DSP mode is displayed for 2 seconds.
For your reference:
- When the unit is turned off, DSP mode becomes off.
- The sound quality/sound field setting can also be changed using the stereo earphones with remote controller (SL-XP470 For areas except Continental Europe and United Kingdom.) or wireless remote controller (SL-XP471C).
| OFF | Releases the DSP. |  |
| HALL | Extends the sound so as to give the atmosphere of a large hall. | 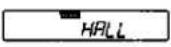 |
| LIVE | Sets the kind of atmosphere generated when sound is heard in a concert hall. |  |
| Church | Provides the sound with ample reverberation which is reminiscent of a church. |  |
| S-XBS | Lends an extra "punch" to the deep bass. |  |
Using the unit with
optional accessories
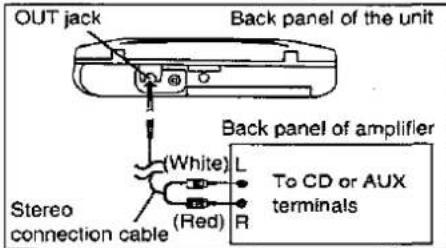
Using the unit with an audio system
Using the stereo connection cable (RP-CA119A), you can hear CDs on your audio system. (included with SL-XP470 model.)
- Connect the cable to the amplifier after turning off its power.
- Do not connect the cable to the PHONO jacks on the amplifier
- Obtain the optional connecting cable (RP-CA102A) if the amplifier comes with mini-phone jacks.
Using the unit with a car stereo
The SL-XP471C comes with the car adaptor and car stereo cassette adaptor.
Obtain the car mounting kit for the SL-XP470 and SL-XP370.
Items to be purchased
For connection to the car audio system:
Car stereo cassette adaptor (SH-CDM9/SH-CDM9D)
For securing the unit and connecting the power supply:
●Car adaptor (SH-CDC9)
●Car mounting kit (SH-CDF20)
Car mounting arm, Car mounting base
Note
It may not be possible to use the unit with some types of car stereos owing to restrictions imposed by the construction of the car stereo cassette adaptor.
For further details, refer to the instructions of the part concerned.
Maintenance
Maintaining the unit
Wipe the unit with a soft cloth. Remove stubborn dirt using a cloth which has been dipped in water or soapy water and wrung out, and then wipe dry.
- If you intend to use a chemical cleaning cloth, read its directions first.
- Do not use alcohol or paint thinners.
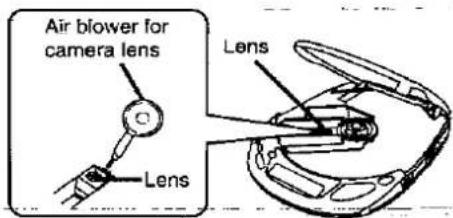
Maintaining the lens
Open the lid and clean the lens as shown in the figure.
Use a cotton swab to gently wipe off any fingerprints.
Recommended product: Lens cleaner kit (SZZP1038C)
Using the Wireless Remote Controller SL-XP471C ONLY
Preparation:
Insert the dry cell batteries into the wireless remote controller.
Check the ⊕ and
⊖ polarities and
align them properly
when inserting the
dry cell batteries.

Removing the batteries
Push the batteries upward in
the direction of the arrow to
remove them.

Notes
- Use the remote controller within a 7-meter range of the remote sensor on the unit. (Depending on the angle of the controller, the signals may not reach the sensor.)
- Do not place any object which will block the path of the signals between the remote controller and the unit.
- Do not allow the remote sensor or transmitter to become dusty.
- Do not leave the remote controller standing in direct sunlight or in high temperature locations in a car.
• In the interest of traffic safety, do not operate the remote controller while driving.
Operation
Preparation: When the unit is to be operated using rechargeable batteries or dry cell batteries, first press ▶ II on the unit and then use the remote controller. (The unit cannot be operated by the remote controller while the unit is turned off.)
| Initiates play/establishes pause mode when pressed again. | Point the transmitter on the remote controller at the remote sensor on the ur | |
| Stops play/turns the unit off when kept depressed. | ||
| Skips tracks (tap).Rapidly searches forward or backward during play (keep depressed). | ||
| Adjusts volume level of speaker and stereo earphones.The level can be adjusted from 0 dB to -21 dB.The 0 dB level is restored when the unit is turned off. | ||
| Establishes the desired sound quality/sound field setting. | ||
| Repeats the section to be heard (A-B repeat). |
Using the Remote Control SL-XP470 ONLY
For areas Continental Europe and United Kingdom:
Operation Indicator — Remote controller button
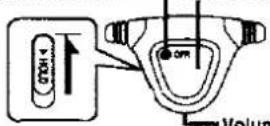
OPR Indicator
This indicator is illuminated when the unit is playing a track, and flashes when the unit is in the standby mode. It is not illuminated when the unit is turned off.
Preparation:
Release the remote controller from the hold mode.
The remote controller can be operated regardless of the hold mode of the unit.
How to use the remote controller

flowchart
graph LR
    A["Off or Standby mode"] --> B["Play"]
    B --> C["(Bee...p)"]
    B --> D["(Beep)"]
    D --> E["(Bee...p)"]
    E --> F["Standby"]
    F --> G["(Beep Beep)"]
    G --> H["(Beep Beep Beep)"]
    H --> I["(Beep Beep Beep)"]
    I --> J["Off mode"]
    J --> K["Skip to beginning of next track"]
    J --> L["Skip to beginning of current track"]
Parentheses represent confirmation tones.
- Press once
- Press twice
• •
- Press three times. - Press and hold.
An operation tone ("Beep") sounds whenever the remote controller button is pressed. In addition, a confirmation tone sounds following every operation.
- When pressing the remote controller button two or three times, do so as quickly and evenly as possible.
- When the button is pressed three times and then three times again, the unit will skip to the beginning of the previous track.
(When the play mode switch on the unit is in the RANDOM position, however, this operation is not possible.)
To adjust the volume
When adjusting the volume using the remote controller, position the volume control on the unit to between 5 and 7.
Location of Controls
Portable CD Player

Portable CD Player
① Memory/recall button (MEMORY/RECALL)
② Repeat button (REPEAT)
③ Push button (PUSH)
④ Open button (OPEN)
⑤ Headphones volume control (VOLUME)
⑥ Headphones Jack (○)
⑦ Skip/search buttons
(◀◀ -SKIP/-SEARCH ▶▶)
⑧ Sound quality/field selector button (DSP)
For others:

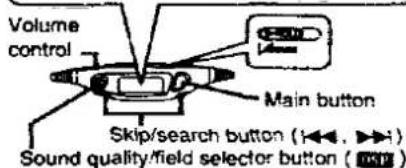
How to use the main button
Operation is the same as "How to use the remote controller".
How to use the skip/search button (|◀◀ and ▶▶)
Operation is the same as for the same button on the unit (See page 3.) (except a beep is heard when a key is operated).
How to use the sound quality/field selector button (DSP)
Operation is the same as for the same button on the unit (See page 5.) (except a beep is heard when a key is operated).
How to attach the clip
- For use, mount the clip onto the cord extending from the top of the remote controller.
• In order to safeguard against damage to the cord, do not slide the clip along the cord after it has been mounted

Fit the cord snugly into the groove.

Stereo earphones
⑨ Display
SL-XP471C ONLY
Remote sensor (REMOTE SENSOR)
⑪ Play/pause button (▶ II)
⑫ Stop/operation off button (■/OPR OFF)
⑬ Hold switch (HOLD)
⑭ High filter switch (HIGH FILTER)
⑮ Play mode selector (MODE)
⑯ Anti-shock memory switch (ANTI-SHOCK MEMORY)
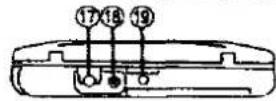
⑰ Out jack (OUT)
⑯ DC in jack (DC IN 4.5 V ⊕-⊕)
⑲ Hole for car mounting base
Operating Precautions
AC adaptor
- Handle the AC adaptor carefully. Improper handling is dangerous.
- Do not touch it with wet hands.
- Do not place heavy objects on top of it.
- Do not forcibly bend it.
- Be sure to connect only the AC adaptor provided with the unit.
- Disconnect the AC adaptor from the power outlet if the unit is not going to be used for a long time.
Unit
No altering or remodeling
This can cause malfunctioning.
No dropping or strong impacts
This may damage the unit.
Locations to be avoided
Avoid using the unit in the following locations since they can cause malfunctioning.
- Bathrooms and other moisture-prone places
- Warehouses and other dusty places
- Very hot places near heating appliances, etc.
Do not leave the unit exposed to direct sunlight for long periods of time
This may deform or discolor the cabinet and may also cause malfunctioning.
① Volume control (VOLUME)
② Remote controller button
③ Operation Indicator (OPR)
④ Hold switch (HOLD)
⑤ Slider
Slide up to prevent entangling of the cord when the stereo earphones are not in use.
⑥ Ear piece
⑦ Remote controller display
⑧ Sound quality/field selector button (DSP)
⑨ Skip/search button (◀◀, ▶▶)
⑩ Main button
Rechargeable batteries
- Only the RP-BP60 (SH-CDB8D) batteries can be re-charged.
- If the power delivered by the batteries lasts for a very short time after recharging, it means that the batteries' service life is over. Do not use them any more.
- Recharging already charged batteries will shorten their service life.
- When recharging batteries for the first time or when they have not been used for a long period of time, the play time may be shorter than usual. In a case like this, repeatedly recharge and discharge the batteries. This will restore them to their regular state.
- Do not allow any metal objects to touch the terminals of rechargeable batteries since this may cause short-circuiting which is dangerous.
Dry cell batteries/rechargeable batteries
To prevent damage to the batteries and electrolyte leakage, heed the following points.
- Align the and polarities properly when inserting the batteries.
- Do not mix different types or makes of batteries or old and new batteries.
- Remove the batteries if you do not plan to use the unit for a long period of time.
- Do not throw batteries into a fire, and do not short-circuit, disassemble or subject them to excessive heat.
- Do not attempt to recharge dry cell batteries.
- Do not peel off the plastic covering on the rechargeable batteries. Short-circuiting may occur which is dangerous.

Only compact discs bearing this mark can be used with this unit.
How to remove a disc from its case
How to store the disc in its case


How to hold a disc

If the surface is dirty
Wipe it with a damp cloth and then wipe dry.
Play surface (shiny surface)

Wipe from the center toward the outer circumference.
Carrying dry cell batteries/rechargeable batteries around
When putting dry cell or rechargeable batteries in a pocket or bag, ensure that no other metal objects such as a necklace are placed together with them. Contact with metal may cause short-circuiting which, in turn, may cause a fire. Be absolutely sure to carry the rechargeable batteries in the case provided for this purpose.
When driving a car
In the interest of traffic safety, do not operate the unit while driving.
Precautions for Listening with the Headphones
- Do not play your headset at a high volume. Hearing experts advise against continuous extended play.
- If you experience a ringing In your ears, reduce volume or discontinue use.
- Do not use while operating a motorized vehicle. It may create a traffic hazard and is illegal in many areas.
- You should use extreme caution or temporarily discontinue use in potentially hazardous situations.
- Even if your headset is an open-air type designed to let you hear outside sounds, don't turn up the volume so high that you can't hear what's around you.
cs
If moisture has formed on a disc
When moisture has formed because the disc was brought suddenly into a warm room from a cold environment, wipe it off using a soft dry cloth.
When storing discs
Avoid locations which are
●Exposed to direct sunlight.
● Susceptible to high levels of humidity or dust.
- Directly exposed to heat from a heating appliance.
- On top of a car dashboard or near the rear window.
Handling precautions
●On the label side (the side with writing)
Do not write anything using a pencil, ball-point pen, etc. Do not stick paper or labels.
●On the disc (shiny) side
Handle this side carefully to keep it free from fingerprints or scratches. Do not use record cleaners, solvents, etc.
Troubleshooting Guide
Before requesting service for this unit, check the chart below for a possible cause of the problem you are experiencing. Some simple checks or a minor adjustment on your part may eliminate the problem and restore proper operation.
If you are in doubt about some of the check points, or if the remedies indicated in the chart do not solve the problem, refer to the directory of Authorized Service Centers (enclosed with this unit) to locate a convenient service center, or consult your dealer for instructions.
| Problem | Checkpoint | Remedy |
| Disc lid does not close. | ●Is the disc secured properly? | ●Secure the disc properly. |
| No play even when disc is inserted. | ●Is unit in HOLD mode? | ●Release HOLD mode. |
| ●Is disc secured? | ●Secure disc until it clicks into position. | |
| ●Any condensation inside unit? | ●Leave for about an hour and then operate. | |
| Disc cannot be removed. | ●Is disc secured? | ●Press PUSH to release disc. |
| Disturbed TV picture or Interference in radio reception. | ●Is unit being used near TV or tuner? | ●Place unit as far away as possible from TV or tuner.●If the TV or tuner has a simple indoor antenna, replace it with an antenna specially designed for the TV or tuner |
| No operation with wireless remote controller.SL-XP471C ONLY | ●Is the unit turned off while rechargeable batteries or dry cell batteries are being used to operate the unit?●Have R03 (UM-4) batteries been inserted? If they have, is their voltage level low? | ●Press ▶ II on unit and then proceed with operation.●Insert new R03 (UM-4) batteries. |
Specifications
When purchasing rechargeable batteries
As a safety precaution, the portable CD players made by Panasonic have a construction designed to make it impossible to recharge ordinary batteries.
To use rechargeable batteries, be absolutely sure to purchase the rechargeable Ni-Cd batteries designed especially for this unit.
Special rechargeable Ni-Cd batteries: SH-CDB8D (set of 2)
For details, check with your dealer.

Audio
No. of channels: 2 (left and right, stereo) Frequency response: 20–20.000 Hz
(+0.5 dB, -1.5 dB)
Output voltage: 0.65 V (50 kΩ)
S/N: more than 96 dB*
Wow and flutter: Below measurable limit
Digital filter: 8 times over sampling
DA converter: 1 bit, MASH
Headphone output
level: Max. 5 mW+5 mW/16Ω
(variable)
Pickup
Light source: Semiconductor laser
Wavelength: 780 nm
General
Power supply: DC 4.5 V
Power consumption
| Power source | Anti-shock memory OFF/ON |
| AC adaptor | 4.5 W/4.9 W |
| Batteries | 0.6 W/1.0 W |
Play time
(When used in hold mode, at 25°C temperature and on flat and stable surface)
| Batteries used | Anti-shock memory OFF/ON |
| Rechargeable batteries | About 3 hours/About 2 hours 30 minutes |
| Panasonic alkaline dry cell batteries | About 8 hours/About 6 hours |
Recharging time;
The play time may be less depending on the operating conditions.
Dimensions
(W×H×D): 130.1×28.7×156.5 mm
Weight:
305 g (with batteries)
265 g (without batteries)
•These specifications were measured in the anti-shock memory OFF state.
Note:
Specifications are subject to change without notice.
Weight and dimensions are approximate
MASH is a trademark of NTT.
For United Kingdom only
This apparatus was produced to BS 800.
- Supplied Accessories
- Common
- SL-XP370 ONLY
- SL-XP471C ONLY
- SL-XP470 ONLY
- Note (SL-XP470 ONLY)
- Technics
- Portable CD Player
- Operating Instructions
- Note
- CAUTION:
- WARNING:
- ADVARSEL:
- VAROITUS:
- CAUTION!
- SUOMI
- VAROITUS!
- DANSK
- BEMAERK!
- NORSK
- ADVARSEL!
- Power Supply Preparations
- Using rechargeable batteries
- Recharging procedure
- Removing the batteries
- Using dry cell batteries (not included)
- LUOKAN 1 LASERLAITE KLASS 1 LASER APPARAT
- Using the AC adaptor
- Using a car adaptor
- Battery Indicator
- Accidental Operation Prevention Function
- To use the accidental operation prevention function
- HOLD Indicator
- Press OPEN to open the lid, and insert the disc.
- Press ▶ II.
- Adjust the volume level.
- Release the hold mode.
- Set MODE to NORMAL.
- SL-XP470/SL-XP370 ONLY
- Removing the disc
- Skip and search functions
- Standby mode
- Automatic Shut-OFF function
- For your reference:
- "no disc" display
- "OPEN" display
- Indicators on the ▶ II and ■/OPR OFF buttons
- (SL-XP470/SL-XP471C ONLY)
- Other Play Methods
- Random play
- Resume play
- Notes
- Program play
- Skip play
- Repeat function
- Inn-Shock Memory Function
- Set ANTI-SHOCK MEMORY to ON.
- Press ▶ II.
- Chengting the tone
- To change to the HIGH FILTER position
- Set HIGH FILTER to ON.
- Changing the sound quality/sound field setting
- Press DSP
- Using the unit with
- optional accessories
- Using the unit with an audio system
- Using the unit with a car stereo
- Items to be purchased
- Maintenance
- Maintaining the unit
- Maintaining the lens
- Using the Wireless Remote Controller SL-XP471C ONLY
- Preparation:
- Operation
- Using the Remote Control SL-XP470 ONLY
- OPR Indicator
- To adjust the volume
- Location of Controls
- How to use the main button
- How to use the skip/search button (|◀◀ and ▶▶)
- How to use the sound quality/field selector button (DSP)
- How to attach the clip
- Stereo earphones
- Operating Precautions
- AC adaptor
- Unit
- Rechargeable batteries
- Dry cell batteries/rechargeable batteries
- Carrying dry cell batteries/rechargeable batteries around
- When driving a car
- Precautions for Listening with the Headphones
- cs
- If moisture has formed on a disc
- When storing discs
- Handling precautions
- Troubleshooting Guide
- Specifications
- When purchasing rechargeable batteries
- Special rechargeable Ni-Cd batteries: SH-CDB8D (set of 2)
- Audio
- Pickup
- General
- Play time
- Recharging time;
- Dimensions
- Note:
Marke : TECHNICS
Modell : SL-XP370
Kategorie : CD-Player