
SL-XP570 - CD-Player TECHNICS - Kostenlose Bedienungsanleitung
Finden Sie kostenlos die Bedienungsanleitung des Geräts SL-XP570 TECHNICS als PDF.


| Produkttyp | Tragbarer CD-Player |
| Modell | SL-XP570 |
| Marke | Technics |
| Abmessungen (B x H x T) | 140 x 30,9 x 172,1 mm |
| Gewicht | 335 g (mit Batterien), 295 g (ohne Batterien) |
| Stromversorgung | Gleichstrom 4,5 V (Netzadapter), 2 x LR6 (AA) Alkaline-Batterien oder wiederaufladbare Akkus (RP-BP60) |
| Stromverbrauch (Netzadapter) | 3,7 W (Anti-Shock aus), 4,3 W (Anti-Shock ein) |
| Stromverbrauch (Batterie) | 0,6 W (Anti-Shock aus), 1,0 W (Anti-Shock ein) |
| Wiedergabezeit (Alkaline-Batterien) | Ca. 7 Stunden (Anti-Shock aus), ca. 4 Stunden (Anti-Shock ein) |
| Wiedergabezeit (wiederaufladbare Akkus) | Ca. 2,5 Stunden (Anti-Shock aus), ca. 2 Stunden (Anti-Shock ein) |
| Ladezeit (Akkus) | Ca. 3 Stunden |
| Frequenzgang | 20 - 20.000 Hz (+0,5 dB, -1,5 dB) |
| Signal-Rausch-Abstand | Mehr als 96 dB |
| Kanalausgabe | 2 (links/rechts, Stereo) |
| Ausgangsspannung | 0,7 V (50 kΩ) |
| Kopfhörerausgang | Max. 5 mW + 5 mW / 16 Ω (einstellbar) |
| D/A-Wandler | 1 Bit, MASH |
| Laserdiode | Halbleiterlaser, Wellenlänge 780 nm |
| Antishock-Speicher | Ja, ca. 3 Sekunden Pufferspeicher |
| Wiedergabemodi | Normal, Programmiert (bis zu 24 Titel), Zufallswiedergabe, Wiederholung (ein Titel/alle Titel), Resume |
| Fernbedienung | Ja, im Lieferumfang enthalten (im Ohrhörerkabel) |
| Zubehör | Netzadapter, Stereo-Ohrhörer mit Fernbedienung, wiederaufladbare Akkus (2x), Stereokabel, Netzstecker-Adapter |
| Reinigung der Linse | Mit einem Wattestäbchen vorsichtig abwischen; optionaler Linsenreiniger (SZZP1038C) |
| Sicherheitshinweise | Nicht Regen oder Feuchtigkeit aussetzen; Laserklasse 1; keine eigenständigen Reparaturen |
Häufig gestellte Fragen - SL-XP570 TECHNICS
Benutzerfragen zu SL-XP570 TECHNICS
0 Frage zu diesem Gerät. Beantworten Sie die, die Sie kennen, oder stellen Sie Ihre eigene.
Eine neue Frage zu diesem Gerät stellen
Laden Sie die Anleitung für Ihr CD-Player kostenlos im PDF-Format! Finden Sie Ihr Handbuch SL-XP570 - TECHNICS und nehmen Sie Ihr elektronisches Gerät wieder in die Hand. Auf dieser Seite sind alle Dokumente veröffentlicht, die für die Verwendung Ihres Geräts notwendig sind. SL-XP570 von der Marke TECHNICS.
BEDIENUNGSANLEITUNG SL-XP570 TECHNICS
Technics
Portable CD Player
SL-XP570
Operating Instructions
Note:
The "EB" indication shown on the packing case indicates United Kingdom.
Before connecting, operating or adjusting this product, please read these instructions completely.
[EB] GC GN
RQT2165-B
Dear Customer
Thank you for purchasing this product. For optimum performance and safety, please read these instructions carefully.
Table of Contents
Supplied Accessories ..... 5
Location of Controls .... 6
Power Source 7
Accidental Operation Prevention Function .....10
Listening to CD Tracks in Their Original Sequence (Normal Play) .....11
Starting Play from a Specific Track (Skip Play) .....15
Playing Tracks in a Particular Sequence (Program Play) ....16
Playing Tracks Repeatedly (Repeat Function) .....18
Playing Tracks in a Random Sequence (Random Play) ....19
Resuming Play from the Track Played Last (Resume Function) .....20
Anti-Shock Memory Function ....21
Using the Remote Control .....23
Using the Unit with Optional Accessories ....24
Concerning Compact Discs ....25
Maintenance .....27
Cautions 28
Troubleshooting Guide .....30
Specifications ....31
Bottom of the unil
Apparatens unde-sida
Komponentens underside
Produktels underside

natural_image
Simple line drawing of a bottle inside a circular container with a dashed arrow indicating vertical direction (no text or symbols)CLASS 1 LASER PRODUCT
IOKAN 1 LASERLAITE ASS 1 LASER ·PARAT
Tarking sign is located on bottom of the unit.
AUTION:
the AC voltage is different according to the area.
- sure to set the proper voltage in our area before use.
or details, please refer to the page
WARNING:
TO REDUCE THE RISK OF FIRE OR ELECTRIC SHOCK, DO NOT EXPOSE THIS APPLIANCE TO RAIN OR MOISTURE.
ADVARSEL:
FOR AT REDUCERE RISIKOEN FOR BRAND OG ELEKTRISKE ST∅D MÅ DETTE APPARAT IKKE UDSÆTTES FOR REGN ELLER FUGT.
VAROITUS:
TULIPALO- JA SÄHKÖISKUVAA- RAN VÄLTTÄMISEKSI ÄLÄ SAATA TÄTÄ LAITETTA ALTTIIKSI SATEEL- LE TAI KOSTEUDELLE.
CAUTION!
THIS PRODUCT UTILIZES A LASER. USE OF CONTROLS OR ADJUSTMENTS OR PERFORMANCE OF PROCEDURES OTHER THAN THOSE SPECIFIED HEREIN MAY RESULT IN HAZARDOUS RADIATION EXPOSURE.
DO NOT OPEN COVERS AND DO NOT REPAIR YOURSELF. REFER SERVICING TO QUALIFIED PERSONNEL.
DANSK
BEMAERK!
I DETTE APPARAY ANVENDES EN LASER.
BRUG AF BETJENINGSKNAPPER ELLER REGULERINGER ELLER FREMGANGSMÅDER UDOVER DE I DENNE BETJENINGSVEJLEDNING ANGIVNE, KAN MEDF∅RE FARE FOR BESTRÅLING. ÅBN IKKE KABINETTET OG FORS∅G IKKE AT UDF∅RE REPARATIONER SELV. REPARATIONER MÅ KUN FORETAGES AF KVALIFICEREDE TEKNIKERE.
SUOMI
VAROITUS!
LAITTEEN KÄYTTÄMINEN MUULLA KUIN TÄSSÄ KÄYTTÖOHJEESSA MAINITULLA TAVALLA SAATTAA ALTISTAA KÄYTTÄJÄN TURVAL- LISUUSLUOKAN 1 YLITTÄVÄLLE NÄKYMÄTTÖMÄLLE LASERSÄTEI- LYLLE.
NORSK
ADVARSEL!
DETTE PRODUKTET ANVENDER E: LASER.
BETJENING AV KONTROLLET JUSTERINGER ELLER ANDREINNGREP ENN DE SOM ER BE SKREVENT I DENNE BRUKSAF VISNING. KAN FÖRE TIL FARLI BESTRÅLING.
DEKSLER MÅ IKKE ÁPNES, O FORS∅K ALDRI Å REPARERE AF PARATET PÅ EGENHÅND.
ALT SERVICE OG REPARASJONS ARBEID MÅ UTFÖRES AV KVAL! FISERT PERSONELL.
ADVARSEL: USYNUG LASERSTRÅLING VED ÅBING, MÅR SIKKERHEDSAF- BRYDERE ER UDE AF FUNKTION. UNDGÅ UDSÄTTELSE FOR STRÅLING
(Pásat under apparaten)
DANGER-Invisible laser radiation when open and interlock defeated AVOID DIRECT EXPOSURE TO BEAM
(Bottom of the product)
VARO: Avattaessa ja aaujelkhus ohittaessa elel sittbne näkymätön tgeeräteikyöhe. Aki katsen sittersten
VÄNRING: Ozyning laserstråring när det är åppred och splärran är utkopplad Betrakta aj strålen.
ADVERSELL: Usyning lænstråling når detret lapnes og sårkerhedstis brytes. Umgå skopenering for stråden
(Tuotteer poljanss, (Apparatens under-sda), (Produkters under-tie)
implied Accessories
-ok the packing carton for these ac- -anes.
MC adaptor 1 pc.
Stereo earphones
—with remote controller .... 1 pc.
Hechargeable batteries ..... 2 pcs.
Stereo connection cable ..... 1 pc.
Power plug adaptor ..... 1 pc.
For areas except Continental Europe,
United Kingdom and Australia)
- configuration of the AC adaptor differs according to area.

natural_image
Simple line drawing of a handheld device with a coiled cable and plug, labeled with number ① (no text or symbols on the device itself)
natural_image
Simple line drawing of a cord with two connectors and a loop, no text or symbols present
natural_image
Simple line drawing of two cylindrical objects with a numbered label (3) in the top-left corner.
natural_image
Illustration of a black cable with two connectors and a connector pin, labeled with number 4 (no text or symbols on the cable itself)
Location of Controls
Portable CD player
① Open button (OPEN)
② Memory/recall button (MEMORY/RECALL)
③ Push button (PUSH)
④ Skip/search buttons
(◀◀-SKIP/-SEARCH▶▶)
⑤ Repeat button (REPEAT)
⑧ Display
⑦ Play/pause button (▶ II PLAY/PAUSE)
⑧ Earphones/headphones volume control (VOLUME)
⑨ Stop/operation off button
(■ STOP/OPR OFF)
⑩ ASC/S-XBS selector (ASC, S-XBS, OFF)
⑪ Earphones/headphones jack (Ω)
⑫ Out Jack (OUT)
⑬ DC in jack
(DC IN 4.5 V ◇-●-⊕)
⑭ Anti-shock memory switch (ANTI-SHOCK MEMORY)
⑮ Play mode selector (PLAY MODE)
⑯ Hold switch (HOLD)
Remote control
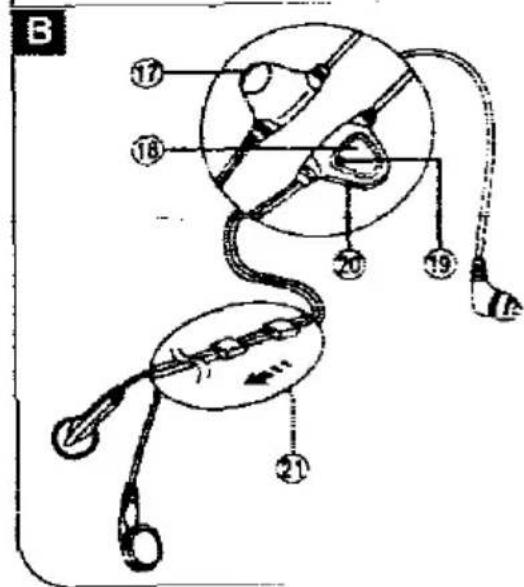
⑰ Volume control (VOLUME)
⑱ Remote control button
⑲ Operation Indicator (OPR)
⑳ Hold switch (HOLD)
⑳ Slider
Slide up to prevent entangling of the cord when the stereo earphones are not in use.

chargeable batteries
* sure that the batteries have been aged before use.
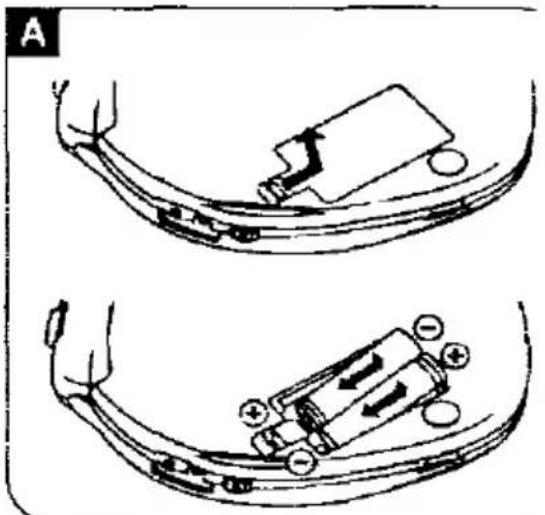
Recharging batteries A
Install two rechargeable batteries.
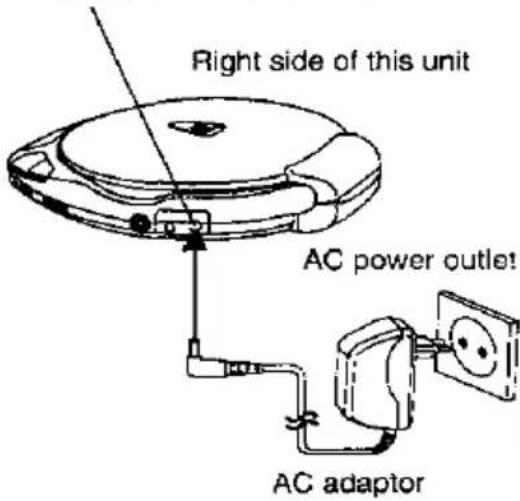
Connect the AC adaptor.
It takes about 3 hours to fully recharge them.
When fully recharged, the unit can be used for about 2 hours 30 minutes with anti-shock memory off, or for about 2 hours with anti-shock memory on (wher the unit is used at 25^ on a flat and stable surface). The play time may be shorter depending on the operating conditions.
●While recharging, the AC adaptor and rechargeable batteries may get warm. This is normal.
After completing recharging of the batteries, disconnect the AC adaptor from the DC in jack and the AC power outlet.
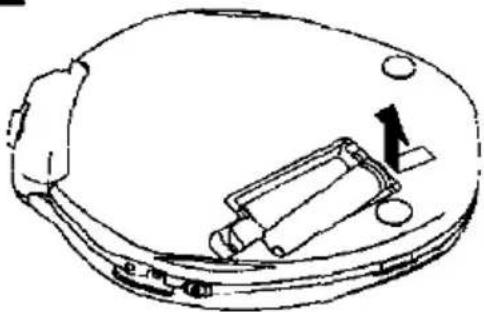
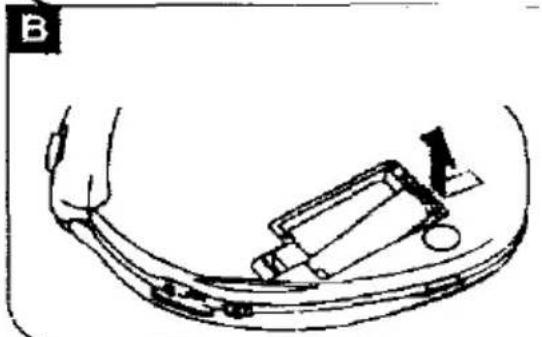
Battery removal
and push up batteries in the direc- of the arrow to remove them.
ou can continue to recharge the same arteries for about 10 months (300 mcs). After that, their operating time will be shortened, and you will need to replace them.
intain new rechargeable batteries (H-CDB8D) designed exclusively for re unit.
You can operate the unit with the AC adaptor while recharging the batteries, but it will lengthen the recharging time.

B
natural_image
Technical line drawing of a mechanical component with no visible text or symbolsPower Source
For areas except Continental Europe, United Kingdom and Australia If the power supply in your area is 110 V or 220 V, the time for complete recharging takes 5 hours, which is different from the time described in this booklet.
Dry cell batteries (not Included)
Install two LR6 (UM-3) type alkaline batteries as shown in the figure. A
Make sure that the AC adaptor is disconnected from the AC power outlet and the unit. Two LR6 alkaline batteries will provide about 7 hours of playing time with anti-shock memory off, or about 4 hours of playing time with anti-shock memory on (when the unit is used at 25°C on a flat and stable surface). The play time may be shorter depending on the operating conditions.
Battery removal
Press and push up batteries in the direction of the arrow to remove them.
Be sure to do this with the power off.
AC adaptor
Before use
(For areas except Continental Europe, United Kingdom and Australia)
Make sure the preset voltage of your AC adaptor fits to your local voltage before plugging it into the AC power outlet. If it doesn't, turn the AC line-voltage selector with a screwdriver so that it corresponds to your local voltage.
If the power plug will not fit your socket, use the power plug adaptor.
natural_image
Diagram of a medical or laboratory procedure showing a hand holding a device near a curved surface (no text or symbols visible)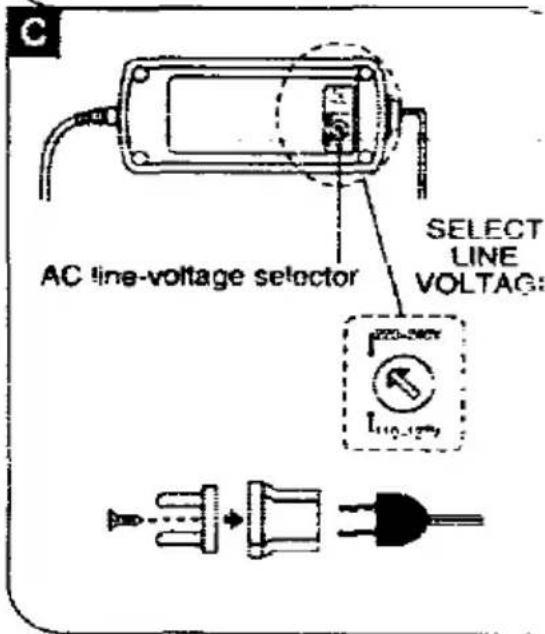
infect the AC adaptor. A
only the AC adaptor provided with this
RITION
to not use the AC adaptor provided in this unit for other products.
unit is in the standby condition when AC adaptor is connected. The primary suit is always "live" as long as the AC adaptor is connected to an electrical outlet.
: adaptor (not Included)
AUTION
ise only car adaptor, Model: 1-CDC9, manufactured by tatsushita Electric Industrial Co., Ltd.
Installations details, refer to the operating instructions for the SH-CDC9. The chargeable battery can be recharged in the car adaptor.
ren the car adaptor or AC adaptor is ii, the backlight of the display comes
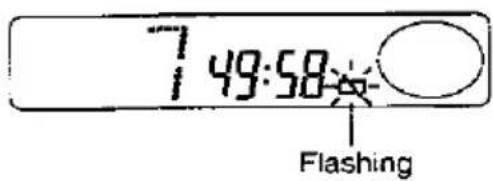
tiery indicator B
period during which the battery indications differs depending on the power
| ype bat-y | When the indicator flashes | Remedial action |
| share-slice-les | The battery is fully-used. | In a short while the unit will be automatically turned off. Recharge the batteries. |
| very cell-les | The battery is half-used. | Play is still possible while the indicator is flashing. |
A
DC in jack
(DC IN 4.5 V ◇—●—⊕)
B
Accidental Operation Prevention Function
When this function is in use, the unit will not operate even if a control button is accidentally pressed. (The disc lid, however, can still be opened and closed.)
Use this function to prevent the following types of situations.
●While the unit is not in use, the power is turned on and the batteries become worn down.
- While the unit is in use, the music being played gets turned off.
There are hold switches on both the main unit and the remote control.
■ To use the accidental operation prevention function
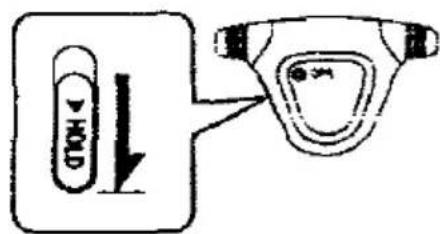
Move the hold switch on the control source being used (i.e., the unit or the remote control) to the HOLD position, as shown in the diagram.
■ To cancel the accidental operation prevention function
Move the hold switch to the position opposite the HOLD position.
Before using the control buttons, be sure to release the unit from the hold state.
■ The HOLD indicator
If "hold" appears on the display when the control buttons on the main unit are pressed, this indicates that the unit is in the hold mode.
hold

When the power is off, however, this indicator only appears when PLAY/PAUSE is pressed.

Steining to CD Tracks in Their Original Sentence (Normal Play)
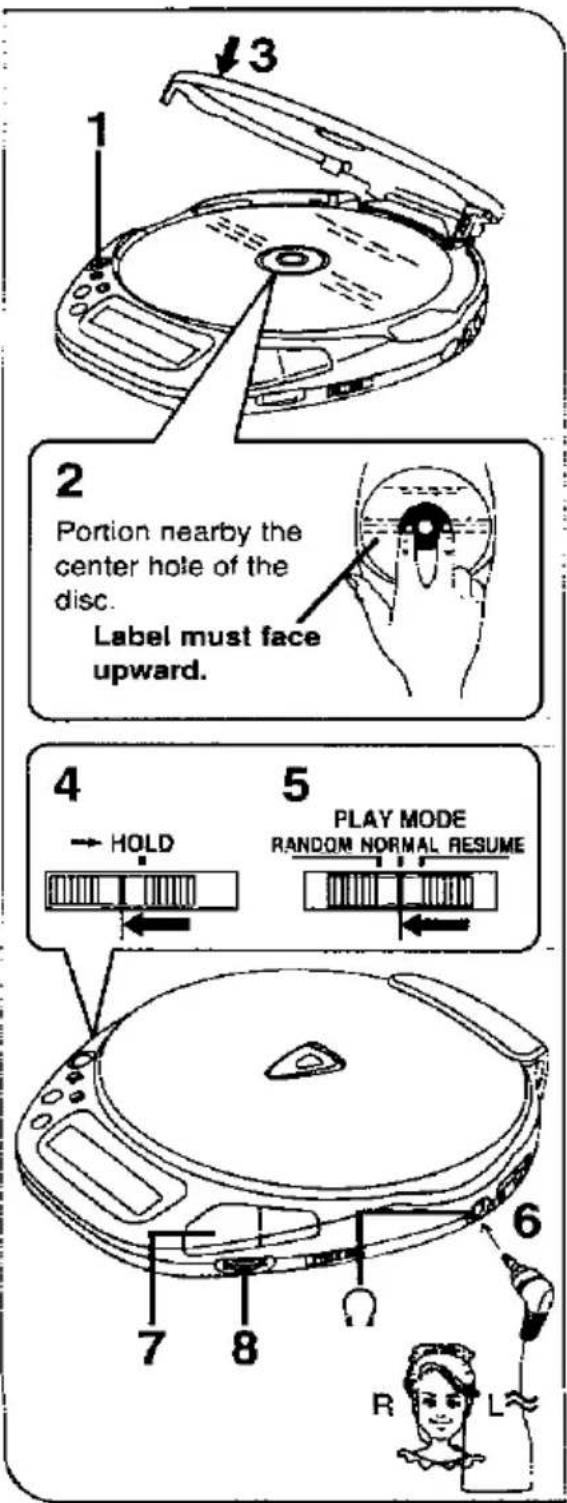
Press OPEN to open the disc lid.
Insert the disc.
Press the portion near the center hole of the disc until a "click" sound can be heard.
Close the disc lid.
Release the unit from the hold state.
Set PLAY MODE to NORMAL.
Connect the plug of the stereo earphones with remote controller (included) to the earphones/headphones jack.
(Plug in firmly.)
Press PLAY/PAUSE.
This turns on the unit and begins the first track.

Adjust the volume level.
the unit plays the tracks on the disc in der and stops automatically when the track ends.
Listening to CD Tracks in Their Original Sequence
■ The "OPEN" display
When the disc lid is opened, this indicator is displayed for about four minutes. It is not displayed, however, when the power is off.
■ The "no diffuse" display
When the PLAY/PAUSE button is pressed with no disc installed or with a disc improperly installed, this indicator is displayed for about 30 seconds.
■ To stop play A
Press STOP/OPR OFF In the play mode.
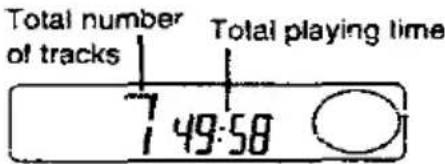
The disc will stop rotating, and the display will show the total number of tracks and total playing time on the disc.
To turn off the unit:
Press STOP/OPR OFF again
■ To temporarily stop disc play
Press PLAY/PAUSE in the play mode.

To resume play:
Press PLAY/PAUSE again.
Automatic Shut-Off
This function, in order to prevent rechargeable and other batteries to become worn down, causes the power to automatically shut off if you leave the unit in the stop mode or pause mode for about four minutes.


skip tracks forward or kward (Skip function)
- either of -SKIP/-SEARCH, - or ◀ in the play mode.
- : The pickup skips forward one track each time you press the button.
: When the button is pressed once, the pickup skips to the beginning of the track being played. If the button is pressed again quickly, the pickup skips backward one track each time you press the button.
(During random play, you can only skip pickup to the beginning of the track being played.)
during program play, the pickup skips forward or backward in the programmed back sequence.
search forward or kward (Search function)
es5 and hold ▶▶ or ◀◀ in the =y mode.
:: To search forward
= : To search backward
Please the button when you reach desired point.
You can search slowly when either but-in is first pressed and quickly when it is then kept pressed down.
in the program, random and one track epeat play mode, you can search for- d or backward only within the current work.

Listening to CD Tracks In Their Original Sequence
To change the tone quality A
(When listening through the stereo earphones)
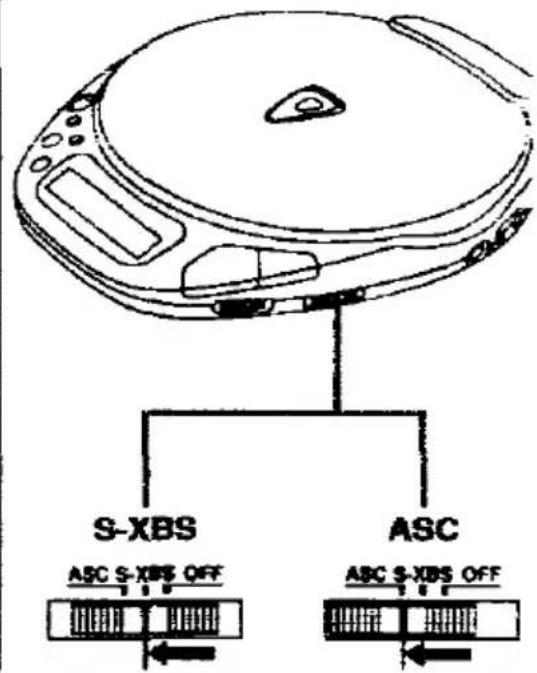
■ For extra bass sound (S-XBS)
Set ASC/S-XBS to S-XBS.
■ For a more dynamic and mellow sound
(Smoothed treble response and more dynamic bass)
Set ASC/S-XBS to ASC.
■ To cancel the ASC/S-XBS mode
Set ASC/S-XBS to OFF.
A
To release the fixed state of the disc B
After the disc has stopped rotating, press OPEN to open the disc ild and press PUSH.
(Do not open the disc lid during play.)
B

natural_image
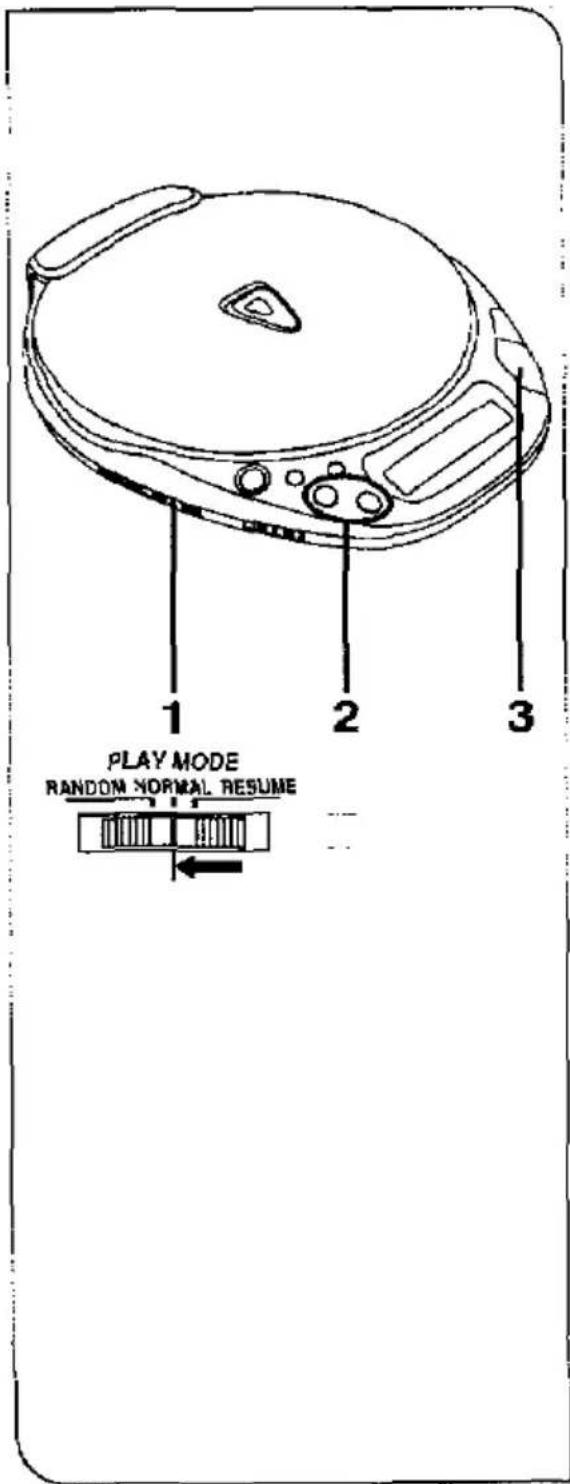
Technical line drawing of a mechanical device with a central hub and a hanging component (no text or symbols)- rung Play from a Specific Track - ip Play)
ore operation:
Release the unit from the hold state.
Press PLAY/PAUSE.
Press STOP/OPR OFF.
-- example:
:select track 3,
Set PLAY MODE to NORMAL.
Press either of -SKIP/- -SEARCH, ▶▶ or ◀◀ until you reach the desired track.
▶▶: To skip forward
To skip backward

The pickup skips forward or backward as many tracks as the number of times you press the button.
Press PLAY/PAUSE.
Play continues in the original sequence from the selected track to the final track and then stops automatically.
Playing Tracks in a Particular Sequence (Program Play)
With program play, you can program up to 24 tracks on the disc in any order you choose.
Before operation:
① Release the unit from the hold state.
② Press PLAY/PAUSE
③ Press STOP/OPR OFF
1 Set PLAY MODE to NORMAL.
2 Press ▶▶ or ◀◀ to select the track number.
▶▶ : To skip forward
: To skip backward
For example:
To select track 3, press ▶▶1 3 times.
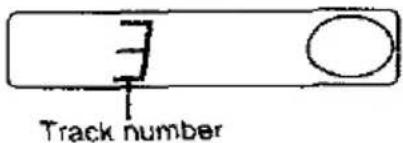
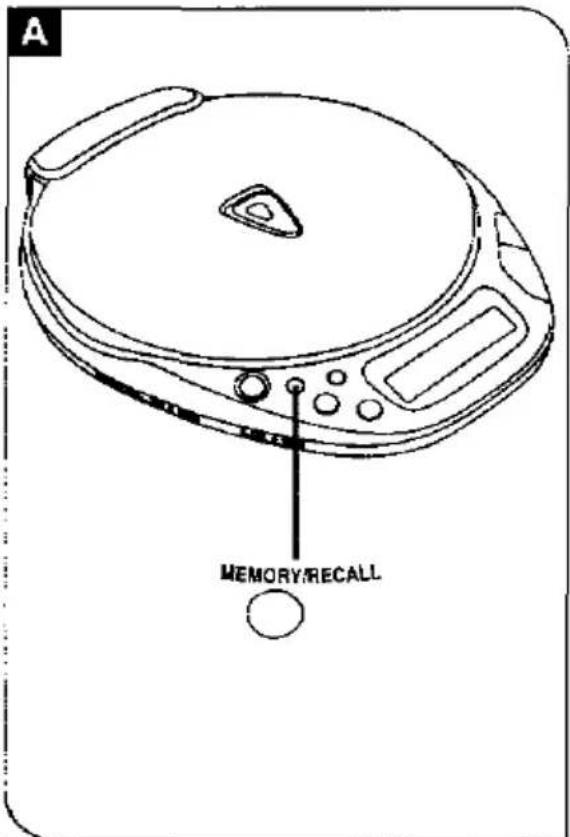
3 Press MEMORY/RECALL to memorize the selected track number.

4 Repeat steps 2 and 3 until you have completed the desired program.
5 Press PLAY/PAUSE.
When all the programmed tracks have been played, the unit will automatically stop.


To program the same track repeatedly
**MEMORY/RECALL repeatedly after 3.
When the "F" (full) indication is displayed
- further tracks can be programmed.
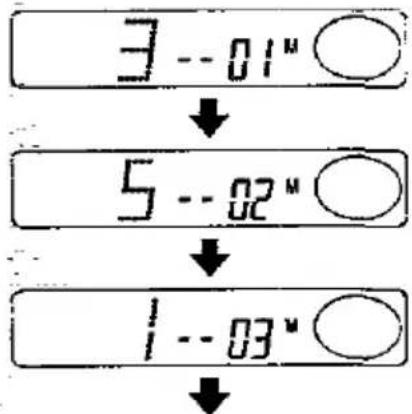
- confirm the program A
ess MEMORY/RECALL once dur- · play.
display shows the programmed track others in the sequence you have en-
example:
: diagram below shows a program con- ing of tracks 3, 5 and 1.
flowchart
graph TD
    A["3 -- 01""] --> B["5 -- 02""]
    B --> C["1 -- 03""]
    C --> D["..."]
Restored to initial display
- cancel the program play ☐
STOP/OPR OFF.
your reference:
all tracks have been played, the pro- amined selections will all be cleared in the memory.

Playing Tracks Repeatedly (Repeat Function)
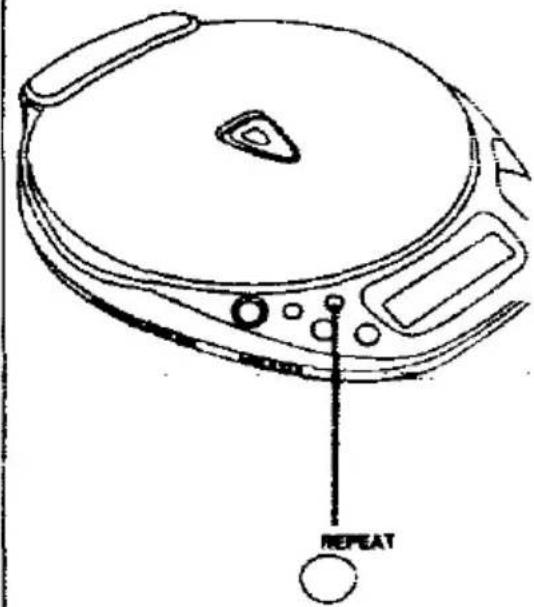
Before operation, release the unit from the hold state.
To repeat only one track
Press REPEAT once in the play mode.
One track repeat indicator

In the stop mode:
Perform skip play after pressing REPEAT (See page 15.)
To repeat all tracks on the disc
Press REPEAT twice in the play or stop mode.
All tracks repeat indicator

In the program play mode, all the programmed tracks will be repeated.
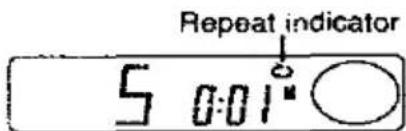
■ To cancel the repeat function
Press REPEAT once in the all tracks repeat mode.
Each time you press REPEAT, the repeat function will change as follows.
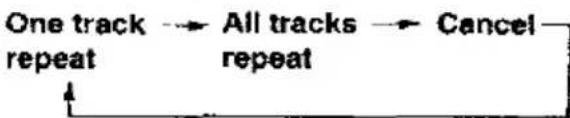
flowchart
graph LR
    A["One track repeat"] --> B["All tracks repeat"]
    B --> C["Cancel"]
=ving Tracks in a Random Sequence
--room Play)
the operation, release the unit from hold state.
Set PLAY MODE to RANDOM.
Press PLAY/PAUSE.
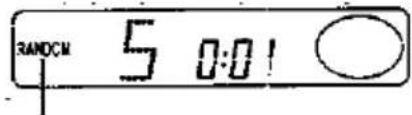
Random indicator
Unit will stop automatically when the random selection finishes playing.
To cancel the random play
PLAY MODE to NORMAL.
until will return to sequential play after current track has finished.
- cannot use program play in the ran- mode. (See pages 16–17.)
your reference:
I can select the first track using -SKIP/ AHCH ▶▶ in the stop mode. (All the is are played no matter which track is 2d first.)

Resuming Play from the Track Played Last (Resume Function)
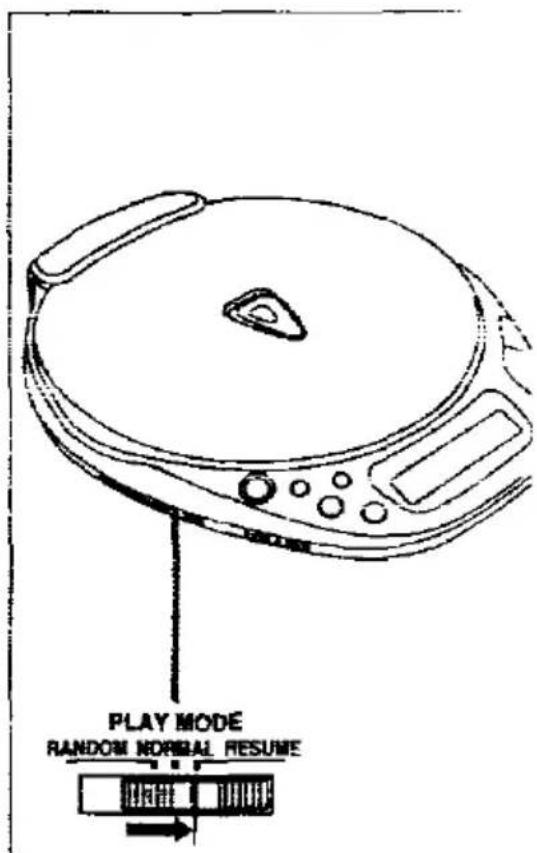
When you set PLAY MODE to RESUME, the unit resumes play from the track that was playing when the unit stopped or was turned off. This is useful when playing a disc inside a car.
Before use, release the unit from the hold state.
Set PLAY MODE to RESUME.
In the OFF mode:
If you set PLAY MODE to RESUME, the all tracks repeat function will be automatically activated.

In the play or stop mode:
If you set PLAY MODE to RESUME, the all tracks repeat function will not be activated.

The all tracks repeat function is automatically activated when play is resumed after the unit has been switched off.
■ To cancel the resume mode
Set PLAY MODE to NORMAL.
Notes:
●Play may start with the next track if previous play stopped near the end of a track.
- When a track is being played, if the power is turned off and another disc is inserted, the position of the track last played is still in the memory, and play will start at the same position among the tracks on the newly inserted disc.
- function reduces the number of mini jumps which result from vibrations in listening to the unit while walking, in a car or train, etc.
in the anti-shock memory is in use, a minimum of about three seconds of play-ik data can be stored. As a result, even unit is jolted, the stored data is uti-i, and interruptions during playback minimized.
the operation, release the unit from hold state.
Set ANTI-SHOCK MEMORY to ON.
Press PLAY/PAUSE.
Storage of playback data begins, and the memory reserve indicator displays the data storage volume.
the display shown in Ⓐ is nested:
- indicates that a sufficient amount of back data has been stored.
To cancel the anti-shock mem- my function
. ANTI-SHOCK MEMORY to OFF.
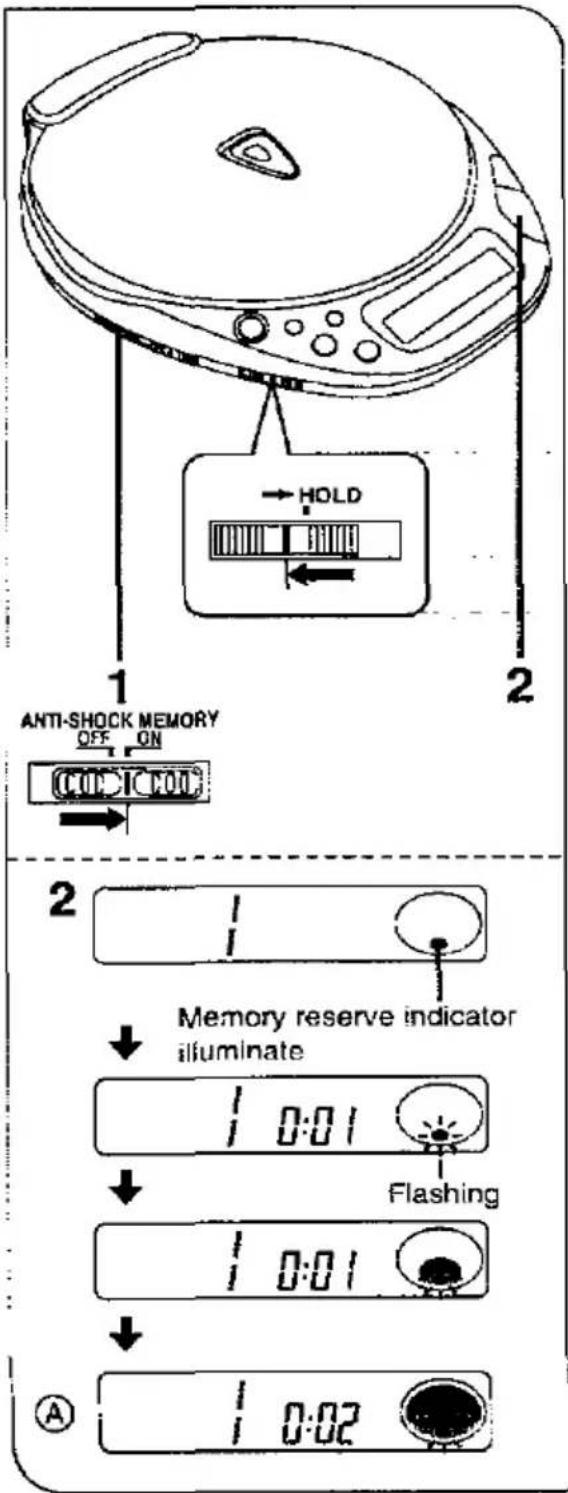
Anti-Shock Memory Function
■ The memory reserve indicator
This indicator varies based on the state of the unit.
| State of Unit | State of Playback(State of Playback Data) | |
| A | Stable | Normal(Sufficient amount of data is stored) |
| B | Unit jolted | Normal (Stored data is utilized) |
| Jolt dies down | Normal (Data storage is begun) | |
| C | Unit repeatedly joited | Interruptions occur (Data is used up) |
Notes:
- When anti-shock memory is operating, the disc rotation speed increases in order to store playback data, causing a decrease in battery life and a slight increase in the sound of the rotating disc.
- The anti-shock memory switch can be re-positioned during playback, but due to the resulting change in the disc's rotation speed, a short interruption will be heard.
- When using functions such as random and repeat, it may not be possible to activate the anti-shock memory function during the last three seconds of a track.

flowchart
graph TD
    A["Memory reserve indicator"] --> B["Step 1"]
    B --> C["Step 2"]
    C --> D["Step 3"]
ing the Remote Control
ing the provided stereo earphones, a very of operations can be performed by it using a single button.
the operation, release the remote module from the hold state (as shown in diagram).
To use the remote control (see diagram at lower right)
rembie control can be operated re- dless of the hold mode of the unit.
The operation (confirmation) tone
operation tone ("Beep") sounds when the remote control button is pressed. Edition, a confirmation tone sounds fol- ing every operation (see diagram at night).
then pressing the remote control button for three times, do so as quickly and fully as possible.
then the button is pressed three times and then three times again, the unit will up to the beginning of the previous ask
then the play mode switch on the unit is the RANDOM position, however, this ation is not possible.)
To adjust the volume
on adjusting the volume using the re- control, position the volume control the unit to between 5 and 7.
OPR indicator
- indicator is illuminated when the unit playing a track, and flashes when the is halted.
- not illuminated when the power is off.

flowchart
graph TD
    A["Operation indicator"] --> B["Off or Stop mode"]
    B --> C["Play"]
    C --> D["(Bee...p) (Bee...p)(Beep Beep) (Beep Beep)<br>Beep"]
    D --> E["Off state"]
    D --> F["Skip to beginning of next track"]
    D --> G["Skip to beginning of current track"]
    H["Remote control button"] --> I["Operation indicator"]
    I --> J["Operation indicator"]
    J --> K["Operation indicator"]
    K --> L["Operation indicator"]
    L --> M["Operation indicator"]
    M --> N["Operation indicator"]
    N --> O["Operation indicator"]
    O --> P["Operation indicator"]
    P --> Q["Operation indicator"]
    Q --> R["Operation indicator"]
    R --> S["Operation indicator"]
    S --> T["Operation indicator"]
    T --> U["Operation indicator"]
    U --> V["Operation indicator"]
    V --> W["Operation indicator"]
    W --> X["Operation indicator"]
    X --> Y["Operation indicator"]
    Y --> Z["Operation indicator"]
    Z --> AA["Operation indicator"]
    AA --> AB["Operation indicator"]
    AB --> AC["Operation indicator"]
    AC --> AD["Operation indicator"]
    AD --> AE["Operation indicator"]
    AE --> AF["Operation indicator"]
    AF --> AG["Operation indicator"]
    AG --> AH["Operation indicator"]
    AH --> AI["Operation indicator"]
    AI --> AJ["Operation indicator"]
    AJ --> AK["Operation indicator"]
    AK --> AL["Operation indicator"]
    AL --> AM["Operation indicator"]
    AM --> AN["Operation indicator"]
    AN --> AO["Operation indicator"]
    AO --> AP["Operation indicator"]
    AP --> AQ["Operation indicator"]
    AQ --> AR["Operation indicator"]
    AR --> AS["Operation indicator"]
    AS --> AT["Operation indicator"]
    AT --> AU["Operation indicator"]
    AU --> AV["Operation indicator"]
    AV --> AW["Operation indicator"]
    AW --> AX["Operation indicator"]
    AX --> AY["Operation indicator"]
    AY --> AZ["Operation indicator"]
    AZ --> BA["Operation indicator"]
    BA --> BB["Operation indicator"]
    BB --> BC["Operation indicator"]
    BC --> BD["Operation indicator"]
    BD --> BE["Operation indicator"]
    BE --> BF["Operation indicator"]
    BF --> BG["Operation indicator"]
    BG --> BH["Operation indicator"]
    BH --> BI["Operation indicator"]
    BI --> BJ["Operation indicator"]
    BJ --> BK["Operation indicator"]
    BK --> BL["Operation indicator"]
    BL --> BM["Operation indicator"]
    BM --> BN["Operation indicator"]
    BN --> BO["Operation indicator"]
    BO --> BP["Operation indicator"]
    BP --> BQ["Operation indicator"]
    BQ --> BR["Operation indicator"]
    BR --> BS["Operation indicator"]
    BS --> BT["Operation indicator"]
    BT --> BU["Operation indicator"]
    BU --> BV["Operation indicator"]
    BV --> BW["Operation indicator"]
    BW --> BX["Operation indicator"]
    BX --> BY["Operation indicator"]
    BY --> BZ["Operation indicator"]
    BZ --> CA["Operation indicator"]
    CA --> CB["Operation indicator"]
    CB --> CC["Operation indicator"]
    CC --> CD["Operation indicator"]
    CD --> CE["Operation indicator"]
    CE --> CF["Operation indicator"]
    CF --> CG["Operation indicator"]
    CG --> CH["Operation indicator"]
    CH --> CI["Operation indicator"]
    CI --> CJ["Operation indicator"]
    CJ --> CK["Operation indicator"]
    CK --> CR["Operation indicator"]
    CR --> CS["Operation indicator"]
    CS --> CT["Operation indicator"]
    CT --> CU["Operation indicator"]
    CU --> CV["Operation indicator"]
    CV --> CW["Operation indicator"]
    CW --> CX["Operation indicator"]
    CX --> CY["Operation indicator"]
    CY --> CZ["Operation indicator"]
    CZ --> DA["Operation indicator"]
    DA --> DB["Operation indicator"]
    DB --> DC["Operation indicator"]
    DC --> DD["Operation indicator"]
    DD --> DE["Operation indicator"]
    DE --> DF["Operation indicator"]
    DF --> DG["Operation indicator"]
    DG --> DH["Operation indicator"]
    DH --> DI["Operation indicator"]
    DI --> DJ["Operation indicator"]
    DJ --> DK["Operation indicator"]
    DK --> DL["Operation indicator"]
    DL --> DV["Operation indicator"]
    DV --> DW["Operation indicator"]
    DW --> DX["Operation indicator"]
    DX --> DXB["Operation indicator"]
Using the Unit with Optional Accessories
Listening through an audio system A
Discs can be played as part of an audio system by connecting the portable CD player to the system using the stereo connection cable (included)
- Before connecting the portable CD player to your audio system. make sure to turn off the power on all other system components.
- Do not connect the cable to the turntable (PHONO) connectors on the amplifier.
- If you have an amplifier which is equipped with mini phone jack, obtain the optional connecting cable (RP-CA102A).
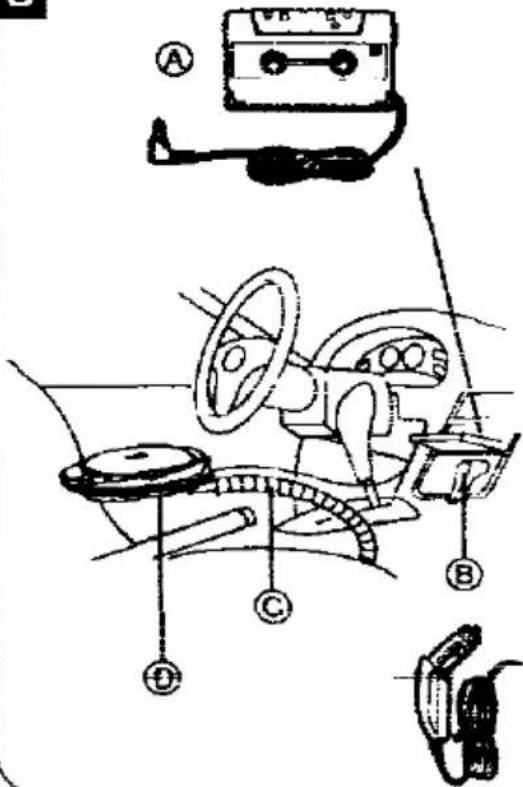
Using the unit together with a car audio system n
The car kit, available as an optional accessory, makes it possible to listen to CDs in a car.
The structure of the cassette adaptor may not allow connection to some car stereo systems.
■ What should be purchased
For connection to the car audio system: Car stereo cassette adaptor (SH-CDM9) Ⓐ
For securing the unit and connecting the power supply:
• Car adaptor (SH-CDC9) ⑧
- Car mounting arm ©, Car mounting base
⑥ (SH-CDF20)
For further details, refer to the Operating Instructions of the respective products.
A
Right side of this unit

B
compact discs having this mark can used with this unit. A
remove a disc from its

- the center holder and lift the disc ing by the edges.
hold the disc
the disc by the edges so the surface is soiled with fingerprints. Prints, dirt and scratches can cause piping and distortion.
store a disc in its case
at the disc with the label facing up- us and press downwards at the center.
the surface is soiled
is gently with a soft, damp (water only)
he disc is brought from a 1 to a warm environment, mixture may form on the disc
ie this moisture off with a soft, dry, lint- cloth before using the disc.

flowchart
graph TD
    A["COMPACT DISC DIGITAL AUDIO"] --> B["Arrow pointing to a circular object"]
    B --> C["(Correct)"]
    B --> D["(Incorrect)"]
    C --> E["Label"]
    D --> E
    E --> F["(Correct)"]
    E --> G["(Incorrect)"]
Concerning Compact Discs
Improper disc storage:
You can damage discs if you store them in the following places:
● Areas exposed to direct sunlight
● Humid or dusty areas
■ Areas directly exposed to a heat outlet or heating appliance
Handling precautions:
- Do not write on the label side with a ball-point pen or other writing utensils
- Do not use record cleaning sprays, benzine, thinner, static electricity prevention liquids or any other solvent.
- Do not soil with fingerprints.
- maintenance
is care
Iied lens will cause audible skipping. Play may not be possible if the lens is nously soiled.
sure to turn the unit off. When using the adaptor, disconnect it before cleaning.
in the disc lid and clean the lens as own in the figure.
a cotton swab to clean away fingers, etc., on the lens.
- ing kit (SZZP1038C, not included) - dust on the lens
in unit
an it with a cloth, dampened in a mild tion of soap and water.
not clean the cabinet with benzine or
did excessive moisture.
bio spray aerosol type cleaner. Some eners contain corrosive chemicals that cause internal damage and cabinet furity.


Cautions
Rechargeable batteries
- Do not use the rechargeable batteries accompanying this unit with any other product.
- Only the RP-BP60 batteries can be re-charged.
- If the power supplied by the batteries lasts for only a very short time even after recharging this, it means that the batteries are reaching the end of their service life. Do not use them any more.
●Recharging for more than 24 hours will reduce battery life. - When recharging the batteries for the first time or when recharging them after they have not been used for a long period of time, the play time may be shorter than usual. If this is the case, repeatedly recharge the batteries after use. This will restore them to their normal operational state.
● Recharging should be performed at 0°C-40°C. - Do not allow any metal objects to touch the terminals of the rechargeable batteries, as this may cause short-circuiting which is dangerous.
Dry cell batteries/ Rechargeable batteries
- Do not mix old and new batteries, or i teries of different types (carbon and s line, etc.).
●Always remove old, weak or worn batteries promptly and dispose of it properly.
●Never subject batteries to excessive for flame; do not attempt to disassent them; and be sure they are not shircuited. - If you will not use this unit for a 1 period of time, remove the batteries: store them in a cool, dark place
- If a battery leaks, remove all batter and dispose of them properly.
- Thoroughly clean the battery component before inserting new batteries
- If leaking electrolyte comes into cont with skin or clothes, wash it off with we immediately.
- Keep batteries out of the reach of children.
- Do not attempt to recharge alkaline carbon batteries
To carry dry cell batteries and rechargeable batteries around
When batteries are placed inside a door, or bag, do not put them together with necklaces or other metal objects.
Contact may cause short-circuiting a generate heat.
adaptor
-- only the AC adaptor provided with = unit.
power source polarities of the adaptor provided with this unit and total car adaptor (SH-CDC9) are (polarized plug provided).
in mind that the polarities of some pors on the market may differ (○).
you use the unit with the AC adaptor for long period of time, take out the rechargeable batteries or dry cell batteries preserve their service life and prevent the use of the electrolyte.
you will not use the unit with the AC aptor for a long period of time, discon- it from the AC power outlet.
- Solutions for Listening with Headphones
I not play your headset at a high vol- Hearing experts advise against - litinous extended play.
you experience a ringing in your ears, juice volume or discontinue use.
I not use while operating a motorized vehicle. It may create a traffic hazard and illegal in many areas.
it should use extreme caution or tem- mily discontinue use in potentially continuous situations.
if your headset is an open-air type signed to let you hear outside sounds, it turn up the volume so high that you I'll hear what's around you.
Troubleshooting Guide
Before requesting service for this unit, check the chart below for a possible cause of the problem you are experiencing. Some simple checks or a minor adjustment on your part may eliminate the problem and restore proper operation.
If you are in doubt about some of the ch. points, or if the remedies indicated in chart do not solve the problem, refer to directory of Authorized Service Center (enclosed with this unit) to locate a convenient service center, or consult; dealer for instructions.
| Problem | Probable cause(s) | Suggested remedy |
| The disc lid does not close. | The disc is not fixed properly. | Fix the disc property |
| The unit will not play. | The hold switch is set to HOLD. | Release the hold state. |
| Moisture has formed inside the unit. | Allow the unit to dry for about one hour before using | |
| The disc in the unit does not play. | The disc will not fill into the pivot. | Push the disc gently until it clicks |
| The disc is scratched. | Replace the disc with a new one | |
| The disc is not within specified standards. | Exchange the disc for an equal one. | |
| The disc in the unit cannot be removed. | The disc is fixed. | Open the disc lid and press PUSH. |
| A certain music passage won't play correctly. | The disc is dirty. | Wipe the disc with a soft cut off |
| The disc is scratched. | Replace the disc with a new one. | |
| There is noise from the tuner or disturbance on the TV screen. | Caused by high-frequency signals of this unit. | Use the unit farther away from the tuner or TV |
| If the tuner or TV antenna is the indoor type, use an outdoor antenna. |
tin
| m channels: | 2 (left and right, stereo) |
| frequency | |
| response: | 20-20,000 Hz(+0.5 dB, -1.5 dB) |
| put voltage: | 0.7 V (50 kΩ)more than 96 dB* |
| and flutter: | Below measurable limit |
| converter: | 1 bit, MASH |
| iphone | |
| input level: | Max. 5 mW+5 mW/16Ω (variable) |
| up | |
| i source: | Semiconductor laser |
| length: | 780 n m |
| = | Glass pressed lens |
General
| Power supply: | DC 4.5 V |
| Power consumption: |
| Type of power supply | Anti-shock memory OFF/ON |
| AC adaptor | 3.7 W/4.3 W |
| Battery | 0.6 W/1.0 W |
Dimensions
| (W×H×D): | 140×30.9×172.1 mm |
| Weight: | 335 g (with batteri)295 g(without batteries) |
These specifications were measured with anti-shock memory in the off state.
Note:
Specifications are subject to change without notice. Weight and dimensions are approximate.
MASH is a trademark of NTT.
For United Kingdom only
This apparatus was produced to B\$ 800.
440
Matsushita Electric Industrial Co., Ltd. Central P.O. Box 288, Osaka 530-91, Japan
Printed in Japan
RQT2165
F0893
- Technics
- Portable CD Player
- SL-XP570
- Operating Instructions
- Note:
- Dear Customer
- Table of Contents
- CLASS 1 LASER PRODUCT
- IOKAN 1 LASERLAITE ASS 1 LASER ·PARAT
- AUTION:
- WARNING:
- ADVARSEL:
- VAROITUS:
- CAUTION!
- DANSK
- BEMAERK!
- SUOMI
- VAROITUS!
- NORSK
- ADVARSEL!
- implied Accessories
- Location of Controls
- Remote control
- chargeable batteries
- Recharging batteries A
- Battery removal
- Power Source
- Dry cell batteries (not Included)
- Install two LR6 (UM-3) type alkaline batteries as shown in the figure. A
- AC adaptor
- Before use
- infect the AC adaptor. A
- RITION
- : adaptor (not Included)
- AUTION
- tiery indicator B
- Accidental Operation Prevention Function
- ■ To use the accidental operation prevention function
- ■ To cancel the accidental operation prevention function
- ■ The HOLD indicator
- Steining to CD Tracks in Their Original Sentence (Normal Play)
- Listening to CD Tracks in Their Original Sequence
- ■ The "OPEN" display
- ■ The "no diffuse" display
- ■ To stop play A
- ■ To temporarily stop disc play
- Automatic Shut-Off
- skip tracks forward or kward (Skip function)
- - either of -SKIP/-SEARCH, - or ◀ in the play mode.
- search forward or kward (Search function)
- es5 and hold ▶▶ or ◀◀ in the =y mode.
- Please the button when you reach desired point.
- To change the tone quality A
- To release the fixed state of the disc B
- - rung Play from a Specific Track - ip Play)
- ore operation:
- -- example:
- Set PLAY MODE to NORMAL.
- Press PLAY/PAUSE.
- Playing Tracks in a Particular Sequence (Program Play)
- Before operation:
- - confirm the program A
- - cancel the program play ☐
- STOP/OPR OFF.
- Playing Tracks Repeatedly (Repeat Function)
- To repeat only one track
- To repeat all tracks on the disc
- =ving Tracks in a Random Sequence
- --room Play)
- To cancel the random play
- PLAY MODE to NORMAL.
- your reference:
- Resuming Play from the Track Played Last (Resume Function)
- Set PLAY MODE to RESUME.
- ■ To cancel the resume mode
- Notes:
- Anti-Shock Memory Function
- ■ The memory reserve indicator
- ing the Remote Control
- To use the remote control (see diagram at lower right)
- The operation (confirmation) tone
- To adjust the volume
- OPR indicator
- Using the Unit with Optional Accessories
- Listening through an audio system A
- Using the unit together with a car audio system n
- ■ What should be purchased
- remove a disc from its
- hold the disc
- store a disc in its case
- the surface is soiled
- Concerning Compact Discs
- Improper disc storage:
- Handling precautions:
- - maintenance
- is care
- in unit
- Cautions
- Rechargeable batteries
- Dry cell batteries/ Rechargeable batteries
- To carry dry cell batteries and rechargeable batteries around
- adaptor
- - Solutions for Listening with Headphones
- Troubleshooting Guide
- For United Kingdom only
Marke : TECHNICS
Modell : SL-XP570
Kategorie : CD-Player