
SL-PJ22 - CD-Player TECHNICS - Kostenlose Bedienungsanleitung
Finden Sie kostenlos die Bedienungsanleitung des Geräts SL-PJ22 TECHNICS als PDF.


| Produkttyp | CD-Player |
| Marke | Technics |
| Modell | SL-PJ22 |
| Abmessungen (B×T×H) | 36 × 28 × 7,7 cm |
| Tiefe bei geöffnetem Disc-Fach | 42 cm |
| Gewicht | 3,3 kg |
| Stromversorgung | ~50/60 Hz, 240 V |
| Leistungsaufnahme | 10 W |
| Frequenzgang | 2 – 20.000 Hz (EIAJ) |
| Signal-Rausch-Verhältnis | 96 dB (EIAJ) |
| Dynamikumfang | 96 dB |
| Klirrfaktor | 0,004 % (1 kHz, 0 dB) |
| Kanaltrennung | 90 dB (EIAJ) |
| DA-Wandlung | 16-Bit linear |
| Laserwellenlänge | 780 nm |
| Zugriffszeit (letzter Titel) | 1 Sekunde |
| Ausgangsspannung | 2 V (bei 0 dB, EIAJ) |
| Ausgangsimpedanz | ca. 600 Ω |
| Mindestlastimpedanz | > 10 kΩ |
| Funktionen | Automatische Wiedergabe, Direktzugriff, Wiederholung, Programmwiedergabe (bis zu 20 Titeln), Vor-/Rücklauf-Suche, manuelle Suche, Zeitmodusanzeige, Preset-Edit-Wiedergabe |
| Disc-Einzug | Motorgetrieben, horizontal |
| Anschlüsse | Line Out (Cinch), Synchro-Recording (3,5 mm), Fernbedienung (3,5 mm), AC-Eingang |
| Zubehör | Netzkabel, Stereoverbindungskabel, Synchro-Recording-Kabel, Fernbedienungskabel |
Häufig gestellte Fragen - SL-PJ22 TECHNICS
Benutzerfragen zu SL-PJ22 TECHNICS
0 Frage zu diesem Gerät. Beantworten Sie die, die Sie kennen, oder stellen Sie Ihre eigene.
Eine neue Frage zu diesem Gerät stellen
Laden Sie die Anleitung für Ihr CD-Player kostenlos im PDF-Format! Finden Sie Ihr Handbuch SL-PJ22 - TECHNICS und nehmen Sie Ihr elektronisches Gerät wieder in die Hand. Auf dieser Seite sind alle Dokumente veröffentlicht, die für die Verwendung Ihres Geräts notwendig sind. SL-PJ22 von der Marke TECHNICS.
BEDIENUNGSANLEITUNG SL-PJ22 TECHNICS
Technics
Compact Disc Player
SL-PJ22
OPERATING INSTRUCTIONS

natural_image
3D rendered image of a technical device labeled 'Technical' with no visible text or symbols on the body itself.DIGITAL

"This apparatus was produced to BS800: 1983."
Notes:
- Specifications differ according to the area code.
The "EK" area code, for example, indicates United Kingdom specifications. - The "EK" indication is shown on the packing case and serial number tag.
Before operating this product, please read these instructions completely.
Suggestions for Safety
Before using this unit, be sure to read applicable items of the operating instructions and these safety suggestions carefully; and afterwards keep them handy for future reference. Take special care to follow the warnings indicated on the unit itself as well as in the operating instructions.
- Avoid places where there is water or humidity.
Do not use this unit near a bathtub, wash basin, swimming pool, or the like. Damp basements should also be avoided.
- Do not allow water or any foreign object to get inside this unit.
Do not place small metal objects or anything containing liquid on or near the unit.
- Avoid placement of the unit where it will be exposed to the direct rays of the sun, or where ventilation is inadequate.
Do not place this unit in a bookcase or between cabinets, unless proper ventilation is provided, or where curtains or furniture may obstruct the ventilation holes.
- Place this unit away from heat-emitting appliances.
Never place this unit on or near a radiator, heat register, stove, or any other heat-emitting equipment (including amplifiers).
- Placement
Place the unit on a stable, level, vibration-free shelf or stand.
- Check the voltage rating of this unit before connecting the unit to a power supply.
Be sure to connect the unit only to the type of power supply indicated in the operating instructions, or as indicated on the unit itself.
- Care of the mains cord and plug.
Take care that the cord is not bent sharply (especially near its connection to the unit or near the plug), that nothing is placed on it, and that it is not pinched or crushed. Never take hold of the plug or cord if your hand is wet, and always be sure to grasp the plug body when connecting or disconnecting it.
- Maintenance
Refer to the operating instructions for details.
- Repairs
Except for adjustments explained in the operating instructions, do not attempt any repairs yourself. Be sure to request service from a qualified technician (or your dealer or nearest service center).
Concerning Compact Discs
Handling precautions
Only compact discs having this mark can be used with this unit.

Observe the following precautions to enjoy the same outstanding sonic performance from your Compact Discs for many years.
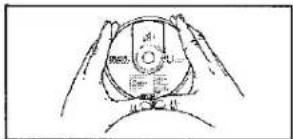
●Hold compact discs by the edges so the surface is not soiled with fingerprints.

natural_image
Line drawing of two hands holding a CD or DVD disc (no text or symbols)- Be careful not to scratch the surface with fingernails or other sharp objects, particularly when inserting and removing discs from their cases.
Do not bend the disc. - Do not use record cleaning sprays or static electricity prevention liquids.
Do not wipe with benzine, thinner or any other solvent. If the surface is soiled, wipe gently with a soft, damp (water only) cloth.
When wiping discs, always move the cloth directly outward from the center of the disc, not in a circular motion as with standard phonograph records.


(In compact discs, circular scratches along a line of pits are more likely to cause errors than straight scratches across many lines of pits.)
If the disc is brought from a cold environment into a warm room, moisture may form on the disc. Wipe this off with a soft, dry, lint-free cloth before using the disc.
- Do not dry discs with a hair dryer.
*Do not write on the label side with a ball-point pen, hard pencil or other writing utensil.
- Handle compact discs with care. Fingerprints, dirt and scratches can cause skipping and distortion.
Storage precautions
- Be sure to store discs in their cases to protect them from dust, scratches and warping.
- Do not place or store discs in the following places:
1) Locations exposed to direct sunlight.
2) Humid or dusty locations.
3) Locations directly exposed to a heat outlet or heating appliance.
4) In the glove compartment or rear ledge of an automobile.
Installation
This unit incorporates many sensitive optical components. To enjoy optimum performance at all times, avoid using this unit under the following conditions.
• In a closed vehicle or other location where the temperature could exceed 100°F (40°C).
- For long periods of time in direct sunlight.
•In very cold places (below 40°F; 5°C).
In very humid locations.
- Near a heat outlet or heating appliance.
•In dusty or smoky locations.
In locations prone to vibrations.
On an unstable or uneven surface.
- Near appliances generating strong magnetic fields.
- Within reach of children.
In locations where the rear panel is less than 10 cm (about 4") away from the wall or back of an audio rack.
For reliable performance, be sure to place the unit on a flat, level surface. Not doing so may cause the unit to malfunction.
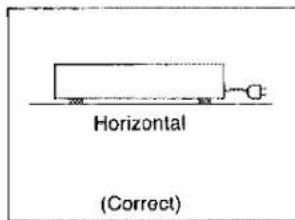

Do not place near a tuner or television.
This unit uses high frequency signals and can cause interference with tuner and television reception. If this occurs, move this unit farther away from the tuner or television, or change from an interior to an exterior television antenna.
Otherwise turn off the power (mains) switch while using a tuner or television.
Do not place any heavy objects on the top panel (except recommended system components).
Notes and Maintenance
When carrying or storing the unit, handle it with care so it is not subjected to any strong bumps.
Always remove the disc before storing the unit for any period of time.
Before transporting this unit, be sure to remove the disc and lock the lock shaft or severe damage will result.
(See page 2 for directions on shipping this unit again.)
Do not take apart this unit or attempt to make any changes yourself.
This unit is a very intricate device that uses a laser pickup to retrieve information from the surface of compact discs. The laser is carefully shielded so that its rays remain inside the cabinet. Therefore, never try to disassemble the unit or alter any of its parts since you may be exposed to laser rays and dangerous voltages.
Turn down the amplifier volume control.
Compact discs have much less noise and a much wider dynamic range than phonograph records. Consequently, you may turn the volume up too high if you adjust it by trying to listen to surface noise as you might with a phonograph record. To prevent this problem, turn the volume down, increasing it as desired only after the music has started.
■ Times displayed by this unit may differ slightly from the track times in the disc liner note.
The liner note included with each compact disc lists the playing time of each track. Since the times calculated by this unit include pause intervals, the displayed time may differ from the liner note time by this amount.
■ Close the disc holder when not in use.
There is a precision-made focusing lens in the unit which cannot be seen from the outside. Always close the disc holder when not using the player to protect this lens from dirt and dust.
■ Turn off the power (mains) switch of the compact disc player while using a tuner.
Maintenance
Wipe the cabinet with a soft, dry cloth.
To avoid harming the cabinet finish, do not clean this unit with solvents or volatile compounds such as alcohol, benzine or paint thinner. Do not use treated dust cloths.
About moisture
Moisture may form on the lens in the following cases...
- Immediately after a heater has been turned on.
• In a steamy or very humid room. - When the unit is suddenly moved from a cold environment to a warm one.
If moisture forms inside this unit, it may not operate properly. To correct this problem, turn on the power (mains) and wait about one hour for the moisture to evaporate.
Thank you for purchasing this Compact Disc Player. For optimum performance and safety, please read these instructions carefully.
Caution for safe use of this apparatus for UK standard model SL-PJ22. ("EK" model only)
The "EK" indication is shown on the name plate.
Caution:
This apparatus is double insulated, safety earth not required.
This plug of the AC power (mains) cord must only be connected to electronic apparatus equipped with suitable sockets.
Otherwise cut off and dispose of the plug, and fit an appropriate one in accordance with the instruction below.
Important
The wires in this mains lead are coloured in accordance with the following code:
Blue:
Neutral
Brown:
Live
As the colours of the wires in the mains lead of this apparatus may not correspond with the coloured markings identifying the terminals in your plug, proceed as follows. The wire which is coloured BLUE must be connected to the terminal which is marked with the letter N or coloured BLACK. The wire which is coloured BROWN must be connected to the terminal which is marked with the letter L or coloured RED.
This equipment should be disconnected from the mains when not in use.
Before Use
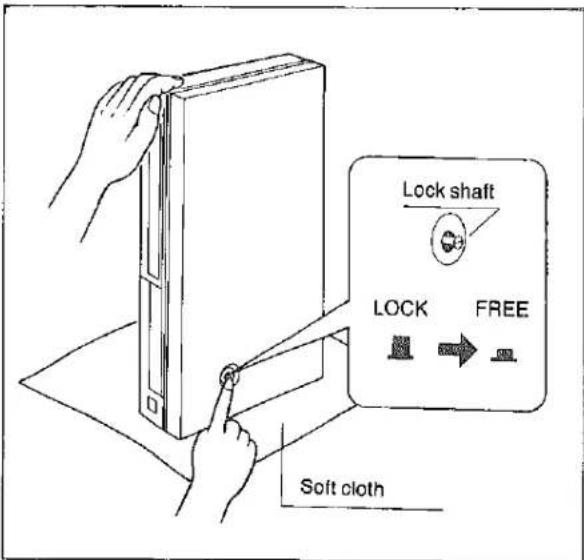
- Place a soft cloth under the unit to protect it from scratches.
- Press the lock shaft on the bottom panel to the in (FREE) position (圆…m).
NOTE:
IF THE UNIT IS TRANSPORTED AGAIN, PERFORM THE FOLLOWING STEPS:
1) Remove the disc from the holder.
2) Pull the lock shaft to the out (LOCK) position (≡—≡).
CAUTION:
Do not transport the unit without locking the lock shaft.
SEVERE DAMAGE WILL RESULT.
Contents
Before use 2
Accessories 2
Installation 3
Notes and maintenance 3
Suggestions for safety 4
Concerning compact discs 4
Connections.... 5
Front panel controls and functions 6\~7
Playing a disc 8\~12
Troubleshooting guide 13
Specifications .... Back cover
Accessories
Power (mains) cord....1
Stereo connection cable 1
Synchro recording cord 1
Remote control cord (part no. SJP2257T) 1
Caution
This product utilizes a laser. Use of controls or adjustments or performance of procedures other than those specified herein may result in hazardous radiation exposure.
Connections
- Make sure your hands are dry when making connections.
-
Turn power off to all components before making connections.
-
Make all connections firmly.
- Be sure to read the operating instructions for all units connected.
(When connecting a system amplifier, or when installing other components, please refer to the operating instructions for the respective components.)

flowchart
graph TD
    A["Line OUT"] --> B["LINE OUT terminals"]
    B --> C["Synchro recording terminal"]
    C --> D["Rear panel of this unit"]
    D --> E["AC outlet"]
    E --> F["AC IN socket"]
    F --> G["Power (mains) cord (included)"]
    G --> H["To wall socket"]
    I["SEREO CONNECTION CABLE (included)"] --> J["CD"]
    K["SYNCHRO REC"] --> L["REMOTE"]
    M["CLASS 1 LASER PRODUCT"] --> N["AC Outlet - SWITCH - 2.0V - 5.0V MAX"]
    O["SYNCHRO REC"] --> P["CD"]
    Q["AC OUTLET"] --> R["AC IN"]
    S["To wall socket"] --> T["To wall socket"]
Rear panel of amplifier or receiver
① Line out terminals (LINE OUT)
These are the audio output terminals.
- Connect the line out terminals to the CD or AUX terminals on your amplifier or receiver.
*Do not connect the line out terminals to the PHONO terminals of your amplifier or receiver.
⑫ Synchro recording terminal (SYNCHRO REC)
ΦConnect the synchro recording cord to the CD synchro recording terminal of your amplifier.
Synchro recording function
Recording can be synchronized with the beginning and end of disc play and pause operation.
■ Direct operation function
The amplifier input source can be automatically switched to CD or AUX when the play/pause button is pressed. It is also possible to automatically start disc play when the amplifier input source selector is switched to CD play, by the remote control unit.
Note:
This terminal can be used only with Technics amplifiers or cassette decks having a synchro recording terminal for a CD player. (Contact your dealer for details.)
③ Remote control terminal (REMOTE)
*Note: This terminal can be used only with Technics amplifiers or cassette decks (or graphic equalizers) having a remote control terminal for a CD player. (Contact your dealer for details.)
④ AC outlet
"SWITCHED" outlet
Power (mains) outlet is switched on/off by the power (mains) switch of this unit. Audio equipment rated up to 50 W can be connected.
⑤ AC IN socket (\~ AC IN)
Connect this socket to a wall socket or an AC outlet using the power (mains) cord.
[The configuration of AC power (mains) plug may differ according to the area.]
Front Panel Controls and Functions

Power (mains) switch
Press (且_)to switch power (mains) on.
Press again (m-Ⅲ) to switch power (mains) off. (See page 8.)
② Disc holder
The disc is inserted in this holder with the label side up. (See page 8.)
③ Open/close button
Press this button to open and close the disc holder. (See page 8.)
④ Display panel
(See page 7.)
(Please refer to items ④A to;④F.)
⑤ Play/pause button
This button is used for the following three operations.
-
If the button is pressed while the unit is in the stop mode or in the pause mode, play begins and the play indicator illuminates.
-
If the button is pressed during play, the unit goes to the pause mode, and the pause indicator illuminates.
-
If the synchro-recording cord is properly connected, pressing this button when the unit is in the stop or pause modes causes the amplifier's input selector to switch to "CD" automatically.
Pickup:
The pickup is a laser device that reads the information on the disc surface. The pickup moves across the disc as the disc is played, but it is not visible from outside the cabinet.
Pause mode:
Play is stopped, but the pickup remains where it was at the time when the play/pause button was pressed. The disc rotates while the unit is in the pause mode.
Stop button
Press this button to stop disc play and cancel all previous settings.
Note:
When this button is pressed, the unit returns to the stop mode.
(See page 8.)
Stop mode:
In the stop mode, the pickup is at the beginning of the first track and the display shows the total number of tracks and total playing time of the disc. (The disc does not rotate.)
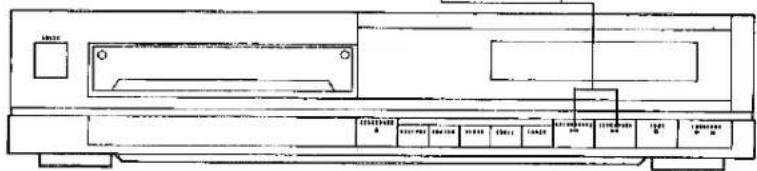
⑦ Forward and backward skip/search buttons
These buttons are used for the following five operations.
- To program track numbers before starting play (program play).
Press either button before starting play. (See page 9 for details.)
- To start play from a specific track (direct access play).
Press either button before starting play. (See page 10 for details.)
- To skip to the beginning of a specific track (skip play).
Press either button for an instant (less than one second) during play or the pause mode.
(The number of tracks skipped is the same as the number of times one of these buttons is pressed.) (See page 10 for details.)
- To move the pickup forward or backward to a desired point (manual search play).
Keep either button pressed and release it when it reaches the desired point.
The pickup moves slowly at first and then rapidly if one of the skip/search buttons is held down for more than about 3 seconds.
(See page 10 for details.)
- To specify playing time (min.) (preset edit play). (See page 12 for details.)
8 Repeat button
Press this button to activate the repeat mode.
(The repeat indicator illuminates.)
Press again to cancel the repeat mode.
(See page 11.)
⑨ Recall button
Press this button to display the program play sequence in the memory.
When this button is pressed, the tracks stored in the memory for program play are shown one by one.
(See page 9.)
⑩ Clear button
Press this button to cancel the programmed track when the unit is in the stop mode.
Each time this button is pressed, the previous entry is cancelled.
(See page 9.)
⑬ Memory button
Press this button to enter track numbers before starting play (program play).
(A maximum of 20 selections can be programmed.)
The letter “F” (FULL) will be displayed if more than 20 memory selection are attempted.
(See page 9.)
⑫ Time mode select button
Use this button to select the desired time display mode.
① Disc remaining playing time.
② Track number and remaining playing time of the current track.
③ Playing time from the beginning of the first track.
④ Track number and elapsed playing time from the beginning of the current track.
(See page 11.)

④A Track number display (track)
Track numbers (up to 99) are shown here.
④B Time display
This display shows four time modes (see page 11) and programmed order (see page 9).
④C Play indicator (▶)
Illuminates when the play mode is activated and goes out when the play is stopped.
④D Pause indicator (III)
Illuminates when the pause mode is activated and goes out when the pause mode is cancelled.
④E Repeat indicator ( ◎ )
Illuminates when the repeat mode is activated and goes out when the repeat mode is cancelled.
④F Disc Indicator (disc)
Flashes on and off when the disc holder is opening or closing.
Illuminates when a disc is in the holder (If power is on) and the disc holder is closed.
Playing a Disc
All of the examples on pages 8–12 refer to a disc which contains 7 tracks and has a total playing time of 55 minutes and 58 seconds, as illustrated.
1 Automatic play
(To play a disc from beginning to end.)

| Track 1 | Track 2 | Track 3 | Track 4 | Track 5 | Track 6 | Track 7 |
| 6 min. | 4 min. | 21 min. 58 sec. | 5 min. | 4 min. | 4 min. | 12 min. |
| (Stop mode) | ||||||

① Display momentarily illuminates as shown below:

Afterwards the display reads all zeros as shown below.

② Insert the disc only after the disc holder has opened all the way. If the disc is inserted too soon, it may be damaged. Do not tilt the unit while the disc holder is opening or closing since the disc could fall out of the holder.
Step 4 can be skipped by pressing the play/pause button after inserting a disc. In this case, the holder will close and play will begin directly from track 1, but the tracks and total playing time will not be displayed.
4 If the open/close button is pressed, the display illuminates as shown below.

Disc indicator flashes on and off.
Disc information is being read.


Reading of disc information finished.

Stop mode.
⑤ The play indicator (▶) illuminates and play begins.

(The illustration above shows that the 1 sec. point of track 1 is being played.)
The unit switches to the pause mode and the pause indicator illuminates.

(The illustration above shows the play is interrupted at the 3 min. 15 sec. point of track 1.)
The pause mode is cancelled, play is resumed, and the play indicator illuminates.
The pickup returns to the beginning of the first track and the unit switches to the stop mode.
After the last track has been played, the pickup returns to the beginning of the first track and the unit switches to the stop mode.
⑨ When not in use
Remove the disc from the disc holder.
- Close the disc holder.
●Turn off the power (mains).
2 Program play
(When the unit is in the stop mode.)
1 While watching the track number display, press momentarily to specify the desired track number.
(See below.)
Button to move the pickup forward.
Button to move the pickup backward.
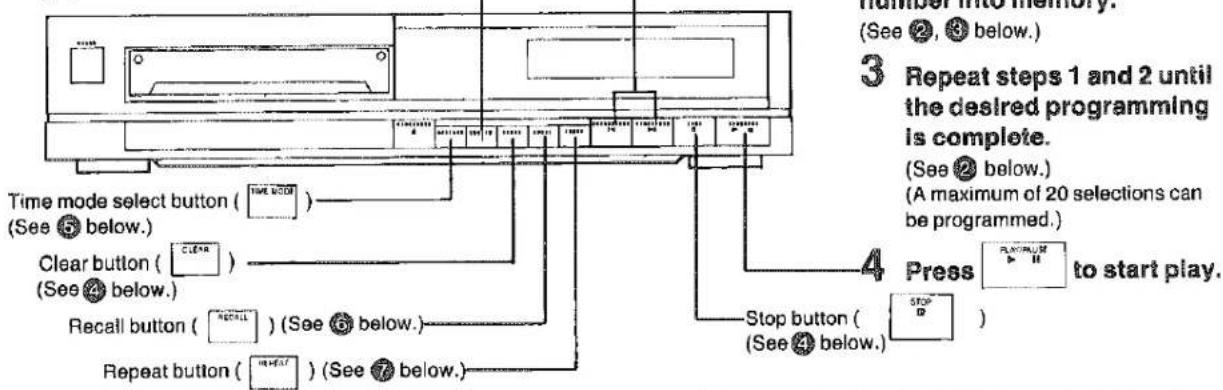
Note:
On this and the following pages, these basic operation procedures are omitted.
●Power (mains) on/off ●Interrupting play
•Disc holder open/close •Stopping play
Disc insertion/removal
●Power (mains) on/off ●Interrupting play
•Disc holder open/close •Stopping play
●Power (mains) on/off ●Interrupting play
•Disc holder open/close •Stopping play
Disc insertion/removal
Note:
On this and the following pages, these basic operation procedures are omitted.
If more than 20 selections are entered, “F” (full) is shown in the display panel and no further selections can be programmed.
Example:
To play track 3, 5 and 1 in that order.
Press as follows.
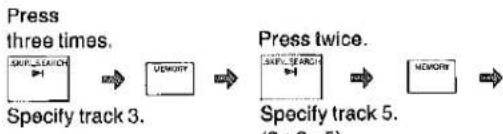
flowchart
graph LR
    A["Press three times."] --> B["Specify track 3."]
    B --> C["USEMISTRY"]
    C --> D["Press twice."]
    D --> E["Specify track 5. (2+2-5.)"]
    E --> F["NEWMORY"]

flowchart
graph LR
    A["S&P-SEARCH"] --> B["MEASURE"]
    B --> C["PLAYHASE"]
    style A fill:#f9f,stroke:#333
    style B fill:#ccf,stroke:#333
    style C fill:#cfc,stroke:#333
To enter the same track number in succession, simply press the memory button the same number of times as that track is to be played. • For example, to program tracks 3, 5, 5, and 1 in that order, press the memory button twice after track 5 appears on the display.
4 How to cancel the program
If you make a mistake when entering a track number, press the clear button to cancel that entry. Each time this button is pressed, the previous entry is cleared.
During play, however, the track being played can not be cancelled.
*All program entries are cancelled when the stop button is pressed, or power (mains) is turned off.
In this case, all functions are stopped.
⑤ Total playing time confirmation (before starting play)
To display the total playing time of all programmed tracks.
For example; if tracks 3, 5 and 1 are specified and the time mode select button is pressed, 30 minutes 58 seconds is displayed.

6 Program confirmation
(During program play or in the pause mode.) To display programmed track numbers.
*When the recall button is pressed during first programmed track (track 3) programmed track numbers are displayed one by one in the order in which they are to be played.
After the last track has been displayed, the current track is shown.
The diagram below shows track 3, track 5 and track 1 programmed in that order.

Note: Programmed tracks that have been played are not displayed unless the repeat button is on. (When playing the programmed tracks repeatedly, press the repeat button before starting play. In this case, all programmed track numbers will be displayed when the program is confirmed.)
3 Direct access play (When the unit is in the stop mode.)

① For example:
To play a disc from track 3 to the end of the disc.
Press three times ▶→ ▶→
The display shows track 3 specified.
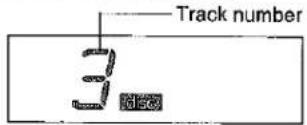
② The play indicator (▶) illuminates and play begins from track 3.

4 Manual search play
(During play or in the pause mode.)
To play the disc from a specific point
■ Keep or pressed to move
the pickup forward or backward.
Release the button when the desired point has been reached. (See ⑩ below.)
Pickup moves forward
Pickup moves backward.
5 Skip play
(During play or in the pause mode.)
To skip to the beginning of a specific track
Press or momentarily until the desired track has been located.
(See ① below.)
Pickup skips forward.
Pickup skips backward.
Forward or backward search
- The pickup moves slowly at first and then rapidly if one of the buttons is held down for more than about 3 seconds.
- If one of the buttons is pressed while a disc is being played, sound from the disc can be heard as the pickup moves. The output level at this time is decreased by 12 dB ( 14 ) compared with the normal level.
During program play, the pickup can only be moved between the beginning and end of the track currently being played. If you move the pickup all the way to the end of the track being played and then release the skip/search button, program play will continue with the next track in the memory sequence (if there is one). If you move the pickup to the end of the last track in memory and then release the search button, the unit switches to the stop mode.
① Forward skip
*During automatic play, the pickup skips to the beginning of the next track each time the button is pressed.
During program play or program repeat play, the pickup skips to the beginning of the next programmed track each time the button is pressed.
Backward skip
During automatic play, the pickup skips to the beginning of the current track. If pressed again quickly, the pickup skips to the beginning of the previous track.
During program play (repeat function not activated), the pickup skips backward only to the beginning of the current track.
During program repeat play, the pickup skips to the beginning of the current track. If pressed again quickly, the pickup skips to the beginning of the previous programmed track.
6 Repeat play
(Before play, during play, or in the pause mode.)
Entire disc and programmed track repeat play
Press before play.
The repeat indicator ( ) illuminates to show that the repeat mode has been activated. (See below.)
7 Time mode display
(During play or in the pause mode.) Four time mode displays can be selected.

1
Repeat play
For automatic play
Press the repeat button before play or during play; all tracks will be played repeatedly.
For direct access play
Press the repeat button during direct access play; the tracks from the selected track to the end of the disc are played then the pickup returns to the first track and plays all tracks repeatedly.
For program play
ePress the repeat button before program play; the programmed tracks will be played repeatedly.
- Press the repeat button during program play; only the remaining programmed tracks will be played repeatedly.
- Press the repeat button again to cancel the repeat play. (Indicator goes out.)
- Pressing the stop button also cancels the repeat mode, but this clears previous program settings, too.
① Time mode display function
In the example, a disc of 55 min. 58 sec. is playing at a point 2 min. 10 sec. after the beginning of track 5.
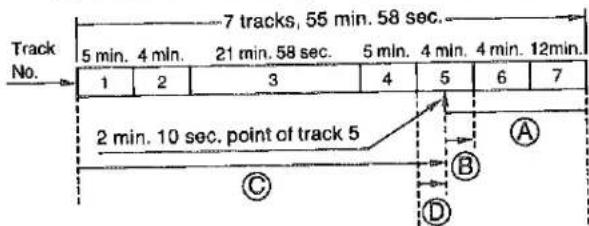
Each time the time mode select button is pressed, the time display mode changes in the following manner:

(During program play, the total remaining playing time of the program is displayed.)


(During program play, playing time from the beginning of the first programmed track is displayed.)
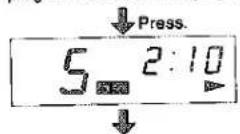
Ⓐ Disc remaining playing time.
(B) Track number and remaining playing time of the current track.
© Playing time from the beginning of the first track.
(D) Track number and elapsed playing time from the beginning of the current track.
Note:
In the following cases the time display shows “--;--” when the remaining playing time of the disc is displayed:
- When a track number higher than 20 is programmed;
- When the total playing time of a program is more than 99 minutes. (For example, when one 20-minute track is programmed to play six times, the total playing time of the program is 120 minutes.)
8
Preset edit play
(When the unit is in the stop mode.)
Desired length of time (1 to 99 minutes) can be specified.
- A maximum time of 99 minutes can be specified for program play.


For example;
To play only 15 minutes:
When the time mode select button is pressed in the stop mode:

Press.

When 15 minutes are specified:

Press.

(Specify
15 minutes.)


When 15 minutes are entered into memory.
(For automatic play or repeat play, this operation may be omitted.)

Press.
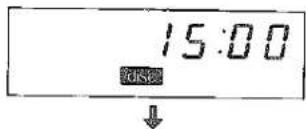

When the play/pause button is pressed:

Press.
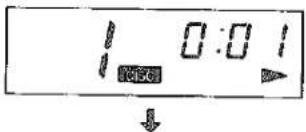

After playing the preset edit time (15 minutes), the unit switches to the pause mode.

Note:
Pause time is included in the preset edit time.
Notes:
During automatic play, the unit switches to the pause mode after playing for 15 minutes.
During program play, the unit switches to the pause mode after playing for 15 minutes, and the next programmed track is displayed if there is a further programmed track.
(Play is restarted by pressing the play/pause button.)
*During repeat play, the unit switches to the pause mode every 15 minutes.
(Play is restarted by pressing the play/pause button.)
- If a preset edit time that is longer than the recorded playing time is specified, the unit switches to the stop mode after the last track has been played.
*For preset edit play during programming, the preset edit time must be specified before the program selections are entered. - Using the skip/search buttons during preset edit play does not subtract any time from what was specified. It does move the desired length of time to the new location.
To cancel this function, press the stop button.

Remaining specified time confirmation
The time mode button can also be used for the following function.
To display the remaining specified time.
For example: If 15 minutes has been specified and then tracks 2→4→6 are programmed, pressing the time mode select button displays the remaining playing time between the end of the last programmed track and the specified preset edit time of 15 minutes.
This indication is helpful to determine if the programmed tracks will fit on a tape or a section of a tape.
If track 2 has a playing time of 4 minutes, track 4 of 5 minutes and track 6 of 4 minutes (as in the example disc on page 8), the displayed remaining playing time will be two minutes (15 minutes minus 13 minutes).
Note:
When the time mode select button is pressed, -F F F F will appear on the display panel if the programmed play time is longer than the preset edit time. In this case, cancel the track number using the clear button and reprogram so that the programmed play time is within the preset edit time.
Troubleshooting Guide
If the unit does not operate properly, check all of the following points, as well as connections and the control positions of all components connected to this unit, before requesting professional servicing. This table does not include checks for mistaken connections or Incorrect settings of other components. If the problem is not solved by this table or is not included in the problems listed below, contact your Technics dealer for -assistance.
| Problem | Causes | Remedy |
| Disc holder does not close when the open/close button is pressed. | ●The disc is warped. | ●Replace the disc. |
| Disc is inserted but number of tracks and playing time are not displayed. | ●The lock shaft is in the out position ( Ⅱ ).●Disc is inserted upside down.●Disc is dirty.●Disc is scratched.●Disc is seriously warped.●A non-standard disc is inserted.●Moisture has formed inside the player. | ●Press to the in (unlocked) position ( Ⅲ . Ⅳ ).●Insert disc again properly.●Wipe clean with soft cloth.●Use a new disc.●Use a new disc.●Use only discs with the ℃DISC mark.●Wait about 20 to 30 minutes. |
| Certain sections of a disc are not played normally. | ●The lock shaft is in the out position ( Ⅴ ).●Disc is dirty.●Disc is scratched. | ●Press to the in (unlocked) position ( Ⅱ . Ⅳ ).●Wipe clean with soft cloth.●Play disc, skipping over scratched sections (if so desired); otherwise, replace disc. |
Note:
If you connect Technics amplifier having a remote control unit with Digital Volume Attenuation Function (for CD player), you can reduce the output level as follows.
Digital volume attenuation function
• Each time the ▼ button or ▲ button is pressed, the display mode changes to the attenuation mode (dB display). The current digital volume level setting is displayed momentarily in the time display. Pressing one of these buttons again while the dB display is illuminated will cause a volume level change as described below.
To lower the volume level press the □ button. The volume level can be lowered to -12 dB in 2 dB steps.
For example, when the ☐ button is pressed once:

When the □ button is pressed again:
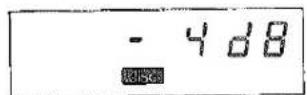
- Press the □ button to return to 0 dB in 2 dB steps.
©After the dB display has gone out, the playing time is shown again.
Volume attenuation is also returned to 0 dB automatically when power (mains) is switched off.
Note: Headphone level is also affected.
Technical Specifications
(Measured by EIAJ [CP-307])
Audio
| Number of channels: | 2 (left and right, stereo) |
| Frequency response: | 2-20,000 Hz (EIAJ) |
| Dynamic range: | 96 dB |
| S/N ratio: | 96 dB (EIAJ) |
| Harmonic distortion: | 0.004% (1 kHz, 0 dB) |
| Total harmonic distortion: | 0.006% (1 kHz, 0 dB) (EIAJ) |
| Channel separation: | 90 dB (EIAJ) |
| Wow and flutter: | Below measurable limit |
| Low-pass filter: | High-resolution digital filter |
Signal Format
| Sampling frequency: | 44.1 kHz |
| Correction system: | Technics Super Decoding Algorithm |
| D-A conversion: | 16-bit linear |
Pickup
| Access time: | 1 second (access to the last track) |
| Light source: | Semiconductor laser |
| Wavelength: | 780 nm |
| Traverse system: | High-speed linear access system |
General
| Power supply: | ~50/60 Hz, 240 V |
| Power consumption: | 10 W |
| Output voltage: | 2 V (at 0 dB) (EIAJ) |
| Output impedance: | Approx. 600Ω |
| Load impedance: | More than 10 kΩ |
| Dimensions(W×D×H): | 36×28×7.7 cm145/32"×111/32"×31/32"[When disc holder is op42 cm 1617/32"(D)] |
| Weight: | 3.3 kg (7.3 lbs.) |
Functions
| Automatic play: | All tracks |
| Direct access play: | Track number |
| Repeat play: | Entire disc or programmed tracks |
| Search: | Forward/backward track skip |
| Forward/backward manual search | |
| Program play: | For up to 20 selections |
| Display: | Total tracks (up to 99) |
| Programmed track | |
| Current track | |
| Time display (min., sec.) | |
| Time modes display | |
| Indicators: | Disc indicator |
| Repeat indicator | |
| Play indicator | |
| Pause indicator | |
| Disc loading: | Motor-driven horizontal type |
| Synchro recording terminal: | 18 inch (M3) |
| Remote control terminal: | 18 inch (M3) |
Specifications are subject to change without notice. Weight and dimensions are approximate.
(For DENMARK only)
ADVARSEL - Usynligt laserlys udstråles ved åbning. UNDGÅ DIREKTE BESTRÅLING.
(Indersiden af apparatet)
DANGER-Invisible laser radiation when open. AVOID DIRECT EX—POSURE TO BEAM.
(INSIDE OF PRODUCT)
- Technics
- Compact Disc Player
- SL-PJ22
- OPERATING INSTRUCTIONS
- Suggestions for Safety
- Concerning Compact Discs
- Handling precautions
- Storage precautions
- Installation
- Notes and Maintenance
- Maintenance
- About moisture
- Caution for safe use of this apparatus for UK standard model SL-PJ22. ("EK" model only)
- Caution:
- Important
- Before Use
- NOTE:
- IF THE UNIT IS TRANSPORTED AGAIN, PERFORM THE FOLLOWING STEPS:
- Contents
- Accessories
- Caution
- Connections
- ① Line out terminals (LINE OUT)
- ⑫ Synchro recording terminal (SYNCHRO REC)
- ③ Remote control terminal (REMOTE)
- ④ AC outlet
- ⑤ AC IN socket (\~ AC IN)
- Front Panel Controls and Functions
- Pickup:
- Pause mode:
- ⑨ Recall button
- ⑩ Clear button
- ⑬ Memory button
- ⑫ Time mode select button
- Playing a Disc
- Automatic play
- ⑨ When not in use
- Program play
- (When the unit is in the stop mode.)
- While watching the track number display, press momentarily to specify the desired track number.
- How to cancel the program
- ⑤ Total playing time confirmation (before starting play)
- Program confirmation
- Direct access play (When the unit is in the stop mode.)
- ① For example:
- Manual search play
- Skip play
- Forward or backward search
- ① Forward skip
- Backward skip
- Repeat play
- Time mode display
- 1
- Repeat play
- ① Time mode display function
- 8
- Preset edit play
- Desired length of time (1 to 99 minutes) can be specified.
- For example;
- Notes:
- Remaining specified time confirmation
- To display the remaining specified time.
- Troubleshooting Guide
- Digital volume attenuation function
- Technical Specifications
- Audio
- Signal Format
- Pickup
- General
- Functions
Marke : TECHNICS
Modell : SL-PJ22
Kategorie : CD-Player