
RMS02 - Computergehäuse SILVERSTONE - Kostenlose Bedienungsanleitung
Finden Sie kostenlos die Bedienungsanleitung des Geräts RMS02 SILVERSTONE als PDF.


| Produkttyp | Serverschienenkit (Tool-less Slide Rail) |
| Modell | RMS02 |
| Marke | SilverStone |
| Kompatibilität | Für 2U-Gehäuse und größer (nicht für 1U empfohlen) |
| Maximale Tragfähigkeit | 80 kg (180 lb) |
| Schienenlänge (einstellbar) | 662 mm bis 914 mm (±3 mm) |
| Einbauart | Werkzeuglos (Tool-less), Bajonettmontage |
| Befestigung am Rack | Für EIA-Schienen mit Vierkantlöchern; Adapter für Rundlöcher erforderlich |
| Lieferumfang | 2 Schienenteile (links/rechts), 4 H-370 Schrauben, 2 H-315 Schrauben |
| Material | Stahl |
| Farbe | Silber |
| Gewicht (ca.) | 2,5 kg |
| Besondere Merkmale | Stag-Beetle-Mechanismus, Sicherheitsverriegelung, Kugelkäfig |
| Montagehinweis | Erfordert mindestens 2 Personen zur sicheren Installation |
| Reinigung & Pflege | Mit feuchtem Tuch abwischen; keine aggressiven Reiniger verwenden |
| Sicherheitshinweise | Kugelkäfig vor dem Einsetzen vollständig öffnen; Entriegelungstaste vor dem Einschieben betätigen |
| Ersatzteile | Erhältlich über SilverStone Kundendienst |
Häufig gestellte Fragen - RMS02 SILVERSTONE
Benutzerfragen zu RMS02 SILVERSTONE
0 Frage zu diesem Gerät. Beantworten Sie die, die Sie kennen, oder stellen Sie Ihre eigene.
Eine neue Frage zu diesem Gerät stellen
Laden Sie die Anleitung für Ihr Computergehäuse kostenlos im PDF-Format! Finden Sie Ihr Handbuch RMS02 - SILVERSTONE und nehmen Sie Ihr elektronisches Gerät wieder in die Hand. Auf dieser Seite sind alle Dokumente veröffentlicht, die für die Verwendung Ihres Geräts notwendig sind. RMS02 von der Marke SILVERSTONE.
BEDIENUNGSANLEITUNG RMS02 SILVERSTONE

SILVERSTONE®
Designing Inspiration
Quick installation Guide of RMS02
Installation Instructions
Stag -Beatle tool-less server slide, 180 pounds (80kg) loading.

4 STEPS TO THE SUCCESSFUL INSTALLATION!!
A. Please note that the 180lb-grade SB Tool-less is designed and built for 2U chassis or above. Not recommended for 1U applications.
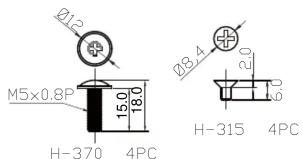
B. The SB bracket is for EIA rail with hole pitch as shown on fig-1 and square holes, and can only be mounted behind the rail. You will need to purchase transfer bracket in order to mount SB bracket on the rail with round holes. The standard retail packaging shall include one piece of left hand, one piece of right hand, 4 pieces of H-370 screws for ear plate fastening and 2 pieces of H-315 screws for chassis fastening.
* The 180lb-grade SB tool-less is not designed to be screw mounted. You Must mount the slides with bayonet pre-formed on the chassis.
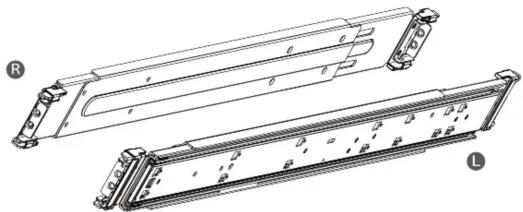
natural_image
Technical line drawing of two mechanical components labeled R and L, showing internal structure without any text or symbols.SCREW KIT
After installation or maintenance is finished, you may secure the server by putting screw through the center hole on bracket.
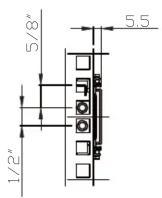
(Fig-1)
Step 1 > Remove the chassis (inner) member

Pull the slide open. Then press the trigger down as shown on the drawing, and pull the chassis (inner) member out.
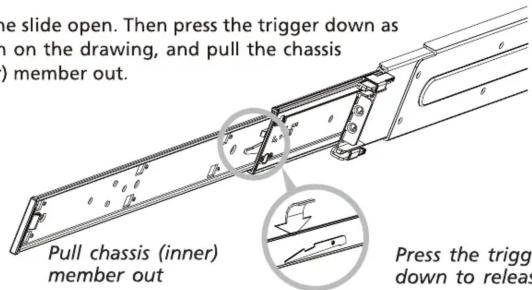
Press the trigger down to release
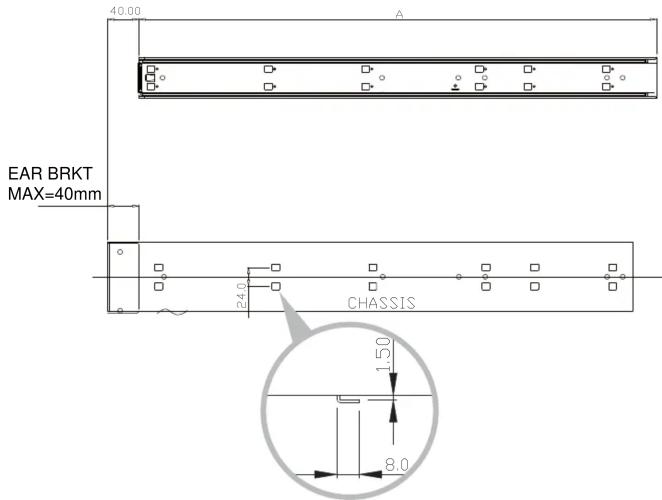

**Extendable front bracket only apply to some Tool-less model EXT=300MM
Step 2 > Mount the chassis (inner) member to the chassis

Please secure the screws on both sides and push back the inner member to allow the rail slide to be fixed to the rackmount chassis. Moreover, please make sure the spring clip installation has been completed on the rackmount chassis when finishing this step.
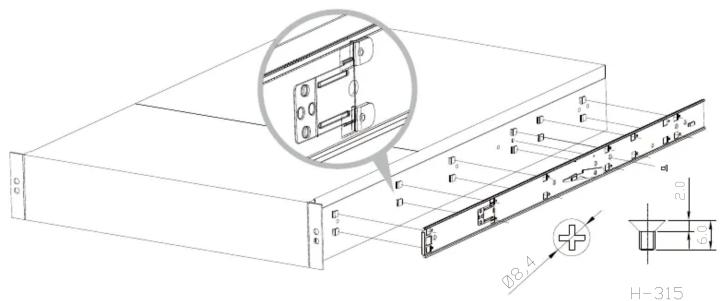
*Bayonet on chassis shall be pre-formed as per the recommended dimension and location.
*If you need to remove the inner member from the rackmount chassis, please pull up spring clip first and then push forward to allow the spring clip to separate from the inner member. If you had already installed the screw in your rackmount chassis, please remove the screws first.
Step 3 > Attach the cabinet (outer) member to the rail

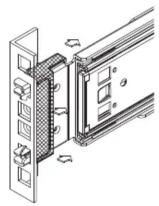
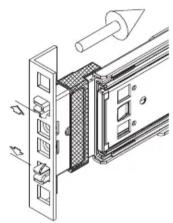
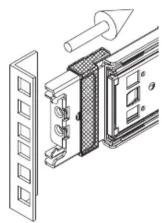
Insert the stag into the upper and lower square holes on EIA rail from the back of rail.
Push the safety lock forward to secure the bracket. It is important to check if the safety lock is in unlocked position before mounting the brackets.
*Release safety lock before mounting
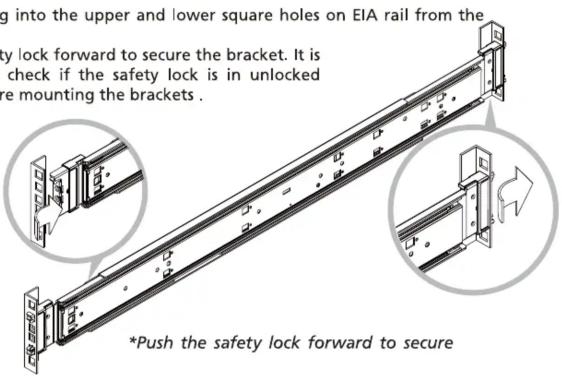
Uninstall the bracket
Step 4 > Mount the chassis into the cabinet

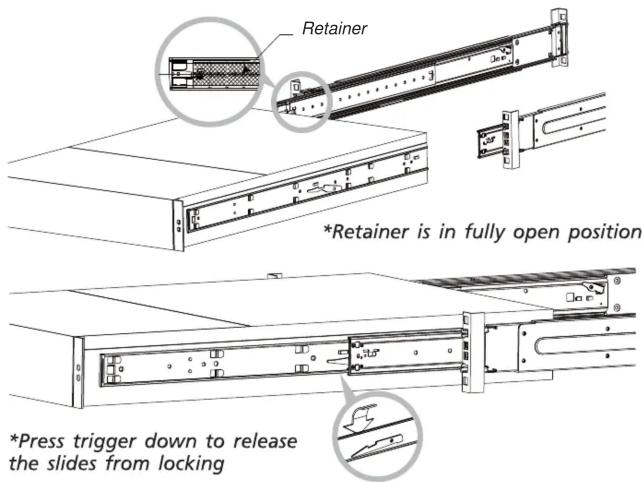
Insert the chassis (inner) member into the cabinet member as shown on the drawing. It is important to check if the ball retainer is in fully open position before install the chassis.
It might cause catastrophic damage to the chassis if ball retainer is not in fully open position while mounting the chassis. While you are pushing chassis back to the cabinet, you need to release the slide from locking position by pressing the trigger down.
* VERY IMPORTANT – IT REQUIRES AT LEAST 2 PEOPLE TO INSTALL THE CHASSIS FOR SAFETY PUROPOSE.
G11223540



- SILVERSTONE®
- Quick installation Guide of RMS02
- Installation Instructions
- STEPS TO THE SUCCESSFUL INSTALLATION!!
- Step 1 > Remove the chassis (inner) member
- Step 2 > Mount the chassis (inner) member to the chassis
- Step 3 > Attach the cabinet (outer) member to the rail
- Step 4 > Mount the chassis into the cabinet
Marke : SILVERSTONE
Modell : RMS02
Kategorie : Computergehäuse