
NV-MPD1B - Drucker PANASONIC - Kostenlose Bedienungsanleitung
Finden Sie kostenlos die Bedienungsanleitung des Geräts NV-MPD1B PANASONIC als PDF.

| Produkttyp | Digitaler Videodrucker |
| Marke | Panasonic |
| Modell | NV-MPD1B |
| Druckverfahren | Thermosublimations-Übertragungsverfahren |
| Druckgeschwindigkeit | ca. 105 Sek./Blatt |
| Druckauflösung (Video) | 464 x 664 Pixel (144 x 158 dpi) |
| Druckauflösung (PC-Karte) | 478 x 700 Pixel (144 x 158 dpi) |
| Druckauflösung (Computer) | 480 x 640 Pixel (Standard) / 480 x 1280 Pixel (hohe Auflösung) |
| Farbtiefe | 256 Abstufungen pro Farbe (16,7 Mio. Farben) |
| Papierformat | 100 x 148 mm (Postkartengröße) |
| Papierkapazität | max. 25 Blatt Standardpapier |
| Tintenkassette | 3-Farben (Gelb, Magenta, Cyan) in einer Kassette |
| Eingänge | S-Video, Video, PC-Karte (Typ II), Parallel (Centronics), Serie (Macintosh) |
| Ausgang | Video OUT |
| Stromversorgung | AC 220–240 V, 50/60 Hz |
| Leistungsaufnahme | ca. 60 W (Druck) / ca. 8 W (Ein) / ca. 3 W (Standby) |
| Abmessungen (B x H x T) | ca. 250 x 89,5 x 269,5 mm |
| Gewicht | ca. 2,4 kg |
| Betriebstemperatur | 5 °C bis 35 °C |
| Betriebsfeuchtigkeit | 35 % bis 60 % |
| Besondere Funktionen | Albumdruck (4/9/16 Bilder), Mehrfachbild, Stroboskop, Titel einfügen, Rahmen einfügen, automatischer Druck, Speichern auf PC-Karte |
| Reinigung | Mit einem weichen, trockenen Tuch abwischen; keine Lösungsmittel verwenden |
| Sicherheitshinweise | Gerät nicht Feuchtigkeit aussetzen, Lüftungsschlitze nicht abdecken, nur empfohlenes Zubehör verwenden |
| Lieferumfang | Netzkabel, Papierkassette, Videokabel, CD-ROM (Treiber), Klammerfilter, Treiberhandbuch |
Häufig gestellte Fragen - NV-MPD1B PANASONIC
Benutzerfragen zu NV-MPD1B PANASONIC
0 Frage zu diesem Gerät. Beantworten Sie die, die Sie kennen, oder stellen Sie Ihre eigene.
Eine neue Frage zu diesem Gerät stellen
Laden Sie die Anleitung für Ihr Drucker kostenlos im PDF-Format! Finden Sie Ihr Handbuch NV-MPD1B - PANASONIC und nehmen Sie Ihr elektronisches Gerät wieder in die Hand. Auf dieser Seite sind alle Dokumente veröffentlicht, die für die Verwendung Ihres Geräts notwendig sind. NV-MPD1B von der Marke PANASONIC.
BEDIENUNGSANLEITUNG NV-MPD1B PANASONIC
Panasonic
Digital Video Printer
NV-MPD1B
Operating Instructions
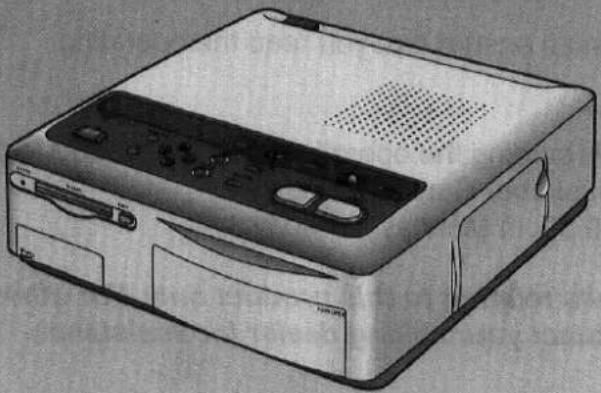
natural_image
Illustration of a portable electronic device with control panel and ventilation slots (no text or symbols visible)
Before attempting to connect, operate or adjust this product, please read these instructions completely.
Preparations
6 \~
Video Input
14 \~
PC Card Input
26\~
Advanced Operations
40 \~
Precautions, etc.
47\~
Index
57\~
VQT7539
Dear Customer,
We would like to take this opportunity to thank you for purchasing this Panasonic Digital Video Printer. Please read these Operating Instructions carefully and keep them handy for future reference.
Panasonic
Customer Care Hot Line Digital Video Printer 08701 505610
Before operating this product, please ensure that you read the operating instructions completely.
If you require further assistance regarding the operation, or if the product requires repair, then please contact our Customer Care Hot Line by telephone between 9.00am and 5.30pm Monday to Friday.
This Hot Line number is for calls relating to this product only. For other product categories, please contact your selling dealer for assistance.
Please retain for future reference.
IMPORTANT
Please respect all copyrights.
Whatever you have recorded and created can be used for your personal entertainment only. Under copyright laws, it cannot be used without obtaining permission from the holders of the copyrights.
- "Microsoft Windows" is a trademark of Microsoft Corporation (U.S.).
●The "Apple" name, Macintosh and System are registered trademarks or trademarks of Apple Computer Inc. - Other names, company names, and product names, mentioned in this manual are either the trademarks or registered trademarks of the companies concerned.
WARNING
TO REDUCE THE RISK OF FIRE OR SHOCK HAZARD AND ANNOYING INTERFERENCE, USE ONLY THE RECOMMENDED ACCESSORIES AND DO NOT EXPOSE THIS EQUIPMENT TO RAIN OR MOISTURE.
FOR YOUR SAFETY
■DO NOT REMOVE OUTER COVER.
To prevent electric shock, do not remove cover. No user serviceable parts inside. Refer servicing to qualified service personnel.
- As this equipment gets hot during use, operate it in well ventilated place; do not install this equipment in a confined space such as a book case or similar unit.
- Do not open the Ink Cassette Side Cover while printing is in progress. Your fingers could be pinched between the thermal head arms and the ink cassette.
PLACE THIS UNIT WITH ENOUGH SPACE AROUND IT FOR EASY OPERATING OF MAINS POWER SWITCH ON THE REAR.
Caution for AC mains lead
For your safety, please read the following text carefully.
This appliance is supplied with a moulded three-pin mains plug for your safety and convenience.
A 5-ampere fuse is fitted in this plug. Should the fuse need to be replaced please ensure that the replacement fuse has a rating of 5 amperes and it is approved by ASTA or BSI to BS1362.
Check for the ASTA mark 📋 or the BSI mark 🌐 on the body of the fuse.
If the plug contains a removable fuse cover you must ensure that it is refitted when the fuse is replaced.
If you lose the fuse cover, the plug must not be used until a replacement cover is obtained. A replacement fuse cover can be purchased from your local Panasonic Dealer.
IF THE FITTED MOULDED PLUG IS UNSUITABLE FOR THE SOCKET OUTLET IN YOUR HOME THEN THE FUSE SHOULD BE REMOVED AND THE PLUG CUT OFF AND DISPOSED OF SAFELY.
THERE IS A DANGER OF SEVERE ELECTRICAL SHOCK IF THE CUT OFF PLUG IS INSERTED INTO ANY 13-AMPERE SOCKET.
If a new plug is to be fitted please observe the wiring code as shown below. If in any doubt, please consult a qualified electrician.
■IMPORTANT
The wires in this mains lead are coloured in accordance with the following code:
Blue: Neutral
Brown: Live
As the colours of the wires in the mains lead of this appliance may not correspond with the coloured markings identifying the terminals in your plug, proceed as follows:
The wire which is coloured BLUE must be connected to the terminal in the plug which is marked with the letter N or coloured BLACK.
The wire which is coloured BROWN must be connected to the terminal in the plug which is marked with the letter L or coloured RED.
Under no circumstances should either of these wires be connected to the earth terminal of the three pin plug, marked with the letter E or the Earth Symbol .
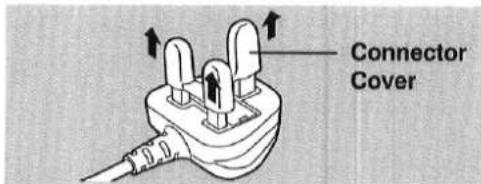
■Before use
Remove the Connector Cover as follows.
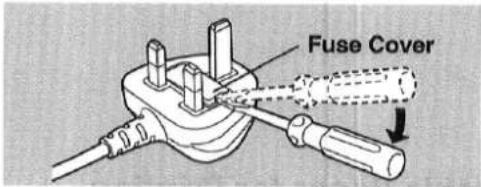
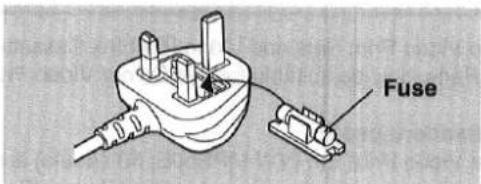
■How to replace the Fuse
- Remove the Fuse Cover with a screwdriver.
- Replace the fuse and attach the Fuse Cover.
Supplied Accessories
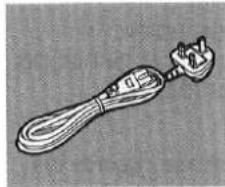
natural_image
Illustration of a toothbrush with a crown and toothpaste tube (no text or symbols)Power Cord (p.9) (VJA0733)
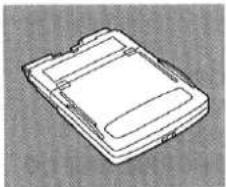
natural_image
Simple line drawing of a rectangular electronic component or device (no text or symbols)Paper Cassette (p.12) (VXF0153)
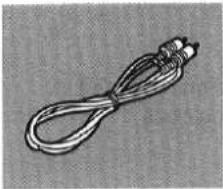
natural_image
Coiled cable or wire with connectors, no visible text or symbolsVideo Cord (p.9) (VJA0815)

natural_image
Simple diagram of a circular object with concentric rings, no text or symbols present.CD-ROM containing printer driver software (Windows, Macintosh) (VFF0038)
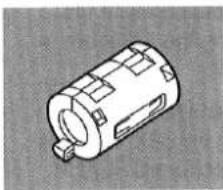
natural_image
Technical line drawing of a cylindrical mechanical component with mounting holes (no text or symbols)Clamp Filter (p.8) (VLF1321)
Printer Driver Manual (VQT7540)
Usable Paper for Printing
Use Video Print Sets and Video Print Ink Cassettes that either bear the MP mark or have been designated by Panasonic as suitable for this Colour Video Printer.
Standard paper
The Video Print Set (VW-MPS50E; 50 sheets) is required (sold separately). This paper can be used as a postcard if you affix the proper postage.
Preparations
Controls and Components 6
Connections 9
Automatic Printing. 10
Paper That Can Be Used for Printing....11
Inserting the Printing Paper 12
Inserting the Ink Cassette....12
Video Input
Printing from a Video Input....14
Using the MENU Mode....16
For Optimum Printing Results. 18
Printing a Series of Different Pictures on the Same Print....20
Printing the Same Picture Repeatedly on the Same Print ..... 22
Printing a Sequence of Pictures on the Same Print 24
PC Card Input
Inserting a PC Card 26
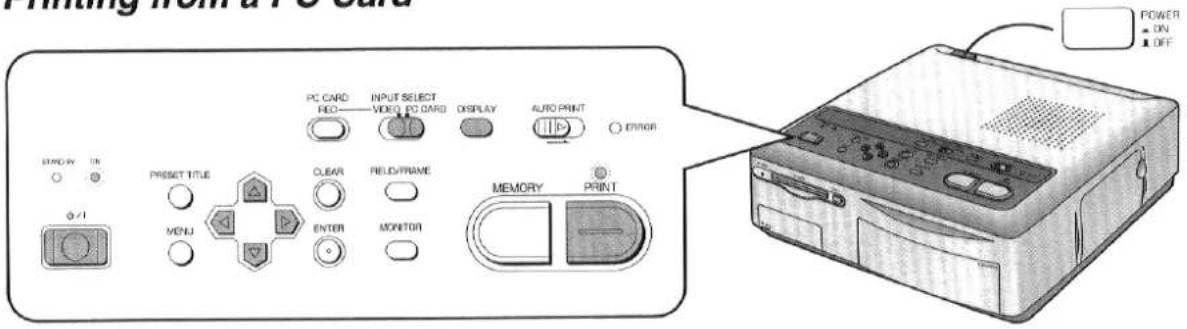
Printing from a PC Card 28
Printing Multiple Images at Once from a PC Card 30
Using MENU Mode....32
Printing a Series of Different Pictures on the Same Print. . . . . . . . 34
Printing the Same Picture Repeatedly on the Same Print ..... 36
Erasing the Images on the PC Card....38
Recording the Video Input Image on the PC Card 38
Advanced Operations
Printing with Title or Trimmed Frame 40
Printing with a Trimmed Frame. 42
Printing with a Title 44
Connections When Using as Personal Computer Printer....46
Precautions, etc.
Precautions....47
Questions and Answers 50
Before Requesting Service....54
Error Messages 56
Index 57
Specifications 58
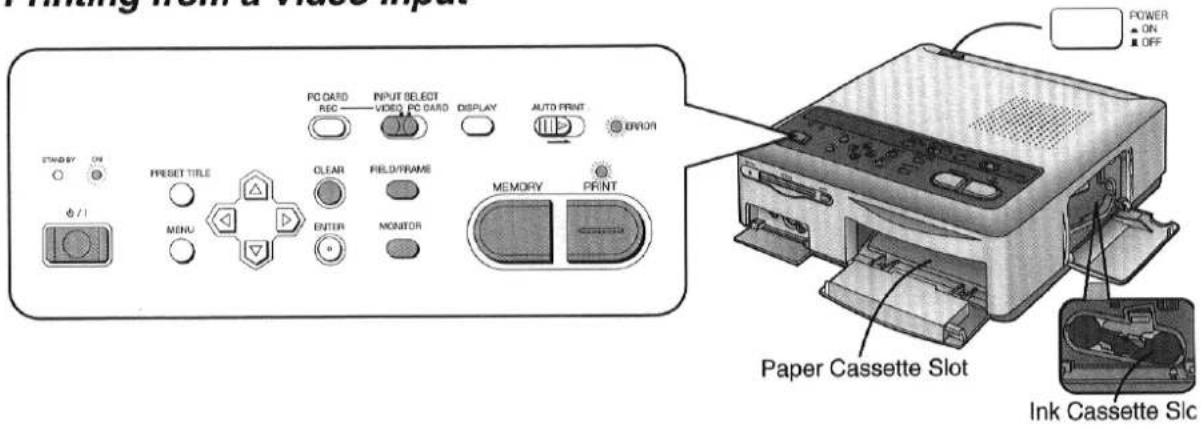
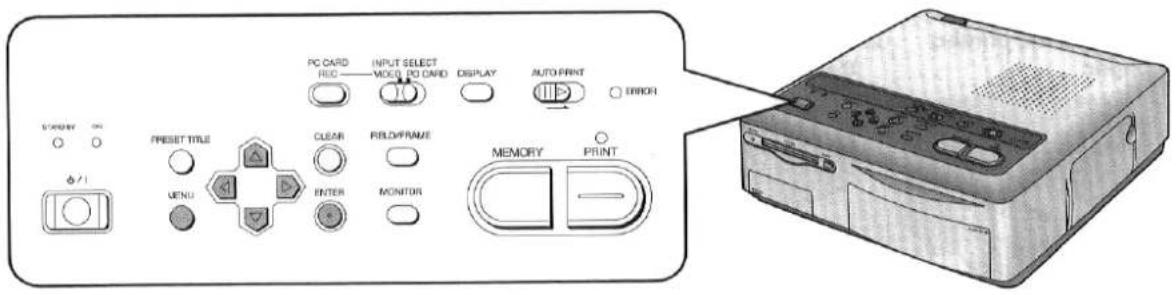
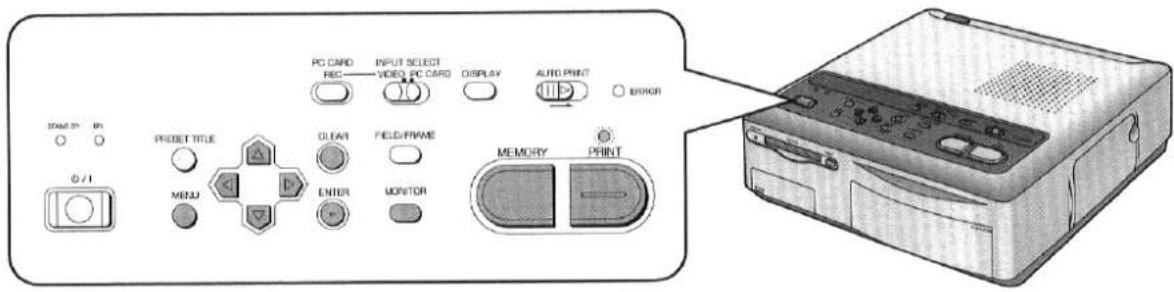
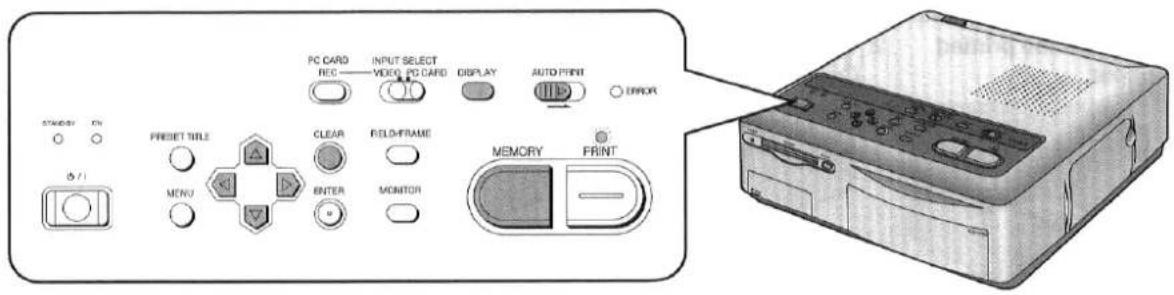
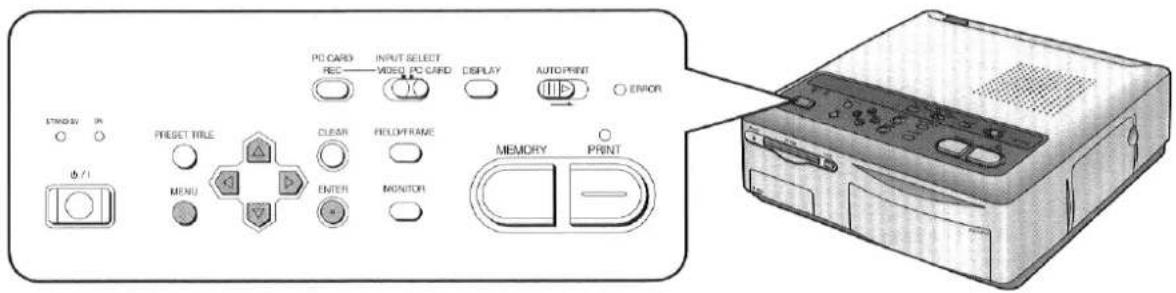
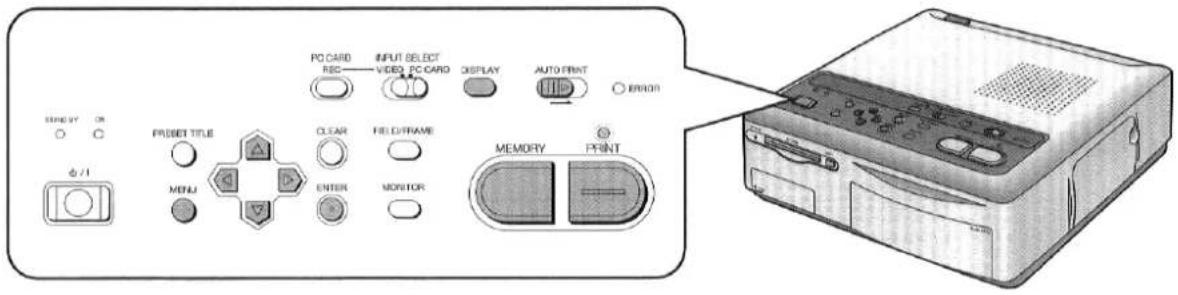
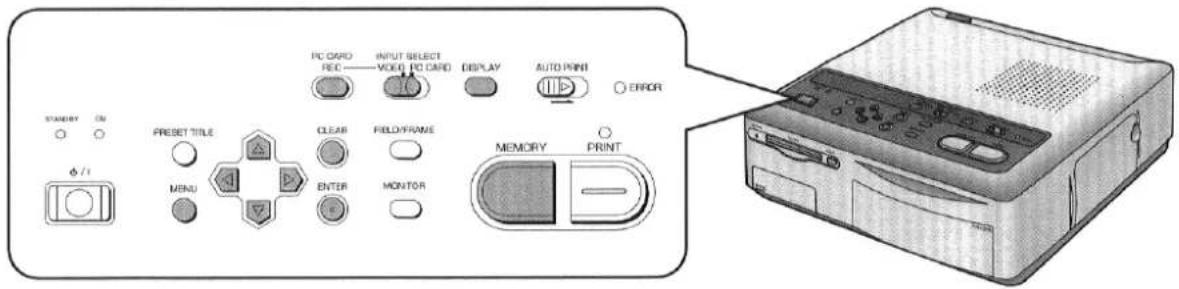
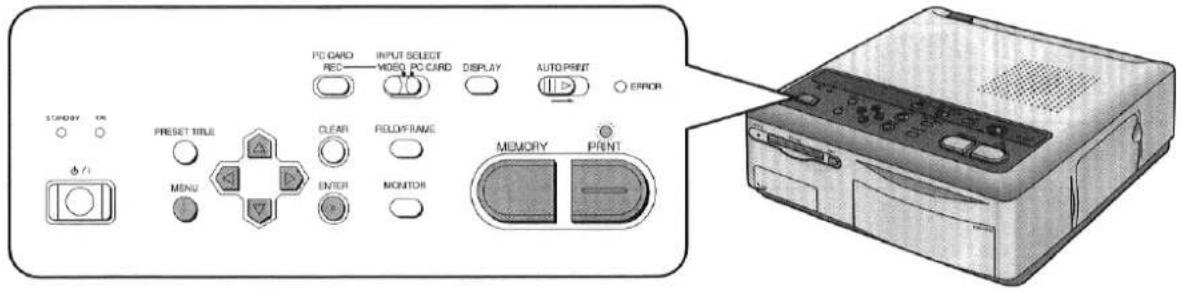
Front
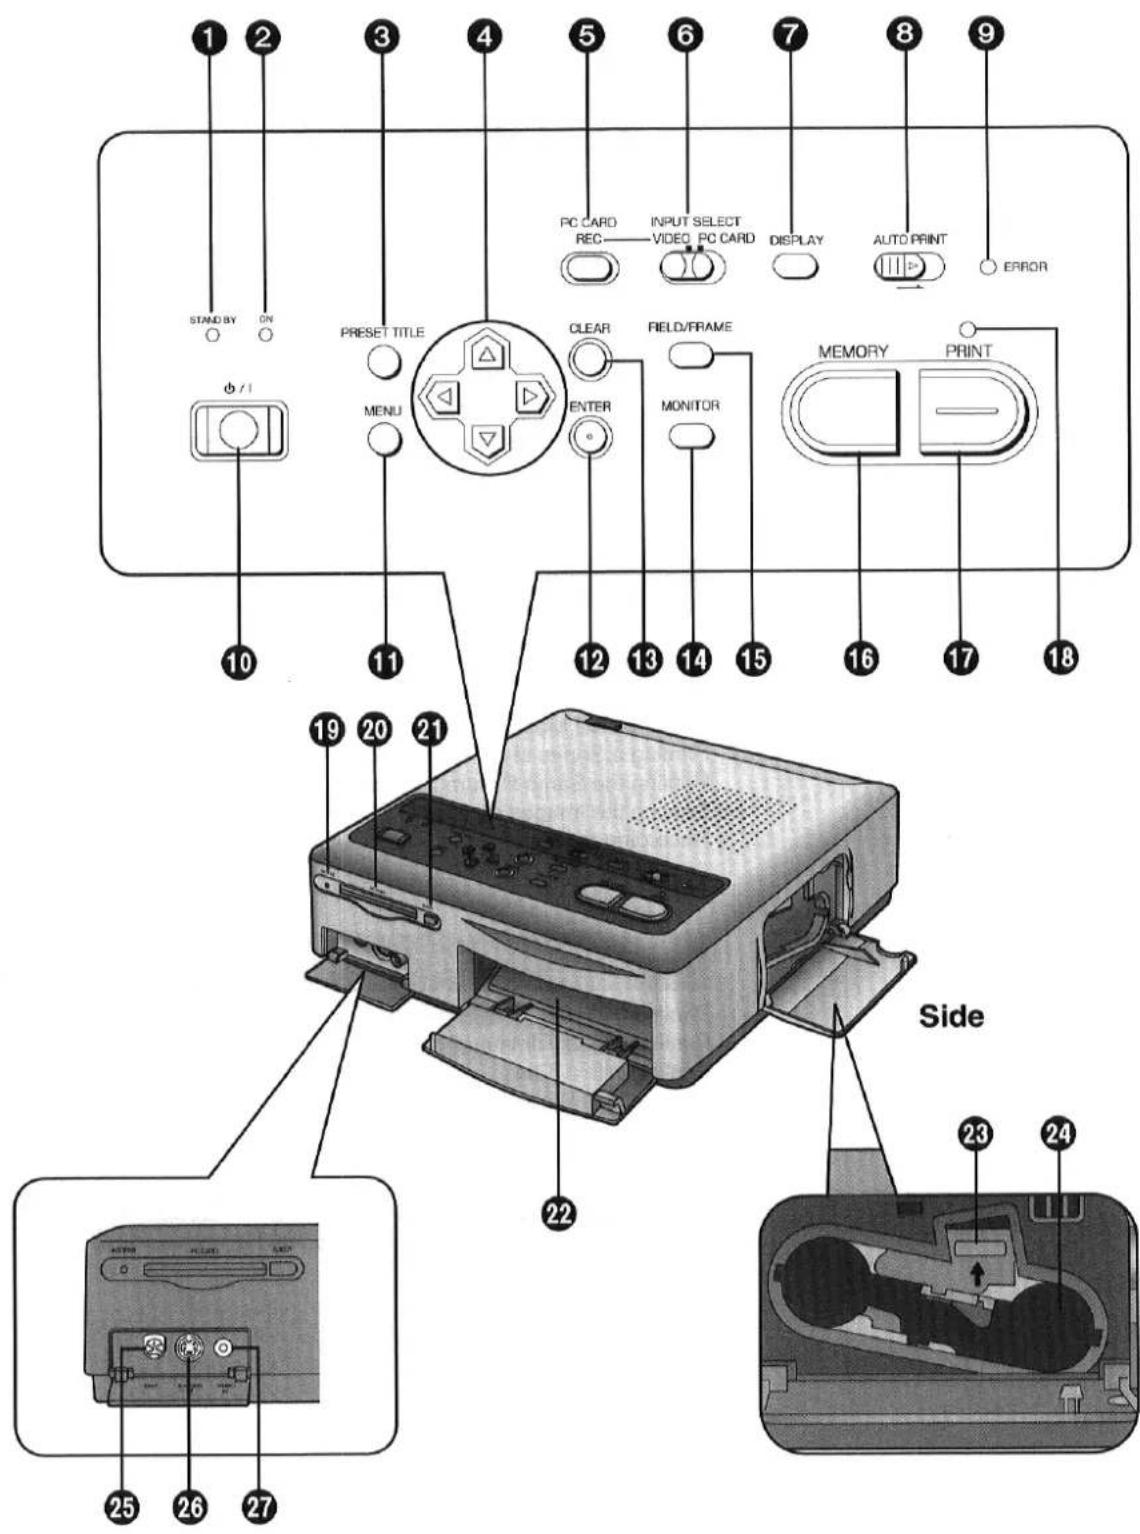
① STAND BY Lamp
This lamp lights up when the Printer is plugged into the outlet and the ⏻ / I (Power) Button is set to off.
② ON Lamp (p.14, 28)
This lamp lights up when the ⏻ / I (Power) Button is pressed and the Printer is turned on. When the power is turned off, the Printer goes into STAND BY Mode and the STAND BY Lamp lights up.
③ PRESET TITLE Button (p.40)
Use this button to insert one of the included trimming frames or titles for printing.
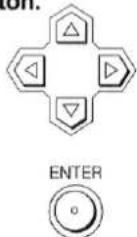
④ ▶▲▼▶ Buttons (p.16, 29)
Use these buttons to select the menu contents or select the PC Card image.
⑤ PC CARD REC Button (p.39)
Use this button to record the image from the VIDEO IN (or S-VIDEO IN) Socket to the PC Card.
⑥ INPUT SELECT (VIDEO / PC CARD) Switch (p.14, 28)
Use this switch to select either VIDEO IN (or S-VIDEO IN) Socket or PC CARD for input of the image to be printed. Either setting can be used when printing from a computer.
⑦ DISPLAY Button (p.28)
Use this button to switch between the Single-image and Index Screen when displaying the images stored in the PC Card.
8 AUTO PRINT Lever (p.31)
Use this lever to batch print the images stored in the PC Card.
9 ERROR Lamp (p.56)
This lamp flashes when a problem that prevents normal printing has occurred, such as paper jamming or running out of printing paper or ink. A corresponding error message also appears on the television screen.
10 ⏻ / I (Power) Button (p.14, 28)
Use this button to turn the Printer on and off. When the Printer is turned off, all data stored in the memory is lost.
⑪ MENU Button (p.16, 32)
Use this button to display the MENU Screen. Various printer functions can be selected at the MENU Screen. The ◀▲▼► Buttons, ENTER Button, INPUT SELECT Switch, and the ⏻ / I (Power) Button are the only buttons and switches that function while the MENU Screen is displayed.
⑫ ENTER Button (p.17, 33)
Use this button to execute the items selected in MENU Mode.
⑬ CLEAR Button (p.14)
Use this button to erase the image stored in memory, cancel printing of multiple prints, cancel batch printing, or cancel the settings.
14 MONITOR Button (p.14)
During video input, this button switches between the image from the video source and the image stored in memory.
⑮ FIELD/FRAME Button (p.14)
Use this button when storing a fast-moving image in memory or when the image stored in memory is blurred.
16 MEMORY Button (p.15, 31)
Use this button to store the image currently displayed on the television screen in memory.
⑰ PRINT Button (p.15, 28)
Use this button to print pictures. No buttons function while printing is in progress.
18 PRINT Lamp (p.15, 28)
This lamp lights up when the MEMORY Button is pressed. This lamp flashes while printing is in progress.
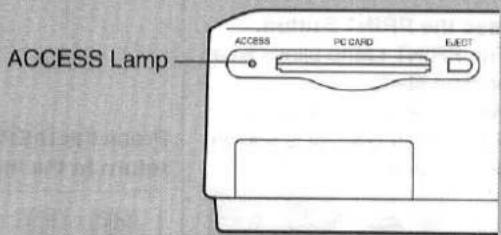
⑲ ACCESS Lamp (p.27)
This lamp lights up when image data from an inserted PC Card is being read or stored.
20 PC CARD Slot (p.26)
The PC Card is inserted here.
21 PC Card EJECT Button (p.27)
Use this button to eject the PC Card.
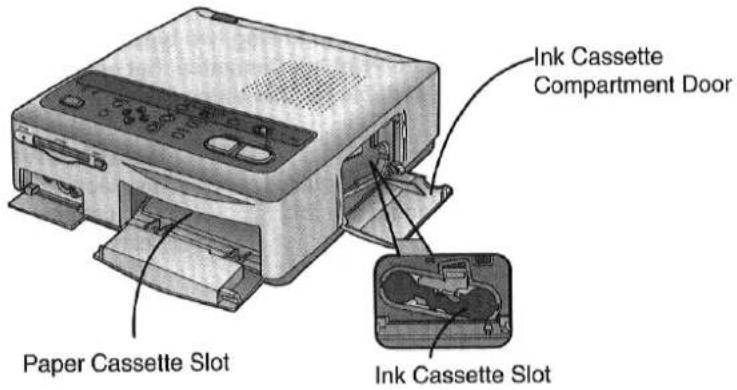
22 Paper Cassette Slot (p.13)
The Paper Cassette is loaded here.
23 Ink Cassette EJECT Lever (p.13)
Raise this lever to eject the Ink Cassette.
24 Ink Cassette Slot (p.13)
The Ink Cassette is inserted here.
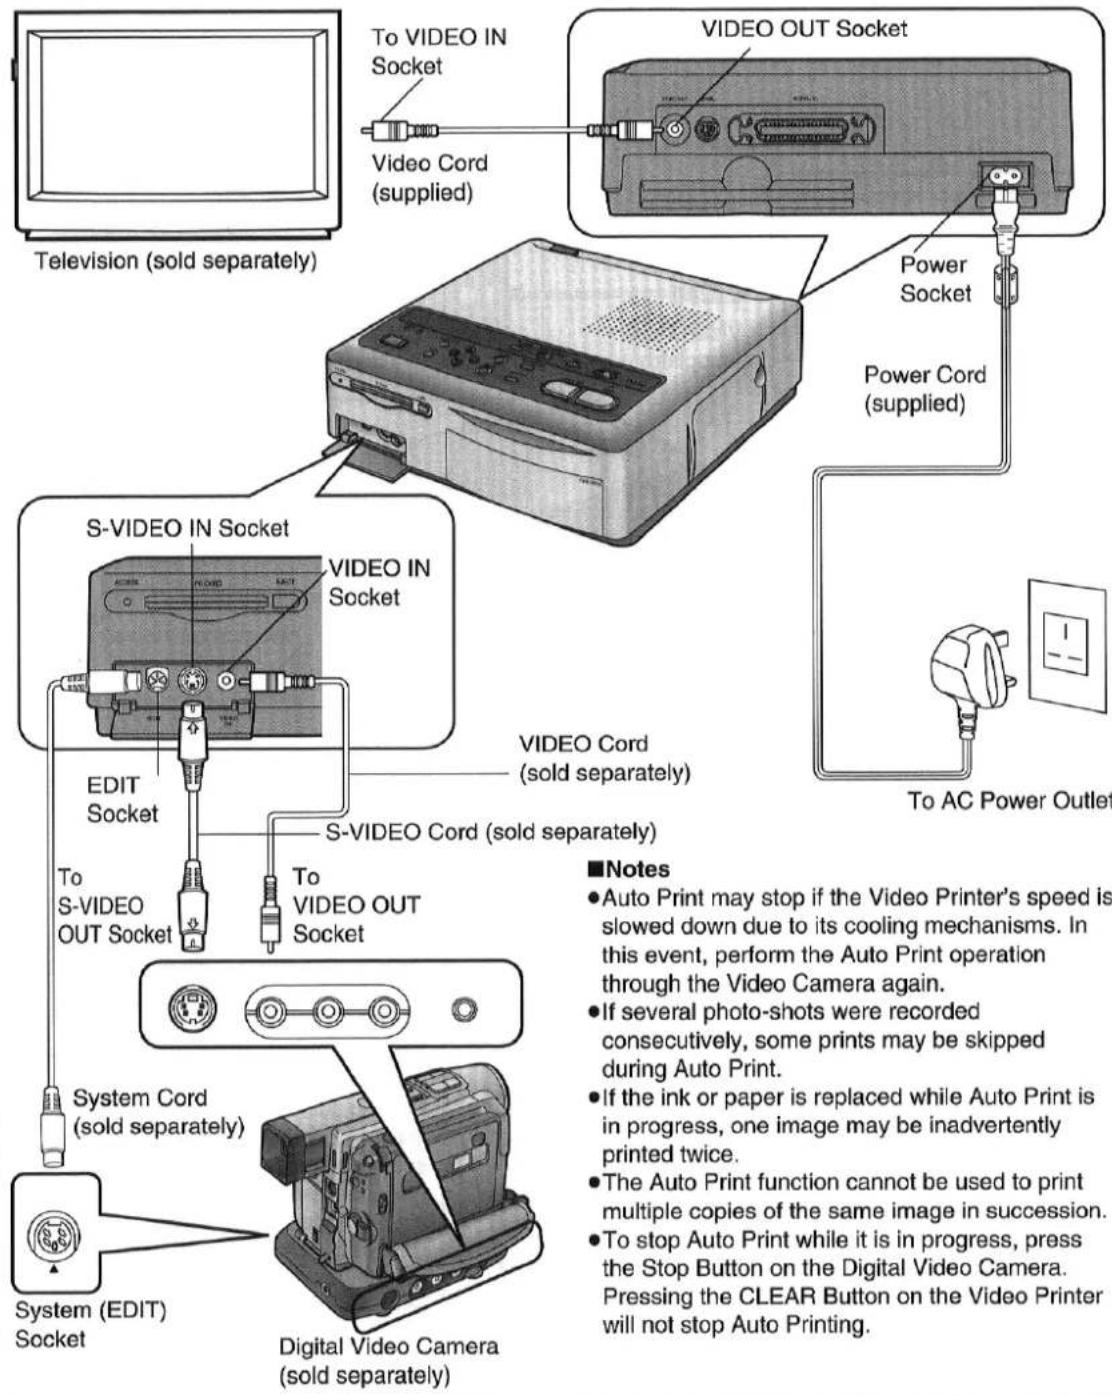
25 EDIT Socket (p.10)
Connecting this Printer to the Panasonic Digital Video Camera using the System Cord (sold separately) lets you automatically search for and print still images that were recorded with the digital photo-shot function. For details, refer to the Operating Instructions for the Digital Video Camera.
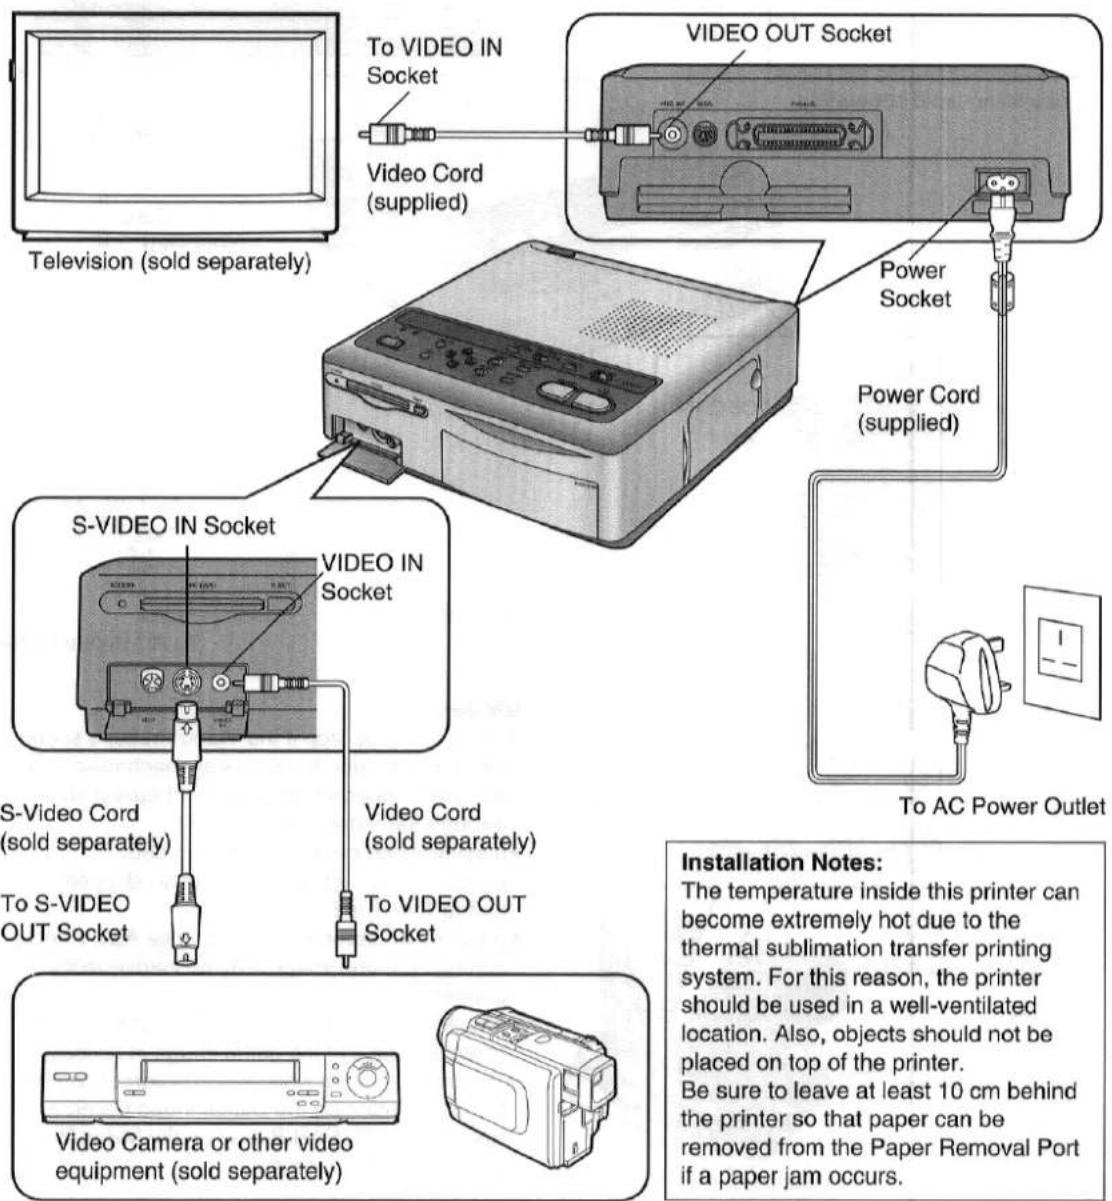
26 S-VIDEO IN Socket (p.9)
Use an S-VIDEO Cord to connect this socket to the S-VIDEO OUT Socket on video equipment.
High-quality images are obtained from the S-VIDEO IN Socket.
If the device you are using has an S-VIDEO OUT Socket, it is recommended that you use this socket.
27 VIDEO IN Socket (p.9)
Use a VIDEO Cord to connect this socket to the VIDEO OUT Socket on video equipment.
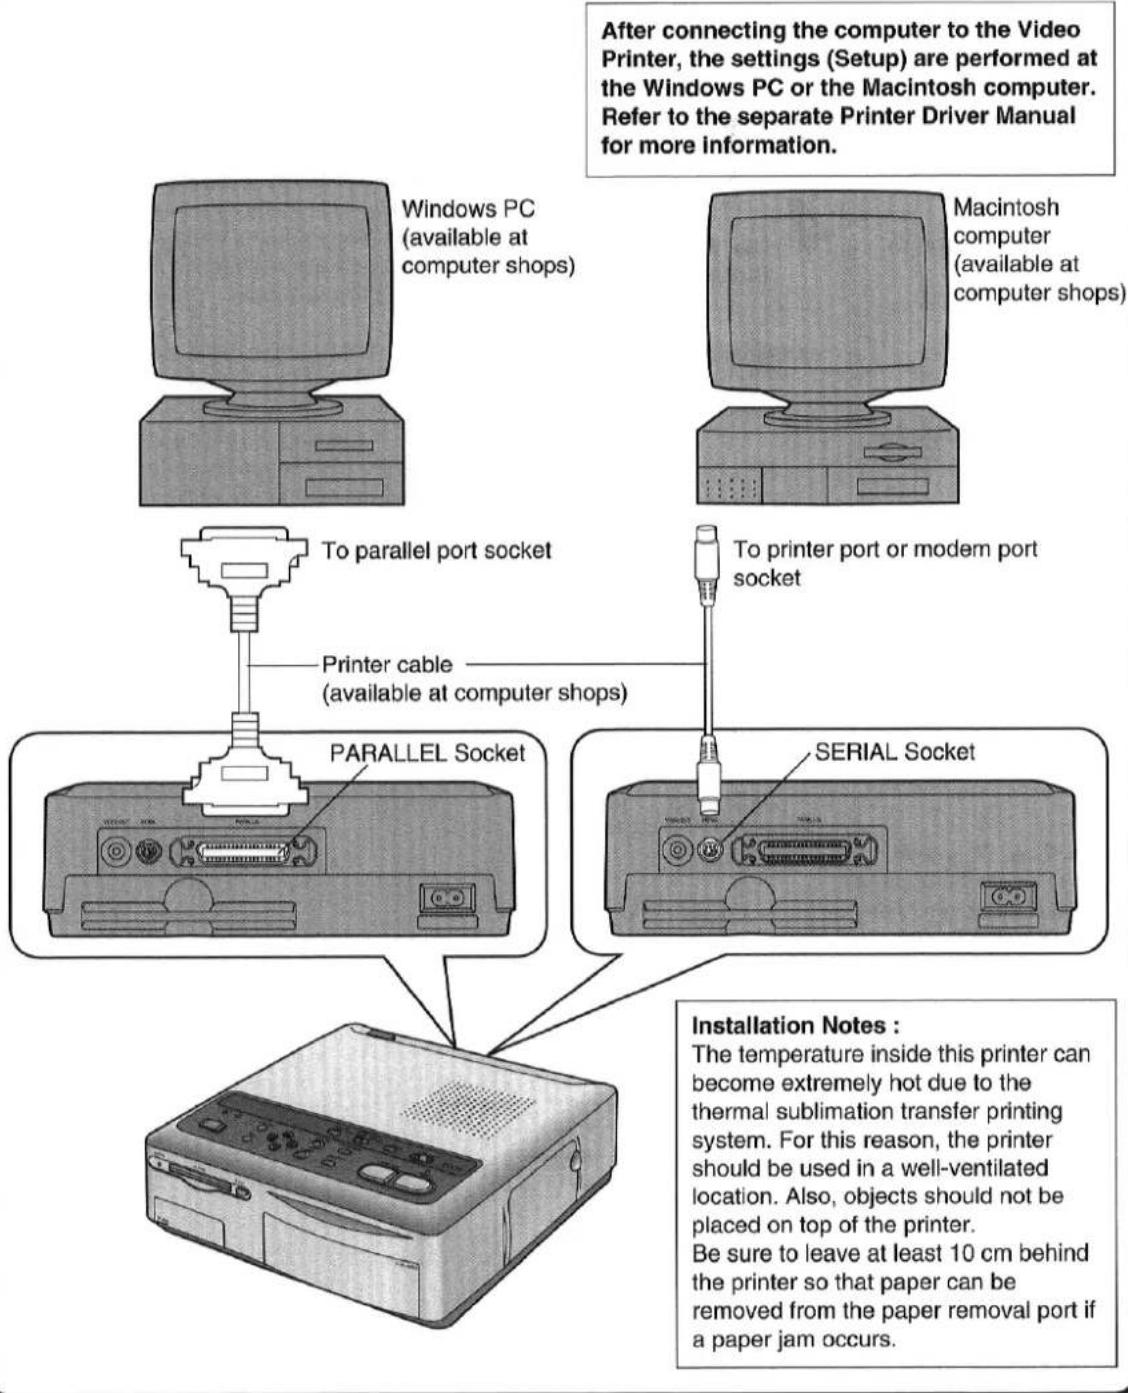
28 SERIAL Socket (p.46)
Use this socket to connect the printer cable for Macintosh computers (available at computer shops).
29 PARALLEL Socket (p.46)
Use this socket to connect the printer cable (available at computer shops). The PC should have a bidirectional parallel socket conforming to Centronics standards.
30 POWER (Main Power) Button (p.14, 28)
Use this button to turn the Printer's main power ON or OFF. When it is set to the OFF position, no power will be supplied even if the ⏻ / | (Power) Button is pressed.
31 VIDEO OUT Socket (p.9)
Use this socket to connect the cable from the VIDEO Socket (VIDEO IN Socket) on the television.
32 Paper Removal Port (p.15)
Remove paper from here if a paper jam occurs.
33 Power Socket (p.9)
Connect the supplied Power Cord here.
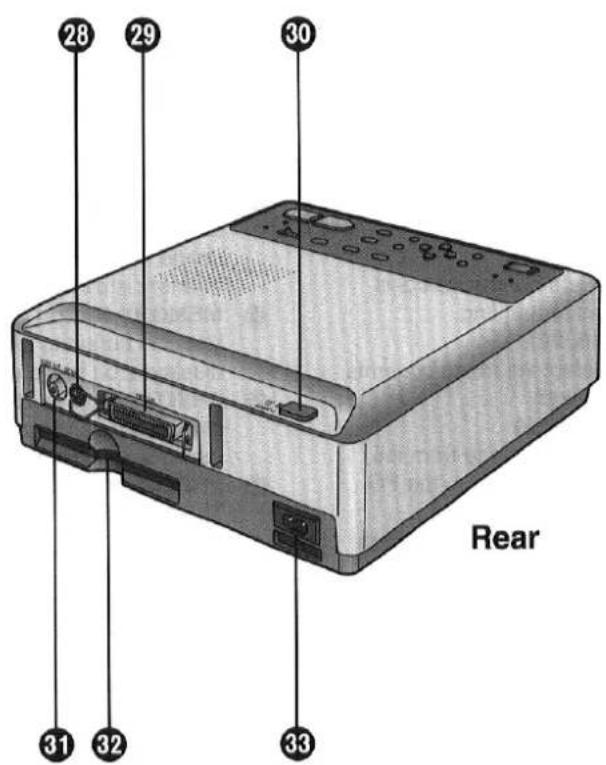
Important Information
natural_image
Diagram showing two cable fastening techniques (no text or symbols present)In order to prevent electromagnetic interference from the power supply, install the Clamp Filter (supplied) on the Power Cord as shown in the figure above.
- After passing the Power Cord through the Clamp Filter and looping it around once, close the Clamp Filter until it clicks into place.
■Connect with the S-Video Cord if the VCR or Camera has an S-VIDEO OUT socket.
- Connect using a Video Cord if the VCR or Camera has no S-VIDEO OUT socket.
- To listen to sound from the VCR or Video Camera, connect the audio output from the VCR or Video Camera directly to the television AUDIO IN socket.
- If different video sources are connected simultaneously to the S-VIDEO IN Socket and the VIDEO IN Socket, the video for the S-VIDEO IN Socket takes precedence.
Automatic Printing
(Automatic printing requires a Digital Video Camera (sold separately) with a System EDIT Socket.)
Using a Video Cord (sold separately) or an S-Video Cord (sold separately), connect the Digital Video Camera to the Video Printer. If the System Cord (sold separately) is also used to connect the System (EDIT) Socket on the Digital Video Camera to the EDIT Socket on the Video Printer, you can automatically search for and print still images that were recorded with the digital photo-shot function.
Procedure
- Turn on the Video Printer.
- Turn on the Digital Video Camera.
- Perform the Auto Print operation through the Digital Video Camera. (For details, refer to the manual provided with the Digital Video Camera.)
The Digital Video Printer can use the following two types of paper.
(Use Video Print Sets and Video Print Ink Cassettes that either bear the MP mark or have been designated by Panasonic as suitable for this Video Printer)
Standard paper
The Video Print Set VW-MPS50E is required.
(Sold separately: Ink Cassette and paper [50 sheets])
- This paper can be used as a postcard if a postage stamp is affixed.
- Do not affix stamps or adhesive paper to the paper or print on it with a word processor before printing. The paper may become curled, or the stamp may come off, resulting in a paper jam or malfunction in the Video Printer.
- Do not write on the paper before printing on it with the Video Printer.
- When writing on a printed surface, use a permanent marker. In this case, do not allow printed surfaces to come into contact with each other.
●Permanent markers, washable markers, pencils, and ballpoint pens can all be used to write on the back of the printed images. However, be careful not to apply too much pressure when writing on the back since this will leave marks on the printed surface.
■Adhesive paper
(available at stores)
- Do not peel off the adhesive before printing. This can cause a paper jam or malfunction in the Video Printer.
- When affixing the adhesive paper to another surface (paper, glass, plastic, metal, etc.), carefully clean the surface of all dirt and foreign matter.
- When cutting off adhesive paper after printing, use a "one-sheet cutter" (available at stores) to cut the adhesive paper with the backing paper still in place.
Inserting the Printing Paper / Inserting the Ink Cassette
| Title | Procedure | |
| Inserting the Printing Paper | 1 Open the cover of the Paper Cassette (supplied).1 Slide the switch, and2 Raise the cover. Open the cover of the Paper Cassette (supplied).1 Slide the switch, and2 Raise the cover. | 2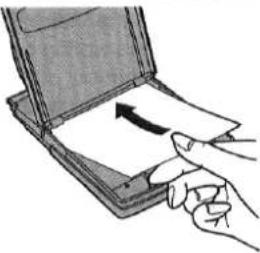 Place the paper in the Paper Cassette with the blank side to be printed facing up.The Paper Cassette can hold up to 25 sheets of standard paper.Tuck the paper under the two tabs. Place the paper in the Paper Cassette with the blank side to be printed facing up.The Paper Cassette can hold up to 25 sheets of standard paper.Tuck the paper under the two tabs. |
| 3 Close the cover. | ||
| Inserting the Ink Cassette | 1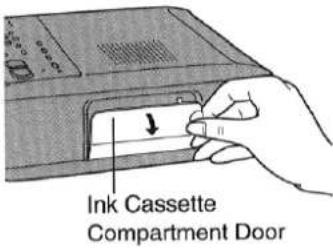 Open the Ink Cassette Compartment Door. Open the Ink Cassette Compartment Door. | 2Ink Cassett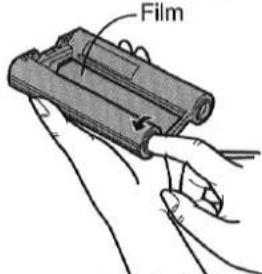 Take up any slack in the Ink Cassette Film.Insert a finger in a spool and turn it in the direction indicated by the arrow.Ink Cassettes are included in the Video Print Sets (sold separately). (p.11) Take up any slack in the Ink Cassette Film.Insert a finger in a spool and turn it in the direction indicated by the arrow.Ink Cassettes are included in the Video Print Sets (sold separately). (p.11) |
Removing the Ink Cassette
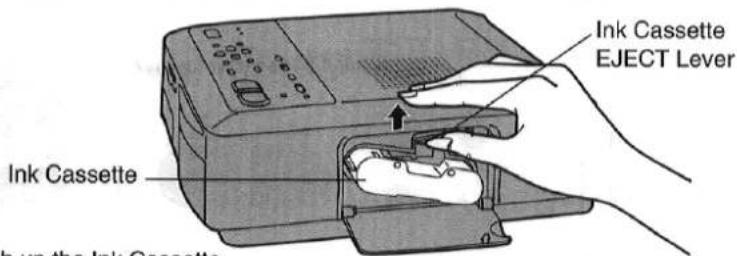
- Push up the Ink Cassette EJECT Lever, and then pull the Ink Cassette straight out.
| Remarks, etc. | ||
4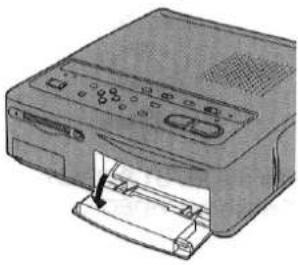 Open the cover of the Paper Slot.To open, press "PUSH OPEN" at the top right of the cover. Open the cover of the Paper Slot.To open, press "PUSH OPEN" at the top right of the cover. | 5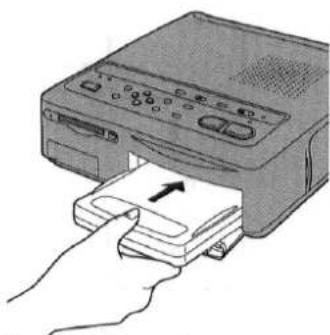 Push the Paper Cassette into the Video Printer as far as it will go. Push the Paper Cassette into the Video Printer as far as it will go. | ·Do not bend or fold the paper or place it in the cassette with the wrong side facing upward.·Do not soil the printing side (blank side) of the paper.Fan the paper before placing it in the Paper Cassette.The front end of the Paper Cassette Slot becomes the left side of the image to be printed.Do not remove the Paper Cassette while printing is in progress.After printing, remove the Paper Cassette and close the cover of the Paper Cassette Slot. |
3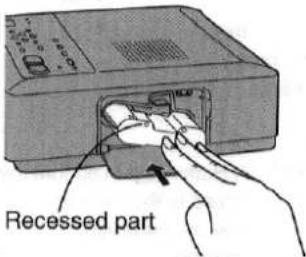 With the recessed part facing upward, push the Ink Cassette into the Video Printer as far as it will go. With the recessed part facing upward, push the Ink Cassette into the Video Printer as far as it will go. | 4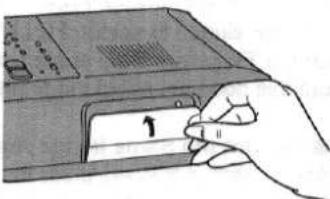 Close the Ink Cassette Compartment Door.Check that the Ink Cassette has been inserted all the way before closing the Compartment Door. Close the Ink Cassette Compartment Door.Check that the Ink Cassette has been inserted all the way before closing the Compartment Door. | ·Do not touch the ink film in the Ink Cassette, and do not try to pull it out of the cassette.Do not peel off the label on the Ink Cassette.The "ink film" refers to the wide tape that is inside the Ink Cassette.When all of the ink film in an Ink Cassette has been used up, replace the Ink Cassette with a new one. Used Ink Cassettes cannot be reused.For best printing results, use only the printing paper and Ink Cassette packaged together as a Video Print Set. |
Printing from a Video Input
| Title | Procedure | |
| Printing from a Video Input (Printing an image from the VIDEO IN or S-VIDEO IN socket)Before printing, check that an Ink Cassette has been inserted in the Ink Cassette Compartment.Check that paper has been placed in the Paper Cassette, and then start the printing procedure. | 1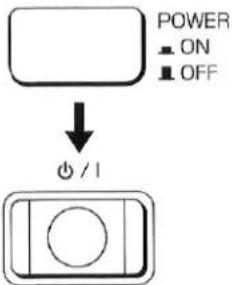 Turn on the power by pressing first the POWER (Main Power) Button and then the ⏻ / I (Power) Button.The ON Lamp lights up. Turn on the power by pressing first the POWER (Main Power) Button and then the ⏻ / I (Power) Button.The ON Lamp lights up. | 2INPUT SELECTVIDEO PC CARD Set the INPUT SELECTSwitch to “VIDEO”. Set the INPUT SELECTSwitch to “VIDEO”. |
| ■Reducing BlurTo reduce the blur in a printed picture and to minimise the jitter on the TV screen caused by the subject moving, Press the FIELD / FRAME Button to select “FIELD”. The picture on the TV Screen may appear slightly blurry but this does not affect the printed image.■To Print the Same Image AgainAfter printing is finished, press the MONITOR Button again so that the image displayed on the television screen is stored in the memory.Then, press the PRINT Button to print the same image again.■Printing Multiple Copies of the Same ImageSet the number of prints on the MENU Screen (up to 10 sheets).(p.16)●The remaining sheets to be printed are shown at the top right of the television screen. This number includes the sheet being printed.To cancel continuous printing when two or more sheets remain press the CLEAR Button. | ||
| While printing is in progress, the only button on the Video Printer that functions is the CLEAR Button for cancelling the printing of multiple sheets. | ||
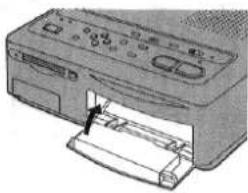
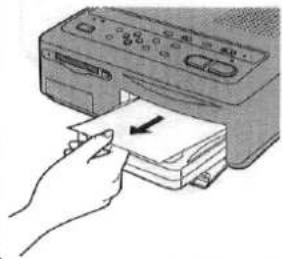
After Printing
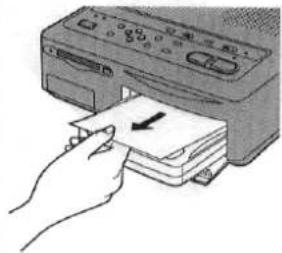
- Remove the printed paper.
natural_image
Illustration of a hand inserting a card into a printer (no text or symbols visible)- Take out the Paper Cassette.
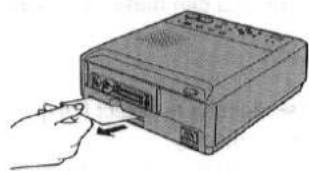
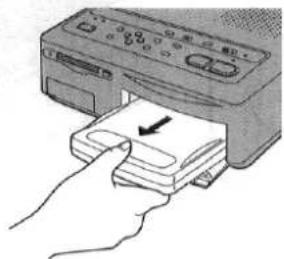
natural_image
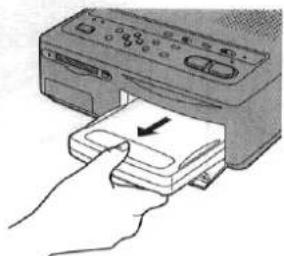
Illustration of a hand inserting a card into a printer (no text or symbols visible)- Close the cover of the Paper Cassette slot.
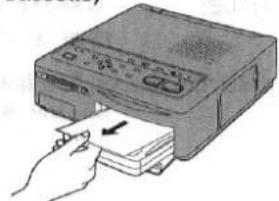
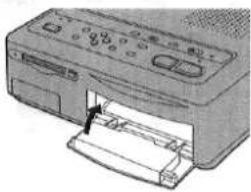
natural_image
Illustration of a printer with a paper feeding into a slot (no text or symbols visible)- Turn the printer off by pressing the ⏻ /l (Power) Button.
●The STAND BY Lamp lights up.
3
MEMORY
While watching the television screen, press the MEMORY Button at the scene that you want to print.
●The PRINT Lamp lights up.
- To store a new scene in memory, press the MONITOR Button so that the PRINT Lamp turns off. Then, press the MEMORY Button again to store a new image in memory.
4
PRINT

Check that the PRINT Lamp on the Video Printer is lit, and then press the PRINT Button.
- Printing starts.
●During printing, the picture that is being input from the memory appears on the television screen. - When printing is finished, the picture that is being input from the video source appears on the television screen again.
■If a Paper Jam Occurs
A "REMOVE JAMMED PAPER" error message is displayed, and the ERROR Lamp flashes. When this happens, remove the paper where it has jammed (1 or 2 in the figure below). If the paper cannot be removed, turn off the printer. Then, turn the printer on again and remove the paper from either 1 or 2.
① Rear Paper Removal Port
natural_image
Hand inserting a CD into a drive into a computer tower (no text or symbols visible)② Print Exit (above the Paper Cassette)
natural_image
Illustration of a hand inserting a card into a printer (no text or symbols visible)- If the Paper Cassette is removed while printing is in progress, paper will become jammed in the Print Exit (above the Paper Cassette) and be unable to be pulled out. Insert the Paper Cassette and turn the printer on again to discharge the paper.
Remarks, etc.
- When printing starts, the “— — —” display shown at the top right of the screen changes to “☆ — —”.
“☆——”: Printing in progress
“☆☆—”: Printing in progress
"☆☆☆": Printing is completed when the ☆ mark flashes and then lights up.
(The ☆ mark indicates the printing progress.)
- Do not pull the paper while it is moving during the printing operation.
- Do not remove the Paper Cassette while printing is in progress.
- Do not take out the Ink Cassette while printing is in progress.
- If there is no paper in the Paper Cassette or if the paper is not inserted properly, the "SET PAPER AND PUSH [PRINT]" message may appear after the PRINT Button is pressed (after approx. 25 seconds). When this happens, reinsert the paper correctly.
- Printing may take more time for continuous printing of two or more sheets or when printing at high or low temperatures. Also, if the Video Printer becomes hot, the edges of the printed images may be slightly discolored.
- Please note that if the paper is bent or folded, the prints may fall from the Print Exit (above the Paper Cassette).
• To prevent paper jams, do not allow more than 10 sheets of paper to accumulate at the Print Exit.
Using the MENU Mode
| Title | Procedure | |
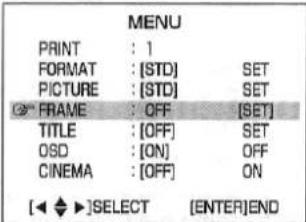
| Using the MENU ModeThe settings for the functions in the Video Printer are made at the MENU Screen. | 1MENU Press the MENU Button.•The MENU Screen is displayed on the television screen. Press the MENU Button.•The MENU Screen is displayed on the television screen. | 2 or or  Use the ▲ and ▼ Buttons to select the desired menu.•The 🔒 mark indicates the selected item. Use the ▲ and ▼ Buttons to select the desired menu.•The 🔒 mark indicates the selected item. |
| ■Menu Description | 1 PRINT: Use the ◀ and ► Buttons to set the number of prints (from 1 to 10) desired.2 FORMAT: If [SET] is selected, use the ▲ and ▼ Buttons to select each print function. (p.20 - 25)3 PICTURE: If [SET] is selected, you can adjust the picture quality. (p.18)4 FRAME: If [SET] is selected, you can make your own trimming frame. (p.42)5 TITLE: If [SET] is selected, you can make your own titles. (p.44)6 OSD (On Screen Display):Use the ◀ and ► Buttons to select [ON] or [OFF] for the screen display.•Error messages, menus, and the preset title menu are still displayed even when [OFF] is selected for OSD.(The setting for OSD is still stored even when the INPUT SELECT Switch is set to "PC CARD"). | |
![MENU PRINT : 1 FORMAT : [STD] SET PICTURE : [STD] SET FRAME : [OFF] SET TITLE : [OFF] SET OSD : [ON] OFF CINEMA : [OFF] ON [◄►]CHANGE [ ◆ ]SELECT [ENTER]END](/content/2026/05/794531/images/a1d5af1ca483e1bd1a4812ee5a07282719d4fef196d68a129f0490a4ddc627d7.jpg)
| Remarks, etc. | ||
| 3or ▶ Use the ◀ and ► Buttons to select the desired setting.●The selected setting is indicated by brackets [ ]. | 4ENTERPress the ENTER Button to complete the setting.●The MENU Screen disappears from the television screen. | ●The ◀▲▼► Buttons, ENTER Button, and ⏻/1 (Power) Button are the only buttons that function while the MENU Screen is displayed.●Once you set "PICTURE," [ADJ] is displayed on the MENU Screen. The previous settings are maintained in memory until you select [SET] to implement the new settings.●Once you set "FRAME" or "TITLE," [ON] is displayed on the MENU Screen. The previous settings are maintained in memory until you select [SET] to implement the new settings.●The stored settings are erased when the power cord is unplugged.●If the letters are blurred and difficult to read when the MENU Screen is displayed, go to the MEMORY Screen and then return to the MENU Screen to make the settings. |
| 7 CINEMA: [ON][OFF] | All pictures are printed in wide dimensions.All images, including wide images, are printed in normal dimensions. | ●When normal-sized images are printed as cinema images, the top and bottom of the images will be cut off.●When cinema images are printed as normal-sized images, the printed picture is stretched vertically . |
For Optimum Printing Results (PICTURE)

| Title | Procedure | |
| For Optimum Printing Results(PICTURE)Although the picture quality of an image that you want to print can be adjusted before storing the image in memory, for optimum results we recommend that you adjust the picture quality of the image after you have stored it in memory. | 1MENUPress the MENU Button. | 2Use the▼Button to select “PICTURE”. |
| MENUPRINT: 1FORMAT: [STD] SETPICTURE: [STD] SETFRAME: [OFF] SETTITLE: [OFF] SETOSD: [ON] OFFCINEMA: [OFF] ON[◄►]CHANGE[◆]SELECT [ENTER]END | MENUPRINT: 1FORMAT: [STD] SETPICTURE: [STD] SETFRAME: [OFF] SETTITLE: [OFF] SETOSD: [ON] OFFCINEMA: [OFF] ON[◄◆►]SELECT [ENTER]END | |
| 5or ▶Use the◄and►Buttons to adjust the level. | 6ENTERPress the ENTER Button. | |
| C-LEVEL +2-++[◄►]ADJUST[◆]SELECT [ENTER]END | ||
Picture Quality Adjustment Procedure
- Set "PICTURE" to [STD] in MENU mode, and then print an image with contrasting bright and dark areas.
- In television picture quality adjustment, adjust the television screen to nearly the same colour as the printed picture.
- At "PICTURE" in MENU mode, adjust the television screen to the desired colour balance.
Printing after making these adjustments will produce a print with almost exactly the same colours as the screen.
| Remarks, etc. | |
| 3 | 4 |
| Use the ▶ Button to select [SET]. | Use the ▲ and ▼ Buttons to select the picture quality item that you want to adjust. • See the adjustment items below. |
| MENU PRINT : 1 FORMAT : [STD] SET 2" PICTURE : STD [SET] FRAME : [OFF] SET TITLE : [OFF] SET OSD : [ON] OFF CINEMA : [OFF] ON [◀ ◆ ▶]SELECT [ENTER]END | C-LEVEL 0 - - - - - - - - - - - - - - - - - - - - - - - - - - - - - - - - - - - - - - - - - - - - - - - - - - - - - - - - - - - - - - - - - - - - - - - - - - - - - - - - - - - - - - - - - - - - - - - - - - - - - |
| Picture Quality Adjustment Items → C-LEVEL ↔ C-BALANCE ↔ BRIGHTNESS ↔ → SHARPNESS ↔ CONTRAST ← The adjustments shown above change in the following order. C-LEVEL: This setting lets you adjust to the desired colour intensity. C-BALANCE: This setting lets you reproduce colours with the correct balance. BRIGHTNESS: This setting lets dark parts become more visible. CONTRAST: This setting lets you adjust the difference between the light and dark parts of the picture. SHARPNESS: This setting lets you adjust the contours. • The C-LEVEL, C-BALANCE, BRIGHTNESS, and CONTRAST settings can be adjusted from -9 to +9 using the ◀ and ▶ Buttons. • The level of SHARPNESS can be set to L (Low), M (Medium), or H (High) using the ◀ and ▶ Buttons. | • For PC Card input, follow the same procedure shown on the left. • If it is necessary to re-adjust the picture quality, start from Step 1. • The picture will not be displayed in black and white even if C-LEVEL is set to -9. • Adjusting SHARPNESS has no effect on television picture quality. • Images are stored in the PC Card without the setting adjustments made to the picture. When using video input, one of the most important factors in printing images of high quality is skillful video camera work. When printing, it is recommended that you use an S-VIDEO IN Socket for best results. When shooting a scene from a Video Camera, keep the following points in mind. • If at all possible, shoot with the light source at your back. • When shooting a scene outdoors that includes motion, either put the Video Camera into "sports mode" or, if the camera is equipped with an electronic shutter function, set it to about 1/500. Doing so will allow you to print images with less blurring. • When shooting indoors, make sure that there is enough light. |
Printing a Series of Different Pictures on the Same Print (ALBUM)

| Title | Procedure | |
Printing a Series of Different Pictures on the Same Print (ALBUM)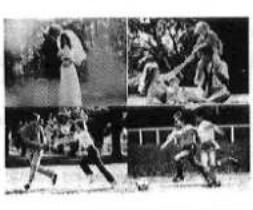 This printing function allows you to divide the screen into 4, 9, or 16 mini-frames containing different pictures, and then print them all together on the same print.This feature is useful for printing a variety of scenes from an event on a single print. This printing function allows you to divide the screen into 4, 9, or 16 mini-frames containing different pictures, and then print them all together on the same print.This feature is useful for printing a variety of scenes from an event on a single print. | 1 Press the MENU Button, and then use the▼Button to select “FORMAT”. Press the MENU Button, and then use the▼Button to select “FORMAT”.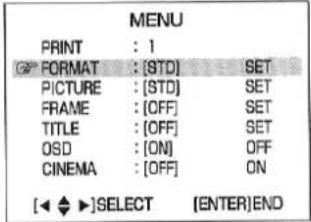 | 2 Use the ►Button to select [SET].MENUPRINT:1FORMAT:STD[SET]PICTURE:[STD]SETFRAME:[OFF]SETTITLE:[OFF]SETOSD:[ON]OFFCINEMA:[OFF]ON[◄◆►]SELECT[ENTER]END Use the ►Button to select [SET].MENUPRINT:1FORMAT:STD[SET]PICTURE:[STD]SETFRAME:[OFF]SETTITLE:[OFF]SETOSD:[ON]OFFCINEMA:[OFF]ON[◄◆►]SELECT[ENTER]END |
 Press the ENTER Button.ALBUM Press the ENTER Button.ALBUM | 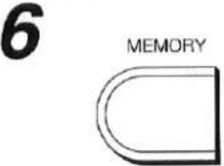 Press the MEMORY Button.●After the image stored in memory is displayed for about one second, the display returns to the input screen. Press the MEMORY Button.●After the image stored in memory is displayed for about one second, the display returns to the input screen. PRINT 1 PRINT 1 | |
| MENU | ||
| : 1 | ||
| FORMAT | : STD | [SET] |
| PICTURE | : [STD] | SET |
| FRAME | : [OFF] | SET |
| TITLE | : [OFF] | SET |
| OSD | : [ON] | OFF |
| CINEMA | : [OFF] | ON |
| [◀ ◆ ▶]SELECT | [ENTER]END | |
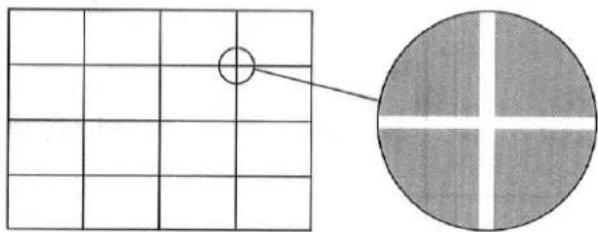
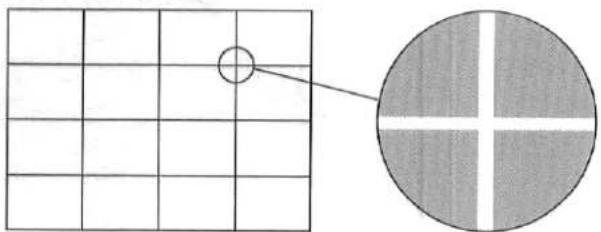
Printing for 16 Mini-frame Pictures
16 mini-frame pictures are printed separated by white lines. (These lines are also displayed on the television screen.)
natural_image
Grid pattern with a small circle and a circular cross-section, no text or symbols present| Remarks, etc. | ||
| 3 | 4 | ■To Erase Stored PicturesPress the CLEAR Button when the PRINT Lamp is lit. One frame is erased each time the CLEAR Button is pressed.(To store new pictures to replace the erased pictures, press the MONITOR Button so that the PRINT Lamp turns off, and then press the MEMORY Button.) |
| Use the ▼ Button to select "ALBUM". | Use the ◀ and ► Buttons to select the desired number of mini-frames. | ■Storing Pictures Again after All the Pictures Are StoredPress the MONITOR Button so that the PRINT Lamp turns off, and then press the MEMORY Button. (See Step 6 on the previous page.) |
| 7 | 8 | ■To Abort the Setting ProcessPress the CLEAR Button twice when the PRINT Lamp is turned off.Hints for Use●The PRINT Lamp lights up and turns off each time the MONITOR Button is pressed.●If you press the MONITOR Button again after printing is complete, the display returns to the MEMORY Screen, allowing you to print the same pictures again.●To allow printing without the entire ALBUM Screen stored in memory, press the MONITOR Button to light up the PRINT Lamp. The ALBUM Screen will be printed with white spaces where no image was saved. (In this case, the pictures are still stored in memory starting from the upper left corner. There is no editing process that will allow images to be printed between blank (white) images.) |
| Check that the PRINT Lamp is lit up.●If the entire ALBUM Screen is not stored in memory, press the MONITOR Button to light up the PRINT Lamp. | Then press the PRINT Button.●Printing starts. | |
Printing the Same Picture Repeatedly on the Same Print (MULTI FRAME)
| Title | Procedure | |
Printing the Same Picture Repeatedly on the Same Print (MULTI FRAME)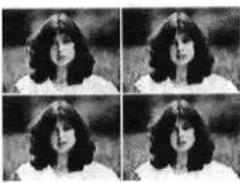 This feature allows you to divide the paper into 4, 9, or 16 mini-frames, and then print the same stored image, reduced in size, in each mini-frame. This feature allows you to divide the paper into 4, 9, or 16 mini-frames, and then print the same stored image, reduced in size, in each mini-frame. | 1MENU→Press the MENU Button, and then use the▼Button to select “FORMAT”.[IMAGE] | 2 Use the►Button to selec [SET]. Use the►Button to selec [SET].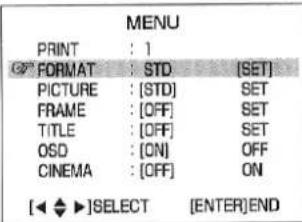 |
| 5ENTERPress the ENTER Button. | 6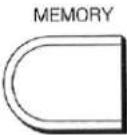 Press the MEMORY Button. Press the MEMORY Button.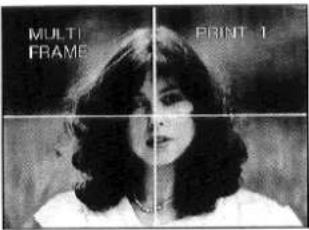 | |
| MULTIFRAME | ||
| Remarks, etc. | ||
3 | 4 or or  | ■To Erase Stored PicturesPress the MONITOR Button when the PRINT Lamp is lit.(To store new pictures to replace the erased pictures, press the MONITOR Button so that the PRINT Lamp turns off, and then press the MEMORY Button.)■To Abort the Setting ProcessPress the CLEAR Button once when the PRINT Lamp is turned off.The PRINT Lamp lights up and turns off each time the MONITOR Button is pressed.If you press the MONITOR Button again after printing is complete, the display returns to the MEMORY Screen, allowing you to print the same pictures again.It is also possible to store the image that you want to print in memory first, and then select the "MULTI" printing settings on the MENU Screen. |
Use the ▼ Button to select “MULTI”. | Use the ◀ and ► Buttons to select the desired number of mini-frames.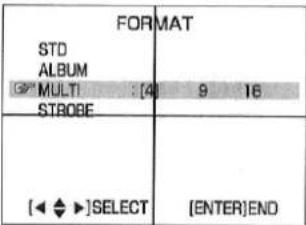 | |
7 Press the PRINT Button.•Printing starts. Press the PRINT Button.•Printing starts.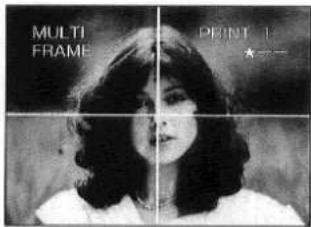 | ||
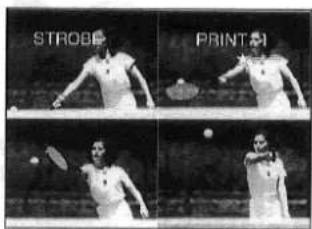
Printing a Sequence of Pictures on the Same Print (STROBE)

| Title | Procedure | ||||
Printing a Sequence of Pictures on the Same Print (STROBE) 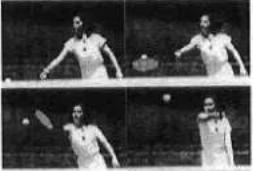 This feature allows the screen to be divided into 4, 9, or 16 mini-frames, allowing you to print a series of freeze-frames on a single sheet.This feature is useful when studying, for instance, a golfer's swing or a tennis player's shot.●One of three strobe speeds can be selected.The memory storage time is determined by the MODE and SPEED settings. This feature allows the screen to be divided into 4, 9, or 16 mini-frames, allowing you to print a series of freeze-frames on a single sheet.This feature is useful when studying, for instance, a golfer's swing or a tennis player's shot.●One of three strobe speeds can be selected.The memory storage time is determined by the MODE and SPEED settings. | 1MENU→Press the MENU Button, and then use the▼Button to select "FORMAT".[←◆►]SELECT [ENTER]END | 2Use the ►Button to select [SET].[←◆►]SELECT [ENTER]END | |||
5 Use the▼Button to select "SPEED", and then use the◀and ►Button to select the speed. Use the▼Button to select "SPEED", and then use the◀and ►Button to select the speed.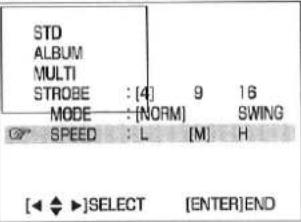 | 6ENTERPress the ENTER Button.STROBE | ||||
| Normal | Swing | ||||
| L | 3 seconds | 2 seconds | |||
| M | 2 seconds | 1.8 seconds | |||
| H | 1 second | 1.4 seconds | |||
Printing for 16 Mini-frame Pictures
16 mini-frame pictures are printed separated by white lines. (These lines are also displayed on the television screen.)
3


Use the ▼ Button to select "STROBE", and then use the ◀ and ► Button to select the number of mini-frames.
![STD ALBUM MULTI STROBE : [4] 9 16 MODE : [NORM] SWING SPEED : L [M] H [◀ ◆ ▶]SELECT [ENTER]END](/content/2026/05/794531/images/ca6b031f5e6346c35e7ae33325a5f11d5a972a43864675d3cbf1ef645720cebe.jpg)
7
Press the MEMORY Button where you want the desired freeze-frames to start.
- The screen goes blank while these frames are being stored in memory.
STROBE
NOW MEMORIZING
4


Use the ▼ Button to select "MODE", and then use the ◀ and ▶ Button to select the mode.
![STD ALBUM MULTI STROBE : [4] 9 16 MODE : [NORM] SW/NG SPEED : L [M] H [◀ ◆ ▶]SELECT [ENTER]END](/content/2026/05/794531/images/418109c795710a0cbc613953aad3cea8d5187493a2db39397ce85f74090127c5.jpg)
8
Press the PRINT Button. ● Printing starts.
Remarks, etc.
■To Erase Stored Pictures
Press the CLEAR Button when the PRINT Lamp is lit. One frame is erased each time the CLEAR Button is pressed.
(To store new pictures to replace the erased pictures, press the MONITOR Button so that the PRINT Lamp turns off, and then press the MEMORY Button.)
■To Resume Storing Pictures Again
Press the MONITOR Button so that the PRINT Lamp turns off, and then press the MEMORY Button. (See Step 7)
■To Abort the Setting Process
Press the CLEAR Button twice when the PRINT Lamp is turned off.
- The PRINT Lamp lights up and turns off each time the MONITOR Button is pressed.
- If you press the Button again after printing is complete, the display returns to the MEMORY Screen, allowing you to print the same pictures again.
■When to Use the Two Strobe Modes
NORM (Normal):
Use this mode to store the screen in memory at uniform intervals.
SWING:
Use this mode to store the screen in memory at long intervals during the first part of the sampling period, then at shorter intervals during the middle part of the sampling period, and then at longer intervals again.
This mode is suitable for printing tennis and golf swings.
natural_image
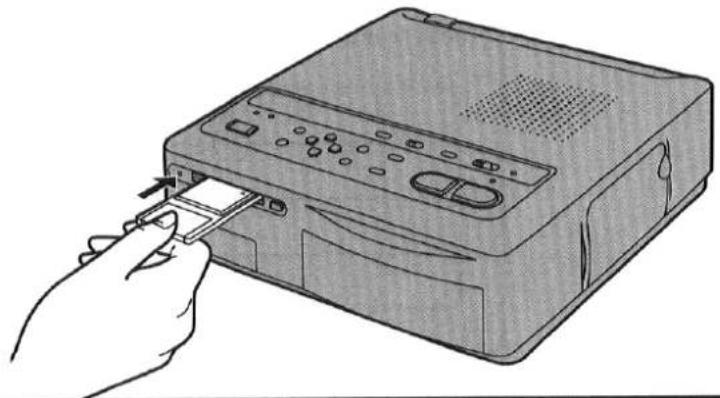
Illustration of a hand inserting a USB into a computer monitor (no text or symbols visible)| Title | Procedure |
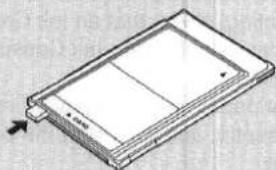
| Inserting a PC CardThis feature allows you to insert a PC Card, CF Card, or Smart Media into the PC Card Slot, and then print images from the card.The PC Card can be inserted into the PC Card Slot without any adaptors. CF Cards and Smart Media require adaptors (available at stores). | ■Using a CF Card1Attach the CF Card containing image data to a PC Card Adaptor (available at stores).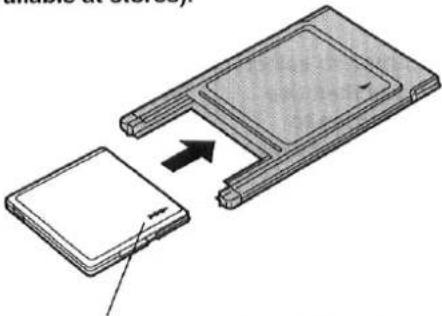 Insert the CF Card in the direction of the ▲ mark as shown in the figure. Insert the CF Card all the way into the PC Card Adaptor. Insert the CF Card in the direction of the ▲ mark as shown in the figure. Insert the CF Card all the way into the PC Card Adaptor. |
■Using Smart Media1Attach the Smart Media containing image data to a PC Card Adaptor (available at stores).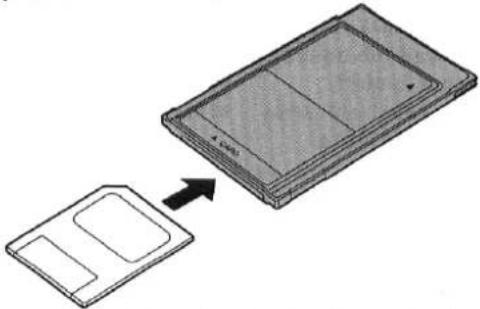 Follow the adaptor instructions for attaching the Smart Media. Follow the adaptor instructions for attaching the Smart Media. |
Removing the PC Card
Press the EJECT Button.
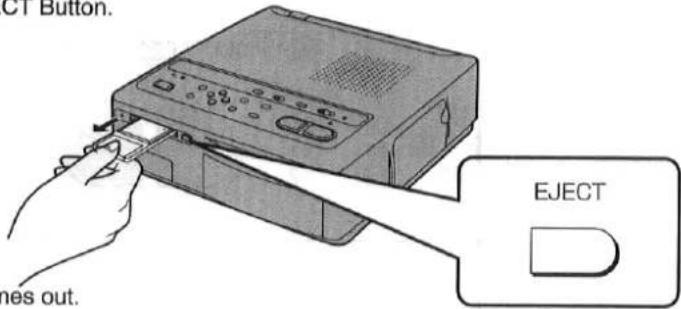
- The card comes out.
2
Inserting into PC Card Slot.
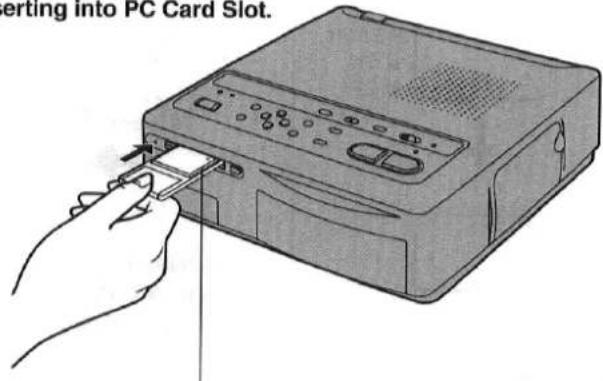
Insert the card in the direction of the ▲
mark as shown in the figure.
Insert the card all the way into the PC Card Slot.
WARNING
Never pull out or insert the card while the ACCESS Lamp on the front of the Video Printer is lit up. This could damage the format of the card and make it unusable.
Remarks,etc.
- Be careful not to insert the card in the wrong direction.
- PC Card Adaptors (available at stores) include a CF Card type and Smart Media type. Choose the correct one for the card you are using.
●The Smart Media is removed from the adaptor by pressing the button on the adaptor.
natural_image
Diagram of a rectangular electronic device with a label 'A' and an arrow pointing to its side panel (no text or symbols on the device itself)Do not remove the Smart Media while the adaptor is still inserted into the PC Card Slot.
■Compatibility of Cards from Digital Still Cameras with this Digital Video Printer
- Cards with recorded images from the following Digital Still Cameras (in no particular order) can be printed with this Digital Video Printer.
(As of February 1998)
NV-DCF1, KXL-600A (Panasonic)
- In the use of the Digital Still Camera noted above, the better printed results can be obtained, when printing directly from the PC Card, rather than from video input socket.
■About the CF Card (sold separately)
Panasonic offers the VW-CF4E CF Card (4MB capacity) (sold separately).
Printing from a PC Card
| Title | Procedure | |
| Printing from a PC Card(Printing images from a PC Card)The images stored in the PC Card are displayed as an Index (16 images per screen). This makes it easy to select the image to be printed.Insert the PC Card into the Digital Video Printer before starting the procedure.Before printing, check that an Ink Cassette has been inserted into the Ink Cassette Compartment.Check that paper has been placed in the Paper Cassette, and then start the printing procedure. | 1 POWERONOFF↓/I POWERONOFF↓/I Turn on the power by pressing first the POWER (Main Power) Button and then the /I (Power) Button.The ON Lamp lights up. Turn on the power by pressing first the POWER (Main Power) Button and then the /I (Power) Button.The ON Lamp lights up. | 2INPUT SELECTVIDEO PC CARD Set the INPUT SELECTSwitch to “PC CARD”.The ACCESS Lamp lights up, and the data in the card is read.The images stored in the carc are shown on an Index Display (16 images per screen). Set the INPUT SELECTSwitch to “PC CARD”.The ACCESS Lamp lights up, and the data in the card is read.The images stored in the carc are shown on an Index Display (16 images per screen). |
4PRINT Press the PRINT Button.The PRINT Lamp blinks when printing starts.When printing is finished, a Full Screen Display is shown on the screen. Press the PRINT Button.The PRINT Lamp blinks when printing starts.When printing is finished, a Full Screen Display is shown on the screen.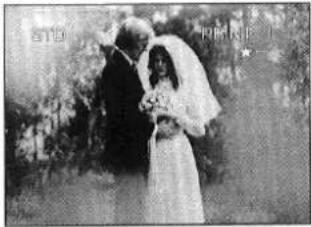 | 5DISPLAY Press the DISPLAY Button to return to the Index. Press the DISPLAY Button to return to the Index.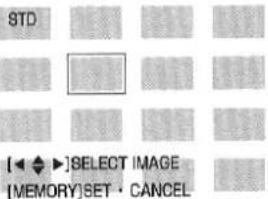 | |
| None of the buttons on the Video printer function while printing is in progress. | ||
After Printing
- Remove the printed paper.
natural_image
Illustration of a hand inserting a card into a printer (no text or symbols visible)- Take out the Paper Cassette.
natural_image
Illustration of a hand inserting a card into a printer (no text or symbols visible)- Close the cover of the Paper Cassette Slot.
natural_image
Illustration of a printer with a paper feeding into a slot (no text or symbols visible)- Turn the printer off by pressing the ⏻ / I (Power) Button.
●The STAND BY Lamp lights up.
3

natural_image
Symmetrical geometric pattern with four hexagonal shapes and central arrow (no text or symbols)![STD [◀ ◆ ▶]SELECT IMAGE [MEMORY]SET · CANCEL](/content/2026/05/794531/images/92ffcee27f33be41a69920e078b8ce7fd17e3d71870e7fd0ea16322ef77efddd.jpg)
Use the ◀, ▶, ▲, and ▼ Buttons to select the image to be printed.
- The green frame moves each time one of these buttons is pressed.
- When more than 16 images are recorded, you can go to the next Index Display by pressing the ▼ and ▶ Buttons several times.
- The printer does not print while the images are being displayed.
■Switching the Television Picture from Index Display to Full Screen Display and Printing
- Press the DISPLAY Button.

- The DISPLAY Button switches between Full Screen Display and Index Display.
- Use the ◀ and ▶ Buttons to select the image to be printed.


●The PRINT Lamp lights up.
- Press the PRINT Button.
- Printing starts.
Remarks,etc.
- Some images stored in the PC Card may be output to the television screen at a slow rate depending on the image.
One image takes about 5 to 30 seconds to be displayed on the screen. (An Index
Display takes about 5 to 30 seconds × 16 images.)
Also, when the screen switching button is used to change between the Full Screen Display and the Index Display, about 5 to 30 seconds are required for each image to be output.
The menu operations do not function when the picture image is being output.
- If the image is not displayed properly, remove the card and reinsert it, and then try to display the image again.
- When printing starts, the "----" display shown at the top right of the screen changes to "☆--".
“☆——”: Printing in progress
“☆☆-”: Printing in progress
"☆☆☆": Printing is completed when the ☆ mark flashes and then lights up.
(The ☆ mark indicates the printing progress.)
- Do not pull the paper while it is moving during the printing operation.
- Do not remove the Paper Cassette while printing is in progress.
- Do not take out the Ink Cassette while printing is in progress.
• To prevent paper jams, do not allow more than 10 sheets of paper to accumulate at the Print Exit.
Printing Multiple Images at Once from a PC Card (Batch print)
| Title | Procedure | |
| Printing Multiple Images at Once from a PC Card (Batch print)This feature allows multiple images selected from the PC Card to be automatically printed. | 1DISPLAYIf a Full Screen Display is shown, press the Display Button to display the Index. | 2 Use the ◀, ▶, ▲, and ▼ Buttons to select the image to be printed.When more than 16 images are recorded, you can go to the next Index Display by pressing the ▼ and ▶ Buttons several times.You can return to the previous Index Display by pressing the ▲ and ▶ Buttons several times. Use the ◀, ▶, ▲, and ▼ Buttons to select the image to be printed.When more than 16 images are recorded, you can go to the next Index Display by pressing the ▼ and ▶ Buttons several times.You can return to the previous Index Display by pressing the ▲ and ▶ Buttons several times.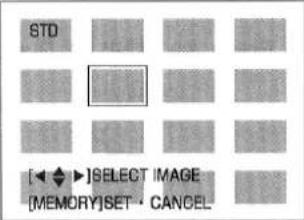 |
| Remarks,etc. | ||
3MEMORY Press the MEMORY Button.The image is marked with a○ mark.Pressing the MEMORY Button again will erase the○ mark.Repeat Steps 2 and 3 to select a number of images. Press the MEMORY Button.The image is marked with a○ mark.Pressing the MEMORY Button again will erase the○ mark.Repeat Steps 2 and 3 to select a number of images. | 4AUTO PRINT[IMAGE]Slide the AUTO PRINT Lever.The PRINT Lamp blinks when printing starts. | The images are printed in the order they were selected in Steps 2 and 3.When printing is finished, the ○ mark is erased, and the memory is reset.After storing the images in memory, setting the INPUT SELECT Switch to “VIDEO” or turning the power off will reset the memory.To Print All the Images Recorded in the CardSlide the AUTO PRINT Lever.(Steps 1, 2, and 3 are not necessary.)To Abort PrintingPress the CLEAR Button.Although the image being printed will not stop, the following printing images will be cancelled. |
 |  | |
| Title | Procedure | |
| Using MENU ModeThe settings for the functions in the Video Printer are made at the MENU Screen. | 1MENUPress the MENU Button.The MENU Screen is displayed on the television screen. | 2orUse the ▲ and ▼ Buttons to select the desired menu.•The 🔒 mark indicates the selected item. |
| ■Menu Description | 1 PRINT: Use the ◀ and ▶ Buttons to set the number of prints (from 1 to 10) desired.2 FORMAT: If [SET] is selected, use the ▲ and ▼ Buttons to select each print function. (p.34 - 37)3 PICTURE: If [SET] is selected, you can adjust the picture quality.•The setting procedure is identical to the procedure for video input. (p.18)4 FRAME: If [SET] is selected, you can make your own trimming frame. (p.42)5 TITLE: If [SET] is selected, you can make your own titles. (p.44) | |
![CARD MENU PRINT : 1 FORMAT : [STD] SET PICTURE : [STD] SET FRAME : [OFF] SET TITLE : [OFF] SET OSD : [ON] OFF DELETE : [NO] YES [◀▶]CHANGE [ ◆ ]SELECT [ENTER]END](/content/2026/05/794531/images/b7264caa80d1e60ecacaa34bda5b8b7b381bc0e5f098beb220d25c7b0a3bebc6.jpg)
Full Screen Dispaly
![CARD MENU PRINT : 1 FORMAT : [STD] SET OSD : [ON] OFF DELETE : [NO] YES [◄►]CHANGE [ ◆ ]SELECT [ENTER]END](/content/2026/05/794531/images/0abfa26ce1cfdbe31e3b815bdd69f393d9d9839ebaf84f239479b24d0626ec5c.jpg)
Index Display
| Remarks,etc. | ||
| 3or ▶ | 4ENTERPress the ENTER Button to complete the setting.The MENU Screen disappears from the television screen. | The ▶▲▼ Buttons, ENTER Button, and ⏻/ I (Power) Button are the only buttons that function while the MENU Screen is displayed.The menu operations do not function when the picture image is being output. Operation can be performed once the complete picture appears.Once you set "PICTURE," [ADJ] is displayed on the MENU Screen. The previous settings are maintained in memory until you select [SET] to implement the new settings.Once you set "FRAME" or "TITLE," [ON] is displayed on the MENU Screen. The previous settings are maintained in memory until you select [SET] to implement the new settings.The stored settings are erased when the power cord is unplugged. |
| 6 OSD (On Screen Display):Use the ▶ and ▶ Buttons to select [ON] or [OFF] for the screen display.Error messages, menus, and the preset title menu are still displayed even when [OFF] is selected for OSD.(The setting for OSD is still stored even when the INPUT SELECT Switch is set to "VIDEO".)7 DELETE: Use the ▶ and ▶ Buttons to select [YES] or [NO] for allowing images in the PC Card to be erased (p.38). | During Index Display, only 1, 2, 6, and 7 are shown. (PICTURE, FRAME, and TITLE are not shown.) | |
Printing a Series of Different Pictures on the Same Print (ALBUM)

| Title | Procedure | |
Printing a Series of Different Pictures on the Same Print (ALBUM) This printing function allows you to divide the screen into 4, 9, or 16 mini-frames containing different pictures, and then print them all together on the same print.This feature is useful for printing a variety of scenes from a vacation on a single print. This printing function allows you to divide the screen into 4, 9, or 16 mini-frames containing different pictures, and then print them all together on the same print.This feature is useful for printing a variety of scenes from a vacation on a single print. | 1MENUPress the MENU Button, and then use the▼Button to select “FORMAT”.CARD MENUPRINT:1FORMAT: [STD] SETPICTURE: [STD] SETFRAME: [OFF] SETTITLE: [OFF] SETOSD: [ON] OFFDELETE: [NO] YES[◄◆►]SELECT [ENTER]END | 2Use the ►Button to select [SET].CARD MENUPRINT:1FORMAT: STD [SET]PICTURE: [STD] SETFRAME: [OFF] SETTITLE: [OFF] SETOSD: [ON] OFFDELETE: [NO] YES[◄◆►]SELECT [ENTER]END |
5MEMORY Use the ◀ and ►Buttons to select the desired image to be printed, and then press the MEMORY Button.PRINT 1 Use the ◀ and ►Buttons to select the desired image to be printed, and then press the MEMORY Button.PRINT 1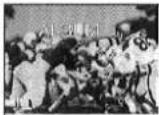 IMAGE NO. 0001[◄►]SELECT IMAGE[MEMORY]OK IMAGE NO. 0001[◄►]SELECT IMAGE[MEMORY]OK | 6PRINT Repeat Step 5, and after storing the number of images which fill up the screen, press the PRINT Button.Printing starts. Repeat Step 5, and after storing the number of images which fill up the screen, press the PRINT Button.Printing starts.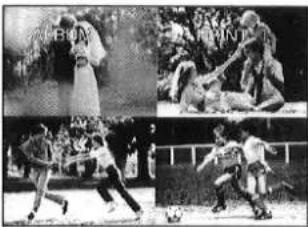 | |
Printing for 16 Mini-frame Pictures
16 mini-frame pictures are printed separated by white lines. (The horizontal lines are displayed on the television screen, but the vertical lines are not displayed.)
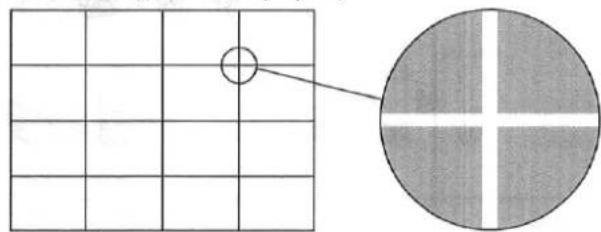
natural_image
Grid pattern with a circle and a circular cross-section, no text or symbols present3

Use the ▼ Button to select "ALBUM", and then use the ◀ and ▶ Buttons to select the desired number of mini-frames.
![FORMAT STD ALBUM : [4] 9 16 MULTI [◀ ◆ ▶]SELECT [ENTER]END](/content/2026/05/794531/images/65d0d22b7c1543a397e7587099df3338d813322fb2357882944f7ec7fceb183c.jpg)
4

Press the ENTER Button.
![ALBUM IMAGE NO. 0001 [◀▶]SELECT IMAGE [MEMORY]OK](/content/2026/05/794531/images/1f7fd31c98556eaadd6fa64a48aa3b4128f096bbd1824e54142d2c8ab3426b60.jpg)
■To Select the Desired Image Displayed on the Index Display
- After Step 4, press the DISPLAY Button.
- Use the ◀, ▶, ▲, ▼ Buttons to select desired image to be printed, and then press the MEMORY Button.


![ALBUM PRINT 1 [◀ ◆ ▶] SELECT IMAGE (MEMORY) SET • CANCEL](/content/2026/05/794531/images/e7561a1b1fa57c2b54a4e5a9695d1f7995a5c8fe23e136bb8440a6c507a59da7.jpg)
●The image is marked with a ○ mark.
- This operation can be performed only for the number of images on the screen.
- Press the DISPLAY Button to confirm the print images.
(Please be careful when pressing the DISPLAY Button since pressing it twice will clear the memory.)
- Press the PRINT Button.
Remarks,etc.
■To Erase Stored Pictures
Press the CLEAR Button when the PRINT Lamp is lit.
■To Abort the Setting Process
Press the CLEAR Button several times to completely clear the memory screen. Pressing the MENU Button when the Index Display is displayed will return you to the CARD MENU.
■To Print Various ALBUM Prints from Different Screens at the Same Time
- Use the ◀, ▶, ▲, and ▼ Buttons and MEMORY Button to select the various different types of images.
2.Slide the AUTO PRINT Lever.
AUTO PRINT
- Example: If ALBUM:[4] is selected when printing 8 selected images, then the first print will have the first to the fourth selected images, and the second print will have the fifth to the eighth selected images.
- The ALBUM Screen shows white spaces where no image was saved. There is no editing process that will allow images to be printed between blank (white) images.
Printing the Same Picture Repeatedly on the Same Print (MULTI FRAME)
| Title | Procedure | |
Printing the Same Picture Repeatedly on the Same Print (MULTI FRAME) This feature allows you to divide the paper into 4, 9, or 16 mini-frames, and then print the same stored image, reduced in size, in each mini-frame. This feature allows you to divide the paper into 4, 9, or 16 mini-frames, and then print the same stored image, reduced in size, in each mini-frame. | 1MENU→Press the MENU Button, and then use the▼Button to select “FORMAT”.CARD MENUPRINT:1FORMAT:[STD] SETPICTURE:[STD] SETFRAME:[OFF] SETTITLE:[OFF] SETOSD:[ON] OFFDELETE:[NO] YES[◄◄►]SELECT [ENTER]END | 2Use the ►Button to select [SET].CARD MENUPRINT:1FORMAT:STD [SET]PICTURE:[STD] SETFRAME:[OFF] SETTITLE:[OFF] SETOSD:[ON] OFFDELETE:[NO] YES[◄◄►]SELECT [ENTER]END |
5 Use the ◀ and ►Buttons to select the desired image to be printed. Use the ◀ and ►Buttons to select the desired image to be printed.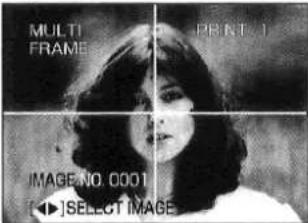 | 6PRINT Press the PRINT Button.●Printing starts. Press the PRINT Button.●Printing starts. | |
| Remarks,etc. | ||
| 3▽→or▽>Use the▼Button to select “MULTI”, and then use the◀ and ►Buttons to select the desired number of mini-frames. | 4ENTERPress the ENTER Button. | ■To Print Various Types of Different MULTI FRAME Prints from the Same Screen at the Same Time1. After Step 4, press the DISPLAY Button so that the Index Display is shown.2. Use the◀, ►, ▲, and▼Buttons and MEMORY Button to select the various different types of images.3. Slide the AUTO PRINT Lever.AUTO PRINT |
| FORMATSTDALBUM○* MULTI : [4] 9 16[◀ ◆ ►]SELECT [ENTER]END | ||
| ■To Select the Desired Image Displayed on the Index Display1. After Step 4, press the DISPLAY Button.2. Use the◀, ►, ▲,▼Buttons to select the desired image to be printed, and then press the MEMORY Button.●The image is marked with a ○ mark.●Pressing the MEMORY Button again will erase the ○ mark.3. Press the DISPLAY Button to confirm the print images.4. Press the PRINT Button. | ||
Erasing the Images on the PC Card / Recording the Video Input Image on the PC Card
| Title | Procedure | |
| Erasing the Images on the PC Card(Erasing card images)The images stored on the PC Card can be erased one at a time. | 1MENUPress the MENU Button, and then use the ▼ Button to select “DELETE”. | 2Use the ▶ Button to select [YES]. |
| CARD MENUPRINT: 1FORMAT: [STD] SETPICTURE: [STD] SETFRAME: [OFF] SETTITLE: [OFF] SETOSD: [ON] OFFDELETE: [NO] YES[◀ ◆ ►]SELECT [ENTER]END | CARD MENUPRINT: 1FORMAT: [STD] SETPICTURE: [STD] SETFRAME: [OFF] SETTITLE: [OFF] SETOSD: [ON] OFFDELETE: NO [YES][◀ ◆ ►]SELECT [ENTER]END | |
| Recording the Video Input Image on the PC Card(Recording images on the PC Card)This function allows images from the VIDEO IN Socket or the S-VIDEO IN Socket to be recorded on the PC Card as still images.The images are recorded as still images.Approximately 40 images can be recorded on a 4-MB capacity PC Card. However, this may vary depending on the stored image. | 1Connect the necessary devices, and then prepare the desired image to be recorded on the PC Card.Connections (p.9) | 2INPUT SELECTVIDEO PC CARDSet the INPUT SELECTSwitch to “VIDEO”. |
■To Select the Desired Image to be Erased from the Index Display Screen
- Press the DISPLAY Button so that the Index Display is shown.

- At the MENU Screen, select "DELETE", and then select [YES].
![CARD MENU PRINT : 1 FORMAT : [STD] SET OSD : [ON] OFF DELETE : NO [YES] [◄►]CHANGE [ ◆ ]SELECT [ENTER]END](/content/2026/05/794531/images/9c4cb6df7ff98cf3e1344abc88a1865fda935791df6d0fed55e2b53ff86a49ce.jpg)
- Use the ◀, ▶, ▲, and ▼ Buttons to select the image to be erased, and then press the ENTER Button.
![DELETE THIS IMAGE [◀ ◆ ▶]SELECT IMAGE [ENTER]DELETE [CLEAR]CANCEL](/content/2026/05/794531/images/2df3164ed90e504bb467d0838d5fa9f7afbf1214e9b8696a7e185736e7548005.jpg)
| Remarks,etc. | ||
| 3orUse the ◀ and ► Buttons to select the desired image to be erased.[◄]SELECT IMAGE[ENTER]DELETE[CLEAR]CANCEL | 4ENTERPress the ENTER Button.When the image is erased, the screen returns to the CARD MENU. To continue erasing images, repeat Steps 2 and 3.NOW DELETING[◄]SELECT IMAGE[ENTER]DELETE[CLEAR]CANCEL | ·Once an image has been erased, it cannot be restored. Check carefully before erasing any images.·Never remove the PC Card or press the ⏻/I (Power) Button to turn off the Video Printer while the image is being erased (when the ACCESS Lamp is lit up). This could damage the format of the card and make it unusable.·Images can be erased either from the Full Screen Display and Index Display. |
| 3MEMORYStart playback of the video equipment, and then while viewing the television screen, press the MEMORY Button at the scene to be recorded on the card.·The scene is stored in the Video Printer memory. | 4PC CARD RECPress the PC CARD REC Button.The scene is stored in the PC Card from the Video Printer memory.The ACCESS Lamp lights up while the image is being recorded.STD PRINT 1FRAME NOW RECORDING | ·Never remove the PC Card or turn off the Video Printer while the image is being recorded (when the ACCESS Lamp is lit up). This could damage the format of the card and make it unusable.·Images cannot be recorded on the PC Card with MULTI FRAME Mode.·Data stored in the PC Card undergoes image compression. In some cases, this can deteriorate the image when it is stored on the card.·Images are stored in the PC Card without the setting adjustments made to the picture quality.·Blurred images are stored without any adjustments.·Titles are not stored.·Wide images cannot be stored in wide format in the PC Card. |
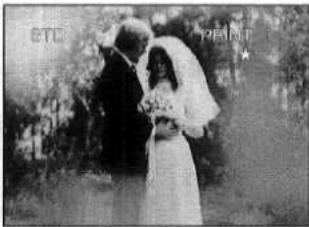
Printing with Title or Trimmed Frame (Preset title)

Title
Printing with Title or Trimmed Frame (Preset title)
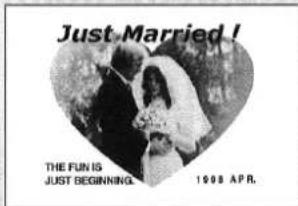
This feature uses preset titles to add titles or trimmed frames to the image.
- The Video Printer includes 14 examples of preset titles and 8 illustrations. (See next page.)
- Some of the greeting examples are coloured.
| Colours | Example Number |
| Black | 1, 3, 13 |
| Red | 6,7,8,9,12,14 |
| Cyan | 10 |
| Pink | 2, 4 |
| Green | 5, 11 |
1
PRESET TITLE

Press the PRESET TITLE Button.
- If the Index Display Screen is shown when using the PC Card, press the PRESET TITLE Button after switching to Full Screen Display.
TITLE
[THANK YOU]
HOW ARE
NEW BABY
MEMORIES
MOTHERS
FATHERS
PATHENS
CONGRATS
CONGRATS
ILLUSTRATION
ILEDUSTRATION
[RESETICANCE]
[PHRESET]CANCEL
[◀ △ ▶] SELECT
MISS YOU
MARRIED
NEW YEAR
BIRTHDAY
HOLIDAYS
HOLIDATO
YMAC
AMAS STREET
GREETING
(五)
2、审议通过了《关于
[ENTER]OK
2
ENTER

Use the ◀, ▶, ▲, and ▼ Buttons to make a selection and then press the ENTER Button.
TITLE
[THANK YOU]
HOW ARE
NEW BABY
MEMORIES
MEMORIERS MOTHERS
MOTHERS EATHERS
FATHERS CONGRAT
CONGRATS GREETING ILLUSTRATION
ILLUSTRATION
[PRESET]CANCEL
[◀ ◆ ▶] SELECT
[ENTER]OK
5
ENTER

Use the ▲ and ▼ Buttons to select the "MONTH", and then press the ENTER Button.
- You can change to the desired month using the ◀ and ▶ Buttons.
MONTH : [JAN]
OFF
[PRESET] CANCEL
[◄►]CHANGE
[▲]SELECT
[ENTER]OK
6
Print the title and image.
1
2
3
4
5
6
7
8
9
10
11
12
13
14

ILLUSTRATION
Remarks,etc.
3
ENTER

Use the ▲ and ▼ Buttons to select the "TEXT", and then press the ENTER Button.
- Text cannot be selected for examples ②, ③, ⑤, ⑥, ⑦, ⑧, and ⑩.
![TEXT : [FOR ALL YOU ...] OFF [PRESET]CANCEL [ ◆ ]SELECT [ENTER]OK](/content/2026/05/794531/images/4f9913eea3ec1e73c1ba38e8acad0309f95372b4f15e69f9702067465ca79537.jpg)
4
ENTER

Use the ▲ and ▼ Buttons to select the "YEAR", and then press the ENTER Button.
- You can change to the desired year using the ◀ and ► Buttons.
![YEAR : [1998] OFF [PRESET]CANCEL [◀]CHANGE [◀]SELECT [ENTER]OK](/content/2026/05/794531/images/24c980f457a2292d0dddcc6e4da54631745a593a516b4adb3fc3225ff18d4ebd.jpg)
![ILLUSTRATION 1 [PRESET]CANCEL [◀]CHANGE [ENTER]OK](/content/2026/05/794531/images/f8ce7569e90a1a976990af6f92ad39f3cba349afefd9e11153b6a1e81ab9d695.jpg)
15 Selecting "ILLUSTRATION" allows you to choose from the eight illustrations 1 to 8.
Use the ◀ and ▶ Buttons to select one of the illustrations 1 to 8, and then press the ENTER Button.
- Although a portion of the title display is not shown on the television screen, this has no effect on the printing.
●The year can be set from 1997 to 2028. - All data stored in the memory is erased when the Video Printer is turned off.
- To turn off a trimming frame or title on the television screen, press the PRESET TITLE Button.
- To turn off either the trimming frame or title only, set FRAME or TITLE in MENU Mode to [OFF].
(Switching this setting to [ON] again will display the trimming frame or title again.)
■To Abort the Setting Process
Press the PRESET TITLE Button.
- When an 15 Illustration is inserted into an image from a PC Card, the right and left sides of the illustration will become slightly shortened.
1
2
3

4
5
6
7
8
Printing with a Trimmed Frame
Title
Printing with a Trimmed Frame
A trimming frame can be made in one of two possible ways.
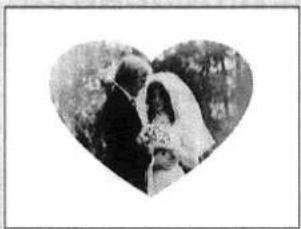
natural_image
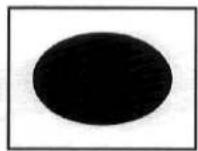
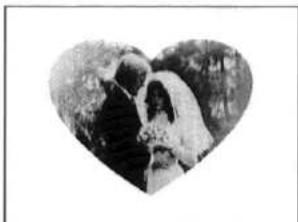
Black-and-white photo of a bride and groom embracing inside a heart shape (no text or symbols)① Selecting from one of the preset trimming frames: SQUARE, OVAL, FROST, or HEART
(The size of the SQUARE trimming frame can be adjusted.)
- Trimming can be used to cover black bands appearing at the top, bottom or around the image (such as for movie scenes).
② Capturing with your Video Camera a trimming frame that you created
Procedure
1
Press the MENU Button.
Example:Video Input
| MENU | ||
| 1 | ||
| FORMAT | [STD] | SET |
| PICTURE | [STD] | SET |
| FRAME | [OFF] | SET |
| TITLE | [OFF] | SET |
| OSD | [ON] | OFF |
| CINEMA | [OFF] | ON |
| [◄►]CHANGE | ||
| [◆]SELECT | [ENTER]END | |
2
Use the ▼ Button to select "FRAME".
| MENU | ||
| : 1 | ||
| FORMAT | :[STD] | SET |
| PICTURE | :[STD] | SET |
| FRAME | :[OFF] | SET |
| TITLE | :[OFF] | SET |
| OSD | :[ON] | OFF |
| CINEMA | :[OFF] | ON |
| [◀ ◆ ▶]SELECT [ENTER]END | ||
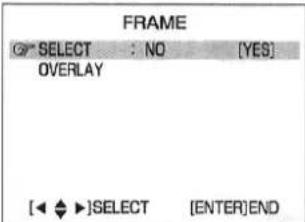
① When "SELECT" is chosen
Select one of the four trimming frames: SQUARE, OVAL, FROST, and HEART. Then, select [YES].
- The size of the SQUARE trimming can be adjusted by using the ◀, ▶, ▲, and ▼ Buttons.
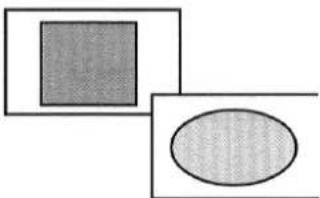
natural_image
Two geometric shapes: a solid square and an oval, both outlined in gray (no text or symbols)5
If "OVERLAY" was selected in Step 4, press the ENTER Button.
6
To perform inside-outside reversal, use the ▼ Button to select "NEGA-POSI". Next, use the ▶ Button to select [YES], and then select "NEGA" or "POSI".
| FRAME | ||
| SELECT | ||
| OVERLAY | ||
| [IMAGE] NEGA · POSI : NO [YES] | ||
| [◀ ◆ ▶]SELECT [ENTER]END |
1
2
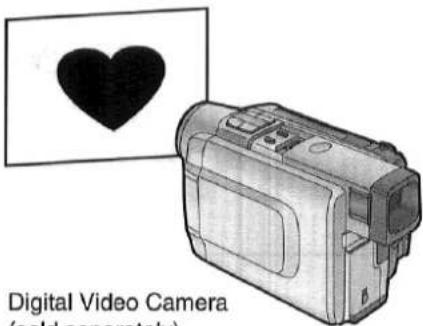
Digital Video Camera (sold separately)
| Remarks,etc. | ||
| 3 Use the ▶ Button to select [SET]. | 4 Use the ▼ Button to select one of the two methods, and then use the ▶ Button to select [YES]. | ●When a trimming frame is stored in memory, [ON] appears on the MENU Screen. ●A trimmed frame stored in memory is lost when the Digital Video Printer is turned off. ●When a new trimming frame is stored in memory, the previous trimming frame is erased. ●When a preset title is used, the previous trimming frame is lost. ●When capturing the title or trimming frame with a Video Camera, shine the lighting at a 45-degree angle to prevent reflection. ●To temporarily turn off a trimming frame stored in memory displayed on the screen, set "FRAME" in MENU Mode to [OFF]. (When the setting is switched back to [ON], the stored trimming frame reappears on the screen.) ●When creating your own frame, use a black marker on white paper. |
 |  | |
| 2 When "OVERLAY" is chosen A trimming frame that you created is captured with your Video Camera, and the trimmed frame is adjusted for optimum appearance. ●The value can be adjusted over a range from -9 to +9. Positive values make the trimmed frame lighter, and negative values make the trimming frame darker. | 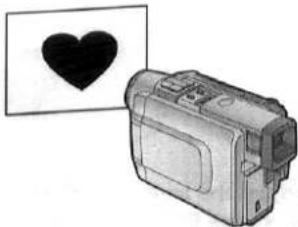 | |
| 7 Press the ENTER Button. (If the menu is displayed, hold down this button until the menu disappears.) | 8 Print the trimmed frame. | |
 | ||
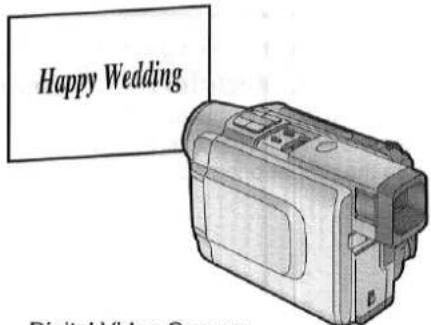
Printing with a Title (Inserting your own titles)

| Title | Procedure | |
Printing with a Title(Inserting your own titles)With this function, you can use your Video Camera to capture titles that you created, allowing you to add an original title to the image. | 1Press the MENU Button.Example:Video InputMENUPRINT : 1FORMAT : [STD] SETPICTURE : [STD] SETFRAME : [OFF] SETTITLE : [OFF] SETOSD : [ON] OFFCINEMA : [OFF] ON[◄►]CHANGE[◆]SELECT [ENTER]END | 2Use the▼Button to select “TITLE”. |
5Happy Wedding Adjust the level, and then press the ENTER Button.●The value can be adjusted over a range from -9 to +9. Positive values make the title darker, and negative values make the title lighter.6Print the title with the image.LEVEL : -6[◆]ADJUST [ENTER]OK Adjust the level, and then press the ENTER Button.●The value can be adjusted over a range from -9 to +9. Positive values make the title darker, and negative values make the title lighter.6Print the title with the image.LEVEL : -6[◆]ADJUST [ENTER]OK | ■Changing the Colour of the Title1. Select “COLOUR CHANGE WHOLE”, and then select [YES].TITLEOVERLAY COLOUR CANGEWHOLE : NO [YES]PART[◄◆►]SELECT [ENTER]END2. Use the▲and▼Buttons t select the colour, and then press the ENTER Button.CYANRED MAGENTA YELLOW WHITE BLACK BLUE GREEN[◆]SELECT [ENTER]OK | |
Digital Video Camera (sold separately)
![Remarks,etc. 3 Use the ▶ Button to select [SET]. MENU PRINT : 1 FORMAT : [STD] SET PICTURE : [STD] SET FRAME : [OFF] SET TITLE : OFF [SET] OSD : [ON] OFF CINEMA : [OFF] ON [◀ ◆ ▶]SELECT [ENTER]END 4 Use the ◀ and ▶ Buttons to select [YES]. TITLE OVERLAY : NO [YES] COLOUR CANGE WHOLE PART [◀]SELECT [ENTER]END ■Changing the Colour of Part of the Title 1. Select "PART", and then select [YES]. TITLE OVERLAY COLOUR CANGE WHOLE PART : NO [YES] [◀ ◆ ▶]SELECT [ENTER]END 2. Use the ◀, ▲, ▼, and ▶ Buttons to select the upper left limit for the colour, and then press the ENTER Button. Upper Left Corner 3. Use the ◀, ▲, ▼, and ▶ Buttons to select the size for the colour, and then press the ENTER Button. 4. Use the ▲ and ▼ Buttons to select the colour, and then press the ENTER Button. A title stored in memory is lost when the Digital Video Printer is turned off. When a new title is stored in memory, the previous title is erased. To temporarily erase a title stored in memory from the screen, set "TITLE" in MENU Mode to [OFF]. (When the setting is switched back to [ON], the stored title reappears on the screen.) When creating your own title, use a black marker on white paper. The MACRO function on the Video Camera is useful for capturing titles. Be sure to also read the Operating Instructions for the Video Camera.](/content/2026/05/794531/images/b7b7069736493365655ff716d8d8b0ffb8fe9ce1e918fc0cb176b41fd56bf7a8.jpg)
■When Connecting to a Windows (PC/AT) Computer:
A printer cable (available at computer shops) is required to connect the Video Printer. Obtain the proper printer cable for your computer.
■When Connecting to a Macintosh Computer:
A printer cable for Macintosh computers (available at computer shops) is required to connect the Video Printer.
■Precautions when using the Digital Video Printer
- If the Video Printer emits smoke, becomes unusually hot, or gives off an unusual smell, turn off the printer and unplug it.
- If water or other foreign matter gets inside the printer, turn off the printer and unplug it.
- If the surface of the printer becomes broken or cracked, turn off the printer and unplug it.
- If the power cord is damaged (such as the core wires being exposed), turn off the printer and unplug it.
- Do not use the Video Printer in any way which overloads the electric outlet or wiring. Also, only AC 220 - 240 V should be used as the power supply for the Video Printer.
- Make sure the plug is properly plugged in when using the Video Printer.
- Do not damage the power cord or plug.
- Remove dust or other foreign matter adhering to the power plug.
- Do not place the Video Printer on unsteady, inclined, or other unstable surfaces.
- Do not place flower vases, containers with water, or small metal objects on the Video Printer.
- Do not drop or insert metal or flammable objects inside the Video Printer.
- Do not splash or wet the Video Printer.
- Do not disassemble or remodel the Video Printer.
- Do not touch the metal parts on the Video Printer or the plug during a thunderstorm.
- Do not unplug with wet hands.
- Do not place the Video Printer in locations with smoke, steam, high humidity, large amounts of dust, or severe vibrations.
- Do not install the Video Printer in such a way that the power cord is forcibly bent.
- Do not cover the ventilation holes on the Video Printer.
- Do not place heavy objects on the Video Printer.
- Do not move the Video Printer with the power cord plugged in.
- Do not unplug by pulling on the power cord.
- Remove the plug from the outlet as a safety measure when cleaning the Video Printer or when the Video Printer will not be used for a long
period of time.
The printer consumes about 3 W of power even when the power is turned off (STAND BY).
- Do not touch any internal components other than those specified.
- Do not remove the Paper Cassette while printing is in progress.
During printing, the paper moves forward and backward three times. You can be cut if you touch the paper during this operation.
■Notes on Handling the Ink Cassettes, Ink Cassette Film, Paper Cassette, and Paper
To ensure high-quality, precise printing, always observe the following points.
Failure to observe these points can not only result in poor-quality prints, but also paper jams or breakdown of the Video Printer.
- Use only the specified paper.
Use Video Print Sets that carry the MP mark or that have been specified for use with this Video Printer by Panasonic.
- Use the Ink Cassette with the paper provided in the same box.
One Ink Cassette is designed to provide enough ink film to print the number of sheets provided in that Video Print Set.
- Do not remove the label from the Ink Cassette. Doing so could lead to mistaken operation.
● Before loading an Ink Cassette, take up any slack in the ink film (wide tape inside the Ink Cassette). The slack can be taken up by turning the spool in the direction of the arrow.
●Make sure that the Ink Cassette is oriented properly and insert it all of the way in.
- Do not touch or pull on the ink film.
- Do not get fingerprints or dust on the ink film or on the paper.
- Do not get the ink film or the paper wet.
- Do not touch the Ink Cassette or the Paper Cassette while printing is in progress. The Ink Cassette cannot be taken out while printing is in progress.
Forcibly pulling out the Ink Cassette, loading too much paper, or applying strong pressure or vibrations to the Paper Cassette could result in a paper jam or other malfunction. (Do not take out the Paper Cassette and add paper while printing is in progress.)
- Do not attempt to reuse an empty Ink Cassette or paper which has already been printed on.
Doing so could result in malfunction or breakdown of the Video Printer.
- Fan the paper thoroughly before placing it in the Paper Cassette. Sheets that adhere to other sheets can cause a paper jam.
- Do not fold or bend the paper. If a postcard is curled, remove the curl before attempting to use the postcard in the printer.
- Do not load the paper upside-down. The glossy side of the paper with no markings on it is the printing side. The paper should be loaded with this side facing up.
- Do not write on the paper before printing on it. This could lead to mistaken operation.
- Do not load too much paper in the Paper Cassette. No more than 25 sheets of standard paper should be loaded.
- Allow the Video Print Set to adjust to the ambient temperature before using it. If the Video Print Set has been stored at a low temperature, condensation could form on the paper when brought into a warmer room. Do not open the Video Print Set package until it has reached the room temperature.
- Do not leave printed paper above the Paper Cassette (in the Print Exit). Do not allow more than 10 sheets to accumulate above the Paper Cassette.
- Do not place foreign objects above the Paper Cassette (in the Print Exit).
■Notes on Video Print Set Storage
- Do not store the Ink Cassettes or paper under high temperatures or high humidity. Doing so could result in a deterioration of printing quality.
- Do not store the paper on end. Store the paper flat in its original silver bag.
- Do not store Ink Cassettes or paper in a location exposed to direct sunlight. Doing so will result in a deterioration of printing quality. The Ink Cassette and paper could even become unusable.
- After using the Video Printer, remove the Ink Cassette and paper and put them back in storage. If the Ink Cassette is left in the Video Printer, slack will develop in the ink film and dust will collect, which may make high-quality printing
impossible. In order to keep leftover paper in optimum condition for as long as possible, remove the paper from the Video Printer, and then place it in the original silver bag for storage.
■Notes on Handling Finished Prints
In order to preserve finished prints in the best condition, always observe the following points. Failure to observe these points could result in a deterioration of print quality or a slight injury.
- Do not affix cellophane tape to the printed surface.
- Do not touch the printed surface with your fingers.
- Do not let the printed surface come into contact with other objects. Do not let the following materials in particular come into contact with the printed surface:
- Desk pads or business card cases made of vinyl
- Erasers made of plastic
- Do not spill or apply volatile solvents such as alcohol to the printed surface. Doing so could result in discoloration or fading.
- Do not leave printed surfaces in contact with one another. Doing so could cause colour transfer between the two images. Colour transfer could also occur if a printed surface is left in contact with any other type of paper under pressure for an extended period of time.
- Do not store prints under conditions of high temperature or high humidity. Leaving prints under such conditions for an extended period of time could cause a deterioration in print quality. Do not leave prints exposed to direct sunlight.
- When prints are to be stored in an album, select an album that has nylon pockets. Other materials could cause colour transfer or discoloration. (Polypropylene and cellophane are also acceptable materials.)
■Notes on Handling the Digital Video Printer
- Do not spray insecticides or other volatile materials on the printer. If such materials come into contact with the printer, they can damage the surface of the printer or cause the finish to peel. Also, do not leave rubber or vinyl materials in contact with the printer for an extended period of time.
- When the printer will not be used for an extended
period of time:
To conserve electricity, turn off the printer and unplug it.
(The printer consumes about 3 W of power even when the power is turned off [STAND BY].) Leaving the printer idle for long periods can impair its functionality. Be sure to turn the power on and operate the printer once every six months.
- When transporting the printer by car or truck: Pack the printer carefully in its original packing materials. If you did not retain the packing materials, wrap the printer carefully in a blanket or other cushioning material to protect it. (Before transporting the Video Printer, be sure to first remove the Paper Cassette and Ink Cassette, and then close the cover.)
■Maintenance Notes
- Do not use benzene, paint thinner, or other solvents to clean the printer. Most of the printer surface is plastic. Do not use solvents such as benzene and paint thinner to wipe the printer since they can damage the surface of the printer and cause the surface to peel.
To clean the printer surface, wipe up any dust with a soft, dry cloth.
If the Video Printer is particularly dirty, soak the cloth in kitchen detergent (neutral) diluted with water and wring out thoroughly. Then, wipe off the dust with the cloth, and wipe again with a dry cloth.
When using a synthetic cloth, follow the precautions in the usage instructions.
- When dust accumulates around the ventilation holes on top of the printer:
After removing the Ink Cassette, use a vacuum cleaner to clean the dust from the ventilation holes. Dust that enters the printer through the ventilation holes can adhere to the ink film, making high-quality printing impossible. In this event, remove the Ink Cassette, and then clean the dust off the ink film.
■Installation Notes
- Install the Video Printer away from devices that generate magnetic fields.
The magnetic fields generated by stereo speakers or large monitors will distort the image produced by the Video Printer.
Electromagnetic waves produced in this Video Printer and in televisions, video games, and other devices can cause mutual interference, disrupting both the display on the television screen and the print image.
■Internal Temperature
- Although it varies with the ambient temperature, if the internal temperature of the Video Printer rises above a certain level, the ERROR Lamp will flash and the error message "WAIT: COOLING" will appear on the television screen. In this situation, the printing operation will halt temporarily. This is not a malfunction. After waiting for a few minutes for the temperature to drop (four or five minutes at the most), the Video Printer will automatically resume printing.
- The printing operation may be halted temporarily in any of the following cases, which will result in a longer than normal printing time:
- When printing images continuously
- When the ambient temperature is high
- When the internal temperature of the printer rises quickly because the ventilation holes or other parts are blocked.
- Note that if two or more of these conditions exist, printing will take even longer. Therefore, make every effort to find a well-ventilated location for installing this printer.
Condensation
- When a bottle is taken out from a refrigerator in summer and left standing for a while for instance, droplets of water will form on it. This phenomenon is known as condensation.
- Conditions for condensation Condensation will form if the printer or Video Print Set is moved to a location with a considerable difference in temperature or humidity, such as:
- A high-humidity location, such as one filled with steam
- When suddenly moved from an air-conditioned environment to one with high temperatures and high humidity
- A room that has just been heated In this event, turn the power on and wait for two hours.
If the paper or rollers are damp with condensation, the printed surface that is produced may be dirty.
Miscellaneous
-Video Print Sets
If a Video Print Set is defective due to a manufacturing error on the part of Panasonic, we will replace the Video Print Set with an equivalent Video Print Set. Panasonic shall not bear any responsibility beyond replacing the product.
■About Functions
Q1: When printing, what are the differences between "Photo Shot" and normal video?
A1: When an image is shot using the "Photo Shot" function of a Digital Video Camera, the result will be a high-quality image with little noise or distortion. Therefore, a print of this image will be of higher quality than a print of a normal video image.
Q2: What kinds of Video Cameras can be connected to the Digital Video Printer?
A2: Any type of Video Camera that is equipped with either an S-VIDEO OUT Socket or a VIDEO OUT Socket can be used. (p.9)
Q3: Can a title or trimming frame be input from a camera?
A3: You can input your own titles or trimming frames by shooting them with a Video Camera. (p.42 - 45)
Q4: How should I adjust the level settings when storing the trimming frame?
A4: The level adjustments are similar to the darkness adjustment on a copy machine. Under normal conditions, you do not need to adjust the settings. However, if the trimming frame which you created shows unwanted lines, then reduce the level of the trimming frame for the best appearance. (p.43)
Q5: Can the Digital Video Printer print images from HDTV broadcasts?
A5: No, because the video signals are different.
Q6: What should I do about poor colouring?
A6: The most important factor is the colouring of the original shot of the image. The colour and other parameters can be adjusted by selecting "PICTURE" on the MENU Screen. (p.18)
Q7: When I adjust the colouring and other aspects of picture quality, can I check the results on the television screen?
A7: Yes, this can be done for all the adjustments except SHARPNESS. The quality of the picture on the television monitor will differ slightly from the quality of the printed image. Test print the image, adjust the television so that the quality of the picture on the screen is close as possible to that of the printed image, and then adjust the Digital Video Printer. (p.19)
Q8: Is it possible to insert a title for each ALBUM Mode screen?
A8: No, it is not possible in normal ALBUM Mode. It is possible in MULTI FRAME Mode, but it is not possible to insert a different title for each mini-frame.
Q9: Which should I use, the S-VIDEO IN Socket or the VIDEO IN Socket?
A9: When connecting a device that has an S-VIDEO OUT Socket, it is best to use the S-VIDEO IN Socket. Doing so will provide the best print quality. If devices are connected to both the S-VIDEO IN Socket and the VIDEO IN Socket, the S-VIDEO IN Socket takes precedence. (p.9)
Q10: What should I do if a paper jam occurs?
A10: Remove the paper from either the ① Rear Paper Removal Port or the ② Print Exit (above the Paper Cassette). If the paper cannot be removed, turn off the printer. Then, turn the printer on again and remove the paper from either ① or ②. If the paper still cannot be removed, please contact your nearest Panasonic Dealer. (p.15)
■About the Digital Video Printer in General
Q11: How should I store my prints?
A11: We recommend keeping them in an album. When doing so, make sure that the pockets are made of nylon, polypropylene, or cellophane. Using other materials may result in colour transfer or discoloration. (p.48)
Q12: What is the "thermal sublimation transfer printing system"?
A12: This is a type of printing method offering excellent image quality. Other methods exist, such as direct thermal printing method.
Q13: What does the number of dots in a printed picture mean?
A13: A printed picture is made up of many dots. This printer prints 464 dots (vertical) × 664 dots (horizontal) during VIDEO Input Mode, and prints 478 dots (vertical) × 700 dots (horizontal) during PC Card Input Mode. The print size for PC Card input is slightly larger than the print size for Video input.
Q14: What does "256 colour gradations" mean?
A14: It means that the Digital Video Printer can express 256 gradations of colour between white and the darkest colour formed by the three primary colours. Because each of the three colours can be expressed in 256 gradations, the total number of colours is 256 × 256 × 256 (full colour).
Q15: How do the Ink Cassettes and paper work?
A15: The Ink Cassettes contain three colours in one unit: cyan, magenta, and yellow. The printing paper has a special coating that improves the adhesion of the ink. Since post cards do not have this special coating, the coating is transferred to the postcard before printing. This is why printing on postcards takes longer than printing on standard paper.
■About the Paper and Ink Cassettes
Q16: How should I store the Ink Cassettes and paper after having opened them?
A16: Do not leave the Ink Cassettes or paper in a location exposed to direct sunlight, or in a location subjected to high temperature or high humidity. Place the cassette or paper back in its original silver bag, and then store them flat. (p.47) These supplies should be used as soon as possible after they are opened.
Q17: What kind of paper can the Digital Video Printer print on?
A17: The Digital Video Printer can print on standard paper, adhesive paper (including 16 Pre-Cut Adhesive paper), and postcards. Do not use other types of paper, since doing so could cause paper jams or other malfunctions. Use the special Video Print Set and Video Print Ink Cassette when printing. (p.11)
Q18: Can the Digital Video Printer print images continuously?
A18: If "PRINT" is set in MENU Mode, up to 10 sheets can be printed continuously. (p.16, 32)
Q19: How many sheets can be printed with a single Ink Cassette?
A19: An Ink Cassette can print the number of sheets that are included in the same Video Print Set. For example, the Video Print Set VW-MPS50E is intended for 50 sheets, and so the Ink Cassette can print 50 sheets. Ink Cassettes cannot be rewound and used again.
Q20: What kinds of Ink Cassettes and printing paper can I use with the Digital Video Printer?
A20: Use Video Print Sets that bear either the MP mark or have been designated by Panasonic as suitable for this Digital Video Printer.
■About Computers
●Windows and Macintosh
Q21: What is an OS?
A21: OS is an abbreviation for Operating System, and it is also sometimes called "basic software". The OS is the basic software provided for allowing the computer to be used easily. For example, operations such as reading data or displaying text cannot be performed only with other software. The OS performs these operations through commands from the software. The OS for PC/AT computers is Windows 3.1 or Windows 95, and the OS for Macintosh computers is the MacOS (System).
Q22: What are applications (software)?
A22: This is software for performing specific tasks in a computer. Applications include, for instance, word-processing and spreadsheet software.
Q23: What is an interface?
A23: An interface is a means of connecting two or more different devices. Interfaces are used in a variety of contexts, including between computers and external devices, and computers and humans. For example, interfaces include connection cables, connection sockets, and keyboards.
Q24: What is resolution?
A24: The resolution indicates how many dots can be displayed on a screen. The resolution is shown in dots per inch, and the higher the resolution, the better the printing quality.
Q25: What is dpi?
A25: The dpi is a unit of resolution which indicates the number of dots per inch that can be printed. Higher dpi allows more detailed printing.
Q26: What is a printer port?
A26: A printer port is a socket for connecting a printer to other devices. It is provided at the rear of the computer. Printer ports are classified into the following two types based on the transmission system. - Serial port A serial port is an input/output socket for connecting peripheral devices which allow only one bit of data to be sent at a time, such as a mouse or modem.
- Parallel port
A parallel port is an input/output socket for connecting peripheral devices which transfer data by simultaneously sending a number of bits over separate lines. Although the parallel port allows data transfer at a higher speed than the serial port, transfer cannot be performed over long distances since interference will result between the data lines. This port is usually used to connect a printer to a computer. In general, printing with a Windows computer uses a parallel port, while printing with a Macintosh computer uses a serial port.
Q27: What is memory?
A27: The memory is a temporary storage location for data when the computer performs operations. Memory can be broadly divided into RAM and ROM. RAM is an acronym for random-access memory, a type of memory which allows data to be read and stored freely. Software programs and entered data are stored in RAM. ROM, on the other hand, stands for read-only memory, a special type of memory which only allows data to be read. The ROM contains fixed data for programs of the particular computer.
Q28: What is a bitmap?
A28: A bitmap is a type of standard used for storing graphics created by the computer as a file. The graphics file is stored as a collection of extremely small dots.
Q29: What is a dialogue box?
A29: A dialogue box is a specialized window on Windows and Macintosh screens for displaying specific information and soliciting a needed response.
Q30: What is a printer driver?
A30: A printer driver is a program used to control how the computer and printer interact. The printer driver provides the printer interface and font designation, functions of the installed printer, and other necessary information to Windows and Macintosh systems.
Q31: Can the Digital Video Printer print text created with word-processing software so that titles can be added to photographs and other images in the computer?
A31: Text created with image-handling software (graphics software: painting software, drawing software, photograph retouching software) can also be printed with the image.
Q32: Can the Digital Video Printer print video scenes shot with a Video Camera?
A32: You can print video scenes if your computer includes a video capture board (device which digitalizes video signals before sending them to the computer).
Also, when images shot with a Digital Video Camera are sent to the computer, they can be printed with the Digital Video Printer. For Panasonic Digital Video Cameras, a Personal Computer Connection Kit VW-DTA1E (only Windows 95) is available (sold separately).
This kit allows data to be sent to the computer. (However, this kit can only be used for Digital Video Cameras equipped with a Digital Still-Frame Socket.)
•Macintosh
Q33: What is AppleTalk?
A33: AppleTalk is the name of the LAN (local area network: an in-house computer network connecting a number of computers, printers, and other devices together) system standards and the network software for Macintosh computers.
Q34: What is LocalTalk?
A34: LocalTalk is a LAN standard for Appletalk that allows a computer network to be formed by simply connecting Macintosh computers together with a special cable.
You cannot connect to a printer port when using a LocalTalk network. In this case, the modem port must be used. However, by setting "AppleTalk" to "Not Used", you can cut off the LocalTalk network connections and then use the printer port.
Q35: What is PICT?
A35: PICT is the standard format for Apple's graphics files.
Q36: What are the major computers capable of supporting high-resolution printing?
A36: The following computers are compatible with this Digital Video Printer.
Macintosh series computers with a 68030 or faster CPU
However, PPC603, 603eCPU, and 68030
CPU systems can also be used for high-resolution printing by setting the transmission method to "Customize".
Before Requesting Service
| Symptom | Cause | Remedy |
| The power cannot be switched on. | ●The power plug is not plugged in correctly. | ●Insert the power plug all the way into a wall outlet. |
| No picture appears on the television screen.(video input) | ●The external video source is not connected properly. | ●Connect the external video source correctly. (p.9) |
| ●A device is connected to an S-VIDEO IN Socket, but you are attempting to use a VIDEO IN Socket. | ●Unplug the S-Video Cord connected to the S-VIDEO IN Socket. | |
| ●The INPUT SELECT Switch is set to "PC CARD". | ●Set to "VIDEO". (p.14) | |
| The printer does not print. | ●The Ink Cassette is not oriented properly, or was not pushed all of the way in. | ●Insert the Ink Cassette correctly. (p.13) |
| ●There is slack in the ink film. | ●Take up the slack in the ink film. (p.12) | |
| ●The Paper Cassette is not oriented properly, or was not pushed all of the way in. | ●Insert the Paper Cassette correctly. (p.13) | |
| ●The paper was loaded upside-down. | ●Load the paper correctly. (p.12) | |
| ●The internal temperature of the printer is too high. | ●Wait. | |
| Printing is not of the expected quality. | ●The paper being used is not of the specified type. | ●Use the specified paper. (p.11) |
| ●The paper was not loaded correctly. | ●Load the paper correctly. (p.12) | |
| ●The ink film or paper is dirty. | ●Use clean supplies. | |
| ●Condensation has formed. | ●Wait. | |
| The printed colours are not right. | ●The print image has not been adjusted correctly. | ●Adjust the print image correctly. (p.18) |
| The printed pictures are distorted. | ●The printer is located near a television, video game or other source of electromagnetic waves. | ●Move the printer so that it is at least one meter away from the television, video game, etc. |
| ●The printer is located near a stereo speaker, large motor, or other source of a strong magnetic field. | ●Move the printer away from the device generating the magnetic field. | |
| Pressing the MEMORY Button does not store the picture in memory. | ●The MENU Screen is displayed. | ●Press the ENTER Button. (p.17) |
| ●A picture stored in memory is displayed on the television screen due to the MONITOR Button settings. | ●Press the MONITOR Button to display the video source picture on the screen. (p.15) | |
| The printer does not respond when a button is pressed. | ●The internal temperature of the printer is too high. | ●Wait. |
| ●Printing is in progress. | ●Wait until printing is complete. | |
| Paper jams occur frequently. | ●More than 25 sheets of paper have been loaded in the Paper Cassette. | ●Do not place more than 25 sheets of paper in the Paper Cassette. |
| ●More than 10 sheets of paper have accumulated in the Print Exit. | ●Do not allow more than 10 sheets to accumulate in the Print Exit. | |
| ●The paper is creased or curled. | ●Do not use creased or curled paper. |
| Symptom | Cause | Remedy |
| The MENU Screen does not appear. | ●The Video Printer is not connected properly to the television. | ●Connect the printer to the television correctly. (p.9) |
| ●Printing is in progress. | ●Wait until printing is complete. | |
| No picture appears on the television screen (PC Card input). | ●The CF Card or Smart Media is not correctly inserted in the adaptor. | ●Insert correctly. (p.26) |
| ●The PC Card is not correctly inserted in the printer. | ●Insert correctly. (p.27) | |
| ●The INPUT SELECT Switch is set to "VIDEO". | ●Set to "PC CARD". (p.28) | |
| ●A card with an incompatible format is being used. | ●This card cannot be used with this printer. | |
| It takes time for the image to appear. | ●Depending on the image system for storing the images in the PC Card and its capacity, it can take 20 to 30 seconds to display the image. | ●This is not a malfunction. |
| Multiple images from the PC Card cannot be all printed at once. | ●Multiple images are not stored in the PC Card. | ●Use a PC Card with multiple images stored. |
| Images in the PC Card cannot be erased, or cannot be all erased at once. | ●There are no images stored in the PC Card. | ●You cannot erase. |
| ●The image is set to write-protect in the camera or computer. | ●Change the write-protect setting in the camera or computer, and then erase. | |
| ●Images can only be erased one at a time. | - | |
| Video images cannot be recorded in the PC Card. | ●The INPUT SELECT Switch is set to "PC CARD". | ●Set to "VIDEO". (p.38) |
| ●The PC Card is set to write-protect. | ●Set the PC Card to write-enable. | |
| ●The PC Card is full. | ●Either erase unneeded images (p.38) or use another PC Card with sufficient capacity. | |
| The video image was stored in the PC Card, but the image is not clear. | ●In some cases, image compression may deteriorate the quality of image when storing. | ●This is not a malfunction. |
| The printer cannot be used as a computer printer. | ●The printer and computer are not connected correctly. | ●Connect the printer and computer correctly. (p.46) |
| ●You are not using the proper printer cable for your computer. | ●Obtain the proper printer cable (available at computer stores) for your computer. (p.46) | |
| ●The printer driver software is not installed or is not installed correctly. | ●Refer to the separate Printer Driver Manual. | |
Precautions,
etc.
Error Messages
When an error occurs, an error message appears in the center of the television screen to notify you. The ERROR Lamp also flashes.
| Error Message | Remedy |
| SET PAPER AND PUSH [PRINT] | Insert the printing paper correctly. (p.12, 13) |
| SET PAPER (when using as a computer printer) | Insert the printing paper correctly. (p.12, 13) |
| CHECK PAPER TYPE | Remove the jammed paper (p.15) and insert the specified printing paper (p.11). |
| REMOVE JAMMED PAPER | |
| CHECK PAPER TYPE | Insert the specified printing paper (p.11) correctly. (p.12, 13) |
| SET PAPER PROPERLY AND PUSH [PRINT] | |
| NO PAPER CASSETTE | Insert the Paper Cassette. (p.13) |
| REMOVE JAMMED PAPER | Remove the jammed paper. (p.15) |
| NO INK | Replace the Ink Cassette with a new one. (p.13) |
| CHECK INK TYPE | Use the specified Ink Cassette. (p.11) |
| NO INK CASSETTE | Insert the Ink Cassette. (p.13) |
| WAIT | Wait for a moment. |
| WAIT:COOLING | Internal temperature (p.49) |
| NO CARD | Insert the card. (p.27) |
| CAN NOT USE THIS CARD | Insert a card which can be used. (p.26) |
| CAN NOT RECORD | Either the card is full or an incompatible card is being used. Either erase unneeded images (p.38), or use another card. |
| CAN NOT DELETE | No images are recorded on the card. |
| NO IMAGE IN THIS CARD | Use a card with images recorded on it. |
- If F00 or other error message appears, contact your nearest Panasonic dealer.
Index
A
ACCESS lamp (p.27)
Adhesive paper (p.11)
ALBUM (p.20, 34)
M
Macintosh (p.46)
MENU Mode (p.16, 32)
MULTI FRAME (p.22, 36)
B
Blur Reduction (p.14)
BRIGHTNESS (p.19)
N
NEGA (p.43)
C
C-BALANCE (p.19)
CF Card (p.26)
CINEMA (p.17)
C-LEVEL (p.19)
CONTRAST (p.19)
P
Paper (p.11)
Paper Cassette (p.12)
Paper Jam (p.15)
PARALLEL Socket (p.46)
PC Card Adaptor (p.26)
PICTURE (p.18)
POSI (p.43)
PRESET TITLE (p.40)
E
Error Messages (p.56)
S
SERIAL Socket (p.46)
SHARPNESS (p.19)
Smart Media (p.26)
Standard Paper (p.11)
STROBE (p.24)
F
FRAME (p.42)
T
TITLE (p.44)
TRIMMING (p.42)
1
Ink Cassette (p.12)
INPUT SELECT Switch (p.14, 28)
W
Windows (p.46)
Precautions,
etc.
Index
| Power SupplyPower Consumption | AC 220 - 240 V 50 / 60 HzDuring printing: Approx. 60 WWhen on: Approx. 8 WWhen off (STAND BY): Approx. 3 W |
| Printing SystemPrinting SpeedPicture MemoryPrint Media●Ink Film●Printing Paper | Thermal sublimation transfer printing systemApprox. 105 sec./ sheet8-bit, 1 frameCassette type (exclusive),3 colour field successive printing (yellow, magenta, cyan)Cut sheets 100 × 148 mm (postcard size)Screen dimensions: Video mode: 82 × 107 mmCard mode: 85 × 112 mmComputer mode: 85 × 113 mm |
| Paper Feeding SystemPicture QualityNumber of Printing Pixels | Automatic paper feed (holds 25 sheets of standard paper)256 colour gradationsVideo mode: 464 × 664 dots (frame and field), 144 × 158/dpiCard mode: 478 × 700 dots, 144 × 158/dpiComputer mode: 480 × 640 dots (standard and high-speed), 144 × 144/dpi480 × 1280 dots (high resolution), 144 × 288/dpi |
| Number of CopiesFunctions | Video/Card mode: Max. 10 sheetsComputer mode: Max. 99 sheetsVideo mode: Single Screen, Album Print, Strobe Print, Multi Frame Print,Title, Cinema, Card StorageCard mode: Single Screen, Album Print, Multi Frame Print, Title, CardErase, Auto PrintComputer mode: Single Screen, Multi Frame Print |
| Print HeadInput Socket●S-VIDEO IN Socket●VIDEO IN Socket●EDIT Socket●PARALLEL Socket●SERIAL Socket●PC Card●Input Switch | Film Thermal Head 5.65 dots/mmY (luminance signal) 1 Vp-p, 75 ohm, C (colour signal) 0.3 Vp-p, 75 ohm(front: 1)RCA pin socket 1 Vp-p, 75 ohm (front: 1)(front: 1)Centronics standard 36 pin (rear: 1)Macintosh serial port 8 pin (rear: 1)PC Card type II (CF card and Smart Media are compatible with the adaptor) (front: 1)Video mode: S-VIDEO takes precedence when both S-VIDEO and VIDEO are connected.Computer mode: When both the PARALLEL Socket and SERIAL Socket are connected, you can switch to the side to be used. |
| Output Socket●VIDEO OUT SocketCompatible Computers●Windows●Macintosh | RCA pin socket 1 Vp-p, 75 ohm (rear: 1)PC/AT compatible system with i486SX or faster CPUOS: Windows 95, Windows 3.1Memory: 16 MB or more (Windows 95)8 MB or more (Windows 3.1)Macintosh series with 68030 or faster CPUOS: System 7 or laterMemory: 8 MB or more |
Compatible PC Cards
•Standards
PCMCIA 2.1 and PCMCIA ATA 1.02 standard
- Format
DOS format
- Image Format
JPEG baseline system (JFIF, EXIF, SISRIF)
●Number of Pixels
320 × 240 (QVGA) to 1536 × 1024 (4BASE)
- Recorded Image
Sampling ratio 4:4:4, 4:2:2, 4:2:0, 4:1:1
●Number of Recorded Images
JPEG baseline system JFIF 4:2:2
●Decompression Time
Approx. 20 images (2-MB card)
Allowable Operating
Approx. 10 seconds (VGA image)
Temperature
5^ C-35^ C
Allowable Operating Humidity
35% - 60%
External Dimensions
Approx. 250 (W) × 89.5 (H) × 269.5 (D) mm
Weight
Approx. 2.4 kg

Printed in Japan
VQT7539
X0298Y0(600④)
| MJFO | Door No. ? | |
| Drop No. 0 | ||
| Customer: PANASON182 | ||
| Assembly Number: SPOF SS/01 | ||
| Model: VQT7539 | Qty: 1 | |
| Carton: | Pallet: | |
Matsushita Electric Industrial Co., Ltd.
Central P.O.Box 288, Osaka 530-91, Japan
- Panasonic
- Dear Customer,
- Customer Care Hot Line Digital Video Printer 08701 505610
- IMPORTANT
- WARNING
- FOR YOUR SAFETY
- Caution for AC mains lead
- ■IMPORTANT
- ■Before use
- ■How to replace the Fuse
- Supplied Accessories
- Usable Paper for Printing
- Standard paper
- Preparations
- Video Input
- PC Card Input
- Advanced Operations
- Precautions, etc.
- ■Connect with the S-Video Cord if the VCR or Camera has an S-VIDEO OUT socket.
- Automatic Printing
- Procedure
- ■Adhesive paper
- After Printing
- 3
- 4
- ■If a Paper Jam Occurs
- Remarks, etc.
- Picture Quality Adjustment Procedure
- Printing for 16 Mini-frame Pictures
- 7
- 8
- ■To Erase Stored Pictures
- ■To Resume Storing Pictures Again
- ■To Abort the Setting Process
- ■When to Use the Two Strobe Modes
- 2
- Remarks,etc.
- ■Compatibility of Cards from Digital Still Cameras with this Digital Video Printer
- ■About the CF Card (sold separately)
- ■To Select the Desired Image Displayed on the Index Display
- ■To Print Various ALBUM Prints from Different Screens at the Same Time
- Printing the Same Picture Repeatedly on the Same Print (MULTI FRAME)
- ■To Select the Desired Image to be Erased from the Index Display Screen
- Title
- Printing with Title or Trimmed Frame (Preset title)
- 1
- Press the PRESET TITLE Button.
- 5
- 6
- Printing with a Trimmed Frame
- ① When "SELECT" is chosen
- ■When Connecting to a Windows (PC/AT) Computer:
- ■When Connecting to a Macintosh Computer:
- ■Precautions when using the Digital Video Printer
- ■Notes on Handling the Ink Cassettes, Ink Cassette Film, Paper Cassette, and Paper
- ■Notes on Video Print Set Storage
- ■Notes on Handling Finished Prints
- ■Notes on Handling the Digital Video Printer
- ■Maintenance Notes
- ■Installation Notes
- ■Internal Temperature
- Condensation
- Miscellaneous
- ■About Functions
- ■About the Digital Video Printer in General
- Q11: How should I store my prints?
- Q12: What is the "thermal sublimation transfer printing system"?
- Q13: What does the number of dots in a printed picture mean?
- Q14: What does "256 colour gradations" mean?
- Q15: How do the Ink Cassettes and paper work?
- ■About the Paper and Ink Cassettes
- Q16: How should I store the Ink Cassettes and paper after having opened them?
- Q17: What kind of paper can the Digital Video Printer print on?
- Q18: Can the Digital Video Printer print images continuously?
- Q19: How many sheets can be printed with a single Ink Cassette?
- Q20: What kinds of Ink Cassettes and printing paper can I use with the Digital Video Printer?
- ■About Computers
- ●Windows and Macintosh
- Q21: What is an OS?
- Q22: What are applications (software)?
- Q23: What is an interface?
- Q24: What is resolution?
- Q25: What is dpi?
- Q26: What is a printer port?
- - Parallel port
- Q27: What is memory?
- Q28: What is a bitmap?
- Q29: What is a dialogue box?
- Q30: What is a printer driver?
- •Macintosh
- Error Messages
- Index
- A
- M
- B
- N
- C
- P
- E
- S
- F
- T
- W
- Compatible PC Cards
- Allowable Operating
- Temperature
- Allowable Operating Humidity
- External Dimensions
- Weight
Marke : PANASONIC
Modell : NV-MPD1B
Kategorie : Drucker