
DH-500 - Nicht kategorisiert CASIO - Kostenlose Bedienungsanleitung
Finden Sie kostenlos die Bedienungsanleitung des Geräts DH-500 CASIO als PDF.


| Produkttyp | Digitales Blasinstrument (Digital Horn) |
| Abmessungen | 100 (B) × 654 (H) × 167 (T) mm |
| Gewicht | 1 kg (inkl. Batterien) |
| Stromversorgung | 6 AA-Batterien (R6P/SUM-3) oder optionales AD-5 Netzteil oder CA-5 Autoadapter |
| Hauptfunktionen | 6 Preset-Töne (Saxophon, Trompete, Synth-Reed, Oboe, Klarinette, Flöte), Effekte: Auto-Delay Vibrato (Ein/Aus), Digitaler Hall (lautstärkeregulierbar), Portamento (Ein/Aus), Transponierung (±1 Oktave chromatisch), Atemempfindlichkeit einstellbar, Stimmungskontrolle (A4=442Hz ±50 Cent), MIDI OUT |
| Pflege und Reinigung | Mundstück nach Gebrauch reinigen, Wasserablauf abwischen, keine scheuernden Reinigungsmittel |
| Sicherheit | Batteriepolarität beachten, keine gemischten Batterietypen, kein Kurzschluss, Gerät nicht bei eingeschaltetem Zustand anblasen |
| Ersatzteile und Reparierbarkeit | Optionales AD-5 Netzteil und CA-5 Autoadapter erhältlich; keine Angaben zu internen Ersatzteilen |
| Allgemeine Informationen | Zwei Fingersysteme (Boehm und Casio Original), Auto Power Off nach ca. 6 Minuten, Lautsprecher 9×5 cm oval, 2.0 W, Ausgang: 70Ω, 0.18V RMS max., MIDI OUT, DC 9V |
Häufig gestellte Fragen - DH-500 CASIO
Benutzerfragen zu DH-500 CASIO
0 Frage zu diesem Gerät. Beantworten Sie die, die Sie kennen, oder stellen Sie Ihre eigene.
Eine neue Frage zu diesem Gerät stellen
Laden Sie die Anleitung für Ihr Nicht kategorisiert kostenlos im PDF-Format! Finden Sie Ihr Handbuch DH-500 - CASIO und nehmen Sie Ihr elektronisches Gerät wieder in die Hand. Auf dieser Seite sind alle Dokumente veröffentlicht, die für die Verwendung Ihres Geräts notwendig sind. DH-500 von der Marke CASIO.
BEDIENUNGSANLEITUNG DH-500 CASIO
Supplying Power to Your Digital Horn
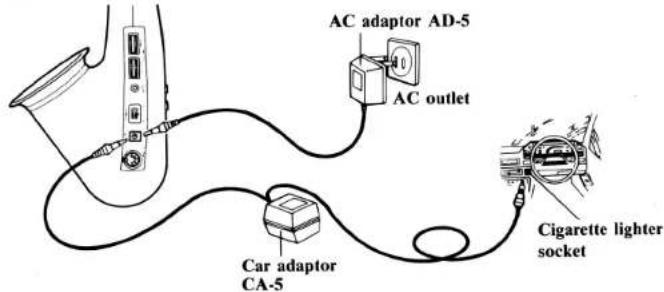
For total portability, the Digital Horn is designed so that you can power it by using 6 AA-size dry cell batteries, or by using standard household current through an optional AD-5 AC adaptor. You can also make use of car battery power by using CASIO's optional CA-5 car adaptor.
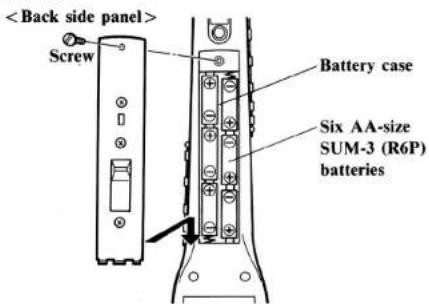
Inserting and Replacing Batteries
Before inserting or replacing batteries, make sure that the Digital Horn is turned OFF. Remove the battery compartment cover by removing the screw holding it in place and insert batteries, taking care the polarity (+/−) is correct. When replacing batteries, be sure to replace all six to ensure long battery life.
- Battery life of high-performance AA dry cells (R6P/SUM-3) is approximately 1 hour (approximately 3 hours when using LR6/AM-3). Weakened batteries will cause the transpose indicator to lose its brightness and result in lower volume, poor tonal quality and eventually the DH-500 will switch OFF, even if you are playing. If this occurs, replace all six batteries with new ones as soon as possible.
Precautions
Incorrectly using batteries can cause them to burst or leak, possibly damaging the interior of the unit. Note the following precautions:
- Be sure that the positive and negative poles of each battery are facing in the proper direction.
- Never mix batteries of different types.
- Never mix old batteries and new ones.
- Never leave dead batteries in battery compartment.
- Remove batteries if you do not plan to use the unit for long periods.
- Replace batteries at least once every 2 years, no matter how much the unit is used during that period.
- Never try to recharge the batteries supplied with the unit.
- Do not expose the batteries to direct heat, let them become shorted, or try to take them apart.
- Should a battery leak, clean out the battery compartment of the unit immediately, taking care to avoid letting the battery fluid come into direct contact with your skin.
Using a Car Battery
By connection an optional CA-5 car adaptor to a car cigarette lighter, you can power the Digital Horn with auto battery current.
2 Supplying Power to Your Digital Horn
www.tedkeys.com
Using an AC Adaptor
An AC adaptor (AD-5, optional) is required when using household current. Use only a genuine Casio AD-5 adaptor with the same voltage rating (100, 117, 220 or 240V) as the power supply in your area to prevent damage to the Digital Horn's internal components. Plug the AC adaptor into the AC outlet and the cord into the unit. This will automatically cut off the battery power supply.
- Use only genuine Casio adaptors to avoid risk of damage.
- The adaptor may become warm when left connected to an outlet. This is normal, but the adaptor should be disconnected when not in use.
Auto Power Off Function
To preserve power, the Digital Horn will shut OFF automatically approximately 6 minutes after the last operation of the unit. Normal operation can be restored by first turning the power switch OFF and then ON again.
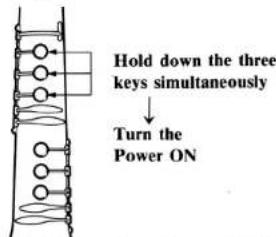
You can cancel this function by holding down the three keys shown below and turning power ON. The unit will then remain ON until you turn it OFF.
• Note that if you press any other key along with the three shown at right, Auto Power Off Function will not be cancelled.
Supplying Power to Your Digital Horn/Auto Power Off Function
Water Drain
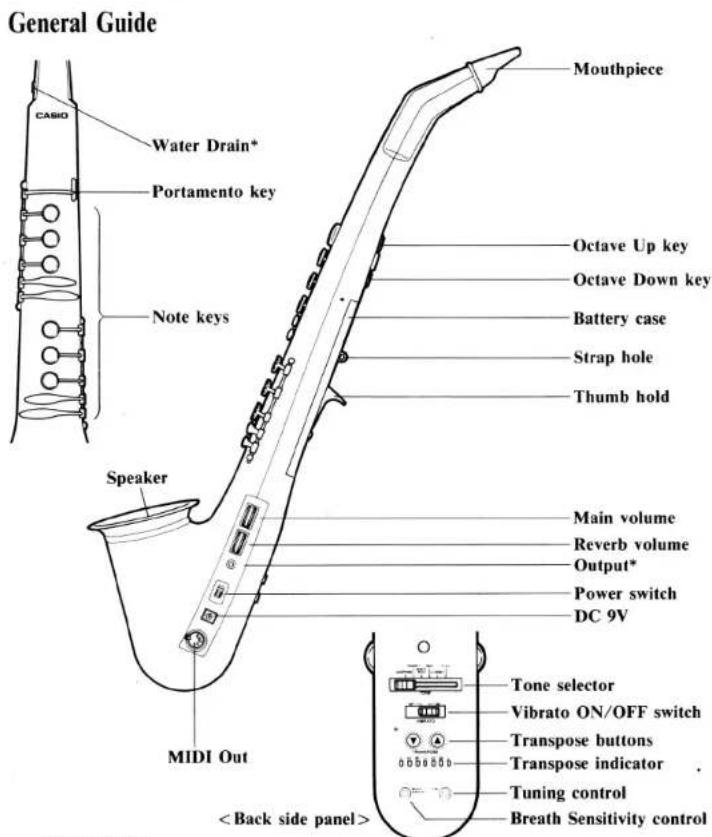
* Should moisture form on the water drain, wipe it off with a handkerchief or tissue. Also, we recommend that you hold a handkerchief up to the water drain and blow through the mouthpiece before switching power ON. When doing so, be careful not to press the handkerchief tightly against the water drain or blow through the mouthpiece too strongly.
* Never allow the water drain to become covered while playing the DH-500. Doing so can cause the instrument to malfunction.
4 General Guide
www.tedkeys.com
Output jack
* For connection of optional headphones, audio amplifier or keyboard amplifier. Connecting headphones automatically cuts speaker output.
The Basics: How to Make Music on the DH-500
- Supply power to the Digital Horn.
-
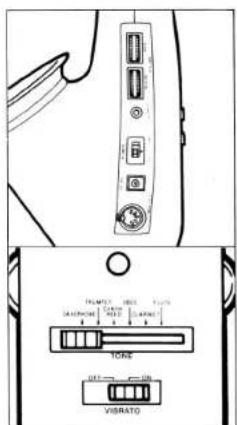
Turn the Digital Horn power switch ON. The transpose indicator lights. Never turn the power ON while blowing through the mouthpiece as doing so may cause malfunction.
-
Adjust to an appropriate volume level with the main volume control.
-
Select a preset tone with the tone selector.
-
Play the Digital Horn using either the "Boehm" fingering system or Casio's original finger pattern (see page 6).
Initialized Settings
When the Digital Horn power is turned ON, it is set up to operate a certain way. The settings that are selected automatically are known as initialized settings. These respective settings are shown below.
Transpose ....C4 Fingering Pattern ....Boehm Fingering System Auto Power OFF Function ....ON
Fingering Patterns
Unlike conventional wind instruments, the DH-500 Digital Horn lets you choose between two different fingering patterns. The standard pattern is the "Boehm" fingering system, while the second is a unique Casio original.
For details on how to produce notes using these patterns, refer to the Fingering Chart which accompanies this manual.
Boehm Fingering System
This system is based on the standard “Boehm” system, and has been adjusted for use with the saxophone, flute and recorder (both German and Baroque). Two sharp (#) keys are provided to raise natural tones chromatically, while a flat (b) key is provided to lower natural tones chromatically (see figure at right).
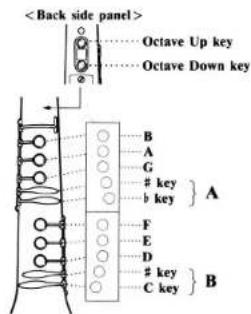
The # key and b key marked "A" are pressed with the little finger of the left hand. The # key and C key marked "B" are operated with the little finger of the right hand.
- The b key has priority, so when you press both the # and b keys simultaneously, only the b key will affect the sound.
- Pitch is raised a whole tone (double sharp) when you press both the right-hand and left-hand # keys.
- Pitch is not altered if you press both the b key of the left hand and the # key of the right hand simultaneously.
- C# sounds when you press both # key and C key of the right hand.
- Pitch is not altered if you press the b key and # key of the left hand, and the # key of the right hand simultaneously.
To raise or lower the octave, simply press the octave up key or octave down key on the back of the horn. The range of this fingering system is 4.5 octaves, as illustrated in detail in the Fingering Chart which accompanies this manual.
Casio Fingering
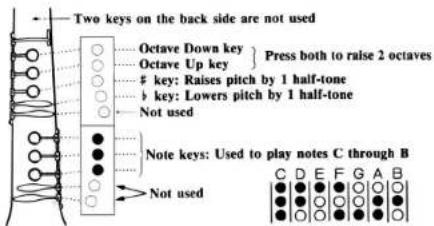
This original fingering system is organized so that even total wind-instrument beginners can master the Digital Horn with ease. An entire scale — from C to B — can be played by using only 3 keys. With the use of other keys, you can also raise or lower octaves and add sharps and flats.
The range of this fingering system is 4 octaves, as shown in the Fingering Chart which accompanies this manual.
To change fingering
When the Digital Horn is turned ON, normal fingering is automatically selected.
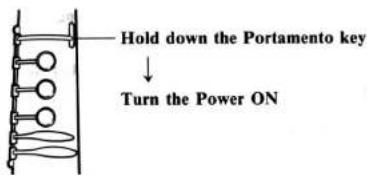
• To select Casio original fingering, hold down the Portamento key when you turn power ON.
• To return to Boehm system fingering, simply turn the power OFF and then ON again, without holding down the Portamento key.
Preset Tones
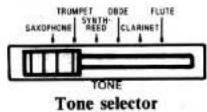
The Digital Horn features 6 preset horn tones which can be selected by sliding the Tone Selector.
Digital Horn Tone Ranges
In order to faithfully reproduce the sounds of conventional wind instruments, the pitch range of Digital Horn tones vary, as shown in the chart on page 10.
Digital Horn Performance Tips
Your Digital Horn is a wind instrument with built-in digital sounds. By using correct playing techniques, you can play true horn sounds that rival acoustic wind instruments for beauty and clarity. Be sure to study and observe the following tips on performance to improve your playing techniques.
1. Correct Posture
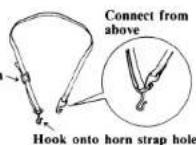
Adjust the length of the strap and put it around your neck. Sit or stand with your back straight, but be sure to relax the other parts of your body.
- Be sure that the screws holding the battery case cover are secured tight before connecting the strap.
2. Correct Finger Positioning
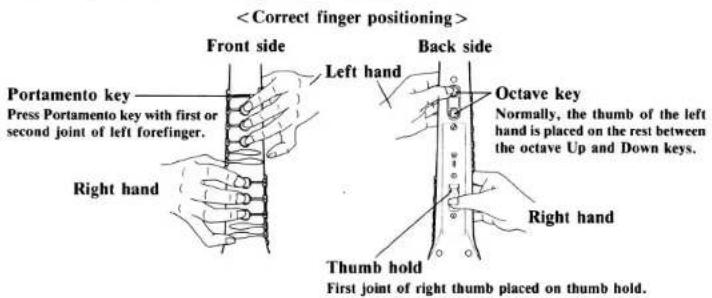
You'll find it hard to play the Digital Horn if you don't use the correct finger positions. Bend your fingers slightly, and be sure to keep them relaxed so they can move freely.
3. Vary Air Flow Strength
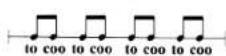
The characteristics of Digital Horn sound will vary with the strength with which you blow on the mouthpiece. Try placing your tongue at the roof of your mouth against your teeth and imagine you are saying "to" or "do" as you play.
For a quick staccato effect try forming the sounds "to" and "coo" (as in "cool") in rapid succession, as shown to the right. This is commonly known as "double-tonguing".
Effects
Portamento Effect
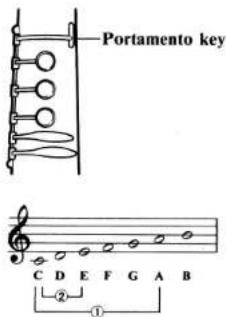
The Digital Horn built-in portamento effect adds realism to your sound by creating a "gliding" effect between notes, for natural, "horn-like" transition.
To add portamento, simply hold down the Portamento key at the upper end of the horn. Naturally, portamento glide time will depend on note intervals.
For example, it takes longer to glide from C up to A (FIG-①) than to glide from C up to E (FIG-②), as the intervals between C and A is greater.
Auto-Delay Vibrato
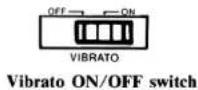
The DH-500's Auto-Delay Vibrato function automatically adds delayed vibrato to your sound, resulting in natural, expressive performance.
To add auto-delay vibrato, simply switch the Auto-Delay Vibrato function ON. Vibrato will be added automatically to any preset tone you select.
When you want to play "straight" sounds without the vibrato, simply switch it OFF.
Digital Reverb Effect
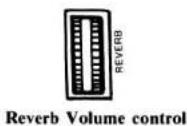
The DH-500's built-in Digital Reverb can be used to add depth and ambience to your performance.
Using the reverb volume control, you can adjust the volume of the reverberated sound.
Transpose Function
The DH-500's transpose function lets you raise or lower the key of performance chromatically.
When the Digital Horn is turned ON, the performance key is automatically set to "C", equal to center C on a piano (C4).
Each time the transpose UP or DOWN buttons are pressed, the key is raised or lowered in half-step increments. The key can be raised up to a full octave, or lowered a full octave.
Transpose buttons
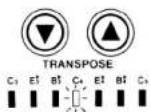
- If you select the illustrated keys ( C_3 , Eb_3 , Bb_3 , C_4 , Eb_4 , Bb_4 , C_5 ), corresponding LED's light. If you select other keys, the nearest two indicators will light.
- You can quickly shift back to "home base" (C4) by pressing the UP and DOWN buttons simultaneously.
- E^b (E^b_3, E^b_4) is the key of the alto saxophone, while B^b (B^b_3, B^b_4) is the key of tenor saxophone, clarinet, and other wind instrument, in addition to the trumpet.
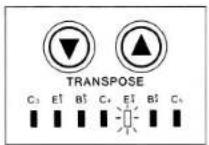
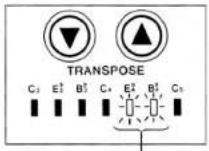
Indicates key set between E_4 and A_4 .
| Preset tones | Normal Range (C4 scale) | Total Range (including transposition) | ||
| Boehm fingering | Casio fingering | Boehm fingering | Casio fingering | |
| Saxophone | E_1 A_5 | B_1 C_6 | E_0 A_6 | B_0 C_7 |
| Trumpet | E_2 A_6 | B_2 C_7 | E_1 A_7 | B_1 C_8 |
| Synth-Reed | E_2 A_6 | B_2 C_7 | E_1 A_7 | B_1 C_8 |
| Oboe | E_2 A_6 | B_2 C_7 | E_1 A_7 | B_1 C_8 |
| Clarinet | E_2 A_6 | B_2 C_7 | E_1 A_7 | B_1 C_8 |
| Flute | E_3 A_7 | B_3 C_8 | E_2 C_8^* | B_2 C_8^* |
*When the upper limit (C _8 ) is exceeded with the "Flute" sound selected, the pitch automatically shifts down one octave.
Controls
Breath Sensitivity Function
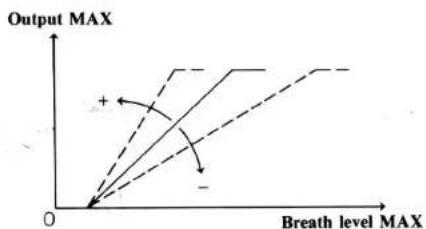
When you want to adjust the output of the DH-500 according to how hard you blow into the horn, you can change the sensitivity RATE curve by turning the breath sensitivity controller with a jeweler's screwdriver.
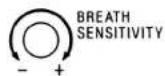
- This adjustment is quite delicate. Do not turn the screw more than 100^ (about a quarter turn) in either direction. Never use excessive force when making this adjustment.
- It is best to check sensitivity by blowing into the mouthpiece first softly and then progressively harder. The change in sensitivity is hard to sense if you just blow hard into the mouthpiece.
line
| Breath level MAX | Output MAX | | ---------------- | ---------- | | 0 | 0 | | >0 | + |+: Output level reaches MAX even if you blow lightly.
- : Output level reaches MAX only if you blow strongly.
Tuning Control
Using the built-in tuning control, you can raise or lower the tuning of the DH-500 within a range of ± 50 cents (in 4-cent increments). This makes it easy to tune to other instruments. You can adjust the tuning by turning the tuning controller with a jeweler's screwdriver.
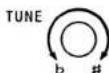
- This adjustment is quite delicate. Do not turn the screw more than 100^ (about a quarter turn) in either direction. Never use excessive force when making this adjustment.
MIDI
The Digital Horn is equipped with MIDI — the Musical Instrument Digital Interface. This industry-standard interface lets you connect the Digital Horn with other MIDI-equipped electronic instruments and devices, allowing remote control.
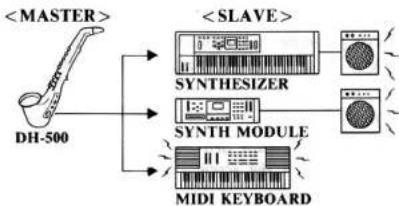
flowchart
graph TD
    A["DH-500"] --> B["<MASTER>"]
    B --> C["SYNTH MODULE"]
    C --> D["SYNTHSIZER"]
    D --> E["<SLAVE>"]
    E --> F["MIDI KEYBOARD"]
More specifically, the Digital Horn features a MIDI OUT terminal, which lets you use the Digital Horn to control other sound sources, such as synthesizers.
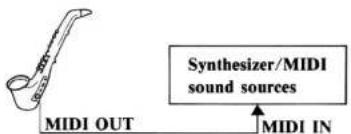
flowchart
graph TD
    A["MIDI OUT"] --> B["Synthesizer/MIDI sound sources"]
    B --> C["MIDI IN"]
The DH-500 outputs basic MIDI messages, including NOTE ON, AFTER TOUCH, PROGRAM CHANGE and PORTAMENTO ON/OFF messages. For further information on MIDI messages, refer to the MIDI Implementation Chart which accompanies this manual.
- MIDI NOTE numbers shift up or down in accordance with setting of key transpose function.
For further information on output MIDI messages, refer to the MIDI implementation chart accompanying this manual.
Care of Your Unit
- Avoid exposing the unit to extremes of temperature, excessive humidity and direct sunlight.
- Your unit features precision electronic components. Any modification of, or tampering with internal parts can be cause of malfunction or damage.
- Avoid playing the unit immediately after eating. First be sure to rinse out your mouth to prevent the possibility of foreign matter entering the horn.
- Never turn the power switch ON while blowing through the mouthpiece.
- Do not use excessive force on the keys.
- Do not use alcohol, thinner or similar chemicals for cleaning.
- Be sure that the screws holding the battery case cover are secured tight before connecting the strap.
- Never use excessive force on the strap.
- Never allow the water drain to become covered while playing the DH-500. Doing so can cause the instrument to malfunction.
To clean the mouthpiece
• After playing your Digital Horn, be sure to remove the mouthpiece and clean it. Wipe off any moisture or dirt from the inside of the mouthpiece with a piece of tissue paper.
- When the mouthpiece becomes dirty, remove it and soak it in a neutral cleaner.
- The watertight cover which holds the mouthpiece in place cannot be removed, but you can clean it with a cotton swab. Do not insert the swab too far into the horn. Doing so may damage internal components.
- Before replacing the mouthpiece, be sure to wipe it thoroughly dry. When replacing it, take care not to remove the watertight cover which holds it in place. Gaps may cause the horn to sound abnormally.
Attaching the Mouthpiece Making sure that the watertight cover is straight, attach the mouthpiece by pressing it at the top first, and then at the bottom.
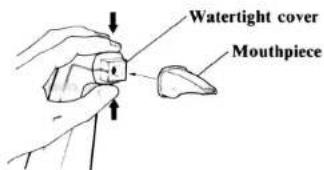
Specifications
| Preset tones | 6; Saxophone, Trumpet, Synth-Reed, Oboe, Clarinet, Flute |
| Effects | Auto-delay vibrato (ON/OFF)Digital reverb (volume adjustable)Portamento (ON/OFF) |
| Controls | Tuning control (A4=442Hz ±50 cents)Key transpose (±1 octave, chromatic)Breath sensitivity |
| Fingering | Boehm fingering system (E2~A6)*Casio original fingering (B2~C7)**When C4is selected. |
| Built-in speaker | 9×5 cm (oval)Output = 2.0 W |
| Terminals | Output; Output impedance = 70ΩOutput voltage = 0.18V (RMS) max.MIDI OUTDC 9V |
| Power | AC: 100, 117, 220 or 240V (±10V), 50/60Hz, with optional Casio AD-5 AC adaptorDC: 6 AA-size (SUM-3/R6P) manganese dry batteriesBattery life: approx. 1 hour. (3 hours when using LR6/AM-3).Car battery: Requires optional CA-5 car adaptor |
| Power consumption | 4.5W |
| Dimensions | 100(W)×654(H)×167(D) mm(4”(W)×253/4”(H)×65/8”(D)) |
| Weight | 1 kg (2.2 lbs) including batteries |
| Standard accessories | Strap, mouthpiece, batteries |
* Design and specifications are subject to change without notice.
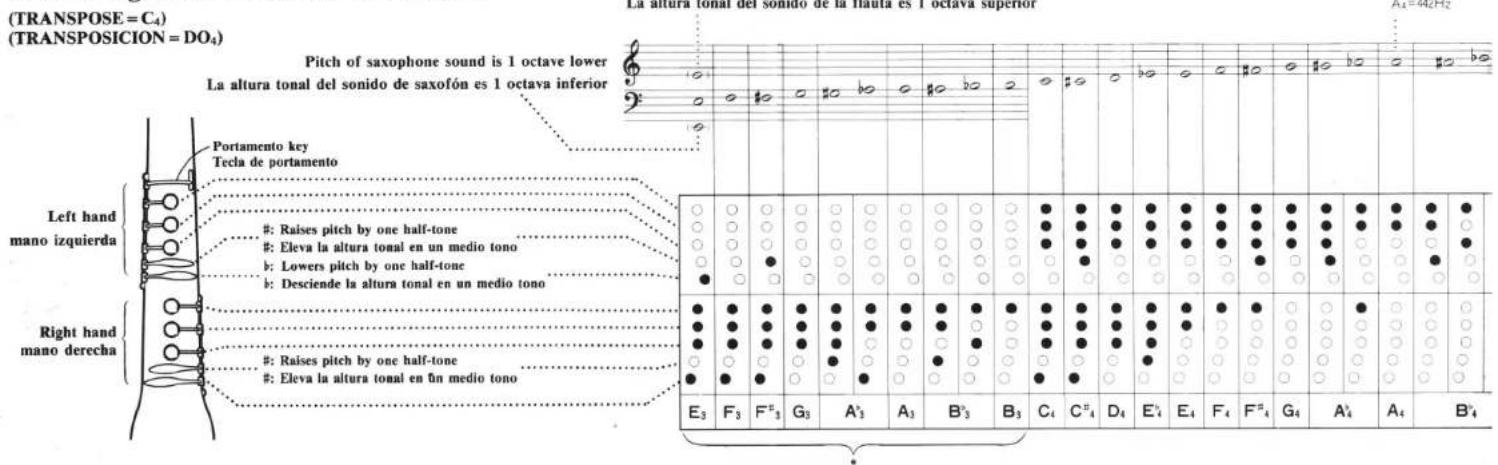
Boehm System Fingering Guide
Guía de digitación de sistema de travesera
Casio Original Fingering Guide
Guía de digitación original de Casio
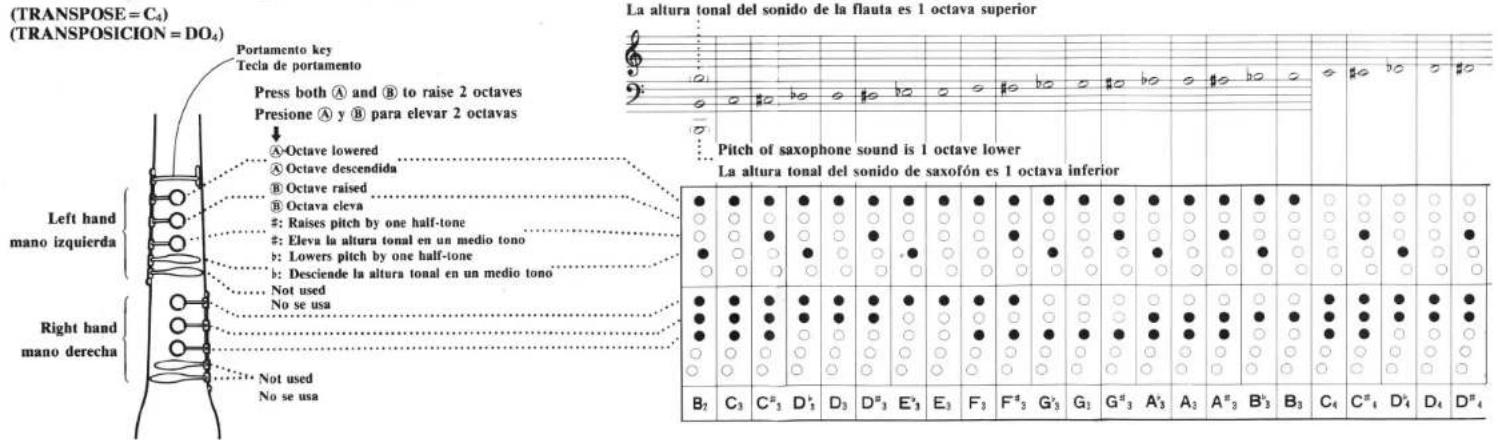
| 0 | #0 | b0 | 0 | b0 | 0 | 0 | #0 | b0 | 0 | #0 | 0 | |
| ○●○○○ | ○●○○○ | ○○○○○ | ○●○○○ | ○●○○○ | ○●○○○ | ○●○○○ | ○●○○○ | ○●○○○ | ○●○○○ | ○●○○○ | ○●○○○ | ○●○○○ |
| ○○○○○ | ●●○○○ | ○○○○○ | ●●○○○ | ●●○○○ | ●●○○○ | ●○○○○ | ●○○○○ | ●○○○○ | ○●○○○ | ○○○○○ | ○○○○○ | ○○○○○ |
| ○○○○○ | ●○○○○ | ●○○○○ | ●●○○○ | ●●○○○ | ●●○○○ | ●○○○○ | ●○○○○ | ●○○○○ | ●○○○○ | ●○○○○ | ●○○○○ | ●○○○○ |
| C3 | C#5 | D5 | E5 | E5 | F5 | F#5 | G5 | G#5 | A5 | |||
Boehm fingering system chart
- You can expand the pitch range to 4.5 octaves (E_2 - A_6) using the octave UP/DOWN keys.
- Though fingerings lower than B_3(*) are generally not possible using the Boehm fingering system on acoustic wind instruments, the expanded range of the DH-500 allows such fingerings.
- Although there are many possible fingering variations, this chart shows only the standard fingering patterns.
Cuadro de sistema de digitación de tipo travesera
- Se puede ampliar la gama de la altura tonal a 4,5 octavas (MI₂ \~ LA₆) usando las teclas de elevación y descenso (UP/DOWN) de octava.
- Aunque las digitaciones más bajas de SI_3(*) no son generalmente posibles usando el sistema de digitación de tipo travesera en los instrumentos de viento acústicos, la ampliada gama de la DH-500 permite tales digitaciones.
- Aunque existen muchas posibles variaciones de digitación, este cuadro muestra solamente el patrón de digitación normal.
○ = Released
● = Depressed
○ = liberado
● = presionado
| A4=442Hz | ||||||||||||||||||||||||||||||||||||||||||||||||||||||||||||||||||||||||||||||||||||||||||||||||||||||||||||||||||||||||||||||||||||||||||||||||||||||||||||||||||||||||||||||||||||||||||||||||||||||||||||||||||||||||||||||||||||||||||||||||||||||||||||||||||||||||||||||||||||||||||||||||||||||||||||||||||||||||||||||||||||||||||||||||||||
| 0 | #0 | bo | 0 | #0 | bo | 0 | #0 | bo | 0 | #0 | bo | 0 | #0 | bo | 0 | #0 | bo | 0 | #0 | bo | 0 | #0 | bo | 0 | #0 | bo | 0 | #0 | bo | 0 | #0 | bo | 0 | #0 | bo | 0 | #0 | bo | 0 | #0 | bo | 0 | #0 | bo | #0 | bo | #0 | bo | #0 | bo | #0 | bo | #0 | bo | #0 | bo | #0 | bo | #0 | bo | #0 | bo | #0 | bo | #0 | bo | #0 | bo | #0 | bo | #0 | bo | #0 | bo | #0 | bo | #0 | bo | #0 | bo | #0 | bo | #0 | #0 | bo | #0 | bo | #0 | bo | #0 | bo | #0 | bo | #0 | bo | #0 | bo | #0 | bo | #0 | bo | #0 | bo | #0 | bo | #0 | bo | #0 | bo | #0 | bo | #0 | bo | #0 | bo | #0 | bo | #0 | bo | #0 | bo | #0 | ||||||||||||||||||||||||||||||||||||||||||||||||||||||||||||||||||||||||||||||||||||||||||||||||||||||||||||||||||||||||||||||||||||||||||||||||||||||||||||||||||||||||||||||||||||||||||||||||||||||||||||||||||||||||||
| #0 | #0 | bo | #0 | #0 | bo | #0 | #0 | bo | #0 | #0 | bo | #0 | #0 | #0 | #0 | #0 | #0 | #0 | #0 | #0 | #0 | #0 | #0 | #0 | #0 | #0 | #0 | #0 | #0 | #0 | #0 | #0 | #0 | #0 | #0 | #0 | #0 | #0 | #0 | #0 | #0 | #0 | #0 | #0 | #0 | |||||||||||||||||||||||||||||||||||||||||||||||||||||||||||||||||||||||||||||||||||||||||||||||||||||||||||||||||||||||||||||||||||||||||||||||||||||||||||||||||||||||||||||||||||||||||||||||||||||||||||||||||||||||||||||||||||||||||||||||||||||||||||||||||||||||||||||||||||||||||||||||||||||||

- Supplying Power to Your Digital Horn
- Inserting and Replacing Batteries
- Precautions
- Using a Car Battery
- Supplying Power to Your Digital Horn
- Using an AC Adaptor
- Auto Power Off Function
- Output jack
- The Basics: How to Make Music on the DH-500
- Initialized Settings
- Fingering Patterns
- Boehm Fingering System
- key
- Casio Fingering
- key: Raises pitch by 1 half-tone
- key: Lowers pitch by 1 half-tone
- To change fingering
- Preset Tones
- Digital Horn Tone Ranges
- Digital Horn Performance Tips
- Correct Posture
- Correct Finger Positioning
- Vary Air Flow Strength
- Effects
- Portamento Effect
- Auto-Delay Vibrato
- Digital Reverb Effect
- Transpose Function
- Controls
- Breath Sensitivity Function
- Tuning Control
- MIDI
- Care of Your Unit
- To clean the mouthpiece
- Boehm fingering system chart
- Cuadro de sistema de digitación de tipo travesera
Marke : CASIO
Modell : DH-500
Kategorie : Nicht kategorisiert