
DH-800 - Nicht kategorisiert CASIO - Kostenlose Bedienungsanleitung
Finden Sie kostenlos die Bedienungsanleitung des Geräts DH-800 CASIO als PDF.


| Produkttyp | Tischrechner |
| Marke | Casio |
| Modell | DH-800 |
| Display | 8-stellig, LCD |
| Stromversorgung | Solar und Batterie (LR44) |
| Abmessungen (B x T x H) | ca. 157 x 105 x 23 mm |
| Gewicht | ca. 100 g |
| Grundrechenarten | Addition, Subtraktion, Multiplikation, Division |
| Prozentrechnung | Ja |
| Quadratwurzel | Ja |
| Speicher | Ja (M+, M-, MR, MC) |
| Automatische Abschaltung | Ja (nach ca. 7 Minuten) |
| Tasten | Kunststofftasten, robust |
| Gehäusefarbe | Schwarz |
| Batterietyp | LR44 (1 Stück) |
| Batterielebensdauer | ca. 3 Jahre |
| Betriebstemperatur | 0°C bis 40°C |
| Lieferumfang | Rechner, Bedienungsanleitung |
| Herstellergarantie | 2 Jahre |
| CE-Kennzeichnung | Ja |
| Reinigung | Mit trockenem Tuch abwischen; keine Flüssigkeiten verwenden |
| Recycling | Entsorgung gemäß örtlicher Vorschriften |
Häufig gestellte Fragen - DH-800 CASIO
Benutzerfragen zu DH-800 CASIO
0 Frage zu diesem Gerät. Beantworten Sie die, die Sie kennen, oder stellen Sie Ihre eigene.
Eine neue Frage zu diesem Gerät stellen
Laden Sie die Anleitung für Ihr Nicht kategorisiert kostenlos im PDF-Format! Finden Sie Ihr Handbuch DH-800 - CASIO und nehmen Sie Ihr elektronisches Gerät wieder in die Hand. Auf dieser Seite sind alle Dokumente veröffentlicht, die für die Verwendung Ihres Geräts notwendig sind. DH-800 von der Marke CASIO.
BEDIENUNGSANLEITUNG DH-800 CASIO
CASIO
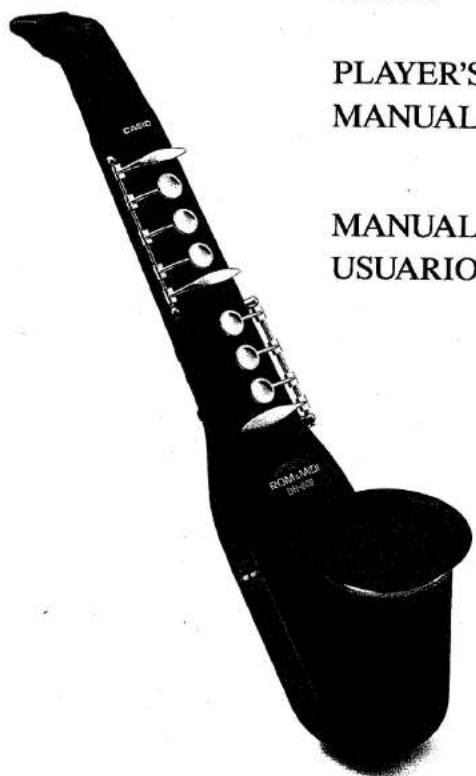
DIGITAL HORN
DH-800
PLAYER'S
MANUAL..... 1
MANUAL DEL
USUARIO ..... 21
CASIO.
CASIO DH-800
Digital Horn
Player's Manual
Congratulations on your purchase of the Casio DH-800 Digital Horn. Your new Digital Horn is a whole new type of musical instrument which can be enjoyed by virtually anyone, anytime and anywhere. To obtain optimum performance and ensure long-term reliability, be sure to read this manual carefully before playing your new Digital Horn.
Main Features
Preset Reed/Brass Tones
The Digital Horn lets you choose from any of 6 ultra-realistic horn sounds, including saxophone, trumpet, synth-reed, oboe, clarinet and flute.
High-quality Built-in Speaker
With a high-quality speaker built right into the Digital Horn and battery power, you're free to perform or practice virtually anywhere! Pack it along for portable music fun, or make use of the AD-1 AC adaptor and save on batteries.
Portamento Effect
Add even greater realism to your sound with the built-in portamento effect. This creates a "gliding" effect, for natural, "horn-like" transition between notes.
2-Octave Key Transpose
A built-in key transpose function lets you raise or lower the performance key for even greater sound variation. For example, choose a higher octave for soprano sax, then just move the octave down for baritone sax sound.
ROM Pack Compatibility
The Digital Horn is compatible with Casio's wide selection of ROM packs, so you can enjoy listening to auto-play tunes or even play along with auto-play accompaniment. A melody ON/OFF switch lets you listen and learn the melody, then turn it OFF and play yourself.
Two-Way Fingering
The Digital Horn lets you choose from two different fingering patterns - one's the same as a recorder while the other is a unique Casio original that lets you play full scales with only three fingers.
MIDI Output
The Digital Horn is equipped with MIDI - the Musical Instrument Digital Interface, that gives you Digital Horn control of other MIDI instruments or sound sources. For example, connect the Digital Horn to a Casio digital synthesizer and virtually limitless digital sounds are at your control.
Contents
3 Supplying Power to Your Digital Horn
3 Inserting and Replacing Batteries
3 Connecting an AC Adaptor
3 Connecting a Car Adaptor
4 Auto Power Off Function
5 General Guide
6 The Basics: Manual Performance 6 Initialized Settings
7 Preset Tones
8 Portamento Effect
8 Fingering Patterns 8 Recorder Fingering 9 Casio Fingering
10 Digital Horn Performance Tips
11 Transpose Function
12 ROM Pack Memory Performance
16 MIDI
17 Care of Your Digital Horn
18 Specifications
39 Music Scores
Supplementary Inserts
Fingering Chart MIDI Implementation Chart
Supplying Power to Your Digital Horn
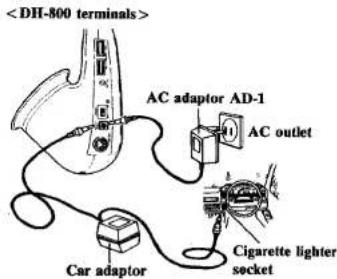
For total portability, the Digital Horn is designed so that you can power it by using 5 AA-size dry cell batteries, or by using standard household current through an optional AD-1 AC adaptor. You can also make use of car battery power by using CASIO's optional CA-1 car adaptor.
Inserting and Replacing Batteries
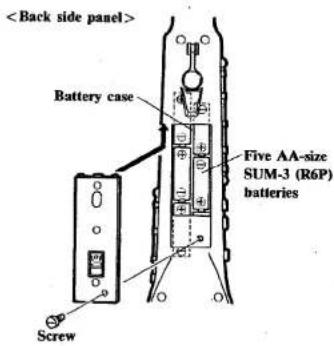
Before inserting or replacing batteries, make sure that the Digital Horn is turned OFF. Remove the battery compartment cover by removing the screw holding it in place and insert batteries, taking care the polarity (+/-) is correct. When replacing batteries, be sure to replace all five to ensure long battery life.
- Battery life of high-performance AA dry cells is approximately 6 hours. Weakened batteries will cause the power indicator to lose its brightness and result in lower volume, poor tonal quality and eventually malfunction. If such symptoms occur, replace all five batteries with new ones as soon as possible.
Connecting an AC Adaptor
By connecting an optional AD-1 AC adaptor, you can power the Digital Horn with standard household current. Be sure to use only a genuine Casio AD-1 adaptor with the same voltage rating as your local power supply, to prevent malfunction or damage to the Digital Horn.
Connecting a Car Adaptor
By connecting an optional CA-1 car adaptor to a car cigarette lighter, you can power the Digital Horn with auto battery current. Be sure to use only a genuine Casio CA-1 adaptor.
3 Power Source
Important
• Always make sure that the Digital Horn is turned OFF before connecting or disconnecting adaptors.
- Remove batteries from the battery compartment when the unit is not in use for extended periods. Battery leakage can damage internal components.
- Adaptors normally become warm when connected to the power source. This is not cause for worry, however, adaptors should be disconnected whenever the unit is not used for extended periods.
- The following conditions can cause batteries to burst:
- Use of other than genuine CASIO adaptors.
- Loading batteries with polarities reversed.
σ Use of batteries of different types.
σ Mixing old and new batteries. - Attempting to recharge non-rechargeable batteries.
σ Exposing batteries to extremely high temperatures.
Auto Power OFF Function
To preserve power, the Digital Horn will shut OFF automatically approximately 6 minutes after the last operation of the unit. Normal operation can be restored by first turning the power switch OFF and then ON again.
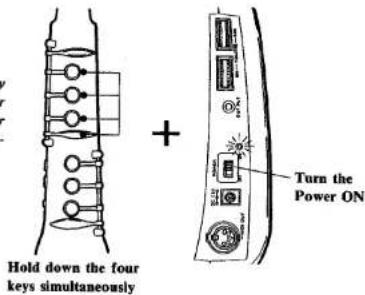
You can cancel this function by holding down the four keys shown below and turning power ON. The unit will then remain ON until you turn it OFF.
• Note that if you press any other key along with the four shown at right, Auto Power OFF function will not be cancelled.
Power Source/Auto Power OFF
General Guide
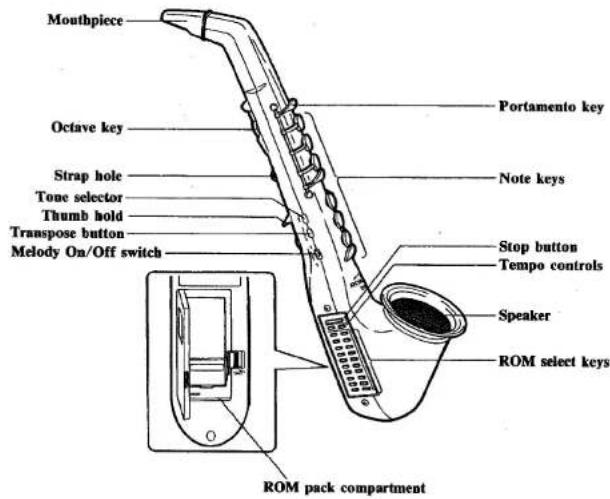
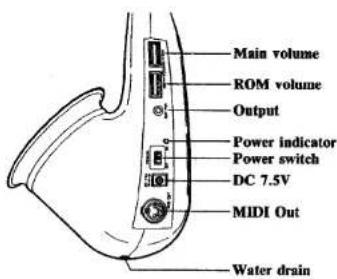
The Basics: Manual Performance
- Supply power to the Digital Horn.
- Turn the Digital Horn power switch ON. An indicator above the switch lights. Never turn the power ON while blowing through the mouthpiece as doing so may cause malfunction.
- Adjust to an appropriate volume level with the main volume control.
- Select a preset tone. When the Digital Horn power is turned ON, the SAXOPHONE tone is selected automatically. To choose other tones, simply press the Tone Selector (see page 7).
- Play the Digital Horn using either standard recorder fingering or Casio's original finger pattern (see page 9).
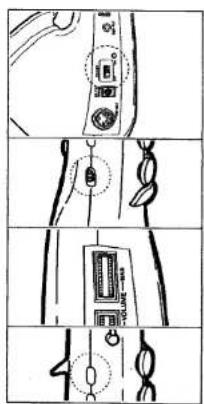
Initialized Settings
When the Digital Horn power is turned ON, it is set up to operate a certain way. The settings that are selected automatically are known as initialized settings. These respective settings are shown in the chart below.
Initialized Settings
TONE....Saxophone TRANSPOSE....C4 FINGERING PATTERN....Recorder AUTO POWER OFF FUNCTION....On
5 General Guide
The Basics
Preset Tones
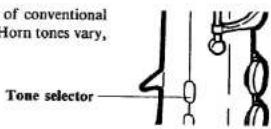
The Digital Horn features 6 preset horn tones which can be selected by pressing the Tone Selector. Each of these horn sounds features a preset delayed vibrato effect.
When power is turned ON, the SAXOPHONE tone is selected. Succeeding sounds can be selected by pressing the Tone Selector; press once to select the TRUMPET tone, twice to select SYNTH-REED, etc.
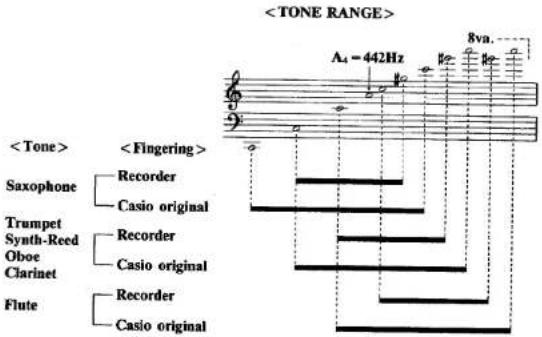
Digital Horn Tone Ranges
In order to faithfully reproduce the sounds of conventional wind instruments, the pitch range of Digital Horn tones vary, as shown in the chart below.
7 Preset Tones
Portamento Effect
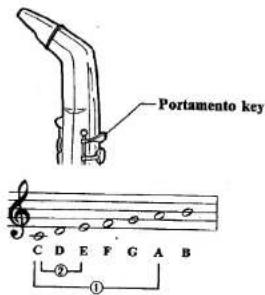
The Digital Horn built-in portamento effect adds realism to your sound by creating a "gliding" effect between notes, for natural, "horn-like" transition.
To add portamento, simply hold down the Portamento key at the upper end of the horn. Naturally, portamento glide time will depend on note intervals.
For example, it takes longer to glide from C up to A (FIG-1) than to glide from C up to E (FIG-2), as the interval between C and A is greater.
Fingering Patterns
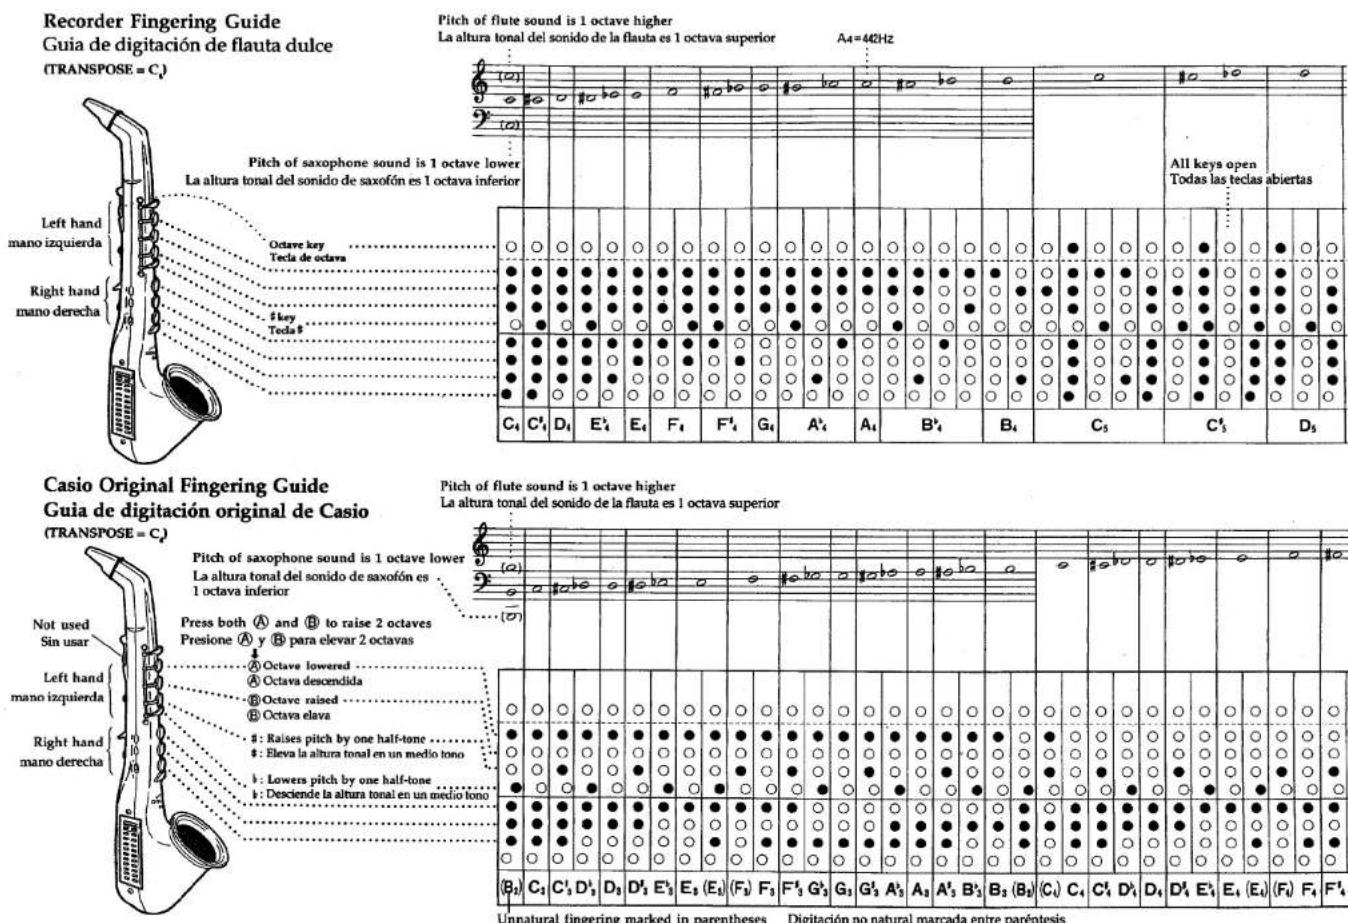
Unlike a conventional wind instrument, the Digital Horn lets you choose between two different fingering patterns. The standard pattern is the same as that used to play a recorder, while the second is a Casio original.
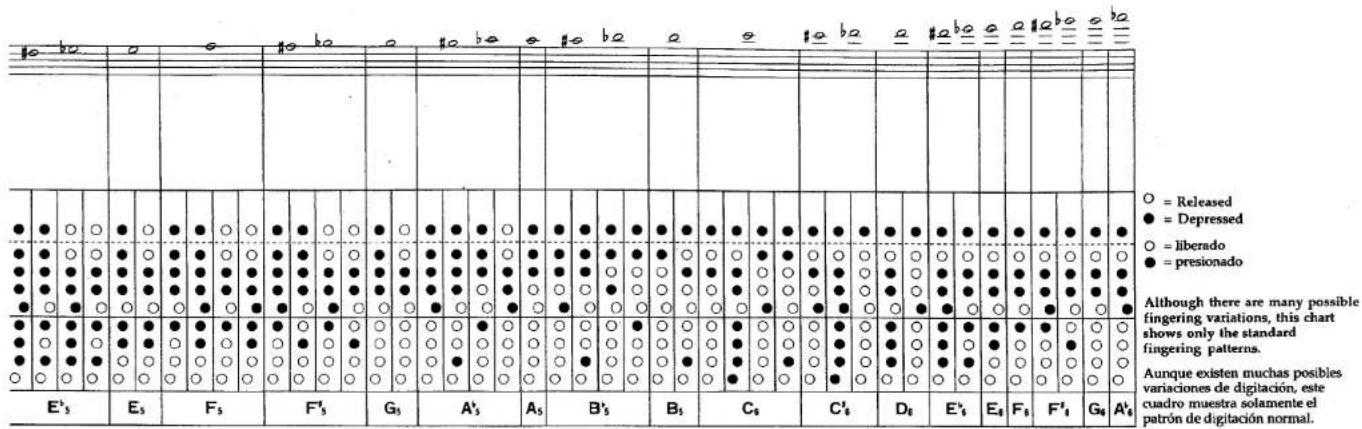
For details on how to produce notes using these patterns, refer to the Fingering Chart which accompanies this manual.
Recorder Fingering
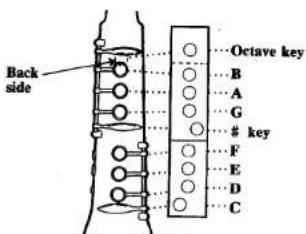
This system is based on standard recorder fingering, however a sharp (#) key is provided to raise natural tones chromatically (see figure to right).
To raise the octave, simply press the octave key on the back side of the horn. The range of this fingering system is 2.5 octaves and is illustrated in detail in the Fingering Chart which accompanies this manual.
Portamento/Fingering
Casio Fingering
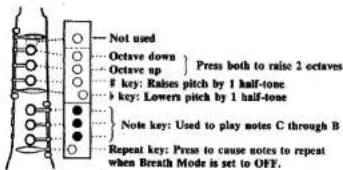
This original fingering system is organized so that even total wind-instrument beginners can master the Digital Horn with ease. An entire scale-from C to B - can be played by using only 3 keys. With the use of other keys, you can also raise or lower octaves and add sharps and flats.
The range of this fingering system is 4 octaves, as shown in the Fingering Chart which accompanies this manual.
To change fingering
When the Digital Horn is turned ON, normal fingering is automatically selected.
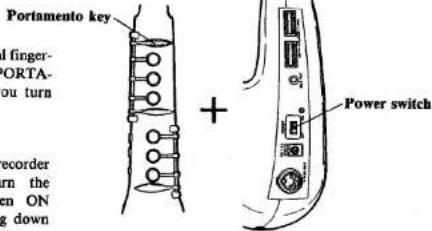
• To select Casio original fingering, hold down the PORTAMENTO key when you turn power ON.
• To return to normal recorder fingering, simply turn the power OFF and then ON again, without holding down the PORTAMENTO key.
Digital Horn Performance Tips
Your Digital Horn is a wind instrument with built-in digital sounds. By using correct playing techniques, you can play true horn sounds that rival acoustic wind instruments for beauty and clarity. Be sure to study and observe the following tips on performance to improve your playing technique.
1. Correct Posture
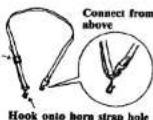
Adjust the length of the strap and put it around your neck. Sit or stand with your back straight, but be sure to relax the other parts of your body.
Adjust strap length
2. Correct Finger Positioning
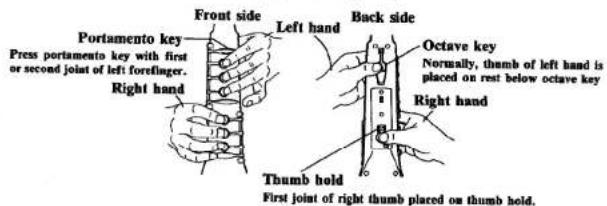
You'll find it hard to play the Digital Horn if you don't use the correct finger positions. Bend your fingers slightly, and be sure to keep them relaxed so they can move freely.
3. Vary Air Flow Strength
The characteristics of Digital Horn sound will vary with the strength with which you blow on the mouthpiece (when breath mode switch is ON). Blow relatively softly for normal play, blowing harder to add emphasis.
4. Staccato Play Using Your Tongue
You can sharpen your sound by adding staccato sounds with your to tongue (when the breath mode switch is ON). Try placing your tongue at the roof of your mouth against your teeth and imagine you are saying "to" or "do" as you play.
For a quick staccato effect try forming the sounds "to" and "coo" (as in "cool") in rapid succession, as shown to the right. This is commonly known as "double-tonguing."
9 Fingering
Performance
Transpose Function
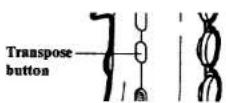
The Digital Horn features a "transpose" function that lets you raise or lower the key of performance chromatically.
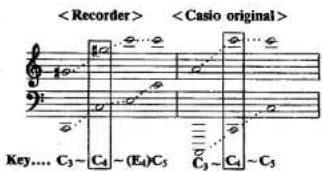
When Digital Horn power is turned ON, the performance key is set with "C" equal to center C on a piano (C4).
Each time the transpose button is pressed the key is raised in half-step increments up to C5.
If the button is pressed once again after it reaches C5, the key reverts to C3. Subsequently pressing the Transpose button will once again raise the key in half-step increments.
- If you have transposed the Digital Horn into another key, lost track of what key you are in and want to get back to "home base" (C4) quickly, simply turn the Digital Horn off and then back on again to initialize.
ROM Pack Memory Performance
The Digital Horn's ROM pack memory performance function provides auto-play of melody, chords, obbligato notes or auto-accompaniment patterns which are stored in Casio ROM packs.
How to Install the ROM Pack
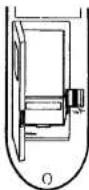
① Lift up the ROM pack compartment lid on the back side of the unit.
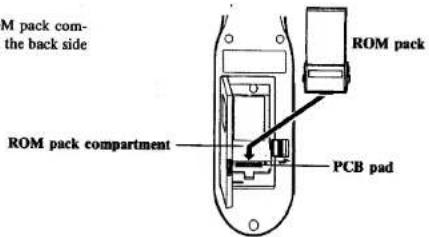
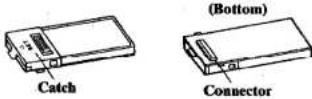
② Install the ROM pack into the compartment. Place the ROM pack with its connector facing the PCB pad.
• Make sure the power is turned OFF before inserting a ROM pack.
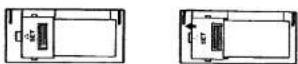
③ Fasten the ROM pack by sliding the catch.
CAUTION
- Since the internal circuitry of the ROM pack may be damaged by static electricity, be sure to ground yourself by touching some metallic object such as a door-knob prior to handling the ROM pack, so as to discharge any static electricity.
• Take good care of the connector part of the ROM pack and the PCB pad of the unit. They must be free from dust and dirt, so avoid touching them by hand. Use a soft dampened cloth to clean them.
11 Transpose
ROM Pack
Auto Play
By simply selecting a tune from the ROM pack, the Digital Horn will play the tune back automatically.
① Insert the ROM pack into the ROM pack compartment on the back side of the horn.
- An "error sound" is heard if the ROM pack is not installed in the compartment properly.
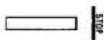
② After turning the power ON, set the melody switch to the ON or OFF position, depending on your preference.
Melody ON
When the melody switch located on the right-side control panel is turned ON, the melody part is added automatically to the accompaniment pattern.
Molody OFF
When the melody switch is turned OFF, only the accompaniment pattern is heard (minus melody). In this mode, you can play the melody along with the ROM pack auto-accompaniment.
③ Select a tune by pressing the select key (1\~20) corresponding to the tune you want to play.
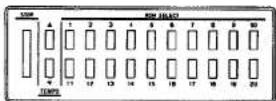
• Auto-play starts after a one-measure intro count.
④ To stop auto-play, simply press the stop key.
3-Step Practice Method
① Set the melody ON/OFF switch to the ON position and start the ROM pack performance. Listen carefully to the melody.
② Start the auto-play performance again and try to play along with the melody this time.
③ Turn the melody switch OFF and start the tune again. This time you play the melody by yourself! If you have some trouble, just turn the melody ON again!


Auto Rhythm Play
The accessory ROM Pack (RO-556) lets you choose 16 different auto-rhythms. To select an auto-rhythm, use the ROM selectors no. 5 through 20.
| ROM select key | Auto rhythm |
| 5 | ROCK |
| 6 | DISCO |
| 7 | 16 BEAT |
| 8 | SWING 2 BEAT |
| 9 | SWING 4 BEAT |
| 10 | SAMBA |
| 11 | BOSSA NOVA |
| 12 | BEGUINE |
| 13 | TANGO |
| 14 | MARCH |
| 15 | SLOW ROCK |
| 16 | WALTZ |
| 17 | ROCK WITH FILL-IN |
| 18 | DISCO WITH FILL-IN |
| 19 | 16 BEAT WITH FILL-IN |
| 20 | SWING 2 BEAT WITH FILL-IN |
* Rhythms 16 through 20 feature a fill-in pattern every 8 measures.
Notes on ROM Pack Auto-Play
- Melody can be turned ON and OFF during auto-play performance.
• Volume level of the auto-play performance can be controlled with the ROM volume control. - You can freely change the tempo during auto-play performance by using the tempo control buttons. Press the <> button to increase the tempo or the <> button to decrease the tempo. You can reset the tempo to [J=110] by pressing both buttons at the same time.
- If you select a tune number higher than the number provided in the ROM pack, the first tune is played automatically.
- It is impossible to select different ROM pack tunes midway through a performance - you must first press the STOP key.
- Note that some tones heard in the ROM pack auto-play performance (such as Piano, Guitar, Vibraphone, Pipe Organ, Violin, etc.) cannot be played normally on the Digital Horn. These sounds are held only in the ROM pack memory. You can therefore select any of the 6 preset tones to play along with the ROM pack auto-play tones for wide tonal variations.
- If you press the ROM select keys during ROM pack auto-play, the auto-play melody tone will sound. Notes F3\~C5 are assigned to ROM select keys 1 through 20, in half-tone increments.
MIDI
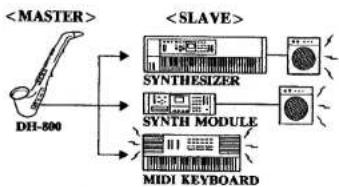
The Digital Horn is equipped with MIDI - the Musical Instrument Digital Interface. This industry-standard interface lets you connect the Digital Horn with other MIDI-equipped electronic instruments and devices, allowing remote control.
flowchart
graph TD
    A["DHL800"] --> B["<MASTER>"]
    A --> C["<SLAVE>"]
    C --> D["SYNTHSIZER"]
    C --> E["SYNTH MODULE"]
    C --> F["MIDI KEYBOARD"]
More specifically, the Digital Horn features a MIDI OUT terminal, which lets you use the Digital Horn to control other sound sources, such as synthesizers.
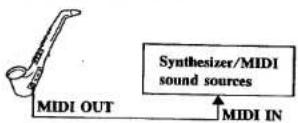
The Digital Horn outputs basic MIDI messages, as listed in the MIDI implementation chart which accompanies this manual.
- MIDI messages transmitted through the MIDI out terminal are related only to notes actually played on the Digital Horn. ROM pack performance data is not transmitted.
- MIDI note numbers shift up or down in accordance with setting of key transpose function.
For further information on output MIDI messages, refer to the MIDI implementation chart accompanying this manual.
Care of Your Digital Horn
- Avoid exposing the Digital Horn to extremes of temperature, excessive humidity and direct sunlight.
- Your Digital Horn features precision electronic components. Any modification of, or tampering with internal parts can be the cause of malfunctions or damage.
- Avoid playing the Digital Horn immediately after eating. First be sure to rinse out your mouth to prevent the possibility of foreign matter entering the horn.
- Never turn the power switch ON while belowing through the mouthpiece.
- Do not use excessive force on the keys.
- Do not use alcohol, thinner or similar chemicals for cleaning.
- Be sure that the screws holding the battery case cover are secured tight before connecting the strap.
- Never use excessive force on the strap.
To clean the mouthpiece
- When the mouthpiece becomes dirty, remove it and soak it in a neutral cleaner.
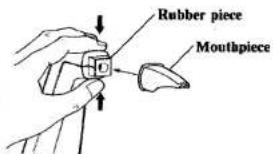
- The rubber piece which holds the mouthpiece in place cannot be removed, but you can clean it with a cotton swab. Do not insert the swab too far into the horn. Doing so may damage internal components.
- Before replacing the mouthpiece, be sure to wipe it thoroughly dry. When replacing it, take care not to remove the rubber piece which holds it in place. Make sure that the mouthpiece is firmly in place. Gaps may cause the horn to sound abnormally.
Attaching the Mouthpiece Making sure that the white rubber piece is straight, attach the mouthpiece by pressing it at the top first, and then at the bottom.
Specifications
Preset tones
Polyphony
Effects
Fingering
Transpose
Volume controls
Memory performance
MIDI OUT
Tuning
Terminals
Power
Output
Power consumption
Built-in speaker
Auto Power OFF
Dimensions
Weight
Standard accessories
6; Saxophone, Trumpet, Synth-Reed, Oboe, Clarinet, Flute
Monophonic
Delayed vibrato (preset), Portamento
Recorder fingering (2.5-octave range)
Casio original fingering (4-octave range)
±1 octave, chromatic
Main/ROM
ROM pack memory function
Auto play
Melody ON/OFF
Tempo control: J = 54\~180 (approx.)
16 auto rhythms (using standard accessory ROM)
Note ON/OFF, Program change, Basic channel (1).
Velocity (1-127), After touch
A4=442Hz
MIDI out, DC7.5V, Output
AC: 100, 117, 220 or 240V (+/-10V), 50/60HZ, with
optional Casio AD-1 AC adaptor
DC: 5 AA-size (SUM-3/R6P) manganese dry batteries
Battery life: approx. 4 hrs.
Car battery: Powered by car battery using optional
Casio CA-1 car adaptor
(Not available in United States)
Output impedance = 70Ω
Output voltage = 0.16V (RMS) max.
3.2W
9.0×5.0cm (oval)×1
Output = 2.0W
After 6 minutes, ON/OFF
100(W)×532(H)×167(D)mm
(3^15/_16''(W) × 21''(H) × 6^5/8''(D))
1 kg (2.2 lbs) including batteries
Strap, mouthpiece, batteries, ROM pack
* Design and specifications are subject to change without notice.
17 Care of Your Horn
Specifications
GUIDELINES LAID DOWN BY FCC RULES FOR USE OF THE UNIT IN THE U.S.A. (not applicable to other areas).
This equipment generates and uses radio frequency energy and if not installed and used properly, that is, in strict accordance with the manufacturer's instructions, may cause interference to radio and television reception. It has been type tested and found to comply with the limits for a Class B computing device in accordance with the specifications in Subpart J of Part 15 of FCC Rules, which are designed to provide reasonable protection against such interference in a residential installation. However, there is no guarantee that interference will not occur in a particular installation. If this equipment does cause interference to radio or television reception, which can be determined by turning the equipment off and on, the user is encouraged to try to correct the interference by one or more of the following measures: .... reorient the receiving antenna
..... relocate the computer with respect to the receiver
..... move the computer away from the receiver
..... plug the computer into a different outlet so that computer and receiver are on different branch circuits.
If necessary, the user should consult the dealer or an experienced radio/television technician for additional suggestions. The user may find the following booklet prepared by the Federal Communications Commission helpful: "How to Identify and Resolve Radio-TV Interference Problems". This booklet is available from the US Government Printing Office, Washington, D.C., 20402, Stock No. 004-000-00345-4.
Music Score
—Accessory ROM pack RO-556—
Partitura
—Módulo ROM accesorio RO-556—
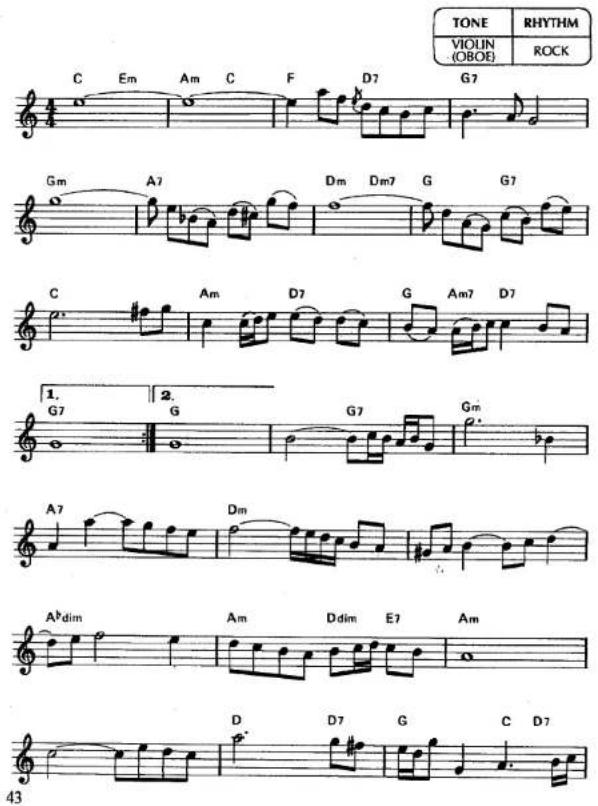
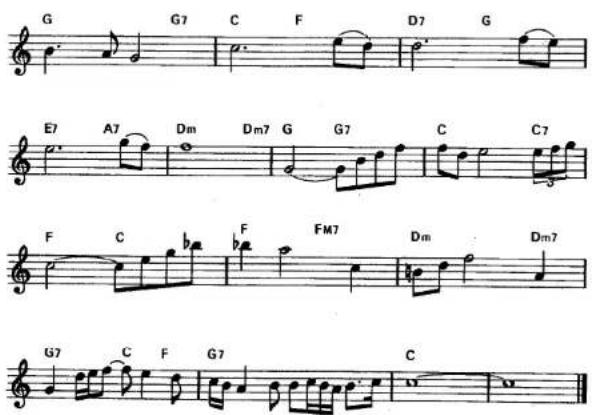
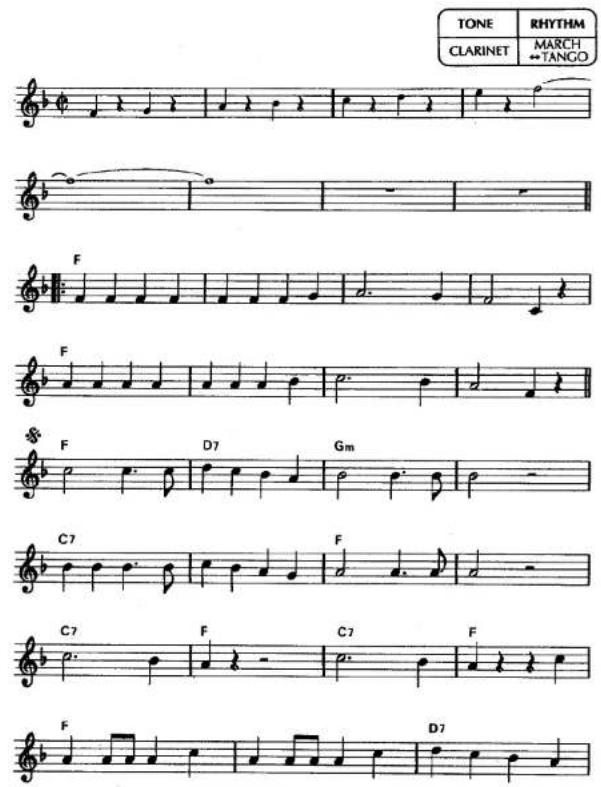
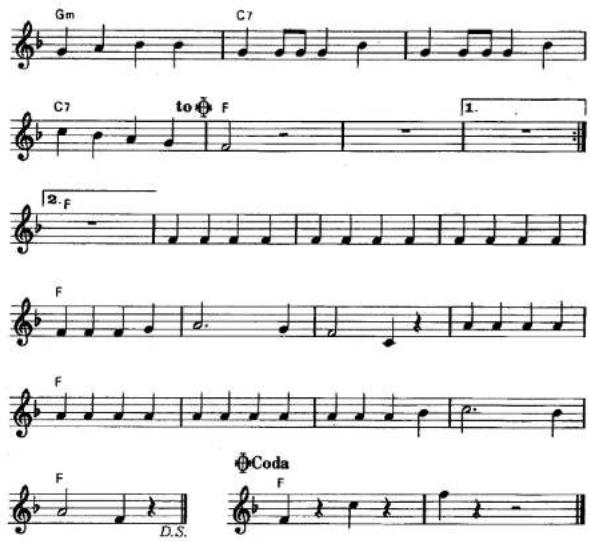
The accessory ROM pack (RO-556) features the following 4 tunes.
- Small notes indicate obligato accompaniment.
* Indicates the tone (timbre) and rhythm pattern of ROM pack auto play. Tones listed in parentheses indicate suggested tone for manual play.
El módulo ROM accesorio (RO-556) presenta las siguientes 4 melodías.
* Indica el patrón de ritmo y sonido (tono) de la ejecución automática del módulo ROM. Los sonidos listados entre paréntesis indican el sonido sugerido para le ejecución manual.
* Las notas pequeñas indican el acompañamiento de obligado.
1. When The Saints Go Marching In
| TONE | RHYTHM |
| TRUMPET | SWING2 BEAT |





- Chopin's Nocturne
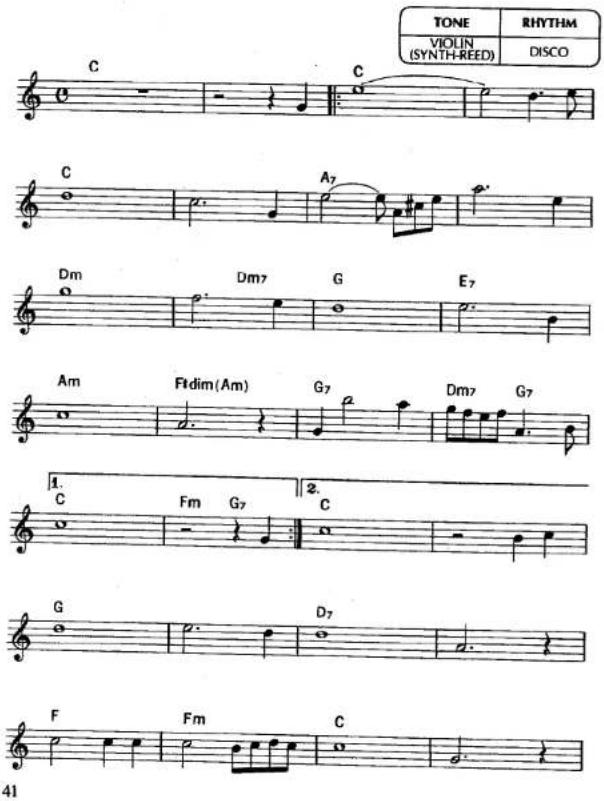
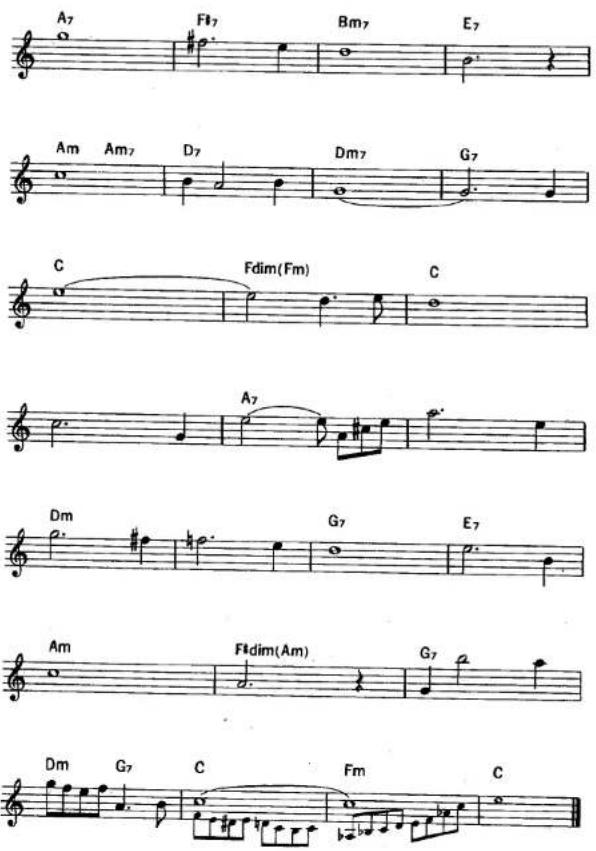
- Air On The G String
- I Have Lost The Doh Of My Clarinet
bar
| Category | Symbol | Value | |---|---|---| | O = Released | ● | 0 | | O = Depressed | ● | 0 | | O = liberado | ● = presionado | 0 | | Although there are many possible fingering variations, this chart shows only the standard fingering patterns. Aunque existen muchas posibles variaciones de digitación, este cuadro muestra solamente el patrón de digitación normal.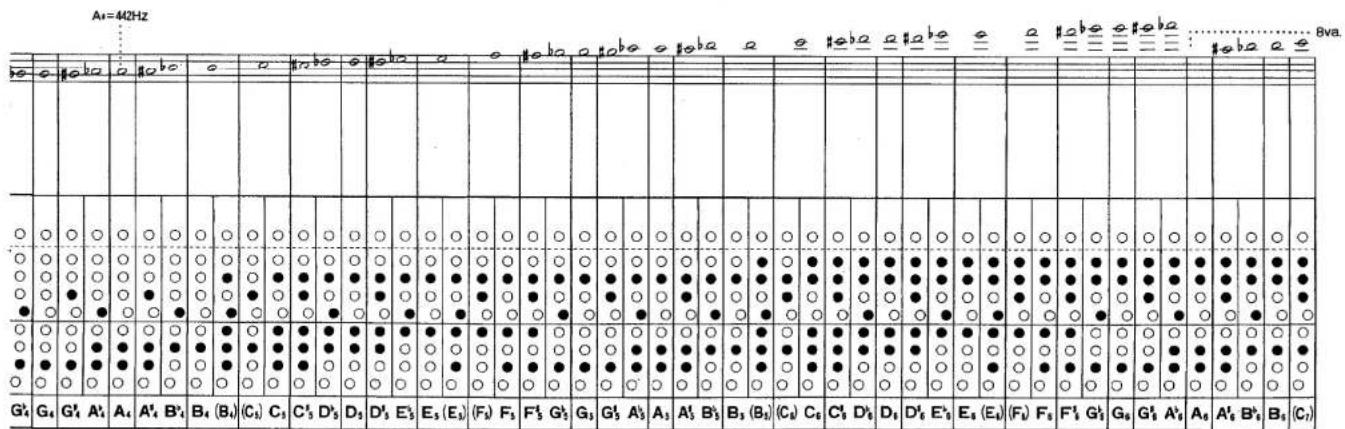
CASIO DIGITAL HORN
Model DH-800
MIDI Implementation Chart
Version: 1.0
| Function ... | Transmitted | Recognized | Remarks | |
| Basic Channel | Default Changed | 1× | ||
| Mode | Default Messages Altered | Mode 3×********** | ||
| Note Number: | True voice | 36-96********** | Recorder fingering: 48-96 | |
| Velocity | Note ON Note OFF | ○ 9n v=1-127× 9n v=0 | ||
| After Touch | Key's Ch's | ×○ | ||
| Pitch Bender | × | |||
| Control Change | 65 | ○ | PORTAMENTO ON/OFF | |
| Prog Change: | True # | ○ 0-5********** | ||
| System Exclusive | × | |||
| System Common : Tune | ××× | |||
| System Real Time : Commands | ×× | |||
| Aux : Local ON/OFF : All notes OFFMes- : Active Sense sages : Reset | ×××× | |||
| Remarks | ||||
Mode 1: OMNI ON, POLY
Mode 2 : OMNI ON, MONO
○ : Yes
Mode 3 : OMNI OFF, POLY
Mode 4 : OMNI OFF, MONO
× : No

- Preset Reed/Brass Tones
- High-quality Built-in Speaker
- Portamento Effect
- 2-Octave Key Transpose
- ROM Pack Compatibility
- Two-Way Fingering
- MIDI Output
- Supplying Power to Your Digital Horn
- Inserting and Replacing Batteries
- Connecting an AC Adaptor
- Connecting a Car Adaptor
- Power Source
- Important
- Auto Power OFF Function
- The Basics: Manual Performance
- Initialized Settings
- Preset Tones
- Digital Horn Tone Ranges
- Preset Tones
- Fingering Patterns
- Recorder Fingering
- key
- Casio Fingering
- key: Raises pitch by 1 half-tone
- key: Lowers pitch by 1 half-tone
- To change fingering
- Digital Horn Performance Tips
- Correct Posture
- Correct Finger Positioning
- Vary Air Flow Strength
- Staccato Play Using Your Tongue
- Fingering
- Transpose Function
- ROM Pack Memory Performance
- How to Install the ROM Pack
- CAUTION
- Auto Play
- Melody ON
- Molody OFF
- 3-Step Practice Method
- Auto Rhythm Play
- Notes on ROM Pack Auto-Play
- MIDI
- Care of Your Digital Horn
- To clean the mouthpiece
- Specifications
- MIDI OUT
- GUIDELINES LAID DOWN BY FCC RULES FOR USE OF THE UNIT IN THE U.S.A. (not applicable to other areas).
- Music Score
- Partitura
- When The Saints Go Marching In
- : Raises pitch by one half-tone
- : Eleva la altura tonal en un medio tono
- : Lowers pitch by one half-tone
- : Desciende la altura tonal en un medio tono
Marke : CASIO
Modell : DH-800
Kategorie : Nicht kategorisiert