
E2216HV - Bildschirm DELL - Kostenlose Bedienungsanleitung
Finden Sie kostenlos die Bedienungsanleitung des Geräts E2216HV DELL als PDF.


| Produkttyp | LCD-Monitor |
| Marke | Dell |
| Modell | E2216HV |
| Bildschirmdiagonale | 54,6 cm (21,5 Zoll) |
| Aufloesung | 1920 x 1080 (Full HD) |
| Seitenverhaeltnis | 16:9 |
| Panel-Typ | TN (Twisted Nematic) |
| Helligkeit | 250 cd/m² |
| Kontrastverhaeltnis | 1000:1 (statisch) |
| Reaktionszeit | 5 ms (Gray-to-Gray) |
| Betrachtungswinkel (horizontal/vertikal) | 170°/160° |
| Anschluesse | 1x VGA, 1x DVI-D |
| Stromverbrauch (Betrieb) | 22 W (maximal) |
| Stromverbrauch (Standby) | 0,3 W |
| Abmessungen (mit Standfuss) | 51,2 x 38,0 x 18,0 cm |
| Gewicht (mit Standfuss) | 4,0 kg |
| VESA-Halterung | 100 x 100 mm |
| Neigungsverstellung | -5° bis +21° |
| Lieferumfang | Monitor, Standfuss, Netzkabel, VGA-Kabel, Treiber-CD, Kurzanleitung |
| Reinigungshinweise | Mit einem trockenen, weichen Tuch abwischen. Bei hartnaeckigen Flecken leicht angefeuchtetes Tuch verwenden. |
| Sicherheitshinweise | Nicht in der Naehe von Wasser oder Feuchtigkeit verwenden. Netzstecker ziehen vor Reinigung. |
| Reparatur und Ersatzteile | Wenden Sie sich an den Dell-Support. Ersatzteile nur durch autorisiertes Fachpersonal austauschen lassen. |
Häufig gestellte Fragen - E2216HV DELL
Benutzerfragen zu E2216HV DELL
0 Frage zu diesem Gerät. Beantworten Sie die, die Sie kennen, oder stellen Sie Ihre eigene.
Eine neue Frage zu diesem Gerät stellen
Laden Sie die Anleitung für Ihr Bildschirm kostenlos im PDF-Format! Finden Sie Ihr Handbuch E2216HV - DELL und nehmen Sie Ihr elektronisches Gerät wieder in die Hand. Auf dieser Seite sind alle Dokumente veröffentlicht, die für die Verwendung Ihres Geräts notwendig sind. E2216HV von der Marke DELL.
BEDIENUNGSANLEITUNG E2216HV DELL
Simplified Service Manual
LCD Monitor
E2216HV
Service Manual Versions and Revision
| No. | Version | Release Date | Revision |
| 1 | 1.0 | 2015/04/20 | Initial Release |
| 2 | 2.0 | 2021/02/26 | ErP lot 5 additional requirements |
- IMPORTANT SAFETY NOTICE 4
- EXPLODED VIEW DIAGRAM WITH LIST OF ITEMS....4
- WIRING CONNECTIVITY DIAGRAM....5
- LIST OF TOOLS / EQUIPMENT 5
- DISASSEMBLY AND ASSEMBLY PROCEDURES 5
- TROUBLE SHOOTING INSTRUCTIONS 8
Simplified Service Manual
1. Important Safety notice
Connecting Your Monitor
⚠ WARNING: Before you begin any of the procedures in this section, follow the Safety Instructions.
To connect your monitor to the computer:
- Turn off your computer and disconnect the power cable.
- Connect VGA cable to the corresponding video port on the back of your computer.
2. Exploded view diagram with list of items
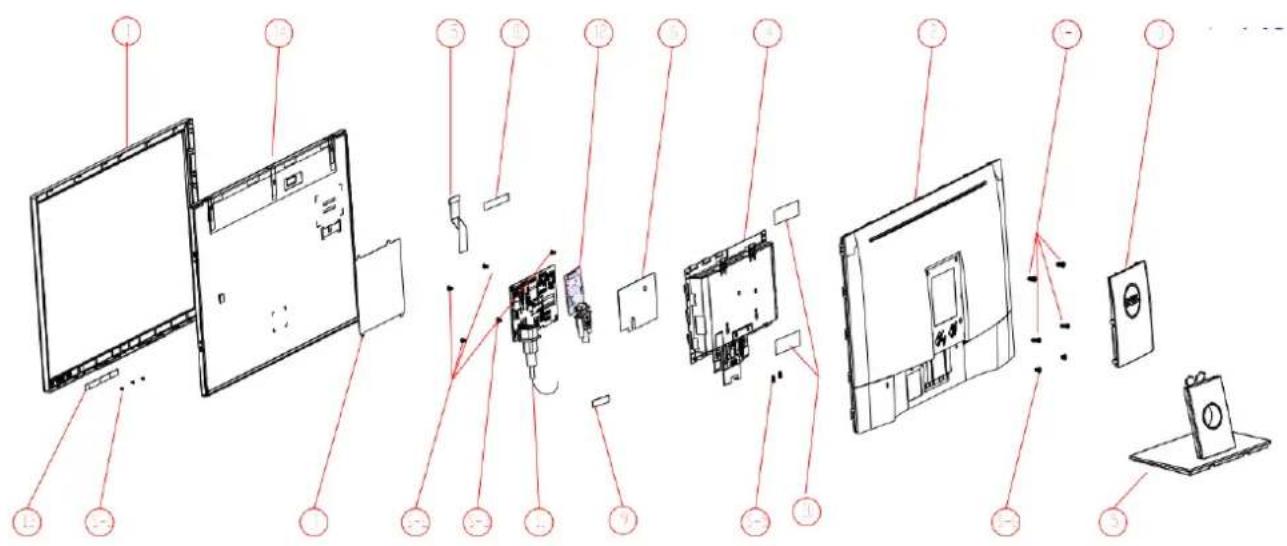
text_image
Exploded view diagram of a computer system with labeled components in Chinese
3. Wiring connectivity diagram
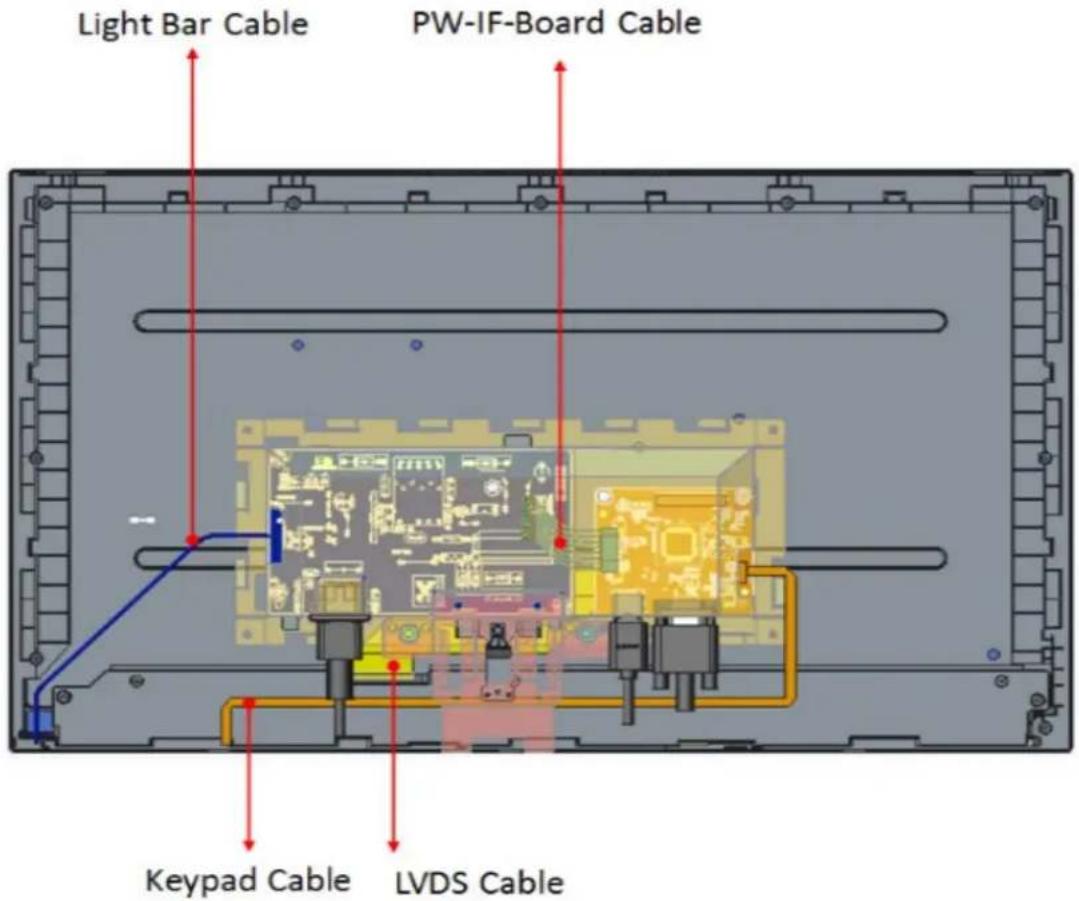
text_image
Light Bar Cable PW-IF-Board Cable Keypad Cable LVDS Cable4. List of tools / equipment
- Philips-head screwdriver
- Hex-head screwdriver
5. Disassembly and Assembly Procedures
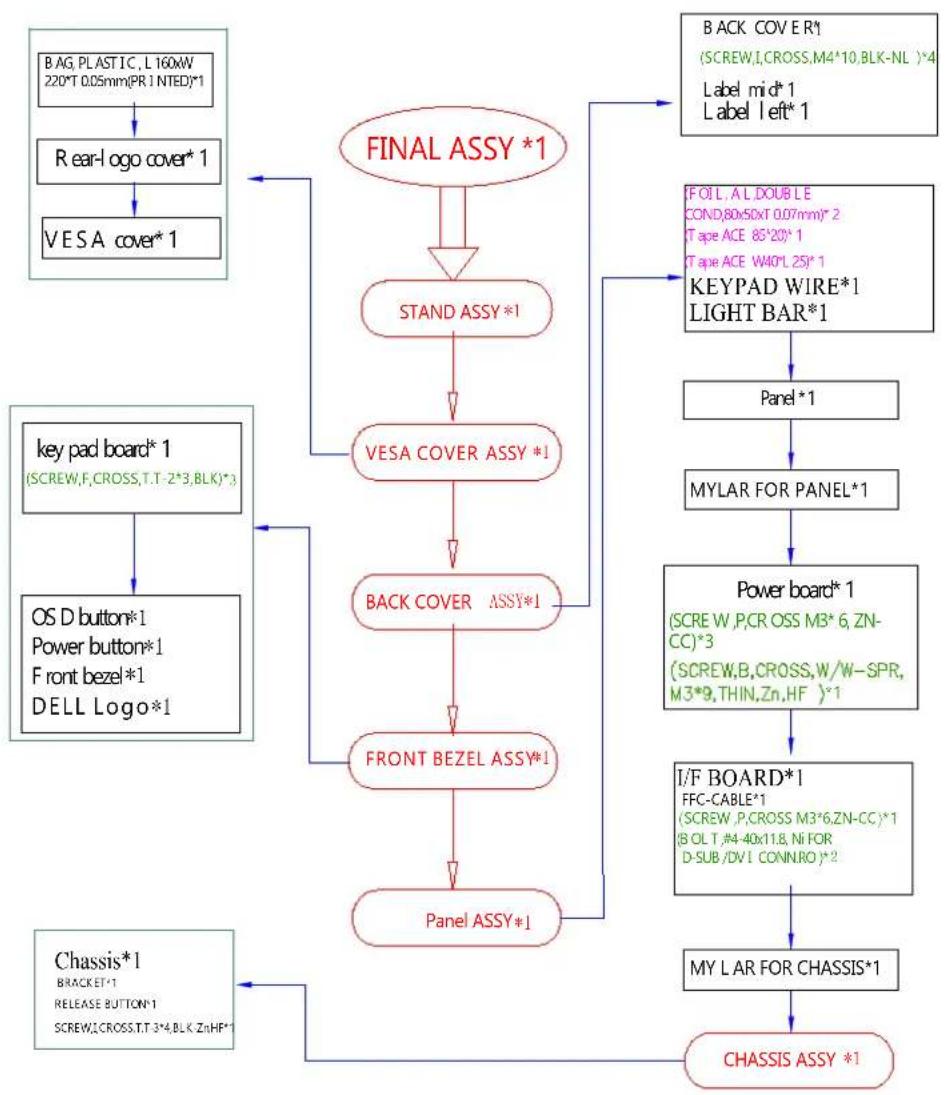
flowchart
graph TD
    A["BAG, PLASTIC, L 160xW 220*T 0.05mm(PRINTED)*1"] --> B["RearLogo cover* 1"]
    B --> C["VESA cover* 1"]
    C --> D["FINAL ASSY *1"]
    D --> E["STAND ASSY *1"]
    E --> F["VESA COVER ASSY *1"]
    F --> G["BACK COVER ASSY*1"]
    G --> H["FRONT BEZEL ASSY*1"]
    H --> I["Panel ASSY*1"]
    I --> J["CHASSIS ASSY *1"]

    K["BACK COVER*1 (SCREW,I,CROSS,M4*10,BLK-NL)*4 Label mi*1 Label left* 1"] --> D
    L["FOIL, AL.DOUBLE COND,80x50xT 0.07mm)*2 Tape ACE 85*20* 1 Tape ACE W40*L25* 1"] --> F
    M["KEYPAD WIRE*1 LIGHT BAR*1"] --> N["Panel *1"]
    N --> O["MYLAR FOR PANEL*1"]
    O --> P["Power board* 1 (SCREW,W,P,CROSS,M3*6,ZN-CC)*3 (SCREW,B,CROSS,W/W-SPR,M3*9,THIN,Zn,HF)*1"]
    P --> Q["I/F BOARD*1 FFC-CABLE*1 (SCREW,P,CROSS,M3*6,ZN-CC)*1 (BOLT,#4-40x11.8,Ni FOR D-SUB/DVI CONNRO)*2"]
    Q --> R["MY L AR FOR CHASSIS*1"]
    R --> S["CHASSIS ASSY *1"]

    T["key pad board* 1 (SCREW,F,CROSS,T.T-2*3,BLK)*3"] --> U["OS D button*1 Power button*1 Front bezel*1 DELL Logo*1"]
    U --> V["Chassis*1 BRACKET*1 RELEASE BUTTON*1 SCREW,CROSS,T.T 3*4,BLK ZnHF*1"]
text_image
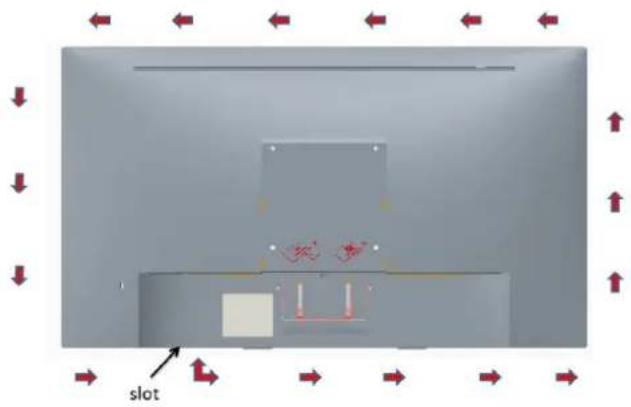
slotLE22PE ASSEMBLY BLOCK
flowchart
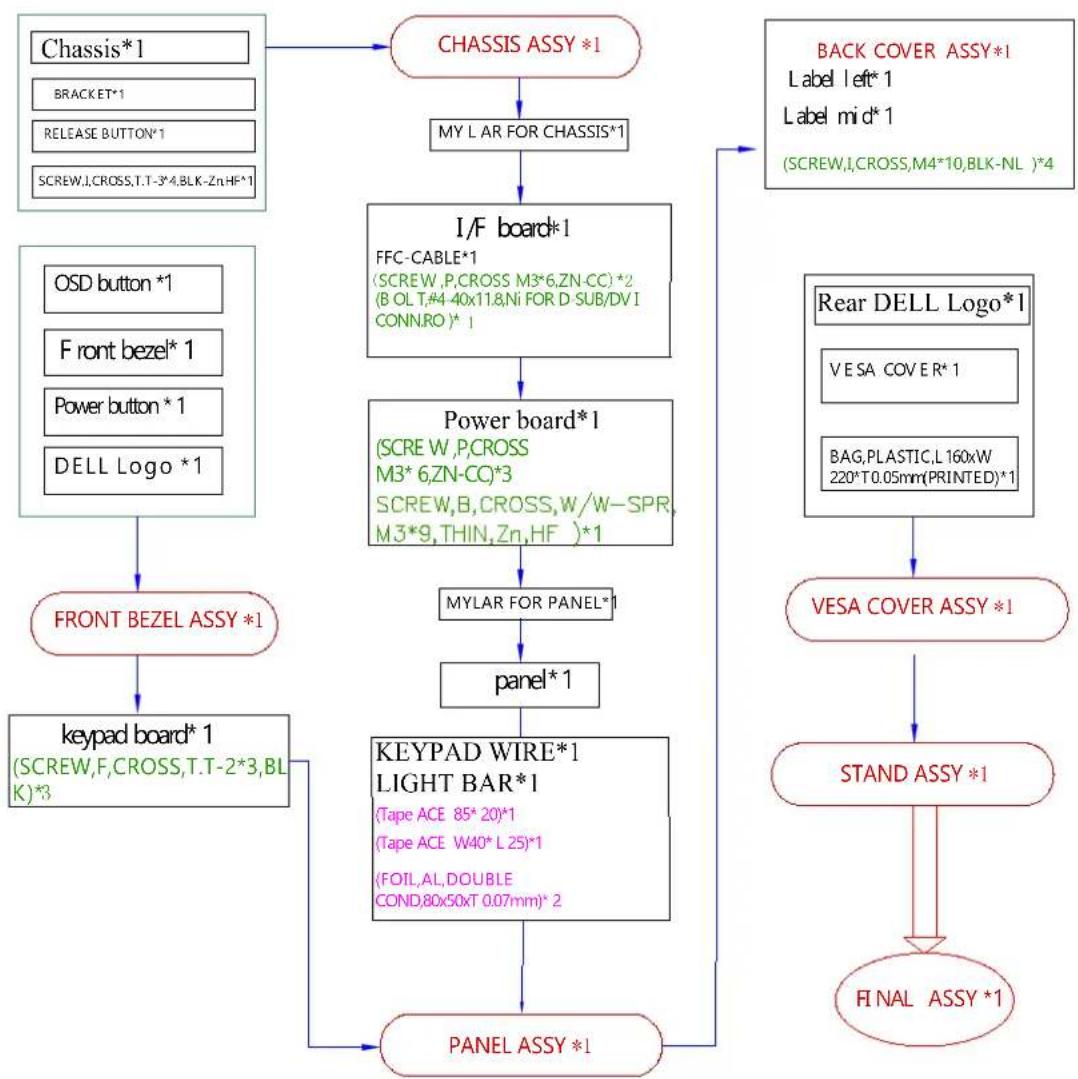
graph TD
    A["Chassis*1"] --> B["CHASSIS ASSY *1"]
    C["BRACKET*1"] --> B
    D["RELEASE BUTTON*1"] --> B
    E["SCREW,I,CROSS,T.T-3*4,BLK-Zn,HF*1"] --> B
    F["OSD button *1"] --> G["I/F board*1"]
    H["Front bezel*1"] --> G
    I["Power button *1"] --> G
    J["DELL Logo *1"] --> K["FRONT BEZEL ASSY *1"]
    L["Keypad board*1 (SCREW,F,CROSS,T.T-2*3,BLK)*3"] --> M["PANEL ASSY *1"]
    B --> N["MY L AR FOR CHASSIS*1"]
    N --> O["FFC-CABLE*1 (SCREW,P,CROSS M3*6,ZN-CC)*2 (B OL T,#4 40x11.8,Ni FOR D SUB/DVI CONN,RO)*1"]
    O --> P["Power board*1 (SCRE W,P,CROSS M3*6,ZN-CC)*3 SCREW,B,CROSS,W/W-SPR M3*9,THIN,Zn,HF)*1"]
    P --> Q["MYLAR FOR PANEL*1"]
    Q --> R["panel*1"]
    R --> S["KEYPAD WIRE*1 LIGHT BAR*1 (Tape ACE 85*20)*1 (Tape ACE W40*L25)*1 (FOIL,AL,DOUBLE COND,80x50xT 0.07mm)*2)"]
    S --> T["PANEL ASSY *1"]
    U["Rear DELL Logo*1 VESA COVER*1 BAG,PLASTIC,L160xW 220*T0.05mm(PRINTED)*1"] --> V["VESA COVER ASSY *1"]
    V --> W["STAND ASSY *1"]
    W --> X["FINAL ASSY *1"]
    Y["BACK COVER ASSY*1 Label left*1 Label mid*1 (SCREW,I,CROSS,M4*10,BLK-NL)*4"] --> Z
6. Trouble shooting instructions
Troubleshooting
⚠ WARNING: Before you begin any of the procedures in this section, follow the Safety Instructions.
Self-Test
Your monitor provides a self-test feature that allows you to check whether your monitor is functioning properly. If your monitor and computer are properly connected but the monitor screen remains dark, run the monitor self-test by performing the following steps:
- Turn off both your computer and the monitor.
- Unplug the video cable from the back of the computer. To ensure proper Self-Test operation, remove VGA cables from the back of computer.
- Turn on the monitor.
The floating dialog box should appear on-screen (against a black background) if the monitor cannot sense a video signal and is working correctly. While in self-test mode, the power LED remains white. Also, depending upon the selected input, one of the dialogs shown below will continuously scroll through the screen.
Dell E1916HV / E2016HV / E2216HV


No VGA Cable
The display will go into Standby mode in 5 minutes.
www.dell.com/support/monitors
Dell E1916HL / E1916HM / E2016HL / E2016HM


No VGA Cable
The display will go into Power Save Mode in 5 minutes.
www.dell.com/support/monitors
-
This message also appears during normal system operation, if the video cable becomes disconnected or damaged. The monitor will enter Standby mode after 5 minutes if left at this state.
-
Turn off your monitor and reconnect the video cable; then turn on both your computer and the monitor.
If your monitor screen remains blank after you use the previous procedure, check your video controller and computer, because your monitor is functioning properly.
Built-in Diagnostics
Your monitor has a built-in diagnostic tool that helps you determine if the screen abnormality you are experiencing is an inherent problem with your monitor, or with your computer and video card.
text_image
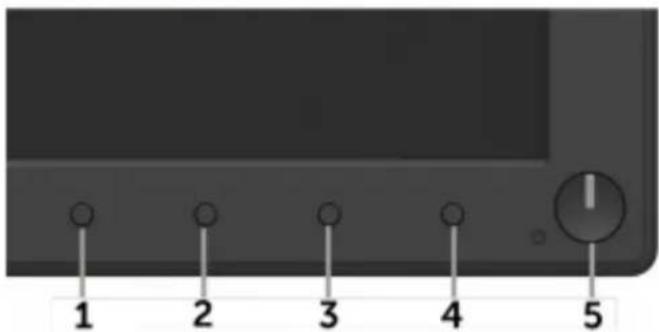
1 2 3 4 5
NOTE: You can run the built-in diagnostics only when the video cable is unplugged and the monitor is in self-test mode.
To run the built-in diagnostics:
-
Ensure that the screen is clean (no dust particles on the surface of the screen)
-
Unplug the video cable(s) from the back of the computer or monitor. The monitor then goes into the self-test mode.
-
Press and hold the Button 1 and Button 4 on the front panel simultaneously for 2 seconds. A gray screen appears.
-
Carefully inspect the screen for abnormalities.
-
Press the Button 4 on the front panel again. The color of the screen changes to red.
-
Inspect the display for any abnormalities.
-
Repeat steps 5 and 6 to inspect the display in green, blue, black, white screens.
The test is complete when the Text screen appears. To exit, press the Button 4 again. If you do not detect any screen abnormalities upon using the built-in diagnostic tool, the monitor is functioning properly. Check the video card and computer.
Common Problems
The following table provides general information about common monitor problems you might encounter and the possible solutions.
| Common symptoms | What you experience | Possible solutions |
| No video/Power LED off | No picture | ·Ensure that the video cable connecting the monitor and the computer is properly connected and secure.·Verify that the power outlet is functioning properly using any other electrical equipment.·Ensure that the power button is depressed fully.·Ensure that the correct input source is selected using the Input Source Select button.·Check the "Power LED Button" option under Energy in OSD Menu. |
| No video/Power LED on | No picture or no brightness | ·Increase brightness & contrast controls via OSD.·Perform monitor self-test feature check.·Check for bent or broken pins in the video cable connector.·Ensure that the correct input source is selected using the Input Source Select menu.·Run the built-in diagnostics. |
| Poor focus | Picture is fuzzy, blurry, or ghosting | ·Perform Auto Adjust via OSD.·Adjust the Phase and Pixel Clock controls via OSD.·Eliminate video extension cables.·Reset the monitor to Factory Settings.·Change the video resolution to the correct aspect ratio (16:9). |
| Shaky/Jittery video | Wavy picture or fine movement | ·Perform Auto Adjust via OSD.·Adjust the Phase and Pixel Clock controls via OSD.·Reset the monitor to Factory Settings.·Check environmental factors.·Relocate the monitor and test in another room. |
| Missing pixels | LCD screen has spots | ·Cycle power on-off.·Pixel that is permanently off is a natural defect that can occur in LCD technology.For more information about Dell Monitor Quality and Pixel Policy, see Dell Support site at: http://www.dell.com/support/monitors. |
| Stuck-on pixels | LCD screen has bright spots | ·Cycle power on-off.·Pixel that is permanently off is a natural defect that can occur in LCD technology.For more information about Dell Monitor Quality and Pixel Policy, see Dell Support site at: http://www.dell.com/support/monitors. |
| Brightness problems | Picture too dim or too bright | ·Reset the monitor to Factory Settings.·Auto Adjust via OSD.·Adjust brightness and contrast controls using OSD. |
| Geometric distortion | Screen not centered correctly | ·Reset the monitor to Factory Settings.·Auto Adjust via OSD.·Adjust horizontal and vertical controls using OSD. |
| Horizontal/Vertical lines | Screen has one or more lines | ·Reset the monitor to Factory Settings.·Perform Auto Adjust via OSD.·Adjust Phase and Pixel Clock controls via OSD.·Perform monitor self-test feature check and determine if these lines are also in self-test mode.·Check for bent or broken pins in the video cable connector. |
| Synchronization problems | Screen is scrambled or appears torn | ·Reset the monitor to Factory Settings.·Perform Auto Adjust via OSD.·Adjust Phase and Pixel Clock controls via OSD.·Perform monitor self-test feature check to determine if the scrambled screen appears in self-test mode.·Check for bent or broken pins in the video cable connector.·Restart the computer in the safe mode. |
| Safety-related issues | Visible signs of smoke or sparks | · Do not perform any troubleshooting steps.· Contact Dell immediately. |
| Intermittent problems | Monitor malfunctions on & off | · Ensure that the video cable connecting the monitor to the computer is connected properly and is secure.· Reset the monitor to Factory Settings.· Perform monitor self-test feature check to determine if the intermittent problem occurs in self-test mode. |
| Missing color | Picture missing color | · Perform monitor self-test feature check.· Ensure that the video cable connecting the monitor to the computer is connected properly and is secure.· Check for bent or broken pins in the video cable connector. |
| Wrong color | Picture color not good | · Change the Color Mode in the Color OSD to Graphics or Video depending on the application.· Try different Color Preset Settings in Color OSD. Adjust R/G/B value in Color OSD if the Color Management is turned off.· Change the Input Color Format to PC RGB or YPbPr in the Color OSD. |
| Image retention from a static image left on the monitor for a long period of time | Faint shadow from the static image displayed appears on the screen | · Set the screen to turn off after a few minutes of screen idle time. These can be adjusted in Windows Power Options or Mac Energy Saver setting.· Alternatively, use a dynamically changing screensaver. |
Product-Specific Problems
| Specific symptoms | What you experience | Possible solutions |
| Screen image is too small | Image is centered on screen, but does not fill entire viewing area | ·Check the Aspect Ratio setting in the Display OSD.·Reset the monitor to Factory Settings. |
| Cannot adjust the monitor with the buttons on the front panel | OSD does not appear on the screen | ·Turn off the monitor, unplug the power cord, plug back, and then turn on the monitor.·Check whether the OSD menu is locked. If yes, press and hold the button beside the Power button for 10 seconds to unlock (for more information, see Lock). |
| No Input Signal when user controls are pressed | No picture, the LED light is white. When you press "up", "down" or "Menu" key, the message * No input signal* will appear. | ·Check the signal source. Ensure that the computer is not in the power saving mode by moving the mouse or pressing any key on the keyboard.·Check whether the signal cable is plugged in properly. Re-plug the signal cable if necessary.·Reset the computer or video player. |
| The picture does not fill the entire screen | The picture cannot fill the height or width of the screen | ·Due to different video formats (aspect ratio) of DVDs, the monitor may display in full screen.·Run the built-in diagnostics. |
Dell Soundbar Problems
| Common symptoms | What you experience | Possible solutions |
| No sound for system where the Soundbar draws power from an AC adapter | No power to Soundbar - the power indicator is off | Turn the Power/Volume knob on the Soundbar clockwise to the middle position; check if the power indicator (white LED) on the front of the Soundbar is illuminated.Confirm that the power cable from the Soundbar is plugged into the adapter. |
| No sound | Soundbar has power - power indicator is on | Plug the audio line-in cable into the computer's audio out jack.Set all volume controls to their maximum and ensure that the mute option is not enabled.Play some audio content on the computer (example, audio CD, or MP3).Turn the Power/Volume knob on the Soundbar clockwise to a higher volume setting.Clean and reseat the audio line-in plug.Test the Soundbar using another audio source (For example: portable CD player, MP3 player). |