
I-ALARM Indoor siren - Alarm Techly - Kostenlose Bedienungsanleitung
Finden Sie kostenlos die Bedienungsanleitung des Geräts I-ALARM Indoor siren Techly als PDF.


| Produkttyp | Innensirene |
| Marke | Techly |
| Modell | I-ALARM Indoor siren |
| Abmessungen (B x H x T) | 81 x 80 x 76 mm |
| Stromversorgung | 110–220 V AC, eingebauter Netzstecker |
| Backup-Batterie | Lithium 4,2 V / 600 mAh, 8 Stunden Standby |
| Lautstärke | 90 dB |
| Standby-Strom | < 13 mA |
| Alarmstrom | < 300 mA |
| Funkfrequenz | 433 MHz (±75 kHz) |
| Gehäusematerial | ABS-Kunststoff |
| Betriebstemperatur | -10 °C bis +55 °C |
| Relative Luftfeuchtigkeit | ≤ 80 % (nicht kondensierend) |
| Anzahl unterstützter Fernbedienungen | bis zu 10 |
| Anzahl unterstützter Sensoren | bis zu 10 |
| Verzögerungseinstellungen | 10, 20 oder 30 Sekunden (werksseitig keine Verzögerung) |
| Funktionen | Nutzung als Zusatzsirene oder eigenständiges Alarmsystem, Nachtlichtmodus, drahtlose Verbindung |
| Lieferumfang | 1x Innensirene, 1x Bedienungsanleitung |
Häufig gestellte Fragen - I-ALARM Indoor siren Techly
Benutzerfragen zu I-ALARM Indoor siren Techly
0 Frage zu diesem Gerät. Beantworten Sie die, die Sie kennen, oder stellen Sie Ihre eigene.
Eine neue Frage zu diesem Gerät stellen
Laden Sie die Anleitung für Ihr Alarm kostenlos im PDF-Format! Finden Sie Ihr Handbuch I-ALARM Indoor siren - Techly und nehmen Sie Ihr elektronisches Gerät wieder in die Hand. Auf dieser Seite sind alle Dokumente veröffentlicht, die für die Verwendung Ihres Geräts notwendig sind. I-ALARM Indoor siren von der Marke Techly.
BEDIENUNGSANLEITUNG I-ALARM Indoor siren Techly

TECHly®
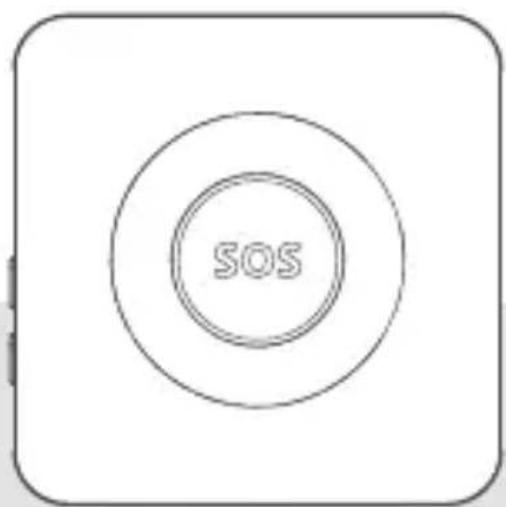
Indoor siren
www.techly.com
Features
The Indoor Siren can be used either as an additional siren connected to your alarm system or as an independent siren connected to a remote control and/or wireless detectors.
• Wireless connection for easy installation
• Radio-frequency security of the accessories; more than one codes combinations
• Simplified connection to accessories
• Built-in 4.2V / 600mAh lithium batteries: 8 hour battery life in stand by mode
Box content
1 x Indoor siren
1 x User's manual
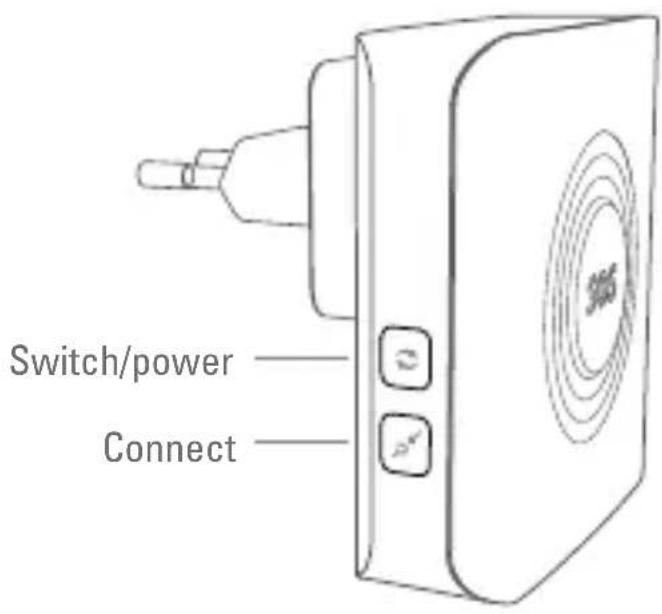
Layout
General information
The indoor Siren is powered by its built-in AC 110-220V plug. Several Sirens can be installed throughout your home and connected to your alarm system. When the alarm of your system is triggered, the Siren rings switch on.
The Indoor Siren can also be used as a standalone siren and can be connected to wireless sensors and/or to a remote control.
Power on / off
Power on
The siren is powered off as per default settings. Plug the siren to a 110-220V socket and you hear a beep: the siren is on. You can also turn the siren on by long pressing (6 seconds) the Power button on the siren.
Enter Setup Mode / Power off
Enter Setup Mode by pressing the Power button once. Press again the Power button for 6 seconds to turn the siren off.
Siren and light indications
When arming the system
The siren beeps once, the LED lights blink once and switch on.
When disarming the system
The siren beeps twice, the LED lights blink twice and turn off.
When armed/disarmed in Mute Mode from the control panel
The siren does not beep, the LED lights do not blink.
Use as an additional siren
If the siren is used as an additional siren, it must be registered to your alarms control panel. If the alarm is triggered, the Siren will ring out and its LED lights will fast flash.
Register the siren in the control panel
Press the Connect button on the siren. The LED lights up: the siren is now in Connection Mode.
Press the “SOS” or “Arm” button on the control panel of your alarm system. You hear one beep: the siren has been registered in the successfully (if you hear 3 beeps, the siren has already been Press the Connect button again on the siren to exit the Connection Mode.
Note
Do not trigger any alarm with a sensor when registering the control panel.
Test
Press the “Arm” button on the control panel. Both the built-in siren of the control panel and the Indoor Siren beep: the connection is successful. If not, the connection has failed, try registering the siren again.
Use as a standalone alarm system
Before using the Siren as a standalone alarm system, it must be connected to a remote control or an accessory (e.g. motion detector, contact).
When the system is armed, if a sensor is triggered, the siren will ring out and the LED lights will fast flash.
Connect a remote control
Press the Connect button on the siren. The LED lights up: the siren is now in Connection Mode.
Press any button on the remote control.
You hear one beep: the remote control has been connected successfully (if you hear 3 beeps, the remote control has a connected).
Connect a wireless sensor
Press the Connect button on the siren. The LED lights up: the siren is now in Connection Mode.
Trigger the sensor (e.g. walk in front of the sensor if you want to connect a motion detector).
You hear one beep: the accessory has been connected to the siren successfully (if you hear 3 beeps, the accessory has already been connected).
The siren supports up to 10 remote controls and 10 wireless detectors.
Test
a) Test the connection to a remote control
Press the "Arm" button on the remote control. The siren beeps once: the connection of the remote control is successful. If not, the connection has failed, try registering the remote control again.
b) Test the connection to a wireless sensor
Arm the system. Trigger the sensor (e.g. walk in front of the sensor if you have connected a motion detector), The siren rings out: the connection of the sensor is successful. If not, the connection has failed, try registering the sensor again.
Clear all accessories
Press the Connect button on the siren for 6 seconds until you hear two beeps. The LED light on: all accessories and control panel connected to the siren have been cleared.
Entry / Exit Delay
A delay before activation can be set for the siren if the sensor is assigned to the Delay Zone*.
If the Entry / Exit Delay is activated, the siren beeps once every second until the system is armed, during the period of delay set. If one of your system's sensors triggers the alarm, the ringing out of the siren will accordingly.
* The name of the Delay Zone and the connection process depending on models. Refer to the user manual of your alarm system for more information.
Set up the delay:
Enter Setup Mode by pressing the power button once. Press the power button again
• once to set the delay to 10 seconds
• twice to set the delay to 20 seconds
• three times to set the delay to 30 seconds
Default setting: no delay.
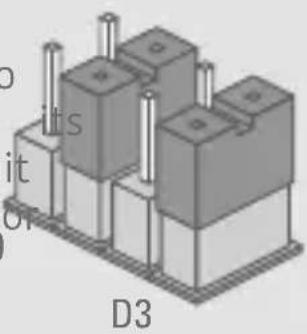
The delay will be effective only if the sensors have been assigned to the Delay Zone. To assign a sensor to the Delay Zone, open cover and move the jumpers on the circuit board according to the opposite drawing. For more information, refer to the manual of your alarm system.
Night Lamp mode
When used as a standalone alarm system, the Siren can also be used as an LED night lamp.
Press the “Home mode” button on the remote control twice: switches to Home Mode and the strobe light turns into a night lamp.
Press the “Home mode” button twice, then the “Arm” button once: the siren is in monitoring mode with night lamp on. Press the “Disarm” button: the siren is disarmed and the LED lights switch off.
Specifications
Power supply
110-220V
Volume
90dB
Backup battery
4,2V / 600mAh Lithium
Static current
<13mA
Alarm current
< 300mA
Radio frequency
433MHz (+/-75KHZ)
Housing material
ABS plastic
Operating conditions
Temperature: -10°C \~ +55°C
Relative Humidity
≤80% (non-condensing)
Dimensions
81 x 80 x 76 mm
www.techly.com

In compliance with Eu Directive WEEE this product is market with this symbol. It means that used electrical and electronic products should not be mixed with general household waste. There is a separate collections system for there products in compliance with WEEE directive, otherwise contaminative and ous substances can pollute the environment.

With CE sign, Techly ensures that the product is conformed to the basic European standards and directives.

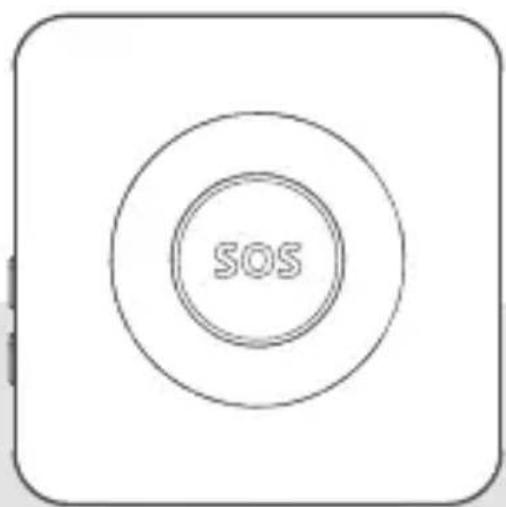
Sirena per interno
www.techly.com

Caratteristiche
Questa sirena per interno può essere usata sia come una sirena aggiuntiva collegata al sistema di allarme sia come una sirena indipendente collegata ad un telecomando e/o un rilevatore wireless.
- Connessione wireless per una facile installazione
- Sicurezza radio-frequenza degli accessori; più di un milione di combinazioni
• Collegamento degli accessori semplificato - Incorpora batteria gli ioni di litio da 4.2V/600mAh: 8 ore modalità stand by
Contenuto della confezione
1 x Sirena per interno
1 x Manuale d'istruzione
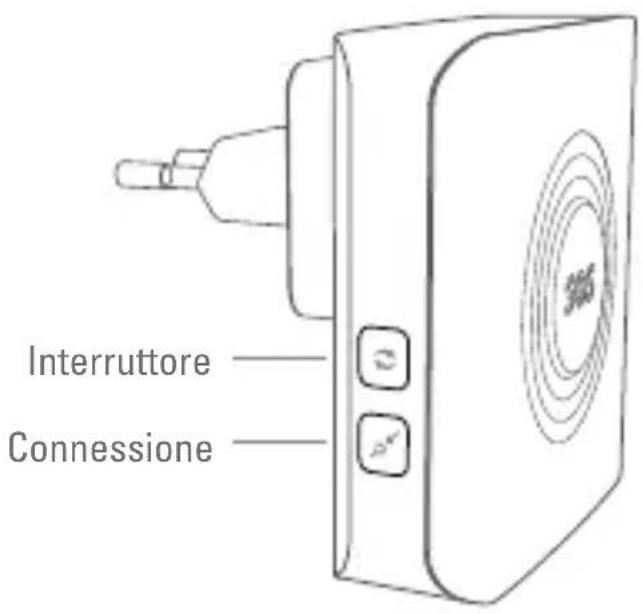
Struttura
Informazioni generali
La sirena da interno è alimentata dalla corrente AC 110/220V. Diverse sirene possono essere installate all'interno dell'abitazione e possono es collegate al vostro sistema di allarme. Quando il sistema di allarme viene attivato, la sirena suona e il led si illumina.
La sirena da interno può essere usata come sirena autonoma e può essere connessa ai sensori senza fili e / o ad un telecomando.
Accensione/Spegnimento
Accensione
La sirena si spegne come da impostazioni predefinite. Collegare la sirena ad una presa di corrente 110-220V e verificare se udite un segnale acustico: la sirena è accesa. É possibile accendere la sirena tenendo premuto a lungo (6 secondi) il tasto di accensione sulla sirena.
Accesso alla modalità di configurazione / spegnimento
Accedere alla modalità di configurazione premendo una volta i accensione. Premere di nuovo il tasto di accensione per 6 s spegnere la sirena.
Sirena e indicazioni luminose
Quando si inserisce il sistema di allarme
La sirena emette un beep, la luce LED lampeggia una volta e poi si accende.
Quando si disinserisce il sistema di allarme
La sirena emette due beep, la luce LED lampeggia due volte e si spegne.
Quando si inserisce/ disinserisce in modalità silenziosa dal pannello di controllo
La sirena non emette alcun segnale acustico, la luce LED non lampeggia.
Utilizzo di una sirena aggiuntiva
Se la sirena viene usata come una sirena aggiuntiva, deve essere registrata sul pannello di controllo dell'allarme. Se l'allarme è attivato, la sirena suona e le luci LED lampeggiano velocemente.
Registrazione della sirena nel pannello di controllo
Premere il tasto di collegamento presente nella sirena. Il LED si accende: la sirena ora è in modalità Connessione.
Premere il tasto “SOS” o “Arm” sul pannello di controllo de allarme. Si udirà un beep: la sirena è stata registrata con pannello di controllo (se vengono uditi 3 beep, la sirena er connessa). Premere nuovamente sulla sirena il tasto connessione per uscire dalla modalità Connessione.
Nota
Non innescare alcun allarme con un sensore quando si sta effe registrazione della sirena sul pannello di controllo.
Test
Premere il tasto “Arm” sul pannello di controllo. Sia la sirena incorporata al pannello che la sirena interna emettono un segnale acustico: la connessione è avvenuta con successo. Se questo non accade, la connessio riprovate nuovamente a registrare la sirena.
Uso come sistema di allarme indipendente
Prima di utilizzare la sirena come un sistema di allarme in sirena deve essere collegata ad un comando remoto o ad un accessorio (per esempio un rilevatore di movimento, un contatto porta/finestra).
Quando il sistema di allarme è inserito, se un sensore fa scattare l'allarme, la sirena suonerà e le luci LED lampeggeranno velocemente.
Collegamento ad un telecomando
Premere il tasto connessione sulla sirena. Il LED si illumina, la sirena ora è in modalità Connessione.
Premere un tasto sul telecomando.
Si udirà un segnale acustico: il telecomando è stato connesso con successo alla sirena (se vengono uditi 3 beep, il telecomando non è stato collegato).
Collegamento ad un sensore senza fili
Premere il tasto Connessione sulla sirena. Il LED si illumina: la sirena è ora in modalità Connessione.
Attivare un sensore (per esempio camminando di fronte al sensore se si vuole connettere un rilevatore di movimento).
Si udirà un beep: l'accessorio è stato connesso alla sirena con successo (se si udiranno 3 beep, l'accessorio era già stato connesso).
La sirena supporta fino a 10 telecomandi e 10 rilevatori di movimento.
Test
a) Testare la connessione al telecomando
Premere il tasto “Arm” sul telecomando. La sirena emette u acustico: la connessione al telecomando è avvenuta con successo. Se ciò non avviene, il tentativo di connessione è fallito, provare nuovamente a registrare il telecomando.
b) Testare la connessione ad un sensore senza fili
Inserire l'allarme. Attivare il sensore (per esempio camminando di fronte al sensore se è stato collegato un sensore di movimento). La sirena suona: il collegamento al sensore è avvenuto con successo. Se ciò non avviene, il tentativo di connessione è fallito, provare nuovamente a sensore.
Eliminazione di tutti gli accessori
Premere il tasto Connessione sulla sirena per 6 secondi fino a quando non si udiranno due beep. La luce LED si accende: tutti gli accessori e il pannello di controllo connessi alla sirena sono stati eliminati.
Entrata/Uscita ritardate
Prima dell'attivazione è possibile impostare un tempo di ritardo per la sirena se il sensore è assegnato alla Zona Delay*.
Se l'entrata/uscita ritardata è attivata, la sirena emette un beep per ogni secondo per tutto il tempo di ritardo impostato, fino a quando il sistema di allarme non è inserito. Se uno dei sensori del sistema l'allarme, il suono della sirena sarà ritardato di conseguenza impostazioni.
* Il nome della Zona Delay e il processo di collegamento potrebbero variare a seconda dei modelli. Fare riferimento al manuale d'istruzione del vostro sistema di allarme per ulteriori informazioni.
Impostazione del tempo di ritardo:
Accedere alla modalità di configurazione premendo una volta i accensione. Premere il tasto di accensione di nuovo
- una volta per impostare un ritardo di 10 secondi
• due volte per impostare un ritardo di 20 secondi
• tre volte per impostare un ritardo di 30 secondi
Configurazione preimpostata: nessun ritardo.
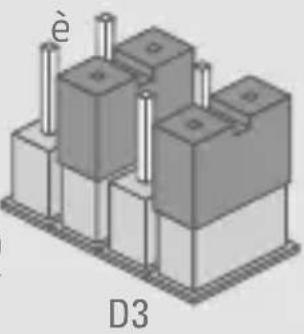
Il ritardo sarà effettivo solo se il se stato assegnato alla Zona Delay. Per assegnare un sensore alla Zona Delay, aprire il coperchio e spostare i jumpers sul circuito stampato come da disegno indicativo qui a fianco. Per maggiori informazioni, fare riferimento al manuale vostro sistema di allarme.
sensore
Modalità luce notturna
Quando viene utilizzato come sistema di allarme indipendente, la sirena può essere utilizzata anche come una lampada notturna a LED.
Premere il tasto “Modalità Home” sul telecomando due volte: la sirena passa alla modalità Home e la luce stroboscopica si trasforma in lampada notturna. Premere il tasto “modalità Home” due volte, quindi premere una volta il tasto “Arm”: la sirena è in modalità monitoraggio con la lampada notturna accesa. Premere il tast “Disarm”: la sirena è disinserita e le luci LED sono spente.
Specifiche
Alimentazione
110-220V
Volume
90dB
Alimentazione di backup
Batteria al litio 4,2V / 600mAh
Corrente statica
<13mA
Corrente di allarme
< 300mA
Radio frequenza
433MHz (+/-75KHZ)
Materiale alloggiamento
Plastica ABS
Condizioni d'esercizio
Temperatura: -10°C \~ +55°C
Umidità relativa:
≤80% (senza condensa)
Dimensioni
81 x 80 x 76 mm
www.techly.com

In conformità alla normativa WEEE, le apparecchiature elettriche ed elettroniche non devono essere smaltite con i rifiuti domestici. Il presente prodotto deve essere consegnato ai punti di raccolta preposti allo smaltimento e riciclo delle apparecchiature elettriche ed elettroniche. Contattate le autorità locali competenti per ottenere informazioni in merito allo smaltimento corretto della presente apparecchiatura.

Con il marchio CE, Techly garantisce che il prodotto è conforme alle norme e direttive europee richieste.


- TECHLY®
- INDOOR SIREN
- FEATURES
- BOX CONTENT
- LAYOUT
- GENERAL INFORMATION
- POWER ON / OFF
- POWER ON
- ENTER SETUP MODE / POWER OFF
- SIREN AND LIGHT INDICATIONS
- WHEN ARMING THE SYSTEM
- WHEN DISARMING THE SYSTEM
- WHEN ARMED/DISARMED IN MUTE MODE FROM THE CONTROL PANEL
- USE AS AN ADDITIONAL SIREN
- REGISTER THE SIREN IN THE CONTROL PANEL
- NOTE
- TEST
- USE AS A STANDALONE ALARM SYSTEM
- CONNECT A REMOTE CONTROL
- CONNECT A WIRELESS SENSOR
- CLEAR ALL ACCESSORIES
- ENTRY / EXIT DELAY
- SET UP THE DELAY
- NIGHT LAMP MODE
- SPECIFICATIONS
- POWER SUPPLY
- VOLUME
- BACKUP BATTERY
- STATIC CURRENT
- ALARM CURRENT
- RADIO FREQUENCY
- HOUSING MATERIAL
- OPERATING CONDITIONS
- RELATIVE HUMIDITY
- DIMENSIONS
- SIRENA PER INTERNO
- CARATTERISTICHE
- CONTENUTO DELLA CONFEZIONE
- STRUTTURA
- INFORMAZIONI GENERALI
- ACCENSIONE/SPEGNIMENTO
- ACCENSIONE
- ACCESSO ALLA MODALITÀ DI CONFIGURAZIONE / SPEGNIMENTO
- SIRENA E INDICAZIONI LUMINOSE
- QUANDO SI INSERISCE IL SISTEMA DI ALLARME
- QUANDO SI DISINSERISCE IL SISTEMA DI ALLARME
- QUANDO SI INSERISCE/ DISINSERISCE IN MODALITÀ SILENZIOSA DAL PANNELLO DI CONTROLLO
- UTILIZZO DI UNA SIRENA AGGIUNTIVA
- REGISTRAZIONE DELLA SIRENA NEL PANNELLO DI CONTROLLO
- NOTA
- USO COME SISTEMA DI ALLARME INDIPENDENTE
- COLLEGAMENTO AD UN TELECOMANDO
- COLLEGAMENTO AD UN SENSORE SENZA FILI
- ELIMINAZIONE DI TUTTI GLI ACCESSORI
- ENTRATA/USCITA RITARDATE
- IMPOSTAZIONE DEL TEMPO DI RITARDO
- MODALITÀ LUCE NOTTURNA
- SPECIFICHE
- ALIMENTAZIONE
- ALIMENTAZIONE DI BACKUP
- CORRENTE STATICA
- CORRENTE DI ALLARME
- RADIO FREQUENZA
- MATERIALE ALLOGGIAMENTO
- CONDIZIONI D'ESERCIZIO
- UMIDITÀ RELATIVA
- DIMENSIONI
Marke : Techly
Modell : I-ALARM Indoor siren
Kategorie : Alarm