Finum 2009 - Heimtrainer Finnlo - Kostenlose Bedienungsanleitung
Finden Sie kostenlos die Bedienungsanleitung des Geräts Finum 2009 Finnlo als PDF.


Benutzerfragen zu Finum 2009 Finnlo
0 Frage zu diesem Gerät. Beantworten Sie die, die Sie kennen, oder stellen Sie Ihre eigene.
Eine neue Frage zu diesem Gerät stellen
Laden Sie die Anleitung für Ihr Heimtrainer kostenlos im PDF-Format! Finden Sie Ihr Handbuch Finum 2009 - Finnlo und nehmen Sie Ihr elektronisches Gerät wieder in die Hand. Auf dieser Seite sind alle Dokumente veröffentlicht, die für die Verwendung Ihres Geräts notwendig sind. Finum 2009 von der Marke Finnlo.
BEDIENUNGSANLEITUNG Finum 2009 Finnlo
text_image
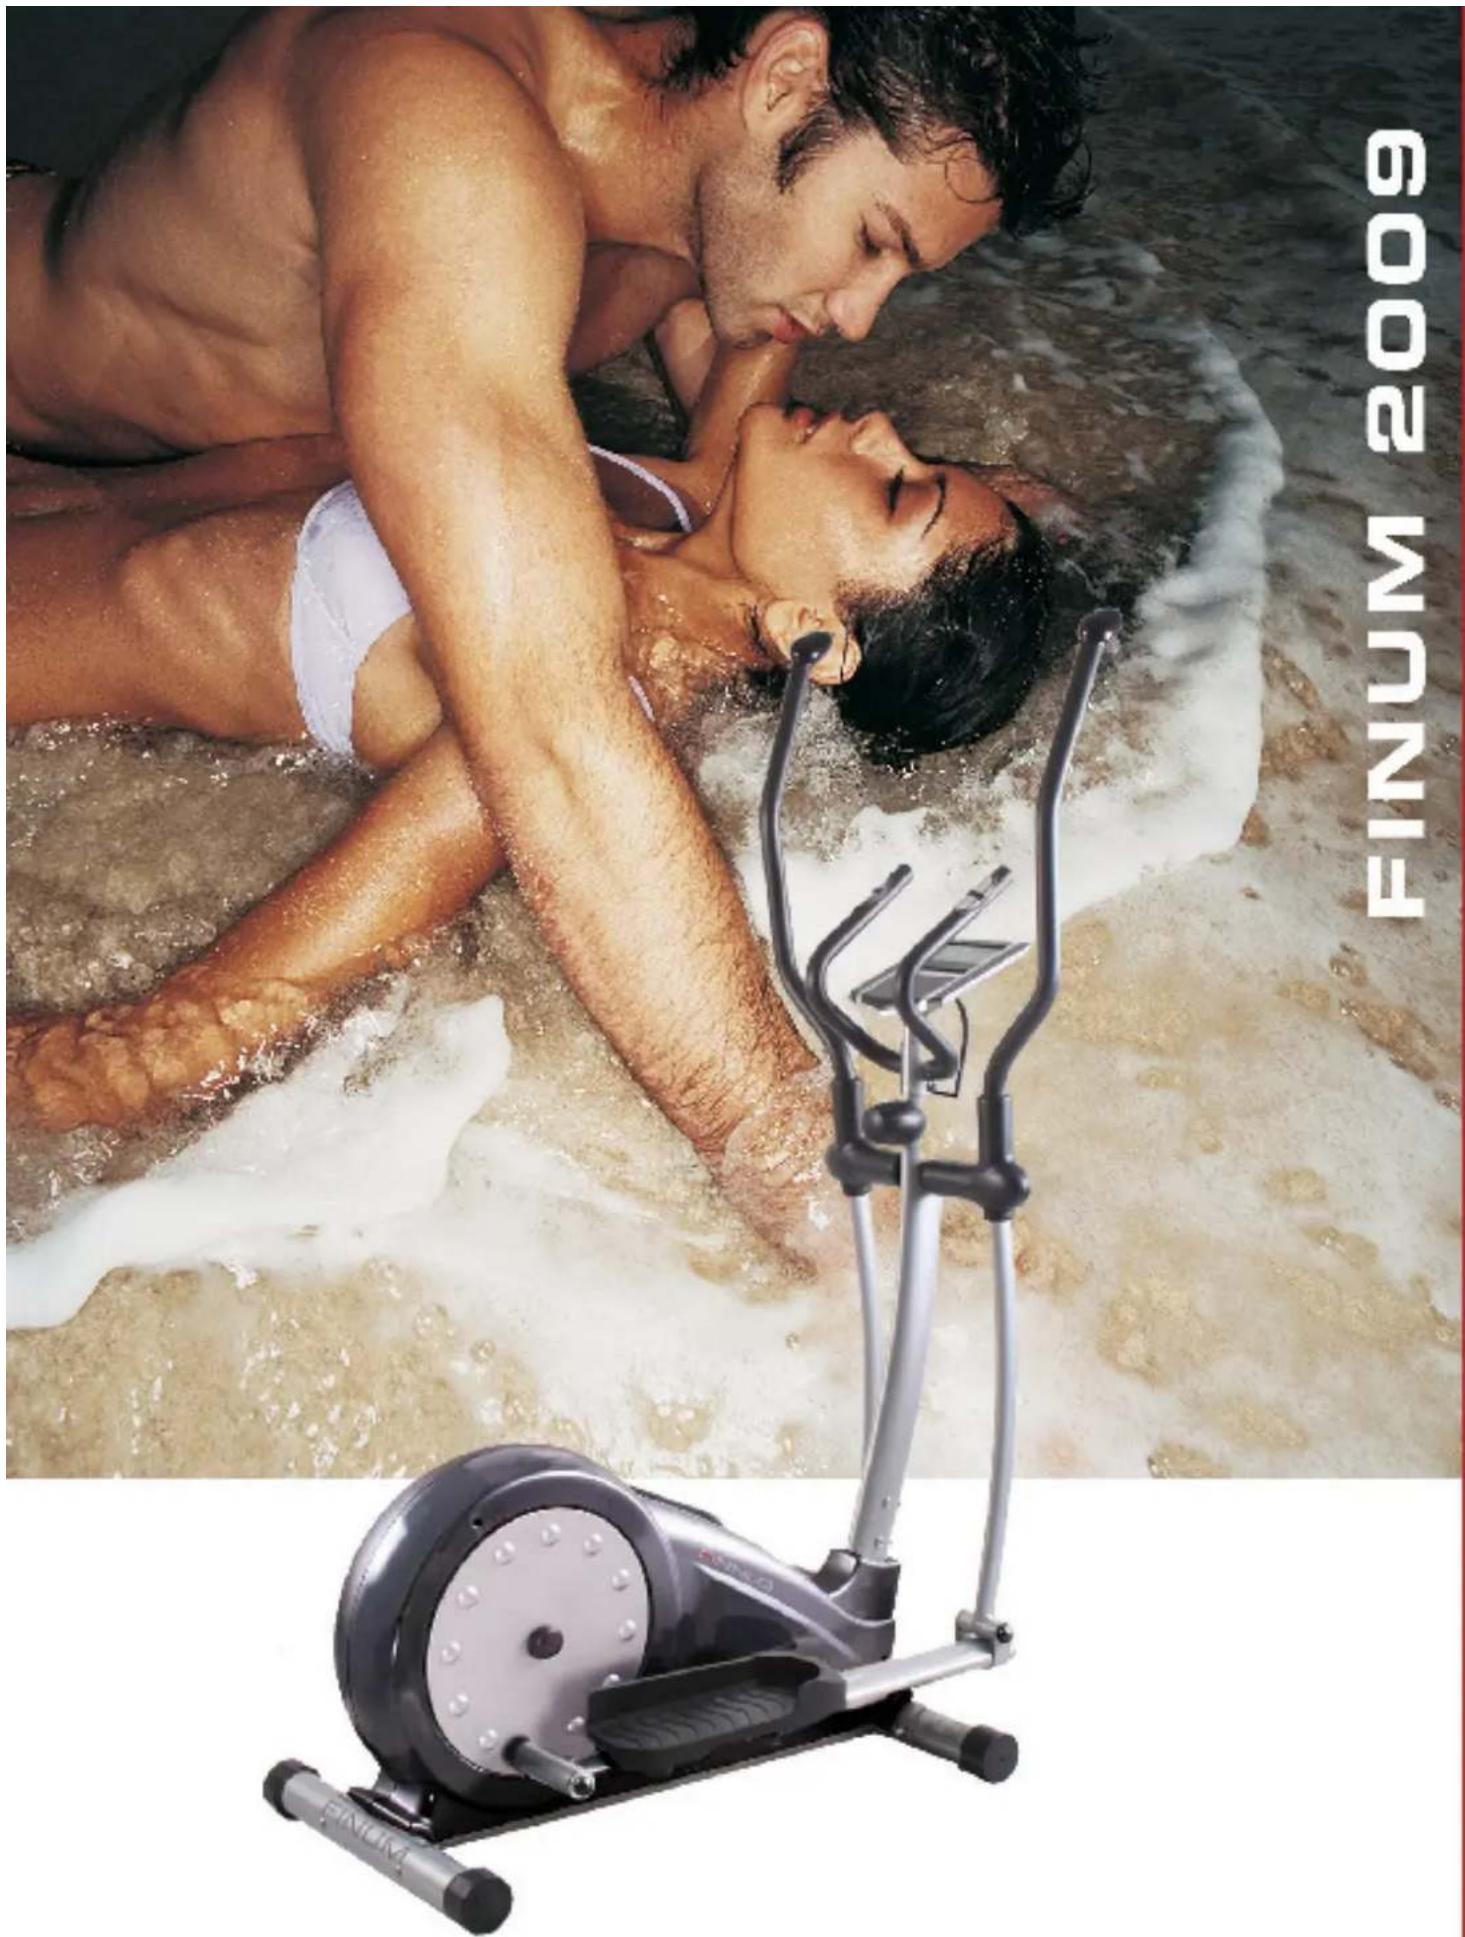
FINUM 2009 FINUM6002 WUNIF
FINNLO
finnlo.com
HAMMEI EROPT AD
NRG
Art. Nr.: 3250 (09)
ID: 105091
Inhoudsopgave
Index
Pagina/Page
- Veiligheidsinstructies
- Algemeen
2.1 Verpakking
2.2 Afvalverwerking
2.3 Uitleg symbolen
- Montage
3.1 Checklist
3.2 Montage stappenplan
-
Reiniging en Onderhoud
-
Safety instructions 2
- General 3
2.1 Packaging 3
2.2 Disposal 3
2.3 Explanation of symbols 3
- Assembly 3
3.1 Check list 4
3.2 Assembly Steps 5
-
Care and Maintenance 11
-
Computer
1 Co mputertoetsen
2 Display
.3 Computerfuncties
.3.1 Batterijen plaatsen
.3.2 Kamertemperatuur
.3.3 Instellen tijd en datum
.3.4 Auto ON/OFF functie
.4 Trainen zonder ingestelde waardes
5 Trainen met ingestelde waardes
5.6 Hand hartshagheiting amet ina
5.7 Herstelfunctie
- Co mputer 11
5.1 Co mputer keys 11
5.2 Display 11
5.3 Computer functions 12
5.3.1 Insert the batteries 12
5.3.2 Room temperature 12
5.3.3 Setting of time and date 12
5.3.4 Auto O N/OF= function 12
5.4 Tr aining without set values 13
5.5 Training wit h set values 13
5.6 Hand pulse measurement 13
5.7 Recovery function 13
- Batterijen verwijderen
- Trainingshandleiding
7.1 Trainen op de crosstrainer
7.2 Richtlijnen training
7.2.1 Trainingsfrequentie
7.2.2 Trainingsintensiteit
7.2.3 Hartslag-gecontroleerde training
7.2.4 Trainingscontrole
7.2.5 Trainingsduur
- Battery disposal 14
- Training manual 15
7.1 Ways of training with an elliptical 15
7.2 Training notes 16
7.2.1 Training frequency 16
7.2.2 Training instensity 16
7.2.3 Heart rate orientated Training 17
7.2.4 Training control 17
7.2.5 Training duration 19
- Target pulse diagram 19
9 Explosion drawing 20 - Parts list 22
- Warranty (Dutch only) 24
1. Veiligheidsinstructies
BELANGRIJK
- De crosstrainer is gefabriceerd conform EN 957-1/9 klasse HC, en kan niet worden gebruikt voor medisch-therapeutische training.
● Maximaal gebruikersgewicht is 130 kg. - De crosstrainer dient alleen gebruikt te worden voor hetgeen waarvoor dit apparaat bedoeld is.
- Elk ander gebruik van het fitnessapparaat is verboden en kan gevaarlijk zijn. De importeur kan niet verantwoordelijk worden gehouden voor eventuele schade en/of ongelukken die ontstaan als gevolg van onrechtmatig gebruik van de apparatuur.
- De crosstrainer.is.gefabriceerd.conform.de.meest tuele veilighei dsnormen.
Om blessures, letsel en/of ongelukken te voorkomen dient u de ond erstaande regels te lezen en in acht te nemen:
- -aat geen kinderen op of rondom h et itnessappar aat spelen.
- C: ontroleer regelmatigo falle s chroeven, moeren, endels en peda len goed zijn aangedraaid en /of v estigd.
- Ver vangdirectalle def ecte onderdelen en geb ruik crosstrainer niettodat deze zijn gerepareerd nwel vervangen. Wees alert op versleten ateriale n.
- Vöorköm blootstelling aan höge temperaturen, vocht en spetterend water.
- Lees aandachtig de gebruiksaanwijzing voordat u het fitnessapparaat opstart.
- Het fitnessapparaat heeft voldoende vrije ruimte nodig in alle richtingen (minimaal 1,5m).
- Het fitnessapparaat dient opgebouwd te worden op een solide en vlak oppervlak.
- Train niet direct voor of na een maaltijd.
- Voordat u begint aan elke vorm van fitnesstraining dient u uzelf te laten onderzoeken door een arts.
- Het veiligheidsniveau van het apparaat kan alleen gewaarborgd blijven indien u onderdelen regelmatig controleert op slijtage. Deze onderdelen zijn met een * aangegeven in de onderdelenlijst. Hefbomen en andere aanpasbare mechanismen van het apparaat mogen niet de bewegingsvrijheid tijdens het trainen belemmeren.
- Fitnessapparaten mogen nooit als speelgoed worden gebruikt.
- Stap niet op de behuizing maar enkel op de trappen die hiervoor bedoeld zijn.
- Draag geen losse kleding: draag geschikte kleding voor een training, zoals bijvoorbeeld een trainingspak.
- Draag schoenen en train nooit blootvoets.
- Zorg dat andere personen zich niet in de buurt van de crosstrainer bevinden, omdat deze gewond kunnen raken door de bewegende onderdelen.
1. Safety instructions
IMPORTANT
● The Elliptical is produced according to EN 957-1/9 class HC, and cannot be used for medical therapeutic exercise.
● Max. user weight is 130 kg.
● The elliptical should be used only for its intended purpose.
- Any other use of the item is prohibited and may be dangerous. The importeur cannot be held liable for damage or injury caused by improper use of the equipment.
● The elliptical has been produced according to the latest safety standards.
To prevent injury and / or accident, please read and follow these simple rules:
- Do not allow children to play on or near the equipment.
- Regularly check that all screws, nuts, handles and pedals are tightly secured.
- Promptly replace all defective parts and do not use the equipment until it is repaired. Watch for any material fatigue.
- Avoid high temperatures, moisture and splashing water.
- Carefully read through the operating instructions before starting the equipment.
- The équipément requires sufficient free space in all directions (at least 1.5 m).
- Set up the equipment on a solid and flat surface.
- Do not exersice immediately before or after meals.
- Before starting any fitness training, let yourself examined by a physician.
- The safety level of the machine can be ensured only if you regularly inspect parts subject to wear. These are indicated by an * in the parts list. Levers and other adjusting mechanisms of the equipment must not obstruct the range of movement during training.
- Training equipment must never be used as toys.
- Do not step on the housing but only on the steps provided for this purpose.
- Do not wear loose clothing; wear suitable training gear such as a training suit, for example.
- Wear shoes and never exercise barefoot.
- Make certain that other persons are not in the area of the Hometrainer, because other persons may be injured by the moving parts.
2. Algemeen
Dit fitnessapparaat is bedoeld voor gebruik thuis. Het apparaat voldoet aan de eisen van DIN EN 957-1/9 klasse HC. De CE markering refereert aan EU richtlijn 89/336/EEC. Schade aan gezondheid kan niet worden uitgesloten indien het apparaat niet wordt gebruikt als bedoeld (bijvoorbeeld overmatig trainen, foutieve instellingen, etc.).
Voordat u begint met trainen, dient u een compleet lichamelijk onderzoek door uw arts te hebben doorlopen, om bestaande gezondheidsrisico's uit te sluiten.
2.1 Verpakking
Milieuvriendelijke en recycleerbare materialen:
● Externe verpakking gemaakt van karton
- Gemodelleerde onderdelen gemaakt van schuim
CFS-vrij propostysteene(RS)PS
- Folies en zakken gemaakt van polyetheen (PE)
- <lembanden g emaa kt van polypropyleen (PP)
2.2 Afvalverwerking
natural_image
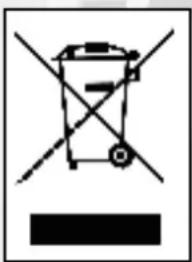
Simple line drawing of a trash bin with no text or symbols3ewaarde originele verpakking voor eventuele reparaties/ aanspraken o garantie. De apparatuur mag niet word enw eggegooid bij het reguliere nuisafval!
2.3 Uitleg symbolen

Bevat belangrijke informatie ter voorkoming van schade aan de apparatuur
3. Montage
Om montage van de crosstrainer zo gemakkelijk mogelijk voor u te maken, hebben wij de meest belangrijke onderdelen voorgemonteerd. Voordat u begint met de montage van het fitnessapparaat, lees aandachtig de onderstaande instructies en volg het stappenplan zoals omschreven.
Inhoud van de verpakking
- Pak alle individuele onderdelen uit en plaats ze naast elkaar op de vloer.
- Plaats het hoofdframe op een mat ter bescherming van de vloer. Zonder een mat bestaat de kans dat uw vloer beschadigd raakt of krasschade oploopt. De mat dient vlak en niet te dik te zijn, zodat het hoofdframe een stabiele ondergrond heeft.
2. General
This training equipment is for use at home. The equipment complies with the requirements of DIN EN 957-1/9 Class HC. The CE marking refers to the EU Directive 89/336/EEC. Damage to health cannot be ruled out if this equipment is not used as intended (for example, excessive training, incorrect settings, etc.).
Before starting your training, you should have a complete physical examination by your physician, in order to rule out any existing health risks.
2.1 Packaging
Environmentally compatible and recyclable materials:
● External packaging made of cardboard
● Molded parts made of foam CFS-free polystyrol (PS)
- sSheetinggaarodlaags smaadecofpoolyeethyderee (RE)
- Wrapping straps made of polypropylene (PP)
2.2. Disposal
text_image
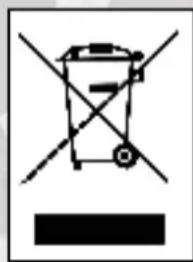
Prohibition sign with crossed-out trash bin and no text or symbolsPlease be sure to keep the packing for the event of repairs/ warranty matters. The equipment should not be disposed of in the household rubbish!
2.3 Explanation of symbols

Contains important information for prevention of damage to the equipment
3. Assembly
In order to make assembly of the elliptical as easy as possible for you, we have preassembled the most important parts. Before you assemble the equipment, please read these instructions carefully and then continue step by step as described
Contents of packaging
● Unpack all individual parts and place them alongside each other on the floor.
- Place the main frame on a pad protecting the floor, because without its assembled base feet it can damage / scratch your floor. The pad should be flat and not too thick, so that the frame has a stable stand.
- Zorg ervoor dat u in alle richtingen voldoende ruimte overhoudt voor beweging tijdens het monteren (minimaal 1,5m).
● Make certain that you have adequate room for movement (at least 1.5 m) on all sides during assembly.
3.1 Checklist
3.1 Check list
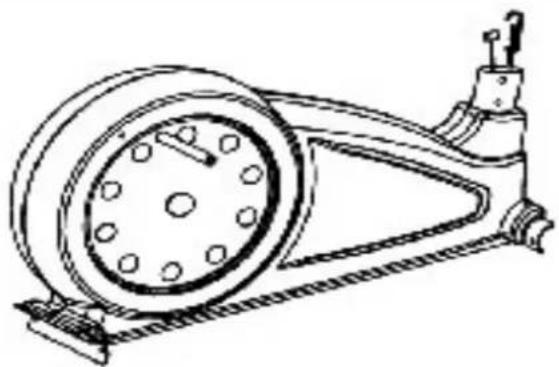 | 1 |
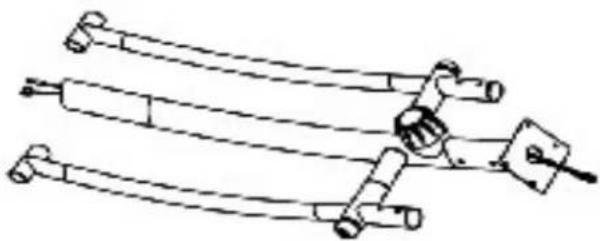 | 1 |
 | 1 |
 | 1 |
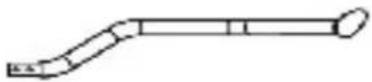 | 1 |
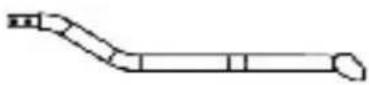 | 1 |
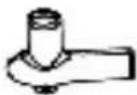 | 1 |
3.2 Montage stappenplan / Assembly
Stap / Step 1
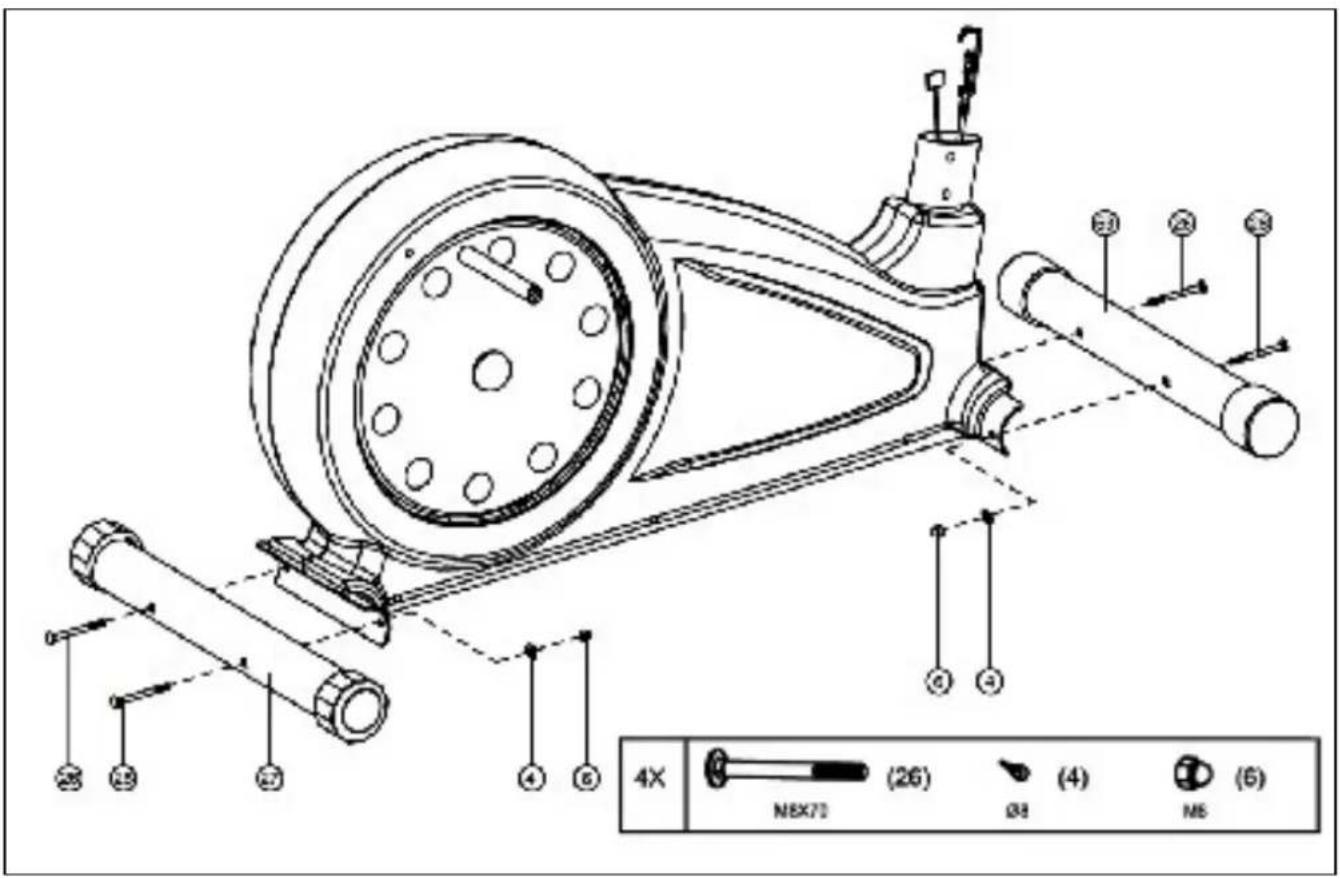
text_image
4X N8X70 (26) (4) M5 (6)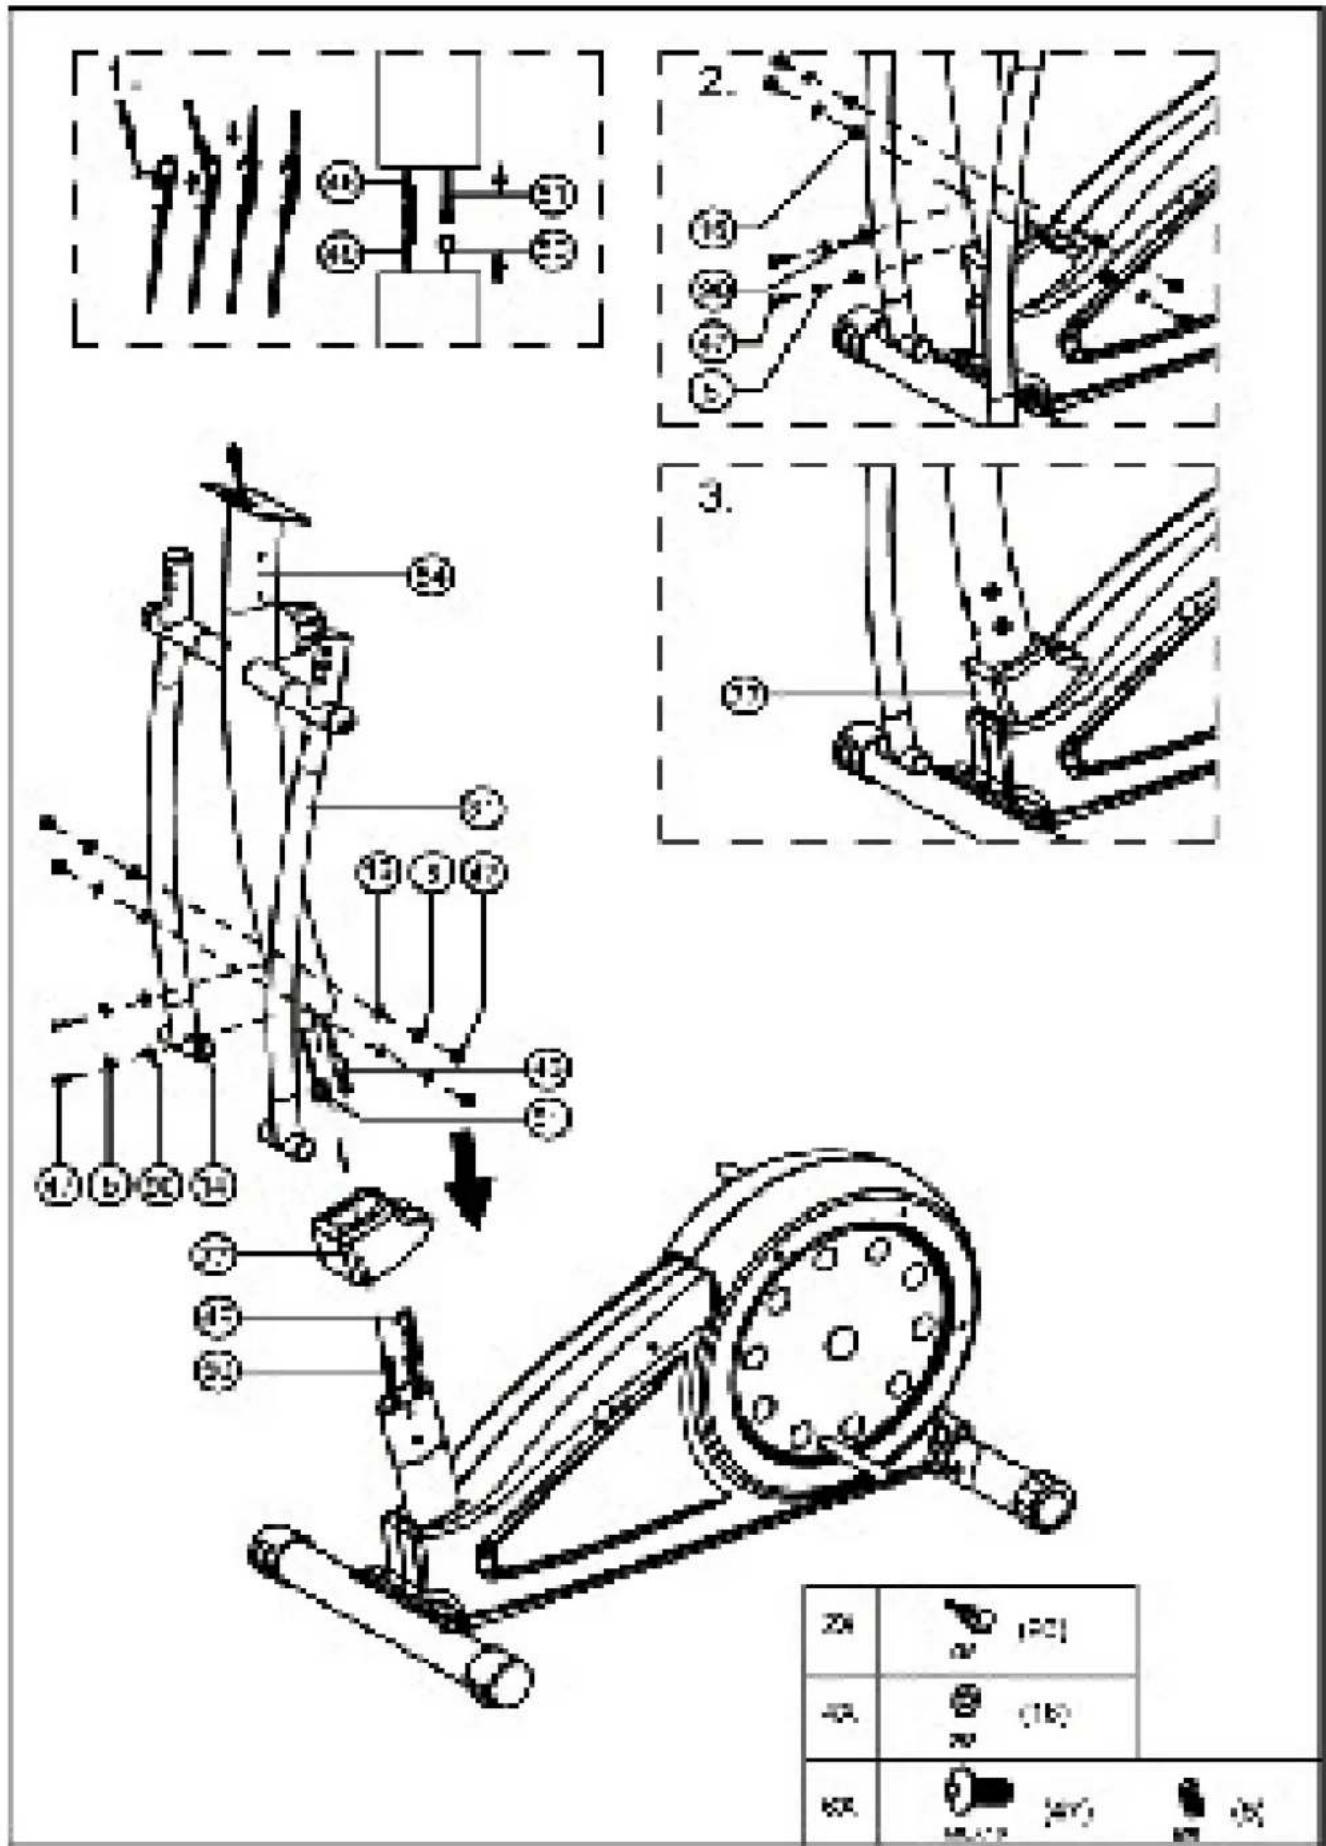
text_image
Technical diagram of a mechanical assembly with numbered components and exploded views, including a detailed view of the assembly process.Stap / Step 3
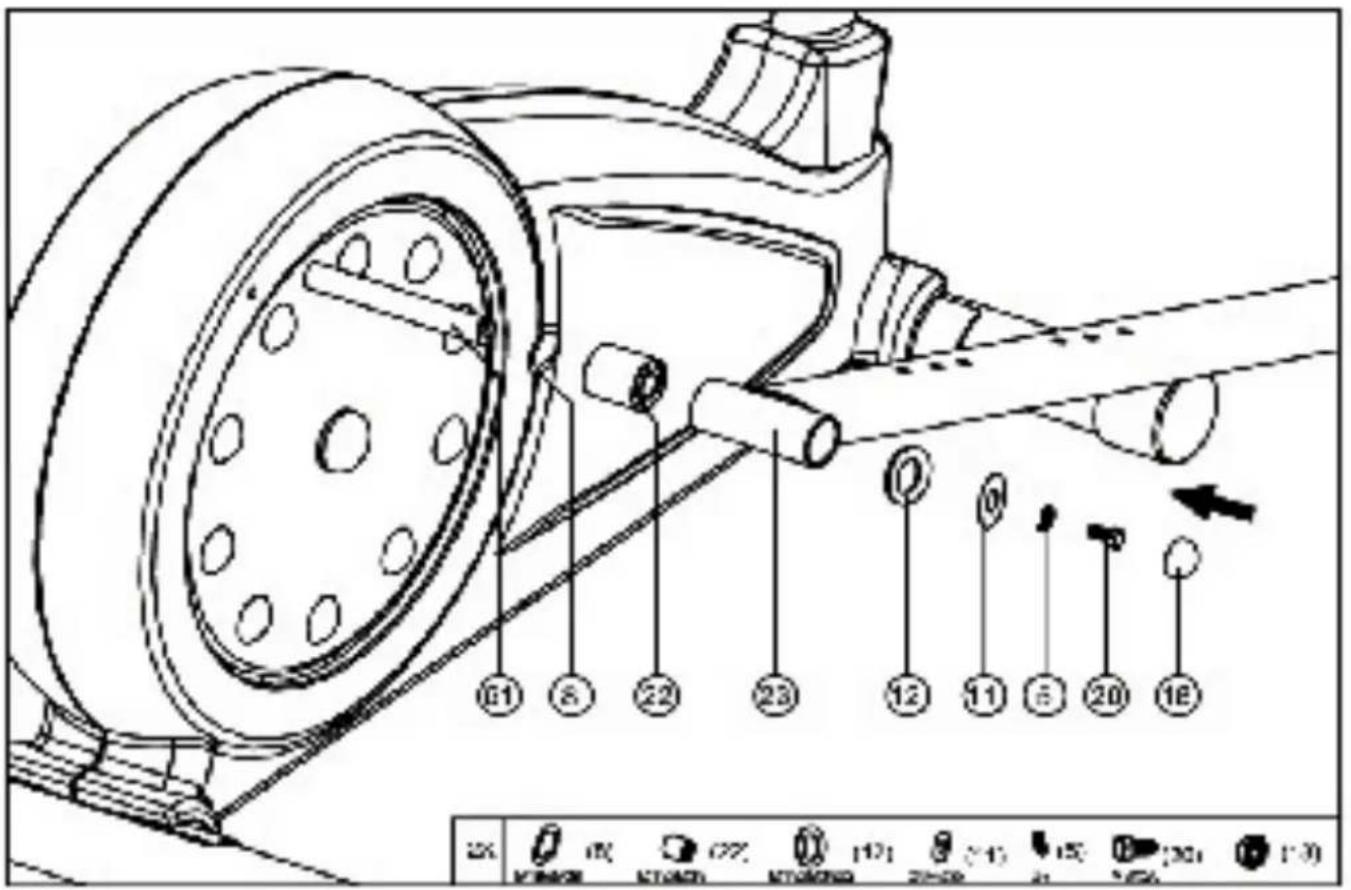
text_image
Technical diagram of a mechanical component with numbered parts and a control panel below showing measurement ranges.Stap / Step 4
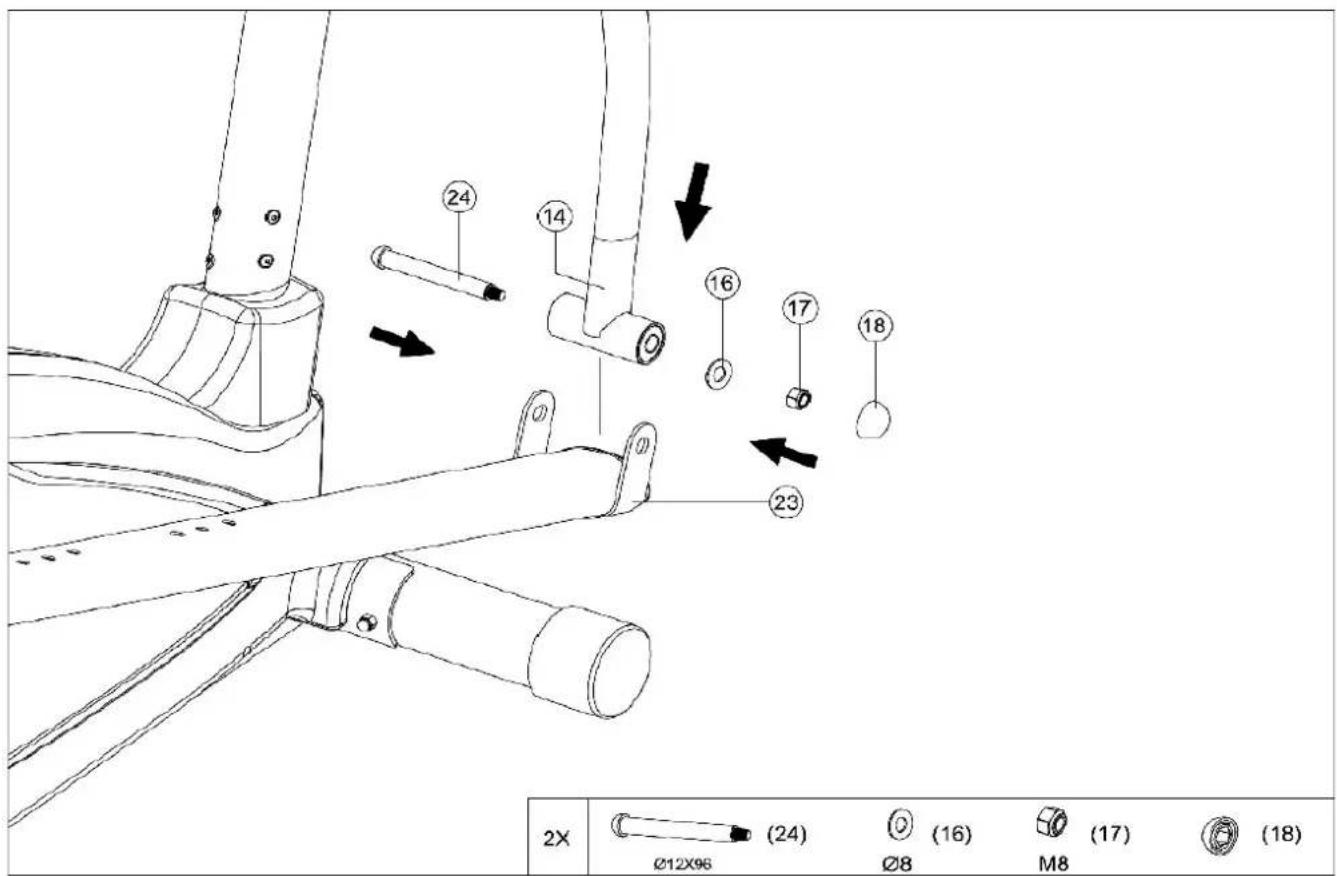
text_image
2X Ø12X96 (24) Ø8 (16) M8 (17) (18)Stap / Step 5
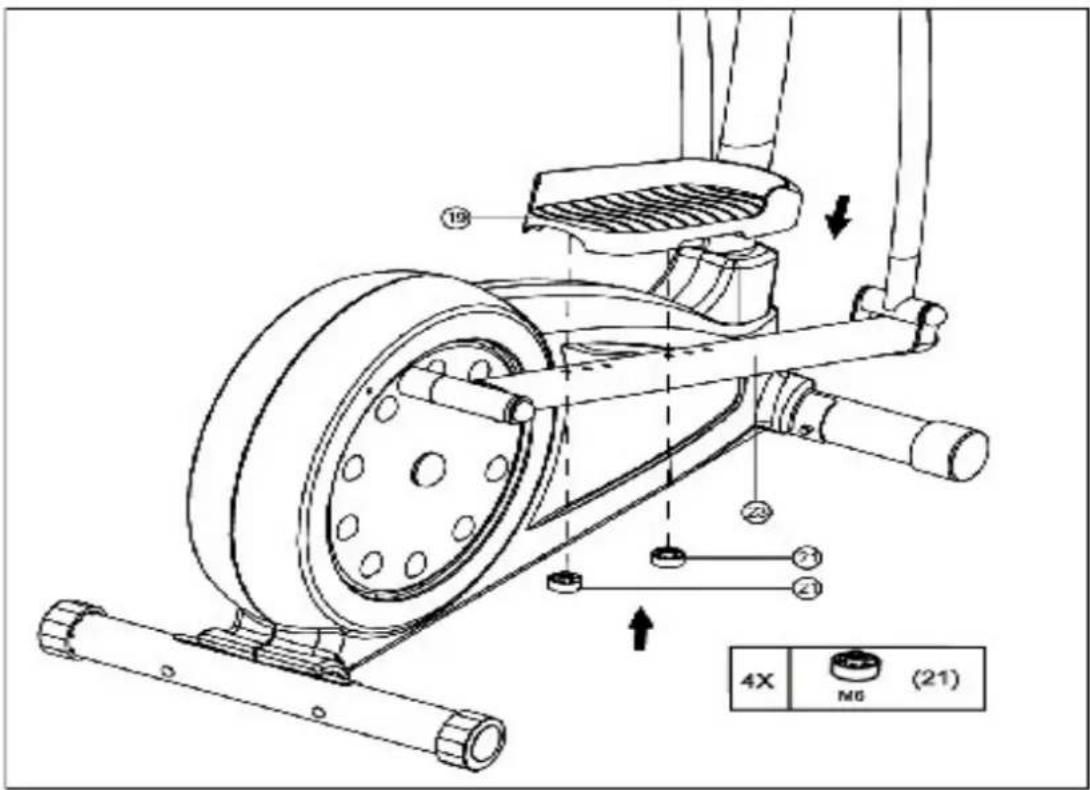
text_image
Technical diagram of a stationary exercise machine with numbered components and a 4X magnified view labeled (21)Stap / Step 6
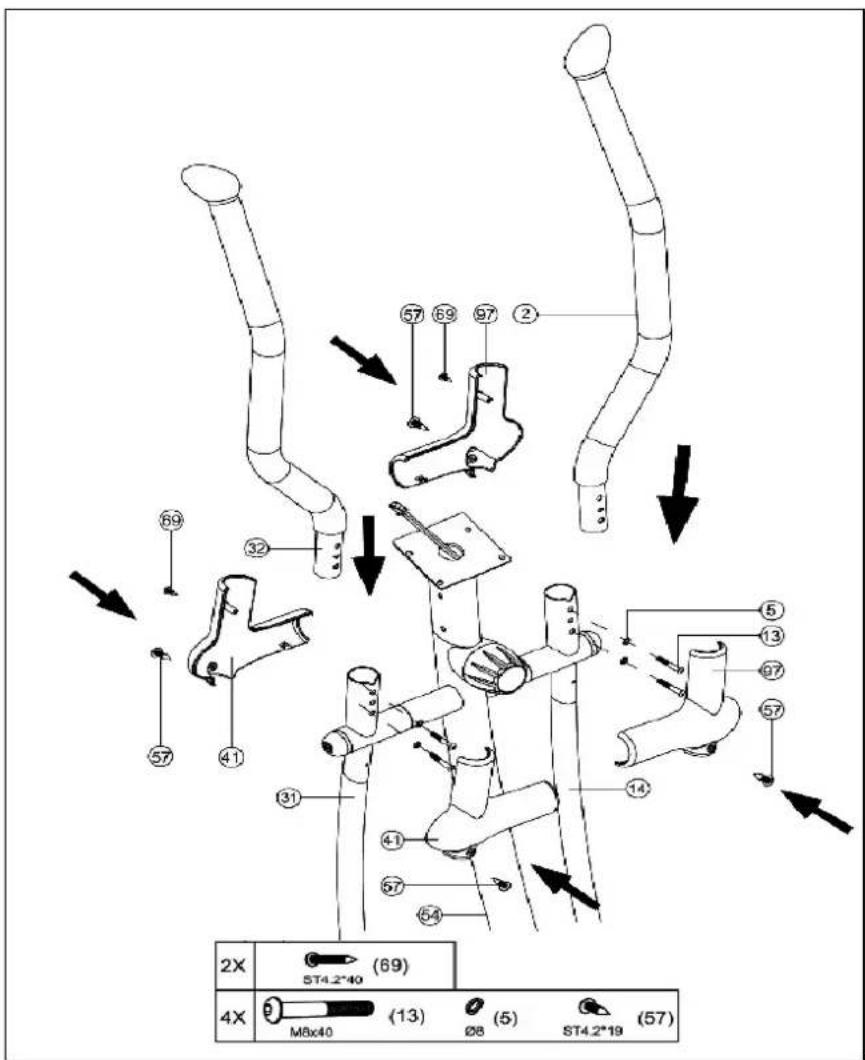
text_image
2X ST4.2*40 (69) 4X M8x40 (13) Ø8 (5) ST4.2*19 (57)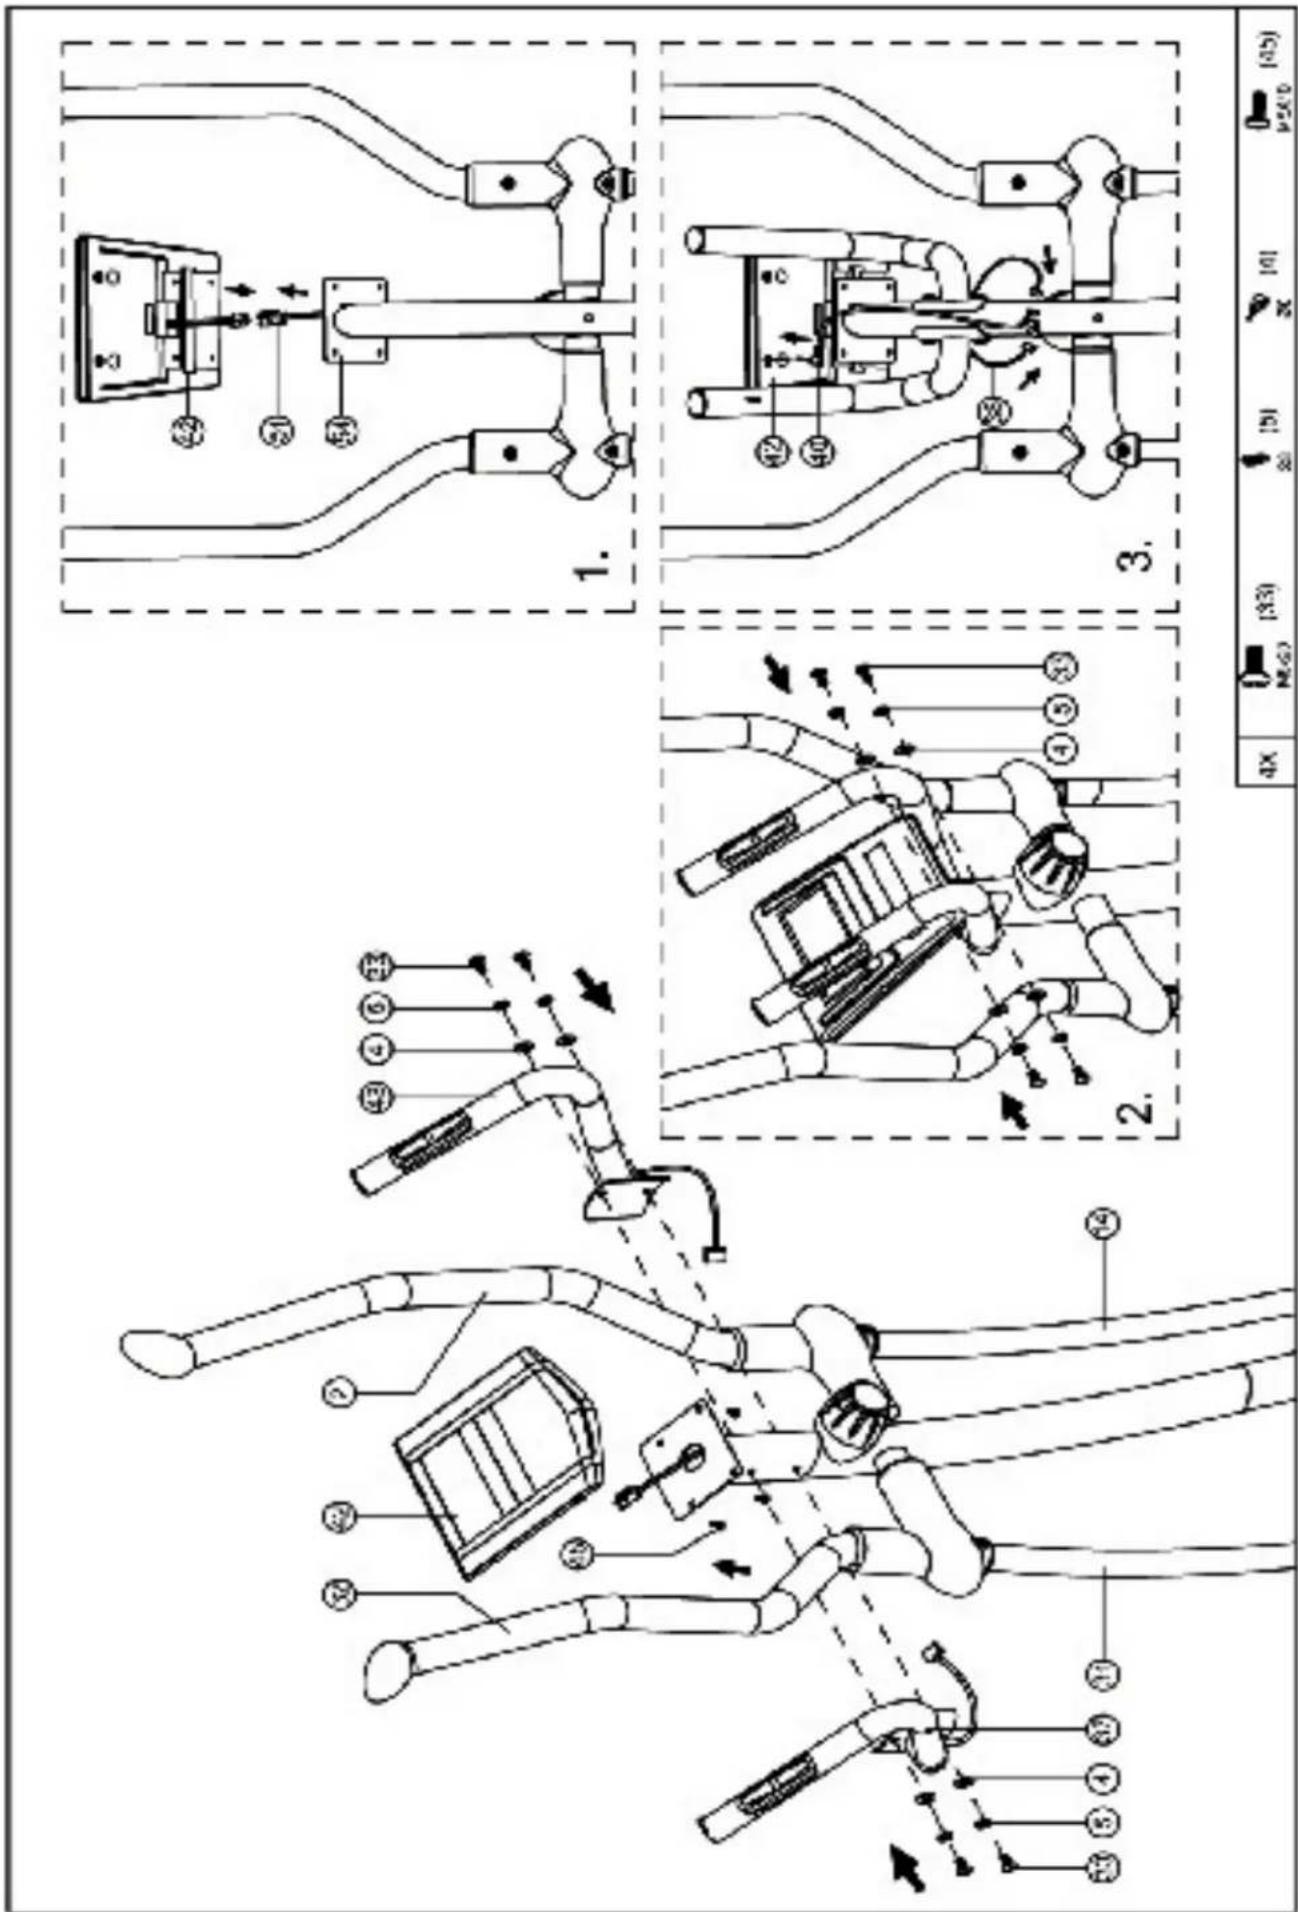
text_image
Technical schematic diagram of a mechanical assembly with numbered components and directional arrows indicating motion or flow.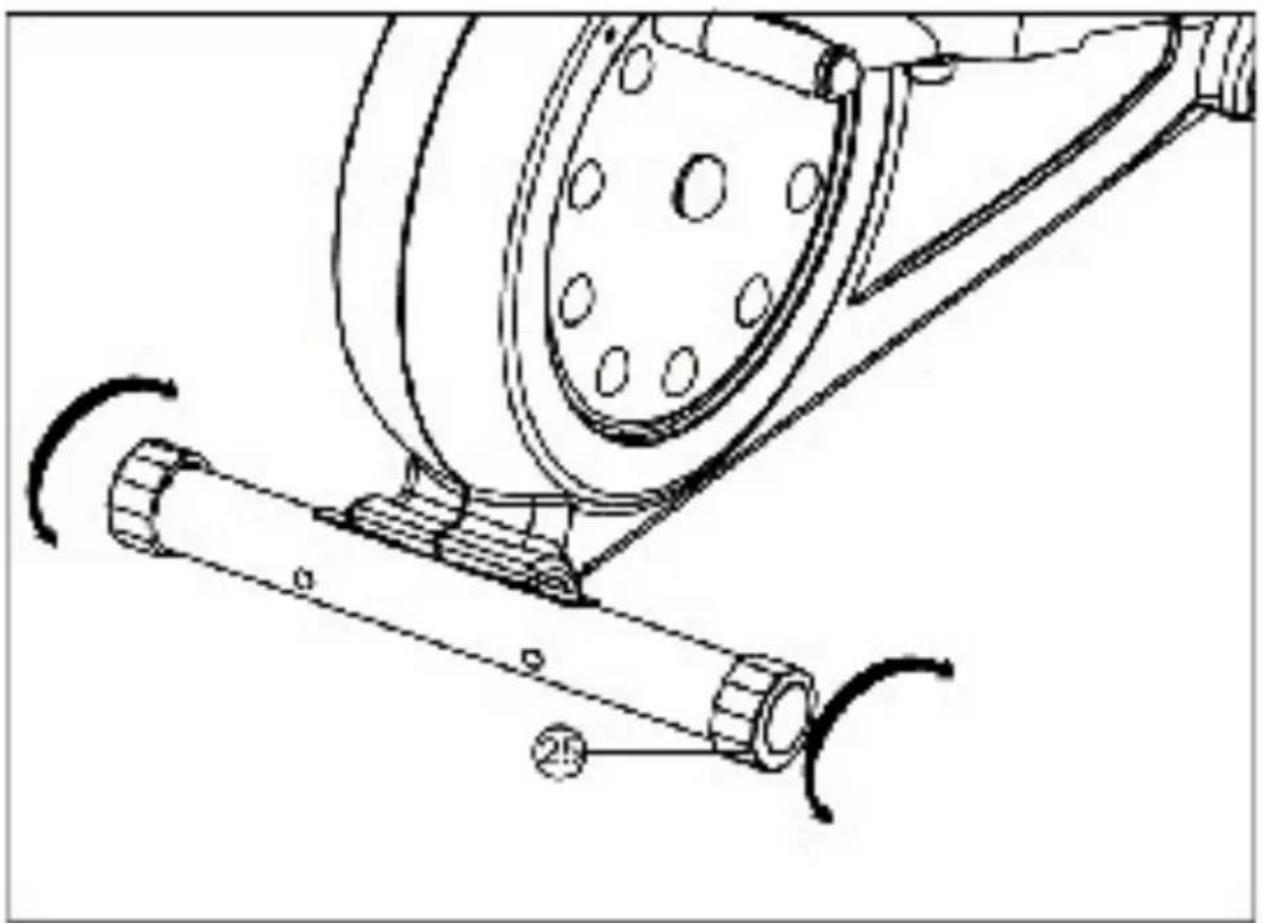
natural_image
Technical line drawing of a mechanical assembly with rollers and linkages (no text or symbols)4. Reiniging en Onderhoud
Onderhoud
- In beginsel vereist de apparatuur geen onderhoud.
- Inspecteer regelmatig alle onderdelen van het apparaat en een goede zitting van alle schroeven en verbindingen.
- Laat alle defecte onderdelen direct vervangen door onze klantenservice. Totdat deze gerepareerd of vervangen zijn, mag het apparaat niet gebruikt worden.
Reiniging
- Voor reiniging dient u alleen een vochtige doek te gebruiken. Vermijd het gebruik van harde schoonmaakmiddelen. Zorg dat er geen vocht in de computer terechtkomt.
- Onderdelen die met transpiratie in aanraking komen, dienen met een vochtig doekje gereinigd te worden.
5. Computer
5.1 Computer toetsen
RECOVERY: Meting van de herstelhartslag.
DELETE: ndr ukken om ingestelde waardes te wissen. ange rdan 2 seconden indrukken zal alle waardes wissen.
SET: Instellen van waardes voor tijd, afstand, calorieën en hartslag. Deze toets indrukken zal de waardes automatisch verhogen.
MODE: Navigeren tussen de verschillende functies. De geactiveerde functie wordt in de display weergegeven.
5.2 Display
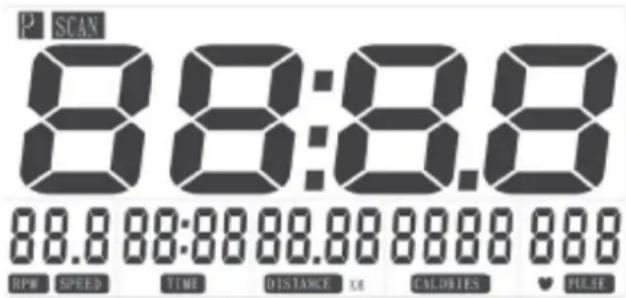
text_image
P SCAN 8:8:8.8 88.8 88:88 88.88 88.88 88.8 RPM SPEED TIME DISTANCE X1 CALORIES ♥ PULSE4. Care and Maintenance
Maintenance
- In principle, the equipment does not require maintenance.
● Regularly inspect all parts of the equipment and the secure seating of all screws and connections. - Promptly replace any defective parts through our customer service. Until it is repaired, the equipment must not be used.
Care
- When cleaning, use only a moist cloth and avoid harsh cleaning agents. Ensure that no moisture penetrates into the computer.
- Components (handlebar, saddle) that come into contact with perspiration, need cleaning only with a damp cloth.
5. Computer
5.1 Computer keys
RECOVERY: Recover y pulse measurement.
DELETE: Press to delete entered values. Holding the RESET k eypressedf or more than 2 seconds will delete all values.
SET: Setting of values for Time, Distance, Calories and Heart rate. Pressing the key will increase the values automatically.
MODE: Changing between the functions. The activated function will be shown in the big display.
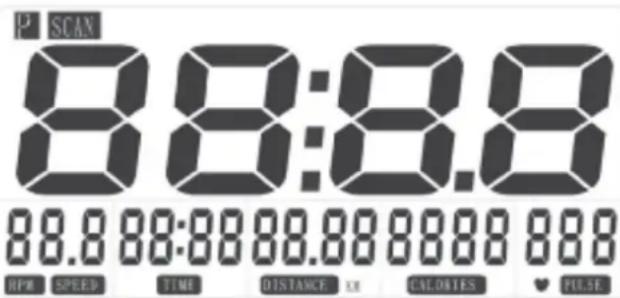
5.2 Display
text_image
SCAN 8:8:8.8 88.8 88:88 88.88 88.88 88.8 HPR SPEED TIME DISTANCE KR CALORIES ♥ PULSERPM/SPEED: Deze functie weergeeft afwisselend de snelheid (km/h) (0 - 99.99 km/h) en RPM (omwentelingen per minuut) (0 - 999).
SCAN: Automatisch verspringen tussen alle functies elke 6 seconden.
TIME: Trainingstijd (00:00 tot 99:00 minuten). De trainingstijd kan met behulp van de SET toets ingesteld worden.
DISTANCE: Afstand (0.0 tot 99.5 km). De afstand zal in stappen van 100 meter worden weergegeven. De afstand kan met behulp van de SET toets ingesteld worden.
CALORIES: Weergeeft het geschatte calorieverbruik (0.0 tot 990 Kcal.), dat afhankelijk is van leeftijd, geslacht en basiscondities van de gebruiker. Het calorieverbruik kan met behulp van de SET toets ingesteld worden.
PULSE: Weergeeft de actuele hartslag van 72 - 240 BPM (hartslagen per minuut). De maximale hartslag kan met behulp van de SET toets ingesteld worden.
5.3 Computerfuncties
5.3.1 Batterijen plaatsen
Plaats 2 AA batterijen in de batterijhouder aan de achterkant van decomputer. Let op de juiste plaatsing met be trekking tot de polariteit.
5.3.2 Kame rtem peratuur
Nadat u debatterijen heeft geplaatst zal de computer de huidige kamertem peratuur in °C weergeven.
5.3.3 Instellen tijd en datum
De display weergeeft een knipperende waa rde voor uren. Door de SET toets in te drukken kun t u de uur waardev erande ren. Door de MODE toets in te drukken activeert u de vo lgende waarde! Gazo door tot dat alle waardes ingesteld zijn. Natat alle waardes ingesteld zijn, zal de display automatisch het trainingsmenu weergeven. Het verwijderen van de batterijen zal alle waardes wissen.
5.3.4 Auto ON/OFF functie
De computer zal automatisch inschakelen bij het begin van de training en automatisch uitschakelen 4 minuten nadat uw training beëindigd is.
RPM/SPEED: This function range is showing Speed (Km/H) (0-99.9Km/H) and RPM (0-999) on a rotating basis.
SCAN: Automatic change between all function values every 6 seconds.
TIME: Exercise time (00:00-99:00 minutes). The time can be set by using the "SET"- button.
DISTANCE: 0.0-99.5 km range. Distance will be shown in 100m steps. The distance can be set by using the "SET"-button.
CALORIES: Shows the approx. calories consumption 0.0-990 Kcal. which differs naturally according to age, sex and basic conditions of the user. The calories consumption can be set by using the "SET"- button.
PULSE: Shows the actual heart rate from 72-240 bpm. The max heart rate can be set by using the "SET"- button.
5.3 Computer functions
5.3.1 Insert the batteries
Use 2pcs of AAbatteries and put them into the batteries case at the backside of the computer. Pay attention to the correct polarity.
5.3.2 Room temperature
After in, setting the batteries, the computer is showing the current room temperature in °C.
5.3.3 Setting of time and date
The display show sa bl'ink hour valu e. Pressing of the SET-key will change the hour value. By pressing the MODE-Key, you can activate the next value. Please continue, until all values are set. After all data is set, the display will automatically show the exercise menu. Removing of the batteries will delete all set values.
5.3.4 Auto ON/OFF function
Computer will be activated automatically when exercise is started and 4 minutes after you finish your exercise, it will be deactivated automatically.
5.4 Trainen zonder ingestelde waardes
Begin met uw training en alle waardes zullen vanaf 0 tellen.
5.5 Trainen met ingestelde waardes
Selecteer de waardes die u wilt instellen door de MODE toets in te drukken. De geactiveerde waarde is aan het knipperen. U kunt de waarde aanpassen door het indrukken van de SET toets. Door de MODE toets in te drukken, gaat u door naar de volgende waarde.
Indien u een waarde wilt herinstellen, activeer deze en druk de DELETE toets in. Om alle waardes te wissen, dient u de DELETE toets langer dan 2 seconden in te drukken totdat u een piep hoort.
Let op: Indien u meerder waardes instelt, de computer zal een piep produceren bij de eerste waarde die de 0 bereikt. Indien u de door u ingestelde hartslag passeert, zal de computer elke 3 seconden piepen.
5.6 Hand hartslagmeting
Verbind de hand hartslag kabel met de verbindingspoort (hartslag input) aan de achter zijde van de computer. Plaats beide handen op de contactsensoren op het stuur. Indien u één hand van de contactsen sor afhaalt, zal het langer duren om de correcte watt waarde te verkrijgen U di ent met beide handen de contactsen soren vast te houden.
5.7 Herstelfunctie
Gedurende een hartslag-geon trobeerd e training, druk de RECOVERY toets in (beide handen dien en op de contactsensoren voor h artslagmeting ge plaatste worde n) en stop direct met peddelen. Alle compu ter data worden direct beëindigd. Deti jd zal a flopend telen van 00:60 ( één minuut) naar 00:00. Daarna wordt uw persoonlijke fitness score (F1 - F6) weergegeven op de display.
Berekening:
Het verschil tussen uw hartslag aan het einde van uw training en uw hartslag gedurende één minuut na het indrukken van de RECOVERY toets.
Uitleg:
Deze crosstrainer is voorzien van een herstelhartslag meetfunctie, zodat u uw prestatievermogen kunt reconstrueren of verbeteren. Een belangrijke indicatie voor uw fitnessniveau is de snelheid waarmee uw lichaam herstelt. Indien uw trainingshartslag binnen één minuut na het beëindigen van uw training met ongeveer 30% daalt, dan kunt u aannemen dat u een goede trainingsconditie heeft.
De computer weergeeft uw fysieke herstelcapaciteit in de vorm van een herstelscore (F1 - F6). F1 betekent een voldoende, F6 betekent een onvoldoende.
5.4 Training without set values
Start your exercise and all values count from zero.
5.5 Training with set values
Select the values you want to set by pressing the MODE-button. The activated value is blinking. Pressing the SET-button will change the value, pressing the MODE-button will activate the next value.
If you want to reset a value, please activate it and press the DELETE-button for a short time. To delete all set data, you have to press the DELETE-button for more than 2s until you will hear a beep.
Attention: If you set several values, the computer will beep if the first value reach „0“. If you pass your set heart rate, the computer will beep every 3 seconds.
5.6 Hand pulse measurement
Plug in the hand pulse cable in the hand pulse plug (Pulse input) at the back of the computer. Please put both hands on the sensors, which are assembled on the hand lebar. If you lift off one hand off the sensor during measuring, it will take some time to reach the correct watt value. Both hands have to be kept on the hand pulse sensors
5.7 Recovery function
During training with pulse control press the RECOVERY button (pulse grip – both hands must grip the errors immediately after pressing the button) and immediately stop pedalling. All computer data are immediately stopped. The time counts down from 00:60 for one minute to 00:00. Then your fitness score (F1 – F6) appears on the display.
Calculation:
The DIFFERENCE between the pulse rate at the end of training and the pulse rate 60 seconds after pressing the RECOVERY button.
Explanation:
This exercise bike is equipped with a recovery pulse measurement feature, so that you can reconstruct your performance status or a performance improvement. An important indicator for your fitness is the speed of your body's recovery. If the training pulse decreases within one minute after completing training by about 30 %, you can assume that you are in a good training condition.
The training computer prints out your physical recovery capacity in the form of a recovery score (Note F1 – F6). F1 means very satisfactory, F6 means very unsatisfactory.
Opmerking
Om de herstelfunctie te activeren dient u ten minste 30 seconden te trainen. Echter, om een betekenisvolle fitness score te verkrijgen dient u ten minste 15 minuten te trainen. Die tijd is nodig om een stabiele trainingshartslag te bereiken.
Fout:
Indien de display onjuiste waardes weergeeft, verwijder de batterijen voor tenminste 15 seconden.
Note
To activate the recovery function, you must exercise for at least 30 seconds. In order to receive a meaningful fitness score, however, you must exercise for at least 15 minutes. That time period is required to reach a stable training pulse.
Error:
Please remove the batteries for 15 seconds, if the display shows incorrect values.
6. Batterijen verwijderen
6. Batterijenverw ijdere n
Graag uw lege batterij eni nleveren bij een inlev erpunt, bijvoorbeeld e ene lectronicaza ak. De lege batterijen mogen niet bij het reguliereh uisafval weggego oid worden.
6. Battery disposal
6. Battery disposal
Please dispose batteries properly at authorised shops, e.g. electronic shops. Do not put it into the normal house hold rubbish bin.
7. Trainingshandleiding
De elliptische beweging maakt een optimale aerobic weerstandtraining mogelijk, die soepel is voor de gewrichten.
De beweging is soepel en vloeiend, een mix van lopen, joggen en steppen. De druk op de gewrichten en pezen wordt verminderd door de trainingsefficiency van deze drie vormen van beweging, wat uitermate soepel is voor het gehele motorieke systeem.
Trainen met de crosstrainer is een ideale bewegingstraining voor versteviging van belangrijke spiergroepen en hart en bloedsomloop. Gecombineerd met een training van de armen maakt de crosstrainer het mogelijk om tegelijkertijd de bovenarmen en schouders te trainen.
De volgende belangrijke richtlijnen zijn belangrijk voor een correcte houding en techniek, met betrekking tot optimale trainingsresultaten.
- Een rechte houding, de torso licht naar voren gebogen, om een gunstige trainingspositie in de i een te bereiken.
- Aan het begin van de training, train eerst zonder et stuur en de hendels vast te houden, om kennis te take n met de elliptische vorm van trainen zonder er ulp van de armen. Wan neer uh iermee begint, traint
- automatisch in eene orrecte positie.
Da ama kunt u langza amaan de armen gaa n gebruiken, o m he t complete bewegingstraject te „ervaren“. - Le unniet op de amsteunen en „duw“ niet met duw voeten. Dit zorgt voor een verhoging van het horizontale krachteffect op de knieën, wat resulteert in een v eigrote drukvan d egewrichten.
Bijzonder bela ngrijkz zijn de volgende twee punten:
1) rain n oo itin een excessieve positie waarin u lem aal na ar voren leunt, omdat dan het ge hele onderlichaam (lende, hêupên, knieën) te maken krijgt met negatieve druk.
2) Train nooit in een achterwaardse positie, omdat deze positie een nadelige en ongunstige druk uitoefent op de rugspieren (holle rug formatie) en de knieën.
7.1 Trainen op de crosstrainer
U kunt kiezen uit twee verschillende vormen van training:
- Voorwaarts, alleen benen: Neem plaats op de trappen, pak het stuur stevig vast en maak een voorwaartse beweging met uw benen, vergelijkbaar met de fietsbeweging. Hiermee traint u uw benen, billen en buikspieren. Bij twijfel, pak het stuur stevig vast.
7. Training manual
In virtue of the elliptical movement the elliptical trainer makes optimum, aerobic endurance training that is gentle on the joints possible.
The motion is gentle and fluent, a mixture of walking, jogging and stepping, which largely eliminates stressing of the joints and tendons with the simultaneous addition of the training efficiency of these three forms of movement and thus is particularly gentle on the entire locomotion system.
Training with the elliptical trainer is an ideal movement training for strengthening important muscle groups and the cardio-circulatory system. Combined training with the arms makes it possible to simultaneously strengthen the upper arm and shoulder musculature.
In the following, several important points are provided for correct posture and clean technique, with regard to optimum training outcome.
- Erect posture, the torso inclined slightly forward, in order to achieve a favorable power action in the knees.
At the start of exercising, train with out holding on to the handlebar and the handles, in order to become familiar with the elliptical form of movement without the aid of the arms. When this is done, you automatically train in the correct position. - Theng radually involve the arms, in order to "feel" the complete course of the motion.
Do not lean on the arm rails and do not "push" with the feet. The latter movement increases the horizontal force effect on the knees, which results in increased stressing of the joint.
When this is done the following two points are particularly important:
1) Never train in an excessive forward position, because when this is done adverse stresses result on the entire lower half of the body (loins, hips, knee joints)
2) Never train in a rearward position, because this represents a detrimental load on the back (hollow back formation) and on the knee joints.
7.1 Types of training using the elliptical trainer
You have the option of choosing from two different training types:
-
Forward, legs only: Stand on the steps, hold the handlebar firmly and describe a forward movement with your legs, similar to riding a bike. When doing this the leg, buttocks and abdominal musculatures are trained. If you do not feel sure, then it is best to firmly grip the handlebar.
-
Voorwaarts, benen en bovenlichaam: Neem plaats op de trappen, pak de handels stevig vast en begin voorzichtig met uw benen voorwaarts te bewegen. Voor het trainen van uw bovenlichaam, ondersteun de beenspieren door uw armen te gebruiken, u kunt ze afwisselend naar u toe trekken en van u af duwen. U bepaalt de intensiteit van de spiertraining, door uw beenspieren danwel uw bovenlichaam harder in te spannen. Gedurende deze vorm van training is het altijd van belang uw evenwicht te bewaren. U traint dan uw rugspieren wanneer u de handels naar u toe trekt; u traint uw borstspieren wanneer u de hendels van u af duwt. De trekbeweging met uw armen zorgt voor vesteviging van uw rug, wat belangrijk is voor personen die veel tijd doorbrengen achter de computer.
Om uw training te variëren, kunt u de bovengenoemde trainingstechnieken ook in de tegengestelde richting uitvoeren.
7.2 Richtlijnen training
Train nooit direct na een maaltijd.
- ndien mogelijk, train met hartslagmeting.
● Warm u w spieren op voor het trainen door rek- en et choefeningen uit te voeren
Verlaag de snelheid voor dat u stopt met trainen. Stop ooit abruptmet trainen.
- Do een kee stretch ofeningen na uwtrain ing.
7.2.1 Training sf frequentie
Om uw fysiek en conditie op lange termijn te verbeteren, raden wij een training aan van minimaal drie keer per week. Dit is een gemiddelde trainingsfrequentie voor een volwassene om op lange termijn conditie te verbeteren of vet te verbranden. Wanneer uw fitnessniveau verbetert, kunt u ook dagelijks trainen. Het is met name belangrijk met regelmaat te trainen.
7.2.2 Trainingsintensiteit
Bouw uw trainingsschema zorgvuldig op. De intensiteit van uw training dient geleidelijk opgevoerd te worden, zodat geen vermoeidheid van de spieren of motoriek optreedt.
- Forwards, legs and upper body: Stand on the steps, grasp the handles firmly and cautiously start to move your legs forward. For upper body training, supporting the leg musculature and using the arms, you can now alternatingly pull them towards you or push them away from you. You determine the intensity of the respective muscle training, by either working the leg musculature or the upper body musculature harder. In this training it is always important to have control over balance. When this is done, by pulling the movable arms towards you the back is trained; by pushing them away from you the chest musculature is trained. Drawing in the arms supports straightening of the back, which is very important for persons, who spend a lot of time sitting at the computer.
To expand your training, you can also do the exercises listed above using reverse movements.
7.2 Training notes
Never train immediately after a meal.
- f possible, orient training to pulse rate.
Do muscle warm-ups before starting training by loosening or stretching exercises.
When finishing training, please reduce speed. Never abruptly end training.
Do some stretching exercises when finished training.
7.2.1 Training frequency
To improve physical fitness and to enhance condition over the long term, we recommend training at least three times a week. This is the average training frequency for an adult in order to obtain long-term condition successor high fat burning. As your fitness level increases, you can also train daily. It is particularly important to train at regular intervals.
7.2.2 Training intensity
Carefully structure your training. Training intensity should be increased gradually, so that no fatigue phenomena of the musculature or the locomotion system occurs.
Omwentelingen (RPM)
In termen van een doelgerichte training voor verbetering van uithoudingsvermogen is het aangeraden met een lagere weerstand en een hogere RPM (toeren per minuut) te trainen. Zorg ervoor dat de RPM hoger dan 80 naar niet hoger dan 100 is.
7.2.3 Trainen met hartslagmeting
Voor uw persoonlijke hartslagzone is het aangeraden een aerobic trainingsbereik te kiezen. Verbetering van prestaties met betrekking tot uithoudingsvermogen is haalbaar door lange trainingsessies in een aerobic trainingsbereik.
Zoek deze hartslagzone op in de doelhartslag diagram of informeer uzelf over hartslagprogramma's. U dient 80% van uw training in aerobics trainingsbereik te doen (tot 75% van uw maximale hartslag).
De overige 20% van de tijd, kunt u invullen met vermogenshoogtepunten om uw aerobic drempels te verhogen. Met de resulterende trainingssuccessen kunt u later hogere prestaties met dezelfde hartslag bereiken; dit betekent een verbetering in uw fysieke gesteldheid.
Wanneer u reeds ervaren bent met een
hartslag-gecontroleerde training, dan kunt u uw gewenste hartslagzonematchen aanu w speciale tra iningsplan of fitness status
Opmerking:
Omdat er mensen zijn met een „hoge“ en een „lage“ hartslag, kunnen de optimale individue le hartslag zones (aerobic zone anaerobic zone) vers chillen van de zones voor het algemene publiek (doel hartslag diagram). In deze gevalen die nt training te worden afgesteld op persoonlij ke erv aingen. Wan neer beginners met dit fenome- en te maken krij gen, is het be a ngrijk e enarts te raadplegen voordat er getraind wo rdt, om zo trainingscapaciteit in kaart te brengen.
7.2.4 Trainingscontrole
Zowel medisch als in termen van trainingsphysiologie is een hartslag-gecontroleerde training een meest logische keuze en is georiënteerd op de individuele maximale hartslag.
Deze regel geldt voor zowel beginners en ambitieuze recreationele athleten als professionele sporters. Afhankelijk van de doelstelling van de training en prestatievermogen, bestaat een training uit specifieke intensiteit van de individuele maximale hartslag (uitgedrukt in procentpunten).
Om een effectieve cario-training te configureren conform de sport-medische aspecten, readen wij een training aan waarbij uw hartslag tussen de 70% en 85% van de maximale hartslag ligt. Neem a.u.b. kennis van de onderstaande doelhartslag diagram.
RPM
In terms of objective endurance training it is recommended in principle to select a lower step resistance and to train at a higher rpm (revolutions per minute). Ensure that the rpm is higher than 80 RPM but does not exceed 100.
7.2.3 Heartrate training
For your personal pulse zone it is recommended that an aerobic training range be chosen. Performance increases in the endurance range are principally achieved by long training units in the aerobic range.
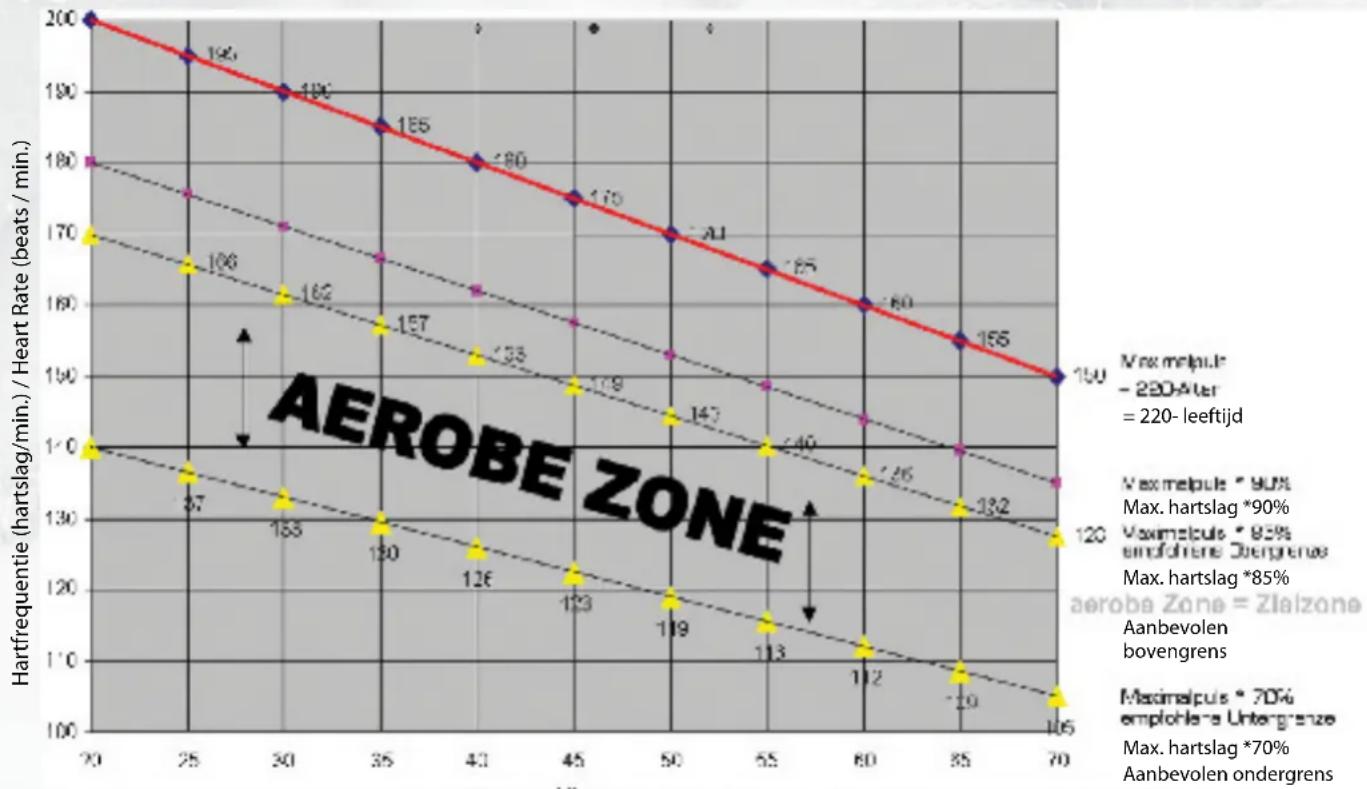
Find this zone in the target pulse diagram or orient yourself on the pulse programs. You should complete 80% of your training time in this aerobic range (up to 75% of your maximum pulse).
In the remaining 20 % of the time, you can incorporate load peaks, in order to shift your aerobic threshold upwards. With the resulting training success you can then later produce higher performance at the same pulse; this means an improvement in your physical shape.
If you already have some experience in pulse-controlled training, you can match your desired pulse zone to your special training plan or fitness status.
Note:
Because there are persons who have "high" and "low" pulses, the individual optimum pulse zones (aerobic zone, anaerobic zone) may differ from those of the general public (target pulse diagram).
In these cases, training must be configured according to individual experience. If beginners are confronted with this phenomenon, it is important that a physician be consulted before starting training, in order to check health capacity for training.
7.2.4 Training control
Both medically and in terms of training physiology, pulse-controlled training makes most sense and is oriented on the individual maximum pulse.
This rule applies both to beginners, ambitious recreational athletes and to pros. Depending on the goal of training and performance status, training is done at a specific intensity of individual maximum pulse (expressed in percentage points).
In order to effectively configure cardio-circulatory training according to sports-medical aspects, we recommend a training pulse rate of 70% - 85% of maximum pulse. Please refer to the following target pulse diagram.
Meet uw hartslag op de volgende punten:
- Voor het trainen = rusthartslag
- 10 minuten na het starten van de training = trainingshartslag
- Een minuut na het trainen = herstelhartslag
- Gedurende de eerste paar weken wordt het aangeraden om met een lagere hartslag te trainen dan in de trainingshartslagzone (ongeveer 70 %) of lager.
- Gedurende de volgende 2 - 4 maanden kunt u de intensiteit van uw training stapsgewijs opvoeren totdat u aan de bovenkant van de trainingshartslagzone ligt (ongeveer 85 %), zonder dat u overmatig gaat trainen.
- Indien uw trainingsconditie goed te noemen is, kunt u de makkelijkere onderdelen in het lage aerobics bereik hier en daar verspreiden door het trainingsprogramma, zodat u voldoende herstelt. Een „goede“ training betekent altijd dat juistien traimt, waarin, baardt dat dat u ldoende kunt herste llen op de juiste momenten ermatig trainen kan uw trainingsresultaten in de weg itten.
- Elke training aande boven grens van de individuele ithoudingsvermogen dient altijd opgevolgd te worden et een hersteltraining met een lag ere hart slag (to 15% van de maximale hartslag).
Waneer uw conditie ver beterd is, wordt een hogere trainingsinten steit ver eist om uw hartslag in de „trainingszone“ te brengen, uw lichaam is dan in staateen hoger prestatievermogen telleveren. U zu ltde resultaten vande verbetering van uw conditiem erken aan een hogeref itness score (F1 - F6).
Berekening van de trainingshartslag
220 hartslagen per minuut min uw leeftijd = persoonlijke maximale hartslag (100 %).
Trainingshartslag
Ondergrens: (220 - leeftijd) x 0,70
Bovengrens: (220 - leeftijd) x 0,85
Measure your pulse rate at the following points in time:
- Before training = resting pulse
- 10 minutes after starting training = training / working pulse
- One minute after training = recovery pulse
- During the first weeks, it is recommended that training be done at a pulse rate at the lower limit of the training pulse zone (approximately 70%) or lower.
- During the next 2 - 4 months, intensify training stepwise until you reach the upper end of the training pulse zone (approximately 85% ), but without overexerting yourself.
- If you are in good training condition, disperse easier units in the lower aerobic range here and there in the training program. so that you regenerate sufficiently. "Good" training always means training intelligently, which includes regeneration at the right time. Otherwise, otherwise overtraining results and your form degenerates.
Every loading training unit in the upper pulse range of individual performance should always be followed in subsequent training by a regenerative training unit in the lower pulse range (up to 75% of the maximum pulse).
When condition has improved, higher intensity of training is required in order for the pulse rate to reach the "training zone"; that is, the organism is capable of higher performance. You will recognize the result of improved condition in a higher fitness score (F1 - F6).
Calculation of the training / working pulse:
220 pulse beats per minute minus age = personal, maximum heart rate (100 %).
Training pulse
Lower limit: (220 - age) x 0.70
Upper limit: (220 - age) x 0.85
7.2.5 Trainingsduur
Elke training dient idealiter te bestaan uit een warming-up fase (opwarmen), een trainingsfase en een cool-down fase (afkoelen) om blessures te voorkomen.
Opwarmen:
5 tot 10 minuten langzaam fietsen.
Training:
15 tot 40 minuten van intensieve (maar geen overmatige) inspanning, zoals hierboven beschreven.
Afkoelen:
5 tot 10 minuten langzaam fietsen, gevolgd door strechtoefeningen om de spieren te ontspannen.
Stop direct met trainen indien u zich niet goed voelt of indien er sprake is van overmatige fysieke inspanning.
Verandering van metabolisme gedurende de training
- Gedurende de eerste 10 minuten van de inspanning nsumeert on s lichaam de suikers die opgeslagen zijn onze s pieren. Glycogeen.
● Na ong eveer 10 min uten begint de vetverbranding. - Na 30 - 40 minuten wordt de vetstofwisseling eactiveerd en ge bruikt ons lichaam vet als de oofdbron van energie.
7.2.5 Trainings duration
Every training unit should ideally consist of a warm-up phase, a training phase, and a cool-down phase in order to prevent injuries.
Warm-up:
5 to 10 minutes of calisthenics or stretching (also slow cycling).
Training:
15 to 40 minutes of intensive or not overtaxing training at the intensity mentioned above.
Cool-down:
5 to 10 minutes of slow cycling, followed by calisthenics or stretching, in order to loosen up the muscles.
Stop training immediately if you feel unwell or if any signs of overexertion occur.
Alterations of metabolic activity during training
In the first 10 minutes of endurance performance our bodies consume the sugars stored in our muscles. Glycogen:
After ab out 10 minutes fat is burned in addition.
After 30 - 40 minutes fat metabolism is activated, then the body's fat is the main source of energy.
Doelhartslag Diagram / Target Pulse Diagram
(Hartfrequentie/Leeftijd) / (Heart Rate / Age)
line
| Time (min) | Max. hartslag (beats/min) | Max. hartslag*90% (beats/min) | Max. hartslag*85% (beats/min) | | ---------- | ------------------------- | ------------------------------ | ------------------------------- | | 20 | 200 | 180 | 170 | | 25 | 195 | 175 | 165 | | 30 | 190 | 170 | 160 | | 35 | 185 | 165 | 155 | | 40 | 180 | 160 | 150 | | 45 | 175 | 155 | 145 | | 50 | 170 | 150 | 140 | | 55 | 165 | 145 | 135 | | 60 | 160 | 140 | 130 | | 65 | 155 | 135 | 125 | | 70 | 150 | 130 | 120 |Leeftijd / Age
text_image
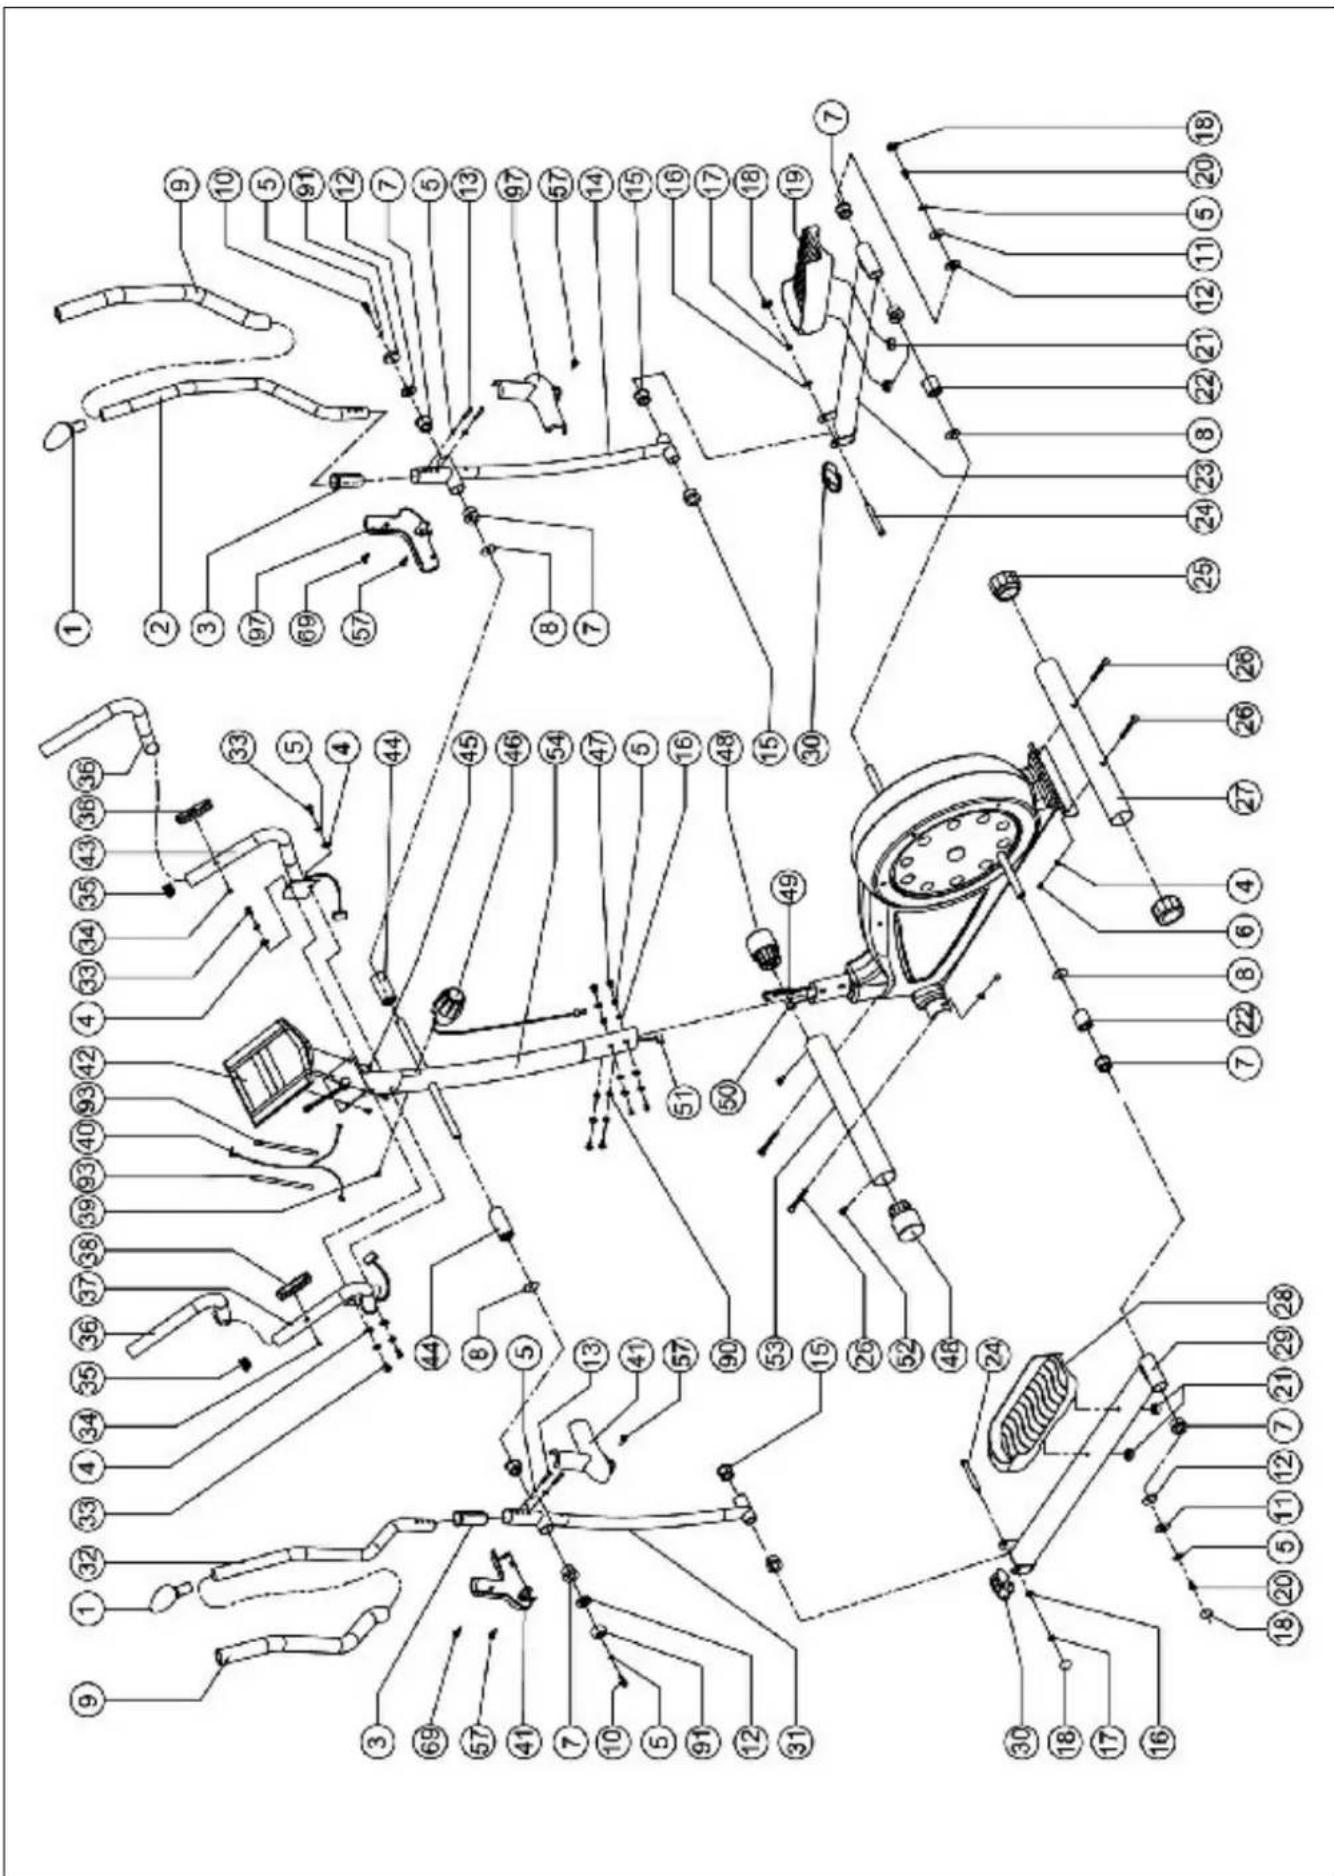
Technical diagram of a mechanical assembly with numbered components for identification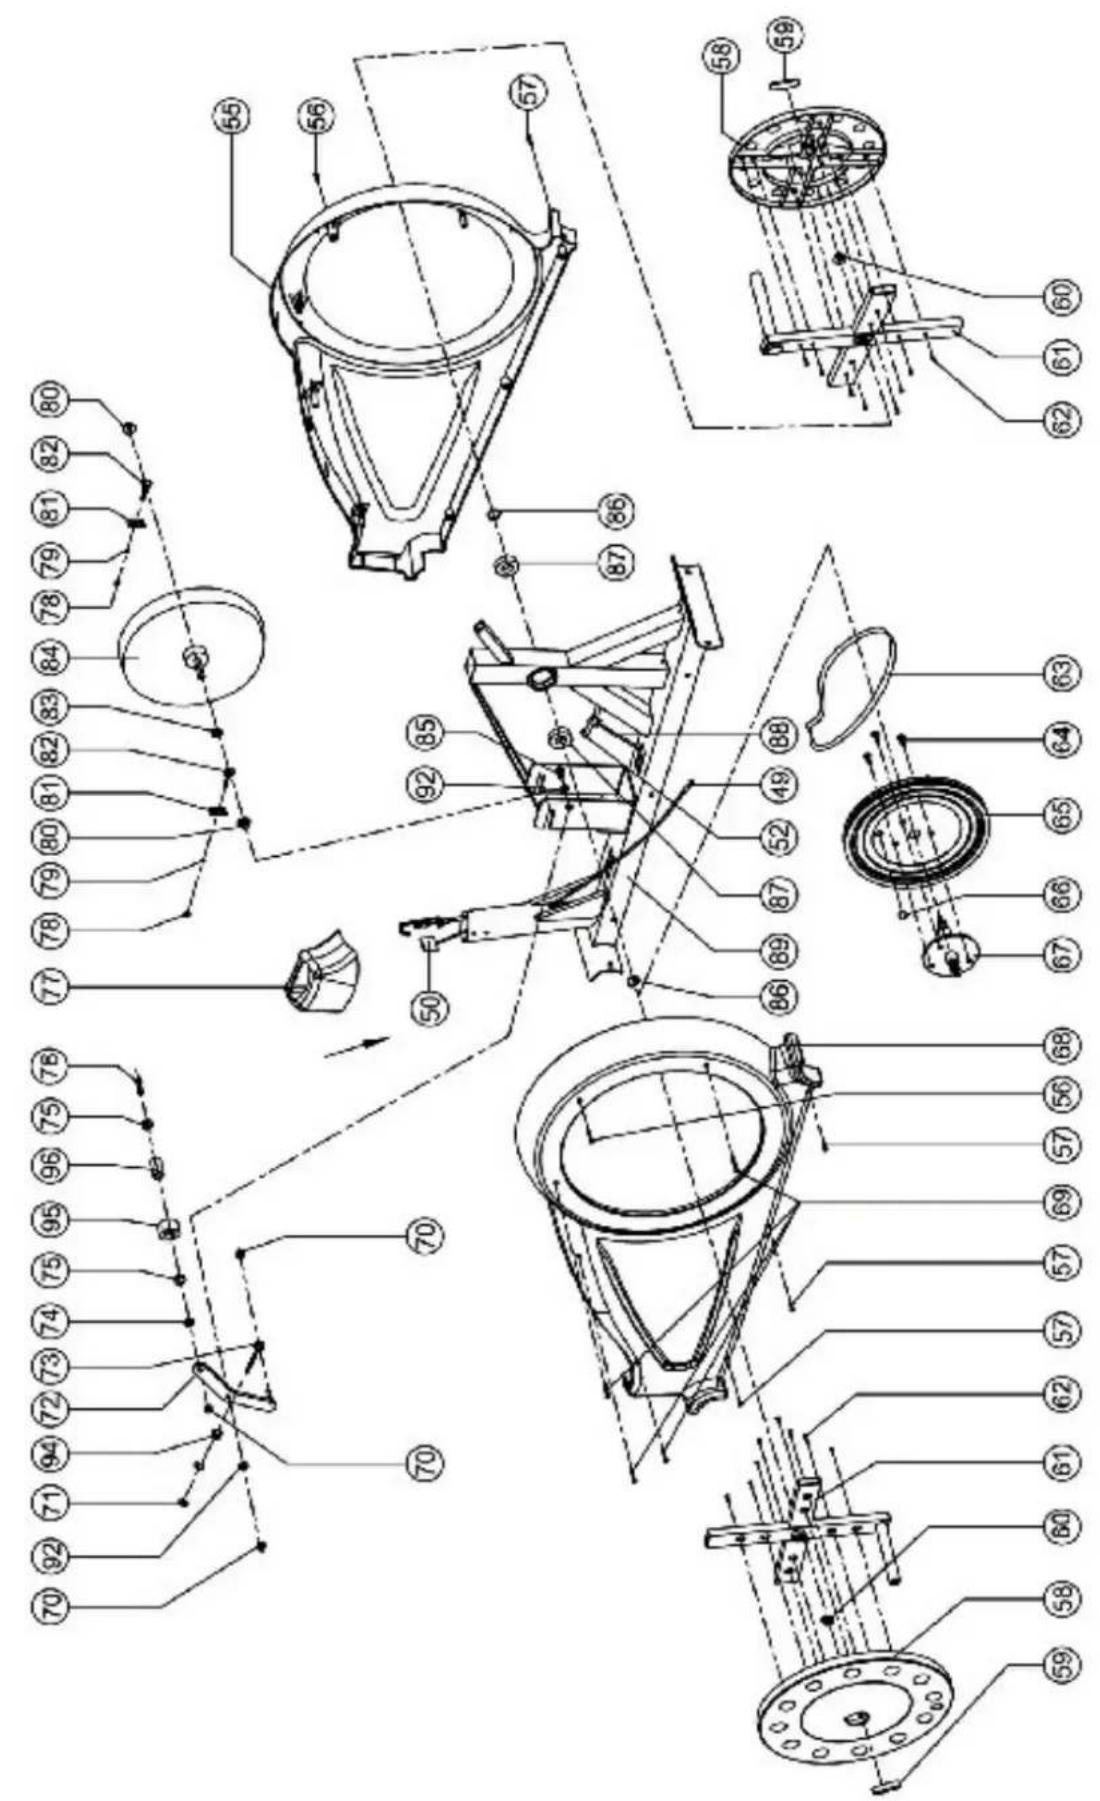
text_image
Technical diagram of a mechanical assembly with numbered components and exploded viewsPositie Omschrijving Description Afmetingen/Dimension Aant./Quantity
| 3250-1 Afdekkap End cap 2 | ||||
| -2 Hendel, rechts Movable handlebar, right 1 | ||||
| -3 Lager Bushing 2 | ||||
| -4 | Revet, gegolfd | Wavy washer | ∅8 | 8 |
| -5 | Springrevet | Spring washer | ∅8 | 18 |
| -6 Dopmoer | Cap nut | M8 | 4 | |
| -7 Metaallager | Metal bushing 8 | |||
| -8 Revet, gebogen | Curved washer | 4 | ||
| -9* Schuim | Foam | 2 | ||
| -10 Inbusschroef | Allen screw | M8x20 | 2 | |
| -11 Revet Washer | ∅8x∅38 | 4 | ||
| -12 Revet, plastic | Plastic ring | 4 | ||
| -13 Inbusschroef | Allen screw | M8x45 | 4 | |
| -14 Verbindingsarm, onder rechts | Connection arm right lower side | 1 | ||
| -15 Lager Bushing 4 | ||||
| -16 Revet Washer | ∅8 | 6 | ||
| -17 Veiligheidsmoer | Safety nut | M8 | 2 | |
| -18 Afdekdop voor veiligheidsmoer | Cap for safety nut | 4 | ||
| -19 Pedaal, rechts | Pedal, right side | 1 | ||
| -20 Inbusschroef | Allen screw | M8x20 | 2 | |
| -21 Paukartelschroef voor pedaal | Knunked nut for pedal | 4 | ||
| -22 Afstand houder | Spacer | 2 | ||
| -23 Pedaala rm, rechts | Pedal arm, right side | 1 | ||
| -24 Inbusschroef | Alen screw | 2 | ||
| -25 Kap hoogtever stelling | Height adjustable cap | 2 | ||
| -26 Bout met ronde kop | Carriage bolt | M8x70 | 4 | |
| -27 Voetkap, achter | Rear foot tubing | 1 | ||
| -28 Pedaal, links | Pedal, left side | 1 | ||
| -29 Pedaalarm, links | Peda arm, left side | 1 | ||
| -30 Afdekkap | End cap | 2 | ||
| -31 Ver bindingsarm, onder links | Connection arm left lower side | 1 | ||
| -32 Hendel, links | Movable handlebar, left | 1 | ||
| -33 Inbusschroef | Alen screw | M8x20 | 4 | |
| -34 Kruiskopschroef | Crossehead screw | St 3.5x20 | 2 | |
| -35 Afdekkap | End cap | 2 | ||
| -36* Schuim | Foam | 2 | ||
| -37 S tuur, links | Handlebar, left side | 1 | ||
| -38 Hartslagsensor | Hand pulse sensor | 2 | ||
| -39 Kruiskopschroef | Crosse head screw | M5 | 1 | |
| -40 Hand hartslagkabel | Hand pulse cable | 1 | ||
| -41 Afdekkap voor stuur, links | Handlebarcover, left side | 1 set | ||
| -42 Computer | Computer | TZ 2170 | 1 | |
| -43 Stuur, rechts | Handlebar, right side | 1 | ||
| -44 Afstandhouder, stuur | Space, handle bar | 2 | ||
| -45 Kruiskopschroef | Crosse head screw | M5x10 | 4 | |
| -46 Weerstandknop | Tension knob | 1 | ||
| -47 Inbusschroef | Allen screw | M8x16 | 6 | |
| -48 Afdekkap met transportrol | End cap with roller | 2 | ||
| -49 Weerstand controlekabel, onder | Lower tension cable | 1 | ||
| -50 Datakabel, onder | Lower computer cable | 1 | ||
| -51 Datakabel, boven | Upper computer cable | 1 | ||
| -52 Kruiskopschroef | Crosshead screw | St 2.9x11 | 4 | |
| -53 Voetkap, voor | Front foot tubing | 1 | ||
| -54 Stuurstang | Handlebar post 1 | |||
| -55 Behuizing, rechts | Right housing | 1 | ||
| -56 Kruiskopschroef | Cross head screw | St 4.2x25 | 2 | |
| -57 Kruiskopschroef | Cross head screw | St 4.2x19 | 10 | |
| -58 Rotatiewiel | Rotation wheel | 2 | ||
| -59 Afdekkap voor rotatiewiel | Cover for rotation wheel | 2 | ||
| -60 Kartelmoer | Serrated nut | M10 | 2 | |
| -61 Stalen kruis voor rotatiewiel | Steel cross for rotation wheel | 2 | ||
| -62 Kruiskopschroef | Cross head screw | St 4.2x15 | 16 | |
| -63* Riem | Belt | 1 | ||
| -64 Kruiskopschroef | Cross head screw | M6x16 | 3 | |
| -65 Rotatiewiel | Drive wheel | 1 | ||
| -66 Magneet | Magnet | 1 | ||
| -67 As | Axle | 1 | ||
| -68 Behuizing, links | Left housing | 1 | ||
| -69 Kruiskopschroef Cross head screw ST4.2x40 6 | ||||
| -70 Veiligheidsmoer Safety nut M8 3 | ||||
| -71 Moer Mutter M8 2 | ||||
| -72 Riemspanner | Idler | 1 | ||
| -73 Oogbout | Eyebolt | M8 1 | ||
| -74 Lager voor weerstandrol | Tension roller bushing | 1 | ||
| -75 Lager | Bearing | 608ZZ | 2 | |
| -76 As voor weerstandrol | Axle for tension roller | 1 | ||
| -77 Afdekkap voor stuurstang | Front cover for handlebar post | 1 | ||
| -78 Moer Nut | M6 2 | |||
| -79 Springrevet | Spring ring | ∅6 | 2 | |
| -80 Kartelmoer | Serrated nut M10 | 2 | ||
| -81 Spanner | Bracket | 2 | ||
| -82 Oogbout | Eye bolt | M6 2 | ||
| -83 Lager | Bushing | 1 | ||
| -84 Vliegwiel | Fly wheel | 1 | ||
| -85 Inbusschroef | Allen screw | M8x20 | 1 | |
| -86 Springrevet | Spring ring | ∅20 | 2 | |
| -87 Lager | Bearing | 6004ZZ | 2 | |
| 88 Sensor | Sensor | 1 | ||
| ) Hoofdfr ame | Main frame | 1 | ||
| ) Revet. geogold Wavv washer ∅8 | 2 | |||
| Afdekkap voor as | Plastic cover for centre axle | 2 | ||
| ? Revet | Washer | MN65 | 1 | |
| ) Afdekking voor rha rtslagkabel | Cover for handpulse cable | 2 | ||
| 94 Afdekking voor oogbout | Eyebolt Cover | 1 | ||
| 95 S panwiel | Idler wheel | 1 | ||
| 96 Bevestiging van s panwiel | Fixation of idler wheel | 1 | ||
| 97 Afdekkap voor stuur,rechts | Handlebarcover,rechts | 1 set | ||
De onderdelen met een * zijn gevoelig voor slijtage en dienen vervangen te worden bij intensief of langetermijng ebruik. Voor nieuwe onderdelen ne emt u contact op met Finnlo Fitness klantenservice.
The partn umbers with an * are wear and tear parts, which are subject to natural wear and which must be replaced after intensive or long-term use. In this case, please contact Finnlo Customer Service. You can request the parts and be charged for them.
11. Garantie / Warranty (Dutch only)
NRG fitness systems geeft vanaf de aankoopdatum van uw Finnlo trainingstoestel de volgende garantie.
- Twee jaar garantie op alle onderdelen en herstelkosten
- Bij registratie van uw product via www.finnlofitness.nl/registreren ontvangt u een extra derde jaar op alle onderdelen.
Wat zijn herstelkosten?
- Alle kosten die gemaakt worden om een garantie reparatie uit te voeren, zoals voorrijkosten, arbeid en onderdelen.
- Naar ons goeddunken reparatie, vervanging of vervanging van beschadigde losse onderdelen.
- Reserveonderdelen die bij de opbouw van het toestel zelf aangebracht moeten worden, dienen door de garantienemer zelf vervangen te worden en maken geen deel uit van het herstel.
- Na afloop van de garantieperiode van twee jaar geldt dat de voorrijkosten en arbeid volledig voor rekening komen voor de gebruiker.
- Garantie bij semiprofessioneel, professioneel en commercieel gebruik bestaat alleen bij de modellen die in de verkoopfolder als zodanig zijn gekenmerkt.
- De voorwaarden die daarvoor gelden, staan aldaar apart vermeld.
- De geldige verkoopfolder is de folder die actueel was op het moment van aanschaf.
CONDITIES EN VOORWAARDEN
De Finnlo fitnessapparatuur is altijd in het bezit geweest van de originele koper en het originele aankoopbewijs kan worden overlegd. De apparatuur is niet onderhevig geweest aan ongelukken, verkeerd gebruik, misbruik, slecht onderhoud, niet geautoriseerde reparaties en onvakkundige demontage en montage bij bv. verhuizing. Nonmale slijtage door gebruik waltmiet onderde garantie.
Claims moeten worden ingediend binnen de duur van de omschreven garantie periode.
KASSABON
Om u onze service binnen de garantie te kunnen aanbieden, hebben wij een kopie nodig van uw originele kassabon met datum van aanschaf. Zorge r voor dat u in geval van garantie een kwita ntie of een factuur van uw dealer/warenhuis kunt tonen. ZONDER DIT AANKOOPBEWIJS KAN en ZALG EEN GARANTIE WORDEN VERLEEND.
FOUT MELDINGEN
Uw trainingstoestel is zodanig ontwikk eld, dat het eenkwalitatief hoogwaardige training op lange duur mogelijkmaakt. hd ien er toch problemen mochte noptre eden, lees dan a.u.b. eerst deg ebruiksaanwijzing. Vaak vindt u daar al een op-lossing.A lsu verdergaande problemen wil toplossen, reem dan contact op met uw dealer/vakhandel. Om ons de kans te geven het pop leem zo snel mogelijk voor u op te lossen, v erzo eken wiju de fo ut zo duidelijk mogelijk te beschrijven.U w dealer/vakhandel kan teven s een beroep doen op onze service dienst.
SERIENUMMER
Om uw model/versie feilloos te kunnen identificeren hebben wij in servicegevallen het serienummer van het toestel nodig. Dit nummer is ook nodig voor de kwaliteitscontrole. Het serienummer staat meestal op een kleine sticker op het frame gedeelte. In uw bijgeleverde handleiding staat de plaats van deze sticker vermeld. Zorg dat u het serienummer al bij de hand heeft als u service vraagt. Als u het serienummer niet op uw trainingstoestel kunt vinden, zal uw vakhandel/dealer u met extra informatie graag terzijde staan.
GARANTIE-SERVICE
Indien er een fout optreedt in uw trainingstoestel, neem dan EERST contact op met uw vakhandel. Zij zullen allereerst samen met u proberen, het probleem op te lossen. Als dit niet mocht lukken, bieden wij nog individuele servicemogelijkheden, die u ook kunt bespreken met uw vakhandel.
GARANTIEVOORWAARDEN
Vanaf wanneer en in welke omvang geldt de garantie?
Deze garantie geldt vanaf de aanschafdatum door de consument voor alle nieuw gekochte producten, die gekocht worden bij bevoegde verkooppartners van NRG fitness systems. In geval van reeds gebruikte showroomexemplaren geldt de garantie vanaf de aanschafdatum door de koper (dealer). Deze garantie geldt onder voorbehoud van andere overeenkomsten tussen de consument en diens verkoper (vakhandel). Wij geven garantie op de afwezigheid van gebreken van onze, via de vakhandel/warenhuizen aangeschafte producten. Deze garantie geldt niet voor verbruiksmaterialen als bijv. batterijen of schade, die het gevolg is van moedwillig ondoelmatig gebruik, normale slijtage, verkeerde installatie, overmacht, reparatie of aangebrachte veranderingen door technici die niet erkend zijn door NRG fitness systems. Voorwaarde voor doelmatig gebruik is het feit dat Finnlo Fitness uitsluitend thuis gebruikt worden.
Wie kan aanspraak maken op garantie en waar wordt deze gegeven?
NRG fitness systems sluit geen koopcontract met de consument. Wij bieden u wel de mogelijkheid aan om niet alleen via uw dealer/vakhandel, maar ook via onze website uw service aan te vragen. Uw aanspraken als koper (consument) jegens uw verkoper (vakhandel) blijven natuurlijk onaangetast, voor zover u geen andere overeenkomsten heeft afgesloten met de uw verkoper (vakhandel).
In geval van een reparatie, een retourtransport of een vervanging, is het doorgaans niet nodig, dat u uw trainingstoestel allereerst naar de vakhandel moet brengen.
Indien door ons noodzakelijke transporten geregeld worden, moet het defecte toestel gedemonteerd en klaargezet worden en moet het gerepareerde of reservetoestel in ontvangst worden genomen en geplaatst worden. Deze service valt niet onder de door ons gegeven garantie.
Afspraken die u met uw dealer gemaakt heeft, alsook diens aanspraken als koper jegens ons blijven in dat geval onaangetast. Wij streven er altijd naar, garantieprestaties voor u zo ongecompliceerd mogelijk te verrichten en wel zo veel mogelijk op de plaats waar het toestel staat opgesteld. Als dit niet mogelijk mocht zijn, leveren wij de prestaties in geval van twijfel op de plaats van vestiging van uw dealer.
Het geven van garantie is beperkt tot het desbetreffende land, waar u uw trainingstoestel heeft aangeschaft.
Aanspraak op garantie en vrijwaring buiten Nederland en België is altijd uitgesloten.
SERVICE BUITEN DE GARANTIE
Ook in geval van een gebrek aan uw trainingstoestel na afloop van de garantie of in gevallen, waarin de vrijwaring niet geldt, bijv. normale slijtage staan uw dealer en wij altijd voor u klaar om problemen voor u op te lossen. Wij doen u graag een aanbod om uw probleem snel en voordelig voor u op te lossen. Kijk op onze website www.finnlofitness.nl/service.
COMMUNICATIE
Eengroot aantal mogelijke problemen wordt reeds opgelost na een gesprek met uw dealer of met ons. Wij weten, hoe belangrijke en snelle en ongecompliceerde oplossing van een probleem voor u als gebruiker van het trainingstoestelis, zodat u zonder al te lange onderbrekingen met veel plezier kunt trainen. Daaromondersteunen wij de vakhandel/warenh uizen door middel van maatregelen voor het snel en effectief verhelpen van fouten en staan wij ook graag persoonlijkvoor u klaar:
Finnlo Fitne ssSys tems
onderdeel van NRGfi tness systems
Postbus 1797
470) BT Roosendaa
T. 06-24100929
F. 084-7363024
E. info@finnlofitness.nl
W. www.finnlofitness.nl
E. info@nrgfitness.nl
W. www.nrgfitness.nl
finnlo.com