
AT150MLX - DJ-Ausrüstung Audio-Technica - Kostenlose Bedienungsanleitung
Finden Sie kostenlos die Bedienungsanleitung des Geräts AT150MLX Audio-Technica als PDF.


| Produkttyp | Tonabnehmer (Moving Magnet) |
| Marke | Audio-Technica |
| Modell | AT150MLX |
| Nadeltyp | MicroLine |
| Ausgangsspannung | 4,0 mV (1 kHz, 5 cm/s) |
| Kanaltrennung | 30 dB (1 kHz) |
| Frequenzgang | 20 – 27.000 Hz |
| Empfohlene Auflagekraft | 1,4 g (Bereich 1,0 – 1,8 g) |
| Nadelnachgiebigkeit | 10 × 10⁻⁶ cm/dyn |
| Gewicht | 7,6 g |
| Abmessungen (B × T × H) | 17,3 × 16,8 × 28,9 mm |
| Impedanz | 47 kΩ (empfohlen) |
| Kapazität | 150 – 250 pF (empfohlen) |
| Montage | 1/2 Zoll Standard-Befestigungsabstand |
| Reinigung | Nadel vorsichtig mit weicher Bürste von hinten nach vorne reinigen |
| Sicherheitshinweise | Staub und Feuchtigkeit vermeiden, Nadel nicht berühren |
| Ersatzteile | Ersatznadel ATN150MLX verfügbar |
| Garantie | 2 Jahre (abhängig vom Händler) |
Häufig gestellte Fragen - AT150MLX Audio-Technica
Benutzerfragen zu AT150MLX Audio-Technica
0 Frage zu diesem Gerät. Beantworten Sie die, die Sie kennen, oder stellen Sie Ihre eigene.
Eine neue Frage zu diesem Gerät stellen
Laden Sie die Anleitung für Ihr DJ-Ausrüstung kostenlos im PDF-Format! Finden Sie Ihr Handbuch AT150MLX - Audio-Technica und nehmen Sie Ihr elektronisches Gerät wieder in die Hand. Auf dieser Seite sind alle Dokumente veröffentlicht, die für die Verwendung Ihres Geräts notwendig sind. AT150MLX von der Marke Audio-Technica.
BEDIENUNGSANLEITUNG AT150MLX Audio-Technica
audio-technica®
AT150MLX Vector-Aligned™ Stereo Phono Cartridge
Wide Range Vector-Aligned Vibration System and Improved Paratoroidal Signal Generating System featuring PCOCC Wire
Vector-Aligned stereo phono cartridges feature an original design patented by Audio-Technica around the world. The key to this mechanism is the two magnetic generators arranged in the shape of a "V". These two magnets are positioned precisely to match the positions of the left and right channels in the stereo record groove. Major benefits of the Vector-Aligned cartridge include outstanding channel separation, very low distortion and superb tracking performance. Incorporating the same essential merits as other Vector-Aligned models, the AT150MLX features three additional technological advances:
Boron Cantilever. Its tiny, gold-plated boron cantilever provides an extremely rigid yet lightweight platform to which the stylus is mounted. Interestingly, the gold plating acts to damp what little resonance the boron may produce.
MicroLine™ Stylus. The stylus used is of the latest and most advanced design: the MicroLine™ stylus (Figure 1). More closely resembling the cutter stylus than any previous design, this shape produces better high frequency response with less wear or distortion than with earlier configurations.
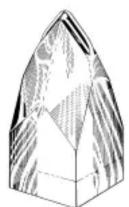
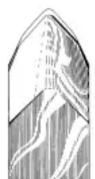
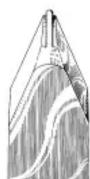
Fig. 1
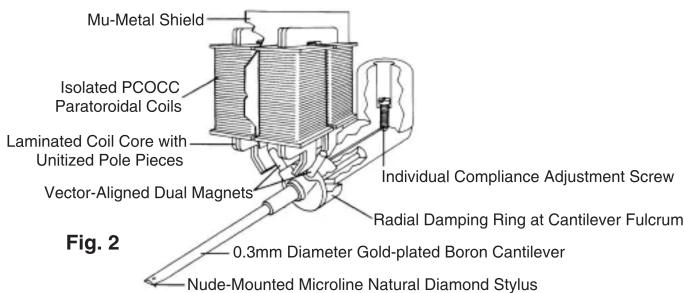
PCOCC Wire. A technologically advanced pure copper material is used in Audio-Technica's exclusive "Paratoroidal Signal Generator" (Figure 2). Together with the laminated core structure, which minimizes loss in the high frequency region, this integrated paratoroidal generator system operates at an efficiency significantly greater than conventional cartridges. The use of PCOCC wire (Pure Copper by Ohno Continuous Casting) perfects the performance of the advanced paratoroidal coil design. A special high-temperature extrusion die produces copper with virtually no transverse crystal barriers to impede signal transmission or color sound. Thus, the coils of the AT150MLX transmit distortion-free sound in which even the most subtle details are reproduced with clarity and purity.
A mu-metal shielding plate between the left and right channels in the generator system assure that the high level of channel separation achieved is preserved at the cartridge output.
To further increase the accuracy of the AT150MLX's moving system, Audio-Technica engineers have ensured against unwanted parasitic vibration with an anti-resonance ceramic mounting base.
As a final attention to detail, even the output terminals are constructed of PCOCC copper. This meticulous care and attention given to every minute detail in both the vibration and generator systems has resulted in a significant improvement in the performance and sound quality. This superb cartridge offers audiophiles and other serious listeners added musical enjoyment.
Preliminary Installation
Keep stylus guard down. Remove the stylus assembly by pulling away from the cartridge body at a slight rearward angle (Figure 3). Place the stylus assembly out of harm's way.
Mount the cartridge body to the tone arm head shell.* Use the mounting hardware supplied with the cartridge or with the turntable, and tighten until just snug. Replace the stylus assembly briefly to check for mechanical interference with mounting hardware. The stylus assembly should click into place. Again remove the stylus assembly for safekeeping.
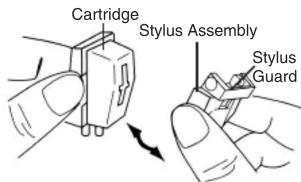
Fig. 3
Electrical Connections
Four terminals at the rear of the cartridge are color-coded to match standard wiring in stereo tone arms (Figure 4). Connect with slip-on lugs provided on the head shell wiring. NEVER SOLDER TO CARTRIDGE TERMINALS! Heat applied to the terminals will damage the internal cartridge wiring. Left Output (White)
For monaural operation, the Left and Right signal terminals should be connected to the monaural signal lead, and the Left and Right ground terminals should be connected to the ground lead.
Final Adjustment
It is especially important that the
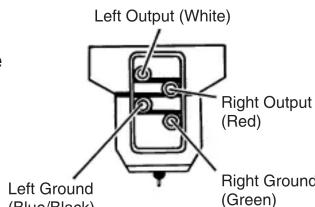
Fig. 4
“overhang” and tone arm height should be exactly correct. The stylus overhang, or distance from the stylus tip to the center of the turntable, should be 15mm. You can check for correct overhang with the plastic gauge to which your cartridge is mounted in the packaging.
Replace the stylus assembly; flip the stylus guard up. You should be certain that the stylus assembly and cartridge body are exactly perpendicular to the record surface, and that the cartridge is aligned with the sides of the tone arm for best performance.
If possible, adjust the arm height so that the top of the cartridge is parallel to the record surface when the stylus is cued down on the record.
Connection to System
Run two shielded audio cables from the cartridge/tone arm connections on the turntable to the magnetic phono inputs on the amplifier or receiver. Observe Left and Right channel markings.
To assure maximum performance, the lowest possible connecting cable losses between turntable and amplifier are required. Very short conventional cables may be used.
A separate ground wire usually comes attached to the turntable of most electronics.
Distorted or unbalanced sound from the two phono channels often can be traced to wires interchanged or touching at the cartridge terminals. A reduction in output or muffled sound may result if the stylus assembly is not fully seated. Hum from the phonograph input can usually be traced to a bad audio cable or absence of the separate ground wire from turntable to amplifier.
*Note: These instructions assume that you will be using this cartridge in conjunction with a tone arm having a universal head shell. If your tone arm has a different style head shell, follow the instructions included with your tone arm.
Operating Suggestions
The low tracking force and high compliance of Audio-Technica cartridges provide the highest level of performance available, but also make them susceptible to damage if handled improperly.
Most stylus damage is caused by rough treatment while the tone arm is being operated by hand. A finger should always be placed under the tone arm finger lift, never over it. A damped cueing device that lowers the tone arm gently to the record is found on many record players, and should be used for greatest protection of the stylus and records.
The stylus should be cleaned with the brush supplied with the cartridge. Use a rear-to-front motion of the brush only.
An accumulation of dirt on the stylus indicates that the records themselves are dirty, a condition which will shorten record and stylus life, and reduce the potential performance of your system.
Keep records stored vertically in their jackets except when being played, and clean each side of the record just before it is played. You'll be amazed at how much better a clean record sounds and how much longer it lasts.
Replacement Styli
Audio-Technica grain-oriented diamond styli are carefully selected and polished for minimum wear to themselves and to your records. However, after an extended period of play, even the finest diamond stylus becomes worn. For this reason, it is best to have the stylus inspected annually, or whenever it appears that wear or damage may be a problem. The dealer from whom you purchased this cartridge can supply genuine A-T replacement styli. Only A-T styli with the circle monogram will provide the same level of performance.
Audio-Technica cartridges are protected by the following patents:
Canada Nos. 856,351 and 909,683
England Nos. 1,232,210 and 1,283,404
France No. 6,928,056
Japan Nos. 1,083,037 and 883,307
Sweden No. 347,636
Switzerland Nos. 478,502 and 505,437
U.S.A. Nos. 3,720,796; 3,761,647 and 4,075,418
Germany Nos. 1,772,685 and 1,941,569
SPECIFICATIONS AT150MLX
| Frequency Response (Hz)* 10-30,000 | |
| Vertical Tracking Force (VTF)Range (grams) 0.75 - 1.75 | |
| Channel Separation(dB at 1kHz/10kHz) 30/20 | |
| Channel Balance (dB) 0.8 | |
| Output (mV at 1kHz, 5 cm/sec) 4 | |
| Vertical Tracking Angle ^ | 23° |
| Stylus Shape MicroLine | TM |
| Stylus Construction Nude square shank | |
| Cantilever Gold-plated boron | |
| Wire Used For Coils PCOCC | |
| Recommended Load Impedance (ohms) | 47,000 |
| Recommended Load Capacitance (pF) | 100 – 200 |
| Dynamic Compliance(x 10-6 cm/dyne, 100Hz) | 10.0 |
| Cartridge Weight (grams) | 8.3 |
| Dimensions | 1" x ^11/16 " x ^11/16 " |
| Mounting | ^1/_2 " centers |
| Replacement Stylus | ATN150MLX |
*This model exceeds the requirements of DIN Standard 45 500 for frequency response bandwidth and tolerance.
^ DIN 45 549/AT6607 test records with bands of carefully calibrated recorded amplitude (one micron equals 0.0001 cm). Program levels of typical commercial recordings are on the order of 60-70 microns.
^11 20° is IEC/DIN Standard.
One Year Limited Warranty
Audio-Technica brand products purchased in the U.S.A. are warranted for one year from date of purchase by Audio-Technica U.S., Inc. (A.T.U.S.) to be free of defects in materials and workmanship. In event of such defect, product will be repaired promptly without charge or, at our option, replaced with a new product of equal or superior value if delivered to A.T.U.S., or an Authorized Service Center, prepaid, together with the sales slip or other proof of purchase date. Prior approval from A.T.U.S. is required for return. This warranty excludes defects due to normal wear, abuse, shipping damage, or failure to use product in accordance with instructions. This warranty is void in the event of unauthorized repair or modification.
For return approval and shipping information, contact the Service Department, Audio-Technica U.S., Inc., 1221 Commerce Drive, Stow, Ohio 44224.
Except to the extent precluded by applicable state law, A.T.U.S. will have no liability for any consequential, incidental, or special damages; any warranty of merchantability or fitness for particular purpose expires when this warranty expires.
This warranty gives you specific legal rights, and you may have other rights which vary from state to state.
Outside the U.S.A., please contact your local dealer for warranty details.
audio-technica®


- audio-technica®
- AT150MLX Vector-Aligned™ Stereo Phono Cartridge
- Wide Range Vector-Aligned Vibration System and Improved Paratoroidal Signal Generating System featuring PCOCC Wire
- Preliminary Installation
- Electrical Connections
- Final Adjustment
- Connection to System
- Operating Suggestions
- Replacement Styli
- One Year Limited Warranty
Marke : Audio-Technica
Modell : AT150MLX
Kategorie : DJ-Ausrüstung