
Lomond 600 - Zelt Vango - Kostenlose Bedienungsanleitung
Finden Sie kostenlos die Bedienungsanleitung des Geräts Lomond 600 Vango als PDF.


| Produkttyp | Zelt |
| Marke | Vango |
| Modell | Lomond 600 |
| Kategorie | Tunnelzelt |
| Personenkapazität | 6 Personen |
| Anzahl Schlafkabinen | 3 |
| Anzahl Eingänge | 2 |
| Anzahl Vorzelte | 1 |
| Wassersäule | 3000 mm |
| Gestänge | Aluminiumlegierung |
| Boden | Verschweißter Polyethylen |
| Aufstellmaße (L x B x H) | ca. 600 x 350 x 210 cm |
| Packmaß | ca. 70 x 30 x 30 cm |
| Gewicht | ca. 18 kg |
| Farbe | Grün/Grau |
| Material Außenzelt | Polyester Ripstop |
| Material Innenzelt | Atmungsaktives Polyester |
| Belüftung | Mesh-Einsätze |
| Aufbau | Flysheet first |
| Besonderheiten | Ring & Pin System, Spannbandsystem |
| Lieferumfang | Zelt, Gestänge, Heringe, Abspannleinen, Aufbauanleitung |
| Pflege | Handwäsche, nicht bleichen |
| Reparatur | Ersatzteile beim Hersteller erhältlich |
Häufig gestellte Fragen - Lomond 600 Vango
Benutzerfragen zu Lomond 600 Vango
0 Frage zu diesem Gerät. Beantworten Sie die, die Sie kennen, oder stellen Sie Ihre eigene.
Eine neue Frage zu diesem Gerät stellen
Laden Sie die Anleitung für Ihr Zelt kostenlos im PDF-Format! Finden Sie Ihr Handbuch Lomond 600 - Vango und nehmen Sie Ihr elektronisches Gerät wieder in die Hand. Auf dieser Seite sind alle Dokumente veröffentlicht, die für die Verwendung Ihres Geräts notwendig sind. Lomond 600 von der Marke Vango.
BEDIENUNGSANLEITUNG Lomond 600 Vango
natural_image
Two black-and-white photos: a Vango tent with triangular roof design and a modern Vango logo on the left (no text or symbols on the tents themselves)Tent Pitching Instructions – Lomond 400 & 600
FLYSHEET FIRST PITCHING
- Assemble the poles and lay them parallel on the ground.
- Open out flysheet and position in required direction.
- Insert the poles through the pole sleeves on the outside of the flysheet, matching the colour of the middle pole section to the coloured tab at the pole sleeve end.
- Locate one end of each pole on one side of flysheet into the Ring & Pin system at the base of the tent. Make sure poles locate into correct pin system (all poles follow corresponding flysheet seams to pin system).
- Push poles into an arch from opposite ends and locate pole ends into corresponding metal pin.
- Tighten the tension adjusters located on the Ring & Pin webbing.
- Start pegging out the main corners at the rear of the tent using the pin pegs provided.
- Pull the tent forward until taut and peg in the guylines attached to the front porch.
- Peg out the main corners at the front of the tent.
- Ensure the tent is in a straight line.
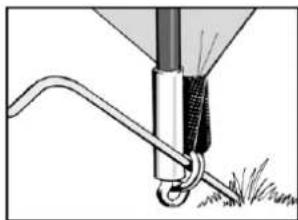
- Secure the tent by putting pin pegs through the Ring & Pin system (see fig. 2).
- Peg out ALL guy lines, ensuring that they are in line with the pole or seam they are attached to.
INNER ATTACHMENT
- Suspend the inner by attaching toggles on the inner tent through rings on the inside of the flysheet. Do the rear first and work towards the front of the tent.
- Once fully attached, the inner can be left in when pitching or striking the tent. However, it is advisable to remove the inner when striking the tent when wet.
TENSION BAND SYSTEM
- Remove Tension Band System from pockets and attach into the corresponding clips at the apex of the pole. Adjust the straps until they are taut.
- DO NOT OVER TENSION. Excess tension will alter the shape of the tent.
- Tension bands are designed to stabilise the tunnel structure of the tent. The bands are not required to be used in calm weather.
natural_image
Illustration of a hand holding a small object with motion lines indicating movement (no text or symbols)Figure 1.
natural_image
Diagram of a mechanical device with a spring and lever, showing force application on grass (no text or symbols)Figure 2.
Ring & Pin System
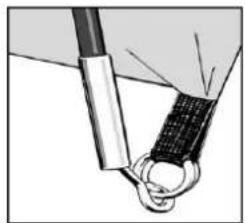
- Locate one end of each pole onto the corresponding metal pin. The metal pin inserts into the hollow metal ferrule on the end of each pole. (See Figure 1). Push the pole into a curve from the opposite side, one at a time, and locate all pole ends onto the metal pins.
- Peg the corners of the tent through the metal rings using pin-pegs. It is important to drive the peg into the ground at a 45 degree angle to obtain the best grip. (See Figure 2).
IF YOU HAVE ANY PROBLEMS PLEASE CONTACT YOUR LOCAL RETAILER or
AMG Group Ltd., Kelburn Business Park, Port Glasgow, Scotland. PA14 6TD.
UK Consumer Hotline: 0844 811 0535 E-Mail: info@vango.co.uk
Calls to our Customer Hotline cost 5p per minute. Calls from mobile phones, cable networks or public payphones will generally cost more.