
Marano 600 - Zelt Vango - Kostenlose Bedienungsanleitung
Finden Sie kostenlos die Bedienungsanleitung des Geräts Marano 600 Vango als PDF.


Benutzerfragen zu Marano 600 Vango
0 Frage zu diesem Gerät. Beantworten Sie die, die Sie kennen, oder stellen Sie Ihre eigene.
Eine neue Frage zu diesem Gerät stellen
Laden Sie die Anleitung für Ihr Zelt kostenlos im PDF-Format! Finden Sie Ihr Handbuch Marano 600 - Vango und nehmen Sie Ihr elektronisches Gerät wieder in die Hand. Auf dieser Seite sind alle Dokumente veröffentlicht, die für die Verwendung Ihres Geräts notwendig sind. Marano 600 von der Marke Vango.
BEDIENUNGSANLEITUNG Marano 600 Vango
Tent Pitching Instructions – Marano 400 & 600
FLYSHEET FIRST PITCHING – Groundsheet is sewn-in
• Assemble poles and lay them parallel on the ground.
• 8 steel upright poles, 4 curved steel roof poles, and 4 fibreglass poles (2 longer bedroom poles, and 2 short brow poles).
- Open out flysheet and position in required direction.
• Ensure the flysheet doors are closed when pitching the tent.
• The poles are colour coded to match the coloured tab on the pole sleeve. (The colour coding is inside the ends of the steel poles).
- Locate pole sleeves on roof section of flysheet and insert the curved steel roof poles.
• Insert steel upright poles into the steel roof poles.
- On both sides of the tent, loosen the tension straps and locate the ends of each steel pole into the corresponding ring & pin.
• Tension the pole end straps and attach the pole clips
• Lay pole arches on the ground. The back of the tent should be face down with the front of the tent on top
• Peg out adjustable anchor straps at both corners of front end of tent using the V-pegs supplied.
• With one person at each side of the tent gather all the poles together and lift into the upright position
- Walk the tent back, away from pegged points, until the central steel tunnel takes shape. Peg the two ring and pins at the back of the tent at the back door.
• Ensure the tent is in a straight line. The groundsheet should be flat and wrinkle free.
- Insert the remaining fibreglass poles into the right and left pods. Attach ring and pin, lift up, attach clips and peg out the back of the pods.
- Insert the two fibreglass brow poles above the front and rear doors of the tent.
- Secure the tent using the pin pegs through the ring & pin system – see diagram below.
• Peg out ALL guy lines, ensuring that they are in line with the pole or seam they are attached to.
INNER ATTACHMENT
• Open out inner tents inside flysheet and position doorway to correspond with the living area.
• Starting from the rear corners of the tent, attach the inner clips to corresponding rings on the tent groundsheet.
- Suspend the inner by attaching toggles of inner tent through rings on inside of flysheet. Do the rear first and work forward.
- Attach the base of the pelmet to the attachment points on the front of the inners.
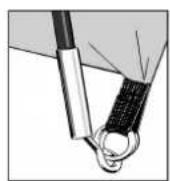
Figure 1.
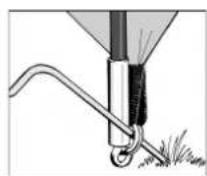
Figure 2.
Ring and Pin System
- Locate one end of each pole onto the corresponding metal pin. The metal pin inserts into the hollow metal ferrule on the end of each pole. (See Figure 1). Push the pole into a curve from the opposite side, one at a time, and locate all pole ends onto the metal pins.
- Peg the corners of the tent through the metal rings using pin-pegs. It is important to drive the peg into the ground at a 45 degree angle to obtain the best grip. (See Figure 2).