Ei407 - Schalter Ei Electronics - Kostenlose Bedienungsanleitung
Finden Sie kostenlos die Bedienungsanleitung des Geräts Ei407 Ei Electronics als PDF.


Benutzerfragen zu Ei407 Ei Electronics
0 Frage zu diesem Gerät. Beantworten Sie die, die Sie kennen, oder stellen Sie Ihre eigene.
Eine neue Frage zu diesem Gerät stellen
Laden Sie die Anleitung für Ihr Schalter kostenlos im PDF-Format! Finden Sie Ihr Handbuch Ei407 - Ei Electronics und nehmen Sie Ihr elektronisches Gerät wieder in die Hand. Auf dieser Seite sind alle Dokumente veröffentlicht, die für die Verwendung Ihres Geräts notwendig sind. Ei407 von der Marke Ei Electronics.
BEDIENUNGSANLEITUNG Ei407 Ei Electronics
text_image
RadioLINK Model: Ei 407 Manual Call Point For use with RadioLINK Smoke/Heat Alarms and Bases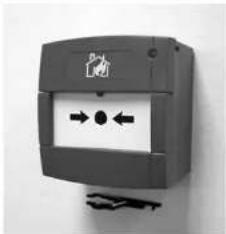
natural_image
Close-up of a black industrial electrical outlet with directional arrows and a logo (no readable text or symbols)Contains vital information on the product's operation and installation. Read and retain carefully. If you are just installing this product the manual MUST be given to the householder.
1. INTRODUCTION
Pressing on the EI407 Manual Call Point (MCP) black spot causes all Alarms on RadioLINK Bases and RadioLINK Alarms to sound. This informs the occupants that the building must be evacuated.
The EI407 MCP also provides a means to test the Alarms without having to reach up to the Alarms on the ceilings, as it can be reset with the plastic key (supplied).
We suggest that the plastic key is mounted on a small nail under or alongside the MCP for future use when resetting (as shown above).
2. INSTALLATION
It is recommended that you install all the other RadioLINK Bases / Alarms and any other RadioLINK components before installing this MCP.
All RadioLINK units should be located in their final positions before House Coding commences.
- The MCP should be positioned (approx) 1.2 meters high on a wall, in a suitable location on an exit route (avoid locating near metal objects).
- Securely attach the mounting box to the wall using the fixing screws supplied.
- Remove the bottom housing by first pushing in the forked end of the key (with arrow side out) into the two slots (see Figure 1). The bottom housing should drop down by about 10mm and expose the yellow edge on the top of the white element (with the black spot). Remove the key, pull the bottom housing down and then lift it up to remove (see Figure 2).
-
Next remove the white element by lifting the lower edge (see Figure 3).
-
Connect the built-in battery by sliding the battery switch into the "on" position. (see Figure 4).
- Press the House Code switch until the light on the front turns on red (see Figure 4) (The unit will now send out a coded alarm signal and the red light will flash).
- Screw the front plate to the wall box using the two machine screws provided (see Figure 5).
- Now re-install the white element, yellow edge uppermost (see Figure 6). Replace the bottom housing by lining up the two notches and carefully pushing it flat - this should leave it about 10mm below the bottom edge. Now slide the bottom housing upwards (see Figure 7). This resets the switch. The yellow edge on the white element should now be hidden (The unit will now send out a coded alarm cancel signal). The red light will then continue to flash to show it is in House Code mode, for the next 15 minutes.
- Immediately put all other RadioLINK Smoke Alarms and other components into House Code mode within 10 minutes.
- In House Code mode, the MCP will now send a radio message every 5 seconds. All RadioLINK Bases and Smoke/Heat Alarms within range that are also in House Code mode themselves will memorise the House Code of the MCP.
- Check that the number of amber light flashes (for RadioLINK Bases) or blue light flashes (for RadioLINK Smoke Alarms) corresponds with the number of units in the system (e.g. Bases / Alarms plus MCP). For example, with 3 RadioLINK Bases and 1 MCP you should see 4 amber light flashes from each Base.
(Note: the MCP flashing red light does not indicate the number of units in the system. It just flashes rapidly to show it is in House Code mode. The MCP is only an RF transmitter and does not receive any RF signals). - Remove all the RadioLINK Bases / Alarms from House Code mode as described in their instruction leaflets.
- The MCP will exit the House Code mode by itself after approx. 15 minutes without further user intervention.
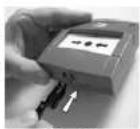
Figure 1
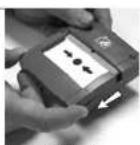
Figure 2
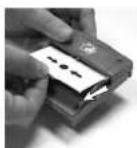
Figure 3
BATTERY ON/OFF SWITCH
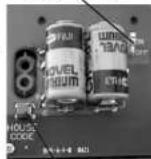
House Code Button Figure 4
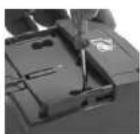
Figure 5
However, this could result in problems with nearby systems if their units are being House Coded at the same time. If this is the case remove the MCP from its mounting box and then from House Code mode by pressing and holding the code button until the red light comes on (i.e. use the same method as to enter House Code mode). Release the button and the red light will go out, indicating that the MCP has exited House Code mode. Re-assemble and attach to box as described previously.
Please note that this will cause the MCP to send out a coded alarm signal which will activate the RadioLINK Bases / Alarms that have previously been House Coded during the installation procedure.
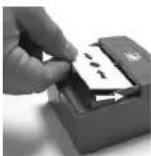
Figure 6
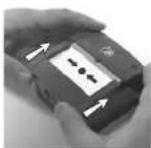
Figure 7
3. CHECKING & TESTING THE MCP
The MCP is an important alarm device and should be tested after installation and then weekly (and after prolonged absence) to ensure correct operation as follows.
a) Check that the light on the front flashes green every 40 seconds. This indicates it has power.
b) Press the black spot and the white element will drop down exposing the yellow edge to show it is activated. The light will turn red and stay on continuously for 3 seconds and then continue to flash red (every 20 seconds) for 5 minutes indicating transmission of the alarm signal (Note: after 5 minutes the RF alarm signal ceases and therefore the smoke alarms will stop alarming. This prevents the batteries in the MCP and the alarm from being depleted).
c) Check the RadioLINK units are now in alarm (If some or all of the alarms have not been activated, then the House Coding procedure should be repeated. If there are still some problems, see the "Troubleshooting RF Link" section on page 4).
d) The MCP should be reset with the plastic key provided by pushing the forked end (arrow side up) into the slots (see Figure 1) and pulling the bottom housing down. Remove the plastic key. Now push the bottom housing firmly against the back and slide upwards. This resets the switch. The yellow strip on the white element should now be hidden.
e) If the MCP is not reset the light will flash red every 40 seconds to remind the user to reset it.
On reset, the alarm cancel signal will be transmitted (indicated by a single red light flash for 3 seconds).
If the light flashes amber every 9 seconds this indicates that the batteries are depleted and the MCP will no longer be able to send an alarm signal. The unit must be removed from its location and returned for repair if within the guarantee period, (see sections 7 & 8 for details).
If the end of life has been reached dispose according to local guidelines and regulations (see section 6 "End of Life").
4. TROUBLESHOOTING RF LINK
If, when checking the radio interconnection, some of the alarms do not respond to the MCP test, then:
(I) Ensure the MCP has been activated correctly, the yellow edge is visible, and the light has come on red continuously for 3 seconds and then continues to flash red every 20 seconds.
(II) If using EI405 or EI405TY RadioLINK Smoke Alarms make one of the Alarms that is centrally located within the house into a "Repeater" (see their respective use and care instructions).
(iii) Rotate/locate the other problematical RadioLINK units. There are a number of reasons why the radio signals may not reach all the Alarms in your system (see section 5 on "Limitations of Radio Communications"). Try rotating the units or relocating the units (e.g. move them away from metal surfaces or wiring) as this can significantly improve signal reception.
Rotating and/or relocating the units may move them out of the range of existing units even though they may have already been House Coded correctly in the system. It is important therefore to check that all units are communicating in their final installed positions. If units are rotated and/or resited, we recommend that all units are returned to the factory settings (see their respective use and care instructions). Then House Code all units again in their final positions. The radio interconnection should then be re-checked again.
Clearing the House Codes:
It may be necessary at some stage to clear the House Codes (e.g. if you wanted to use the MCP with different Smoke Alarms).
To clear the House Codes:
- Remove the MCP from the mounting box.
- Slide the battery switch off. Wait 5 seconds and then slide switch back on.
- Press and hold the House Code button for approx 6 seconds, until the red light turns on, then flashes slowly. Release the button and the red light will go out.
• Re-attach the MCP to the mounting box.
Note clearing the House Codes will now reset the MCP to the original factory settings. It will now only communicate with un-coded alarms (see Bases / Alarm instruction leaflet for information on how to un-code the Bases / Alarms).
5. LIMITATIONS OF RADIO COMMUNICATIONS
Ei Electronics radio communication systems are very reliable and are tested to high standards. However, due to their low transmitting power and limited range (required by regulatory bodies) there are some limitations to be considered:
(I) Radio equipment, such as the MCP, should be tested regularly - at least weekly. This is to determine whether there are sources of interference preventing communication. The radio paths may be disrupted by moving furniture or renovations, and so regular testing can highlight these and other faults.
(ii) Receivers may be blocked by radio signals occurring on or near their operating frequencies, regardless of the House Coding.
The MCP Transmitter has been tested to EN 300 220-1 V1.3.1 (2000-09). In accordance with the requirements of EN 300 220V1.1.1 (2000-09). These tests are designed to provide reasonable protection against harmful interference in residential installations. This equipment generates, uses and can radiate radio frequency energy and, if not installed and used in accordance with the instructions, may cause interference to radio and television reception.
However, there is no guarantee that interference will not occur in a particular installation. Interference from the Alarm system can be identified by turning the whole system off temporarily. To turn off the MCP see Section 2. Refer to the instructions supplied with the other products used for information on these. The user is encouraged to eliminate the interference by one or more of the following measures:
(i) Relocate the unit.
(ii) Increase the distance between the MCP and the device being affected.
(iii) Consult the supplier or an experienced radio/television technician.
6. END OF LIFE
The MCP is designed to last 10 years in normal use. However the MCP must be replaced if:
-
The light does not flash green every 40 seconds.
-
The unit is over 10 years old (see "replace by" label on the side of the mounting box).
-
If pressing the black spot fails to operate the Smoke Alarms.
-
If the amber light is flashing every 9 seconds (indicating the battery is depleted). (Excess use of the MCP can shorten battery life).
The MCP must be powered off (see figure 4) before disposing/recycling in accordance with the directive 2002/96/EC on waste electrical & electronic equipment (WEEE).
7. GETTING YOUR Ei407 MCP SERVICED
If your MCP fails to work after you have read this leaflet, contact Customer Assistance at the nearest address given at the end of this leaflet. If it needs to be returned for repair or replacement put it in a padded box with the battery disconnected (slide switch to 'off' position - see Figure 4). Send it to "Customer Assistance and Information" at the nearest address given on the MCP or in this leaflet. State the nature of the fault, where the MCP was purchased and the date of purchase.
Note: It may be necessary, sometimes, to return a Smoke Alarm (see Smoke Alarm instruction leaflet) along with the MCP, if you cannot establish which is faulty.
8. FIVE YEAR GUARANTEE (Limited)
El Electronics guarantees this product against any defects that are due to faulty material or workmanship for a five year period after the original date of purchase. This guarantee only applies to normal conditions of use and service, and does not include damage resulting from accident, neglect, misuse unauthorized dismantling or contamination howsoever caused. Excessive use of the MCP alarm button will shorten the battery life and is not covered. If this product has become defective it must be returned to one of the addresses below (see "Getting Your El407 MCP Serviced") with proof of purchase. If the product has become defective during the five year guarantee, the unit will be repaired or replaced without charge. This guarantee excludes incidental and consequential damages.
Do not interfere with the product or attempt to tamper with it. This will invalidate the guarantee.
The crossed out wheele bin symbol that is on your product indicates that this product should not be disposed of via the normal household waste stream. Proper disposal will prevent possible harm to the environment or to human health. When disposing of this product please separate it from other waste streams to ensure that it can be recycled in an environmentally sound manner. For more details on collection and proper disposal, please contact your local government of ce or the retailer where you purchased this product.


Aico Ltd
Mile End Business Park,
Maesbury Road, Oswestry.
Shropshire SY10 8NN, U.K.
Telephone: 0870 758 4000
www.alco.co.uk
El Electronics
Shannon Industrial Estate,
Shannon, Co. Clare, Ireland.
Telephone: +353 (0)61 471277
www.elelectronics.com
© El Electronica 2006
PIN A15268 Nov 2