
RS-X50W - Kassettenabspieler TECHNICS - Kostenlose Bedienungsanleitung
Finden Sie kostenlos die Bedienungsanleitung des Geräts RS-X50W TECHNICS als PDF.


| Produkttyp | Kassettenabspielgerät |
| Marke | Technics |
| Modell | RS-X50W |
| Abmessungen (B x H x T) | ca. 430 x 130 x 280 mm |
| Gewicht | ca. 5,0 kg |
| Stromversorgung | 220–240 V, 50/60 Hz |
| Leistungsaufnahme | 15 W |
| Wiedergabegeschwindigkeiten | Normal, CrO2, Metallband |
| Tonköpfe | 2-Kopf-System |
| Motor | Gleichstrom-Servomotor |
| Frequenzgang | 30–18.000 Hz (Normalband) |
| Signal-Rausch-Verhältnis | > 60 dB (Dolby NR ein) |
| Gleichlaufschwankungen | < 0,08 % (WRMS) |
| Automatische Bandauswahl | Ja |
| Auto-Reverse | Ja |
| Dolby Rauschunterdrückung | Dolby B/C |
| Ausgänge | Line Out (Cinch), Kopfhörer (6,3 mm) |
| Eingänge | Line In (Cinch), Mikrofon (optional) |
| Reinigung | Regelmäßige Reinigung der Tonköpfe und Andruckrolle |
| Sicherheit | Gerät vor Feuchtigkeit schützen, keine Fremdkörper einführen |
| Ersatzteile | Riemen, Tonköpfe, Motor (über Fachhändler beziehbar) |
| Reparierbarkeit | Modulare Bauweise, Reparatur durch Fachpersonal empfohlen |
Häufig gestellte Fragen - RS-X50W TECHNICS
Benutzerfragen zu RS-X50W TECHNICS
0 Frage zu diesem Gerät. Beantworten Sie die, die Sie kennen, oder stellen Sie Ihre eigene.
Eine neue Frage zu diesem Gerät stellen
Laden Sie die Anleitung für Ihr Kassettenabspieler kostenlos im PDF-Format! Finden Sie Ihr Handbuch RS-X50W - TECHNICS und nehmen Sie Ihr elektronisches Gerät wieder in die Hand. Auf dieser Seite sind alle Dokumente veröffentlicht, die für die Verwendung Ihres Geräts notwendig sind. RS-X50W von der Marke TECHNICS.
BEDIENUNGSANLEITUNG RS-X50W TECHNICS

Technics
Stereo Double Cassette Deck
RS-X50W
OPERATING INSTRUCTIONS

Dear Stereo Fan
We want to thank you for selecting this product and to welcome you to the growing family of satisfied Technics product owners around the world.
We feel certain you will get maximum enjoyment from this new addition to your home.
Please read these operating instructions carefully, and be sure to keep them handy for convenient reference.
CONTENTS
• FOR UNITED KINGDOM 2
- BEFORE USING THIS UNIT ....2
• FOR SAFE USE OF THIS UNIT ....2
- CONNECTIONS ....3
• FRONT PANEL CONTROLS AND THEIR FUNCTIONS .....4
• STANDARD OPERATING PROCEDURES....6
- NOISE REDUCTION SYSTEM ....7
- PLAYBACK 8
• TIMER RECORDING/PLAYBACK .....9
- RECORDING....10
• TAPE TO TAPE RECORDING ....13
- MAINTENANCE ....14
• TROUBLESHOOTING GUIDE ....14
• TECHNICAL SPECIFICATIONS .....15
FOR UNITED KINGDOM
Important
THE WIRES IN THIS MAINS LEAD ARE COLOURED IN ACCORDANCE WITH THE FOLLOWING CODE.
BLUE: NEUTRAL
BROWN: LIVE
As the colours of the wires in the mains lead of this unit may not correspond with the coloured markings identifying the terminals in your plug, proceed as follows. The wire which is coloured BLUE must be connected to the terminal which is marked with the letter N or colored BLACK.
The wire which is coloured BROWN must connected to the terminal which is marked with the letter L or coloured RED.
This apparatus was produced to B.S. 800: 1977.
BEFORE USING THIS UNIT
Use a minus (−) screwdriver to set the voltage selector (on the rear panel) to the voltage setting for the area in which the unit will be used. (If the power supply in your area is 117 V or 120 V, set to the "127 V" position.)
Note that this unit will be seriously damaged if this setting is not made correctly. (There is no voltage selector for some countries; the correct voltage is already set.)
Be sure to disconnect the mains cord before adjusting the voltage selector.
FOR SAFE USE OF THIS UNIT
■ Use a standard electrical AC wall outlet
-
Use from an AC power source of high voltage, such as for air conditioners, is very dangerous. Be extremely careful not to make a connection to the electrical outlet for a large air conditioner or central-heating unit which uses high voltage, because there is the possibility of fire.
-
A DC power source cannot be used. Be sure to check the power source carefully, especially on a ship or other place where DC is used.
■ Connection and removal of the power cord plug
1. Wet hands are dangerous.
A dangerous electric shock may result if the plug is touched by wet hands.
- Don't pull the power cord. Always grasp the plug; never pull the cord itself.
■ AC outlet on rear panel (not equipped for some countries)
- Any equipment connected here should have specified power consumption or less.
This outlet is exclusively for the connection of other audio equipment, such as a tape deck. Be sure the power consumption does not exceed the wattage specified near the AC outlet.
- Never connect other electrical appliances, such as an iron or toaster.
If appliances with a large power consumption are connected, an unexpected accident might occur as a result of overheating.
■ Never attempt to repair or reconstruct this unit
A serious electric shock might occur if this unit is repaired, disassembled or reconstructed by unauthorized persons, or if the internal parts are accidentally touched.
■ For families with children
Never permit children to put anything, especially metal, inside this unit. A serious electric shock or malfunction could occur if articles such as coins, needles, screwdrivers, etc. are inserted through the ventilation holes, etc. of this unit.
■ Turn off after use
If the unit is left for a long time with the power on, this will not only shorten its useful operation life, but may also cause other unexpected trouble.
■ If water is spilled on the unit
Be extremely careful if water is spilled on the unit, because a fire or serious electric shock might occur. Immediately disconnect the power cord plug, and consult with your dealer.
■ Place the unit where it will be well ventilated, and away from direct sunlight
- Keep the unit away from stoves, etc.
Heat can damage the external surfaces as well as internal circuits and components.
■ Avoid spray-type insecticides
Insecticides might cause cracks or "cloudiness" in the cabinet and plastic parts of this unit. The gas used in such sprays might, moreover, be ignited suddenly.
■ Never use alcohol or paint thinner
These and similar chemicals should never be used, because they may damage the finish.
■ If trouble occurs
If, during operation, the sound is interrupted or indicators no longer illuminate, or if abnormal odor or smoke is detected, immediately disconnect the power cord plug, and contact your dealer or an Authorized Service Center.
CONNECTIONS
Connections by direct connectors (no connection wires needed)
- If units are stacked
1 Move the direct connectors upward, and insert the pin (located in the rear panel) into the top panel.
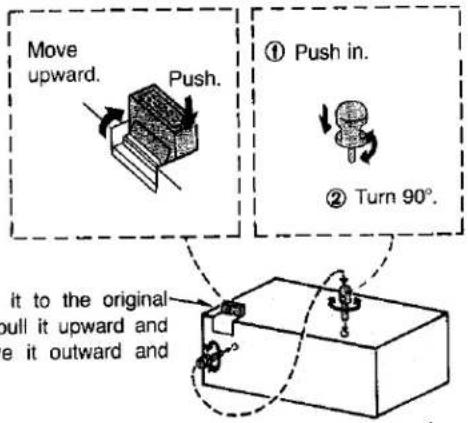
To return it to the original position, pull it upward and then move it outward and down.

- Do not bump or scrape the units against each other. (The direct connectors may be damaged if excessive force is applied.)
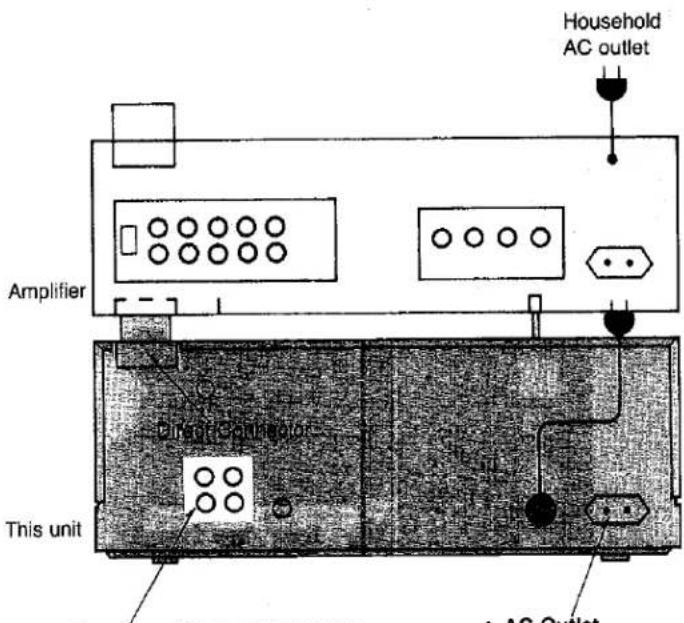
Line-in and line-out terminals
These terminals are used for connection of the cassette deck, via connection cords, to the recording and playback terminals of an amplifier.
• AC Outlet
(Switched 100 W max. for United Kingdom) (Unswitched 100 W max. for other area.)
- Connect the power cord to the power outlet on the amplifier.
- The configuration of AC power plug and outlet may differ according to area.
Using an audio timer
(See the operating instruction of the timer.)
Timer recording/playback is a feature which makes it possible, by using an audio timer (optional), to automatically begin recording a radio broadcast or playback a tape at the desired time.
![graph LR Timer["Timer"] --> AC["AC outlet"] AC --> Tuner["Tuner"] AC --> Amplifier["Amplifier"] Tuner --> ThisUnit["This unit"] Amplifier --> ThisUnit Tuner --> ThisUnit](/content/2026/05/775954/images/ed1fc36dba3b2cb8f571198504c3b759c43f34cd194c32e1ff372dcd8222a653.jpg)
FRONT PANEL CONTROLS AND THEIR FUNCTIONS
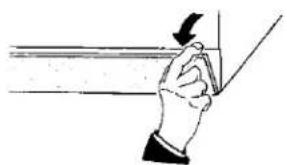
To open the lower panel

TAPE DECK 1 (playback only)
This deck can be used for ordinary playback.
This deck should be used for playback when making a tape-to-tape recording.
TAPE DECK 2 (playback/recording)
This deck can be used for ordinary recording and play-back.
This deck should be used for recording when making a tape-to-tape recording.
① Power switch [power (1 off·on)]
② Timer-start switch [☐timer (rec-off-play)] Used for timer recording or playback.
③ Input level controls [input level (min·max)]
4 Power Indicator [power]
⑤ Level Meters
⑥ Tape 2 Cassette Holder
7 Tape counter and reset button [tape2 counter/reset] When the reset button is pressed, the numbers of the tape counter will return to "000"; the numbers change to correspond to the tape movement in tape deck 2.
⑧ Dubbing switch [dubbing (■ off·■ on)] Press to make a tape-to-tape recording. (The indicator will illuminate.)
⑨ Eject Button [eject (▲)]
10 Play Indicator [play (▶)]
Dubbing Indicator [dubbing]
⑫ Tape 1 Cassette Holder
Music Select Switch [M S (off·on)] Set this button to "on" to find the beginning of a tune.
14 Synchro-start button [synchro start] Press this button when starting a tape-to-tape recording.
15 Dolby NR Indicator [Dolby NR (M)]
16 Fast-forward/cue button [ff/cue]
Press this button to move the tape at high speed in the forward direction, or, during playback, to find ("cue") the beginning of a tune.
17 Play Button [play]
Press to begin recording or playback, or to release the pause mode.
(At the same time, the "play" indicator will illuminate.)
18 Stop button [stop]
19 Rewind/review button [rew/review]
Press this button to move the tape at high speed in the reverse direction, or, during playback, to find ("review") the beginning of a tune.
20 Dubbing Tape-Speed Switch [tape speed (×2·×1)]
21 Record Button [rec/synchro rec (●)]
When this button is pressed, the unit is in the recording stand-by mode, and the record indicator and pause indicator will illuminate. To begin the recording, press the playback button, or start button of the disc player.
22 Pause button [pause (11)]
Press this button to temporarily stop the tape during recording or playback.
(At the same time, the pause indicator will illuminate.)
23 Record-muting button [rec mute (☐)]
A non-recorded section of tape can be made by pressing this button during recording.
24 Pause Indicator [pause (11)]
25 Recording Indicator [rec (●)]
26 Sealed Panel
27 Dolby NR Button [Dolby NR (■out ■in)]
Press to "in" position for recording or playback with Dolby NR system.
STANDARD OPERATING PROCEDURES
When the power switch is switched ON, a mechanical noise will be heard. This is the tape transport mechanism turning to assure that the unit is set to the neutral position.

Be sure the edge of the cassette where the tape can be seen faces down.
Auto Tape Selector Function
This feature is a function which, after the cassette is inserted, automatically senses the type of tape and selects the correct bias and equalization for that tape type.
Either ordinary tape, chromium-dioxide tape or metal tape can be used in this unit.
About the Cassette Tapes
■ Do not use tape such as described below in this unit.
120-minute tape
Because this tape is very thin, it might stretch during use, become tangled with rotating parts in this unit, and/or tape movement might not be stable.
Fe-Cr tape
The high range will be emphasized and a flat frequency response characteristic cannot be obtained.
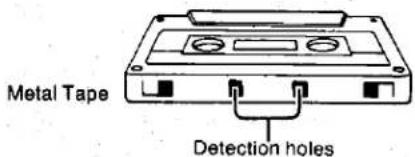
Metal tape without detection holes
Recordings will be very distorted.
(There is no playback problem however.)
■ Tape loosenes
If the tape is loose in the cassette, it may result in scratches on the tape or even tape breakage.

■ Avoid these places...
- Where the temperature is high (35°C or higher) or where the humidity is high (80% or higher).
- Where there is a strong magnetic field (near a speaker, on top of a TV, etc.).
• In direct sunlight.
NOISE-REDUCTION SYSTEM
- Noise-reduction system can be used to reduce tape "hiss" noise, which is a natural characteristic of tape, to an acceptable low level.
- Because such tape noise is mostly in the middle and high-frequency ranges, it would be possible to forcibly cut this out, but at the same time the music signals in those ranges would also be cut out.
- It is for this reason that this unit includes noise-reduction system (the Dolby noise-reduction systems B type) which have been developed to solve this problem.
Examples of uses of the noise-reduction system
Dolby B system
Use this system for playback of tapes which were recorded by the conventional "Dolby noise-reduction" system, and for playback of commercially available music tapes.
Dolby noise-reduction system
Because the level of tape noise is a fixed level, such noise is more easily heard as the level of the music signals becomes lower. Thus, when a recording is made, low levels are recorded at a high level, and, when this recording is played back, it is played back, conversely, at a low level.
Because the tape noise will also be then played back at a low level, the result is a reduction in the noise level.
- The B type Dolby noise-reduction performs this function in the high-frequency range.
Noise-reduction effects of each noise-reduction system
When the noise-reduction results are compared with the noise level when a noise-reduction system is not used (when the noise-reduction button marked "out" is used for the recording), the noise level using the Dolby B type system is about 1/3 .
Note:
- In order to obtain the best possible results from a noise-reduction system, a sound source which has relatively little noise will give the best results.
Note that noises which are already in the sound source (such as, for example, a scratch on a disc) cannot be reduced by any noise-reduction system.
- When playing back a tape which was recorded by using a noise-reduction system, be sure to select the same noise-reduction system for the playback.
It is recommended that you make a note, on the cassette's index card, of which system was used.
- Dolby noise reduction system manufactured under license from Dolby Laboratories Licensing Corporation. 'Dolby' and the double-D symbol are trademarks of Dolby Laboratories Licensing Corporation.
About the Cassette Tape
■ Accidental-erase-prevention tabs
Each tape cassette has two (for side 1 and 2) tabs which, when broken out prevent recording on the tape.
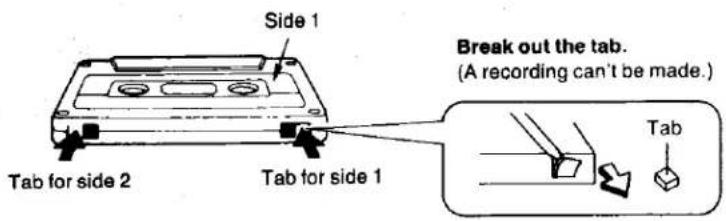
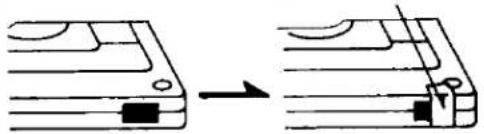
• To re-record on the tape
Cover the hole with cellophane tape.
PLAYBACK
Have you read "STANDARD OPERATING PROCEDURES" on page 6?

③ Adjust the volume control, and other. Use controls on the amplifier connected to this unit.
Note: If tape deck 1 and tape deck 2 are both used at the same time for tape playback, only the sound from tape deck 2 will be heard. When playing back a tape in tape deck 1 therefore, tape deck 2 should be in the stop mode.
Continuous playback
Continuous playback (tape 1→tape 2→tape 1), etc. (until the stop button is pressed.) is possible.
The tapes will automatically rewind when playback has reached the end of the tape.
To stop continuous playback
To stop continuous playback, press the stop button to the tape deck now playing back the tape.
Note:
Leave the tune-select switch at the "off" position, and dubbing switch too.

Tune selection (TAPE 1)
This feature is used to find the beginning of a tune, either before or after the present position of the tape.


Press.
(The search for the tune beginning will start.)
To find a tune which is a few tunes ahead (or before) on the tape, repeat steps 2.
TIMER RECORDING/PLAY- BACK
To use tape as a wake-up alarm
1 Playback the tape to be used and adjust the volume level and tone as desired.
② Stop the tape at the place where you want playback to begin.
③ Set the timer to the desired time.
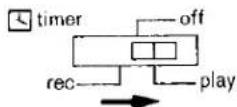
4 Set to the "play" position.
After setting the timer Check to be sure that the power switch is at the "on" position.
To cancel tune selection
Switch to the "off" position. (Music select switch)
The tune-select system will not function correctly under the following conditions:
- If there is 4 seconds or less between tunes (unrecorded space)
- If there is excessive noise between tunes
- If there is a very low-sound level place, or an unrecorded space, during a tune
- If the tape has been recorded by using fade-in and/or fade-out techniques
- Music select system manufactured under license of Start S.A., Bruxelles, Belgium.
For playback by using the timer, use tape 2; tape 1 cannot be used.
To make unattended recordings
① Tune (on the tuner) to the broadcast station which will broadcast the program to be recorded.
② Follow steps 1 to 4 of "Recording" on page 10.
- Tune to the broadcast and make the adjustment of the recording level.
Then press the stop button.
③ Set the timer to the desired time.
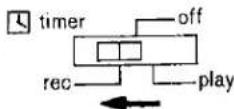
4 Set to the "rec" position.
After setting the timer
Check to be sure that the power switch is at the "on" position.
RECORDING
Have you read "STANDARD OPERATING PROCEDURES" on page 6?

Synchro recording
"Synchro-recording" means to start recording simultaneously when a disc starts playing and stop recording simultaneously when the disc stops playing. (Be sure to adjust the recording level before staying the recording.)
1 Follow steps 1 to 2 on "RECORDING"; after beginning the disc play, press the pause button and adjuste the recording level.
② After adjusting the recording level, begin playing the disc from its beginning. (The recording will begin automatically)

- When the stylus
- Descends to the disc surface, the recording will begin.
- Leaves the disc surface, there will be a 4-second non-recorded space, and then the deck will change to the pause mode.
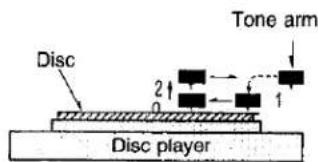
Synchro-recording notes
(To customers who have purchased this unt as part of a system)
The method of connecting this tape deck differs depending on the amplifier or receiver, etc. with which it is combined. After first carefully checking the model number of your amplifier or receiver, make the connections correctly, using the synchro-recording cord(s) included
If you have amplifier model SU-X90 or SU-X70
Using both of the synchro-recording cords included with the amplifier, make the connections between the amplifier and the record player and between the amplifier and the tape deck.
![graph TD A["Record player"] --> B["tuner"] B --> C["ampifier"] C --> D["tape deck"] style A fill:#f9f,stroke:#333 style B fill:#ccf,stroke:#333 style C fill:#cfc,stroke:#333 style D fill:#fcc,stroke:#333](/content/2026/05/775954/images/b63086fcb2beb05d73ad142559d3b1f3412e03345beb4c716c70a141453550dc.jpg)
with the amplifier or receiver. (The connection should be made between the synchro-recording jack on the rear panel of the tape deck, amplifier or receiver, and record player.)
If you have amplifier model SU-X50, or receiver model SA-X20 or SA-X30
Using the synchro-recording cord included with the amplifier or receiver, make the connection between the record player and the tape deck.
![graph TD A["Record player"] --> B["tuner"] B --> C["amplifier (Receiver)"] C --> D["tape deck"] D --> E["Waveform output"] style A fill:#f9f,stroke:#333 style B fill:#ccf,stroke:#333 style C fill:#cfc,stroke:#333 style D fill:#fcc,stroke:#333 style E fill:#ffc,stroke:#333](/content/2026/05/775954/images/0bea87d91515f6bc02176bc7a47e6f0739c43742919131f575428b0694632dcc.jpg)
Using the cassette index card
Although making notes on the index card may not be necessary for longer tunes, such as classical music, if only one or two tunes are recorded on one tape, for short tunes such as popular music which are only 4 or 5 minutes long or less, it is easy to later forget what was recorded and in what order.
It is convenient therefore, when making the recordings, to note the tune titles and other information on the index card. Before making the first recording, be sure to press the tape counter's reset button to the zero position.
Then, if the tape counter reading is also noted on the card after each tune is recorded, it is easier to find any particular tune when the tape is later played back.
| 000 | Help! | 000 | Flute Konzerte |
| 045 | Back in the U.S.S.R | 126 | Zanberflöte |
| 068 | what goes on? | 218 | Le Nozae di Figaro |
| 113 | Taxman | 361 | Posthornserenade |
| 216 | Penny Lane | 418 | Die Kunst der Fuge |
| 282 | Good night | 618 | Technics Symphony |
RECORDING
(continuous)
Adjustment of the recording level
Level Meter
This meter indicates the recording level or playback level by using a bar-graph type of display, of the TAPE 1, and 2.
■ Recording level
The number that you can use as a guide will vary depending upon the type of tape used and the noise-reduction system employed for the recording.
- There may be some difference, depending upon the sensitivity difference of tapes, between the illumination pattern shown by the level meter during recording and during playback, but a slight difference does not indicate any problem.
| Noise Reduction (NR) | Ordinary Level | Max. Level |
| Dolby NR, NR out | +3 dB | +5 dB |
Recording Muting
The Recording-Muting feature is convenient to prevent recording such unwanted material as commercial messages when recording FM radio broadcasts, or the "click" noise heard when the stylus descends to the disc surface.
How to make blank (no sound recorded) spaces
Immediately after one program has been recorded, keep the Record-Muting Button depressed for about 4 seconds. After these 4 seconds have elasped, depress the Pause Button.
This feature is convenient in the following ways:
- To produce the interval between tunes which is necessary for correct operation of the tune-select system.

Erasing recorded sounds
When a recording is made, any sounds previously recorded on that portion of the tape are erased, and only the new recording remains. To erase recorded sounds without making a new recording, proceed as follows.

TAPE TO TAPE RECORDING
Either of 2 speeds can be used for tape to tape recording. If the "×2" tape speed is selected, tape to tape recording is possible in one-half the time as at the "×1" speed. The "×1" position should be used if you want to enjoy listening to the tape to tape recording as it is being made. (Set the tape speed to "×1.)
- Your attention is drawn to the fact that recording prerecorded tapes or discs or other published or broadcast material may infringe copyright laws.
Synchro-start function
By simply pressing the synchro-start button, the tape playback (on tape deck 1) and tape recording (on tape deck 2) can be started simultaneously, thus avoiding any worry about an incorrect start.

Notes:
- During tape-to-tape recording, the recording level is fixed, unaffected by the input level control; the level meter at this time will show the output level of tape deck 1.
- During tape-to-tape recording, the noise-reduction system does not function.
(The noise-reduction indicator also will not function.)
- During tape-to-tape recording, do not change the tape speed, because the sound quality will be adversely affected.
MAINTENANCE
Maintenance of the head section
The head assembly, capstans and pinch rollers should be cleaned after about each 10 hours of use in order to maintain good sound quality.
1. Cleaning with a cotton swab
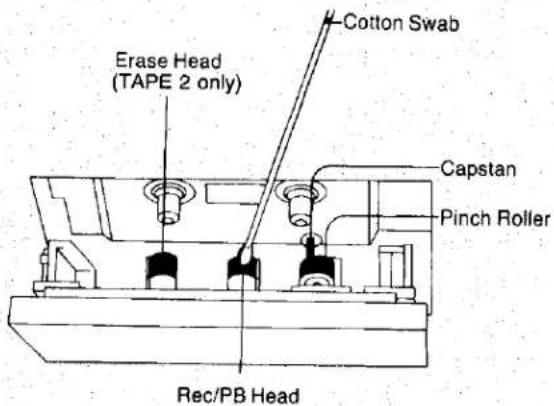
Head demagnetization
The head assembly should be demagnetized after about each 50 hours of use in order to maintain good sound quality. If the heads become magnetized, use a head demagnetizer (option).
The head assembly becomes magnetized, causing noise in recordings and unwanted erasure of valuable recordings, if a magnetized screwdriver or other metal tools come near the head assembly, and when the heads have been used for a long period of time.
Note:
When demagnetizing the head assembly, be sure to first push the power switch to release it outward (■-■) to the "off" position.
Maintenance of external surfaces
To clean, use a soft dry cloth.
If the surfaces are extremely dirty, use a soft cloth, dipped into a soap and water solution or a week detergent solution.
Wring the cloth well before wiping the unit.
Wipe once again with a soft dry cloth.
Never use alcohol, paint thinner, benzine, nor a chemically treated cloth to clean this unit.
Such chemicals may damage the finish of your unit.
TROUBLESHOOTING GUIDE
Before requesting service for this unit, check this table to determine if the problem can be solved as described below. If the problem still persists after making these checks, or if there are symptoms of malfunction not described in this table, it is recom-
mended that you consult the store where this unit was purchased or your local Service Center (see list included) for further information and assistance.
| Problem | Probable cause | Remedy |
| Tape moves but no sound is heard. | The volume control of the stereo amplifier is set to its minimum position. | Adjust the volume control to the desired level. |
| The input selector of the stereo amplifier is not set to the "tape" position. | Set to the "tape" position. | |
| Distorted sound | The recording level is too high. | Referring to the section "Adjustment of the recording level" on page12, make recordings at the most suitable recording level. |
| Strange tone quality or ragged sound | The noise-reduction switch is not set to the correct position. | Set the switch to the position corresponding to the setting used for recording. |
| No recording when the record button is pressed. | The accidental-erase-prevention tab(s) of the cassette have been broken out. | Cover the tab hole(s) with cellophane tape. |
| Playback sound is unclear or wavering; clear recordings can't be made. | The heads are dirty. | Clean the heads as described in the section "MAINTENANCE" on page 14. |
| There is foreign material on the pinch rollers or capstans. |
TECHNICAL SPECIFICATIONS
| Deck system | Stereo cassette deck |
| Track system | 4-track, 2-channel |
| Heads (TAPE 1) PLAY | MX head |
| (TAPE 2) REC/PLAY | MX head |
| Erasing | Double-gap ferrite head |
| Motors | |
| Capstan | 2 motor |
| Reel drive | 2 motor |
| Mechanism | 2 motor |
| Recording system | AC bias |
| Bias frequency | 105 kHz |
| Erasing system | AC bias |
| Tape speed | 4.8 cm/sec (9.6 cm/sec) |
| Frequency reponse | |
| Metal | 30 Hz-17,000 Hz |
| 40 Hz-17,000 Hz (DIN) | |
| 50 Hz-16,000 Hz (±3 dB) | |
| CrO2 | 30 Hz-17,000 Hz |
| 40 Hz-16,000 Hz (DIN) | |
| 50 Hz-15,000 Hz ±3 dB | |
| Normal | 30 Hz-16,000 Hz |
| 40 Hz-15,000 Hz (DIN) | |
| 50 Hz-14,000 Hz ±3 dB | |
| S/N (Signal level = max. recording level, CrO2 type tape) | |
| Dolby B NR in | 67 dB (CCIR) |
| NR out | 57 dB (A weighted) |
| Wow and flutter | 0.07% (WRMS) ±0.13% (DIN) |
| Fast Forward and Rewind Time | Approx. 90 seconds with C-60 cassette tape |
| Input sensitivity and impedance LINE | 60 mV/47 kΩ |
| Output voltage and impedance LINE | 400 mV/1.5 kΩ |
| Power consumption | 14 V |
| Power supply | AC 50 Hz/60 H |
| 220 V for Europe except United Kingdom | |
| 240 V for United Kingdom | |
| 110/127/220/240 | |
| preset power voltage 240 | |
| for other area | |
| Dimensions (W×H×D) | 315×121.5×245 m |
| Weight | 4.4 h |
Weight
- Design and Specifications are subject to change without notice. Weight and dimensions shown are approximate.
Estimado Estereoaficionado
Al mismo tiempo que le expresamos nuestro agradecimiento por habernos honrado con la selección del presente aparato, nos es grato darle la bienvenida a la creciente familia de los satisfechos propietarios de productos Technics en el mundo.
No nos cabe duda que la incorporación de este nuevo equipo a los que ya posee le acarreará momentos felices inolvidables.
Quisiéramos pedirle que lea detenidamente las instrucciones para el uso aquí dadas y las conserve a mano para poder recurrir a ellas con comodidad cuando se presente el caso.
INDICE
- ANTES DE HACER FUNCIONAR EL APARATO .....16
- PARA UN USO SEGURO DEL PRESENTE
APARATO ....16
• CONNEXIONS ...... 17
• CONTROLES DEL PANEL DELANTERO Y SUS RESPECTIVAS FUNCIONES .....18 - PREPARATIVOS PARA GRABAR O REPRODUCIR .....20
- SISTEMAS DE REDUCCIÓN DE RUIDOS .....21
- REDUCCION 22
- GRABACION/REPRODUCCION CON
TEMPORIEADOR ...... 23
• GRABACION 24
• GRABACION DE DOBLAJE 27
• COMO CUIDAR ....28
• GUIA PARA LA LOCALIZACION DE LAS FALLAS .....28
• ESPECIFICACIONES TECHNICAS .....29
ANTES DE HACER FUNCIONAR EL APARATO
Sirviéndose de un destornillador (−), poner el selector de voltaje (ubicado en el panel trasero) a la posición que corresponda al voltje de la región en que habrá de ser usado el aparato. (Si la fuente de alimentación en su área es de 117 V o 120 V, colocarlo a la posición 127 V.
Es de recordar que de no hacer este ajuste como es debido, el aparato resultará seriamente perjudicado.
(En el caso de algunos países, no hay selector de voltaje; el voltaje ya viene puesto como es debido.)
PARA UN USO SEGURO DEL PRESENTE APARATO
■ Usar una fuente de alimentación de corriente alterna casera ordinaria
- Usar una fuente de alimentación de corriente alterna de alta tensión, como la usada para acondicionadores de aire, resulta sumamente peligroso.
Habrá que poner sumo cuidado a fin de no conectar el presente aparato con un tomacorriente usado para un acondicionador de aire grande o para un equipo de calefacción central que usen alta tensión ya que habría peligro de incendio.
- No se podrá usar una fuente de alimentación de corriente continua.
Habrá que revisar bien la fuente de alimentación de corrien-
te, especialmente en el caso de barcos u otros ambientes en que se hace uso de corriente continua.
■ Enchufe y desenchufe de la clavija del cable de corriente
1. Las manos mojadas son peligrosas.
De tocar la clavija con las manos mojadas pueden producirse peligrosas sacudidas eléctricas.
2. No tirar del cable de la corriente.
Siempre habrá que agarrar la clavija; nunca tirar del cable en sí.
■ Tomacorriente para corriente alterna del panel trasero
(No incluido para algunos países)
- Todo equipo a conectarse a estas tomas habrá de tener el consumo de corriente especificado o uno inferior al mismo.
Esta toma de corriente es exclusivamente para conectar otros equipos de audio, como sería un reproductor de cintas o "tape deck".
Habrá que cerciorarse de que el consumo de corriente de cada uno de los equipos no exceda el vatiaje especificado junto al tomacorriente para corriente alterna.
- Jamás conectar otros aparatos eléctricos tales como planchas o tostadores.
De conectar aparatos que requieren mucho consumo de corriente, podrian producirse accidentes inesperados como consecuencia de un calentamiento excesivo.
■ Jamás ponerse a reparar o a reconstruir el presente aparato
De ponerse a arreglar, desmontar o reconstruir el presente aparato personas no calificadas para hacerlo, como también al tocar los componentes encerrados dentro del mismo, pueden ocurrir sacudidas eléctricas con serias consecuencias.
■ Para familias con niños
Jamás habrá que permitir que los niños introduzcan nada, sobre todo objetos de metal, dentro del aparato. Podrían producirse serías sacudidas eléctricas o desperfectos si se meten artículos tales como monedas, agujas, destornilladores, etc., a través de los agujeros de ventilación, etc. del aparato.
■ Apagar el aparato después de usuario
Dejando el aparato por un tiempo relativamente largo con la corriente encendida, esto no solamente hará más corta la duración útil de su funcionamiento sino que podría también ser motivo de otros desperfectos imprevistos.
■ Ojo a no volcar agua sobre el aparato
Habrá que poner mucho cuidado cuando se haya volcado agua sobre el aparato ya que podría dar lugar a incendio o a serias sacudidas eléctricas.
Habrá que desenchufar de inmediato la clavija del cable de la corriente y recurrir al proveedor de la localidad.
El aparato habrá de ir colocado en un lugar donde tenga buena ventilación y donde no quede expuesto a la luz solar directa
■ El aparato habrá de mantenerse separado de las estufas, etc.
El calor puede dañar las superficies externas del aparato como también los circuitos y componentes internos del mismo.
■ Evítese usar insecticidas tipo pulverizador
Los insecticidas podrían causar rajaduras y "opacidad" en el gabinete y en las partes de plástico del aparato. Además, el gas usado en tales pulverizantes podría prender fuego de improviso.
■ Nunca usar alcohol o diluyentes de pintura
Jamas habra que usar ni éstos ni otros productos químicos similares dado que podrian perjudicar el acabado exterior.
■ De encontrarse con un desperfecto
Si, mientras se hace funcionar el aparato, los sonidos quedan interrumpidos, las lucecitas indicadoras no se iluminan más o si se notan olores o humo no normales, habrá que desconectar de inmediato la clavija del cable de la corriente y recurrir al proveedor de la localidad o a un Centro de Servicio Autorizado.
- TECHNICS
- DEAR STEREO FAN
- CONTENTS
- FOR UNITED KINGDOM
- IMPORTANT
- BEFORE USING THIS UNIT
- FOR SAFE USE OF THIS UNIT
- USE A STANDARD ELECTRICAL AC WALL OUTLET
- CONNECTION AND REMOVAL OF THE POWER CORD PLUG
- WET HANDS ARE DANGEROUS
- AC OUTLET ON REAR PANEL (NOT EQUIPPED FOR SOME COUNTRIES)
- NEVER ATTEMPT TO REPAIR OR RECONSTRUCT THIS UNIT
- FOR FAMILIES WITH CHILDREN
- TURN OFF AFTER USE
- IF WATER IS SPILLED ON THE UNIT
- PLACE THE UNIT WHERE IT WILL BE WELL VENTILATED, AND AWAY FROM DIRECT SUNLIGHT
- KEEP THE UNIT AWAY FROM STOVES, ETC
- AVOID SPRAY-TYPE INSECTICIDES
- NEVER USE ALCOHOL OR PAINT THINNER
- IF TROUBLE OCCURS
- CONNECTIONS
- CONNECTIONS BY DIRECT CONNECTORS (NO CONNECTION WIRES NEEDED)
- LINE-IN AND LINE-OUT TERMINALS
- AC OUTLET
- USING AN AUDIO TIMER
- FRONT PANEL CONTROLS AND THEIR FUNCTIONS
- TAPE DECK 1 (PLAYBACK ONLY)
- TAPE DECK 2 (PLAYBACK/RECORDING)
- STANDARD OPERATING PROCEDURES
- AUTO TAPE SELECTOR FUNCTION
- ABOUT THE CASSETTE TAPES
- DO NOT USE TAPE SUCH AS DESCRIBED BELOW IN THIS UNIT
- 120-MINUTE TAPE
- FE-CR TAPE
- METAL TAPE WITHOUT DETECTION HOLES
- TAPE LOOSENES
- AVOID THESE PLACES
- NOISE-REDUCTION SYSTEM
- EXAMPLES OF USES OF THE NOISE-REDUCTION SYSTEM
- DOLBY B SYSTEM
- DOLBY NOISE-REDUCTION SYSTEM
- NOISE-REDUCTION EFFECTS OF EACH NOISE-REDUCTION SYSTEM
- NOTE
- ABOUT THE CASSETTE TAPE
- ACCIDENTAL-ERASE-PREVENTION TABS
- PLAYBACK
- CONTINUOUS PLAYBACK
- TO STOP CONTINUOUS PLAYBACK
- TUNE SELECTION (TAPE 1)
- TIMER RECORDING/PLAY- BACK
- TO USE TAPE AS A WAKE-UP ALARM
- TO MAKE UNATTENDED RECORDINGS
- RECORDING
- SYNCHRO RECORDING
- WHEN THE STYLUS
- SYNCHRO-RECORDING NOTES
- (TO CUSTOMERS WHO HAVE PURCHASED THIS UNT AS PART OF A SYSTEM)
- IF YOU HAVE AMPLIFIER MODEL SU-X90 OR SU-X70
- IF YOU HAVE AMPLIFIER MODEL SU-X50, OR RECEIVER MODEL SA-X20 OR SA-X30
- USING THE CASSETTE INDEX CARD
- (CONTINUOUS)
- ADJUSTMENT OF THE RECORDING LEVEL
- LEVEL METER
- RECORDING LEVEL
- RECORDING MUTING
- HOW TO MAKE BLANK (NO SOUND RECORDED) SPACES
- THIS FEATURE IS CONVENIENT IN THE FOLLOWING WAYS
- ERASING RECORDED SOUNDS
- TAPE TO TAPE RECORDING
- SYNCHRO-START FUNCTION
- PLAY NUMBER
- DISPLAY
- NOTES
- MAINTENANCE
- MAINTENANCE OF THE HEAD SECTION
- CLEANING WITH A COTTON SWAB
- HEAD DEMAGNETIZATION
- MAINTENANCE OF EXTERNAL SURFACES
- TROUBLESHOOTING GUIDE
- TECHNICAL SPECIFICATIONS
- WEIGHT
- ESTIMADO ESTEREOAFICIONADO
- INDICE
- ANTES DE HACER FUNCIONAR EL APARATO
- PARA UN USO SEGURO DEL PRESENTE APARATO
Marke : TECHNICS
Modell : RS-X50W
Kategorie : Kassettenabspieler