
RS-X990 - Kassettenabspieler TECHNICS - Kostenlose Bedienungsanleitung
Finden Sie kostenlos die Bedienungsanleitung des Geräts RS-X990 TECHNICS als PDF.


| Produkttyp | Stereo-Doppelkassetendeck |
| Abmessungen (B × H × T) | 360 × 128 × 285 mm |
| Gewicht | 5,0 kg |
| Stromaufnahme | 26 W |
| Netzanschluss | AC 50/60 Hz, 240 V |
| Bandgeschwindigkeit | 4,8 cm/s (1-7/8 ips) |
| Kopfsystem | DECT A/B: REC/PLAY Solid Permaloy, Löschen: Doppelspalt-Ferritkopf |
| Motoren | 2 geschwindigkeitsgesteuerte Gleichstrommotoren (pro Deck) |
| Rauschunterdruckung | Dolby B NR, Dolby C NR |
| Klirrfaktor & Gleichlaufschwankungen | 0,07 % (WRMS), ±0,2 % (DIN) |
| Frequenzgang (METALL) | 30 Hz - 18 kHz |
| Signal-Rausch-Abstand (Dolby C) | 74 dB (CCIR) |
| Eingangsempfindlichkeit (LINE) | 85 mV/70 kΩ |
| Ausgangsspannung (LINE) | 400 mV/1,5 kΩ |
| Automatische Bandauswahl | Ja (Normal, CrO2, Metall) |
| Wiedergabemodi | Einweg, Dauerlauf, Reihenwiedergabe |
| Aufnahmefunktionen | Serienaufnahme, Parallelaufnahme, Synchronaufnahme, CD-Edit-Aufnahme |
| Edit-Aufnahme | Ja, mit/ohne Klangbeeinflussung, doppelte Geschwindigkeit |
| Timer-Funktionen | Timer-Aufnahme und -Wiedergabe (nur Deck A) |
| Kopfhöreranschluss | Nicht vorhanden |
| Reinigung & Wartung | Kopfreinigung alle 10 Betriebsstunden, Entmagnetisierung empfohlen |
| Zubehör | Netzkabel, 2 Stereoverbindungskabel, 4-adriges Flachkabel, 8-adriges Flachkabel |
| Sicherheitshinweise | Standard-Steckdose verwenden, nicht bei Nässe einstecken, Gerät nicht öffnen, von Hitze fernhalten |
Häufig gestellte Fragen - RS-X990 TECHNICS
Wenn die Verzerrung bei der Wiedergabe auftritt, überprüfen Sie die Dolby-Einstellung: Stellen Sie den Schalter auf die Position, die bei der Aufnahme verwendet wurde.
Kontrollieren Sie auch die Kabelverbindungen zwischen Kassettendeck und Verstärker.
2. Stellen Sie den Timer auf die gewünschte Startzeit (Gerät aus).
3. Setzen Sie den Timer-Bereitschaftsschalter auf REC. Schalten Sie Tuner und Verstärker ein und wählen Sie am Verstärker den Tuner-Eingang.
Dolby C reduziert Rauschen auf etwa ein Zehntel, ideal für Aufnahmen mit großem Dynamikumfang (z.B. Live-Mitschnitte). Achten Sie auf korrekte Einstellung bei Wiedergabe.
Benutzerfragen zu RS-X990 TECHNICS
0 Frage zu diesem Gerät. Beantworten Sie die, die Sie kennen, oder stellen Sie Ihre eigene.
Eine neue Frage zu diesem Gerät stellen
Laden Sie die Anleitung für Ihr Kassettenabspieler kostenlos im PDF-Format! Finden Sie Ihr Handbuch RS-X990 - TECHNICS und nehmen Sie Ihr elektronisches Gerät wieder in die Hand. Auf dieser Seite sind alle Dokumente veröffentlicht, die für die Verwendung Ihres Geräts notwendig sind. RS-X990 von der Marke TECHNICS.
BEDIENUNGSANLEITUNG RS-X990 TECHNICS
Technics
STEREO DOUBLE CASSETTE DECK
RS-X990
OPERATING INSTRUCTIONS

Notes:
- Specifications differ according to the area code.
- The "EK" area code, for example, indicates United Kingdom specifications.
- The "EK" indications is shown on the packing case and serial number tag.
Before operating this unit, please read these instructions completely.
Dear Stereo Fan
We want to thank you for selecting this product and to welcome you to the growing family of satisfied Technics product owners around the world.
We feel certain you will get maximum enjoyment
from this new addition to your home.
Please read these operating instructions carefully, and be sure to keep them handy for convenient reference.
Contents
-Accessories 2
- For United Kingdom 2
●Technical Specifications 2
●Suggestions for Safety 3
- Connections 3
●Front Panel Controls and Functions ..... 4
●Listening to Tapes 6
●Recording 8
- Edit-Recording 10
●Timer Recording/Playback 11
●About Cassette Tapes 11
●Maintenance Back cover
●Troubleshooting Guide .... Back cover
Accessories (Refer to page 3.)
- AC power supply cord ..... 1
- Stereo connection cables .. 2
●4-core flat cables ..... 1
●8-core flat cables ..... 1
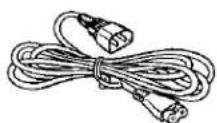


For United Kingdom
("EK" area code model only)
The "EK" indication is shown on the name plate.
The plug of the power supply cord must only be connected to electronic apparatus equipped with suitable sockets.
Otherwise cut off and dispose of the plug, and fit an appropriate one in accordance with the instruction below.
Important
THE WIRES IN THIS MAINS LEAD ARE COLOURED IN ACCORDANCE WITH THE FOLLOWING CODE.
BLUE: NEUTRAL
BROWN: LIVE
As the colours of the wires in the mains lead of this unit may not correspond with the coloured markings identifying the terminals in your plug, proceed as follows. The wire which is coloured BLUE must be connected to the terminal which is marked with the letter N or coloured BLACK.
The wire which is coloured BROWN must be connected to the terminal which is marked with the letter L or coloured RED.
The apparatus was produced to BS 800: 1983.
Technical Specifications
■ CASSETTE DECK SECTION
| Deck system | Stereo cassette deck |
| Track system | 4-track, 2-channel |
| Heads | |
| (DECK A) REC/PLAY | Solid Permaloy head |
| Erasing | Double-gap ferrite head |
| (DECK B) REC/PLAY | Solid Permaloy head |
| Erasing | Double-gap ferrite head |
Motors
| (DECK A) Capstan/reel table drive |
| 2 speed electronically controlled DC motor |
(DECK B) Capstan/reel table drive
| 2 speed electronically controlled DC motor | |
| Recording system | AC bias |
| Bias frequency | 77 kHz |
| Erasing system | AC erase |
Tape speed 4.8 cm/sec. (1-7/8 ips)
Frequency response
METAL 30 Hz\~18 kHz
40 Hz\~17 kHz (DIN)
30 Hz\~17 kHz
40 Hz\~16 kHz (DIN)
30 Hz\~16 kHz
40 Hz\~15 kHz (DIN)
(signal level =
max recording level, CrO2 type tape)
Dolby C NR on 74 dB (CCIR)
Dolby B NR on 66 dB (CCIR)
NR off 56 dB (A weighted)
Wow and flutter 0.07% (WRMS)
±0.2% (DIN)
Fast Forward and Rewind Time
Approx. 95 seconds with C-60 cassette tape
Input sensitivity and impedance LINE
85 mV/70 kΩ
Output voltage and impedance
400 mV/1.5 kΩ
GENERAL
Power consumption 26W
Power supply AC 50 Hz/60 Hz, 240V
Dimensions (W×H×D) 360 × 128 × 285 mm
(14-3/16"×5-1/32"×11-7/32")
Weight 5.0 kg (11 lb.)
Note:
Specifications are subject to change without notice.
Weight and dimensions are approximate.
Suggestions for Safety
■ Use a standard electrical AC wall outlet
-
Use from an AC power source of high voltage, such as for air conditioners, is very dangerous. Be extremely careful not to make a connection to the electrical outlet for a large air conditioner or central-heating unit which uses high voltage, because there is the possibility of fire.
-
A DC power source cannot be used. Be sure to check the power source carefully, especially on a ship or other place where DC is used.
■ Connection and removal of the power cord plug
-
Wet hands are dangerous. A dangerous electric shock may result if the plug is touched by wet hands.
-
Don't pull the power cord. Always grasp the plug; never pull the cord itself.
■ AC outlet on rear panel (not equipped for some countries)
-
Any equipment connected here should have specified power consumption or less. This outlet is exclusively for the connection of other audio equipment, such as a tape deck. Be sure the power consumption does not exceed the wattage specified near the AC outlet.
-
Never connect other electrical appliances, such as an iron or toaster. If appliances with a large power consumption are connected, an unexpected accident might occur as a result of overheating.
■ Never attempt to repair or reconstruct this unit
A serious electric shock might occur if this unit is repaired, disassembled or reconstructed by unauthorized persons, or if the internal parts are accidentally touched.
■ For families with children
Never permit children to put anything, especially metal, inside this unit. A serious electric shock or malfunction could occur if articles such as coins, needles, screwdrivers, etc. are inserted through the ventilation holes, etc. of this unit.
■ Turn off after use
If the unit is left for a long time with the power on, this will not only shorten its useful operation life, but may also cause other unexpected trouble.
■ If water is spilled on the unit
Be extremely careful if water is spilled on the unit, because a fire or serious electric shock might occur. Immediately disconnect the power cord plug, and consult with your dealer.
■ Place the unit where it will be well ventilated, and away from direct sunlight
Place this unit at least 10 cm (4") away from wall surfaces, etc., and away from direct sunlight.
■ Keep the unit away from heaters, etc.
Heat can damage the external surfaces as well as internal circuits and components.
■ Avoid spray-type insecticides
Insecticides might cause cracks or "cloudiness" in the cabinet and plastic parts of this unit. The gas used in such sprays might, moreover, be ignited suddenly.
■ Never use alcohol or paint thinner
These and similar chemicals should never be used, because they may damage the finish.
■ If trouble occurs
If, during operation, the sound is interrupted or indicators no longer illuminate, or if abnormal odor or smoke is detected, immediately disconnect the power cord plug, and contact your dealer or an Authorized Service Center.
Connections
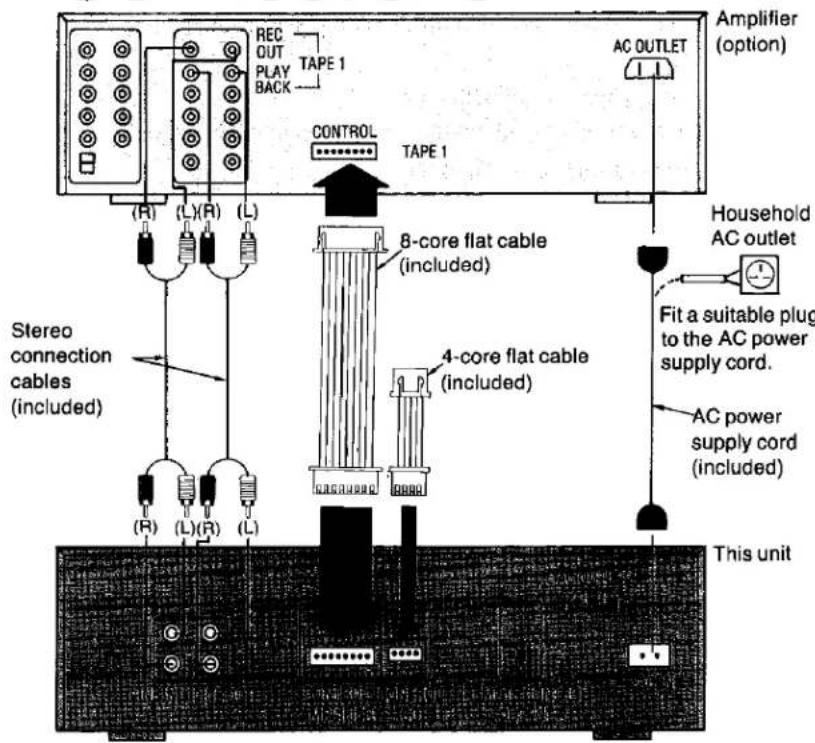
If the AC power supply cord is connected to the household AC outlet, cut off and dispose of the plug. (Refer to "For United Kingdom" on page 2.)
Notes:
- Remote control output terminal (REMOTE CONTROL OUTPUT):
This terminal can be used only with Technics graphic equalizer or compact disc player having a remote control terminal.
(Refer to the operating instructions of the amplifier.)
- AC outlet:
"SWITCHED": Power is controlled by power switch of this unit.
Do not exceed the indicated power rating when connecting to this outlet.
-8-core flat cable:
This cable is for connection to a Technics amplifier that has a control terminal (8-pin type) for a tape deck. (For details, please consult with your dealer.)
-4-core flat cable:
This cable is for connection to a Technics compact-disc player that has a control terminal (4-pin type) for a tape deck. (For details, please consult with your dealer.)
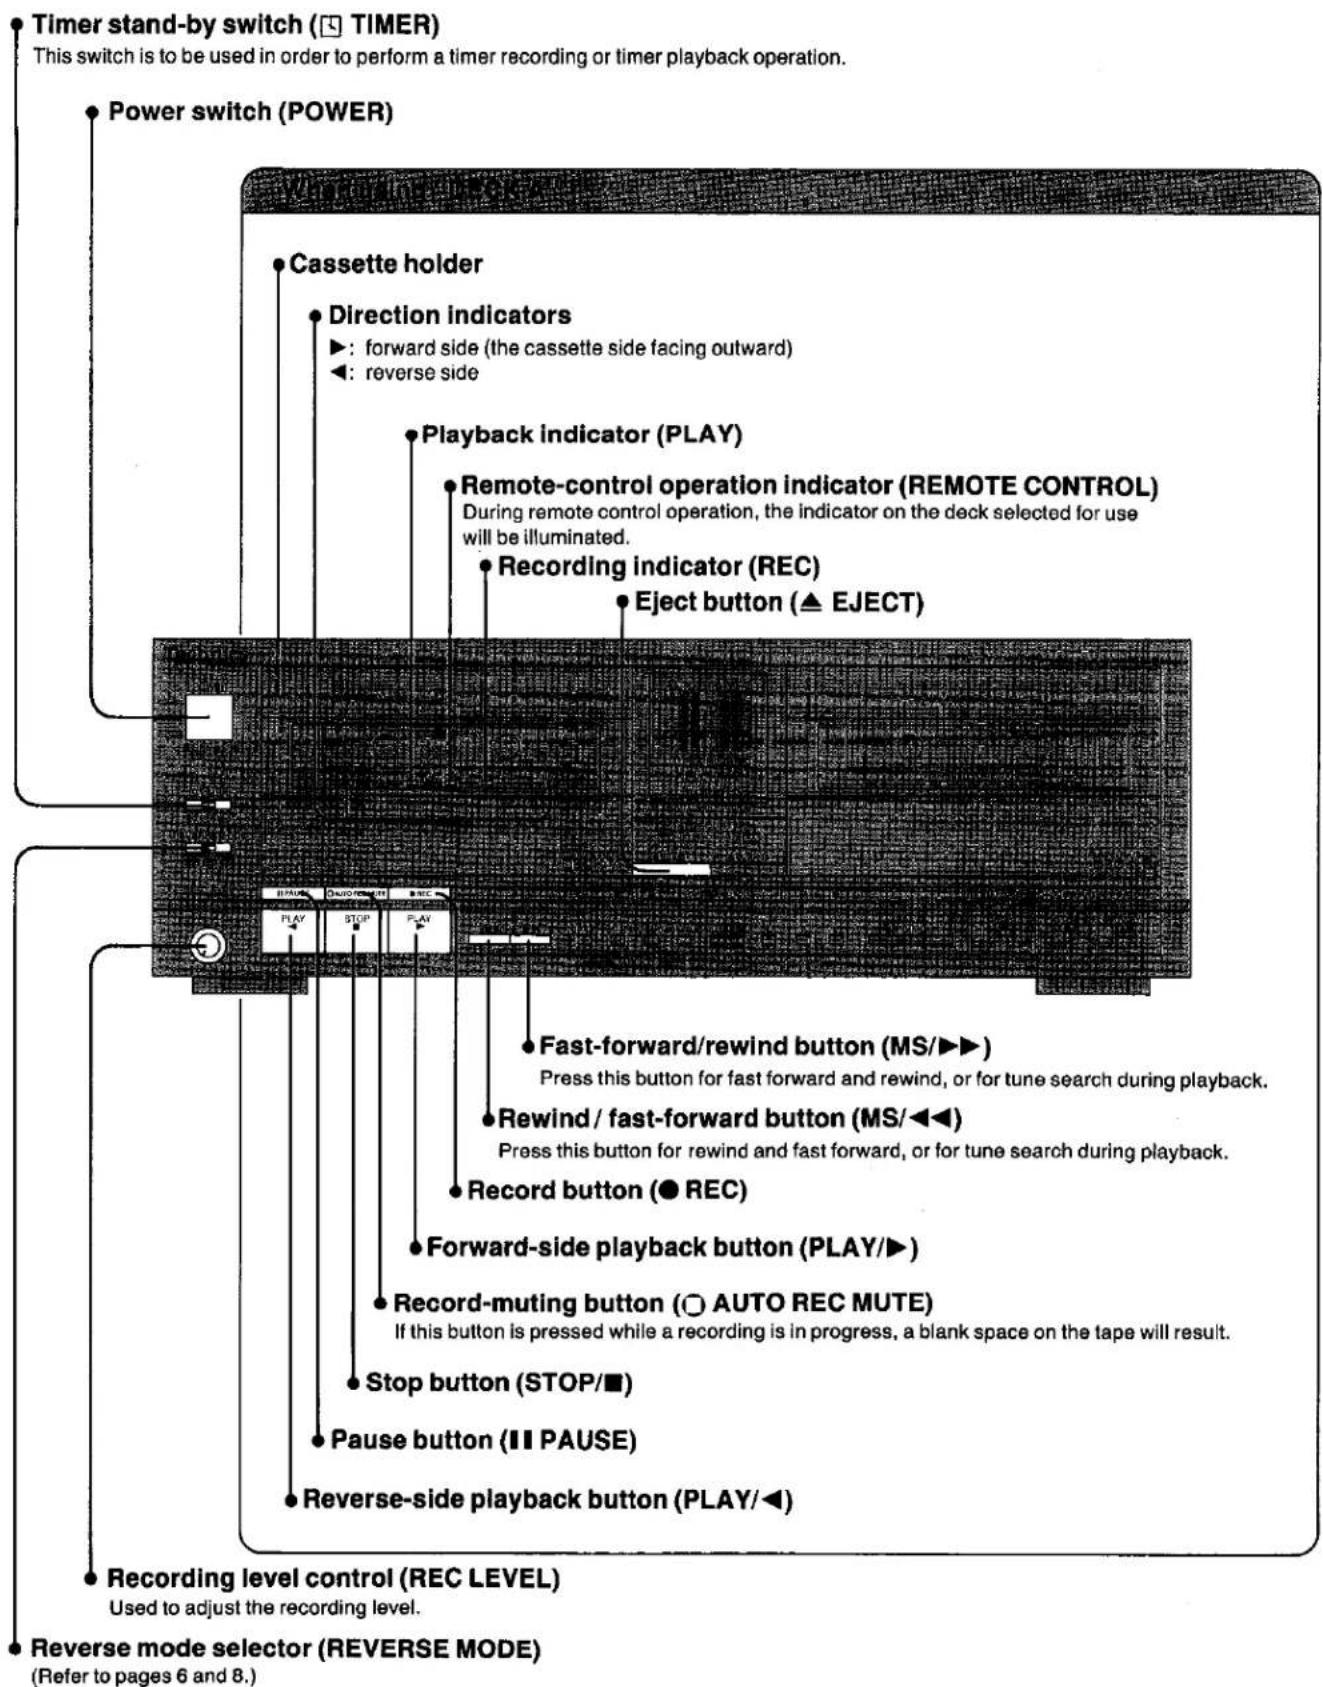
Front Panel Controls and Functions
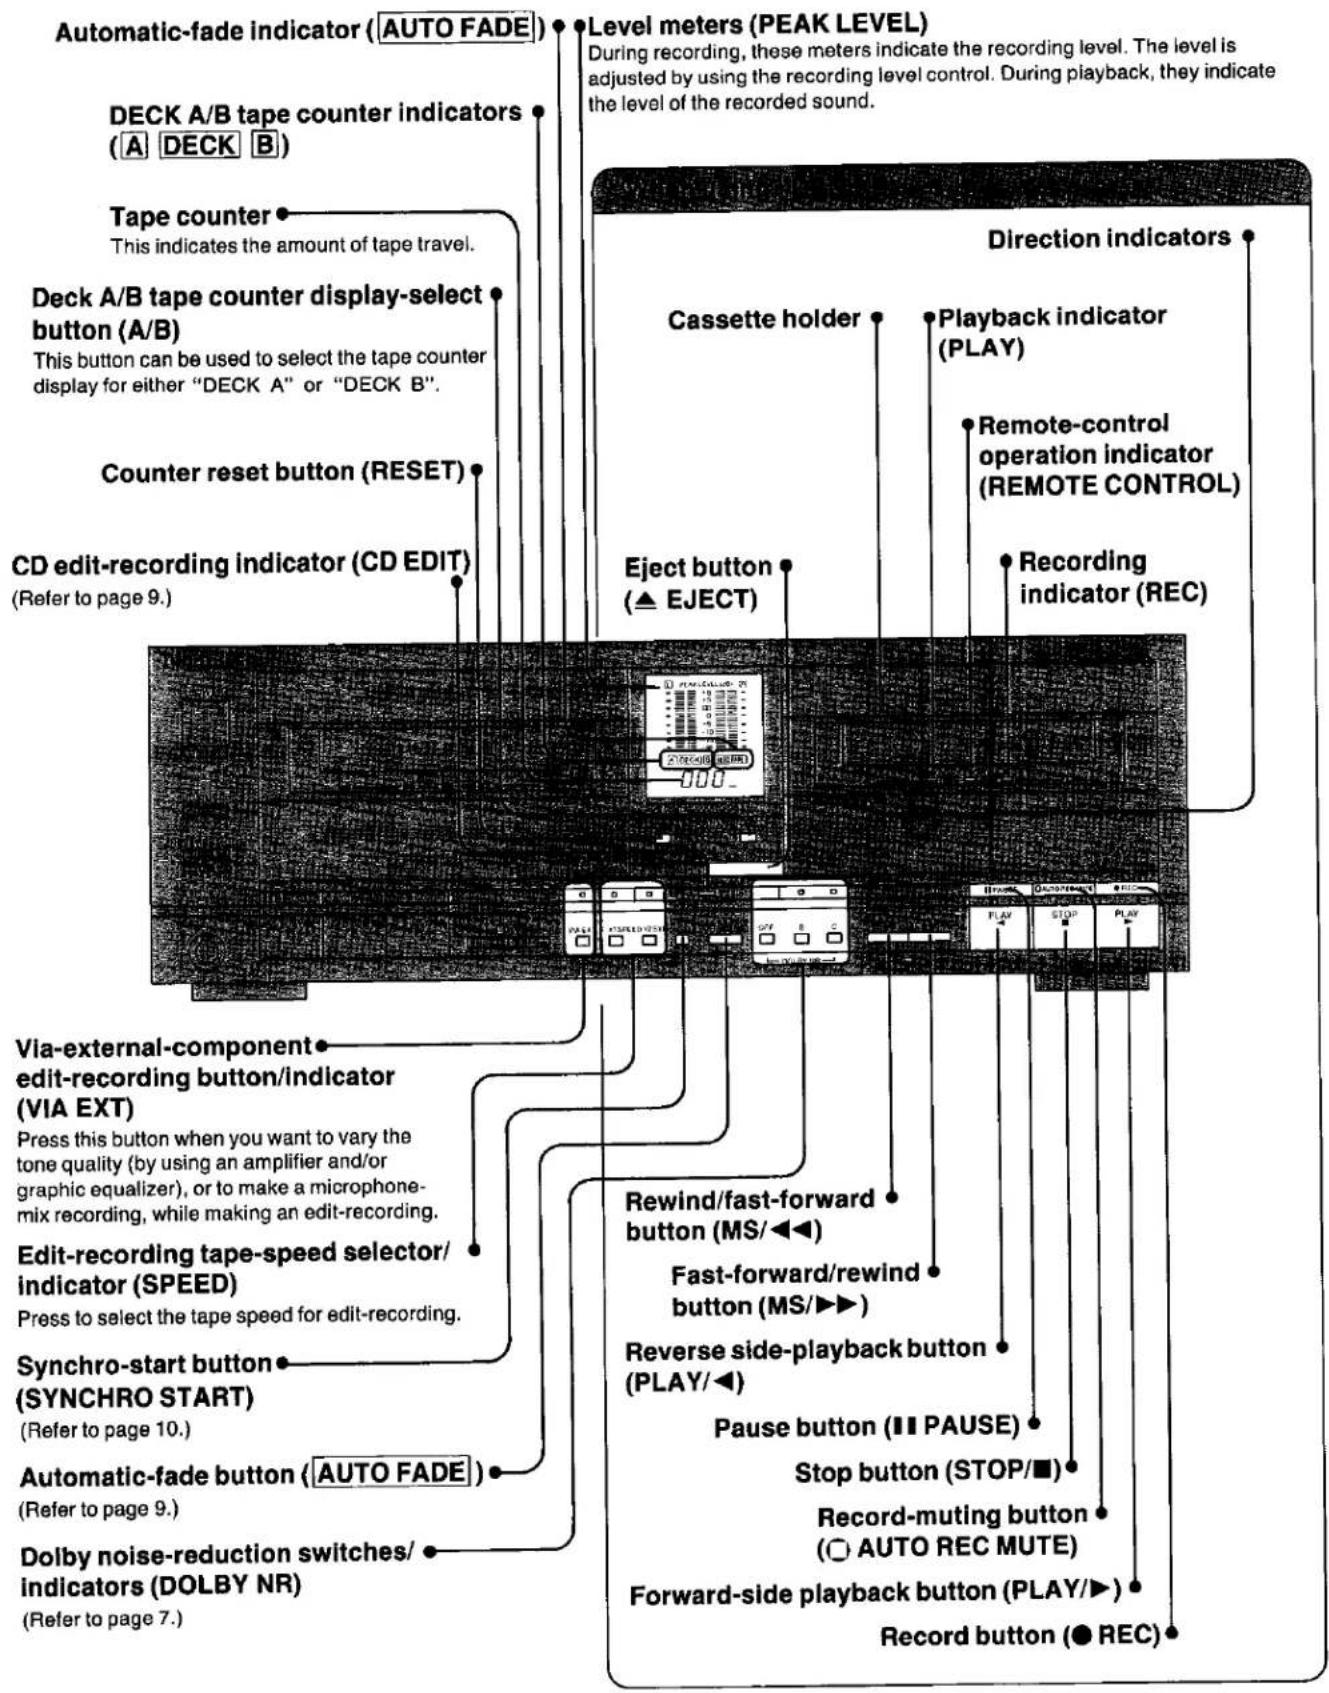
Listening to Tapes


Select the desired reverse mode.
: one-way playback:
Only one side of the tape on "DECK A" or "DECK B" is played; when the playback finishes, the tape will stop automatically.
: continuous playback:
Both sides of the tape on "DECK A" or "DECK B" are played; the tape play will continue eight "times" until the stop button is pressed.
One "time" is when the playback of the reverse side of the tape finishes.
: series playback:
Both sides of the tapes on both tape decks (beginning with "DECK A") are played; the tape play will continue eight "times" until the stop button is pressed.
One "time" is when the playback of the reverse side of the tape on "DECK B" finishes; therefore, when playback begins from "DECK B", the tape on "DECK A" repeats playback seven times.
Notes:
- "DECK A" and "DECK B" cannot both be used for playback at the same time.
- Do not press the eject button while the tape is moving; doing so might cause a malfunction or damage the tape.
- If noise is heard while listening to a tape, switch OFF the power of the compact disc player, etc.
- If the via external component edit-recording indicator is illuminated during tape playback, the level will not be displayed by the level meters. Be sure to press the via-external component-recording button, therefore, and check to be sure that the indicator is not illuminated.
To locate and play a certain tune
■ To find a tune's beginning ("music select" functions) Do so during playback.
After the tune's beginning is located, the tune will begin playing. The playback indicator will flash rapidly while the tune's beginning is being located.
During playback of "forward" side of tape

Notes:
- There can be no switchover from "DECK A" to "DECK B", or from "DECK B" to "DECK A", while you are searching for the beginning of a tune.
- Depending on the tape being used, it may not be possible to fast-forward the first tune and find the next tunes beginning. If this is the case, the music select function will not operate and playback should be done in the usual way.
- Check to be sure that the editing speed indicator or via external component edit-recording indicator illumination stops. If it illuminates, the tape will stop after the beginning of the tune is located.
- The following describes those instances in which the tape that is fast-forwarded or rewound does not stop at the beginning, or stops in the middle, of a song:
- When the music is very soft, e.g., classical music which is mainly pianissimo
- When there is sustained silence of 4 seconds or more within the recording (e.g., of a conversation or a lecture)
- When the interval between songs is very short or contains audible noise
●Tapes recorded by using fade-in or fade-out techniques. - Music select system manufactured under license of Starr S.A., Bruxelles, Belgium.
■ To fast-forward or rewind the tape
First stop the tape.
During playback of "forward" side of tape
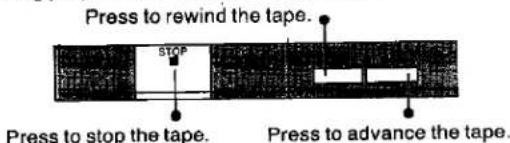
During playback of "reverse" side of tape

Automatic tape selector system
This unit automatically detects the type of tape being used, and adjusts for the proper bias and equalization.
Dolby noise-reduction system
The Dolby-noise reduction system boosts low level high frequency signals during recording. During playback, these high frequency signals are reduced by a corresponding amount and, therefore, noise is reduced.
■ Dolby NR B type
Noise is reduced to about one-third.
Use this system when playing back tapes recorded by the Dolby noise-reduction system, such as prerecorded music tapes, etc.
■ Dolby NR C type
Hiss noise is reduced to about one-tenth.
Use this system for the recording and playback of sound sources that have a wide dynamic range and good tone quality, such as FM broadcasts of live performances, etc., and for playing back such tapes.
Dolby noise reduction manufactured under license from Dolby Laboratories Licensing Corporation.
"DOLBY" and the double-D □□ symbol are trademarks of Dolby Laboratories Licensing Corporation.
Reversing
This unit employs the quick-reverse system.

- The quick-reverse feature cannot be used during the (approximately) first 15 to 20 seconds of recording or playback. This is to avoid incorrect quick reversing at the leader tape part. If for any reason there is no change of direction at the place where the leader tape is joined, the direction reversal will occur at the tape's end. (This is "end reversal".)
The quick-reverse feature might not function as expected in the following instances.
- If a tape does not have a leader tape.
- If a strong light (direct sunlight, a spotlight, etc.) is shining into the cassette holder, or when the unit is subjected to a strong impact.
- If there is dust, dirt or other foreign material on the tape surface, or if the tape is wrinkled.
- If the leader tape includes anything or any printing which is non transparent.
- If the magnetic substance on the tape is unusually thin.
Recording
The steps described below are an example for recording on "DECK A"; to make the recording on "DECK B", the corresponding controls for "DECK B" should be used in steps 3, 5, and 9.

Adjustment of the recording level
The numbers which you should use as a guide for the adjustment of the tape level will differ depending upon the type of tape used.
| Normal tapeCrO2tape | Metal tape |
| (+3) | +5 |
Note:
When the recording is to be from a compact disc or a phono disc, note that the recording is started by synchro-recording (Refer to page 9).
Before making the recording, first play the disc and follow step 5. After the adjustment of the recording level is completed, then once again start the disc play.
To erase recorded sounds
1 Press the "OFF" button of the Dolby noise-reduction switch.
2 Set the recording level control to the minimum ("0") position.
3 Press the record button, and then let the tape run.
Note that any sounds on the tape will be automatically erased if a new recording is made on that part of the tape.
To make non-recorded spaces between tunes
With this unit, by following the steps below, it is possible to make non-recorded spaces (4 seconds long) between tunes.
- To make the unrecorded space that's needed between tunes for correct operation of the music selected feature.
Press record-muting button during recording.
(After 4 seconds, the unit will automatically change to the recording stand-by mode.)
■ To make a non-recorded portion of more than 4 seconds: Press for more than 4 seconds.
(The unit will automatically change to the recording stand-by mode when the button is released.)
■ To start the recording again
Press the playback button.
Series recording
Series recording is making a continuous recording on the forward and reverse sides of the tape in "DECK A" and then on the forward and reverse sides of the tape in "DECK B", in that order.
1 Set the reverse mode selector to the "∞" position.
2 Press the record buttons of "DECK A" and "DECK B", and adjust the recording level.
(See "Recording" on page 8.)
3 Press the forward-playback button of "DECK A". (The playback indicator will change from flashing to a steady illumination, and the recording will begin.)
Note: A series recording cannot be started beginning from "DECK B". If the recording is started first from "DECK B", the recording stand-by condition of "DECK A" will be cancelled.
Parallel recordings
"DECK A" and "DECK B" can make simultaneous recordings of the same sound source.
1 Set the reverse-mode selector to the “←” or “○” position.
2 Press the record buttons of "DECK A" and "DECK B", and adjust the recording level.
(See "Recording" on page 8.)
3 Press the forward-side playback button of "DECK A" and "DECK B".
(Both recordings will start simultaneously.)
Note:
"DECK B" and "DECK A" cannot be used to record simultaneously if the sound sources are different (such as "DECK B" recording an FM broadcast and "DECK A" recording from a disc).
Automatic-fade functions
This unit includes the fade-in feature (the recording level gradually increases from the "0" level, as the recording starts, to the level to which the recording-level is set) and the fade-out feature (the recording level gradually decreases to the "0" level as the recording finishes).
■ To use the fade-in feature
- After step 7 of "Recording" (on page 8), press the automatic-fade button.
(The automatic-fade indicator will illuminate.)
- Follow steps 8 and 9.
■ To use the fade-out feature
Press the automatic-fade button while the recording is in progress.
(The automatic-fade indicator will illuminate, and, after the recording level decreases to the "0" level, an unrecorded space of about 4 seconds will be made, and the unit will change to the recording stand-by mode.)
Notes:
- Because the fade-in effect will function for a maximum of about 6 seconds, this effect may not function during recording if the time until a tune (on a compact disc, etc.) starts is long.
- The fade-in effect does not function during compact disc edit-recording, and an edit-recording without varying the tone quality.
Synchro-recording
"Synchro-recording" is a convenient feature which can be used to automatically begin tape recording at the moment when a Technics turntable or compact disc player performance begins. Before beginning the recording, be sure to adjust the recording level.
Note:
Synchro-recordings cannot be made if the turntable and the compact disc player have no synchro recording function.
■ Synchro-recording from a turntable
When a turntable from which synchro-recordings are possible is connected, the tape recording will begin at the moment when the stylus descends to the disc surface, and will make non-recorded spaces (4 seconds long) between tunes, and the unit will change to the recording stand-by mode when the stylus is lifted from the disc surface.
■ Synchro-recording from a compact disc player
When a compact disc player from which synchro-recordings are possible is connected, the tape recording will begin at the moment the compact disc begins to rotate, and will make non-recorded spaces (4 seconds long) between tunes when the disc stops, and then the unit will change to the recording stand-by mode.
CD edit-recording function
When this unit is used in combination with the Technics compact-disc player which has the CD-editing function, each track on compact discs can, depending on the length of the tape used for recording, be recorded of tracks at the end of one tape side.
Note that when this unit is used in combination with the Technics model SL-PJ45/SL-PJ46 compact disc player, the recording level is automatically adjusted and recording begins automatically.
(Refer to the operating instructions of the compact disc player.)
Edit-Recording
Edit-recording is the recording from one tape to another. (Edit-recordings cannot be made from "DECK A" to "DECK B".)
Your attention is drawn to the fact that recording prerecorded tapes or other published or broadcast material may infringe copyright laws.
To make an edit recording with vary the tone quality
1 "OFF"
2 "ON" (1→)
3 Press, then insert the tape to be used for recording.

Part where tape is exposed facing downward.
6 Select the desired reverse mode (Refer to page 8.)

Press to stop the edit-recording.
"DECK B" will stop simultaneously.
7 Press. (The above indicator will illuminate.)
8 Use a graphic equalizer or a similar component to adjust the tone quality as desired.
9 Adjust the recording level.
4 Press, then insert the tape to be used for playback.

Part where tape is exposed facing downward.
5 Select the noise-reduction system used when the tape to be played back was recorded.
10
Press to stop the edit-recording.
After about 4 seconds, "DECK A" will automatically change to the recording standby mode. (This will make a non-recorded space between tunes.)
Press.
(The playback indicator and recording indicator of "DECK A", and the playback indicator of "DECK B" will illuminate, and the edit-recording will begin.)
Note: When the recording-level control is set to the "6" position, the recording will be made at a level that is approximately the same as the level of the tape being played back. If, however, a graphic equalizer or a similar component is used to change the tone quality, note that the level of the signals from the recording source may change. If this happens, make a setting to the appropriate level.
To make an edit recording without vary the tone-quality
-
Follow the steps 1\~4, and 6 above.
-
Select the tape speed.
“×1”: For operation at the normal tape speed.
“×2”: For operation at the double tape speed.
(The corresponding indicator will illuminate.)
- Follow step 10 above. (The edit-recording will begin.)

Note:
The Dolby noise-reduction system has no effect upon recordings made on "DECK A".
Timer Recording/Playback
If an audio timer (option) is connected to this unit, recording of a radio broadcast, or tape playback, will automatically begin at the preset time.
Notes:
- For timer recording or playback, only "DECK A" can be used (except for "series" mode).
- Timer recording or playback always starts from "DECK A" in the series mode.
●Parallel recording is also possible.
Timer recording
1 Prepare for recording.
(Follow steps 1 through 8 of "Recording" on page 8. After adjusting the recording level, press the stop button.) Check the tape side (front or reverse) to be recorded on to be sure it is correct.
2 Set the timer to the desired recording-start time.
(Power will be off.)
3 Set the timer stand-by switch to the "REC" position.
(At the set time, the power will be switched on and the broadcast will be recorded.)

■ After setting the timer
Make sure that the power switches of the tuner, tape deck, and the amplifier are set to the "ON" position, and the input selector of the amplifier is set to the "TUNER" position.
Note:
If the tuner which has the timer function is used, switch the tuner to standby.
Timer playback
1 Rewind the tape to the position from which you want playback to begin. (Refer to pages 6 and 7.) Check the tape side (front or reverse) to be played back to be sure it is correct.
2 Set the timer to the desired playback-start time. (Power will be off.)
3 Set the timer stand-by switch to the "PLAY" position. (At the set time, the power will be switched on and the playback will begin.)

■ After setting the timer
Make sure that the power switches of the amplifier and this unit are set to the "ON" position.
Note:
If the tuner which has the timer function is used, switch the tuner to standby.
About Cassette Tapes
Selection of cassette tapes
Do not use tape such as described below in this unit.
- 120-minute (or longer) tapes
Because this tape is very thin, it might stretch during use, become tangled with rotating parts in this unit, and/or tape movement might not be stable.
-Fe-Cr tape (TYPE III)
The high range will be emphasized and a flat frequency response characteristic cannot be obtained.
●Metal tape without detection holes
Recordings will be very distorted. (There is no playback problem however.)
Metal tape

Detection holes
Tape slack
This may cause the tape to break.
Use a pencil or similar object to take up the slack.
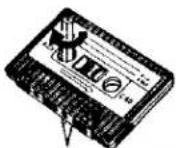
To prevent erasing of recorded sounds
■ Remove the erase-prevention tabs (thus preventing recording).

Tab for side 2
Use a screwdriver or similar object to break out the tab.
■ To record again
Cover the slot with adhesive tape.

Attach tape
Avoid tape storage in the following places
Tape can be damaged if it is stored in places such as described below.
- Where the temperature is high (95°F/35°C or higher) or where the humidity is high (80% or higher).
- Where there is a strong magnetic field (near a speaker, on top of a TV, etc.).
• In direct sunlight.
Maintenance
Head care
To assure sound quality for recording and playback, be sure to clean the heads after approximately every 10 hours of use.
1) Press the power switch to switch off the electrical power supply of the cassette tape deck.
2) Press the eject button to open the cassette holder.
3) Clean the heads, pinch roller and the capstan shaft with a cotton swab (or with a soft, lint-free cloth) slightly moistened with alcohol.
Do not use any solution other than alcohol for head cleaning.
■ Cleaning with a cotton swab

Head demagnetization
In order to maintain good sound quality during recording and playback, it is recommended that the head should be demagnetized when distortion or poor sound quality persist after cleaning the heads.
If the head becomes magnetized, it could create noise in the recordings, loss of high-frequency response or erasure of valuable recordings. Several types of head demagnetizers are available and may be purchased separately at local electronics supply stores. Follow the instructions that are supplied with the device.
Do not bring any type of metal objects or tools such as magnetic screwdrivers in contact with the head assembly.
Maintenance of external surfaces
To clean this unit, use a soft, dry cloth.
If the surfaces are extremely dirty, use a soft cloth, dipped into a soap-and-water solution or a weak detergent solution.
Wring the cloth well before wiping the unit.
Wipe once again with a soft, dry cloth.
Never use alcohol, paint thinner, benzine, nor a chemically treated cloth to clean this unit.
Such chemicals may damage the finish of your unit.
Troubleshooting Guide
Before requesting service for this unit, check the chart below for a possible cause of the problem you are experiencing. Some simple checks or a minor adjustment on your part may eliminate the problem and restore proper operation.
If you are in doubt about some of the check points, or if the remedies indicated in the chart do not solve the problem, refer to the directory of Authorized service centers (enclosed with this unit) to locate a convenient service center, or consult your Technics dealer for instructions.
| Problem | Probable cause(s) | Suggested remedy |
| While using the tape deck | ||
| Tape moves but no sound is heard. | The volume control of the stereo amplifier is set to its minimum position. | Adjust the volume control to the desired level. |
| The input selector of the stereo amplifier is not set to the "TAPE 1" position. | Set to the "TAPE 1" position. | |
| Distorted sound | The recording level is too high. | Select the appropriate recording level. |
| Poor sound quality (especially in the high treble and low bass ranges) | The Dolby noise-reduction switch is not set properly. | Set it to the correct position. |
| Sound is low, poor tone, intermittent sound, noise. | Heads, capstan and/or pinch roller are dirty or tape is damaged. | Clean the heads, capstan and/or pinch roller, or try a new cassette tape. |
| Recording is not possible. | The recording level control of the cassette tape deck is at the "0" position. | Select the appropriate recording level. |
| Erase-prevention tabs have been removed. | Attach tape to cover space left by removal of erase-prevention tabs. | |
| Edit-recordings cannot be made. | The via-external-component edit-recording button or one of the editing speed button is not pressed. | Press the appropriate button for edit-recording so that indicator above the button is illuminated. |
- TECHNICS
- STEREO DOUBLE CASSETTE DECK
- RS-X990
- OPERATING INSTRUCTIONS
- NOTES
- DEAR STEREO FAN
- CONTENTS
- ACCESSORIES (REFER TO PAGE 3.)
- FOR UNITED KINGDOM
- TECHNICAL SPECIFICATIONS
- GENERAL
- NOTE
- SUGGESTIONS FOR SAFETY
- USE A STANDARD ELECTRICAL AC WALL OUTLET
- CONNECTION AND REMOVAL OF THE POWER CORD PLUG
- AC OUTLET ON REAR PANEL (NOT EQUIPPED FOR SOME COUNTRIES)
- NEVER ATTEMPT TO REPAIR OR RECONSTRUCT THIS UNIT
- FOR FAMILIES WITH CHILDREN
- TURN OFF AFTER USE
- IF WATER IS SPILLED ON THE UNIT
- PLACE THE UNIT WHERE IT WILL BE WELL VENTILATED, AND AWAY FROM DIRECT SUNLIGHT
- KEEP THE UNIT AWAY FROM HEATERS, ETC
- AVOID SPRAY-TYPE INSECTICIDES
- NEVER USE ALCOHOL OR PAINT THINNER
- IF TROUBLE OCCURS
- FRONT PANEL CONTROLS AND FUNCTIONS
- LISTENING TO TAPES
- SELECT THE DESIRED REVERSE MODE
- TO LOCATE AND PLAY A CERTAIN TUNE
- TO FAST-FORWARD OR REWIND THE TAPE
- AUTOMATIC TAPE SELECTOR SYSTEM
- DOLBY NOISE-REDUCTION SYSTEM
- DOLBY NR B TYPE
- DOLBY NR C TYPE
- REVERSING
- THE QUICK-REVERSE FEATURE MIGHT NOT FUNCTION AS EXPECTED IN THE FOLLOWING INSTANCES
- RECORDING
- ADJUSTMENT OF THE RECORDING LEVEL
- TO ERASE RECORDED SOUNDS
- TO MAKE NON-RECORDED SPACES BETWEEN TUNES
- SERIES RECORDING
- PARALLEL RECORDINGS
- AUTOMATIC-FADE FUNCTIONS
- TO USE THE FADE-IN FEATURE
- TO USE THE FADE-OUT FEATURE
- SYNCHRO-RECORDING
- SYNCHRO-RECORDING FROM A TURNTABLE
- SYNCHRO-RECORDING FROM A COMPACT DISC PLAYER
- CD EDIT-RECORDING FUNCTION
- EDIT-RECORDING
- TO MAKE AN EDIT RECORDING WITH VARY THE TONE QUALITY
- 1 "OFF
- 10
- TO MAKE AN EDIT RECORDING WITHOUT VARY THE TONE-QUALITY
- TIMER RECORDING/PLAYBACK
- TIMER RECORDING
- AFTER SETTING THE TIMER
- TIMER PLAYBACK
- ABOUT CASSETTE TAPES
- SELECTION OF CASSETTE TAPES
- TAPE SLACK
- TO PREVENT ERASING OF RECORDED SOUNDS
- TO RECORD AGAIN
- AVOID TAPE STORAGE IN THE FOLLOWING PLACES
- MAINTENANCE
- HEAD CARE
- HEAD DEMAGNETIZATION
- MAINTENANCE OF EXTERNAL SURFACES
- TROUBLESHOOTING GUIDE
Marke : TECHNICS
Modell : RS-X990
Kategorie : Kassettenabspieler