
CAL F100 - Uhr CITIZEN - Kostenlose Bedienungsanleitung
Finden Sie kostenlos die Bedienungsanleitung des Geräts CAL F100 CITIZEN als PDF.


Benutzerfragen zu CAL F100 CITIZEN
0 Frage zu diesem Gerät. Beantworten Sie die, die Sie kennen, oder stellen Sie Ihre eigene.
Eine neue Frage zu diesem Gerät stellen
Laden Sie die Anleitung für Ihr Uhr kostenlos im PDF-Format! Finden Sie Ihr Handbuch CAL F100 - CITIZEN und nehmen Sie Ihr elektronisches Gerät wieder in die Hand. Auf dieser Seite sind alle Dokumente veröffentlicht, die für die Verwendung Ihres Geräts notwendig sind. CAL F100 von der Marke CITIZEN.
BEDIENUNGSANLEITUNG CAL F100 CITIZEN
F100 User's Guide
This watch is solar-powered. Expose the dial to light and use it sufficiently charged.
To see details of charging time, specifications, and operations, refer to the instruction manual:

F100 instruction manual
Component identification
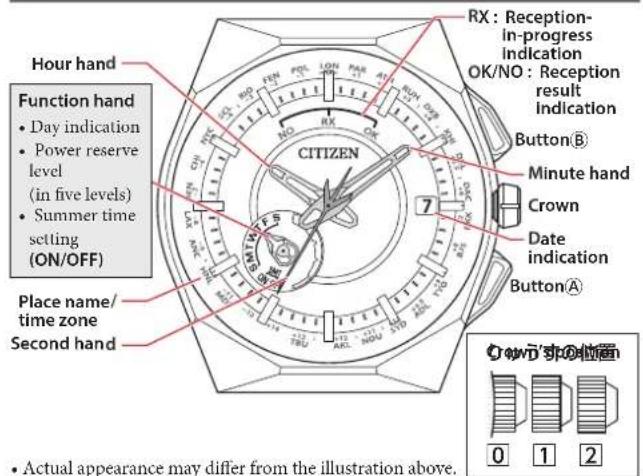
text_image
Hour hand Function hand • Day indication • Power reserve level (in five levels) • Summer time setting (ON/OFF) Place name/time zone Second hand CITIZEN RX : Reception-in-progress indication OK/NO : Reception result indication Button® Minute hand Crown Date indication ButtonA • Actual appearance may differ from the illustration above.Receiving the satellite time signal
Manual reception 1 (time required: 3 to 20 seconds)
Outdoor signal reception is recommended for receiving satellite time signal.
- Push the crown in to position 0.
- Press and hold the lower right button ^A until the second hand points to "RX".
The previous reception result is first indicated and signal reception starts. After finishing reception, the second hand indicates the reception result for 2 seconds and returns to normal movement.
Indication Reception result
| OK | The reception succeeded.The time and calendar have been corrected. |
| NO | The reception failed. The time and calendar was not corrected and the time indication returns to the status before the reception. |
Manual reception 2 (21 to 13 seconds)
Reception to adjust the time and calendar when the leap second has been updated.
- Push the crown in to position 0.
- Press and hold the lower right button Ⓐ for 7 seconds.
Time reception starts after the second hand points "RX" once and turns fully around to point "RX" again.
Checking the previous reception result of the satellite signal
- Push the crown in to position 0.
- Press and release the lower right button Ⓐ.
The previous reception result is indicated.
Indication Reception result
| OK | The reception succeeded.The time and calendar are corrected. |
| NO | The reception failed. The time and calendar was not corrected and the time indication returns to the status before the reception. |
- Press and release the button Ⓐ to finish checking.
Using the world time
Setting the world time
- Pull the crown out to position 1.
The second hand indicates the current time zone and the function hand indicates the summer time setting.
- Rotate the crown to choose a time zone.
Time indication changes.
- See also "How to read indication of the world time setting" and "Table of time zones and representative places".
- Push the crown in to position 0 to finish the procedure.
The function hand returns to day indication.
How to read indication of the world time setting
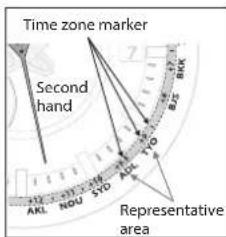
text_image
Time zone marker Second hand Representative areaThe watch has 40 time zone markers with several representative area names. A time zone is set by pointing the second hand at one of the markers.
On the illustration, the second hand points to 28 seconds and time zone setting is “+11.5”.
- Time zones are represented by offsets from UTC (Coordinated Universal Time).
Table of time zones and representative places
| Time zone | Second hand | Area name | Representative area |
| 0 | 0 sec. | LON | London |
| +1 | 2 sec. | PAR | Paris |
| +2 | 4 sec. | ATII | Athens |
| +3 | 6 sec. | RUH | Riyadh |
| +3.5 | 7 sec. | — | Tchran |
| +4 | 8 sec. | DXB | Dubai |
| +4.5 | 9 sec. | — | Kabul |
| +5 | 10 sec. | KIII | Karachi |
| +5.5 | 12 sec. | DFI | Delhi |
| +5.75 | 13 sec. | — | Kathmandu |
| +6 | 14 sec. | DAC | Dhaka |
| 16.5 | 15 sec. | — | Yangon |
| +7 | 16 sec. | BKK | Bangkok |
| +8 | 18 sec. | BJS(HKG) | Beijing/Hong Kong |
| +8.75 | 20 sec. | — | Eucla |
| +9 | 21 sec. | TYO | Tokyo |
| 19.5 | 23 sec. | ADL | Adelaide |
| +10 | 25 sec. | SYD | Sydney |
| +10.5 | 26 sec. | — | Lord Howe Island |
| +11 | 27 sec. | NOU | Nonnea |
| +11.5 | 28 sec. | — | Norfolk Island |
| Time zone | Second hand | Area name | Representative area |
| +12 | 29 sec. | AKL | Auckland |
| +12.75 | 31 sec. | — | Chatham Islands |
| +13 | 32 sec. | TBU | Nuku’aloja |
| +14 | 34 sec. | — | Kiritimati |
| -12 | 36 sec. | — | Baker Island |
| -11 | 38 sec. | MDY | Midway |
| -10 | 40 sec. | HNI. | Honolulu |
| 9.5 | 41 sec. | — | Marquesas Islands |
| -9 | 42 sec. | ANC | Anchorage |
| -8 | 44 sec. | LAX | Los Angeles |
| -7 | 46 sec. | DEN | Denver |
| -6 | 48 sec. | CHI | Chicago |
| -5 | 50 sec. | NYC | New York |
| -4.5 | 51 sec. | — | Caracas |
| -4 | 52 sec. | SCI | Santiago |
| -3.5 | 53 sec. | — | St. John’s |
| -3 | 54 sec. | RIO | Rio de Janeiro |
| -2 | 56 sec. | FEN | Fernando de Noronha |
| -1 | 58 sec. | PDL | Azores |
Switching summer time and standard time
- Pull the crown out to position 1.
- Press and release the lower right button Ⓐ.
| Setting Meaning | |
| SMT ON | Summer time is indicated. |
| SMT OFF | The standard time is indicated. |
• Each time you press the button, ON and OFF changes alternately.
- Push the crown in to position 0 to finish the procedure.
Setting leap second
- Pull the crown out to position 2.
- Press and release the upper right button Ⓑ.
Using the "0:00:00" position as the starting point, the minute and second hands indicate the leap second setting.
| When the leap second setting is "-35 seconds" | When the leap second setting is "-65 seconds" |
| The hands point to "0 minute 35 seconds". | The hands point to "1 minute 5 seconds". |
Turn the crown to adjust the setting if the leap second is not correct.
- Push the crown in to position 0 to finish the procedure.
Adjusting the time and calendar manually
- Pull the crown out to position 1.
- Press and hold the upper right button® until the second hand points to 30 seconds.
- Pull the crown out to position 2.
The hands point to 0 second.
- Press and release the lower right button® repeatedly to change the hand/indication to be corrected.
• Each time you press the buttonⒶ, the target changes as follows. Minute hand → hour hand → date → year/month → day → (back to the top)
-
Rotate the crown to adjust the hand/indication.
-
Date indication changes to the next as the function hand rotates 5 times.
-
When you rotate the crown quickly a few times, the hand/indication will move continuously.
• To stop the rapid movement, rotate the crown in either direction. -
Push the crown in to position 0 in accordance with a reliable time source to finish the procedure.
Month and year indications
Set the year and month with the position of the second hand.
"Month" corresponds to one of the 12 zones shown in the figure below. Each number means month.
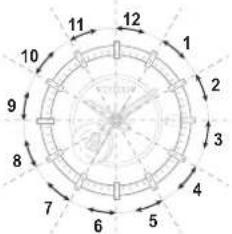
text_image
12 11 10 9 8 7 6 5 4 3 2 1"Year" corresponds to the years since leap year and is indicated with markers in the zone of each month.
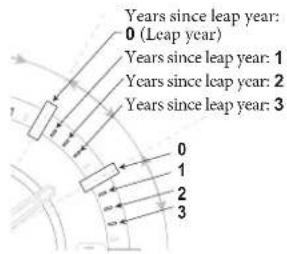
text_image
Years since leap year: 0 (Leap year) Years since leap year: 1 Years since leap year: 2 Years since leap year: 3 0 1 2 3Checking the power reserve and power generation amount
- Push the crown in to position 0.
- Press and release the upper right button Ⓑ.
The power reserve and power generation amount at the moment of pressing the button ⑧ are indicated in levels.
Indication of power reserve in level
| Level | 43210 | ||||
| Power reserve level scale |  |  |  |  |  |
| Duration (approx.) | 24 - 20 months | 20 - 14 months | 14 - 5 months | 5 months - 5 days | 5 days or shorter |
| Meaning | Power reserve is sufficient. | Power reserve is OK. | Power reserve is getting low. | Insufficient charge warning has started. | |
| OK for normal use | mediately. | ||||
Indication of power generation amount in level
The level of power generation amount means power being generated by the solar cell represented in 0 to 6 levels.
| Level | 6 | 5 | 4 | 3 | 2 | 1 | 0 |
| Indication | |||||||
| Meaning | Sufficient power generation for charging. | Charge in a brighter location where the level of power generation amount reaches “5” or “6”. | |||||
- Press and release the upper right button® to finish checking.
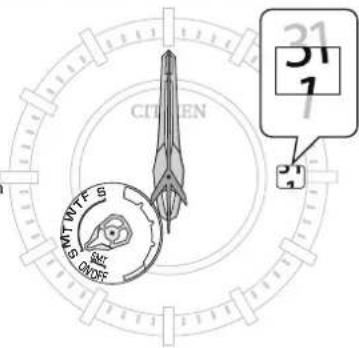
Checking the reference position
- Push the crown in to position [0].
- Press and hold the upper right button Ⓑ for 7 seconds.
Correct reference positions:
-
All hands: 12 o'clock position
• Date indication: midway between 31 and 1
• Day : S (Sunday) -
Press and release the upper right button Ⓑ to finish checking.
text_image
CITIGEN SMT OUTF S SMT OUTF 21 31 7Correcting the reference position
- Push the crown in to position 0.
- Press and hold the upper right button Ⓑ for 7 seconds.
- Pull the crown out to position 2.
- Press and release the lower right button ^® repeatedly to change hand/indication to be corrected.
• Each time you press the button, the target changes as follows.
Date/day → hour hand → minute hand → second hand → (back to the top)
-
Rotate the crown to adjust the hand/indication.
-
When you rotate the crown quickly a few times, the hand/indication will move continuously.
• To stop the rapid movement, rotate the crown in either direction. -
Push the crown in to position 0.
-
Press and release the button Ⓑ to finish checking.
Resetting the watch — All Reset
- Pull the crown out to position 2.
- Press and hold buttons ^A and ^B at the same time for 3 seconds or more and release them.
As you release the buttons, the hands move slightly to indicate that reset completed.
After All Reset
After All Reset, adjust the reference position. Execute world time setting and receive satellite signal manually to adjust the time and calendar after that.