IRC-S2 - Sicherheitskamera BLAUPUNKT - Kostenlose Bedienungsanleitung
Finden Sie kostenlos die Bedienungsanleitung des Geräts IRC-S2 BLAUPUNKT als PDF.

| Produkttyp | Kabellose PIR-Sicherheitskamera |
| Marke | Blaupunkt |
| Modell | IRC-S2 |
| Stromversorgung | 2 x 1,5 V AA-Alkalibatterien (im Lieferumfang enthalten) |
| Batterielebensdauer | Ca. 1–2 Jahre (abhängig von Nutzung) |
| Erfassungsmethode | Passiv-Infrarot (PIR) |
| Erfassungsbereich | Ca. 10 m (typisch) |
| Bilder bei Alarm | 3 Aufnahmen, Übertragung an die Zentrale |
| Funkfrequenz | 2,4 GHz |
| Betriebstemperatur | -10 °C bis 40 °C |
| Luftfeuchtigkeit | Bis 85 % nicht kondensierend |
| Montage | Flächen- oder Eckmontage mit Schrauben und Dübeln |
| LED-Anzeige | Blaue LED und LED-Blitz; verschiedene Signale (siehe Anleitung) |
| Tamper-Schutz | Bodenschraube löst Alarm bei unbefugtem Öffnen aus |
| Testmodus | 5 Minuten nach Drücken der Lerntaste (3 Sek. halten) |
| Einschwingzeit | 30 Sekunden nach Scharfschaltung |
| Lieferumfang | 1 Kamera, 4 Dübel, 4 Schrauben, 2 AA-Batterien (vorinstalliert) |
| Kompatibilität | Blaupunkt Control Panel (nicht im Lieferumfang) |
| Reinigung | Mit weichem, trockenem Tuch |
| Reparatur | Keine Benutzerwartung; Reparatur nur durch Fachpersonal |
Häufig gestellte Fragen - IRC-S2 BLAUPUNKT
Benutzerfragen zu IRC-S2 BLAUPUNKT
0 Frage zu diesem Gerät. Beantworten Sie die, die Sie kennen, oder stellen Sie Ihre eigene.
Eine neue Frage zu diesem Gerät stellen
Laden Sie die Anleitung für Ihr Sicherheitskamera kostenlos im PDF-Format! Finden Sie Ihr Handbuch IRC-S2 - BLAUPUNKT und nehmen Sie Ihr elektronisches Gerät wieder in die Hand. Auf dieser Seite sind alle Dokumente veröffentlicht, die für die Verwendung Ihres Geräts notwendig sind. IRC-S2 von der Marke BLAUPUNKT.
BEDIENUNGSANLEITUNG IRC-S2 BLAUPUNKT
Wireless PIR Camera (IRC-S2)
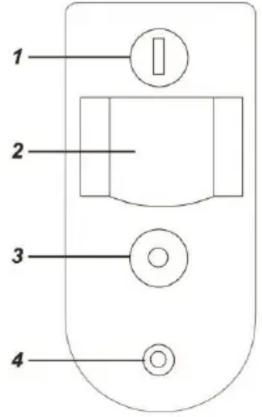
Parts Description
- Blue LED /Learn Button
- IR Sensor
- LED Flash
The LED Flash delivers sufficient light for image capture in low lighting condition.
- PIR Camera Lens
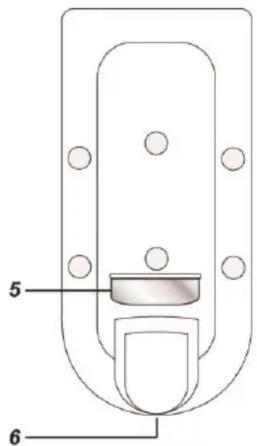
- Battery Insulator
Pull out the insulator to activate battery.
- Bottom Screw (Tamper Switch)
The Tamper switch protects the PIR Camera from unauthorized cover opening and is depressed by bottom screw. When the screw is loosened, the tamper switch will be activate.
Package Content
1 x PIR Camera
4 x wall plugs and screws
2 x 1.5V AA alkaline batteries (Pre-inserted)
Learning
The PIR Camera can only be learnt into Control Panel within 3 minutes after powering on. If it has been powered on for more than 3 minutes, remove and reinsert batteries to repower on the PIR Camera.
- Put the Control Panel into learning model.
- Press and hold the learn button on PIR Camera for 10 seconds until both LED Flash and Blue LED flash once, then release the button to transmit a learn code.
- Wait for a short time for PIR Camera to connect to panel. If the camera is successfully learnt in, the Blue LED will flash twice to indicate. The panel will also display PIR Camera info. Refer to panel manual to complete learning.
- If the PIR Camera and Control do not respond after a short time (about 20\~30 seconds), restart from step 2 to press and hold the button again.
After learning has been completed, Do NOT press and hold the learn button for 10 seconds again within 3 minutes after power on, otherwise the PIR Camera will disconnect from panel and must be relearnt again.
Installation
Mounting
- The PIR camera designed to be mounted on either a flat surface or in a corner with fixing screws and plugs provided.
- The base has knockouts where the plastic is thinner and can be broken through for mounting. 2 in the center for surface mounting and 4 on the sides for corner mounting.

Corner Fixing Knockouts x 4
- Remove the cover.
- For surface mounting, break through the 2 knockouts at the center of base.
For corner mounting, break through the 4 knocks on the corner of PIR camera - Use the holes as template to drill holes in the wall.
- Insert the wall plugs if fixing it into plaster or brick.
- Screw the base into the wall plugs.
- Screw the cover back onto its base.
Operation
Motion Detection
The PIR Camera is designed to detect movement in protected area. Upon movement detection, the PIR reports to the Control Panel for an alarm activation and captures 3 images at the same time. The images are transferred to the Control Panel to send to programmed destinations for user to view.
Warm Up Period
When the Control Panel enters arm mode, or PIR Camera is put into Test Mode, the PIR Camera will warm up for 30 seconds. Do not trigger the PIR Camera during the 30 seconds warm up period. If the PIR Camera is under low battery or tamper opened condition, the Blue LED will light up during the warm up period.
Battery
The PIR Camera uses two 1.5V AA Alkaline batteries as its power source. Remove the battery insulator to activate battery. It also features low battery detection function to notify the Control Panel when battery voltage is low.
When the PIR camera is low on battery, follow the procedure below to change the batteries.
- Open the PIR camera back cover.
- Remove the old batteries.
- Press the tamper switch several times to fully discharge.
- Insert the new batteries and replace the PIR Camera back cover.
Battery Saving Guideline
The PIR Camera is wirelessly connected with the Control Panel at all time. When the PIR Camera loses connection with the Control Panel, it will actively search for the Control Panel, which will consume extra power and greatly reduces battery life. In order to avoid unnecessary power consumption, please follow the guidelines below:
- Ensure the Control Panel is powered on before removing the battery insulator. Always learn in the PIR Camera immediately after activating the battery.
- Ensure the Control Panel is powered on and within signal range when the PIR Camera is powered on.
- When you removed the PIR Camera from the Control Panel, make sure to remove the batteries from the PIR Camera too.
Test Mode
The test mode function allows you to check the PIR camera's detection range. Press and hold the Learn button over 3 seconds, then release the button to enter the Test mode for 5 minutes.
The PIR Camera will first warm up for 30 seconds, do not trigger the PIR camera during this warm up period. After the warm up is complete, you could trigger PIR camera to check its detection range. If PIR camera is triggered, the Blue LED will light up to indicate.
For signal range test, please refer to the control panel manual.
LED Indicator
| Off | Normal Operation |
| On (2 seconds) | Movement detection under low battery, tamper triggered condition, or Test mode. |
| On (30 seconds) | PIR Camera is warming up under low battery or tamper triggered condition |
| Flash Rapidly | PIR Camera is transferring image under low battery or tamper triggered condition. |
| Flash Once | PIR Camera sends a learn code |
| Flash Twice | PIR Camera is learnt into Control Panel |
| Flash every 20 minutes | PIR Camera has lost signal connection with the Control Panel. |
Specification
Environmental Condition
-10°C to 40°C, relative humidity 85% non-condensing.
Radio
2.4 GHz