CMP-WNROUT10 - Router KONIG - Kostenlose Bedienungsanleitung
Finden Sie kostenlos die Bedienungsanleitung des Geräts CMP-WNROUT10 KONIG als PDF.


Benutzerfragen zu CMP-WNROUT10 KONIG
0 Frage zu diesem Gerät. Beantworten Sie die, die Sie kennen, oder stellen Sie Ihre eigene.
Eine neue Frage zu diesem Gerät stellen
Laden Sie die Anleitung für Ihr Router kostenlos im PDF-Format! Finden Sie Ihr Handbuch CMP-WNROUT10 - KONIG und nehmen Sie Ihr elektronisches Gerät wieder in die Hand. Auf dieser Seite sind alle Dokumente veröffentlicht, die für die Verwendung Ihres Geräts notwendig sind. CMP-WNROUT10 von der Marke KONIG.
BEDIENUNGSANLEITUNG CMP-WNROUT10 KONIG

CMP-WNROUT10
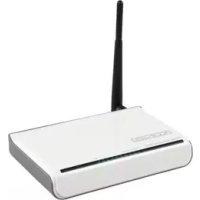
Wireless Router
ENGLISH INSTRUCTIONS
CE
Quick Installation Guide
1 System Requirements
Broadband Internet Access Service (DSL/Cable/Ethernet)
One DSL/Cable modem that has an RJ45 connector (you do not need it if you connect the router to Ethernet)
➢ Each PC on the LAN needs a working Ethernet Adapter and an Ethernet cable with RJ45 connectors
➢ TCP/IP protocol must be installed on each PC
Web browser, such as Microsoft Internet Explorer 5.0 or later, Netscape Navigator 6.0 or later
1.1 Connecting the Router
Before you install the router, you should connect your PC to the Internet through your broadband service successfully. If there is any problem, please contact your ISP. After that, please install the router according to the following steps. Don't forget to pull out the power.
- Power off your PC(s), Cable/DSL modem, and the router.
- Locate an optimum location for the router. The best place is usually near the center of the area in which your PC(s) will wirelessly connect.
- Adjust the direction of the antenna. Normally, upright is a good direction.
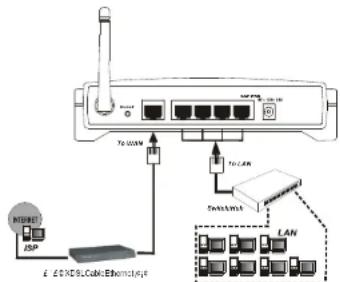
- Connect the PC(s) and each Switch/Hub on your LAN to the LAN Ports on the router, shown in figure 1-1.
- Connect the DSL/Cable Modem to the WAN port on the router, shown in figure 1-1.
- Connect the AC power adapter to the AC power socket on the router, and the other end into an electrical outlet. The router will start to work automatically.
- Power on your PC(s) and Cable/DSL modem.
text_image
TCP/IP 70-100kW I/O JSP E:\CDN\CDuCable\Ethernet\Ag4 70-LAN SOSRAM LANFigure 1-1: Hardware Installation of the CMP-WNROUT10 54Mbps Wireless Router
EN
After connecting the CMP-WNROUT10 into your network, you should configure it. This chapter describes how to configure the basic functions of your CMP-WNROUT10. These procedures only take you a few minutes. You can access the Internet via the router immediately after successfully configured.
1.3 TCP/IP configuration
The default IP address of the CMP-WNROUT10 is 192.168.1.1, and the default Subnet Mask is 255.255.255.0. These values can be seen from the LAN. They can be changed as you desire, as an example we use the default values for description in this guide.
Connect the local PCs to the LAN ports on the router. There are then two means to configure the IP address for your PCs.
➢ Configure the IP address manually
1) Set up the TCP/IP Protocol for your PC(s). If you need instructions as to how to do this, please refer to the detailed manual on the enclosed CD.
2) Configure the network parameters. The IP address is 192.168.1.xxx ("xxx" is from 2 to 254), Subnet Mask is 255.255.255.0, and Gateway is 192.168.1.1 (The router's default IP address)
Obtain an IP address automatically
1) Set up the TCP/IP Protocol in "Obtain an IP address automatically" mode on your PC(s). If you need instructions as to how to do this, please refer to the detailed manual on the enclosed CD. Power off the router and PC(s). Then turn on the router, and restart the PC(s). The built-in DHCP server will assign IP addresses for the PC(s).
1.4 Installation Guide
With a Web-based (Internet Explorer or Netscape ^® Navigator) utility, the CMP-WNROUT10 is easy to configure and manage. The Web-based utility can be used on any Windows, Macintosh or UNIX OS with a web browser.
Connect to the router by typing http://192.168.1.1 in the address field of web browser.
http://192.168.1.1

Figure 1-2 Login to the router
After a moment, a login window will appear. Enter admin for the User Name and Password, both in lower case letters. Then click the OK button or press the Enter key.
Note: If the above mentioned screen does not prompt, it means that your web-browser has been set to a proxy. Go to Tools menu>Internet Options>Connections>LAN Settings, in the screen that appears, cancel the Using Proxy checkbox, and click OK to finish it.
If the User Name and Password are correct, you can configure the router using the web browser. Please click the Quick Setup link on the left of the main menu and the Quick Setup screen will appear.
Quick Setup
The quick setup will tell you how to configure the basic network parameters.
To continue, please click the Next button
To exit, please click the Exit button.
Exit Next
Figure 1-3 Quick Setup
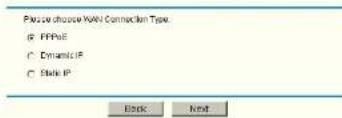
Click Next, the Choose WAN Connection Type page will appear, shown in figure 1-4.
Quick Setup - Choose WAN Connection Type
text_image
Please choose WAN Connection Type. ● FPPsE ○ Dynamic IP ○ State IP Back NextFigure 1-4 Choose WAN Connection Type
The router supports three popular ways to connect to Internet. Please select one compatible with your ISP. Click Next to enter the necessary network parameters. If you choose "PPPoE", you will see this page shown in figure 1-5:
Quick Setup - PPPoE
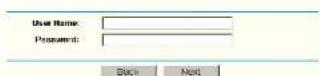
Figure 1-5 Quick Setup - PPPoE
User Name and Password - Enter the User Name and Password provided by your ISP. These fields are case sensitive. If you have difficulty with this process, please contact your ISP.
If you choose * Dynamic IP", the router will automatically receive the IP parameters from your ISP without needing to enter any parameters.
If you Choose "Static IP", the Static IP settings page will appear, shown in figure 1-6:
Quick Setup - Static IP

Figure 1-6 Quick Setup - Static IP
Note: The IP parameters should have been provided by your ISP.
IP Address - This is the WAN IP address as seen by external users on the Internet (including your ISP). Enter the IP address into the field.
Subnet Mask - The Subnet Mask is used for the WAN IP address, it is usually 255.255.255.0
➢ Default Gateway - Enter the gateway into the box if required.
Primary DNS - Enter the DNS Server IP address into the boxes if required.
Secondary DNS - If your ISP provides another DNS server, enter it into this field. When you finished the above and clicking the 'next' button you now can configure the following wireless parameters:
Wireless Radio - indicates whether the Access Point feature of the router is enabled or disabled. If disabled, the WLAN LED on the front panel will not be lit and the wireless stations will not be able to access the router. If enabled, the WLAN LED will be lit up and wireless stations will be able to access the router.
SSID - Enter a value of up to 32 characters. The same SSID must be assigned to all wireless devices on your network. The default SSID is KÖNIG. This value is case-sensitive. For example, KÖNIG is NOT the same as könig.
EN
EN
Region - Select your region from the pull-down list. This field specifies the region where the wireless function of the router can be used. It may be illegal to use the wireless function of the router in a region other than one of those specified in this filed.
Channel - the current channel in use. This field determines which operating frequency will be used.
Mode - Indicates the current mode 54Mbps (802.11g), 11Mbps (802.11b). If you select 54Mbps (802.11g), it is compatible with 11Mbps (802.11b).
These settings are only for basic wireless parameters, for advanced settings, please refer to the detailed manual on the enclosed CD.
Note: The change of wireless settings won't take effect until the router reboots! You can reboot it manually. If you need instructions as to how to do this, please refer to the detailed manual on the enclosed CD.
Click the Next button, you will then see the Finish page:
Quick Setup - Finish
Congratulations! The router is now connecting you to the Internet. For detail settings, please contact other menus if necessary.

Figure 1-7 Quick Setup - Finish
After finishing all configurations of basic network parameters, please click Finish button to exit this Quick Setup.
Brand name: KÖNIG
Model: CMP-WNROUT10
Description: 54Mbps Wireless router
Is in conformity with the following standards:
EN 300 328 V.1.4.1 (2003)
EN 301 489-1 V.1.4.1 (2002) / EN 301 489-17 V.1.2.1 (2002)
EN 60950-1:2001
Following the provisions of the 1999/5/EC R&TTE Directive.
Conform this regulation it's allowed to use this product in all European Community & EFTA countries.
Nedis BV is not responsible for the use of this product outside
the European Community & EFTA countries.
WARNING:
To reduce risk of electric shock, this product should ONLY be opened by an authorized technician if service is required. Disconnect the product from mains and other equipment if a problem should occur. Do not expose the product to water of moisture.
WARRANTY:
No guarantee or liability can be accepted for any changes and modifications of the product or damage caused due to incorrect use of this product.
GENERAL:
Designs and specifications are subject to change without a notice.