8200T - Hi-Fi Audiolab - Kostenlose Bedienungsanleitung
Finden Sie kostenlos die Bedienungsanleitung des Geräts 8200T Audiolab als PDF.


Benutzerfragen zu 8200T Audiolab
0 Frage zu diesem Gerät. Beantworten Sie die, die Sie kennen, oder stellen Sie Ihre eigene.
Eine neue Frage zu diesem Gerät stellen
Laden Sie die Anleitung für Ihr Hi-Fi kostenlos im PDF-Format! Finden Sie Ihr Handbuch 8200T - Audiolab und nehmen Sie Ihr elektronisches Gerät wieder in die Hand. Auf dieser Seite sind alle Dokumente veröffentlicht, die für die Verwendung Ihres Geräts notwendig sind. 8200T von der Marke Audiolab.
BEDIENUNGSANLEITUNG 8200T Audiolab

text_image
1/6 2/7 3/8 4/9 5/10 Band Info Mono Menu Select E200T o Audiolab 8200T Press/ Manual Store POWER audiolab
text_image
220-230V~50Hz 15W FUSE T1.0AL 250V CAUTION ATTENTION AUDIOLAB HUNTINGON INTER KNOODOMPED RIO WWW.AUDIOLAB CO UK S. No. NAME: TUNER MODEL: 8200T REMOTE OUT IN DAS DIGITAL AUDIO OUTPUT COAX OPT AUDIO OUT L R 1 2 DAS SBD AM 3050 CE S 20000 FM 7500 OUT 250008200T
User Instructions
audiolab


1: Statutory & Safety Information

text_image
CAUTION! RISK OF ELECTRIC SHOCK DO NOT OPEN TO REDUCE THE RISK OF ELECTRIC SHOCK DO NOT REMOVE COVER NO USER. REMOVEABLE PARTS INSIDE REFER SERVICING TO QUALIFIED PERSONNEL ADVERT/SSEMENT. RISQUE DE CHOC ELECTRIQUE- NE PAS OUVRIR
This symbol indicates that there are important operating and maintenance instructions in the literature accompanying this unit.
This symbol indicates that dangerous voltage constituting a risk of electric shock is present within this unit.
IMPORTANT SAFETY INFORMATION
Read these instructions.
Keep these instructions. In the event that you pass the product to a third party this instruction manual should be provided along with the product.
Heed all warnings.
Follow all instructions.
Do not use this apparatus near water.
Clean only with dry cloth.
Do not block any ventilation openings.
Install in accordance with the manufacturer's instructions.
Do not install near any heat sources such as radiators, heat registers, stoves, or other apparatus (including amplifiers) that produce heat.
Do not defeat the safety purpose of the polarized or grounding type plug. A polarized plug has two blades with one wider than the other. A grounding type plug has two blades and a third grounding prong. The wider blade or the third prong is provided for your safety. If the provided plug does not fit into your outlet, consult an electrician for replacement of the obsolete outlet.
Protect the power cord from being walked on or pinched, particularly at plugs, convenience receptacles, and the point where they exit from the apparatus.
Use only attachments/accessories specified by the manufacturer.

Use only with a cart, stand, tripod, bracket, or table specified by the manufacturer, or sold with the apparatus. When a cart is used, use caution when moving the cart/apparatus combination to avoid injury from tip-over.
Unplug this apparatus during lightning storms or when unused for long periods of time.
Refer all servicing to qualified service personnel. Servicing is required when the apparatus has been damaged in any way, such as power-supply cord or plug is damaged, liquid has been spilled or objects have fallen into the apparatus, the apparatus has been exposed to rain or moisture, does not operate normally, or has been dropped.
Warning: To reduce the risk of fire or electrical shock, do not expose this product to rain or moisture. The product must not be exposed to dripping and splashing and no object filled with liquids such as a vase of flowers should be placed on the product.
No naked flame sources - such as candles - should be placed on the product.
Caution: Changes or modifications not expressly approved by the manufacturer could void the user's authority to operate this device.
This equipment has been tested and found to comply with the limits for a Class B digital device, pursuant to part 15 of the FCC rules. These limits are designed to provide reasonable protection against harmful interference in a residential installation. This equipment generates, uses and can radiate radio frequency energy and, if not installed and used in accordance with the instructions, may cause harmful interference to radio or television reception, which can be determined by tuning the equipment off and on, the user is encouraged to try to correct the interference by one or more of the following measures:
• Re-orientate or re-locate the receiving antenna.
• Increase the separation between the equipment and the receiver.
- Connect the equipment into an outlet on a circuit different from that to which the receiver is connected.
Consult the dealer or an experienced radio/TV technician for help.
WARNING: The means of disconnecting this apparatus from the mains supply is the mains plug. At all times this must be unobstructed, freely accessible, and capable of being removed in an emergency.
Warning: The battery (battery or batteries or battery pack) shall not be exposed to excessive heat such as the sunshine, fire or the like.
Mains supply and safety

Class II Construction double insulated. These products must not be connected to earth.
Power Cord: An AC power cord is normally supplied with a mains plug suitable for your area. If you have any doubts, consult your dealer about obtaining a suitable power cord.
Mains Supply: The mains voltage of Audiolab units is shown on the rear panel. If this does not match the voltage in your area, consult your dealer. The mains supply fuse is on the rear panel. If it has broken, check for any obvious cause before replacing the fuse with one of the correct rating and type. The fuses for all areas are type T (time lag) AL 20mm.
The fuse values are: 220-240V; T1.0AL 250V;
110-120V: T2.0AL 250V
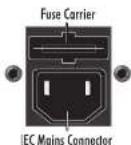
The fuse is located in a slide-in carrier which also contains a spare fuse. The carrier can only be pulled out after the IEC power cord is unplugged. When the carrier is opened the first fuse is the spare. Remove and safely dispose of the blown fuse before replacing it.
Important notice to UK users
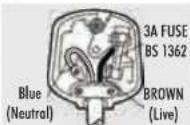
The appliance cord is terminated with a UK approved mains plug fitted with a 3A fuse. If the fuse needs to be replaced, an ASTA or BSI approved BS1362 fuse rated at 3A must be used. If you need to change the mains plug, remove the fuse and dispose of this plug safely immediately after cutting it from the cord.
Connecting a Mains Plug
The wires in the mains lead are coloured in accordance with the code: Blue: NEUTRAL Brown: LIVE
As these colours may not correspond to the coloured markings identifying the terminals in your plug, proceed as follows:
The Blue wire must be connected to the terminal marked with the letter N or coloured BLUE or BLACK. The BROWN wire must be connected to the terminal marked with the letter L or coloured BROWN or RED.
2: Getting Started
Introduction: 8200T
The Audiolab 8200T is a fully-featured tuner of advanced specification and impeccable performance. Please read this manual through carefully before installing and operating the tuner so that you can enjoy to the full the outstanding qualities of this unit.
Reception:
• DAB (Band III) via F-Type connector.
• FM (Band 2) via Co-axial Connector.
• AM via supplied AM Frame antenna.
Outputs:
- Coaxial and optical SPDIF digital outputs to connect an external DAC, digital amplifier or digital recorder when receiving DAB broadcasts.
- Two stereo analog outputs via RCA connectors for connecting an audio amplifier and/or an audio recorder -all broadcast reception.
Operating Features:
- Infrared I/O to enable system control with one handset command when connected to suitably enabled units.
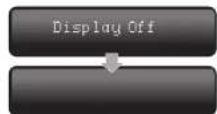
• The display can be switched on/off as required.
DAB
DAB (Digital Audio Broadcasting) technology allows many more radio stations compared to FM.
DAB transmissions greatly reduce problems of hiss and fade that plague AM and FM broadcasts and are less likely to be affected by adverse weather conditions or other sources of interference.
Being digital, DAB transmissions can have a wider frequency range and greater dynamics than that available with FM technology, though this depends on the broadcaster.
Unlike FM, DAB is broadcast on many frequencies. Many countries in Europe, including the UK use Band III (174-230 MHz); others, France for example, use the L-Band (1452-1492 MHz). Germany uses both bands.
The 8200T tunes Band III. Countries in Europe that use Band III include Belgium, Denmark, Holland, Italy, Norway, Portugal, Spain, Sweden and Switzerland.
In addition to audio, DAB transmissions carry high levels of data - far greater than the RDS information available on FM stations. A wide range of information can be displayed on the 8200T screen, such as the title of a song, the name of the artist, what's on next, scrolling news headlines, etc. This is a function of the individual DAB broadcast - different stations broadcast different amounts of information.
Many stations broadcast secondary information at times. This is often the case with sports stations where alternative commentaries are available. The 8200T allows you to access all primary and secondary information.
Unpacking
Unpack the product fully. The carton should contain:
* The Audiolab 8200T
* One EC power cord suitable for your area
s One AM frame antenna.
a One Remote Handset with two AAA batteries
8 This instruction manual.
If any item is missing or damaged report this to your dealer as soon as possible.
Retain the packing for future safe transport of your tuner. If you dispose of the packing, do so with regard to any recycling regulations in your area.
Placement
Place the unit on a sturdy shelf or table.
Do not place anything on top of the unit. If you are using an equipment rock ensure the unit has sufficient space to allow adequate ventilation and is on its own shelf.
Before you connect the 8200T to the mains, ensure your mains voltage corresponds to the rating plate on the rear of the product. If in doubt, consult your dealer. If you move to an area which has a different mains voltage seek advice from an Audiolab appointed dealer or a competent service technician.
Make sure you locate the unit so that the front panel is in view as otherwise the infrared-remote handset will not work.
Before Starting
Your 8200T's performance is determined by the care you take in setting your system up: this includes all connected amplification and loudspeakers.
Please read all the notes regarding antenna choice and placement before connecting your 8200T
3: Controls and Connectors
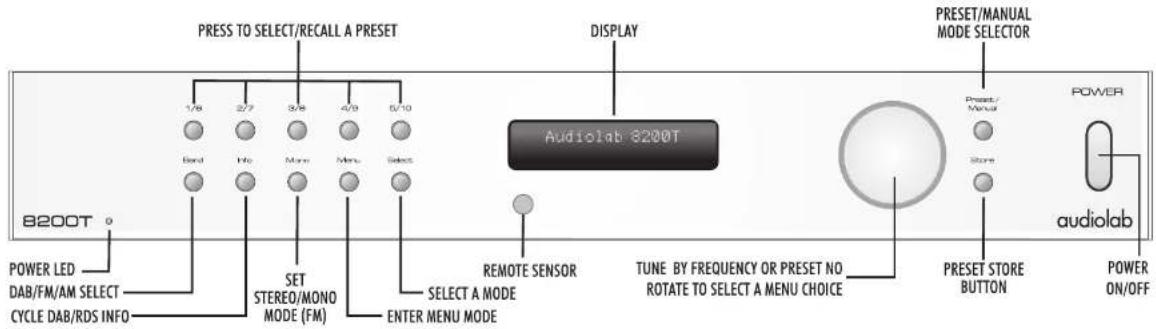
text_image
PRESS TO SELECT/RECALL A PRESET 1/8 2/7 3/8 4/9 5/10 Band Info Mane Menu Select B200T POWER LED DAB/FM/AM SELECT CYCLE DAB/RDS INFO SET STEREO/MONO MODE (FM) ENTER MENU MODE DISPLAY Audiolab 8200T REMOTE SENSOR SELECT A MODE TUNE BY FREQUENCY OR PRESET NO ROTATE TO SELECT A MENU CHOICE PRESET/MANUAL MODE SELECTOR Preset/Manual Store audiolab POWER PRESET STORE BUTTON POWER ON/OFF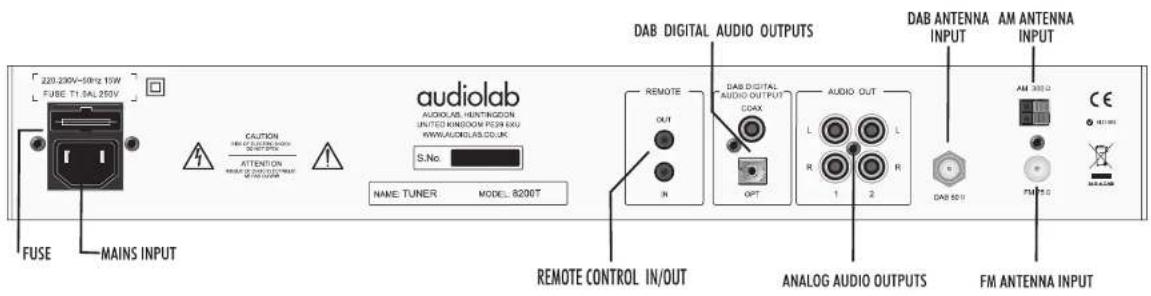
text_image
[220.230V-50Hz 15W] FUSE T1.5AL 250V CAUTION ATTENTION ON MINTUATION ON AUDIOLAB HUNTINGON UNITED KINGDOM FOR KAY WWW.AUDIOLAB.COM.KU S.No. NAME: TUNER MODEL: 8200T DAB DIGITAL AUDIO OUTPUTS REMOTE OUT IN DAB DIGITAL AUDIO OUTPUT CDAX OPT AUDIO OUT L L R R 1 2 DAB ANTENNA INPUT AM ANTENNA INPUT AM 300Ω CE FRM 75Ω FUSE MAINS INPUT REMOTE CONTROL IN/OUT ANALOG AUDIO OUTPUTS FM ANTENNA INPUT4: Remote Handset
NOTE: The handset buttons shown crossed out are for use with Audiolab units other than the 8200T.
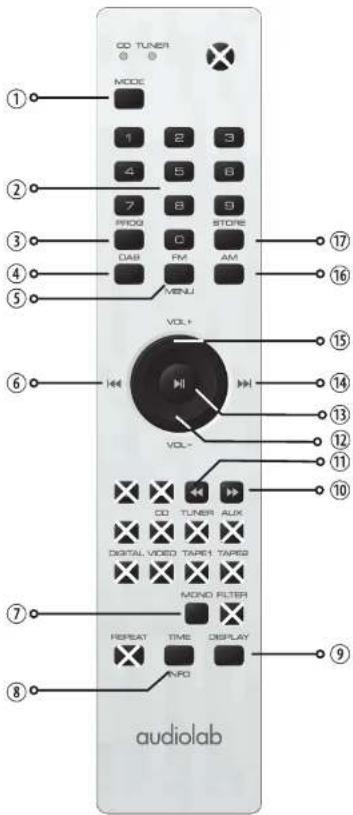
text_image
CD TUNER MODE 1 2 3 4 5 6 7 8 9 PROQ STORE DAB FM AM MENU VOL+ VOL- CD TUNER AUX DIGITAL VIDEO TAPE1 TAPE8 MONO FILTER REPEAT TIME DISPLAY INFO audiolab1 MODE Press to toggle the handset from Tuner to CD operation.
The CD/Tuner lights flash to show the selected mode.
2 NUMBER KEYS Press to go directly to a preset station
Press to select a preset in which to store a station
Use the keys to change a station name
3 PROG Press to select Preset/Manual Tuning mode
4 DAB Select DAB mode
5 FM Select FM mode
Press and hold to access the Setup Menu (AM,FM,DAB)
6 Select the next preset down (Preset Tuning)
Move down the band by frequency (Manual Tuning)
7 MONO Press to toggle Mono/Stereo reception (FM Mode)
8 TIME/INFO Press to display DAB/RDS text information.
9 DISPLAY Press to toggle the display off/on
Press and hold to select display brightness levels
10 ▶▶ Press to auto-tune up the band
11 Press to auto-tune down the band
12 VOL- Press to change a menu item or character
Press to select a character when changing a station name.
13 ▶ Press to confirm a selection
14 Select the next preset up (Preset Tuning)
Move up the band by frequency (Manual Tuning)
15 VOL+ Press to change a menu item or character
Press to select a character when changing a station name.
16 AM Select AM mode
17 STORE Press to store a preset in memory.
Fitting Batteries
Open the cover. Unwrap the supplied AAA batteries and place them in the battery compartment with the polarity as shown. Replace the cover.
Always use AAA batteries and always replace them in sets. Never mix old and new batteries. Very weak batteries can leak and damage the handset. Replace them in good time!
Do NOT short circuit batteries or throw them into water, the general rubbish or a fire. Dispose of used batteries with regard to recycling regulations in your area.
1: Open the battery
compartment cover
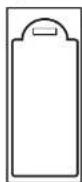
2:Insert 2AAA batteries
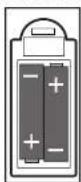
3: Replace the cover
Handset Operation
The handset operates several Audiolab components.
Before using the handset always press the MODE button and check that the TUNER light illuminates. This puts the handset into the correct operating mode.
Point the handset at the remote receiver and press the relevant key. The handset should be within 15 metres of the player and there must be a clear line of sight between the two units.
5: Connections

Make sure all system components are disconnected from the mains before making or changing system connections!
ANALOGUE OUTPUTS
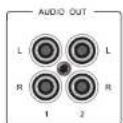
Two identical sets of outputs are provided. Connect a high quality stereo screened RCA phono lead from one set of outputs to a suitable input of your amplifier or pre-amplifier. The other set may be used to connect to an analogue recorder, or any other unit having a suitable line input.
DIGITAL SPDIF OUTPUTS
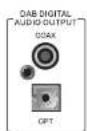
Coaxial and Optical outputs are provided for connecting the 8200T to an external D/A converter (DAC) or digital recorder. Connect an optical or a digital cable from the appropriate output to the input of your DAC, etc. These connections only operate when you are listening to a DAB broadcast:
Both connections may be used together if required.
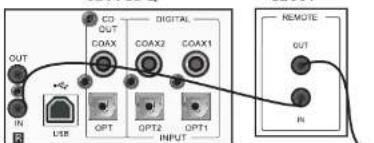
Note - 8200T: If you are using on 8200 series player/DAC, you are strongly advised to connect the digital coaxial output of the 8200T to digital coaxial input on the player and then listen via the player interface. The D-A converters and digital filters on these units are state of the art unit and the range of digital filters available will maximise the sound quality when listening via DAB. Refer to the relevant player User Manual for full guidance and set up procedure.
I/R (REMOTE) CONNECTIONS
An external 3.5mm remote control bus is included to facilitate connection to suitably equipped 8200 series components and to multi-room controllers etc.
By connecting suitably equipped units in a 'daisy chain' you can establish control over an entire system with one handset.
CONNECTING AN FM AERIAL
There is a 75 ohm co-axial FM male connector on the rear panel. This will accept a standard FM aerial co-axial line socket. If your aerial cable is terminated with a 75 ohm co-axial plug, attach the provided coupler to the connector on the rear of the tuner. You will now be able to plug the aerial in.
The performance of your aerial is the performance of your tuner. Ideally you should use a professionally installed multi-element FM aerial mounted on the roof, or in the loft
8200CDQ
text_image
OUT IN USB COX COAX1 COAX2 COAX1 OPT OPT2 OPT1 DIGITAL INPUT REMOTE OUT IN
If you are close to a transmitter, you may be able to use an indoor aerial, but reception may be noisy and distorted in stereo.
If you live in an apartment block that uses an amplified aerial system, or you are using a cable feed, plugging the feed directly into the FM aerial input may cause input overload and distortion. If this occurs, you may need an aerial input attenuator; consult your dealer for advice.
If you are using an indoor aerial, positioning is important, especially when receiving distant stereo signals when the reception could be affected by noise. Be prepared to experiment to find the most favourable location.
CONNECTING THE AM AERIAL
An AM loop aerial is provided. Attach this to the AM antenna input. The input connector uses a pair of spring loaded terminals. Depress the terminal levers, place the prepared ends of the connecting cable into the terminals and release the levers. Ensure the bore wire is neatly trapped and that the ends are not touching each other.
In use you will find that altering the position of the loop antenna may affect signal reception markedly. Additionally, in some locations interference and electrical noise (in particular that caused by vehicle ignitions) may be much worse. Be prepared to experiment to find the most favourable location.
CONNECTING A DAB AERIAL
The DAB aerial input is an F-Type connector. If your DAB aerial has a standard TV Coaxial connector you will need a Co-ax to F-Type socket adopter. This is readily available from most good electrical parts retailers - your dealer will advise you. A DAB antenna is a Bond III device and although we recommend a roof mounted/ loft mounted unit, these can be quite large. There are several smaller alternatives available for indoor use; many of these units are amplified and their effectiveness varies depending on the individual manufacturer and your distance from the transmitter. Always seek the advice of your dealer or a qualified aerial specialist if you are in any doubt.
MAINS INPUT
Before connecting the 8200T to the mains supply make sure that all the other connections to your system have been properly and securely made.
Make sure the ON/OFF switch on the 8200T is switched off. (released position).
Switch the mains supply off at the wall socket and then, using the cable supplied, connect the socket on the back of your 8200T to an AC supply outlet.
The tuner is now ready for operation.


6a: Operation - 1
Switching On and Off
- Connect power to all system units and the 8200T.
- Switch the mains power on.
• Switch on all source units including the 8200T
• Now switch on the pre-amp and the power amplifier/s.
When switching the system off: Always switch off the power amplifiers before switching off the preamp and the 8200T.
Whenever the 8200T is switched on: The Power LED illuminates, the display shows the Model no. In normal use the tuner will default to the last used station when it is switched on.
DAB Reception
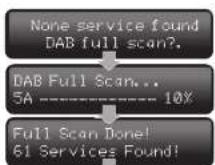
Select DAB on the handset or press the Band key on the front panel to cycle to DAB. When used for the first time you will need to scan the DAB band.
Press Select on the front panel (or ▶ on the handset)
All the usable stations will be stored in memory.
The 8200T will then play the first station.
The display indicates the transmission mode and the bit rate
VIEWING STATION INFORMATION
Repeatedly press the Info key on the handset or Signal Strength the front panel to cycle the available information.
A Note on Multiplexes and Bit Rates
A multiplex is a collection of radio stations transmitted together in a single frequency. There are national and local multiplexes; local ones have stations specific to your area. If there are several stations in one multiplex the Bit Rate is likely to be lower (more compressed) because the space available is being shared by many stations. The bit rate may also vary between different stations on the same multiplex as the programmer decides.

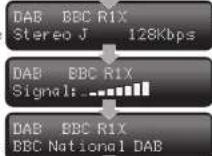
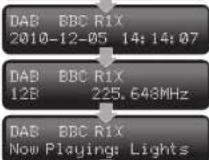
Service Provider
Programme Type
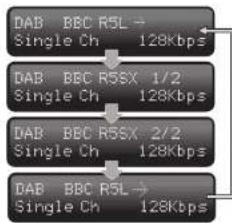
SECONDARY INFORMATION
On occasion you may see a → symbol after the name of the station. This indicates that there are secondary services available that relate to the primary station.
There may be one or more additional services.
Repeatedly press Select on the front panel (or ▶ll on the handset) to cycle through the options available
INITIATING A DAB SCAN
The catalogue of DAB stations changes as stations enter or leave the system, so it is advisable to do a periodic scan.
Press the Menu key on the Front Panel or
Give a long press on the FM/MENU key on the handset.
Press Select on the front panel (or ▶ on the handset).
Press Select on the front panel (or ▶ on the handset) to confirm
When the scan is complete the display will return to the last station tuned before the scan was commenced.
SELECTING A STATION
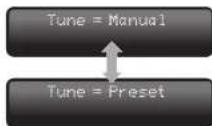
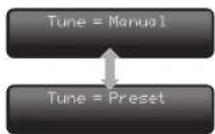
You can select Manual or Preset Tuning.
To select a tuning method:
Press the Preset/Manual key on the front panel or Press PROG on the handset to toggle the tuning mode.
Manual Tuning
1: Select manual tuning.
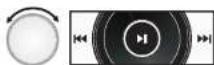
2: Press 🎥 / 🎥 repeatedly or rotate the Tuning knob left/right to move through the stations.
flowchart
graph TD
    A["DAB BBC R5L"] --> B["Single Ch 128Kbps"]
    C["DAB BBC R5SX 1/2"] --> D["Single Ch 128Kbps"]
    E["DAB BBC R5SX 2/2"] --> F["Single Ch 128Kbps"]
    G["DAB BBC R5L"] --> H["Single Ch 128Kbps"]
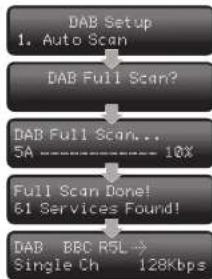
flowchart
graph TD
    A["DAB Setup\n1. Auto Scan"] --> B["DAB Full Scan?"]
    B --> C["DAB Full Scan...\n5A --- 10%"]
    C --> D["Full Scan Done!\n61 Services Found!"]
    D --> E["DAB BBC R5L→\nSingle Ch 128Kbps"]
6b: Operation - 2
STORING A STATION IN A PRESET
1: Select manual tuning
2: Press 🎥 / 🎥 repeatedly or rotate the Tuning knob left/right to select the wanted station.
3: Press STORE on the front panel or handset.
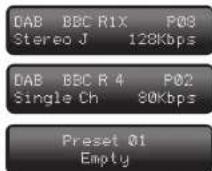
The lowest available empty preset indicates as a prompt:
4: To preset the station into this number, enter the number prompted or enter an alternative number (say 8):
The Preset number will now appear next to the station. You can enter 10 presets via the front panel and 30 from the handset.
To enter numbers 1-9 from the handset: Press 01, 02 etc.
To enter numbers from 10-30: Enter the number.
To enter numbers from the front panel: Give a short press on the selected key to enter the lower number and a long press for the higher one, e.g. to enter 1 give a short press on the 1/6 key. To enter 6 give a long press.
RECALLING A PRESET STATION
1: Select Manual or Preset tuning
2: Enter the preset number from the front panel or the handset. Remember you can only select presets 1-10 from the front panel.
The new station will now display.
If you enter an invalid preset number:
PRESET TUNING
1: Select Preset tuning
2: Press 🎥 / 🎥 repeatedly or rotate the Tuning knob left/right to move through all the preset stations.
Only those stations stored in presets will display. If there is an empty preset that number will be missed out.
OVERWRITING A PRESET
You can enter a new station into an existing preset:
1: Select the wanted station
2: Press STORE
3: Enter the number of the preset you wish to overwrite.
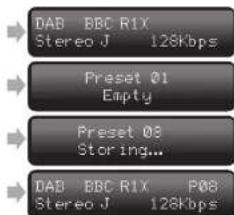
text_image
DAB BBC R1X Stereo J 128Kbps Preset 01 Empty Preset 08 Storing... DAB BBC R1X P08 Stereo J 128Kbps
DELETING ALL PRESETS
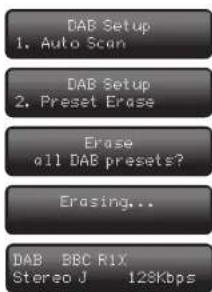
1: Press the Menu key on the Front Panel or Give a long press on the FM/MENU key on the handset
2: Press VOL- or rotate the Tuning knob to the right.
3: Press Select on the front panel (or ▶ on the handset)
3: Press Select on the front panel (or ▶ll on the handset) to erase all DAB presets. (other presets are unaffected).
The last used station will now play.
NOTE: If the 8200T is in Preset Tune Mode you will only be able to select and play the current station. To restore normal tuning, change to Manual Tuning.
text_image
DAB Setup 1. Auto Scan DAB Setup 2. Preset Erase Erase all DAB presets? Erasing... DAB: BBC RIX Stereo J 128Kbps6c: Operation - 3
FM Reception
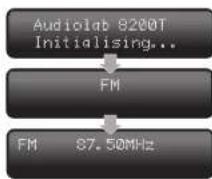
Switch the 8200T on.
When switched on for the first time the 8200T defaults to FM. Thereafter you may need to select FM.
Select FM on the handset or press the Band key on the front panel to cycle to FM.
TUNING AN FM STATION
Incremental Tuning
Press 🎩 / 🎩 repeatedly or rotate the Tuning knob left/right to advance the tuning up/down in 50kHz increments.
Auto (Search) Tuning
Press ▶ or spin the Tuning knob left/right. The tuner will auto search the band. When a usable station is found the tuner will stop the scan and play the station.
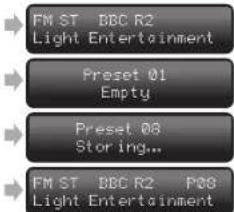
STORING A STATION IN A PRESET
1: Select the wanted station.
3: Press STORE on the front panel or handset.
The lowest available empty preset indicates as a prompt:
4: To preset the station into this number, enter the number prompted or enter an alternative number (say 8):
The Preset number will now appear next to the station. You can enter 10 presets via the front panel and 30 from the handset.
To enter numbers 1-9 from the handset: Press 01, 02 etc. To enter numbers from 10-30: Enter the number.
To enter numbers from the front panel: Give a short press on the selected key to enter the lower number and a long press for the higher one. e.g. to enter 1 give a short press on the 1/6 key. To enter 6 give a long press.
RECALLING A PRESET STATION
1: Enter the preset number from the front panel or the handset. Remember you can only select presets 1-10 from the front panel. The new station will now display.
You can enter a new station into an existing preset:
1: Select the wanted station
2: Press STORE
3: Enter the number of the preset you wish to overwrite

text_image
FM ST BBC R2 Light Entertainment Preset 01 Empty Preset 08 Storing... FM ST BBC R2 P08 Light Entertainment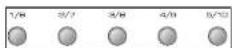
PRESET AND MANUAL TUNING
You can select Manual or Preset Tuning.
To select a tuning method:
Press the Preset/Manual key on the front panel or Press PROG on the handset to toggle the tuning mode.
Manual Tuning
1: Select manual tuning.
2: Refer to the previous section "TUNING AN FM STATION"
Preset Tuning
1: Select Preset tuning
2: Press ⬆/⌘ repeatedly or rotate the Tuning knob left/right to move through all the preset stations.
Only those stations stored in presets will display. If there is an empty preset that number will be missed out.
RDS INFORMATION
Most FM stations display station and other information via RDS.
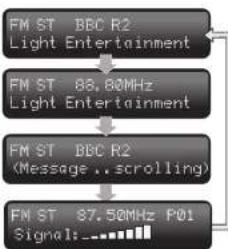
Repeatedly press the INFO key on the front panel or handset to access all the additional text information the station may be putting out.
Signal Strength is shown right below station name and tuning frequency.
STEREO OR MONO
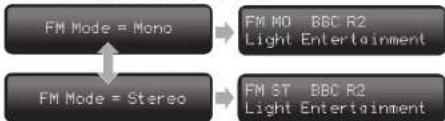
Noise-free stereo needs a stronger signal than mono. If your aerial is less than ideal or the station is weak or distant, setting the tuner to mono will improve the noise performance.
Press the MONO key on the handset or the ST/MO key on the front panel to toggle mono stereo operation.
flowchart
graph TD
    A["FM Mode = Mono"] --> B["FM MO B&C R2 Light Entertainment"]
    C["FM Mode = Stereo"] --> D["FM ST BBC R2 Light Entertainment"]
The display will change to reflect the mode selected.
Note: You cannot store the same station in Mono and in Stereo using different presets.
flowchart
graph TD
    A["FM ST BBC R2 Light Entertainment"] --> B["FM ST 88.80MHz Light Entertainment"]
    B --> C["FM ST BBC R2 (Message .. scrolling)"]
    C --> D["FM ST 87.50MHz P01 Signal: ..."]
6d: Operation - 4
THE FM MENU
1: Press the Menu key on the Front Panel or
Give a long press on the FM/MENU key on the handset.
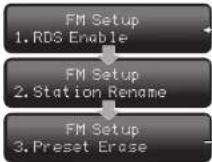
2: Press VOL+/- or rotate the Tuning knob left/right to scroll the three options as indicated.
3: Press Select on the front panel (or ▶ on the handset) to enter the selected menu option
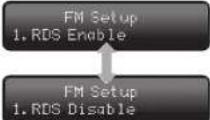
1: RDS Enable/Disable
Select RDS Enable. Press Select on the front panel (or ▶ll on the handset) to enable/disable RDS.
When RDS is disabled all the station information is removed including the station name. Only the Station Frequency and Transmission Mode are displayed.
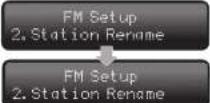
2: Station Rename
You can only rename a station when it has been preset.
Select Station Rename.
Press Select on the front panel (or ▶ on the handset) to enter the menu.
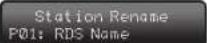
Press VOL+/- or rotate the Tuning knob left/right to scroll through the presets. You will see that you cannot rename any station that features RDS (whether RDS is enabled or not).
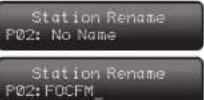
A station without RDS appears as "No Name" and can be renamed using up to 8 characters.
Press Select on the front panel (or ▶ll on the handset)
You can rename the station via the front panel but as this is cumbersome you do this more easily from the handset.
Press VOL + to scroll capital/lower case letters and Nos 1-9 in Reverse order
Press to move back
one space at a time

Press to move forward
one space at a time
Press VOL - to scroll capital/lower case letters and Nos 1-9 in Forward order
Press ▶ll when you have finished. Press the FM key twice to return to the main screen.
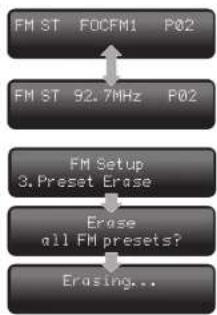
FM ST F0CFM1 P02
NOTE: When a station is renamed you can toggle the display between Station frequency and name whether RDS is enabled or not.
Press the INFO key on the front panel or handset to toggle the display readout.
3: Erasing all Presets
Select Preset Erase.
Press Select on the front panel (or ▶ on the handset).
Press Select on the front panel (or ▶ll on the handset) a second time to erase all FM presets.
AM Reception
Select AM on the handset or press the Band key on the front panel to cycle to AM.
TUNING AN AM STATION
Incremental Tuning
Press 🎩 / 🎩 repeatedly or rotate the Tuning knob left/right to advance the tuning up/down in 9kHz increments.
Auto (Search) Tuning
Press ▶/◄ or spin the Tuning knob left/right. The tuner will auto search the band. When a usable station is found the tuner will stop the scan and play the station.
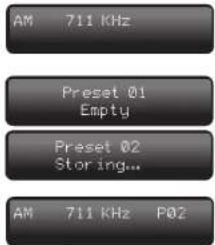
STORING A STATION IN A PRESET
1: Select the wanted station.
3: Press STORE on the front panel or handset.
The lowest available empty preset indicates as a prompt:
4: To preset the station into this number, enter the number prompted or enter an alternative number.
The Preset number will now appear next to the station. You can enter 10 presets via the front panel and 30 from the handset.
To recall a preset: Enter the preset number from the front panel or the handset. Remember you can only select presets 1-10 from the front panel.
flowchart
graph TD
    A["FM ST FOCFM1 P02"] --> B["FM ST 92.7MHz P02"]
    B --> C["FM Setup 3. Preset Erase"]
    C --> D["Erase all FM presets?"]
    D --> E["Erasing..."]
text_image
AM 711 KHz Preset 01 Empty Preset 02 Storing... AM 711 KHz P026e: Operation - 5
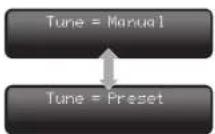
PRESET AND MANUAL TUNING
You can select Manual or Preset Tuning.
To select a tuning method:
Press the Preset/Manual key on the front panel or
Press PROG on the handset to toggle the tuning mode
Manual Tuning
1: Select manual tuning.
2: Refer to the previous section "TUNING AN AM STATION"
Preset Tuning
1: Select Preset tuning
2: Press >> / << repeatedly or rotate the Tuning knob left/right
to move through all the preset stations.
Only those stations stored in presets will display. If there is an
empty preset that number will be missed out.
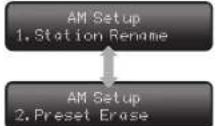
THE AM MENU
1: Press the Menu key on the Front Panel or
Give a long press on the FM/MENU key on the handset.
2: Press VOL+/- or rotate the Tuning knob left/right to scroll
the two options as indicated.
3: Press Select on the front panel (or ▶ll on the handset) to
enter the selected menu
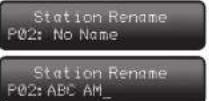
1: Station Rename
You can only rename a station when it has been preset.
Select Station Rename. Press Select on the front panel (or ▶) on the handset) to enter the menu
Press VOL + to scroll capital/lower case letters and Nos 1-9 in Reverse order
Press to move back
one space at a time

Press to move forward
one space at a time
Press VOL — to scroll capital/lower case letters and Nos 1-9 in Forward order
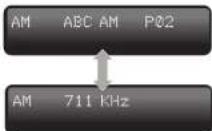
Press ▶ll when you have finished. Press the AM key twice to return to the main screen.
Press the Info key to toggle the display between the new station name and the station frequency.

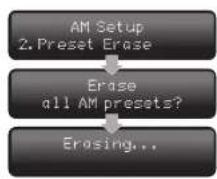
2: Preset Erase
Select Preset Erase.
Press Select on the front panel (or ▶ll on the handset).
Press Select on the front panel (or ▶ll on the handset) a second time to erase all AM presets.
Other 8200T Functions
DISPLAY ON/OFF
Press DISPLAY to toggle the display panel OFF/ON.
When the display is switched off:
Tuning the 8200T or selecting a station or preset will cause the display to momentarily "wake up". After the procedure has executed the display will again switch off.
Switching the 8200T off and then on will restore the display fully.
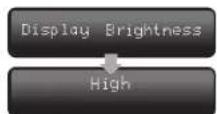
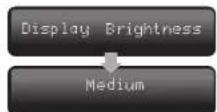
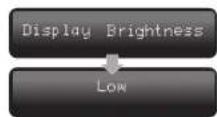
Hold DISPLAY to select display brightness. Then press DISPLAY repeatedly to toggle among HIGH, MEDIUM and LOW.
7: Troubleshooting
Until you are familiar with the operation of your 8200T you may experience occasional difficulties. This guide will help you overcome the most likely issues.
No response/poor response to handset commands
Check that:
• the 8200T is switched on.
• there are fresh batteries in the remote control.
- the 8200T's display window is visible and you are pointing the remote control towards it.
- TUNER mode is enabled on the handset. (TUNER led flashes when a key is pressed).
Signal is Poor/Distorted/Noisy
Check that:
• the appropriate antenna is connected..
- With FM reception, it is possible to have the same station broadcast on different frequencies. Check that you are tuned into the correct station for your area.
• (FM) Switching the tuner into Mono may help.
I cannot change Stations
Check that:
- You have not selected Preset Mode with no preset, or only one preset set up.
The station display will not change (FM)
Check that:
• You have not disabled RDS information
The signal keeps fading in and out (AM).
Check that:
- You have oriented the antenna incorrectly. Correct orientation will also minimise noise and AM interference..
The display does not light up
Check that:
• you have not switched the display off.
etc., the jitter from these sources may be so high that the interface suffers from clicking, drop-outs etc.
8: Specifications
DAB Section
| Tuning Range: | 174 - 240MHz (Band III) |
| 1452 - 1492MHz (Band I |
Frequency response (20Hz - 20kHz): -3dB
| THD (1KHz): | <0.1% |
Output Level: 2.0V
| S/N Ratio: | 80dB |
Sensitivity: 96dBm
| Channel Separation: | 72dB |
DAB Digital Outputs: 1 x coaxial, 1 x optical
| Output Sampling Frequency: | 48kHz |
FM Section
| Tuning Range: | 87.5-108MHz |
Frequency response (20-15kHz): -3dB (75 & 50uS)
| THD: (60dBu IHF wtd) 40KHz Dev. |
| Mono | 0.4% |
| Stereo | 0.6% |
| Output Level: | 1.1V |
S/N Ratio: (60dBu IHF wtd)
| Mono | 72dB |
| Stereo | 66dB |
Sensitivity: 18dBu
| RDS sensitivity: | 44dBu |
| Channel Separation: | 32dB |
AM Section
| Tuning Range: | 531-1602kHz |
THD: (5mV input) 3%
| Output Level (30%, 10mV): | 500mV |
S/N Ratio (5mV input) 38dB
| Usable sensitivity (400Hz,-20dB): | 32dBuv |
General Parameters
Temperature Range (ambient): 10°-40°C
Power Requirements: (Depending on Region)
50-60Hz 100V, 110-120V, and 220-240V models available
Power Consumption: 15 W
Dimensions (W x H x D): 445 x 74 x 335 mm
Weight Net: 5.2 kg
9: Service & Warranty
Care & Cleaning
While cleaning is in progress the AC power cord must be unplugged from the AC power supply socket.
Grease or dirt on the equipment may be removed with a soft, lint-free cloth slightly moistened with a mild solution of warm water and detergent or washing-up liquid. Do not use any other solutions or solvents.
If you have any queries regarding the use of Audiolab equipment, consult your dealer.
Servicing
Servicing of Audiolab products should only be carried out by authorised service agents. If service is required the equipment should be returned, securely packaged, preferably using original packaging, to your dealer.
In the UK equipment may be returned to the IAG Service Centre address shown on this page.
Always telephone before returning any equipment.
A note should be enclosed with your name, address, telephone number, and a brief description of the reason for return.
If you require Service outside the Warranty period, do not hesitate to contact your dealer.
Service Address
IAG Service Centre
Unit 4, St Margaret's Way
Stukeley Meadows Industrial Estate
Huntingdon Cambs
PE29 6EE
England
Tel: +44 (0)1480 45256 Fax: +44 (0)1480 413403
Audiolab limited warranty
Audiolab Ltd. warrants this product, subject to the terms and conditions below, to be free from defects in materials and workmanship. During the warranty period Audiolab will repair or replace (at Audiolab's option) this product, or any defective part in this product, if it is found to be defective due to faulty materials, workmanship or function. The warranty period may vary from country to country.
Terms and conditions:
The warranty starts on the date of purchase (or the date of delivery if this is later).
You must provide proof of purchase / delivery before work can be carried out. Without this proof, any work carried out will be chargeable to you.
All work will be carried out by Audiolab or its authorised agents or distributors. Any unauthorised repair or modification will void this warranty.
If any part is no longer available it will replaced with a functional replacement part.
Any parts that are replaced will become the property of Audiolab.
Any repair or replacement under this warranty will not extend the period of warranty.
This warranty is valid only in the country of purchase, applies only to the first purchaser and is not transferable.
The following are not covered:
- Products on which the serial number has been removed, altered or otherwise made illegible.
• Normal wear and tear and cosmetic damage.
• Transportation or installation of the product.
- Accidental damage, faults caused by commercial use, acts of God, incorrect installation, connection or packaging, misuse, neglect or careless operation or handling of the product which is not in accordance with Audiolab's user instructions.
- Equipment that has been operated in conjunction with unsuitable, inappropriate or faulty apparatus.
- Repairs or alterations carried out by parties other than Audiolab or its authorised agents or distributors.
- Products not purchased from an Audiolab authorised dealer.
- Products that were not new at the time of original purchase.
- Products sold 'as is', 'as seen' or 'with all faults'.
Repairs or replacements as provided under this warranty are the exclusive remedy of the consumer. Audiolab shall not be liable for any incidental or consequential damages for breach of any express or implied warranty in this product. Except to the extent prohibited by law, this warranty is exclusive and in lieu of all other warranties whatsoever, both express and implied, including, but not limited to, the warranty of merchantability and fitness for a practical purpose.
This warranty provides benefits that are additional to and do not affect your statutory rights as a consumer.
Some countries and US states do not allow the exclusion or limitation of incidental or consequential damages or implied warranties so the exclusions in the paragraph above may not apply to you. This warranty gives you specific legal rights, and you may have other statutory rights, which vary from state to state or country to country.
How to claim:
To obtain warranty service contact the Audiolab authorised dealer from which you purchased this product. Do not despatch goods without the prior agreement of the dealer, Audiolab or their authorised distributors.
If asked to return products for inspection and/or repair, pack carefully, preferably in the original cartons or packaging affording an equal degree of protection, and return prepaid. If unsuitable packaging is used, Audiolab may make a charge for the supply of new packaging.
Insurance is recommended as goods are returned at owner's risk. Audiolab or their authorised distributors cannot be held liable for loss or damage in transit.
Packing, insurance and freight on the return journey will be paid by Audiolab or their authorised agents or distributor if corrective work proves to be necessary.

Correct Disposal of this product. This marking indicates that this product should not be disposed with other household wastes throughout the EU. To prevent possible harm to the environment or human health from uncontrolled waste disposal, recycle it responsibly to promote the sustainable reuse of material resources. To return your used device, please use the return and collection systems or contact the retailer where the product was purchased. They can take this product for environmental safe recycling.