
M-355 - Autoradio MUSE - Kostenlose Bedienungsanleitung
Finden Sie kostenlos die Bedienungsanleitung des Geräts M-355 MUSE als PDF.


| Produkttyp | Autoradio mit DVD-Player, USB/SD-Kartenslot und UKW/MW-Radio |
| Marke | MUSE |
| Modell | M-355 |
| Abmessungen (B x H x T) | ca. 178 x 50 x 160 mm (1-DIN) |
| Gewicht | ca. 1,5 kg |
| Stromversorgung | 12 V DC (Fahrzeugbordnetz) |
| Sicherung | Ersatz mit gleichem Nennwert wie auf dem Sicherungshalter angegeben |
| Unterstützte Medien | DVD, VCD, SVCD, CD, CD-R/RW, MP3, WMA, JPEG, USB (2.0), SD/MMC-Karte |
| Radiofrequenzbänder | FM1, FM2, FM3, MW1, MW2 |
| RDS-Funktionen | AF (Alternativfrequenzen), TA (Verkehrsdurchsagen), PTY (Programmtyp) |
| EQ-Voreinstellungen | POP, ROCK, CLASSIC, FLAT |
| Audioausgang | 4 x 45 W (max.), Vorverstärkerausgänge (Front/Rear/Subwoofer) |
| Videoausgang | Composite-Video (RCA), PAL/NTSC umschaltbar |
| Elternaufsicht | Kindersicherung mit Passwort (Standard: 0000) |
| Parkbremssignal | Grünes Kabel: Video nur bei angezogener Parkbremse sichtbar (oder an Masse legen) |
| Abnehmbares Bedienteil | Ja (DIEBSTAHLSCHUTZ) |
| Fernbedienung | IR-Fernbedienung mit CR2025-Batterie |
| Reinigung | Weiches, trockenes Tuch; keine aggressiven Reinigungsmittel |
| Lieferumfang | Autoradio, Bedienungsanleitung, Fernbedienung, ISO-Stecker, Montagematerial |
Häufig gestellte Fragen - M-355 MUSE
Benutzerfragen zu M-355 MUSE
0 Frage zu diesem Gerät. Beantworten Sie die, die Sie kennen, oder stellen Sie Ihre eigene.
Eine neue Frage zu diesem Gerät stellen
Laden Sie die Anleitung für Ihr Autoradio kostenlos im PDF-Format! Finden Sie Ihr Handbuch M-355 - MUSE und nehmen Sie Ihr elektronisches Gerät wieder in die Hand. Auf dieser Seite sind alle Dokumente veröffentlicht, die für die Verwendung Ihres Geräts notwendig sind. M-355 von der Marke MUSE.
BEDIENUNGSANLEITUNG M-355 MUSE

muse
M-355 DR
User Manual CAR RADIO DVD PLAYER WITH
USB/SD

Please read the instruction carefully before
operating the unit

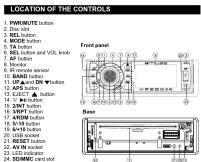
BEFORE YOU BEGIN
⚠️ Important safeguards
1. Be sure to connect the color coded leads according to the diagram. Incorrect connections may cause the unit to malfunction or damage the vehicle's electrical
system.
2. Be sure to connect the speaker (-) leads to the speaker (-) terminal. Never connect the left and right channel speaker cables each other or to the vehicle body.
3. Make sure all the connections are completely correct before turning on your unit.
4. When replacing the fixist, the requirement must be of the same appearance as
4. When replacing the fuse(s), the replacement must be of the same impedance as shown on the fuse holder.
5. Do not block vents or radiator panels. Blocking them will cause heat to build up
6. After completing the installation and beginning to play the underincluding reusing
6. Aset completing the installation and beginning to play the first/nobiting replace (the battery), press RESET button on the base with pointed object (such as ball-
point pen) to set the unit to initial status.
7. Do not attempt to modify the unit, modifying the unit may cause an accident.
8. Stop the vehicle before carrying out any operation that could interfere with yo
driving.
2. Do network in extremely high solar temperatures. To solve the temperature inside
9. DO NOT WORK IN EQUISIARY HIGH OF LOW TEMPERATURE. We sure the temperature inside the vehicle is between +60°C and -10°C before turning on your unit.
10. To avoid the driver distract his attention from, please install the unit in an ap
11. Using the unit after starting the engine, otherwise the unit can not be stated
because the electric energy of battery was used up.
12. Do not use the unit in extreme high temperature or such low temperature conditions, and also avoid humidity and direct sunlight, otherwise the electric
energy of battery will be wasting for the high temperature.
13. Take care of the magnetism of the unit. Do no put the credit card, cause or watch around the unit, otherwise they would be broken or some information in
them losses.
14. To valid distorting the video from every, have for any from the unit when using
14. To avoid disabling the video frequency, keep far away from the unit when using your phone.
15. Do not put the remote control under high temperature or where the sun strikes it,
19. Be sure to remove the transportation screw absolutely before mounting the
unit.
17. When driving, cannot look at the video and the pictures, a warning would be displayed on screen.
(No text)
GB-1 GB-2 GB-5 GB-6
GB-7 GB-8 GB-9
10-19/26 18 MUSE 001 BRYB OIL (mid) 1 3/1/2011 5:27:03 PM
[Non-Text]

When you select or create a disc to play with this product, please note: - Avoid long file names! It is suggested to parse the file with no much than 14
characters.
- The total number of files on the disc should not exceed 3000.
- The maximum number of directories should not exceed 200. - The maximum depth level of directories should not exceed 30
- File system(SD & USB): FAT 32 and FAT 16.
Disc and files you can play
In spite of progress made to ensure playability of all discs types, it is not possible
to guarantee playback or discs which are not in conformity with DVD, LCD, VCD or SVCD standards.
This unit may not play some recordings or files on CDs or DVDs due to diff
In recording forthati, software used and disc types. The Recordable disc may need a longer reading time than normal discs.
(2) Note 4. Note 10. Note 13. Note 14.
| Type of media | Label on the media | Recorded material | Size of media |
| DVD | DVD | Sound and moving pictures | 12cm |
| VCO | [IMAGE] | Sound and moving pictures | 12cm |
| CD | [IMAGE] | Sound only | 12cm |
| MP3 | [IMAGE] | Sound only | 12cm |
| MP3G-4 | [IMAGE] | Sound and moving pictures | 12cm |
| SD | [IMAGE] | Sound and moving pictures | Common SO/SDHC card |
| USB | [IMAGE] | Sound and moving pictures | Version: 2.0 and keys |
GB-3 GB-4
Replacing battery for the remote control
- Press the supper and pour out the battery holder.
-
Install for iCP0035 (bit) on battery, according to the velocity diagram on the battery.
-
Initial type CAQ203 sodium battery according to the polarity diagram on the battery compartment.


4
- Never recharge the batteries, apply heat to them or take them apart.
• In order to avoid any risk of explosion, observe the polarities indicated inside the
battery compartment. - Replace only with the type of batteries specified above.
- If you are not using the remote control for a long period of time, remove the
batteries. - Battery shall not be exposed to excessive heat such as surathing, fire or the like.
- To prevent short circuit, do not use metal tweezer to slip the battery.
• Attention should be drawn to the environmental aspects of battery disposal.
Before throwing any batteries away, consult your distributor who may be a
to take them back for specific recycling
第13.215 本章附注:本期设计
BASIC OPE
Regional Coding
Your D/V/D player has been designed to process regional management information that is stored on D/V/D days. D/V/D days first have different regional orders to
that is more than DVD black. DVD black that have driven a regional code to that of your player cannot be played. The regional code for your player is 2 (Europe
the Middle East, South Africa, Japan). ALL means all regions. When you buy a dis- check first 3 years the smart loss
the quick for I thank the credit logo.
To turn on/off the unit
Under power on mode, press the PWR button(1)(3) to turn on the unit. Under power on mode, press and hold the PWR button(1) or briefly press the PWR
button(R3) to turn off the unit.
NCD D
GB - 10 GB - 11 GB - 12 GB - 13
中
The Description of the Fixed ISO Female Connector
-
-
- 4.
-
■ P P P P
P N P M
1.2.3.4.5.6.7.8.9.10.11.12.13.14.15.16.17.18.19.20.21.22.23.24.25.26.27.28.29.30.31.32.33.34.35.36.37.38.39.40.41.42.43.44.45.46.47.48.49.50.51.52.53.54.55.56.57.58.59.60.61.62.63.64.65.66.67.68.69.70.71.72.73.74.75.76.77.78.79.80.81.82.83.84.85.86.87.88.89.90.91.92.93.94.95.96.97.98.99.100
A |2 |4 |6 |8
(1) 2017年1月1日至2018年1月1日
CONNECTOR A
1.
2.3.
-
Memory +12V
-
Also Artesiva 6.
-
12V (To Ignition Key)
-
GROUND


INSTALLATION
Regardless of the type of installation used, remove the car radio from the mounting clamps before station installation.
Sleeve before starting installation Part 1st:
Mounting Sleeve x1
Fear Mounting Bolt x:1 Spring Washer x:1
Plain Washer x2
Nut x1 Screw x1
Outer Trim Frame #1
Keys x2 ISO Connection Wire x2
Steel Bar x1
AV Connecting Wire x2
[Non-Text]

install the front panel

Remove the front panel


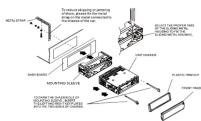
Note: Remove the deck transport screws before installing it.
TA [traffic announcement] function
Press the TX station shortly to turn on TX seaformide. When traffic announcement is transmitted:
1). If the unit is in Disc Play mode, it will switch to radio mode temporarily. (2) If the unit is in radio mode, it will switch automatically to the traffic on
2.01 the one is in radio mode, it will switch automatically to the alarm announcement. * TA interruption function:
The current traffic announcement is cancelled by pressing TA button shortly.
WITH TA is on, set back [SCAN], AD/TS MEMORY (APS), which can only be allowed or saved RD8 station with TA identification.
[Non-Text]
PLAYBACK DISC, USB OR MMC/SC
Begin playback
Press the POWER button briefly to turn on the DVD player
Press the RLL button to detach the front panel from the UN Insert a disc into the DISC 5LOT (Label surface up), then o
Note 15.
Note on this - Do not use irre
result in malfunctions.
* If there is a scratch, dirt or fingerprints on the disc, it may cause trafficking error. Before playing, clean the disc with a cleaning cloth. Wipe the disc from the center out
Don't store discs in places with high temperatures or high humidity, they can become worried. After giving, store the disc is its own
Warried. Also (playing, store the ball with last
Pause playback
During playback, press ▶to pause playback, press again to resume.
Stop playback
when playing DVD/CD disc, press the ▪onba to pre-stip, and press ▶do reslumta the normal playback. To suit slaving completely press STOP twice.
Table 1.2.3.1.1.2.4.5.6.7.8.9.10.11.12.13.14.15.16.17.18.19.20.21.22.23.24.25.26.27.28.29.30.31.32.33.34.35.36.37.38.39.40.41.42.43.44.45.46.47.48.49.50.51.52.53.54.55.56.57.58.59.60.61.62.63.64.65.66.67.68.69.70.71.72.73.74.75.76.77.78.79.80.81.82.83.84.85.86.87.88.89.90.91.92.93.94.95.96.97.98.99.100
Select chaplantrack with the UP/ON of the 🎨 / 🎨 button Press the UP/ON button on the front panel or the 🎨 🎨 auto
during playback to select the next or last chapter/track to playback.
Note: Press UPLON or the 📄 button multiple times to advance multiple chapters tracks forward or backyard.
[Non-Text]
中
广力云
一
-
Select chapter/track with the number buttons When playing DVD/VC/D(PBC-OFF)/MP/ICD discs, press one of the 1-9 and the 0/10 number buttons to directly select and play the 1st to 10th track / chapter (the 0/10 button is used as the 10 button). If you want to play the track/chapter with serial number bigger than 10, use the 10+, 1-9 and 0/10 button. For example 1, to play the 13th track/chapter, firstly press the 10+ button once, then press the 3 button. For example 2, to play the 24th track/chapter, firstly press the 10+ button for 3 times, then press the 4 button (the 0/10 button is used as the 0 button). Note: pressing and holding the +10 or -10 buttons will allow you to play the next 10 or last 10 chapter/track (only for MP3).
Select chapter/track with the Title/PBC menu (if included on the disc)
When playing DVD discs: 1. Press the TITLE button on the remote control to display the title for
-
Press the direction buttons to select your desired title, and then press the OK or ▶
-
Press the direction buttons to select your desired chapter, finally press the OK or
button to play the selected chapter. During playback, pressing the MENU button can directly display the menu of the title
that is playing.
In VCD mode: Press/PRO bus
Press PBC custom to learn how the PBC keyboard (Play Back Control) 1. When PBC is activated, the PBC menu is displayed if existing on the disc
- Press the number buttons to select your desired thick to play:
In MP3 mode 1. The root menu is displayed on the monitor screen all the time and the TITLE or
MENU button is not available). 2. Press the directing buttons in select your denied FOLDER, then press the OK button.
- Push the direction buttons to select your desired file, then press the right button to open the FOLDER, and then press the direction buttons to select your desired file,
finally press the OK button to play the selected file
In CD mode, the TITLE, PBC, MENU buttons are disabled.
[Non-Text]
[Non-Text]
[Non-Text]
[Non-Text]
[Non-Text]
GB - 14 GB - 15 GB
[Non-Text]
RATING (Parental Control)
The item is for setting a new rating level of the Parental Control.
-
Select the P-Data WORD item and then press the URL to enable it, then input the pass word mentioned above, and then press the OK button to unlock the setting of the original level of the Parental Control.
-
Select the RATING items and then press the ▶ button to enter it, then use the
direction buttons to select your desired rating level, then press the OK button to confirm.
Rating levels of Parental Control are as follows:
1 Kit Safe 2 G
3PG 4PG 12
4PG-15 5PG-R
6R TNG 17
B Adult
- Select the PASS WORD item again and then press the button to enter it, then join the ones word, and then press the OK button to lock the new setting of the rating
Inper the pass words, and their level of the Parental Control.
Note
If the rating level set in the disc is higher than one set in the DVD player, the playback will be blocked and password menu is displayed. To release playback, enter the
correct password. The rating level setup is protected by the password!. Therein, if you select Unknown Item, the Parental Capital Inventory will be invalid, the context of data will
be played total
DEGREE
DEFAULT This item is for making all setup items change back to original status.
[Non-Text]
LANGUAGE SETUP

GB-21 GB-22 GB-23
18-3846 18 M35E 001 B57F 05 (mid)2 2 3/1/2011 5:27:13 PM
EJECT DISC AND SWITCH OFF
Terminate the playback;
- Press the REL button to open the front panel, then press the ▲button to eject disc, and then press your disk and press the front panel.
- Press and hold the PWR button on the front panel or briefly press the PWR button
on the remote control to turn off the DVD player.
ADVANCED DISC, USB OR MMC/SD OPERATIONS
- Fast speed
During playback, press and hold ▲i▼ buttons on the front panel or ### has the sample repeatedly to increase speed forward/backpoint at following speed: 2x, 4x, 8x
20x, normal...
During fast playback, press ▶ button to resume normal playback.
During playback, each consecutive press on SLOW_FWD button, the speed
decreases as follows: 1/2, 1/3, 1/4, 1/5, 1/6, 1/7, normal... During slow rotation, goes ▶ is button to ignore nearest playback.
- During slow motion, gross ★ at session to resume normal playbox. - This function is only for video.
Display still frame step in step
If the unit is currently playing video, press the STEP button repeatedly to display still
frame step by step. Press the ▶ button to resume normal spinback
Preserve 25 customers' retention normal payoffs.
Playback repeatedly 1. In the mode of [DV] disc playback press the BPT button in select REP CHAPTER
REP TITLE, REP ALL or REP OFF.
- In the mode of VCD/PBC-OFFyCD disc playback: press the RPT button to select REP ONE, REP ALL or OFF.
When PBC is ON, during VCD playback, the RPT button is not available.
- In the mode of MP3 disc playback: Press the RPT button to select REP ONE, REP DIR, REPALL or OFF.
2017年1月1日
A-Ⅱ repeat Press the A-Ⅱ button if you want to repeat a specific segment on a disc
that you define:
-
Press A-B button at the beginning of the segment in which you want to reper playback (point A).
-
Press A-0 button again at the end of the segment (point 8).
The player will automatically return to point A and start to repeat playback of the selected segment (A/B).
(1) 2017年1月1日
[Non-Text]
[Non-Text]
[Non-Text]
[Non-Text]
OSD LANGUAGE
This item is for selecting the language of the SYSTEM MENU and all operating information disclosed during sineback.
Morrisson displayed during payoffs.
AUDIO/LANGUAGE This item is for selecting a audio language.
STRENTS
SUBTITLE LANG This form is for selecting a subtitle language.
MENUANG
This item is for selecting a disc menu language.
AUDIO SETUP
AUDIO DE 10P
AUDIO SETUP
AUDIO OUT
姓名:____
AUDIO OUT
There is only ANALOG mode, i.e. SPDIFIOFF, not optional.
KEY
It is for selecting your desired basic music tone(from low to high).
VIDEO SETUP

BRICHNESS
It is for adjusting the brightness of the video output.
[Non-Text]
[Non-Text]
- Press A-B button to cancel the A-B repeat function.
During VCD/MP3/ CD playback, points A and II must be within the same track.
During DVD playback, points A and B can be selected from different chapters.
Playback in scan mode
- When playing VCD(PBC OFF)/CD discs, press the INT button to play the first 15 seconds part of each track on the disc. Press the INT button again to reverse normal
second pair of each back on the ball. Please be in a touch again to restore normal playback.
- When playing DVD/MP3 discs, the INT button is not available
Playback from a specified chaptertrack or a specified time
1) When playing DVD discs, press the SEARCH button. In the menu, select the title,
chapter of time with the direction buttons and input a number with numeric buttons. Press OK or ▶buttons to start airbanks from the title, chapter or time that you have
This section is described in the Chapter 2.1. The results of this study are also selected.
2) When playing VCDIMP3CLD disk, proceed all above to start playback from the track or time that you want.
The following table
Playback in random When playing DVD/VC/D/PRC QFF/VMP3/CD discs press the RPM button to switch.
between RANDOM(ON)/RANDOM(OFF). When in RANDOM (ON) mode, it will play in
random.
Playback in different angle
-
When playing VCD/MP-3LCD disk, the □button on the remote control is not available
-
When playing DVD discs, press the ANGLE button repeatedly on the remote control
to view in different angles. (This function is only for the DVD discs with ANoU _2 function)
(二) 2017年1月1日至2018年1月1日
Zoom mode In DVD/GO mode, during playback, press the Z90W button continuously to enlarge
a certain area of the picture. Zoom ratio: ZOOMtx2,ZOOMtx3,ZOOMtx4,ZOOMtx1/
2,ZOOMx1/5,ZOOMx1/4,ZOOM OFF. Press the ▲/▼/▼ buttons to select the area you want to enlarge
to be you have it much.
Change the caption language When using PhD data, we see the QUOTTO C in the yesterday to print the
when playing DVD clips, press the substrate fusion repeatedly to select the language of the caption or turn off the caption/depend on the disc.)
When playing VCD/MP3/CD discs, the button is not available.
Change the audio language
-
When playing DVD discs, press the AUDIO button repeatedly on the remote control to select the desired instruments into (focused on the disc).
-
When playing VCD discs, press the AUDIO button repeatedly to select the sound
mode: MONO L, MONO R, MIX MONO and Stereo.
- When playing CDIMPs discos, the AUDIO button is invalid.
Change the video signal system
During playback of DVD/CD back, press the BAND button on the front panel of P/N on the remote control, repeatedly to change the VIDEO-SIGNAL 8SYSTEM mode as
Followers:
-3 PAL-5 PAL-M -3 PAL-N -3 AUTO -3 NTSC -3
Playback status
When playing discs, press the QoD button repeatedly on the rebate control to turn on/off the playback status.
- DVD discs: the number of the playing titles, the number of the playing chapter, the
elapsed time of the playing chapter, the remaining time of the playing chapter, the elapsed time of the playing title, the remaining time of the playing title, etc.
- VCD/CO discs: the number of the playing track, the elapsed time of the playing track
track, the remaining time of the paying track, the elapsed time of the back, the remaining time of the disc.
- MP3 discs: the number of the playing track, the elapsed time of the playing track,
the remaining tree of the playing track.
Program playback
It allows you to enter the order in which you want some chapters/tracks in DVD/CD/MPVCD also to play.
1 During playback, press the PROG button to enter a program interface as follows:
[Non-Text]
for DVD discs
for VCD/MP3/CD discs
广力云智慧零售收银系统
| PROGRAM | |
| 1_5_9_13_ | 5_9_13_ |
| 2_6_10_14_ | 6_10_14_ |
| 3_7_11_15_ | 7_11_15_ |
| 4_8_12_16_ | 8_12_16_ |
| Play Clear | Play Clear |
2 Use the direction buttons to move cursor onto the desired place for inputting the
sequence number.
3 Use the number button to input desired sequence number of trearchapein track with desired sequence.
4 Use the direction button to move cursor onto play item, then press the OK button to
play the programmed titles/chapters/tracks in programmed order; only pressing the PLAY button also can play the programmed titles/chapters/tracks in programmed
order.
* To exit program playback, firstly press the 810P button twice, then press the PLAY button to enter sequence playback; or press the PROG button twice again.
* To remove all programmed sequence numbers, move the cursor onto Clear item,
then press OK button. * To change, the reprogrammed ways soon move the curnor onto the item, you want to
To change the program not sequenced, have the better time and how you can be to change, input the desired sequence number.
* During VCD playstack, it is in P&C OW mode, when entering the program playstack, will turn off EPC mode.
(1) 2017年1月1日
Playback CD with multiple media format
- When you insert the CD with multiple medias, playback starts by MP3 files first if it
includes MP3. On the bottom of the menu, 3 sorting icons are displayed for MP3 on the left. JPEG at
the center and VIDEO on the right. Select the icon to display the kind of files that you
want to play. If one kind of file does not exist on the disc, the tumor can not select the iron.
A new class of the student's base being used, for similar class not chosen.
-
In the menu, press direction buttons to select folder, file or sorting icon. Press OR or ▶ button to open the folder, play the file or play files of specific kind
-
2023年1月1日,公司召开2023年第二次临时股东大会,并通知全体董事。
-
JPEG playback
when you select the spring room for JPEG press 📄 button to select the first JPEG file, then press ▼ button to select the desired one. Finally, press 🖱K or
button to display this file in full screen.
During JPE3 playback, use the ▶: ▼: ▲: ▼: 7-10 beams to change display angle as: ▶: 90 deg row; ▶: 50deg row; ▲: UP<→DOWN; ▼: LEFT<→RIGHT
^a Press PROG button to change the refreshing mode of the picture. ^b Press STOP buttons to store circular and return in the menu.
* Following buttons are not available: SLOW-PWD, SUBTITLE, TITLE, ANGLE, STE
AUDIO, ROM, INT and A-B.
* Other operations are same as MP3 mode.
- Video playback
During playback, press the STOP button to stop playing and return to the menu. In the menu, press directing buttons to select your desired folder or file. You can also
Use number buttons to select and play the file.
* The ANGLE, PRDG, RDM, INT and TITLE/PBC button are not valid * The other functions are same as DVD disc; but BPT function is same
Theorem 1.2.1
USD and SD operation
Power on the DVD player, insert the USB device, or flip down the front panel to insert MMC/SD Card. Close the front panel then the monitor will display the menu of the
USB or MMC/SD Card.
All the operations are same as ones of the corresponding format as described above.
[Non-Text]
[Non-Text]
DVD SETUP OPERATION
- Press the SETUP button on the remote control to access the DVD System Menu on
the monitor.
-
There are a setup page that for the system panel. Plans the 10-seconds to select a setup page.
-
Press the ▲
- Press the ▶
c. Press and ▶ Lousin to confirm the soap stop. Then jams are ▶ Lousin to select a setting press the OK button to confirm .
* Press the ◀ button to return to the upper level
- Press the 8E10P button again to exit the system
SYSTEM SETUP

TV SYSTEM
This product supports various DVD video systems. The survey will look and improve windows after
The screen will drink and become clothesless when a wrong system is selected. In this case, press the P/N button to switch the right system: NTSC/PAL/PAL-M/PAL-N
AUTO system.
TV TYPE
Select 4:3 PS, 4:3 LB or 18.9 according to the DVD contents or the format, 4:3 or 16:10. Many have reported external monitors in the video output.
10.19, if you have connected external monitor to the video digital
PASS WORD This item is Am
This form is for locking or unlocking the having level of the Parental Control. The defaulted state is locked. The defaulted password is 0000.
You can set a new pass wont; select the PASS WORD item and then press the button to enter it, then join the original pass and 0000, and then press the OK
button to unlock it. Press the Button to enter it again, then input a new pass word
that you like and then press the OK button to make it effective.
GB-14 GB-15 GB-16 GB-17
RATING (Parental Control)
The item is for setting a new rating level of the Parental Control.
- Select the Push WORD item and then press the button to enter it, then input the pass word mentioned above, and then press the OK button to unlock the setting of the
rating level of the Parental Control. 2. Select the PD TING box and then serves the button to enter it then use the
- Select the RATWS with and then press the "Pouch" to enter it, then use the direction buttons to select your desired rating level, then press the OK button to
confirm. Station Impairs of Biennial Control were on failures.
1 Kit Safe
2G
3PG 4 PG 13
SPG-R
6A 7 NC-17
B Adult
- Select the PASS WORD item again and then press the ☐ button to enter it, then input the pass word, and then press the OK button to lock the new setting of the rating
level of the Parental Control.
If the rating level set in the disc is higher than one set in the DVD player, the playback
will be blocked and password menu is displayed. To release playback, enter the correct password. The rating level setup is protected by the password. Therein, if you
select Unlock item, the Parental Control function will be invalid, the content of disc will
be play-
DEFAULT This item is for making all setup items change back to original status
(2) 陈志伟
LANGUAGE SETUP
GB-21 GB-22 GB-23
18-3846 18 M35E 001 B579 GS (mid)2 2 3/1/2011 5:27:13 PM
CSD LANGUAGE This image is for instance the language of the SWITCH MENU and all examples
This item is for soliciting the language of the SYSTEM MENU and all operational information displayed during playback.
AUDIO LANG
This item is for selecting a audio language.
SUBTITLE LANG
This item is for selecting a subtitle language.
MENU LANG
This item is far selecting a disc menu language.
AUDIO SETUP
(No text)
AUDIO SETUP
AUDIO OUT KEY
(No text)
AUDIO OUT There is only ANALOG node i.e. SERVICE, out referral
There is only AAA,CG3 mode, I.E. SP-DF-GFP; no optional.
RELY It is for selection your desired basic music tops(thop low to high)
For example, you can be able to use a computer in order.
VIDEO SETUP

BRICHNESS
It is for adjusting the brightness of the video output.
[Non-Text]
[Non-Text]
CONTRAST
It is for adjusting the contrast of the video output.
[Non-Text]
It is for adjusting the hue of the video output.
[Non-Text]
It is for adjusting
SHARPNESS
It is for adjusting the
SPEAKER SETUP
(No text)
SPEAKER SETUP
DOWNMIX
DOWNNEY
For selecting your desired sound effect when there is no center speaker and
subwoofer. There are 3 modes: LT/RT, STEREO, VSS. LT/RT: When playing a disc with PRQ LOGIC, Dolby stereo effect, so it will output
audio signal with vivid theatre effect.
STEREO with 5.1 audio signal, it will output the left and right channels signal; with 2 channels, it will output the common 2 channels signal of stereo signal.
VSS: when playing a disc with 5.1 channels, the main channel speakers can output
audio signal with VSS effect.
表决意见:全部反对。
DIGITAL SETUP
DIGITAL SETUR
ORANGE
OF MODE DYNAMIC RANGE
DEUAL MONIO
OP MODE
It is for selecting audio output mode
DYNAMIC RANGE Select a value between FYH, (maximum commercial and OFF maximum dynamic)
Select a value between FULL [Intrinsic compression] and OFF [Intrinsic dynamic]
DUAL MONO
It is for selecting a desired audio output mode for the left and right channels. There
are 4 modes as follows: STEREO, MONO L, MONO R, MIX MONO.
(No text)
WARNINGS
WARNING: ATTENTION: To reduce the risk of electric shock, do not remove
CAUTION ATTENTION: To reduce the list of electric shock, do not remove the cover. There are no user serviceable parts inside the u
DO NOT OPEN Refer all servicing to qualified personnel.
A The lightening flash with arrowhead symbol within the triangle is a warning sign offering the use of inter-group valents' inside the unit.
High Leveling the Level of "Lending Stock Range" inside the Grid.
The exclamation point within the triangle is a warning sign alerting the user of investment instructions expressing on the request.
■ or important transactions accompanying the product.
CAUTION: Invisible laser radiation when open and innerocks deflated. Avoid exposure to beam.
WARNING - To reduce the risk of fire or electric shock, do not expose this appliance
to rain or moisture.

Marke : MUSE
Modell : M-355
Kategorie : Autoradio