TME-M006SE - Browser ALPINE - Kostenlose Bedienungsanleitung
Finden Sie kostenlos die Bedienungsanleitung des Geräts TME-M006SE ALPINE als PDF.

| Produkttyp | Navigator / Monitor |
| Marke | Alpine |
| Modell | TME-M006SE |
| Bildschirmgröße | 6 Zoll (ca. 15,2 cm) |
| Anzeigesystem | TN-Flüssigkristallpanel mit niedriger Reflexion und Rückprojektion |
| Antriebssystem | Aktivmatrix, normalerweise weiße Anzeige |
| Bildpunkte | 228.480 (H:960 x V:238) |
| Lichtquelle | Internes optisches System (U-förmige Kaltkathoden-Fluoreszenzröhre) |
| Helligkeitsregler | 2-stufig (mit automatischer Helligkeitsanpassung) |
| Lautsprecher | 36 mm dynamischer Lautsprecher |
| Lautstärkeregelung | Drehregler |
| Abmessungen (B x H x T) | 171 x 127 x 33 mm |
| Gewicht | 510 g |
| Stromversorgung | 12 V Gleichstrom (Fahrzeug mit Minuspol an Masse) |
| Stromverbrauch | Ca. 0,5 A (Standby), ca. 1,5 A (Betrieb) |
| Kompatibler TV-Tuner | Alpine TUE-T011 (separat erhältlich) |
| Fernbedienung | Über TV-Tuner-Fernbedienung (separat) |
| Dimmerfunktion | Ja (manuell oder automatisch abhängig von Fahrlicht) |
| Montage | Mit mitgelieferter Halterung und Doppelklebeband |
| Sicherheitshinweise | Nicht in Airbag-Nähe montieren; nur 12 V Minuspol; Kabel ordentlich verlegen |
| Lieferumfang | Monitor, Montagehalterung, Kabel, Reinigungstuch, Bedienungsanleitung |
Häufig gestellte Fragen - TME-M006SE ALPINE
Benutzerfragen zu TME-M006SE ALPINE
0 Frage zu diesem Gerät. Beantworten Sie die, die Sie kennen, oder stellen Sie Ihre eigene.
Eine neue Frage zu diesem Gerät stellen
Laden Sie die Anleitung für Ihr Browser kostenlos im PDF-Format! Finden Sie Ihr Handbuch TME-M006SE - ALPINE und nehmen Sie Ihr elektronisches Gerät wieder in die Hand. Auf dieser Seite sind alle Dokumente veröffentlicht, die für die Verwendung Ihres Geräts notwendig sind. TME-M006SE von der Marke ALPINE.
BEDIENUNGSANLEITUNG TME-M006SE ALPINE
ALPINE®
SERIAL NUMBER / 系列號
INSTALLATION DATE / 安装日期
INSTALLATION TECHNICIAN / 安装技術員 PLACE OF PURCHASE / 購買地:____
ALPINE ELECTRONICS, INC.
Tokyo office: 1-1-8 Nishi Gotanda,
gawa-ku, Tokyo 141, Tel.: (03) 3494-1101
ALPINE ELECTRONICS OF AMERICA, INC.
5 Gramercy Place, Torra
California 90501, U.S.A. Tel: 1-800-ALPINE-1 (1-800-357-4631)
ALPINE ELECTRONICS OF CANADA, INC.
03, 7300 Warden Ave. Ma Ontario 12P 976 Canada
Ontario L3R 926, Canada Tel.: 1-800-ALPINE-1 (1-800-257-4631)
ALPINE ELECTRONICS OF AUSTRALIA PTY. LTD.
6-8 Fiveways Boulevarde Keysborough, Victoria 2173, Australia
Victoria 3173, Australia Tel : (03) 769-0000
ALPINE ELECTRONICS GMBH
Brandenburger Strasse 2-6 D-40880 Ratingen,
Germany
Tel.: 02102-45 50
ALPINE ITALIA S.p.A.
Via C. Colombo 8, 20090 Trezzano Sul
Naviglio MI, Italy
Tel.: 02-48 40 16 24
ALPINE ELECTRONICS FRANCE S.A.R.L.
(RCS PONTOISE B 338 101 280) 98. Rue De La Belle Etoile, Z J Paris Nord II
B.P. 50016 F-95945, Roissy,
Charles de Gaulle Cedex, France
Tel.: 01-48 63 89 89
ALPINE ELECTRONICS OF U. K., LTD.
13 Tanners Drive, Blakelands,
Milton Keynes MK14 5BU, U.K.
Tel.: 01908-61 15 56
ALPINE ELECTRONICS DE ESPAÑA, S.A.
ortal De Gamarra 36, Pabellón 32
01013 Vitoria (Alava) - Apdo. 133, Spain Tel: 34 45 283588
English
中文
■ OWNER'S MANUAL
- Please read this manual to maximize your enjoyment of the outstanding performance and feature capabilities of the equipment, then retain the manual for future reference.
Points to Observe for Safe Usage
- Read this manual carefully before starting operation and use this system safely. We cannot be responsible for problems resulting from failure to observe the instructions in this manual.
-
This manual uses various pictorial displays to show how to use this product safely and to avoid harm to yourself and others and damage to your property. Here is what these pictorial displays mean. Understanding them is important for reading this manual.
-
Meaning of displays
| Warning | This label is intended to alert the user to the presence of important operating instructions.Failure to heed the instructions will result in severe injury or death. |
| Caution | This label is intended to alert the user to the presence of important operating instructions.Failure to heed the instructions can result in injury or material damage. |
⚠ Warning
DO NOT DISASSEMBLE OR ALTER
Attempts to disassemble or alter may lead to accident, fire or electric shock.
KEEP SMALL ARTICLES OUT OF THE REACH OF CHILDREN
Store small articles (batteries, screws etc.) in places not accessible to children. If swallowed, consult a physician immediately.
USE ONLY IN CARS WITH A 12 VOLT NEGATIVE GROUND
Use only in cars with a 12 volts negative (−) ground. (Check with your dealer if you are not sure.) Failure to do so may result in fire, etc.
BEFORE WIRING, DISCONNECT THE CABLE FROM THE NEGATIVE BATTERY TERMINAL
Before doing any electrical wiring, disconnect the cable from the negative (−) terminal of the battery. Failure to do so may result in electric shock or injury due to electrical shorts.
KEEP ELECTRICAL CABLES TOGETHER TO AVOID OPERATING HAZARDS
Arrange wiring and cables in compliance with the installation manual to prevent obstructions when driving. Cables or wiring that obstructs or hangs up on places such as the steering wheel, gear lever, brake pedals can be extremely hazardous.
DO NOT CUT AWAY THE WIRE SHEATH AND USE POWER TO OTHER EQUIPMENT
Never cut away the cable shielding to use power to another piece of equipment. Doing so will exceed the current carrying capacity of the wire and result in fire or electric shock.
DO NOT INSTALL IN LOCATIONS WHICH MIGHT HINDER VEHICLE OPERATION
Do not install in locations which might create hazards for the vehicle occupants or hinder vehicle operation (such as the steering wheel or gear shift) by obstructing forward vision or hampering movement etc.
DO NOT DAMAGE PIPE OR WIRING WHEN DRILLING HOLES
When drilling holes in the chassis for installation, take precautions so as not to contact, damage or obstruct pipes, tanks or electrical wiring. Failure to take such precautions may result in fire.
DO NOT USE NUTS OR BOLTS IN THE BRAKE SYSTEM WHEN MAKING INSTALLATION OR GROUND CONNECTIONS
Never use safety-related parts such as bolts or nuts in the steering or brake systems or tanks to make wiring installations or ground connections. Using such parts could disable control of the vehicle and cause fire etc.
HALT USE IMMEDIATELY IF A PROBLEM APPEARS
When problems appear, stop using the system immediately and contact the dealer from whom you purchased the equipment. Some problems which may warrant immediate attention include a lack of sound, noxious odors or smoke being emitted from the unit, or foreign objects dropped inside the unit.
DO NOT OPERATE THE REMOTE CONTROL WHILE DRIVING
Do not change settings while driving. If operation requiring a prolonged view of the display is required, stop the vehicle in a safe location before attempting operation.
DO NOT INSTALL THE MONITOR NEAR THE PASSENGER SEAT AIR BAG
Ensure that the location chosen for the monitor does not interfere with the operation of the passenger seat air bag. This will prevent the triggered air bag from launching the display towards passengers, possible causing injury.
Caution
HAVE THE WIRING AND INSTALLATION DONE BY EXPERTS
The wiring and installation of this unit requires special technical skill and experience. To ensure safety, always contact the dealer where you purchased this unit to have the work done.
USE SPECIFIED ACCESSORY PARTS AND INSTALL THEM SECURELY Be sure to use only the specified accessory parts. Use of other than designated parts may damage this unit internally or may not securely install the unit in place as parts that come loose can create hazards.
DO NOT INSTALL IN LOCATIONS WITH HIGH MOISTURE OR DUST Avoid installing the unit in locations with high incidence of moisture or dust. Moisture or dust that penetrates into this unit may cause smoke or fire.
MAKE THE CORRECT CONNECTIONS
Failure to make the correct connections can cause fire or accident to occur.
ARRANGE THE WIRING SO IT IS NOT CRIMPED OR PINCHED
Route the cables and wiring so as not be crimped by moving parts like seat rail or make contact with sharp or pointed spots which might damage the wiring.
DO NOT RAISE THE VOLUME EXCESSIVELY
Keep the volume at a level where you can still hear outside noises while driving. Driving while unable to hear outside sounds could cause an accident.
DO NOT USE THIS EQUIPMENT OUTSIDE THE VEHICLE
Do not use this equipment for purposes other than those listed for a vehicle. Failure to do so may result in an electric shock or an injury.
■ 用戶説明書
- 使用前請二定閱讀本說明書以便能發揮機器的最大性能和特點,並妥為保存供將來參考。
遵守安全注意事項
- 在操作本系統之前請仔細閱讀本手冊,安全地使用本系統。我們對於不按照使用手冊的指示操作而造成的故障,概不負責。
本手冊使用不同的警告標誌以幫助用戶安全地使用本產品,避免對自己或他人造成傷害或經濟損失。以下是這些標誌的含義。瞭解這些含義,對於閱讀本手冊是很重要的。
標誌含義
| 警告 | 此標誌提醒用戶當前的操作指示非常重要。如果不按其操作,可能會造成重傷甚至死亡。 |
| 注意 | 此標誌提醒用戶當前的操作指示非常重要。如果不按其操作,可能會受傷或損壞設備。 |
警告
請勿進行拆卸或改裝
試圖進行拆卸或改裝可能造成事故、引起火災或受到電擊。
使兒童遠離小的零件
將小的零件(如電池、螺釘等)放在兒童拿不到的地方。如果兒童不慎將其吞下,請立即找醫生治療。
祇能在12V負極接地的汽車中使用
祇能在12V負極(-)接地的汽車中使用。(如果您不能確定,請銷售商檢查。)否則,會引起火災等事故。
進行接線前,斷開與電池終端負極接地的連線
在進行任何電氣接線前,斷開與電池終端負極(-)接地的連線。否則,可能會被電擊,或因電氣短路而受傷。
將電氣線整理好以避免操作危險
按照安裝手冊上的指示將電線整理好,以避免其妨礙駕駛。如果電線等放在或挂在方向盤、換檔桿或制動踏板上是非常危險的。
請勿切開電線的包皮將電源用於其它裝置
請勿切開電線的包皮將電源用於裝置的其它部分。這樣會超過電線的電流負載能力,引起火災或受到電擊。
請勿安裝在可能影響汽車操作的地方
請勿安裝在可能對乘客造成傷害或妨礙汽車駕駛操作(例如操作方向盤、換檔等)及前方視線的地方。
在鑽孔時請勿損傷管子或導線
當在底板上鑽安裝孔時,請注意不要接觸、損壞或妨礙管子、油箱或電線。否則會引起火災。
安裝或接地時請勿在制動系統上使用螺帽或螺釘
在連線或接地時請勿將安全部件如螺帽或螺釘等用於方向盤或制動系統或油箱。用這樣的零件會妨礙對汽車的控制或引起火災等。
當出現問題時,請立即停止使用
如果出現問題時,請立即停止使用,並馬上與您的銷售商取得聯繫,應該注意一些問題出現的前兆,包括沒有聲音、異常的氣味、裝置裡有煙冒出或外部的物體掉進裝置裡。
在駕駛時不要使用遙控器
當駕駛時,不要變換設置。如果顯示出需要延長操作時,請把車停在安全的位置,然後再進行操作。不要把音量開得過大
在駕駛汽車時,應使音量控制在能聽得到外面聲音的程度上。如果把音量開到聽不到外面的位置上可能會導致事故發生。
請勿將顯示器安裝在乘客座椅安全氣囊處
請將顯示器安裝在不致影響乘客座椅安全氣囊動作的地方。以防止在安全囊起動時顯示器向乘客飛出,可能造成的傷害。
注意
應由有經驗者連線或安裝
連線或安裝應由有專業技術和經驗的人來做。為確保安全,請讓您的銷售商來做。
請使用規定零件確實安裝好
確保祇使用規定零件。使用與設計不相符的零件會有可能損壞機器內部,也可能會由於其松動使裝置不穩定,造成危險。
請勿在濕度或灰塵大的地方安裝
避免安裝在高濕度或灰塵人的地方。濕氣或灰塵會進入系統,從而產生漂霧或引起火災。
正確連接
不正確連接會引起火災或其它事故。
整理好電線使其不被卷曲或被摺壓
正確合理布線使其不會被座椅軌道等運動部件卷曲或被尖頭物體損壞。
不要把音量開得過大
在駕駛汽車時,應使音量控制在能聽得到外面聲音的程度上。如果把音量開到聽不到外面的位置上可能會導致事故發生。
不要在汽車以外使用本裝置
不要在本使用說明書沒有列出的情況下使用系統。
否則會導致觸電或受傷
Installation
1
2
3
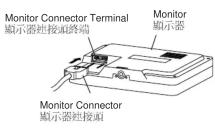
Remove the monitor from the mounting bracket. 從固定托架上拿下顯示器。
4
5
6
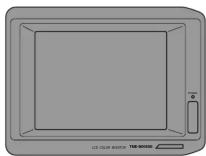
Monitor 顯示器
Screen Display ON/OFF Adjusting the Volume 屏幕顯示開/關 調
調節音量
flowchart
graph TD
    A["POWER STANDARD OFF 0"] --> B["Device"]
    C["POWER STANDARD OFF 2"] --> D["Device"]
    B --> E["Power Supply"]
    D --> F["Power Supply"]
1
Specifications
MONITOR
| Screen Size | 6-type |
| Display System | Low reflection rear projection type TN liquid crystal panel |
| Drive System | Active matrix drive, normally white display |
| Number of Picture Elements | 228, 480 pcs. (H:960 x V:238 dots) |
| Light Source | Internal optical system (U-type cold cathode fluorescent tube) |
| Luminance Selector | 2-step (luminance auto-selector built-in) |
| Speaker | 36mm dynamic speaker |
| Volume Control | Rotary volume |
| Dimensions (W x H x D) | 171 x 127 x 33mm |
| Weight | 510g |
規格
顯示器
| 屏幕尺寸 | 6厘 |
| 显示系数 | 低反射后面投影型TN液晶板 |
| 脚动系数 | 有效基膜脚动,一般为白色显示 |
| 象元数 | 228.48fps (11°960×V:238dots) |
| 光源 | 内部光系统(印刷冷极荧光管) |
| 亮度强控器 | 2步(内设亮度自动振控器) |
| 提醒器 | 9-36mm底动式提醒器 |
| 音量控制 | 旋转调节 |
| 尺寸(宽×高×力) | 171×127×33mm |
| 重量 | 510g |
Installing the Monitor
Caution:
If your vehicle has passenger side air bags, make sure the monitor is not mounted in an area where the air bag will be deployed.
1 Assemble the mounting bracket and temporarily mount the monitor.
Always use the TV mounting bracket supplied.
2 Carefully choose the installation location.
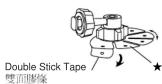
Select a location that is as flat as possible. Temporarily mount the unit there using double-stick tape.
Notes:
- Mounting hints
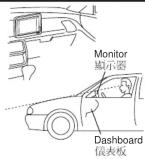
- Top of the monitor should not exceed the top of the dash-board when viewed from the drivers seat.
• The mounting surface should be strong and stable. - Position the monitor and viewing angle so it can be easily seen.
- Do not install this unit in a location that will obstruct the operation of any safety device (such as air bags or passive restraint systems).
- If the surface of the dash board is finished with other than plastic such as leather, wood, or cloth, damage may occur when the mounting bracket is removed.
3 Peel the protective paper from the double stick tape on the mounting bracket. Secure the bracket at the installation location.
Clean the installation location with the cleaner supplied.
- Warm the installation location with a dryer before putting the mounting
- Do not apply force or moisture for 24 hours after installation.
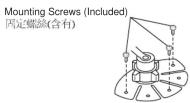
- If the bracket is not attached securely, mount the bracket with the screws provided.
- ★: If the mounting surface is curved, reform the base of the mounting bracket to match its shape.
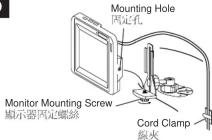
4 Connect the monitor
Insert the connector into the back of the monitor until a click is heard.
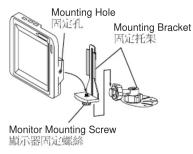
5 Mount the monitor on the mounting bracket.
Align the threaded hole on the bottom of the monitor to the mounting thumb-screw. Secure the monitor by rotating the thumbscrew.
Use the cord clamper to dress the cord to prevent possible entanglements.
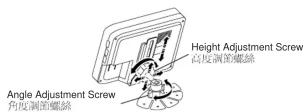
6 Adjust the height and angle of the monitor for the best viewing angle. Determine the height and angle. Tighten the height adjusting screw and the angle adjusting screw securely to fix the monitor.
Operations
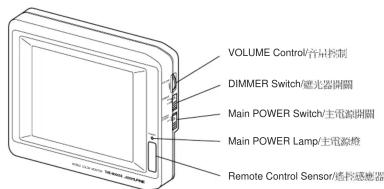
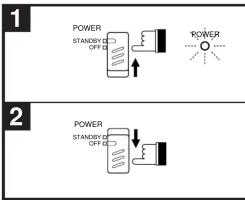
Screen Display ON/OFF
1 Set the Main POWER switch to the STAND-BY position. The main power lamp will illuminate.
2 When you have finished using the monitor, set the Main POWER switch to the OFF position. The main power lamp will turn off.
Notes:
- When you turn off the car's ignition switch, make sure the monitor's power is also turned off. If the monitor is left in the STAND-BY position, it will slowly drain the car's battery.
• On Screen Display
The operation contents will be displayed for 3 seconds.
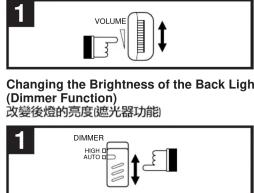
Adjusting the Volume
1 Rotate the VOLUME control UP to increase the volume and DOWN to decrease.
Changing the Brightness of the Back Light (Dimmer Function)
1 Setting the DIMMER switch.
HIGH : Maintains bright backlighting.
AUTO: Adjusts the brightness automatically, depending upon the vehicle's driving lights.
Headlights off = brighter
Headlights on = darker
Notes:
- Contents displayed on the screen may remain on the screen temporarily; this is a residual image effect peculiar to the LCD and not due to failure.
- The screen may lose contrast when used in cold temperature conditions.
Connections
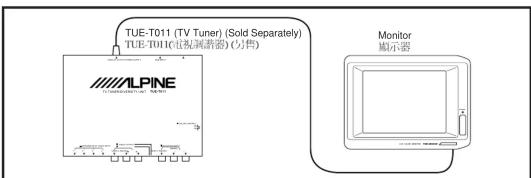
Connection with TV Tuner (TUE-T011) (Sold Separately)
- The unit can be operated with the remote controller attached with the TV Tuner. For details, refer to the Owner's Manual of the TV Tuner (TUE-T011).
In Case of Difficulty
If you encounter a problem, please review the items in the following check list. This guide will help you isolate the problem if the unit is at fault. Otherwise, make sure the rest of your system is properly connected or consult your authorized Alpine dealer.
| Symptom | Cause | Solution |
| No function or display. | Car's ignition is off. | Turn the ignition on. |
| Incorrect connections. | Check connection and remedy. | |
| Vehicle's battery is weak. | Check the voltage of vehicle's battery. | |
| Monitors power is Off. | Turn the monitor's power on. | |
| Unclear picture display. | Fluorescent tube is exhausted. | Replace the fluorescent tube.★ |
| No picture display. | Brightness control is set for minimum brightness control. | Adjust the monitor's brightness in the navigation system's set-up mode. |
| Navigation system's mode set incorrectly. | Switch to the correct mode using the navigation system's set-up remote control. | |
| Protective circuit is on because of high temperature. | Wait until the temperature inside the vehicle comes down to the operating temperature range (45°C). | |
| Incorrect or open connection with the Monitor. | Check the connection and remedy. | |
| Poor picture brightness. | Brightness control is not set to the proper positions. | Check the dimmer switch on the side of the monitor or adjust the brightness in the navigation system's set-up mode. |
| Spots or dotted lines/stripes appear. | Caused by neon signs, high-voltage power lines, CB transmit-ter, other vehicle's spark plugs, etc. | Change the location of your vehicle. |
★ The fluorescent tube replacement is not free of charge even within the warranty period, for the tube is an article of consumption.
安装
安裝顯示器
注意
如果您的汽車上有乘客側安全氣囊,請注意不要將顯示器安裝在安全氣囊動作時可能涉及的地方。
安装固定托架,暂固定显示器。
注意
請使用提供的電視固定托架。
小心選擇安裝位置。
悲量凝握平坦的位置。断时田雙面膠條將系統固定。
注意:
- 固定時注意事項
• 從司機座椅上看,顯示器的上端不應超出儀表板的頂端。
- 固定表面應堅固且穩定。
• 調整顯示器及其可視角度以使其易於看到。
- 清勿安裝在防礙安全設計動作的地方(如安全氣索或被動限位系統)。
如果儀表板使用塑料以外,如皮革、木材或布類等材料裝飾過,當卸下固定托架時將會有所損壞。
3 取下安裝托架上的雙面膠條的保護紙。確實將托架固定在安裝位置處。使用提供的清潔劑清潔安裝處。
注意:
• 在固定托架前用吹風機加熱安裝位置。
• 在安裝后的24小時內請勿對其施力或將其暴露於水份中。
如果托架沒有確實安裝好,請用裝備的螺絲固定。
• ★:如果固定表面變曲,請調整固定托架基體。
4 連接顯示器
將連接頭插入顯示器后部,直至聽到“喀嗒”聲。
5 將顯示器固定在固定托架上
將顯示器底部的穿引孔與固定與形螺絲對齊。轉動與形螺絲以固定顯示器。用線夾整理線以免其纏繞在一起。
6 調整顯示器高度及角度以獲得最好視角
確定高度及角度。緊固高度調節螺絲及角度調節螺絲,以確實固定顯示器。
操作
屏幕顯示打開/關閉
1 將主電源(Main POWER)設定到STAND-BY位置。主電源燈將亮。
2 顯示器使用后,將Main POWER設定到OFF位置。主電源燈將熄滅。
注意 • 當您關汽車點火開關時,請確認顯示器電源也已關閉。如果顯示器保留在 STAND-BY 位置,它將消耗電瓶電力。
- 屏幕顯示
操作內容顯示3秒鐘。
調整音量
1 轉動VOLUM(音量)鈕,向上為增大音量,向下為減小音量。
改變後燈的亮度(遮光器功能)
1 設定激光器開關
IIIGII:保持明亮背后照明。
AUTO:自動調節照明度,根據汽車駕駛燈。
前大燈圖=亮
前大燈開=暗
注意:
- 屏幕上的顯示內容可能會暫時殘留:這是液晶顯示的特殊的圖象效果,而並非故障。
• 當在寒冷的條件下,屏幕會失去反差。
連接
連接到電視調諧器(TUE-T011)(另售)。
- 系統可以用連接在電視調谐器的遙控器操作。詳細內容請參考電視調谐器用戶手冊(TUE-T011)。
在遇到問題時
當您遇到問題時,請參考下面的檢查項目。下面的指導可幫助您在系統故障時解決問題。並檢查其它處是否連接良好,或與Alpine銷售商聯系。
| 現象 | 原因 | 處理方法 |
| 沒有功能或顯示 | 汽車未點火。 | 打印點火開鎖。 |
| 連接不正確。 | 檢查座接,並與以糾正。 | |
| 汽車電瓶電力不足。 | 檢查汽車電瓶電壓。 | |
| 顯示器開鎖罰。 | 打印顯示器電源。 | |
| 回像不清確 | 吸光管故障。 | 互換吸光管 ★★ |
| 沒有回象顯示 | 亮度控制設定到最小。 | 在导航系統設定模式下調整顯示器亮度。 |
| 导航系統模式設定不正確。 | 使用导航系統設定路控設定到正確模式。 | |
| 由於高溫保護電路工作。 | 等待車內溫度降到操作溫度范圍內(45°C)。 | |
| 顯示器連接不正確或未連接。 | 檢查連接,並與以糾正。 | |
| 回象暗 | 亮度控制未設定到正確位置。 | 檢查顯示器開路的巡光開鎖,或在导航系統設定模式下調節亮度。 |
| 完整或座線出現 | 由霓虹信號、高經線、CB發送器及汽車火花塞等。 | 改變汽車位置。 |
★ 即使在保修期内,荧光管也並非免費更換,因為它是消耗品。