LCP192UV 150.664 - Machine à effets lumineux BeamZ - Kostenlose Bedienungsanleitung
Finden Sie kostenlos die Bedienungsanleitung des Geräts LCP192UV 150.664 BeamZ als PDF.

Benutzerfragen zu LCP192UV 150.664 BeamZ
0 Frage zu diesem Gerät. Beantworten Sie die, die Sie kennen, oder stellen Sie Ihre eigene.
Eine neue Frage zu diesem Gerät stellen
Laden Sie die Anleitung für Ihr Machine à effets lumineux kostenlos im PDF-Format! Finden Sie Ihr Handbuch LCP192UV 150.664 - BeamZ und nehmen Sie Ihr elektronisches Gerät wieder in die Hand. Auf dieser Seite sind alle Dokumente veröffentlicht, die für die Verwendung Ihres Geräts notwendig sind. LCP192UV 150.664 von der Marke BeamZ.
BEDIENUNGSANLEITUNG LCP192UV 150.664 BeamZ
Ref. Nr. 150.664
natural_image
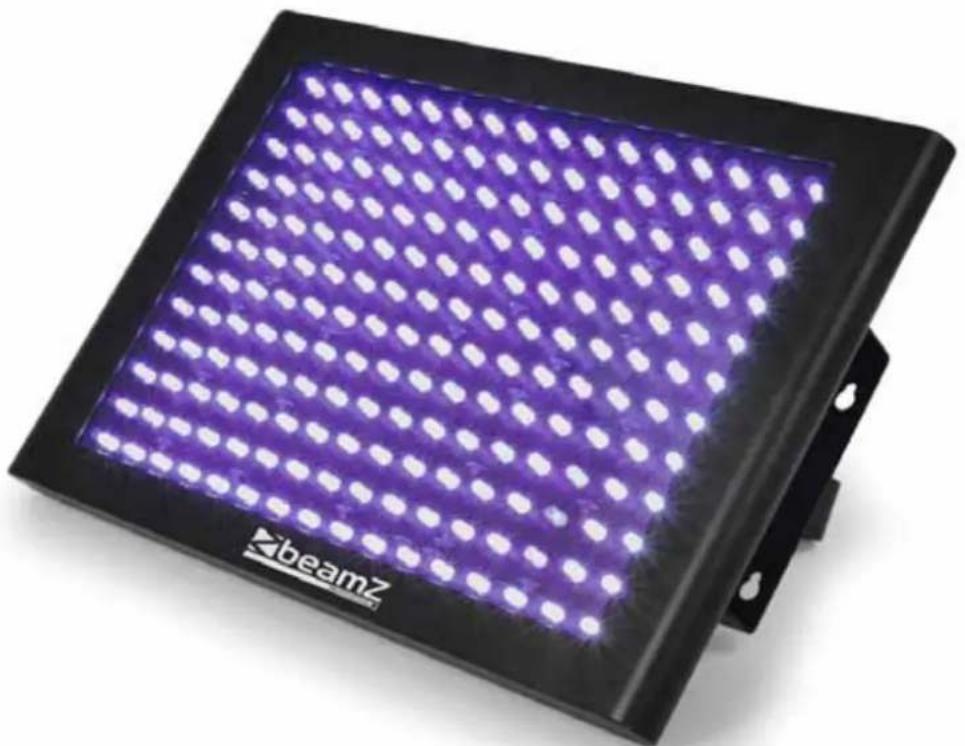
Close-up of a purple LED array mounted on a black square base, labeled 'beamZ' in the corner (no other text or symbols visible)LCP-192UV LED PANEL UV 192X 5MM
MANUAL
Thank you for purchasing our company products. Please read these instructions carefully to enjoy optimum performance and a longer service life before you start to use.
CONTENTS
CONTENTS....2
Unpacking Inspections .... 3
Unpacking instructions .... 3
Checking the contents of the carton:....3
Safety Instructions....3
Product Overview 4
Functions Introductions ...... 4
Main Functions .... 4
Operation Instructions .... 5
Power supply connecting....5
Power supply by storage battery 5
Master/Slave mode....5
Master/Slave connection 6
Sound Active Mode 6
Automatic Mode....6
DIP switch setup....6
DMX controllable 6
DMX Value Functions 3 CH....7
Value setup manual....7
Diagram of value setup....7
Setting DMX address by Dip switch 8
Maintenance 9
Specification 9
CE & R&TTE Declaration of Conformity....11
UNPACKING INSPECTIONS
Unpacking instructions
- Please unpack the carton and check the goods carefully when you receive it, if discover packing damage, shortage or quality problem, please notify the shipper and reject the goods.
- Before using this product, please read the instructions carefully and keep it in a safe place for future reference.
Checking the contents of the carton:
The product, Power cord, Instruction Manual

SAFETY INSTRUCTIONS
- Safety and regulatory power socket with high quality output should be used.
• Always connect the product to a grounded circuit to avoid the risk of electrocution. - Never put tiny metal objects such as a screwdriver, iron wire and coins, etc. into the internal or stretch into the machine in case of short circuit.
- Please make sure to connect the proper voltage and do not higher or lower than that stated on the decal or rear panel of the product.
- Avoid hitting, crashing or squeezing with other objects in transportation. Never carry the product from the power cord or any moving part. Always use the hanging / mounting bracket or the handles.
• The product is used in door only. - Never pull or tug on the cord and change it for another one, stop using it when it is damaged or becomes hot.
- Stop using the product once there is sparks when connecting with the power plug.
• Can not operate product with wet hands and never place it near the water or other liquid. - Make sure there are no flammable materials close to the fixture while operating. Always install it in a location with adequate ventilation.
- Never replace the lighting source with different specification and rating when the original one is damaged.
• Make sure to power off before replacing the light source or the fuse. Never do it while it is on.
• The ambient temperature is no more than 40^ C( 104^ F). - Never clean the fixture by water, thinner or other dissolved agent.
- Stop using the product in case of a serious operating problem and send it to our maintenance agent immediately. Never repair by non-professional workers.
- Avoid direct eye exposure to the light source while the product is on.
PRODUCT OVERVIEW

text_image
Diagram of a computer ventilation panel with labeled ports and connectors- Power output
- Power input
- DMX Dip switch
- Signal indicator LED
- Power indicator LED
-
Sound sensitivity adjustment
-
DMX signal output
- DMX signal input
- Four pin DC connector
- Safety Eyebolt
- Hanging bracket
- LEDs
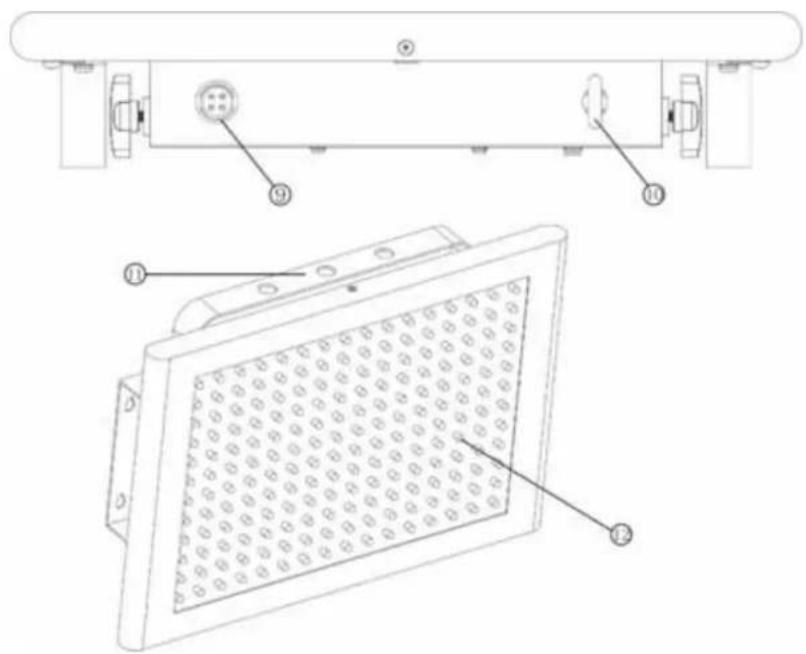
text_image
Technical diagram showing labeled components of a device panel with numbered parts and grid patternFUNCTIONS INTRODUCTIONS
Main Functions
• 3 DMX channels
• Automatic, sound active and master/slave mode
• Eight strobe speed effects by DIP switch, brightness and strobe speed can be adjusted
• Built-in automatic display, static color, dimmer and strobe functions
Operation Instructions
Power supply connecting
Two sockets in the product, Power In and Power Out , the product can be supplied power by the power out. Maximum output power of the socket is 600W .
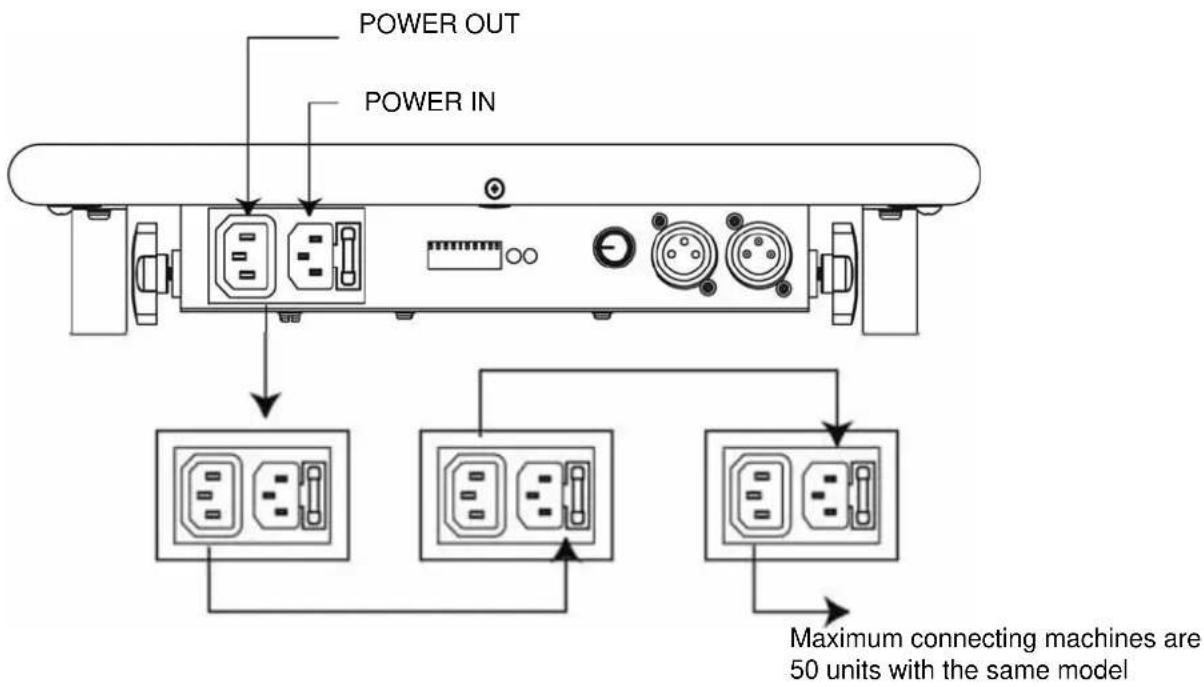
text_image
POWER OUT POWER IN Maximum connecting machines are 50 units with the same modelPower supply by storage battery
The storage batteries Wi-Powerhouse provide DC 12V, can be connected through four-pin Airline Terminal without other power supply, when plug power 100-240V AC, the Wi-Powerhouse will stop supplying power.
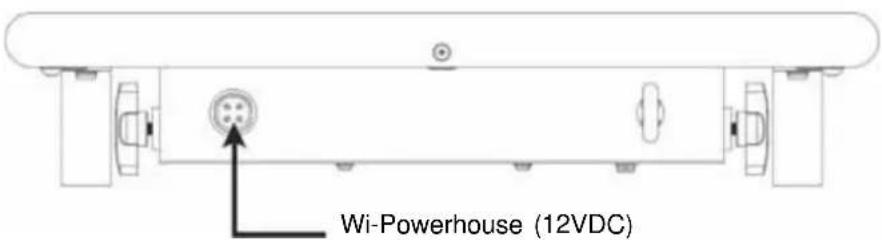
text_image
Wi-Powerhouse (12VDC)Master/Slave mode
The first unit is master without signal of DMX, the others connected are slave units and follow the actions of Master.
Master/Slave connection

text_image
Master Slave Slave ContinueSound Active Mode
In this mode, DIP 9 is on without DMX or master signal. When many fixtures are connected, the first one acts as master, others connected are slaves and follow the actions of master.
Automatic Mode
In this mode, DIP 10 is on without DMX or master signal. When many fixtures are connected, the first one acts as master, others connected are slaves and follow the actions of master.
DIP switch setup
| Mode | DIP | Switch |
| Sound Active Mode 9= ON, 1-8, | 10 = OFF | |
| Automatic Mode 10= ON, 1-9 = | OFF |
Function setup by Dip switch without DMX signal.
DIP1-8 Strobe (slow to fast
DIP9 Sound active
DIP10 Automatic display
DMX controllable
With three channels, automatic display, sound activated and strobe functions can be controlled by DMX. Speed of strobe and automatic display can be adjusted, LED brightness can also be adjusted.
| CHANNEL | VALUE FUNCTION CH 2 | CH 3 | ||
| 1 | 000 – 039 | Strobe | 0 – 19 No strobe10 – 255 Strobe slow-fast | Dimmer0 – 255100% - 0% |
| 040 – 079 | Mode 1 | Speed0 – 255slow - fast | ||
| 080 – 119 | Mode 2 | |||
| 120 – 159 | Mode 3 | |||
| 160 – 199 | Mode 4 | |||
| 200 – 239 | Mode 5 | |||
| 240 – 255 | Sound No function | |||
Value setup manual
Each one needs to setup DMX value when multiple fixtures are connected in the mode of DMX512, data of the channels can be read by the value. With three DMX channels is the value setup for the first 001, 004 for the second one and 007 for the third one.
Diagram of value setup
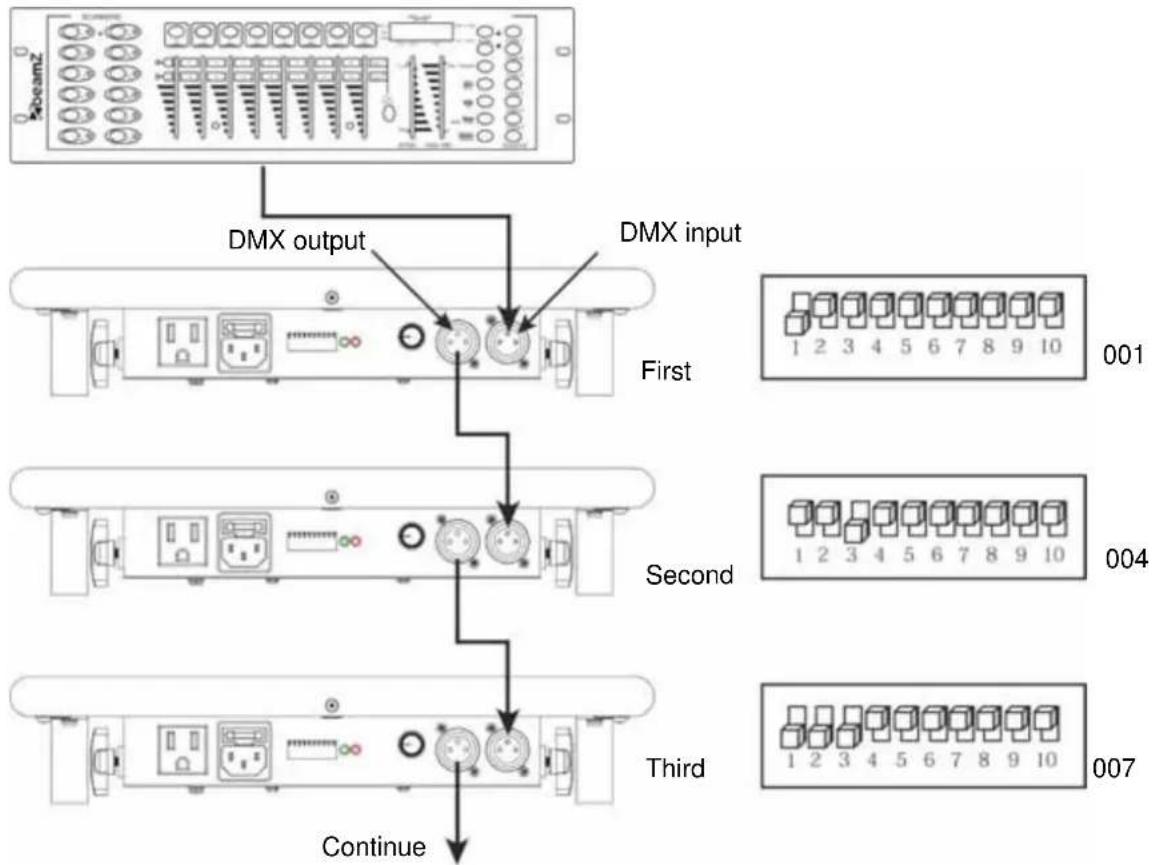
text_image
DMX output DMX input First Second Third ContinueSetting DMX address by Dip switch
The number of channels determines the starting address of each fixture. For example, there are two fixtures with 6 channels and two fixtures with four channels, if the address of two fixtures with 6 channels is ahead of the others, the address of the four fixtures will be 1, 7, 13, 17 separately. If the address of two fixtures with 4 channels is ahead of the others, the address of the four fixtures will be 1, 5, 9, 15 separately.
Address is only set by DIP1 to DIP9 and DIP10 is not be used.
| DIP | Addressing |
| 1 | 1 |
| 2 | 2 |
| 3 | 4 |
| 4 | 8 |
| 5 | 16 |
| 6 | 32 |
| 7 | 64 |
| 8 | 128 |
| 9 | 256 |
Determining which switches to toggle ON given a specific desired address or value can be accomplished in the following manner. By subtracting the largest switch value possible from the selected start address which does not cause a negative number. For example, if you need to set the starting address of a fixture as 43, firstly put DIP6 (32) on, DIP4 (8) on, and then put DIP2 (2), at last DIP1 (1). Adding the value of each switch in the ON position will provide the final address, which is 32 + 8 + 2 + 1 = 43 .
Example address is shown as below:
| DMX address | DIP on Value for DIP switch Diagram | ||
| 10 | DIP 4 | 8 | 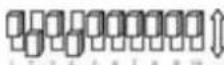 ON ON |
| DIP 2 | 2 (8+2 = 10) | ||
| 24 | DIP 5 | 16 |  ON ON |
| DIP 4 | 8 (16+8 = 24) | ||
| 233 | DIP 8 | 128 |  ON ON |
| DIP 7 | 64 | ||
| DIP 6 | 32 | ||
| DIP 4 | 8 | ||
| DIP 1 | 1 (128+64+32+8+1 =233) | ||
DMX address can be set from 1 to 512 as above.
MAINTENANCE
The unit should be cleaned periodically to ensure the optimum performance, the smudginess can decrease the life of light and the output of light is affected by the dust which can make the machine overheating. In general, make the maintenance at least two times a month. Be sure to power off the unit before cleaning.
Do not clean until the unit recovers normal temperature since high temperature for using, use the lens tissue or soft cotton cloth with alcohol to wipe gently.
Cleaning frequency depends on the environment in which the fixture operates, damp, smoky or dirty surrounding can cause greater accumulation of dirt on the optics. Never rub or press strongly on the panel.
SPECIFICATION
Voltage 100-240V AC 50/60Hz
Input current 0.1A
Power 12W
Fuse....2A250V
Light source 192x 5mm UV LEDs
Weight 2.5kg
Size.....L356 x W70 x H240mm

natural_image
Blue glossy circular icon with a stylized white 't' shape (no text or symbols)tronios
Sound & Light
CE & R&TTE DECLARATION OF CONFORMITY
Importer:
TRONIOS
BV
Bedrijvenpark Twente 415
7602 KM - ALMELO
Tel :
0031546589299
Fax : 0031546589298
The Netherlands
Product number: 150.664
Product Description: Beamz,
LCP-192UV LED Panel UV 192x5mm
Regulatory Requirement: EN 60598-1/-2-17:2009
EN 62031:2008
EN 61347-2-13:2007
EN 62479:2010
EN 55015:2006/A2:2009
EN61547:2009
The product meets the requirements stated in the above mentioned Standards. This certificate does not cover the aspects that may be relevant such as performance and fitness for purpose.
Almelo,
10-03-2012
Signature:

text_image
Handwritten signature or scribble on white background, possibly a signature or artistic markSpecifications and design are subject to change without prior notice..
www.tronios.com
Copyright © 2013 by TRONIOS the Netherlands