LU-TPR-150CR - Audio-/Videoverlängerung PureLink - Kostenlose Bedienungsanleitung
Finden Sie kostenlos die Bedienungsanleitung des Geräts LU-TPR-150CR PureLink als PDF.

| Produkttyp | Audio-/Videoverlängerung (HDMI-Extender) |
| Modell | LU-TPR-150CR |
| Marke | PureLink |
| Übertragungsreichweite | Bis zu 150 m (über CAT6-Kabel) |
| Videoauflösung | Bis zu 4K@60Hz (3840x2160) |
| Audiounterstützung | Stereo-Audio, integriert in HDMI |
| HDCP-Kompatibilität | HDCP 2.2 und 1.4 |
| Anschlüsse Sender | 1x HDMI-Eingang, 1x RJ45-Ausgang |
| Anschlüsse Empfänger | 1x RJ45-Eingang, 1x HDMI-Ausgang |
| Stromversorgung | 5 V DC, 1 A (Netzteil im Lieferumfang) |
| Leistungsaufnahme | Ca. 2,5 W pro Gerät |
| Abmessungen (ca.) | Sender: 100 x 70 x 25 mm, Empfänger: 100 x 70 x 25 mm |
| Gewicht (ca.) | Sender: 200 g, Empfänger: 200 g |
| Gehäusematerial | Metall (Aluminium) |
| Betriebstemperatur | 0 °C bis 40 °C |
| Lagertemperatur | -20 °C bis 60 °C |
| LED-Anzeigen | Strom, HDCP, Übertragungsstatus |
| Plug & Play | Ja, keine Treiberinstallation erforderlich |
| Unterstützte Kabel | CAT5e/6/7 |
| Wartung | Gehäuse mit trockenem Tuch reinigen; keine internen Teile |
| Sicherheitshinweise | Vor Feuchtigkeit schützen; nur im Innenbereich verwenden |
| Ersatzteile / Reparatur | Keine vom Benutzer austauschbaren Teile; Service durch Fachpersonal |
| Zertifizierungen | CE, RoHS |
| Lieferumfang | Sender, Empfänger, 2x Netzteil, Bedienungsanleitung |
Häufig gestellte Fragen - LU-TPR-150CR PureLink
Benutzerfragen zu LU-TPR-150CR PureLink
0 Frage zu diesem Gerät. Beantworten Sie die, die Sie kennen, oder stellen Sie Ihre eigene.
Eine neue Frage zu diesem Gerät stellen
Laden Sie die Anleitung für Ihr Audio-/Videoverlängerung kostenlos im PDF-Format! Finden Sie Ihr Handbuch LU-TPR-150CR - PureLink und nehmen Sie Ihr elektronisches Gerät wieder in die Hand. Auf dieser Seite sind alle Dokumente veröffentlicht, die für die Verwendung Ihres Geräts notwendig sind. LU-TPR-150CR von der Marke PureLink.
BEDIENUNGSANLEITUNG LU-TPR-150CR PureLink
Thank you for purchasing the Luxi Electronics® Presenter product. Please read through this manual before using the product.
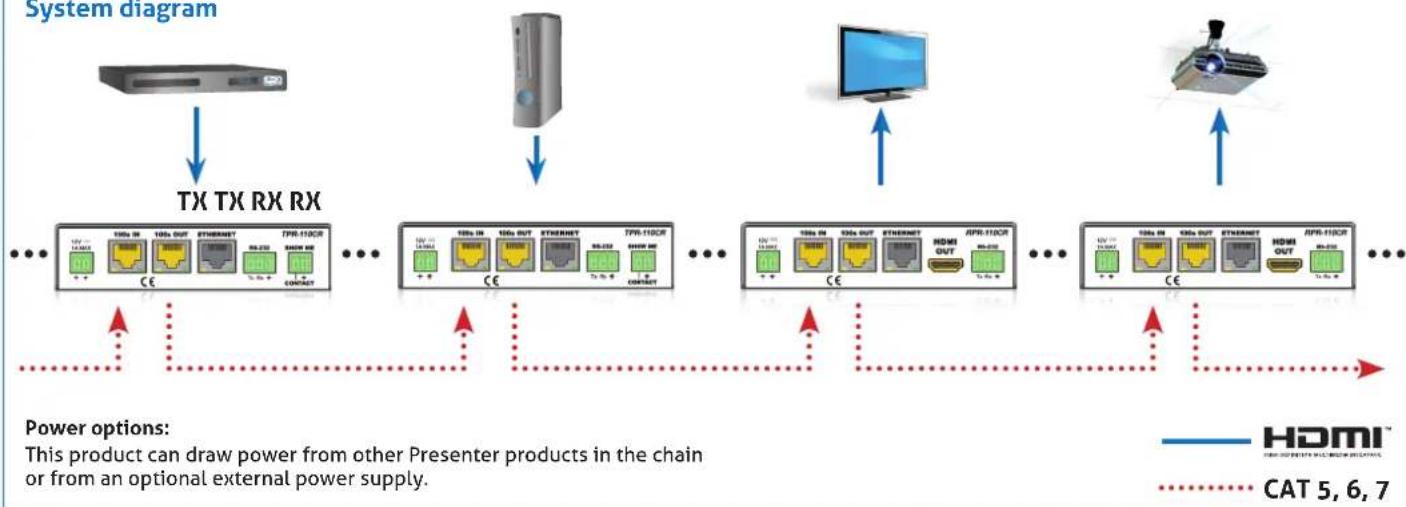
How the product functions: Think of the daisy chain as the flow of a river; each transmitter (Tx) connects to a source device and loads the signal to the river flow; each receiver (Rx) unloads the signal from the river flow and sends it to the display it is connected to. The front panel and the RS-232 controls determine which source signal goes to which display.
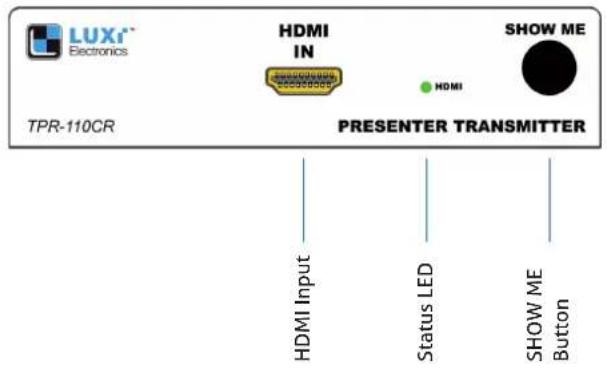
Transmitter - front view
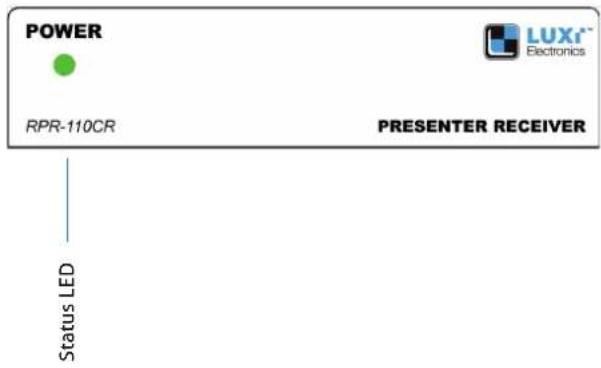
Receiver - front view
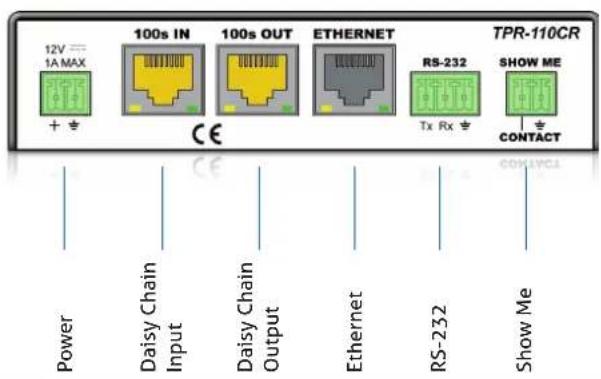
Transmitter - rear view
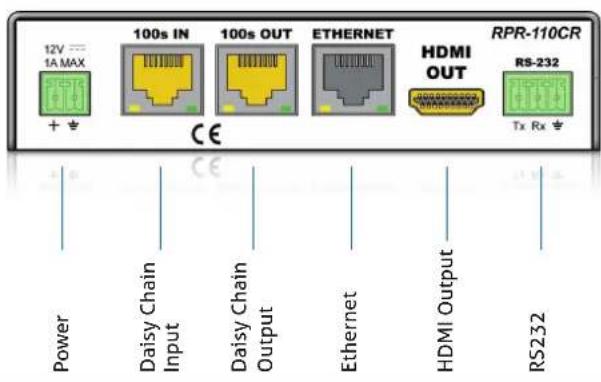
Receiver - rear view
System diagram
flowchart
graph TD
    A["Hardware"] -->|TX TX RX RX| B["PCI"]
    B --> C["TX RX RX"]
    C --> D["PCI"]
    D --> E["TX RX RX"]
    E --> F["PCI"]
    F --> G["TX RX RX"]
    G --> H["PCI"]
    H --> I["TX RX RX"]
    I --> J["PCI"]
    J --> K["TX RX RX"]
    K --> L["PCI"]
    L --> M["TX RX RX"]
    M --> N["PCI"]
    N --> O["TX RX RX"]
    O --> P["PCI"]
    P --> Q["TX RX RX"]
    Q --> R["PCI"]
    R --> S["TX RX RX"]
    S --> T["PCI"]
    T --> U["TX RX RX"]
    U --> V["PCI"]
    V --> W["TX RX RX"]
    W --> X["PCI"]
    X --> Y["TX RX RX"]
    Y --> Z["PCI"]
    Z --> AA["TX RX RX"]
    AA --> AB["PCI"]
    AB --> AC["TX RX RX"]
    AC --> AD["PCI"]
    AD --> AE["TX RX RX"]
    AE --> AF["PCI"]
    AF --> AG["TX RX RX"]
    AG --> AH["PCI"]
    AH --> AI["TX RX RX"]
    AI --> AJ["PCI"]
    AJ --> AK["TX RX RX"]
    AK --> AL["PCI"]
    AL --> AM["TX RX RX"]
    AM --> AN["PCI"]
    AN --> AO["TX RX RX"]
    AO --> AP["PCI"]
    AP --> AQ["TX RX RX"]
    AQ --> AR["PCI"]
    AR --> AS["TX RX RX"]
    AS --> AT["PCI"]
    AT --> AU["TX RX RX"]
    AU --> AV["PCI"]
    AV --> AW["TX RX RX"]
    AW --> AX["PCI"]
    AX --> AY["TX RX RX"]
    AY --> AZ["PCI"]
    AZ --> BA["TX RX RX"]
    BA --> BB["PCI"]
    BB --> BC["TX RX RX"]
    BC --> BD["PCI"]
    BD --> BE["TX RX RX"]
    BE --> BF["PCI"]
    BF --> BG["TX RX RX"]
    BG --> BH["PCI"]
    BH --> BI["TX RX RX"]
    BI --> BJ["PCI"]
    BJ --> BK["TX RX RX"]
    BK --> BL["PCI"]
    BL --> BM["TX RX RX"]
    BM --> BN["PCI"]
    BN --> BO["TX RX RX"]
    BO --> BP["PCI"]
    BP --> BQ["TX RX RX"]
    BQ --> BR["PCI"]
    BR --> BS["TX RX RX"]
    BS --> BT["PCI"]
    BT --> BU["TX RX RX"]
    BU --> BV["PCI"]
    BV --> BW["TX RX RX"]
    BW --> BX["PCI"]
    BX --> BY["TX RX RX"]
    BY --> BZ["PCI"]
    BZ --> CA["TX RX RX"]
    CA --> CB["PCI"]
    CB --> CC["TX RX RX"]
    CC --> CD["PCI"]
    CD --> CE["TX RX RX"]
    CE --> CF["PCI"]
    CF --> CG["TX RX RX"]
    CG --> CH["PCI"]
    CH --> CI["TX RX RX"]
    CI --> CJ["PCI"]
    CJ --> CK["TX RX RX"]
Captive screw plug termination Captive screw plug termination

The captive screw plugs for power, RS-232 and contact controls are supplied with the unit. Separate the wires about 2.5 cm long; strip off the wire insulation precisely 5 mm from the end.

natural_image
3D illustration of a green mechanical component with a black handle and blue spiral motion indicator (no text or symbols)Identify the positive and negative leads for power; Luxi power supply has a white stripe on the positive wire. If not sure, use a multi meter to verify.
Ethernet port Front panel LED
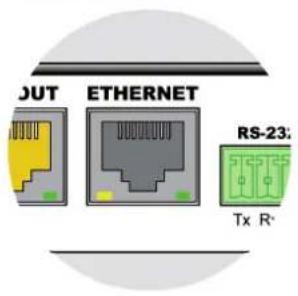
For providing a system wide internet access. Be very careful NOT to plug the Ethernet cable into the yellow 100s connector or vice versa! Permanent damage may occur.

This Presenter is selected.

This Presenter is not selected.

Communication error.
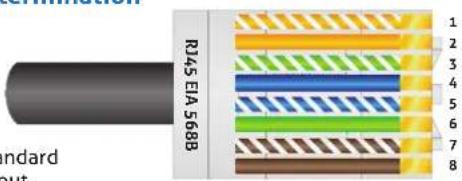
RJ45 plug termination
TRANSMITTER control options RECEIVER control options

Pressing the "Show Me" button on the front panel will select the source connected to this Tx unit; all displays will show the same content from this Tx box. An external button can be connected to the "Show Me" port on the rear panel. A RS-232 host connected to the rear panel can control all functions of every unit in the chain. Make sure both DIP switches recessed on the bottom side are in the down (off) position.

A RS-232 host connected to the rear panel can control all functions of every unit in the chain. Make sure both DIP switches recessed on the bottom side are in the down (off) position.
Minimum system Support
One Tx and one Rx connected with a short Cat6 cable. Use the minimum system to test all devices and cables to be used in bigger systems first in order to isolate any potential problems.
Please contact your reseller directly for local support. See PureLink website for RS-232 commands and user manuals.