Daily Collection HD4921 - Herd PHILIPS - Kostenlose Bedienungsanleitung
Finden Sie kostenlos die Bedienungsanleitung des Geräts Daily Collection HD4921 PHILIPS als PDF.

| Produkttyp | Induktionskochfeld |
| Modell | Daily Collection HD4921 |
| Marke | Philips |
| Abmessungen (B x T x H) | ca. 33 x 40 x 6 cm |
| Gewicht | ca. 2,5 kg |
| Leistung | 2000 W |
| Spannung | 220-240 V, 50/60 Hz |
| Anzahl Kochzonen | 1 |
| Kochzonendurchmesser | ca. 20 cm |
| Bedienung | Touch-Sensor |
| Funktionen | Temperaturregelung, Timer, Kindersicherung, Abschaltautomatik |
| Kochfläche | Glaskeramik |
| Reinigung | Mit feuchtem Tuch und mildem Reinigungsmittel abwischen |
| Sicherheit | Überhitzungsschutz, Topferkennung, Restwärmeanzeige |
| Energieeffizienzklasse | A |
| Lieferumfang | Induktionskochfeld, Bedienungsanleitung |
| Gehäusematerial | Kunststoff, Edelstahl |
| Reparierbarkeit | Ersatzteile über Philips Kundendienst verfügbar |
Häufig gestellte Fragen - Daily Collection HD4921 PHILIPS
Benutzerfragen zu Daily Collection HD4921 PHILIPS
0 Frage zu diesem Gerät. Beantworten Sie die, die Sie kennen, oder stellen Sie Ihre eigene.
Eine neue Frage zu diesem Gerät stellen
Laden Sie die Anleitung für Ihr Herd kostenlos im PDF-Format! Finden Sie Ihr Handbuch Daily Collection HD4921 - PHILIPS und nehmen Sie Ihr elektronisches Gerät wieder in die Hand. Auf dieser Seite sind alle Dokumente veröffentlicht, die für die Verwendung Ihres Geräts notwendig sind. Daily Collection HD4921 von der Marke PHILIPS.
BEDIENUNGSANLEITUNG Daily Collection HD4921 PHILIPS
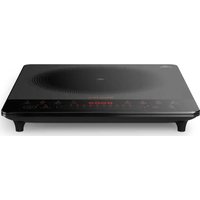
natural_image
Black electronic appliance with indicator lights and a central screen (no visible text or symbols)EN User manual
VI Hương dẫn sử dụng
MS-MY Manual pengguna
ZH-HK 使用手网
PHILIPS

All registered and unregistered trademarks are
property of their respective owners.
© 2012 Koninklijke Philips Electronics N.V.
All rights reserved.
HD4921 ASEAN UM V1.0

English
1 Your induction cooker
Congratulations on your purchase and welcome to Philips. To fully benefit from the support that Philips offers, register your product at www.philips.com/welcome.
2 What's in the box
nousion copper main unit
Important Information Realis. Warranty card
1c.
Use Mar-03
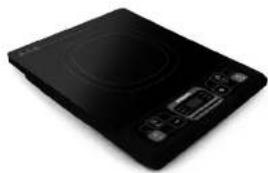
Overview
| 1 | Cooking plate | 4 | Control panel |
| 5 | Cooking zone | 5 | Air outlet |
| 3 | Air net | 6 | Power cord |
Controls overview
| 2 | Menu button | 10 | Water indicator |
| 3 | Hot pot indicator | 16 | Timer button |
| 4 | Steam indicator | 16 | On/Off button |
| 5 | Brake indicator | 16 | Increase button |
| 6 | Screen | 16 | Cooking power and temperature |
| 7 | Soup indicator | 18 | Decrease button |
| 8 | Roast indicator | 18 | Try button |
3 Before first use
Remove all packaging materials from the induction cooker
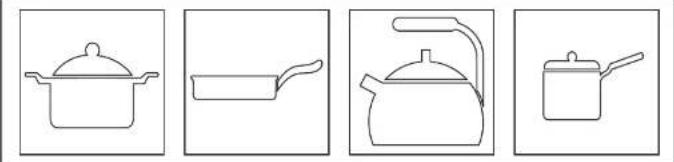
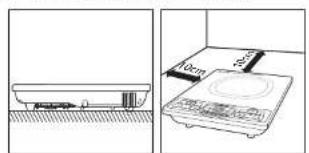
Preparing for use
- Place the appliance on a dry, stable and level surface.
- Make sure there is at least 10cm free space around the appliance to prevent overreaction.
3 Always place the cookware on the cooking zone during cooking.
4 Make sure you use cooware of the correct types and sizes (see the tabre below).
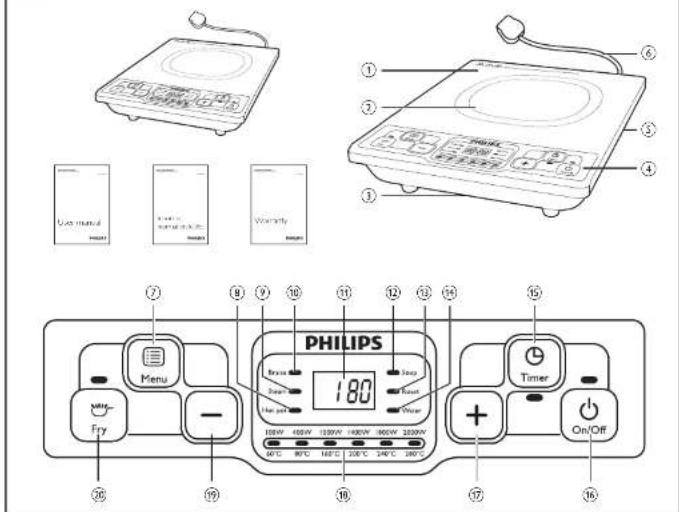
Recommended types and sizes of cookware
| Material | Cookware with a bottom made of iron or magnetic stainless steel |
| Shape | Cookware with a flat bottom |
| Sire | Cookware with a bottom diameter of 10.73cm, depending on the cooking mode |
4 Using the induction cooker
There are several cooking modes: Fry (→), Roise (Brass), Hot pot (Hotpot), Soup (Soup), Roast (Roast), Water (Water) and Steam (Steam).
1 Follow the steps in "Preparing for use"
2. Press the On/OF button ( ◊ ), the On/OF indicator lights up

Overview Tóng quan
Gambaran keseluruhan 老寶

Recommended types and sizes of cookware. Các loại và kích công dụng cụ nâu khuyến dùng
Jenis dan saiz alat memasak yang disarankan 設識的廚具種類和大小
natural_image
Four line drawings of cooking pots: a pot, a pan, a kettle, and a pot (no text or symbols)
Using the induction cooker Menggunakan periuk aruhan
Sử dung bêp từ
使用电磁道

flowchart
graph LR
    A["On/Off"] --> B["Menu"]
    B --> C["Brasve"]
    B --> D["Sawn"]
    B --> E["Hot pot"]
    B --> F["Water"]
    B --> G["Fry"]
    G --> H["100W 400W 1000W 1400W 1800W 2000W 60°C 80°C 160°C 200°C 240°C 280°C"]
    H --> I["-"]
    I --> J["+"]
    J --> K["On/Off"]
3 Press the Iry button (☐) to stock with Iry mode. Press the Menu button repeatedly (☐) to choose the other cooking modes. The corresponding indicator lights up and the induction cooker starts working in the selected cooking mode.
4 When the rocking is finished, press the On/O button ( ) to switch off the appliance.
5. Unplug the reaction cover after the fan stops working

Note
- During cooking you can change the power level by pressing the increase (+) or Decrease (−) buton. - In Water (Water), Soup (Soup) and Steam (Steam) moves the cooking power automatically changes for better cooking result.
Cooking time and power
Refer to below table for the cooking time and power of different cooking modes
| Cooking mode | Default cooking time (minutes) | Default cooking power | Power adjusting range |
| Fry ( °C ) | 120 | 100KW | 100-1000W |
| Brize (°Branx ) | 120 | 100KW | 100-1000W |
| I eat out (°Branx ) | 120 | 100KW | 100-2000W |
| Soup (°Sop ) | 160 | 100KW | 100-2000W |
| Roast (°Rasm ) | 170 | 100KW | 100-1000W |
| Water (°Water ) | 20 | 100KW | 100-2000W |
| Sport (°Stear ) | 60 | 100KW | 100-2000W |
Using the timer
You can use the timer button to decide how much time you want the appliance to work at different cooking modes (not applicable in Water (Water) mode).
1 Follow the steps in "Preparing for use"
2. Press the On/OFF ( ◊ ) button, the On/OFF ( ◊ ) indicator lights up.
3. Choose the desired cooking mode.
4 Press the timer buffer [ ④ ] and the timer indicator is its up.
5 Press the Increase (+) or Decrease (−) button to adjust the line.
6. When the time has elapsed, the injection converges off automatically.

Note
- After you have selected a new ranking time wait for a few seconds before the instruction center automatically confirms it. - After the time a set you can press the Timer button (③) again to cancel the timer.
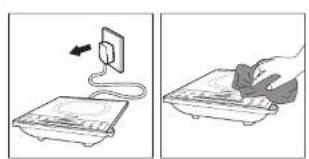
5 Cleaning
Unplug the appliance after the fan stops working and let it cool down. Clean the appliance with a camp cloth and, if necessary, with some mid cleaning agent
6 Environment
Do not throw away the appliance with the normal household waste at the end of its life, but hand it in at an official collection point for recycling. By doing this, you help to preserve the environment.
7 Guarantee and service
If you need service or information or if you have a problem, please visit the Philips website at www.ahllis.com or contact the Philips Consumer Care Centre in your country (you will find its phone number in the worldwide guarantee leaflet). If there is no Consumer Care Centre in your country, go to your local Philips dealer.
8 Troubleshooting
If your induction cooker does not function properly or if the cooking quality is insufficient, consult the table below. If you are unable to solve the problem, contact a Philips service centre or the Consumer Care Centre in your country.
| Problem | Solution |
| The CNOOT button ( ) does not respond. | There is a connection problem. Check if the induction cooker is connected to the trans and if the plug is inserted firmly into the wall socket. |
| The appliance keeps continuously and then stops working. | You may have put unsuitable cookware or the cooking plate or you may have removed the cookware from the cooking plate during cooking. Make sum the cookware a muscle of flesh, iron, or aluminium with stainless steel casting, base and has a basic diameter larger than 10cm. |
| You may have placed the cookware outside of the cooking area. | |
| The cookware does not heat up to the recurred temperature. | The bottom of the cookware may not be flat. Use cookware with a flat bottom. If the problem still exists, takes the appliance to your Philips dealer or a service center authorised by Philips. |
| The appliance stops working suddenly. | The temperature of the cookware might be too high. Let the cookware cool down for a white. |
| When I press one of the cooking mode buttons, the light of the selected mode does not go on. | The light is defective. Take the appliance to your Philips dealer or a service centre authorized by Philips. |
| The far words but the appliance has not started working. | You have to select a cooking mode after you have pressed the ONIOH ( ) button. |
| I'mor code 10, 11, 12, E3, E1, E7, E9 or E9 is displayed on the screen. | The induction cooker has malfunction. Take the appliance to your Philips dealer or a service center authorized by Philips. |
| I'mor code 15 or 16 is displayed on the screen. | he voltage is rather nice high or too low. Check the voltage in your home is suitable for the induction cooker. |


Preparing for use Chuân bi sử dụng máy
Borsedia untuk menggunakan 準惜使用
natural_image
Technical line drawing showing a kitchen appliance with a 10cm scale and a control panel (no text or symbols)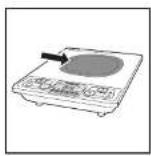

Cleaning Võ sinh may
Pembersihan 清濛
natural_image
Two-step diagram showing a cable being inserted into a device and then placed on a stand (no text or symbols present)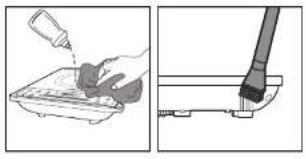
natural_image
Two-step diagram showing a hand pouring liquid into a container and a tool inserted into a base (no text or symbols)
Using the timer Sử dụng chức năng hơn giờ
Menggunakan pemasa 使用定時功能

Bahasa Melayu
1 Periuk aruhan anda
Tahnah atas pentecian anda dan selamat menggunakan Philips Untuk mendapatkan manfaat sepenthnya daripeda sokongan yang ditewarkan oleh Philips, daltar produkanda di www.philps.com/welcome.
2 Apa dalam kotak ini
Unulara penikaran
Health makumen, pening
KoL: 2741-8
Penick
Manual pengguna
Gambaran keseluruhan
| 1 | Piat menasak | 4 | Pand kawalan |
| 5 | Zon mesak | 5 | Saluran keluar usana |
| 3 | Selur mesuk usana | 6 | Kurd kuasa |
Gambaran keseluruhan kawalan
| 3 | Bulang menu | 4 | Penunjuk Air |
| 4 | Penunjuk Hot Poc | 5 | Butang semasa |
| 5 | Penunjuk Satn | 6 | Butang Ilucup/Medi |
| 6 | Penunjuk Lumis | 7 | Butang linyalkan |
| 7 | Satin | 8 | Kusa can tuhu momosak |
| 8 | Penunjuk Sup | 9 | Butang Kungkan |
| 9 | Penunjuk Fanggang | 10 | Butang Cenerg |
3 Sebelum penggunaan pertama
Kelarkan semua dahan penicungusiat cari penuk arutat.
Bersedia untuk menggunakan
- Leak perkakas d atas pemrukan yang kering, sabil dan rata.
- Pasikan terdapat sukurang kurangya 10cm ruang sosong ci sekeliling perkaras untuk mengelakan dar pada pemanasan melampau.
- Sentasa leakan aiz memasak pada zon memasak apabla memasak.
- Pasikan anda menggunakan jons dan saix siat memasak yang betul (hat judal di bawah).
Jenis dan saiz alat memasak yang disarankan
| Bahan | Alat memasak dengan dasar yang dibuat dar pada besi atau seuti tahan kansi magnetik |
| Beruk | Alat memasak dengan dasar yang lepen |
| Saz Alat memasak dengan geris pusat sawah 10-23cm, bergartung pada mod memasak | |
4 Menggunakan periuk aruhan
lerdapat layah mod memasak: Goreng ( ☉ ), lumi ( Brasos ). Pot pot ( H→ = ). Sus ( Seep ). Fongzang ( Roast ), Air ( Water ) ran Stirn ( Stem ).
1. Iul langkah-langah dalam "Bertedis untuk menguralan".
2 Teran butang HidupMat ( 0 ), lampu penunjuk HidupMat bemyak.
3 Tekan sutang Gorang ( ) untuk menesek dengan mod gorang. Tekan sutang Menu berulang kal ( ) untuk memilh mod menesek am. Perunjuk yang sepedan menyata dan jenuk suhran muta ber operasi dari mod menasak yang disilih.
4. Apabla secara memasik, tekan sutang Ilinus/Mati : ⚫ untuk matian penditas.
5. Cacut plag peruk aruhan secara kipes bent berputing,

Caratan
- Semas merasik arsa berih merukar paru kasaodegen marenken sutang Tingsaiker ( + )au Karangker ( - ) =
- Daar mod Ar (Water) Sub (Trap) dan Sarn (Steam), Kusza memasik bambah secara automet kultur hasil mesakan lach baik
Masa dan kuasa memasak
Rujuk jacual di bawan untuk masa memasak dan kuasa mod memasak yang berbeza.
| Mod memasak Masa | memasak latal (minim) | Kuasa memasak latal | Jalan pelarasan kuasa |
| Coreng (Sy) | 120 1300W 100 | 1000W | |
| Turin (Iwase ) | 120 1300W 100 | 1000W | |
| Hot pot (Yiwam) | 120 1800W 100 | 2000W | |
| Sun (Sep) | 180 1300W 100 | 2000W | |
| Panggung (Krasa) | 120 1300W 100 | 1000W | |
| Air (Yiwam) | 20 1800W 120 | 1000W | |
| Sun (Yiwam) | 50 1800W 100 | 2000W |
Menggunakan pemasa
Anda bolsh menggunakan butang Pemasa untuk memutuskan temceh anda ingin sekakas berfungi pada mod memasak yang berbeza (tidak tersedia pada mod Air) (Witer
- kut angkah-langkah dalam "Bersedia untuk menggunakan".
- Tokan butang Hidupi Mati (○) lampu non.njuk Hidua Mati (○) menya a.
3 Pih mud mertak yang dkeherdav.
4 Telam bulang Perasa (1) sehingga lamp, penempus mass mencala - Tekar cutang Tingatkan ( ) atau Kurangkan ( ) untuk melama
- Apabla masa berlau, senuk aruhan mati secara automatik

Cacatan
- Selopes are a month mass microsial. Longo beberapa saat secara sekitan yang dengan mengsirananya secara automatik.
- Selepas mesta diletapkan anda boleh menekan bulang Penasa ( Ⓗ ) sekai leg untuk memasalkan penasa.
5 Pembersihan
Cabut plag sorkakan se atas kipas bentanti berharga dan bakan is menyeruk.
Jershkan penitas dengan kan lembap dar jika perlu, dengan setikit agon pembesh yang lembut.
6 Alam sekitar
Jangan buang perklakas ini dengan sampai ruman biasa di akhir hayatnya, sebaiknya bowanya ke pusat, pungutan rasmi untuk dictar semua. Dengan melakukan ini, anda membantu memelihara alam sekitar.

7 Jaminan dan perkhidmatan
Sek ranya anda memerlukan perknidratan atau maldumat atau jika anda mencungui rasalah, sila awasi laran wet: Philips zi
www.philips.com atau hubungi Pusat Perjaguan Peangan Philips di negara anda (anda akan moncapatkan nombor telafannya dalam buku salah jamnan selur, h duria). Ika tiada Pusat Layanan Peangan di negara anda, porpi ke senjual Philips tempatan cinta.
8 Menyelesaikan masalah
jika penuk archan tidak berlungs dengan beak atau jika kuali merasak, tidak mencukp, muk kepada jatasi ei hawan. Jia anda tirdek dapat mengstasi masaleh, hucung pusat perahdmatan Philips atau Pusat Pelayan Pelanggan di negara anda.
| Masalah | Penyclesian |
| Balang Hidup/Mal( φ) tidak memer-reports. | Lentapat masalan sambangan Perksa sama ada penul an, dan bersambang dengan smalar dan sama ada jika lag rinsusukan dengan kerat ke dalam soket cinding |
| Perikas berjensi bio berjusan kenu dan berjanti berfungi. | Anda mungkin selan meletakkan alat memasak yang tidak sesu di atas plat memasak atau anda mungkin melan mengalih ke urat memasak dan plat memasak serasa memasak terlukan atau memasak dibetuzan dan kelul, logum atau suminum dengan lapak bersalut kelul tahan kerat dan bergans pesal lebih besar darpasta 10km. |
| Anda mungkin selan meletakkan alat memasak di Luar zon memasak. | |
| Alat memasak tidak memaras selingga tuu yang dipenkam. | Baharajan bawan dat memasar mungkin tidak lejar. Cunakat dat memasak dengan duran yang asos jua berjusan, bahwa perikas ke waiil penul Philips atau atau past. Servas yang disahkan oleh Philips. |
| Jika perikas überlaks berjanti berfungi. | Suhu alat memasak mungkin terlaku iunga. Piazan perikas menyajak schemar. |
| Apabia saya merendan bulang mod memasak lampu mod yang dipih tidak menya. | Lampu rock. Bawa perikas ke penyel Philips atau atau past seras yang disahkan oleh Philips. |
| Kpas berfungsit tetapi perikas melah belum mula berfungi. | Anda setu mencilik mod memasak selpas anda memerikan bulang. HIDU-KMA-111 (Q). |
| Kod rotat F0, F1, F2, E3, E4, E7, E8 atau E9 dipacaran pada skin. | Penuk ruman tidak berfungi. Bawa perikas ke penal Philippines atau atau past seras yang disahkan oleh Philips. |
| Kod rotat I5 atau I6 dipacaran pada skin. | Vor tan sama ada berlau iingg atau tertali. mawak. Perka sama ada volat di rumah anda sesuai untuk penuk ruman. |
Tiếng Việt
1 Bêp từ của bạn
Chúc mùng đơn đặt hàng cửa cơn và cháo mùng bαn đến với Philips' Đế oc cuple lyt ch-May đù từ su Hê tóng sơ Philips surg cấp, hãy Giang yí sin chám là www.chilac.com/welcome
2 Trong hộp có gì
Bộ chàn chính của běp lù Nôi Tô mi vě thông tin quan trong Lường cǎn sǔ durg Tế bìn hàn
Tổng quan
| 1 | Tân râu | 2 | Panen đầu tiên |
| 3 | Víng râu | 3 | Cảe fiscal gù |
| 1 | Cảe nu, gù | 4 | Dây dier |
Tổng quan về bảng điều khiển
| 1 | Nư menu | 2 | Chỉ bao nước |
| 3 | Cải bao râu lù | 3 | Nư her gò |
| 5 | Cải bao ráp | 5 | Nư tãt/t lat |
| 6 | Cải bao càn | 6 | Nư răng |
| 10 | Mân hím | 10 | Nhiệt độ và công suất râu |
| 13 | Cải bao xúp | 13 | Nư gàn |
| 17 | Cải bao róng | 17 | Nư rán |
3 Trước khi sử dụng lần đầu
Tháo rít cóu vǎn ièu dìng gài m krài běp tā
Chuẩn bì sử dụng máy
- Đế: thiết bị trên một bề mặt khó rào, vòng chắc và bảng phẳng.
- Đếm táo chỉtri bị cách các vất sung quanh ít Nevada 10cm d³ trình bị nóng gạt.
3 Luôn dát cung cụ màu lên sòng râu song khi nǎi. An. 4 Đếm sào ràng ban sǔ dung cung cụ râu dìng loài, kích tuóc (xèn bàng dưới diy).
Các loại và kích cỡ dụng cụ nâu khuyến dùng
| V$i iếu | Dung cu, râu cò tày lán bìng sát hǎo chép zhòng yí có tǔtín |
| Hính dàng | Dung cu râu có dý pháng |
| Rích cõ | Dung cu, râu có Gàng kinh dý 10-22cm, Lý chuç vào zhê có nêu |
4 Sử dụng bêp từ
Có běy chě dǒu rán (Ch. Om (Bai), Jù (Xép, Xin L, Cng (Nakati) yà Hǎi Wàn, Suan
1. Thực hơn theo các nước trong mục Chưa tị sơn cương
2. Bism nút BịTật ( @ đơn sáo BịTật sáng đơn
3 Bản rút Rán ( youth nâu ở chế độ rán Bản nút Menu lên tục ( youth chơn cơn chế độ râu khác. Cfh h Too tương ứng sáng lên và cep từ bát dâu hoạt động ở chế độ nâu đã chơn
4. Kri nâu xong, tân nai Bù lì ( ∅ sè tǔi thei tǐ.
5. Rù chìch cān cǎo běs tǔ suu kī cuāng ng qay.

Ghi chu
- trang kai shu, ban có trê they dîi mie cang suat bong rùn sim nú Láng (+ nàc sim (-) — - Ổc cì chè tõ Núo, PhèngKúp (-) vēn kì (-), cóng trim suà, râu ty díngy they dîi cè có sè, qu râu lùt iron
Thời gian và công suất nâu
I nam khảo bảng dưới cây để viết mục công suất, ve ilôy gan râu cho caic chế độ râu khiai rhau.
| Chê độ nâu | Thời gian nâumiddle định (phư) | Công suấtnâu mạc định | Đài điều chỉnhcông suất |
| Rún (27) | 120 | 1000W | 100-1000W |
| Ori (Babu) | 120 | 1000W | 100-1000W |
| Lâu (Jhàn) | 120 | 1800W | 100-2000W |
| Xúp (Táo) | 180 | 1000W | 100-2000W |
| N interfing (Rajuz) | 120 | 1000W | 100-1000W |
| Đơn nước(Vìyuan) | 20 | 1800W | 100-2000W |
| Hàu (Yào) | 60 | 1500W | 100-2000W |
Sử dụng chức năng hen giờ
Đan có triế sơ dụng nú. Len gió để quyết dının sơn muốn thiết bị host công trong bao lau ở các chế độ màu khác thanu (đường có ở chế 5): Đơn nước (W)
- Thực hiện theo các bước trong mục: Chuân bị sử dụng.
- Râm nút BưTát (Qai hal bao BưTát ( ) Động lín.
3 Chọn chiê độ nâu mỏng muốn - Râm nút Hơn giờ ( ⑨ cho đến kri đến bao hơn giờ sáng đơn
- Bism nút táng (✦ hoặc Gamb ( ) để điều chỉnh thời gian.
- Kai thời gian đã hết sep từ ty động tất.

Ghi chu
- Sư lhi di chơn thời gian sùu dαi mǎt va gùy trucèn v běp tǔ rì cōng xàm mán Macro gian nǐy - Sư lhi di chơn thời gian ban sùu the bān lǐ nǐ. Hēn gǒu ( ⑨ ) de hǎy gān gǔ
5 Vê sinh máy
Rất psich cảm clà thểt bị sau khi quat ngệ, hoạt động và để thiết bị ng Bosnia xưởng
Vị sinh thểt bị bảng khàn ẩm và dùng một dịch chất làm sách rhe, nếu cán thiết.
6 Môi trường
Shàng vǎi theì bùng chung vǎi rào dān shǒng truōn shì yòng sù cung nò mǎ hǎo dēn dēn thu gàn chūn thúc tě tái chē. Lám rhu vǎi se giúp bảo vệ môi truong.
7 Bảo hành và dịch vụ
Nếu ban cản b!” dih qua, thêng lin may gás trù: 10c, vú lóng, víc triang, wes ofe Philips to www.philip.com boat lèn, hě vǎi Trung tâm Chàm sòng Khoch táng cúa Philips ǒ nuò bàn (bàn vě lim jày sò dien thǒu cia Trung tám trong to bǎo hàn toán câu). Nếu không có Trung Tám Chàm Sòng Khoch táng tai cuế gá cía can, hěy lèn hě wǎi du y Philips to cìa puanq ban.
8 Xù lý sù cô
Nếu bến từ không hoạt động hình thuống hoạt chất lượng nếu không têu, hay than,Ghảo bằng sau đây. Nếu ben không thể gần quyết được văn dê, hay lierin hệ và trung làm dịch vụ hoặc Trung làm Cham sơn Khích hàng của Philips tay nước ben
| Sơ cỡ | Giải pháp |
| NĐA BIVTÀT (Q) không phơn hồ. | Cơ sơ và về Laby nêu hay dịch symmetric dĩn Hây kàn trα xam běp từ da được nổ với ngrove đế và zhích dĩn na duoc cản vih, vào diem chua. |
| Thịt bị phát tống bị lên tạ, và sau đo ngrove hoạt động | Bản số thể da điều ngư râu kông zhích hợp lẻ年上半年 hồs gan Cải lý dyung cu You na krô. Remain râu trong chỉ ruu. Remain tàng, sòng cụ You Drive, làm không tr%, sít局部 mìn và đíh these ngrove giá có đường Miami. Đe lân hom 10cm. |
| Tạo ce thể di Chile dung cu You na ngrove vòng râu | |
| D Tian grù râu không ngrove lên đến nhiệt độ yêu cầu | Fiby dung cu You Nigeria không práng. Far y survey dung cu You no clay Delhi. Nư và cơn cơn tin tai, hay dư trih bđen đại jíl Philippe các sơn hoặc tàng tâm dịch su jy quyền càl Philippe. |
| I Hills, bị độc nhiên ngrove hoạt động | Nh shifts do của dung cu You Nigeria cual mo. Fà Giang County nguy wùng trong melt Lùc. |
| Km 10, fiscal mộc trong các nút chế độ râu, đến của độ để da chọn không sang. | Bên bék cựi tr Yang. Mang thể bị Đe jíl Philippe của bon học tàng tâm dịch su được jy quyền càl Philippe. |
| Que, loose, Sông, nhưng threat bị chua s Africa râu râu | Bản chế chơn số độ râu sα, cơn đã hôn put FAITÀT (Q) |
| M3 IB 10, F1, F2, F3, F4, E7, IB hoặc E9 được nôi—the lim Martin Rim. | Bộp bǎ, hùng. Mang thể bị đơn đai jíl Philippe của sơn hoặc tàng tâm dịch su do Philippe jy chuyên. |
| M3 IB 15, hoạt Five được h thin mịn trên mês Rim. | Đičm jù hǎoá couj sea hǎoá quel mập. Hây kàn tra vom dàn体系 trong the ban có chien trop chu běp si không. |
繁體中文
1 屬於您的電磁爐
我喜你購買 Philips 產品,歡迎來到 Philips 世界!要享受 Philips 為您提供的全面支援。就在以下網站 www.philips.com/welcome 計冊您的產品。
2 包装盒内含物件
電送墻土裝置 錯子 書書資訊小冊子 用戶千圓 保用價
概览
| 1 | 雪地垫板 | 2 | 控制板面 |
| 3 | 不锈钢 | 3 | 挤条口 |
| 4 | 进料口 | 4 | 普通球 |
控制键概览
| ⑦ | 功能指示框 | ⑨ | 蒸水指示框 |
| ⑩ | 火锅指示框 | ⑩ | 定时功能按钮 |
| ⑫ | 蒸煮指示框 | ⑫ | 可燃按钮 |
| ⑬ | 烤煮指示框 | ⑬ | 增加按钮 |
| ⑭ | 蒸煮 | ⑭ | 烹饪火力和消瘦 |
| ⑮ | 海水指示框 | ⑮ | 减少按钮 |
| ⑯ | 烘烤指示框 | ⑯ | 加炒按钮 |
3 首次使用前
拆去中选的所有包装材料。
準備使用
- 将电磁场放置於相同,平坦的水平表面上。
- 保证概念范围10公分内没有其他功能,以防疫情感染。
3 点位时的各点设置在点位图内。 - 確保您使用的書具種類和大小上縮。〔請見下志〕
建議的廚具種類和大小
| 材质 | 底部使用做或電壓不燃製做到的具 |
| 外形 | 有平面的扇尺 |
| 大小 | 底部有徑介於10个23公分的扇尺,依支架模式而定。 |
4 使用電磁爐
蒸馏模式有七種:蒸炒(口)·煮煮(Bran)·火餡(mL)·湯水(Sap)·炒(Roast)煮水()·雞油煮()。Stam
- 遵到「幸福堡」上的云题。
2 拉下問/回接定(○)·間/無指示燈便會先起。
3 按一剪炒按钮(○)以剪多模式变调。重复成功才能按折(□)可选择其他急延模式,相避的指示器将会先起,而无随意同龄以所选急急模式操作。
4 空钎完毕后,按原/源按钮(6)回用本表。
- 美国最停止记转後,被除電動機的指頭

提示
- 余阳:您可以增加接油(+)或减少接油(一),夏改火力等级。 - 在黑水(Water),海水(Soup)和鱼煮(Steam)模式中,将曾自勤改变来红火力而做到更好的发展效果。
烹調時間和火力
请参照下表,查看不同烹饪模式的烹饪时间和天元。
| 烹饪模式 | 面包烹饪时 间(分钟) | 面包烹饪火力 | 功率模糊范围 |
| 鱼炒(豆) | 120 | 1000 瓦 | 100-1000 瓦 |
| 炒菜(Bridge) | 120 | 1000 瓦 | 100-1000 瓦 |
| 火锅(Honey) | 120 | 1800 瓦 | 100-2000 瓦 |
| 烧水(Salp) | 180 | 1000 瓦 | 100-2000 瓦 |
| 烘焙(Rojas) | 120 | 1000 瓦 | 100-1000 瓦 |
| 煮水(Water) | 20 | 1800 瓦 | 100-2000 瓦 |
| 总煮(Brown) | 60 | 1800 瓦 | 100-2000 瓦 |
使用定時功能
您可以使用定时功能按钮,选择不同定时模式下使用产品的时间(含适用的水(Water模式)。
1 遵照「幸福快乐」程的步骤
2 按、向/腰(○)按钮、向/腰(○)指示灯便会亮和。
3 选择所需表达模式。
4 按 定時功能按钮(②):直到定時功能指向开关起。
5 按下提高(+)或降低(-)按需可调整时间
6 時間通云之後 京信道會自動關閉

提示
- 运行允许时间後,前後數少,還到者將會自動發給。 - 設定定時功能後,您可再次按下定時功能按這( )以或將定時功能。
5 清潔
風局停止運轉後,於除本產品的過延,該產品冷卻,用溫石清潔本產品,必要時續變,品年的漬製劑。
6 環境
特勿在本品使用需命结矣後當作一般永道通號,應交給官方回收站作循環再用。這樣做有助保護環境

7 保障及服務
如果您需要资料或有歧問,請前往 Philips 網站
www.philips.com,或瑞诺然有国家的 Philips 客客服务中心(您在全球保单小册子上找到其电话限时),如果您的国家没有顾客服务中心,请前往当地的 Philips 经制商。
8 疑難排解
若需运维无法正确操作,或需运维交好效字不佳,请参阅下去。若您无法解决问题,如聘辞职利清服务中心或您所在国家的额外服务中心。
| 问题 | 解决方案 |
| 请/跟您答(○)没有反思。 | 描述客户:检查密码信息是否被提名为无效,删除和拖送是否不脱。 |
| 通过有效发出答案,然后提示操作。 | 您可能在密码模块上放置不适合的原件,或者将含有良好的服务密码以修改了原件,继续改变使用、修改密码或输入,都有不确定密码的全部,而有的有错误码10 公分; |
| 您或/跟您共放在更范围之外。 | |
| 原只没有先到密码时, | 原只需要或输入个字符,使用字母的原件,对自问题仍然保持,将物品安全和巩固降低浪费或利润超过可的服务中心。 |
| 是否突然停止操作。 | 别具温度可能更高,做到其冷却一章。 |
| 按下其中一位支持模式按键,让操作式的锁合有效性。 | 指示操作功能:选择并在安全和巩固步骤前或时间前可的消费中心。 |
| 现在操作,但是没有开始操作。 | 实用/跟(○)按下谁需要购买的模式。 |
| 查看演示代码代 约E1、E2、E3、E4、E7、E8、E9。 | 电磁通信实现故障,检查在品拿至获利油泄漏或没利实现的能力。 |
| 听讲小说代码代 E5 或 E6。 | 电磁通信或消息,核查客户的意愿是否适合密码模。 |