CX 56 Furry - Radio SCOTT - Kostenlose Bedienungsanleitung
Finden Sie kostenlos die Bedienungsanleitung des Geräts CX 56 Furry SCOTT als PDF.

| Marke | SCOTT |
| Modell | CX 56 Furry |
| Produkttyp | Tragbares Radio |
| Abmessungen (ca.) | 20 × 10 × 5 cm |
| Gewicht (ca.) | 0,5 kg |
| Stromversorgung | 4 × AA-Batterien (nicht im Lieferumfang) oder Netzteil (optional) |
| Empfangsbereiche | AM / FM |
| Lautsprecher | Eingebauter Lautsprecher (3 W) |
| Kopfhöreranschluss | 3,5 mm Klinkenstecker |
| Antenne | Teleskopantenne (FM), eingebaute Ferritantenne (AM) |
| Bedienelemente | Einschalter, Lautstärkeregler, Frequenzwahl (Drehknopf), AM/FM-Umschalter |
| Gehäusematerial | Kunststoff |
| Reinigung | Mit einem weichen, trockenen Tuch abwischen; keine aggressiven Reinigungsmittel verwenden |
| Sicherheitshinweise | Nicht in der Nähe von Wasser verwenden; nicht öffnen; nur für den Innenbereich |
| Ersatzteile | Nicht vom Hersteller vorgesehen; bei Defekt Gerät entsorgen |
| Reparierbarkeit | Keine reparierbaren Teile; nur durch Fachpersonal |
| Besonderheiten | Tragegriff, einfache Bedienung, geeignet für Senioren |
| Garantie | 2 Jahre (gesetzliche Gewährleistung) |
Häufig gestellte Fragen - CX 56 Furry SCOTT
Benutzerfragen zu CX 56 Furry SCOTT
0 Frage zu diesem Gerät. Beantworten Sie die, die Sie kennen, oder stellen Sie Ihre eigene.
Eine neue Frage zu diesem Gerät stellen
Laden Sie die Anleitung für Ihr Radio kostenlos im PDF-Format! Finden Sie Ihr Handbuch CX 56 Furry - SCOTT und nehmen Sie Ihr elektronisches Gerät wieder in die Hand. Auf dieser Seite sind alle Dokumente veröffentlicht, die für die Verwendung Ihres Geräts notwendig sind. CX 56 Furry von der Marke SCOTT.
BEDIENUNGSANLEITUNG CX 56 Furry SCOTT
Dual Alarm Clock FM Radio with fur trim
Instruction Manual
CE
BOX CONTENTS
-
Alarm clock radio
-
Instruction manual
DESCRIPTION OF THE UNIT
- ⏻ (ON/standby) button
- MEM/SET button
- SNOOZE/SLEEP button
- MODE button
- Speaker
- SCAN button
- RESET button
- LCD display
- ▲,▼ buttons
- Headphones jack
- DC IN 6V jack
- FM antenna wire
- VOLUME +/- buttons
- AUX IN jack
- Battery compartment
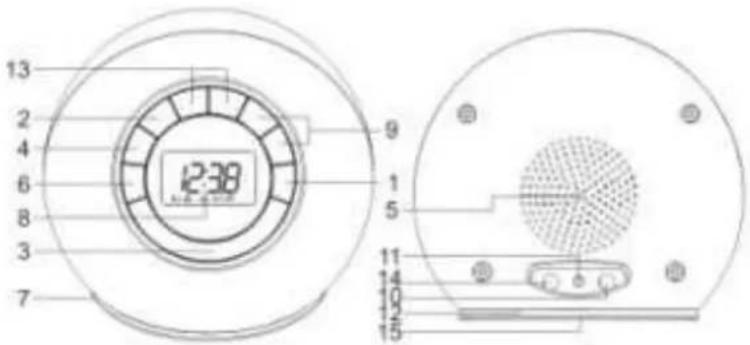
text_image
12:38 13 2 4 6 8 3 7 9 1 5 11 14 10 15OPERATING INSTRUCTIONS
Battery power supply
Battery insertion
- Open the battery compartment on the bottom of the unit by pressing on the catch whilst removing the cover.
- Insert 4 x AA/ LR06 batteries (alkaline batteries are recommended) into the battery compartment, following the polarity as shown on the diagram inside the compartment.
- Replace the battery compartment cover.
Precautions when using batteries
- Replace only with batteries of the same or equivalent type.
- Exhausted batteries must be removed to prevent possible leakage.
- Dispose of the batteries properly in accordance with the environmental regulations in force.
Mains power supply (DC IN 6V)
Note: Remove the fur before connecting the unit to the mains. Connect a DC 6V adapter (not supplied) to the DC IN 6V jack at the back of the unit.
Setting the clock and alarm
Setting the clock
- In standby mode, press the MEM/SET button. The hour digits will flash.
- Use the ▲,▼ buttons to set the hours.
- Press the MEM/SET button to confirm.
- The minute digits will flash. Repeat steps (2) and (3) above to set the minutes.
Note: Press the ▲ button to set 12 or 24 hour display.
Setting the alarm
- Press the MODE button to select alarm 1 or 2.
-
Then use the ▲,▼ buttons to enable or disable the selected alarm (indicated by "0:00" and "--:" respectively), and select an alarm mode - buzzer "∅, ⊕" or radio "∅".
Note: Only buzzer mode is available when alarm 1 is selected. -
When the alarm function is enabled, "0:00" appears on the display. Follow steps (2) to (4) in "Setting the clock" to set the alarm time. After setting the time for alarm 2 and selecting radio mode "mode", use the ▲,▼ button to select a preset station to wake up to and press the MEM/SET button to confirm.
Note: To preset a station, see the section on "USING THE RADIO".
Using the alarm function
- After enabling the alarm function, the selected alarm mode icon(s) (⊕, ⊕ or ⬇) will light up.
- The buzzer or radio will come on at the set time.
- To stop the alarm, press the ⏻ button. The alarm will sound again the next day. To disable the alarm function, see the section on "Setting the alarm".
Note: While the buzzer alarm volume is fixed and cannot be adjusted, the radio alarm volume can be adjusted to your desired level using the VOL +/- buttons.
To save battery power, the alarm duration is as follows:
● The buzzer alarm duration is one minute.
- If you have selected alarm 2 with radio mode “✿”, the radio will come on for 15 minute, after which the unit will automatically switch to standby. The “SLEEP” indicator will light up when the alarm sounds. After 15 minutes, the radio will turn off automatically.
Snooze function
When the buzzer alarm sounds, press the SNOOZE/SLEEP button to stop the alarm temporarily. The SNOOZE indicator will flash and the alarm will sound again after 5 minutes. To cancel the SNOOZE function, press the MEM/SET button. The alarm will stop and come on again the next day.
Note: Snooze function is not available when alarm 2 and radio mode "→" are selected.
Sleep function
You can program the unit so that the radio turns off automatically after a certain time (maximum 99 minutes).
- When the unit is switched on, press the SNOOZE/SLEEP button to enter setting mode for the SLEEP function. "SLEEP --:" appears on the display.
- Use the ▲,▼ buttons to select the time before the unit automatically turns off: '-' (0 minute), '5:00', '6:00', '99:00' (99 minutes).
- While the sleep function is active, you can press the SNOOZE/SLEEP button to view the time remaining before the unit turns off automatically.
- The radio will turn off automatically at the end of the set time.
- To cancel the sleep function before the end of the set time, press the ⏻ button to turn off the radio immediately.
LCD Backlight
Pressing any button on the unit turns the LCD backlight on for 10 seconds.
Connecting headphones
Note: Remove the fur before connecting headphones.
Plug your headphones (not supplied) into the headphones jack at the back of the unit for private listening. The speaker output will be shut off automatically.
Reset function
If the unit or display is not working properly, use a sharp object to press the RESET button in the cavity at the bottom of the unit to reset. If the problem persists, reset the unit by removing one battery for few seconds and then putting it back in again.
USING THE RADIO
Listening to the radio
- Press the ⏻ button to turn on the radio.
- Press and hold one of the ▲,▼ buttons to start automatic tuning up/down. Release the button when the unit is receiving a station you would like to listen to. For manual fine-tuning, you can press it briefly to adjust the frequency step by step.
For optimum reception
In FM mode, extend and position the FM antenna to achieve optimum reception.
Preset radio stations
You can store up to 16 FM stations.
Manual tuning
- Use the ▲,▼ buttons to search for a station. Press and hold the MEM/SET button to store the station. A preset number will flash on the display.
- Press the▲, ▼buttons to change the number.
- Press the MEM/SET button again to confirm the setting
- Repeat steps (1) to (3) above to store other stations.
Scanning
- Press the SCAN button to start scanning. The unit will search from the lowest frequency and stop when it finds a station with a strong signal. A preset number will flash.
- To save that station, press the MEM/SET button. The unit will then start searching again and stop at the next station with a strong signal. You can skip that station without saving by pressing the SCAN button again. The unit will continue to search and stop at next station with a strong signal.
- Repeat step 2 above until the whole frequency range has been scanned. The unit will then start playing preset station no. 1.
Note: Using this function will delete your existing presets. If no button is pressed within 10 seconds, the scanning function will be cancelled.
Listening to a preset station
While listening to the radio, press the MEM/SET button and then use the ▲▼ buttons to select a preset station.
Time/Alarm/Frequency display
When the Radio is on, the frequency is always displayed. Press the MODE button repeatedly to display the time or alarm setting. When the time or alarm setting is being displayed, press the ⏻ button to go back to displaying the current radio frequency.
AUX IN function
Note: Remove the fur before using the AUX IN function.
This unit has an AUX IN jack for connecting an external audio device.
- Plug the AUX IN cable (3.5 mm, not supplied) into the AUX IN jack.
- Operate your external audio device as usual to select and play the music.
- Adjust the volume controls on both your external audio device and this unit to the desired volume level.
MAINTENANCE
Care and maintenance
To clean the fur and casing, remove the fur and wipe off dust and stains with a soft, damp cloth. Do not use benzene, thinner or other similar chemicals to clean the fur and casing. Do not wash the fur.
Warning
If you are allergic to fur, avoid contacting it.

If at any time in the future you should need to dispose of this product, please note that electrical products should not be disposed of with household waste. Find out where your nearest recycling centre is. Consult your local authority or retailer for more details (Waste Electrical and Electronic Equipment Directive).
TECHNICAL SPECIFICATIONS
Radio
| Frequency range | FM 87.5 – 106 MHz |
| Antenna | FM wire antenna |
| General | |
| Output power | 0.3 W |
| Speaker | 2" diameter (50.8 mm), 8 Ohm impedance |
| Power source | DC: 4 x 1.5V batteries (DC 6V), AA/LR06Input: DC 6V 0.35 A |
| Dimensions | 113.5 (H) x 133 (W) x 130 (D) mm |
| Weight | 0.27 Kg |
Note: Due to continuing improvements, the technical specifications are subject to change without notice.