120GB S511 - SSD ADATA - Kostenlose Bedienungsanleitung
Finden Sie kostenlos die Bedienungsanleitung des Geräts 120GB S511 ADATA als PDF.

| Produkttyp | SSD (Solid State Drive) |
| Marke | ADATA |
| Modell | 120GB S511 |
| Kapazität | 120 GB |
| Schnittstelle | SATA III (6 Gbit/s) |
| Formfaktor | 2,5 Zoll (7 mm Höhe) |
| Lesegeschwindigkeit (max.) | 550 MB/s |
| Schreibgeschwindigkeit (max.) | 500 MB/s |
| NAND-Typ | MLC (Multi-Level Cell) |
| Controller | SandForce SF-2281 |
| Stromverbrauch (aktiv) | ca. 0,6 W |
| Stromverbrauch (Leerlauf) | ca. 0,5 W |
| Betriebstemperatur | 0 °C bis 70 °C |
| Lagertemperatur | -40 °C bis 85 °C |
| Abmessungen (L x B x H) | 100,0 x 69,85 x 7,0 mm |
| Gewicht | ca. 76 g |
| MTBF (mittlere Betriebsdauer) | 1.000.000 Stunden |
| TRIM-Unterstützung | Ja |
| SSD-Überwachung (S.M.A.R.T.) | Ja |
| Garantie | 3 Jahre |
| Wartung und Reinigung | Keine beweglichen Teile; Gehäuse trocken und staubfrei halten. Keine Flüssigkeiten verwenden. |
| Sicherheitsfunktionen | Secure Erase, integrierte ECC-Fehlerkorrektur |
| Ersatzteile und Reparierbarkeit | Nicht durch den Benutzer reparierbar. Bei Defekt bitte den Händler kontaktieren. |
| Kompatible Systeme | Windows, Mac, Linux (mit SATA-Anschluss) |
Häufig gestellte Fragen - 120GB S511 ADATA
Benutzerfragen zu 120GB S511 ADATA
0 Frage zu diesem Gerät. Beantworten Sie die, die Sie kennen, oder stellen Sie Ihre eigene.
Eine neue Frage zu diesem Gerät stellen
Laden Sie die Anleitung für Ihr SSD kostenlos im PDF-Format! Finden Sie Ihr Handbuch 120GB S511 - ADATA und nehmen Sie Ihr elektronisches Gerät wieder in die Hand. Auf dieser Seite sind alle Dokumente veröffentlicht, die für die Verwendung Ihres Geräts notwendig sind. 120GB S511 von der Marke ADATA.
BEDIENUNGSANLEITUNG 120GB S511 ADATA
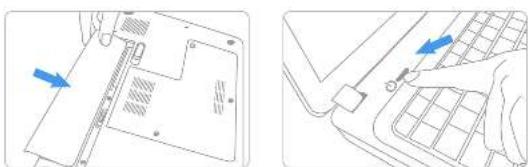
Step 1. Before the installation commences, he sure to shut down your notebook by a connecting the power cord, or non using the battery from battery powered systems.
natural_image
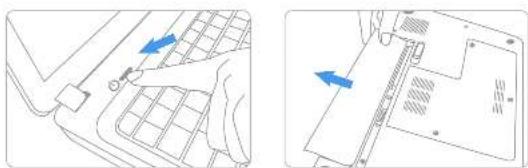
Technical diagram showing two views of a device's internal structure with blue arrows indicating directional movement (no text or symbols present)Step 2. Once the hard drive bay on your notebook and remove screws and slide the drive out of the notebook (Please refer to your notebook system's user manual for information on how to manage the existing hard drive.

natural_image
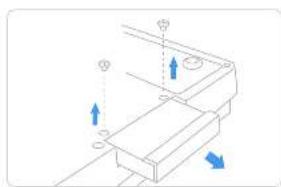
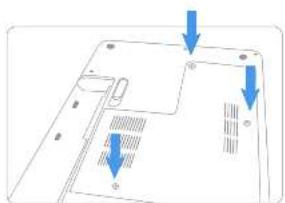
Diagram of a laptop back panel with arrows indicating orientation (no text or symbols)Step 3. Remove bucket, front drive and set aside
natural_image
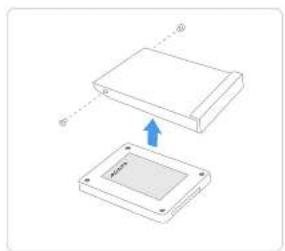
Pure mechanical assembly diagram with arrows indicating direction (no text or symbols)Step 4. A touch drive bracket to the new Solid State Drive. Slide the drive into the box until fully seated (Make sure to align the SATA plugs and solic state drive connectors)
natural_image
Diagram showing two 3D rectangular components with an arrow indicating a transformation or assembly (no text or symbols present)Step 5. Replace screws to secure the drive.
natural_image
Diagram of a laptop back panel with arrows pointing to internal components (no text or symbols)Step 6. Reconnect the power core or battery. Switch on the computer system for the installation verification.