
IFI-160 - Lautsprecher DENVER - Kostenlose Bedienungsanleitung
Finden Sie kostenlos die Bedienungsanleitung des Geräts IFI-160 DENVER als PDF.


| Produkttyp | Lautsprechersystem mit iPod Docking |
| Modell | IFI-160 |
| Marke | Denver |
| Abmessungen (B x T x H) | ca. 288 x 144 x 140 mm |
| Netzspannung | AC 100-240 V, 50/60 Hz |
| Ausgangsleistung | 2 x 8 W RMS |
| Leistungsaufnahme | 40 W |
| Fernbedienung Batterie | 1x 3 V CR2025 Lithiumknopfzelle |
| Kompatible iPod Modelle | iPod 3G, 4G, photo, nano, mini, nano 2 (siehe Tabelle) |
| AUX-Eingang | 3,5 mm Klinke |
| Lautstärkeregelung | am Gerät und per Fernbedienung |
| Klangregelung | Bass- und Höhenregler per Fernbedienung |
| Standby-Funktion | Ja |
| Stummschaltung | Ja (MUTE-Taste) |
| Reinigung | Mit trockenem Tuch, keine chemischen Reiniger |
| Entsorgung | Nicht im Hausmüll, Wertstoffhof für Elektrogeräte |
| Sicherheitshinweise | Vor Nässe schützen, kein offenes Feuer, Netzstecker ziehen |
| Betriebstemperatur | +5 °C bis +35 °C |
| Zubehör | Fernbedienung, 6 iPod-Adapter, Staubschutzabdeckung |
| Hersteller | Denver Electronics |
Häufig gestellte Fragen - IFI-160 DENVER
Benutzerfragen zu IFI-160 DENVER
0 Frage zu diesem Gerät. Beantworten Sie die, die Sie kennen, oder stellen Sie Ihre eigene.
Eine neue Frage zu diesem Gerät stellen
Laden Sie die Anleitung für Ihr Lautsprecher kostenlos im PDF-Format! Finden Sie Ihr Handbuch IFI-160 - DENVER und nehmen Sie Ihr elektronisches Gerät wieder in die Hand. Auf dieser Seite sind alle Dokumente veröffentlicht, die für die Verwendung Ihres Geräts notwendig sind. IFI-160 von der Marke DENVER.
BEDIENUNGSANLEITUNG IFI-160 DENVER
DENVER®
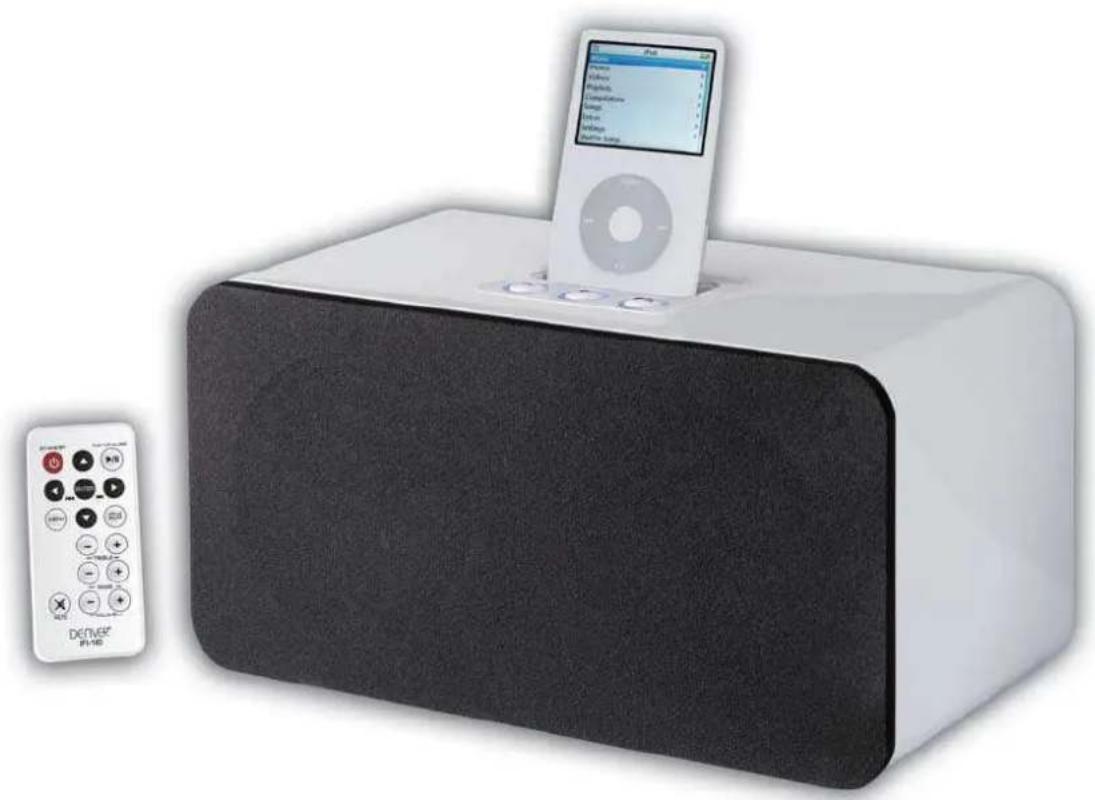
Speaker System with iPod Docking
Model No.: IFI-160
OWNER'S MANUA
natural_image
White electronic device with black speaker and a white iPod-mounted control panel, accompanied by a remote control (no visible text or symbols on the device body)CAUTION
TO PREVENT FIRE OR SHOCK HAZARD, DO NOT USE THIS PLUG WITH AN EXTENSION CORD, RECEPTACLE OR OTHER OUTLET UNLESS THE BLADES
CAN BE FULLY INSERTED TO PREVENT BLADE EXPOSURE. TO PREVENT FIRE
OR SHOCK HAZARD, DO NOT EXPOSE THIS APPLIANCE TO RAIN OR MOISTURE.

The lightning flash with arrowhead symbol, within an equilateral triangle is intended to alert the user to the presence of insulated 'dangerous voltage' within the product's enclosure that may be of sufficient magnitude to constitute a risk of electric shock to persons.
CAUTION
RISK OF ELECTRIC SHOCK DO NOT OPEN
WARNING: TO REDUCE THE RISK OF ELECTRIC SHOCK DO NOT REMOVE COVER (OR BACK), NO USER SERVICEABLE PARTS INSIDE REFER SERVICING TO QUALIFIED SERVICE PERSONNEL.

The exclamation point within an equilateral triangle is intended to alert the user to the presence of important operating and maintenance (servicing) instructions in the literature accompanying the appliance.
IMPORTANT SAFETY INSTRUCTIONS
1.) Read these instructions.
2.) Keep these instructions.
3.) Heed all warnings.
4.) Follow all instructions.
5.) Do not use this apparatus near water.
6.) Clean only with dry cloth.
7.) Do not block any ventilation openings. Install in accordance with the manufacturer's instructions.
8.) Do not install near any heat sources such as radiators, heat registers, stoves, or other apparatus (including amplifiers) that produce heat.
English
UK-1
OWNER'S MANUAL
9.) Do not defeat the safety purpose of the plug. If the provided plug does not fit into your outlet, consult an electrician for replacement of the obsolete outlet.
10.) Protect the power cord from being walked on or pinched particularly at plugs, convenience receptacles, and the point where they exit from the apparatus.
11.) Only use attachments / accessories specified by the manufacturer.
12.) Unplug this apparatus during lightning storms or when unused for long periods of time.
13.) Refer all servicing to qualified service personnel. Servicing is required when the apparatus has been damaged in any way, such as power-supply cord or plug is damaged, liquid has been spilled or objects have fallen into the apparatus, the apparatus has been exposed to rain or moisture, does not operate normally, or has been dropped.
14.) This appliance shall not be exposed to dripping or splashing water and no object filled with liquids such as vases shall be placed on the apparatus.
15.) Do not overload wall outlet. Use only power source as indicated.
16.) Use replacement parts as specified by the manufacturer.
17.) The product may be mounted to a wall only if recommended by the manufacturer.
18.) Upon completion of any service or repairs to this product, ask the service technician to perform safety checks.
19.) Attention should be drawn to the environmental aspects of battery disposal.
IMPORTANT NOTES
● Avoid installing this unit in places exposed to direct sunlight or close to heat radiating appliances such as electric heaters, on top of other stereo equipment that radiates too much heat, places lacking ventilation or dusty areas, places subject to constant vibration and/or humid or moist areas.
- Do not attempt to clean this unit with chemical solvents as this might damage the finish. Use a clean dry cloth.
● Operate controls and switches as described in the manual.
English
UK-2
OWNER'S MANUAL
● No naked flame sources, such as lighted candles, should be placed on the apparatus.
● The apparatus shall not expose to dripping or splashing. No objects filled with liquids, such as vases, shall be placed on the apparatus.
- Before turning ‘On’ the power, make certain that power cord is properly installed.
- When moving the set, be sure to first disconnect the power cord.
PREPARATION FOR USE
UNPACKING AND SET UP
- Carefully remove all the components from the display carton and verify that you have all the necessary components before you dispose of the display carton.
- Remove all packing materials from the individual components. Remove any descriptive labels that may be attached to the front panel of the main unit. Do not remove any labels or stickers on the back panels of the main unit or the speakers.
- Place all the components in the desired location. This system is designed to be used on level, stable, flat surface such as a table, desk, shelf, or stand, convenient to an AC outlet, out of direct sunlight, and away from sources of excess heat, dust, moisture, or vibration.
● Unwind the AC power cord on the back of the unit and extend the cord to its full length.
POWER SOURCE
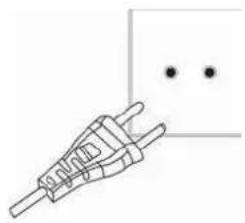
This system is designed to operate on 100-240V AC 50/60Hz house current only. Connecting this system to any other power source may cause damage to the system and such damage is not covered by your warranty.
natural_image
Simple line drawing of a plug with two pins and two dots, no text or symbols presentEnglish
UK-3
OWNER'S MANUAL
NOTE: The system has an AC plug and will only fit into matching AC outlets. This is a safety feature to reduce the possibility of electric shock. If the plug will not fit in your AC outlets, you should have the outlet changed by a qualified, licensed electrician. Do not use an adapter to make the plug fit into your outlet. This defeats the safety feature and could expose you to electric shock.
PROTECT YOUR FURNITURE
This model is equipped with non-skid rubber 'feet' to prevent the product from moving when you operate the controls. These 'feet' are made from non-migrating rubber material specially formulated to avoid leaving any marks or stains on your furniture. However certain types of oil based furniture polishes, wood preservatives, or cleaning sprays may cause the rubber 'feet' to soften, and leave marks or a rubber residue on the furniture. To prevent any damage to your furniture we strongly recommend that you purchase small self-adhesive felt pads, available at hardware stores and home improvement centers everywhere, and apply these pads to the bottom of the rubber 'feet' before you place the product on fine wooden furniture.
LOCATION OF CONTROLS AND INDICATORS
FRONT PANEL

natural_image
Solid black rectangle with rounded corners at top and bottom edges (no text or symbols)English
UK-4
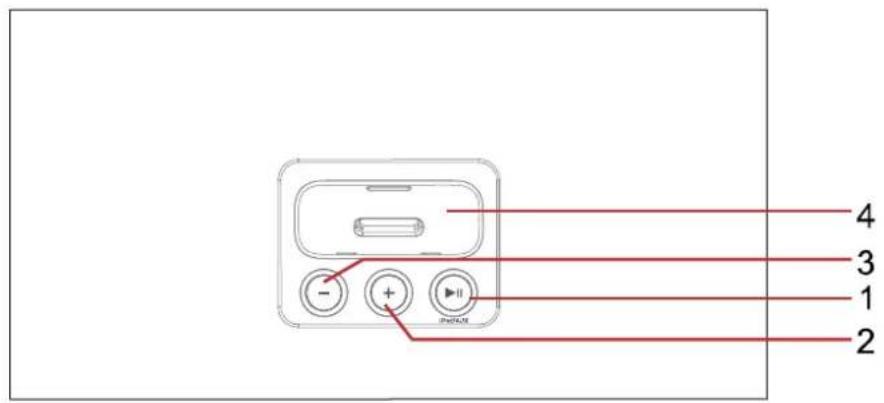
TOP PANEL
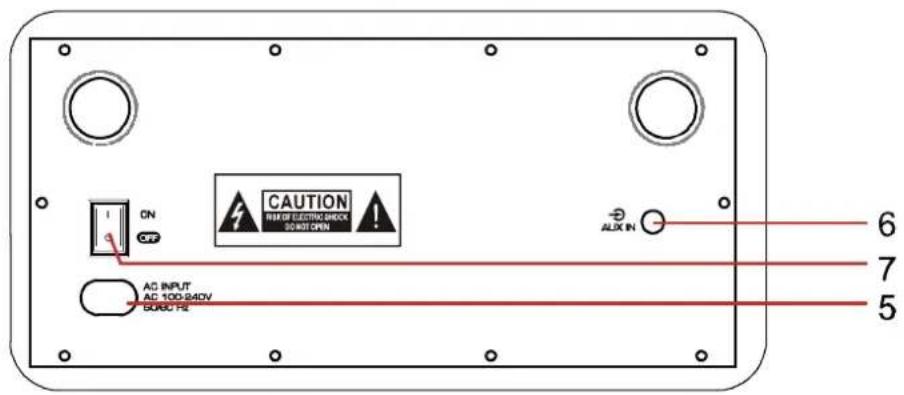
BACK PANEL
1.) PLAY/PAUSE Button
2.) VOLUME + Button
3.) VOLUME - Button
4.) iPod Connector
5.) AC Power Input
6.) AUX Input
7.) Main Power Switch
OWNER'S MANUAL
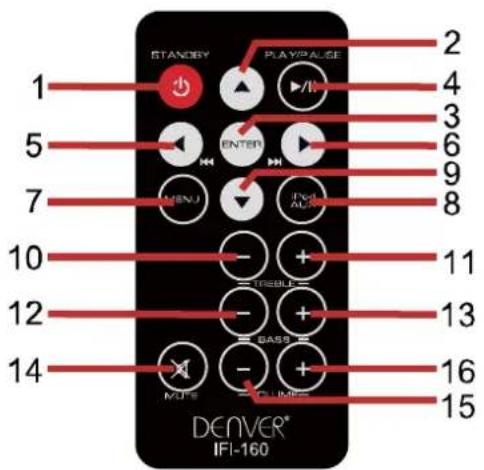
1.) STANDBY Button
2.) iPod UP Button
3.) ENTER Button
4.) PLAY/PAUSE Button
5.) PREV Button
6.) NEXT Button
7.) MENU Button
8.) iPod/AUX Button
9.) iPod DOWN Button
10.) TREBLE - Button
11.) TREBLE + Button
12.) BASS - Button
13.) BASS + Button
14.) MUTE Button
15.) VOLUME - Button
16.) VOLUME + Button
Remote Control
REMOTE CONTROL BATTERY
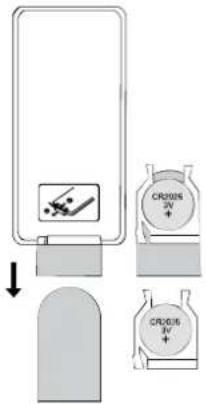
The remote control requires one "button-type" 3-volt lithium battery, included. To extend the life of the original battery we have inserted a small clear plastic spacer tab between the lithium battery and the battery terminal. You must remove this battery spacer tab before you can use the remote control. To remove the tab, pull it in the direction of the arrow in the illustration as shown.
English
UK-6
OWNER'S MANUAL
When the operation of the remote control becomes intermittent or unsatisfactory, replace the original battery with a new 3-volt lithium battery.
1.) Slide out the battery holder from the remote control case.
2.) Place one 3V CR2025 battery in the battery holder, observing the positive (+) direction. If the battery is placed incorrectly the remote control will not work.
CAUTION
Danger of explosion if the battery is replace incorrectly.
Replace only with the same or equivalent type.
3.) Insert the battery holder into the battery slot.
Notes: Use a well-known brand of cell battery for longest life and best performance. When the remote operation becomes intermittent, replace the battery.
OPERATING INSTRUCTIONS
● Make sure the AC power cord from this unit is properly connected to a 100-240V 50/60Hz household AC power outlet.
● Make sure that the minimum distance around the whole unit for sufficient ventilation is 10cm.
Listening to Your iPod / Charging The Battery IMPORTANT!
In order to prevent unwanted distortion during iPod playback, it is recommended that you set the EQ in your iPod to the "Off" position. Go to the Main Menu in your iPod and then select the Settings Menu, select the EQ Setting, and make sure that the EQ function is set to "Off". (Main Menu > Settings Menu > EQ Setting > Select "Off")
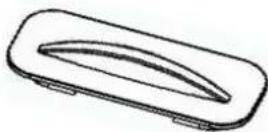
Note : We have also included one flat adaptor with no opening at all. This serves as a dust cover that can be inserted in the docking station if no iPod will be connected to this unit for an extended period of time. Remove this dust cover before use.
English
UK-7
OWNER'S MANUAL
This unit provides an iPod docking station on the top panel. You can connect any "dockable" iPod to this system. Your iPod came packed with a small iPod brackets, place the iPod bracket on the speakers dock before placing your iPod onto this system.
1) Turn the main power switch to 'On' position at the back of the unit.
2) If the unit is in stand-by mode, press PLAY/PAUSE button on the top panel or STAND BY button on remote control to wake the unit.
3) Plug the iPod to the iPod docking station. Then press PLAY/PAUSE button on the top panel or remote control to start music playback.
4) To pause momentarily during iPod playback, press the PLAY/PAUSE button on the top panel or remote control or iPod unit. Press the PLAY/PAUSE button once more to cancel Pause mode and resume playback.
5) Press NEXT button on the remote control or iPod unit to go to the next song. To Fast Forward, Press and Hold the NEXT button on the remote control or iPod unit while playing a song.
6) Press PREV button on the remote control or iPod unit to go back to the previous song. To Rewind, Press and Hold the PREV button on the remote control or iPod unit while playing a song.
7) Press MENU button on the remote control, the iPod will go to the previous menu. Press UP/ DOWN button on the remote control to select up or down of the iPod menu; then press the ENTER button to enter selected menu.
8) Press BASS + / BASS – on the remote control to adjust the BASS level, it will enhance/reduce the BASS effect.
9) Press TREBLE + / TREBLE – on the remote control to adjust the TREBLE level, it will enhance/reduce the TREBLE effect.
10) When the iPod is docked in the unit, the iPod internal battery can be charged during iPod playback, Pause mode or AUX mode, if the main power is switched "Off", the charging will be cut off.
English
UK-8
Note : You must keep the main power switch "On" during iPod internal battery charging.
AUXILIARY IN
Connect the Audio Output jacks of your auxiliary sound source (TV, VCR, DVD Player, Cassette Deck, Mini Disc player, etc., etc.,) to the AUX IN jack on the back panel of the unit. The auxiliary function will only activate when the aux in jack is fitted with connection cable.
Note: The connection cables on'e not included.
- Press and hold the PLAY/PAUSE button on the main unit or iPod/AUX button on the remote control to inter-change the play mode from iPod to Aux. Press and hold the PLAY/PAUSE button on the main unit or press the iPod/AUX button on the remote control once on the remote control to inter-change the play mode from Aux to iPod. During AUX playback, the iPod display will not light up.
- Turn your auxiliary source 'On' and operate it as usual. The sound from the auxiliary source will be heard through the speakers of this system.
- Adjust the VOLUME level controls of this system as desired.
RESETTING
If the system does not have any respond, you may have experienced a severe electric shock (ESD) or a power surge that triggered the internal computer to shut down automatically. If this occurs, simply disconnect the main power and connect the main power again after one minute.
Note: Although disconnect the power will unlock the internal computer after a power surge, it will also erase all of the settings. After turning 'On' the unit, you will need to reset the settings again.
English
UK-9
OWNER'S MANUAL
CARE AND MAINTENANCE
CARE OF THE CABINET
If the cabinet becomes dusty wipe it with a soft dry dust cloth. Do not use any wax, polish sprays, or abrasive cleaners on the cabinet.
CAUTION
Never allow any water or other liquids to get inside the unit while cleaning. The power cable/disconnect device shall remain tasy to operate disconnect.
TECHNICAL INFORMATION
| AC Power: | AC 100-240V 50/60Hz |
| Remote Handset: | DV 3V size:CR2025 X 1 |
| Unit Output Power: | 2 X 8W RMS |
| Power Consumption: | 40W |
| Unit Dimensions: | Approx, 288(L) X 144(W) X 140(H) mm |
| Operation temperature: | +5°C +35°C |
UNIVERISAL DOCK
| In order to allow you to securely connect any "dockable" iPod model to the docking station, 6 different adaptors is included. Please refer to the following table to select the proper adaptors for your particlur iPod model. Please insert the connector to the docking station before connecting your iPod. |
| Adaptors (Marking on Back) | Compatible iPod Models | |
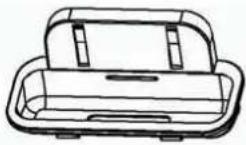 | 10GB, 15GB, 20GB | iPod 4G: 20GBiPod 3G: 15GB, 30GB, 40GBiPod photo: 20GB, 30GB |
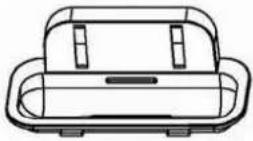 | 30GB+40GB | iPod 4G: 40GBiPod 3G: 30GB |
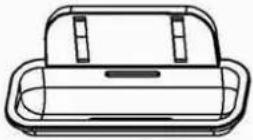 | 60GB | iPod photo: 40GB, 60GB |
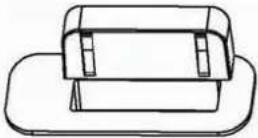 | nano | iPod nano: 1GB, 2GB, 4GB |
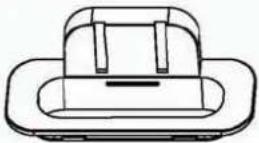 | mini | iPod mini: 4GB, 6GB |
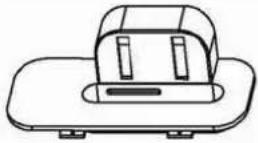 | nano 2 | iPod nano 2: 2GB, 4GB, 8GB |
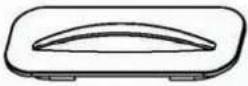 | Dust Cover | Dust cover should be installed in the docking station if no iPod will be docked for an extended period of time. |
English
UK-11
OWNER'S MANUAL
Instructions on environment protection.

natural_image
Symbol of a trash bin crossed with no visible text or labelsDo not dispose of this product in the usual household garbage at the end of its lifecycle; hand it over at a collection point for the recycling of electrical and electronic appliances. The symbol on the product, the instructions for use or the packing will inform about the methods for disposal.
The materials are recyclable as mentioned in this marking. By recycling, material recycling or other forms of re-utilization of old appliances, you are making an important contribution to protect our environment.
Please inquire at the community administration for the authorized disposal location.
All rights reserved Copyright Denver Electronics

WWW.denver-electronics.com
iPod and iPod logo are trademarks of Apple Inc., registered in the U.S. and other countries.
English
UK-12
- DENVER®
- Speaker System with iPod Docking
- CAUTION
- IMPORTANT SAFETY INSTRUCTIONS
- OWNER'S MANUAL
- IMPORTANT NOTES
- English
- UK-2
- PREPARATION FOR USE
- UNPACKING AND SET UP
- POWER SOURCE
- PROTECT YOUR FURNITURE
- LOCATION OF CONTROLS AND INDICATORS
- UK-4
- REMOTE CONTROL BATTERY
- UK-6
- OPERATING INSTRUCTIONS
- Listening to Your iPod / Charging The Battery IMPORTANT!
- UK-8
- AUXILIARY IN
- RESETTING
- CARE AND MAINTENANCE
- CARE OF THE CABINET
- Instructions on environment protection.
- UK-12
Marke : DENVER
Modell : IFI-160
Kategorie : Lautsprecher