
WV-SFR531 - Overvågningskamera PANASONIC - Gratis brugsanvisning og manual
Find enhedens vejledning gratis WV-SFR531 PANASONIC i PDF-format.


Brugerspørgsmål om WV-SFR531 PANASONIC
0 spørgsmål om dette apparat. Besvar dem du kender, eller stil dit eget.
Stil et nyt spørgsmål om dette apparat
Download vejledningen til din Overvågningskamera i PDF-format gratis! Find din vejledning WV-SFR531 - PANASONIC og tag din elektroniske enhed tilbage i hånden. På denne side er alle dokumenter nødvendige for brugen af din enhed offentliggjort. WV-SFR531 af mærket PANASONIC.
BRUGSANVISNING WV-SFR531 PANASONIC
Panasonic
Installation Guide
Included Installation Instructions
Network Camera
Model No. WV-SFR531/WV-SFN531
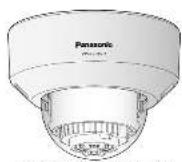
(This illustration represents WJ-5FN5H.)

• The material contains the information permission, which cannot be obtained, and can be used to provide a proof.
■ Before closing his market be 6
- 135 MIRALI (2019)05 FOW TO BELLTO
FOR U.S. AND COMPANY
Panasonic System Communications
Company of North America.
Unit of Panasonic Corporation of North America
www.norolid.com
For version 2 support, vol. 1.800.526/4/
2.3.1.1.1.1.1.1.
Panasonic Canada Inc
3775 A1 5M 3N, M265184
709124-5010
(1) 2017年1月1日
Китратики-Бухля-Некрета Ос. № 2015
for Europe and other countries
Panasonic Corporation
(1) 2007-09-01
附件一:本表二:截至2016年12月31日止年度
PANANA
Голова, Ларан

Auburn Expression
Munorsky, Jr./m. Farley
Panasonic Marketing Europe
Kroserpin; 15, 22115-Her
(1) 本次股东大会的决议
150819226, 1548150, Dlbs: H
2.2.1.2017年(2月25日)
Parts and functions
The company's name of the companies and its follows. Raise to the Extension when including or adopting the company.
A. 10. 2017
p#1851602 30-16064
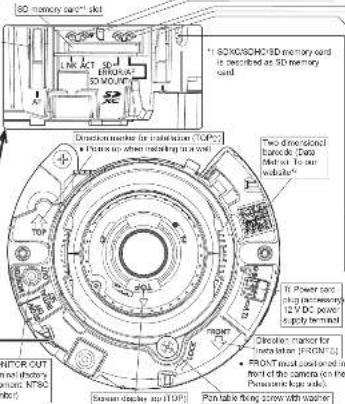
text_image
50Ω memory card* skt LINK ACT 20Ω MOS/AT 50 VOLT Directional mode for installation (TOP): • Power cord when matching in a row • Two of described bandoc data: Data • Two of the line to our bandoc • Power cord plug incrementally 12 V DC power a supply terminal Motor OUT and shunting and MTSO lockout Screw socket in HOPD Screw socket for installation (HOPD) • Power cord should be in the field of the camera on the Perimeter's side. Panel table fixing screw with washer- Descending on the securing application used, the Ddu Mairin may not be able to be read
correctly. In this case, access the site by directly covering the following URL
https://www.1234567.com/10398888888888888888888888888888888888888888888
Standard accessories
import information 1 pc CD-ROM ^2 120
Installation Guide (In a document) .... 1 act Code label ^2 .... 1 pt. Warranty card .... 1 act
*1 The CD-ROM contains the operating instructions and different kinds of tool software programs
- This label may be required for networks management. The network administrator shall retain the original label.
The following parts are used during localization procedure:
© Agreement data ...... 1 yr. © Payment data ...... 1 yr.
- Et (Hex wrench, screw) - External TO terminal plug ^13 1 pc
size 6.35 mm (1/4 inch) T10 .... 1 pc. F MONITOR OUT CONVENIENT PAG .... 1 pc.

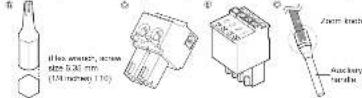
*3 The external VD terminal plug and power cord plug are attached to the camera.
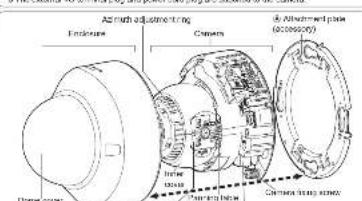
text_image
Engine External coupling Locks Camera External joint pin (8000000) Internal Internal Internal Internal Internal Internal Internal Internal Internal InternalLHS regulator
• Viou la rada a 154 ha a contrava y dla le confei de a Lcle spire
[APT]
[40] P. A. (1985)
- 2017年1月1日,公司召开2017年第二次临时股东大会,并于2018年第一次临时股东大会审议通过了《关于使用部分闲置募集资金进行现金管理的议案》。
5.148,320, 19:59
- 10.4% of (Xanl Hale), speciality being accounted
• 2017年1月1日
- After an acceptable is detected in the SD memory port
or the SD memory card slot is not used after
the camera has started
SD MOUNT Indicator
- When an 3D memory card is inserted and could
be recognized
- When data can be saved after the 50 memory card is
Insextel and the 3D ON/OFF button is pressed
(see 13:1 Second)
■ When the SD number card is removed after hold
down the SD ON/OFF button (about 2 seconds)
(4) 本次股东大会采用现场会议和网络投票相结合的方式。
(二)
- What the control is associated with the SD memory and booklet
an abnormality was collected of the 82 mercury cation
(2) 100%
Note:
- Lighting limiting H12 can be increased with the software installation at any time. The initial
also is fighting or inhibiting. Set the L102 in the state of necessary depertising on the
Installation conditions. (4) Opening instructions included in the CD-ROM
SD CNYCEI turbo
When the SD CNYCEI button is pressed less than 1 second, the SD NCHRI and carer lights
- In respect and case can be equal in the 5D geometry case".
- When the SD ON/OFF button is held down (about 2 seconds), the SD MOUNT indicator lights
off and the 5D memory card can be removed.
N11AL S.1 halkon (in silving / N2SC-019L switch balloon)
• How to initialize the camera
Follow the steps begin to initiate the network camera.
① Turn off the power of the camera. When using a PoE hub, disconnect the LAX calls from the camera.
When using an external power supply, disconnect the power cable conductor of the camera.
- The 100% of the 100% of the 100% of the 100% of the 100% of the 100% of the 100% of the 100% of the 100% of the 100% of the 100% of the 100% of the 100% of the 100% of the 100% of the 25% of the 25% of the 25% of the 25% of the 25% of the 25% of the 25% of the 25% of the 25% of the 25% of the 25% of the 25% of the 25% of the 25% of the 25% of the 25% of the 25% of the
the NITIL SET button, the company will set up and the settings including the network sellings will be initiated.
INSTITUTS
(1)
- When the camera is initialized, the settings including the network settings will be initialized.
■ Before utilizing the settings, this recommended how to down the settings in advance.
- Do not turn off the power of the camera during the process of installation. Otherwise,
may be to introduce and may cause the location.
- When the INITIAL SET button is, the initialing button is pressed less than 1 second to
switch: Principal search of the MONITOR OUT against NTSC=PAL e-mail, the MONITOR
OUT terminal can be switched for the NT3C member/PAL member
Making connections
Turn off each system's power supply before making a connection. Before making connections, prepare the required peripheral devices and cables.
Connect the power cable
connect the power cable
Caulion:
- A READLY ACCESSIBLE DISCONNECT DEVICE SHALL BE INCORPORATED
TO THE EQUIPMENT POWERED BY 12 V DC POWER SUPPLY
• ONLY CONNECT 12 V DC CLASS 2 POWER SUPPLY (UL 1310/CSA221)
LIMITED POWER SOURCE (IECEN/LLC8A6950 1)
Connect the output cable to the 5V power cord plug (necessary).
[1] Loven the scene of the power card plug (accessory), strip 2 mm at 7 mm (1/8 inches lo
932 incls] from Far end of the wise, mis. Far shipped part of the wise sufficiently to sexual
The chart, and then is a series of capital banks in the power bank (A.19) (MBCB20).
(25.1.1)
025 E
Note:
- Check whether the dropped part of the wire is not exposed and is securely reminded
- When providing an external power supply to EV carriers, use the ANC16 to A7/324
ring e-wired or stranded wind cables.
(No text)
IMPORTANT:
- The 12 VDC power supply shall be modified from the nominal AC source.
- Be sure to use the 12 power cord plug (accessory) provided with this product
- Be sure to fully insert the 10 power cord plug (accessory) into the 12 V DC power
supply terminal. Otherwise, it may damage the camera or cause no function.
- When installing the camera, make sure that excessive force is not applied to the
power table.
- Be sure to use an 65 sampler complaint with the Speculative Partner in the indication
RBC on the bottom side of the unit regarding power source and power consumption.
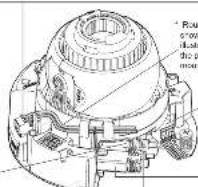
* Round the power cable as
crown in the following
Illustration and do not dp
the power cable was
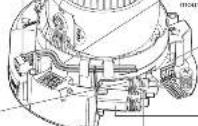
• No necessary use a
(24) 18000
proposed, as to the
rakes, together.
Connect an external amplifier-embedded speaker to the audio output termina
Connect a steel mini plug (ø3,5 mm)
• Output impedance /cpcr. 500 D (unbalanced)
- Recommended cable length: Less than 10 m (32.8 feet)
• Output level -20 dBV
IMPORTANT
• Connect disconnect the audio cables and turn on the power of the camera after running.
off the power of the audio output devices. Otherwise, loud no se may be heard from
the speaker.
- Make sure that the store mini plug is connected to this cable. When a menura mini
plag: a connected, mathematical boundary.
When connecting a meneral speaker with amplifier, use a locally procured conversion
cycle (mono-620150)
Connect an microphone to the microphone/line input terminal
Соотелей майки шт. плод (к3,5 mm)
- Input impedance. Approx. 2 kΩ (unbalanced)
• Intermittent, 2023.11.18 (see text 1 = (5.26 mm) for reference).
- Reoperations: microphones. Evisia trans area (online).
• Sanky zeljnen 2571934
- Environmental sensitivity of microphones: -48 dB ±3 dB (2 dB-1 VPa, 1 kHz)
• Inflation for the past 40% -10%
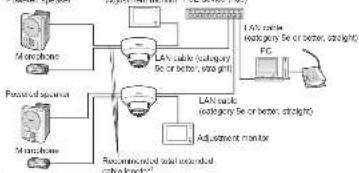
an connecting to a network using a PoE hub
When connecting to a network using a POE hub to the internet the internet, since the internet connection. The information that
was a wiring example of how to connect the camera to the network via a PoE device [hub]
Powered speaker Adjustment monitor PoE device (nuc)
flowchart
graph TD
    A["Microphone"] --> B["LAN cable (category 5e or better, straight)"]
    C["Microphone"] --> D["LAN cable (category 5e or better, straight)"]
    E["Processed sensor"] --> F["LAN cable (category 5e or better, straight)"]
    G["Processed sensor"] --> H["LAN cable (category 5e or better, straight)"]
    I["Adjustment monitor"] --> J["LAN cable (category 5e or better, straight)"]
    K["PC"] --> L["LAN cable (category 5e or better, straight)"]
Connect the alarm input/output cable
Connect the cables of external devices to the F External VC terminal plug (accessory)
[17] When connecting an external device, slip 8 mm - 9 mm [516 inches - 11.32 inches] of the
outer jacket of the cable and twist the cable cord to prevent the other
Specification of cable wire: AWG20 - AWG26. Single core, twisted
- Can down the button of the desired latrine on its box when a plug with a bit
pen; pen, and release the button when the cable of the external device is fully inserted.
12.36
Note:
- Check whether the said case is first when a rail adjacent and a boundary connected
• A ARM RIOYONGCHU MIA KIN2, ALAMIN
Input specification. No voltage make contact input (4V, 5V, 20 internally pulled up)
OFF : Open or 4V 5V DC
D% : which contact with CNC (prepared other cable, 12000 miles;
• N ARM DLL, MAX DLI
Digital specification - Open filter output (precision spinal voltage: 20 V DC)
Open: 4 V - 3 V GC by means pull-up
Close : Output voltage 1 V DC or less [maximum dose current: 50 mA]
* The default of EXT 10 annrals a 01"
Dutler GND
A. A183 R1, A.X 301 (40mm rear front end), A.IX super front end
- 2024 NO. 5. 2024 CHU16 (exhibit 2). Mem: In-1 box
A. M. A. 16, A. M. A. (A) - P. M. M. (A) - A. M. M. (A) - A. M. M. (A)
VACRAMNT, DAYNIGHTIN
(Narm input terminal 1, [AS/AS+IT input terminal])
T. External PO terminal plug (accessory)
IMPORTANT:
- Do not connect 2 miles or more directly to a terminal. When it is necessary to connect
2 or more wires, use a spflec
- Install external forces so that they do not exceed the rating of the 'work camera.
- When using the EX-PC terminal as the 5 carry signal return unit, available aircraft
(1) 2017年1月1日
Note:
- Off, input, and output of the external PO terminal 2 and 3 can be switched by con-
Agring Enabling Refer to the opening instructions on the provided ELL-ROM bar
In particular information about the EXT v0 terminal 2 and 3 JALARMING, 3; will run
"Of," Alarm incur, "Alarm outcur" or "AUX outcur."
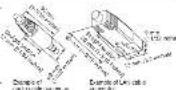
Connect a LAN cable to the network connector
* Use a LAN cable (category 6c or better, 2 pins, straight)
IMPORTANT
• fire old roin
The maximum cable length is 100 m ^2
• Make sure that the PoE device in use is compliant with IEEE902.5uf standard.
- When connecting both the 12 V DC power supply and the FoE device for power
supply, 12 VDC will be used for power supply.
- If a 12V DC power supply and a PCE hub or router are used at the same time,
networks connections may not be possible. In this case, disable the Rule to the working inclusion of the 2-5 key order issues.
- In the case where a 12V DC power supply and a FeF hot circuitor are used as
The season was and the 12.0-30 year ago, in the preceding study. The average
supply is stopped and the camera will restore.
- When the 19% cash is associated with the cash being available
2 seconds. When I'm able to supply necessary fuel, the power may not be supplied
from the PE device.
Acquired cable
LAN calls (category be or better, straight)
Use a LAN cache (database Set or Isler, press) when directly communicating barriers to a PC
- Recommended table length from the Spencer - lens (mm [32.8 mm])
Passional scale graph for the microphone, has just 1 m [5.28 mm]
IMPORTANT:
- The adjustment monitor is used for checking the adjustment of the square held of
view when installing the camera or when sending, it is not provided for recording.
monitoring use
• Depreciating in the past year, state characteristics [Sahamam, 2004-13, M.C. (1997)]: be disclosed on the page.
So displayed on the screen
- Use S banking Master S incl. 10-12% growth with 10% - 12% declined = X - If a PoE hub is not used, each network camera must be expected to a 12 x DC
power supply
- When using 12 VDC, power supply from a PoE hub or router is not required.
Installation
The installation tasks are explained using 6 steps.
| Step1Proportions | Step2Fixing the attachment plate | Step3Mount the camera to the attachment plate | Step4Adjustment | Step6Configure the network settings |
Step1 Preparations
There are 4 methods to install the camera to a ceiling or wall as described below. Prepare the required parts for each installation method because starting the registration. The following are the requirements for the various installation methods.
| Installation method | Recommended screw | Minimum pull out strength (per pc.) |
| (1) When the camera on the front-pump section using the A- attachment plane (accessory). | 300 screw x 4 | 90 % [64 lb/s] |
| (2) Directly mounted the camera in the ceiling or well, using the attachment plane (when each panel is mounted in a closing room). | 300 screw x 4 | 90 % [64 lb/s] |
| (3) Keep the camera in the ceiling using VW-Q178E oil ring mount bracket (approx. 250 g [100 lb/s])** | There are sufficient strength in the ceiling | |
| (4) When running the camera on the capacitously strong ceiling, using the VW-Q195A oil mount bracket (approximately 400 g [100 lb/s])** | * |
Step2 Fixing the attachment plate
(1) Using a two-gang junction box
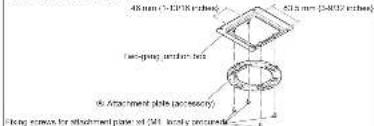
text_image
40 mm (5×10³ inches) 40.5 mm (3×802 inches) Face-groove, corner bits (6) Attachment plots (accessory) Long section for attachment plane set 241 locally precune(2) Using the Attachment plate (accessory)
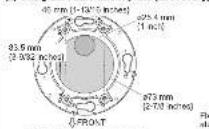
A Attachment plan (necessary)
- If the mounting direction of the carers has already been determined
Align the FRONT direction: the direction of FRONT marker on the camera for indicates the
transloring delinee when inditing the camera of G: sympos A (parroscopy) with P: desired
If the motion direction of the curve is not determined out or if you want to change the
direction of the camera after it has been installed
If you want, it be able to escape the direction of the currents, this image is 72 mm - 2.78 inch/week
here in the center. By doing so you can adjust the mounting direction of the camera in HP instruments.
Step4 Adjustment
(1) Turn-on power for the camera by either con- ing a LHN cable or a 12 V DC power cable. (2) Over-the-HEVITOR CUT converter
(please) to the MONITOR CUT terminal of the currents, and then correct the number for adjustment
mont with a PCA pin cable (locally obscured). Inserd an SCL memory card on the site,
•
• 150: The 62 Monday's 15th week being taken.
• For i-fan
memory card selling, now in the opening
molecular (neural in the CD-ROM)
- Locoen the pan table fixing screw, and adjust
the shape of the corners with the face, topo, and animal guidance.
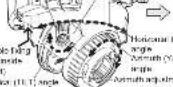
Hodgerel PANI angle: +125° (B)
240°(L±1)
Vertical [TLT:ang: ±25°
Aimuth (A)W angle: ±100
Tighton the cross-head side of H. folie fusing
screw (on one side) and the pan
(Reographical Estimates)
12PM公司4小时
1) Tiling table
1.340 15812 5126N
1) Adjust the zoom and focus.
Leaden the team's best equipped with a high grade for seasonally
to inch to the left, and move it between
TELE and WIDE to obtain the appropriate
angle of view. Then, look the zoom knob
plating it back to the right.
- Adjust the focus by pressing the auto focus
[AF] Button.
- April: the second day the third by April peak to + and 2. Broadcast for action of the
camera with the tilt table, pan table, and
S. Biss for PUSH and on horse sides of the
in'or cover, and install the lower cover to the
place where it was removed.
: Disconnect the member for adjustment.
Attach the enclosure and secure by lightning
-
-
-
-
-
-
-
-
-
-
-
-
-
-
-
-
-
-
-
-
-
-
-
-
-
-
-
-
-
-
-
-
-
-
-
-
-
-
-
-
-
-
-
-
-
-
-
-
-
-
-
-
-
-
-
-
-
-
-
-
-
-
-
-
-
-
-
-
-
-
-
-
-
-
-
-
-
-
-
-
-
-
-
-
-
-
-
-
- 90.
-
-
-
-
-
-
-
-
-
-
-
-
-
-
-
-
-
-
-
-
-
-
-
-
-
-
-
-
-
-
-
-
-
-
-
-
-
-
-
-
-
-
-
-
-
-
-
-
-
-
-
-
-
-
-
-
-
-
-
-
-
-
-
-
-
-
-
-
-
-
-
-
-
-
-
-
-
-
-
-
-
-
-
-
-
-
-
(Platch the schedule by signing, P.E. Panasonic)
3.0 to be circled that is present, circle
5.2 memory rate
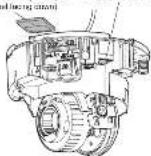
• To remove the SD memory card, hold down
the 3D ON/OFF balloon (used 2 seconds).
When the trading 3D/LOCT analysts get down from our own stock, we are
• After the 50 minutes card has been read
press the SI2 DNAII + In, Itox deox Part 1
securities and make sure the SD MOUNT
Indicator is continually it.
• I say, then you are the
and replacing the 3D memory and Fc
ST (A.JAN) 19:56:48 AM/2020 1
© Microsoft
Note:
- Depending on the adjustable range of the optical room, it must be noted that the
shadow of the enclosure may be projected.
- When mounting the camera on a ceiling, adjust the single edge to the TOP mark
- When mounting fire covers on a wall, where the one takes by 190° in the left and
- When missed the 100 mm mark, there were no marks above the 50 mm mark of the TGF is a filter. The scale the 100 mm mark the TGF marks above the lens always comes to the top slice.
- When adjusting the viewing angle for camera mounted to ceilings, the enclosure
Installation and lary who may be displayed on the screen according on the direct
the context is being. We see the direction of
a
IMPORTANT:
- 2017年1月
• Security Information the company being acquired by a financial institution. On behalf of this
• What is the best thing, it's a good way to be a good way.
• Declarations are carried by the networked meetings, in his case, perform rules.
Issue funding from the setup menu
Remove the camera using the reverse order of the installation procedures
text_image
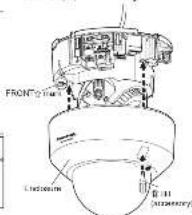
FRONT 21mm Side view Side view E-111 (2023/04/1)Step3 Mount the camera to the attachment plate Step5
Loosen 2 enclosure ring screws.
of the encaps. in with the _0 (this water), respectively, 5.25 mm H
Inches: T1C (accessory), and remove
the enclosure from the camera.
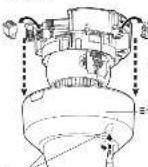
Remove the 43 power cord plug
(accuracy) and the external PC
terminal plug, secondary, anchored to
the camera
Enclosure 1984
(2)
• Do not remove the urinary tube
(图例)
The enclosure is fixed only with enclosure
Hong steam. Please be careful about
the handling when you wish to remove
C
Using the side cable access hole
When installing the camera directly on the
selling or well with cables exposed, or when
Kering, the dam and a green caving method.
be some power to open a cable access hole.
- 2017年
IMPORTANT:
• To prevent injuries and products for
cabies, finish the side cable access hole
zah a be in need of sharp eyes.
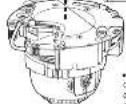
Side cable access hole
m = 311
m = 311
[NO TEXT]
(
1
1
(1)
m - 1 0 ;
Y
1
(No text)
Secure the camera by lightning the camera being size.
IMPORTANT:
■ Un ready [31]
Failure to observe this may cause camera trouble.
due to camera tailing (Recommended lighting)
torque: 0.79 N·m [0.58 (b·m);
- Locozen the cross-head side of 11 table flaxing screw ion
one size), and drive the 10 inches wide keeping the 10
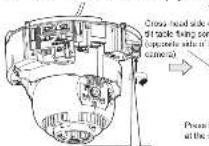
On the following
□ □ □ □
[Unreadable]
[1] 从道
1
s have been connected to the camera, align the
of the camera side panel with the 3ab of the
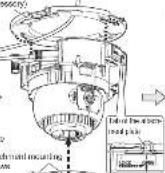
3% Insert 2 attachment mounting holes P15 Pro
The work is important to the best class of the characteristic
a camera is temporarily secured.
arge of the camera can be related in 107 increase
(1) (2) (3)
(1)
→
(1)基因通过控制 通过控制____,____的合成来控制代谢过程,进而控制生物体的性状。
YANT:
formed, after the 12 V DC power
or PoE power source to prevent
to be the, and 4 not coming
work
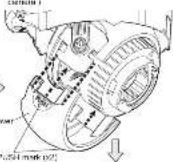
g. mark on the camera lens head facing
The company is the largest of the company, and it is a member of the company.
- Press the PUSH mark on both sides of
the inner cover at the same time, and
remove the inner cover as shown in
the following illustration:
(二)本次股东大会的决议
1 PUSH mark (2)
F mark
- 2014年1月1日
[Unreadable]
1
- 2014年1月1日
k = 3
[Unreadable]
(2) 求流
1
Price
in value
no due
□
1
(1)
S APQ = S AQP + S_ Q
1
[Unreadable]
图 1-3
1
[Unreadable]
V
图 3-1
[Unreadable]
0
S ACD = 1 - 12S COD + 0
①
↓
(1)
1961 made a prize the first job of
C&4 mark. To Belize the 10.1.2023 or low level levels, and purpose law
(1) 2017年1月1日(星期五)上午9:30-15:00
(1)
Configuring the camera so that it can be accessed from a PC
The following are descriptions for when the camera with detail feelings is configured. If you are using the
And Scales on your PC, the group registration will be stated that any candidates are your network. Encourage the rating of the camera after unworthy clinical or the manual scheme. Connect the network
We are the seeing of the 50th and 20th respectively. We see a book, about the network, which is rather than your internet service point on information sheet corrugating the setup of the network
(1) Insert the preview CD-ROM into the CD-ROM drive of your PC.
• The License Agreement will be displayed. Read the Agreement and choose it except
the term in the license agreement, and disk [OK]
- The launcher window will be displayed. If the launcher window is not displayed, double
click the "CD-launcher.exe" file on the CO-ROM
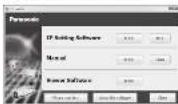
Note:
- Rate in "Using the CD-ROM" is the opening instructions on the powered
CD-ROM for further information about CD launch
The Ground Truth image displays a single, solid horizontal line. According to Rule 2 (UNDERSCORE & LINE RULES), if the GT contains lines used for stylistic emphasis or as background elements (like ruled paper), the OCR result must ignore them. The provided OCR content is "____", which consists of four underscores. This is incorrect because underscores are not equivalent to a solid line and are not permitted under the “Stylistic/Background Lines (Ignore)” rule. The OCR has hallucinated underscores where none should exist in the GT, violating the “Stylistic/Background Lines (Ignore)” rule. Therefore, the OCR result is inconsistent with the Ground Truth.
Ask the Run button to [P. Setting Subway]
-
-
-
-
-
-
-
-
-
-
-
-
-
-
-
-
-
-
-
-
-
-
-
-
-
-
-
-
-
-
-
-
-
-
-
-
-
-
-
-
-
-
-
-
-
-
-
-
-
-
-
-
-
-
-
-
-
-
-
-
-
-
-
-
-
-
-
-
-
-
-
-
-
-
-
-
-
-
-
-
-
-
-
-
-
-
-
-
-
-
-
-
-
-
-
-
-
-
- 100
-
-
-
-
-
-
-
-
-
-
-
-
-
-
-
-
-
-
-
-
-
-
-
-
-
-
-
-
-
-
-
-
-
-
-
-
-
-
-
-
-
-
-
-
-
-
-
-
-
-
-
-
-
-
-
-
-
-
-
-
-
-
-
-
-
-
-
-
-
-
-
-
-
-
-
-
-
-
-
-
-
-
-
-
-
-
-
-
-
-
-
-
-
-
-
-
-
The following table is provided in the image.
select the camera you want to configure, and click [Access Camera].
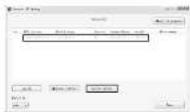
Note:
• When camera are displayed in [Purano P. Selling] soon, click the cam
era with same MAC address as the MAC address printed on the camera that
you want to understand.
3) If the installation screen of the viewer software "Network Camera View 167" is displayed.
follow the minimum of the words to find its translation. The word also is in
32
- The "low" pages will be deployed
- If you cannot install the viewer software "Network Camera View 45" or if images are not
displayed, clock: P-e [Pats] button electric viewer standards on the launcher window to install the software.
- 2016年1月1日
- Perform the time & data, and in the "seconds" - Basic page controls using the camera
-
Note:
- When no image is displayed on the CNE Page here, it does should be in the encoding instructions so the provided OS-PCN.
• It is possible to anchor the next's space by up
- If a position is immediate, the network sector-by-inscription of access to current as using the HTTPS Function. Refer to the operating instructions on the provided
CD-ROM for how to configure the HTTPS settings.
- Click the [Setup] button on the 'L' page, the user authorization window will be
displayed. Enter the default user name and password as follows, and log in.
Длян штва: 8015
P220010 12345
« Котин» толгава антижки и киод 15 «И» веталик ентирск, казанак септизация
In this case, it is a result that is the number of different types of P school students.
■ Due to reactivity changes in "I" Sisira Salwarc, Tisierck selenica n. Ite
tarents to be configured we not be changed when around 20 minutes have
passed after turning on the power of the camera. (When the effective period is set
In 25 m³ in the "key" (key-acceptable) policy.
However, settings can be changed after 20 minutes for cameras in the first set
[Unreadable]
• Πενλητις διστημα τροστημα ΑΙΔ Σχελε δελλημα Ι.Ε. Λυτή μασφός τας πατίκεις από συσμέν ιμας λιμ Μυτήσεις καστήσεις ισε
the first 100%
http://security.egesetock.com/ security/support info.html
(1) 2017年1月1日,公司与关联方发生的交易金额为人民币4,500万元。