
SL-PD7 - Hi-Fi System PANASONIC - Gratis brugsanvisning og manual
Find enhedens vejledning gratis SL-PD7 PANASONIC i PDF-format.


Brugerspørgsmål om SL-PD7 PANASONIC
0 spørgsmål om dette apparat. Besvar dem du kender, eller stil dit eget.
Stil et nyt spørgsmål om dette apparat
Download vejledningen til din Hi-Fi System i PDF-format gratis! Find din vejledning SL-PD7 - PANASONIC og tag din elektroniske enhed tilbage i hånden. På denne side er alle dokumenter nødvendige for brugen af din enhed offentliggjort. SL-PD7 af mærket PANASONIC.
BRUGSANVISNING SL-PD7 PANASONIC
Compact Disc Changer
Operating Instructions
Model No. SL-PD9
SL-PD7
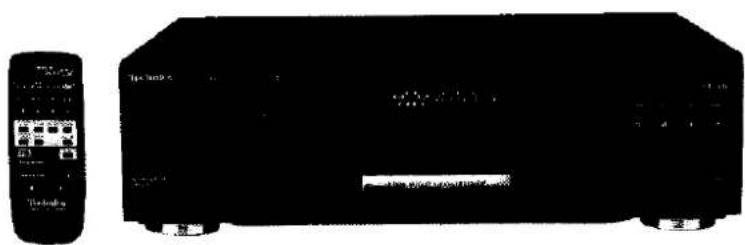
natural_image
Black and white photo of a vintage electronic device with a remote control unit beside it (no visible text or symbols)The photograph shows model SL-PD9 for Europe.
COMPACT disc DIGITAL AUDIO
E EB GN
Technics®
Note:
"EB" on the packaging indicates the United Kingdom.
Before connecting, operating or adjusting this product, please read these instructions completely. Please keep this manual for future reference.
RQT5767-B
Dear customer
Thank you for purchasing this product.
For optimum performance and safety, please read these instructions carefully.
These operating instructions are applicable to the SL-PD9 and SL-PD7 models.
These operating instructions, however, fundamentally explain the operation of SL-PD9 model.
Table of Contents
Before use
Caution for AC Mains Lead 3
Safety precautions 4
Connections 5
Preparing the remote control SL-PD9 only 5
Front panel controls 6
Operations
Basic operations 7
Sequential play 7
To directly access a desired track 8
To exchange discs during play 8
Random play....9
One disc random play 9
Full random play 9
Spiral play 9
Program play 10
ID scan function 11
Search function 11
Skip function 12
To skip discs 12
To skip tracks 12
Repeat function 13
Time mode selection.... 13
Edit guide function.... 14
Reference
Cautions concerning the moving of this unit..... 15
Concerning CDs 15
Maintenance 15
Troubleshooting guide ...... Back cover
Technical specifications.... Back cover
| DANGER | INVISIBLE LASER RADIATION WHEN OPEN.AVOID DIRECT EXPOSURE TO BEAM. |
| ADVARSEL | USTMIG LASER STRALING VIDÅÅNG, MÅR SÄREHEDSÄREHYDEREGRIDE AF FUNCTION UNOGA UDSSETTLESTÖFISIRALING. |
| VARCI | ANATTAESSA JA SUOJALUKIUS CHITETTAESSA OKET ALTIINIANAOMÄTÖNITÄ LASERSTRÄTE Y LYLE. ÄLÄ KATOSÄNIESEERL. |
| WARNING | USTMIG LASER STRALING NÜR DENNA DEL ATRÖPPWAD OCHSÄRNEN ÅH UNIKOPPLAD. BETAKTÄCÄU STRÄLEN. |
| ADVARSEL | USTMIG LASER STRALING NÜR DENKELÄPINES OG SIKERHLDSÄLSÄRNITES UNOGA EKSPOKNING FORSTRÄL DÜ. |
| VORSICHT | UNISCITARE LASERSTRALLIYVE, MEANASDECKUNG GÖFFRET.NICHT DEM STRAIIL ASSETZEN. |
(Inside of product)
(Indersiden at apparatet)
(Tuotteen sisällä)
(Apparatens insida)
(Produktets innside)
(Im Inneren des Gerätes)
Supplied accessories
Please check and identify the supplied accessories.
Use numbers indicated in parentheses when asking for replacement parts.
□ AC mains lead .... 1 pc.
For Europe
(RJA0019-2K)
For United Kingdom
(RJA0053-2X)
For Australia and
New Zealand
(RJA0035-X)
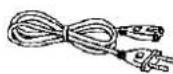
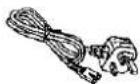
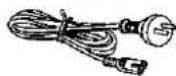
Note
The included AC mains lead is for use with this unit only. Do not use it with other equipment.
□ Stereo connection cable (RJL2P004B08A).... 1 pc.
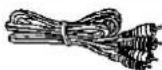
SL-PD9 only
Remote control transmitter (RAK-SL948WK) 1 pc.
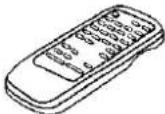
SL-PD9 only
Batteries 2 pcs.
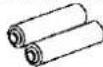
CLASS 1 LASER PRODUCT
LUOKAN 1 LASERLAITE KLASS 1 LASER APPARAT
natural_image
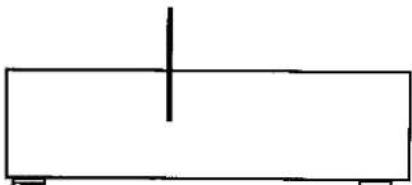
Simple line drawing of a rectangular block with a vertical line and two small base markers (no text or symbols)(Back of product)
(For United Kingdom)
("EB" area code model only)
For your safety, please read the following text carefully.
This appliance is supplied with a moulded three pin mains plug for your safety and convenience.
A 5-ampere fuse is fitted in this plug.
Should the fuse need to be replaced please ensure that the replacement fuse has a rating of 5-ampere and that it is approved by ASTA or BSI to BS1362.
Check for the ASTA mark 📂 or the BSI mark 🌼 on the body of the fuse.
If the plug contains a removable fuse cover you must ensure that it is refitted when the fuse is replaced.
If you lose the fuse cover the plug must not be used until a replacement cover is obtained.
A replacement fuse cover can be purchased from your local dealer.
CAUTION!
IF THE FITTED MOULDED PLUG IS UNSUITABLE FOR THE SOCKET OUTLET IN YOUR HOME THEN THE FUSE SHOULD BE REMOVED AND THE PLUG CUT OFF AND DISPOSED OF SAFELY.
THERE IS A DANGER OF SEVERE ELECTRICAL SHOCK IF THE CUT OFF PLUG IS INSERTED INTO ANY 13-AMPERE SOCKET.
If a new plug is to be fitted please observe the wiring code as stated below.
If in any doubt please consult a qualified electrician.
IMPORTANT
The wires in this mains lead are coloured in accordance with the following code:
Blue: Neutral, Brown: Live.
As these colours may not correspond with the coloured markings identifying the terminals in your plug, proceed as follows:
The wire which is coloured Blue must be connected to the terminal which is marked with the letter N or coloured Black or Blue.
The wire which is coloured Brown must be connected to the terminal which is marked with the letter L or coloured Brown or Red.
WARNING: DO NOT CONNECT EITHER WIRE TO THE EARTH TERMINAL WHICH IS MARKED WITH THE LETTER E, BY THE EARTH SYMBOL 12 OR COLOURED GREEN OR GREEN/YELLOW.
THIS PLUG IS NOT WATERPROOF—KEEP DRY.
Before use
Remove the connector cover.
How to replace the fuse
The location of the fuse differ according to the type of AC mains plug (figures A and B). Confirm the AC mains plug fitted and follow the instructions below. Illustrations may differ from actual AC mains plug.
- Open the fuse cover with a screwdriver.

text_image
Figure A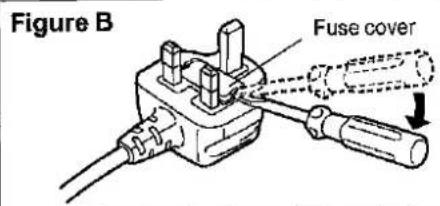
text_image
Figure B Fuse cover- Replace the fuse and close or attach the fuse cover.
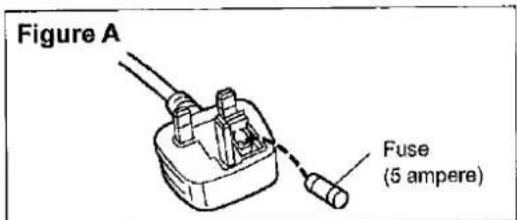
text_image
Figure A Fuse (5 ampere)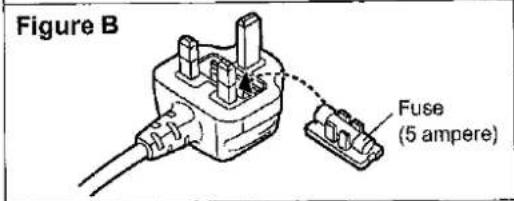
text_image
Figure B Fuse (5 ampere)Placement
Set the unit up on an even surface away from direct sunlight, high temperatures, high humidity, and excessive vibration. These conditions can damage the cabinet and other components, thereby shortening the unit's service life.
Place it at least 15 cm away from wall surfaces to avoid distortion and unwanted acoustical effects.
Do not place heavy items on the unit.
Voltage
Do not use high voltage power sources. This can overload the unit and cause a fire.
Do not use a DC power source. Check the source carefully when setting the unit up on a ship or other place where DC is used.
AC mains lead protection
Ensure the AC mains lead is connected correctly and not damaged. Poor connection and lead damage can cause fire or electric shock. Do not pull, bend, or place heavy items on the lead.
Grasp the plug firmly when unplugging the lead. Pulling the AC mains lead can cause electric shock.
Do not handle the plug with wet hands. This can cause electric shock.
Foreign matter
Do not let metal objects fall inside the unit. This can cause electric shock or malfunction.
Do not let liquids get into the unit. This can cause electric shock or malfunction. If this occurs, immediately disconnect the unit from the power supply and contact your dealer.
Do not spray insecticides onto or into the unit. They contain flammable gases which can ignite if sprayed into the unit.
Service
Do not attempt to repair this unit by yourself. If sound is interrupted, indicators fail to light, smoke appears, or any other problem that is not covered in these instructions occurs, disconnect the AC mains lead and contact your dealer or an authorized service center. Electric shock or damage to the unit can occur if the unit is repaired, disassembled or reconstructed by unqualified persons.
Extend operating life by disconnecting the unit from the power source if it is not to be used for a long time.
CAUTION!
THIS PRODUCT UTILIZES A LASER.
USE OF CONTROLS OR ADJUSTMENTS OR PERFORMANCE OF PROCEDURES OTHER THAN THOSE SPECIFIED HEREIN MAY RESULT IN HAZARDOUS RADIATION EXPOSURE.
DO NOT OPEN COVERS AND DO NOT REPAIR YOURSELF. REFER SERVICING TO QUALIFIED PERSONNEL.
CAUTION!
DO NOT INSTALL OR PLACE THIS UNIT IN A BOOKCASE, BUILT IN CABINET OR IN ANOTHER CONFINED SPACE. ENSURE THE UNIT IS WELL VENTILATED. ENSURE THAT CURTAINS AND ANY OTHER MATERIALS DO NOT OBSTRUCT THE VENTILATION TO PREVENT RISK OF ELECTRIC SHOCK OR FIRE HAZARD DUE TO OVERHEATING.
WARNING:
TO REDUCE THE RISK OF FIRE, ELECTRIC SHOCK OR PRODUCT DAMAGE, DO NOT EXPOSE THIS APPLIANCE TO RAIN, SPLASHING, DRIPPING OR MOISTURE.
SUOMI
VAROITUS!
LAITTEEN KÄYTTÄMINEN MUULLA KUIN TÄSSÄ KÄYTTÖOHJEESSA MAINITULLA TAVALLA SAATTAA ALTISTAA KÄYTTÄJÄN TURVALLISUUSLUOKAN 1 YLITTÄVÄLLE NÄKYMÄTTÖMÄLLE LASERSÄTEILYLLE.
VAROITUS!
ÄLÄ ASENNA TAI LAITA TÄTÄ LAITETTA KABINETTITYYPPISEEN KIRJAKAAPPIIN TAI MUUHUN SULJETTUUN TILAAN, JOTTA TUULETUS ONNISTUISI. VARMISTA, ETTÄ VERHO TAI MIKÄÄN MUU MATERIAALI EI HUONONNA TUULETUSTA, JOTTA VÄLTETTÄISIIN YLIKUUMENEMISESTA JOHTUVA SÄHKÖISKU-TAI TULIPALOVAARA.
VAROITUS:
TULIPALO-, SÄHKÖISKUVAARAN TAI MUUN VAHINGON VÄHENTÄMISEKSI EI LAITETTA SAA ALTISTAA SATEELLE, ROISKEELLE, VESIPISAROILLE TAI KOSTEUDELLE.
NORSK
ADVARSEL!
DETTE PRODUKTET ANVENDER EN LASER.
BETJENING AV KONTROLLER, JUSTERINGER ELLER ANDRE INNGREP ENN DE SOM ER BESKREVENT I DENNE BRUKSANVISNING, KAN F∅RE TIL FARLIG BESTRÅLING.
DEKSLER MÅ IKKE ÁPNES, OG FORS∅K ALDRI Å REPARERE APPARATET PÅ EGENHÅND. ALT SERVICE OG REPARASJONSARBEID MÅ UTF∅RES AV KVALIFI-SERT PERSONELL.
ADVARSEL!
APPARATET MÅ IKKE PLASSERES I EN BOKHYLLE, ET INNEBYGGET KABINETT ELLER ET ANNET LUKKET STED HVOR VENTILASJONSFORHOLDENE ER UTILSTREKKELIGE. S∅RG FOR AT GARDINER ELLER LIGNENDE IKKE FORVERRER VENTILASJONSFORHOLDENE, SÅ RISIKO FOR ELEKTRISK SJOKK ELLER BRANN FORÅRSAKET AV OVERHETING UNNGÅS.
ADVARSEL:
FOR Å REDUSERE FAREN FOR BRANN, STR∅MSJOKK ELLER SKADER PÅ PRODUKTET, MÅ DETTE APPARATET IKKE UTSETTES FOR REGN, VANNSPRUT, VANNDRÅPER ELLER FUKTIGHET.
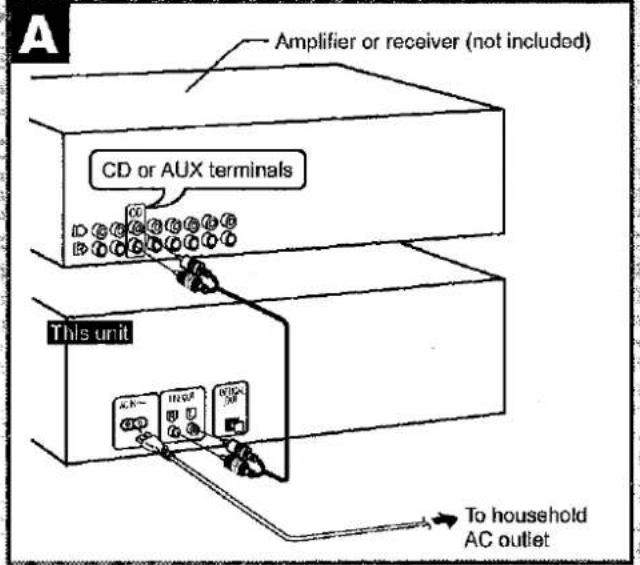
text_image
Amplifier or receiver (not included) CD or AUX terminals This unit A.K- 100kΩ 100kΩ To household AC outlet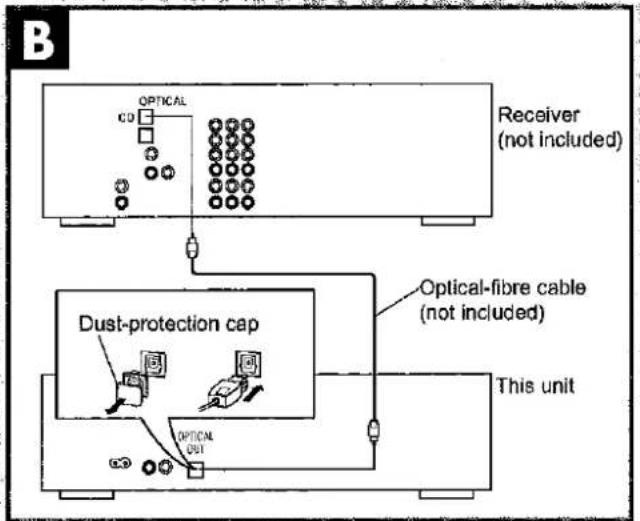
flowchart
graph TD
    A["Optical"] --> B["Dust-protection cap"]
    B --> C["This unit"]
    D["Receiver (not included)"] --> B
    E["Optical-fibre cable (not included)"] --> B
    F["Optical OUT"] --> B
    G["CD"] --> H["Ground"]
text_image
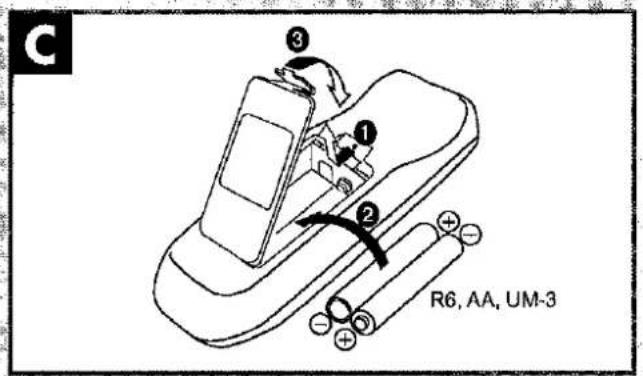
C ① ② ③ R6, AA, UM-3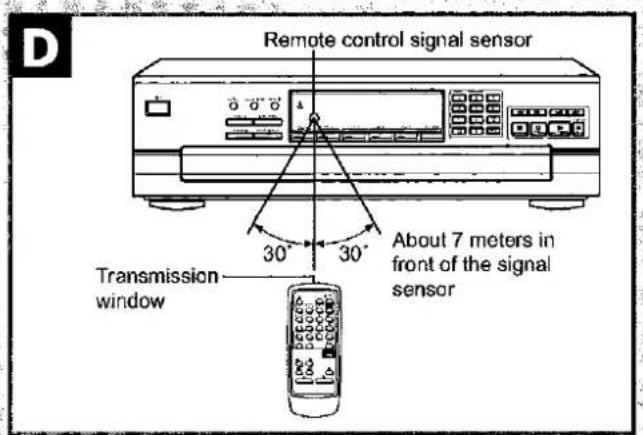
text_image
Remote control signal sensor 30° 30° About 7 meters in front of the signal sensor Transmission windowA Before making connections, be sure that this unit and all other system components are turned off.

text_image
Stereo connection cable (included) White (L) Red (R)FOR UNITED KINGDOM ONLY READ THE CAUTION FOR THE AC MAINS LEAD ON PAGE 3 BEFORE CONNECTION.
Note
Although the figure shows the AC mains lead being connected to a household AC outlet, if the amplifier (or receiver) is equipped with a AC outlet, connect the lead to that outlet.
Insertion of connector
Even when the connector is perfectly inserted, depending on the type of inlet used, the front part of the connector may jut out as shown in the drawing. However there is no problem using the unit.

B Digital connection
Remove the dust-protection cap and connect this unit to other digital equipment with an optical fibre terminal, such as a receiver or digital surround processor.
- Leave the cap attached when this terminal is not being used.
For your reference
If you have DTS format CDs, you can enjoy six channel playback by connecting this unit to a receiver or digital surround processor that has a DTS decoder.
Note
Use only the optical fibre terminal when playing back DTS format discs. DTS signals can only be correctly output through the digital terminal. Connection through the stereo LINE OUT terminals will result in noise and could possibly damage your speakers.
• DTS is a trademark of Digital Theater Systems, L.P.
Preparing the remote control SL-PD9 only
C Battery installation
Use of batteries
- Align the poles (+ and -) properly when inserting the batteries.
- Do not mix old and new batteries, or different types of batteries.
- Do not recharge ordinary dry cell batteries.
- Do not heat or disassemble the batteries. Do not allow them to contact flame or water.
- Remove the batteries if the unit is not to be used for a long time.
- Do not keep together with metallic objects such as necklaces.
- Do not use rechargeable type batteries.
- Do not use batteries if the covering has been peeled off.
Mishandling of batteries can cause electrolyte leakage which can damage items the fluid contacts and may cause a fire.
If electrolyte leaks from the batteries, consult your dealer.
Wash thoroughly with water if electrolyte comes in contact with any part of your body.
D Correct method of use
Operation notes
- Aim the remote control's transmission window toward the unit's sensor. Avoid any obstacles.
- Be sure the transmission window and the unit's sensor are free from dust. Excessive dust might affect performance.
- Do not expose the remote control signal sensor to direct sunlight or to the bright light of a fluorescent light.
To prevent damage
- Never place heavy items on top of the unit.
- Do not disassemble or reconstruct the unit.
- Do not spill water or other liquids into the unit.
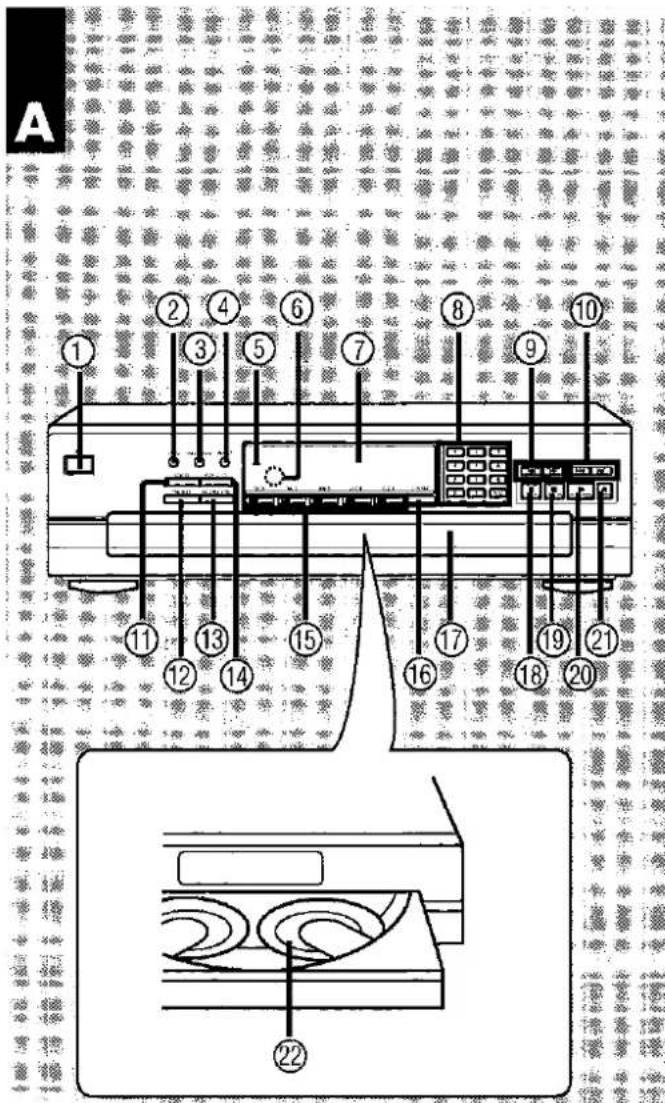
text_image
A ① ② ③ ④ ⑤ ⑥ ⑦ ⑧ ⑨ ⑩ ⑪ ⑫ ⑬ ⑭ ⑮ ⑯ ⑰ ⑱ ⑲ ⑳ ㉑ ㉒ ㉓ ㉔ ㉕ ㉖ ㉗ ㉘ ㉙ ㉚ ㉛ ㉜ ㉝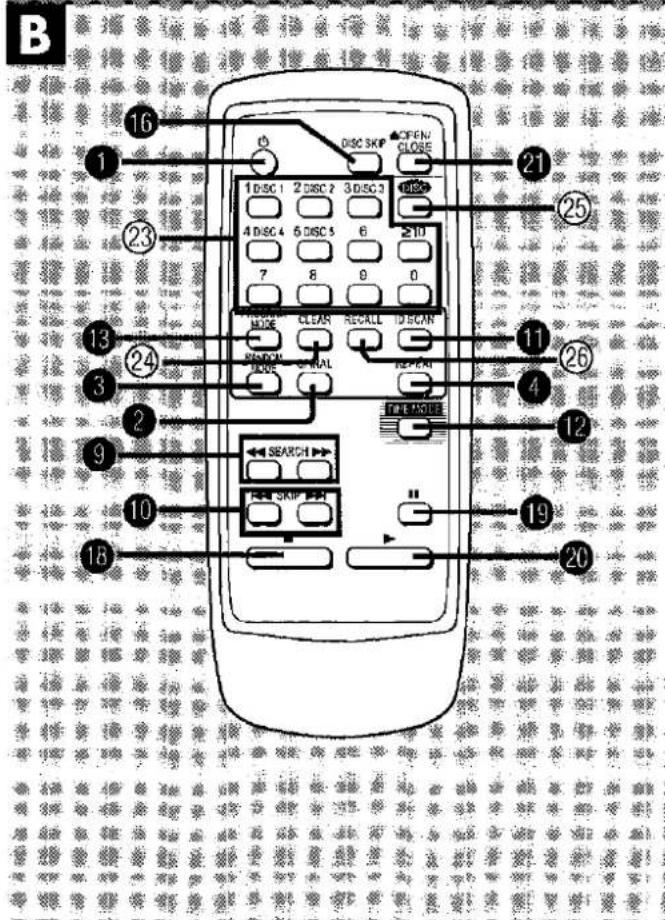
text_image
B 16 21 OPEN CLOSE 10 DISC 1 2 DISC 2 3 DISC 3 DISC 4 DISC 4 5 DISC 5 6 ≥10 7 8 9 0 SIZE CLEAR RECALL DISCAN PICKOUT SIGNAL FIRE MORE 13 24 3 2 9 10 18 19 20
text_image
Front panel controls
Main unit
No.
Name
Ref.page
① For United Kingdom and Europe Standby/on switch (∅/l) 7 Press to switch the unit from on to standby mode or vice versa. In standby mode, the unit is still consuming a small amount of power.
For others
Standby/on switch (☐/I, POWER)....7 Press to switch the unit from on to standby mode or vice versa. In standby mode, the unit is still consuming a small amount of power.
② Spiral button (SPIRAL) 9
③ Random mode button (RANDOM MODE) ..... 9
④ Repeat button (REPEAT) 13
⑤ Standby indicator (☐) When the unit is connected to the AC mains supply, this indicator lights up in standby mode and goes out when the unit is turned on.
⑥ Remote control signal sensor .... 5 This changer can be operated by using the remote control provided with a Technics receiver. (This may not be possible with some models.)
⑦ Display ⑧ Numeric buttons (1–10, 0, >10) ....8
⑨ Search buttons (◀◀, ▶▶).... 11
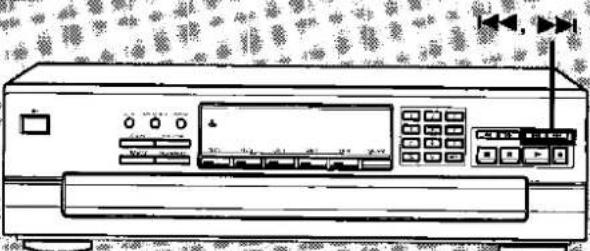
⑩ Skip buttons (|◀◀, ▶▶) 12
⑪ ID scan button (ID SCAN) 11
⑫ Time mode button (TIME MODE).... 13
⑬ Program mode button (PROGRAM MODE).... 10
⑭ Edit guide button (EDIT GUIDE) 14
⑮ Disc buttons (DISC 1-DISC 5) ...... 7
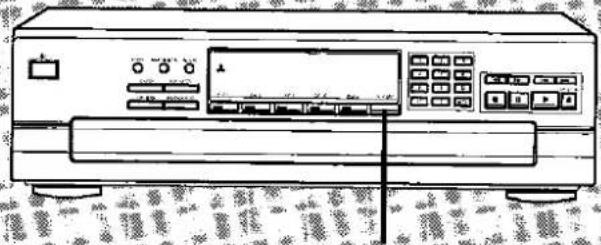
⑯ Disc skip button (DISC SKIP) 7,12
⑰ Loading drawer 7
⑱ Stop button ( ■ )....8
⑲ Pause button (Ⅱ) 8
⑳ Play button (▶) 8
②1 Loading drawer open/close button (▲OPEN/CLOSE) 7
②2 Disc trays (1-5) 7

Remote control SL-PD9 only
Buttons 1, 2, 3, 4, 9, 10, 11, 12, 13, 16, 18, 19, 20 and 21 have the same functions as the corresponding buttons on the main unit.
| No. | Name | Ref.page |
| 23 | Numeric buttons | 8 |
| 24 | Clear button (CLEAR) | 11 |
| 25 | Disc button (DISC) | 7 |
| 26 | Recall button (RECALL) | 11 |
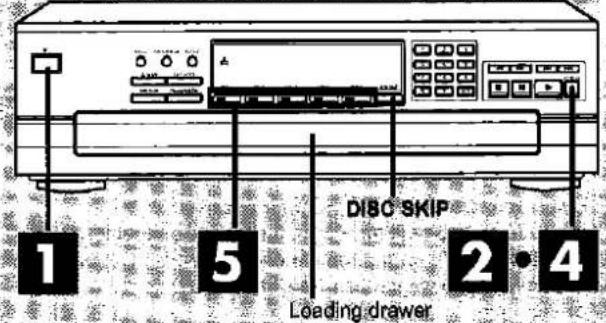
text_image
DIBC SKIP 1 5 2 4 Loading drawer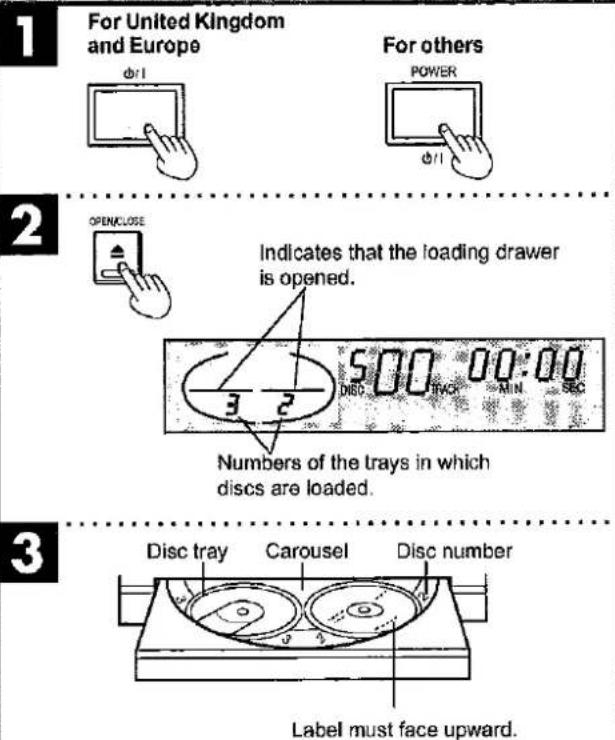
text_image
1 For United Kingdom and Europe For others φ/1 POWER φ/1 2 OPENCLOSE Indicates that the loading drawer is opened. 500 00:00 DISC TIME MIN SEC 3 2 Numbers of the trays in which discs are loaded. 3 Disc tray Carousel Disc number Label must face upward.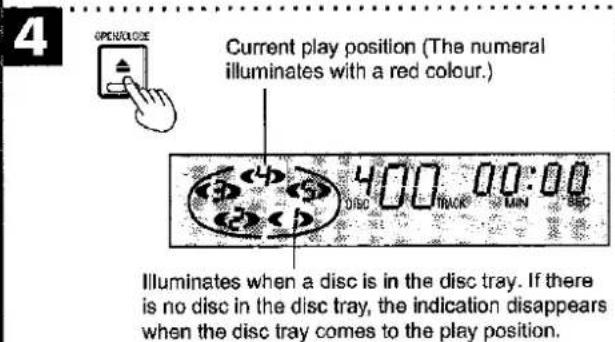
text_image
4 OPEN/CLOSE Current play position (The numeral illuminates with a red colour.) Illuminates when a disc is in the disc tray. If there is no disc in the disc tray, the indication disappears when the disc tray comes to the play position.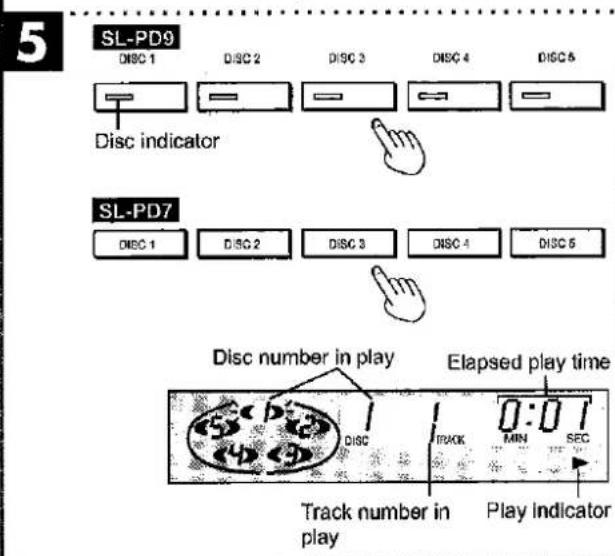
text_image
5 SL-PD9 DISC 1 DISC 2 DISC 3 DISC 4 DISC 5 Disc indicator SL-PD7 DISC 1 DISC 2 DISC 3 DISC 4 DISC 5 Disc number in play Elapsed play time DISC TRACK MIN SEC Track number in play Play Indicator
text_image
Basic operationsThis unit can play CD-DA format audio CD-R and CD-RW that have been finalized* upon completion of recording. It may not be able to play some CD-R or CD-RW due to the condition of the recording. *Finalizing is a process that enables CD-R/CD-RW players to play audio CD-R and CD-RW.
Sequential play
All of the discs will be played, beginning from track 1 on the selected disc.
The explanation below is an example of operation in the case where all five disc trays in the changer are holding CDs.
1 Press [⏻/ı]. The unit will switch on.
2 Press [▲OPEN/CLOSE] to open the loading drawer.
3 Load the disc(s) on the disc tray(s).
The discs can be loaded two at a time by pressing [DISC SKIP] to rotate the carousel.
Note
- Do not load 8 cm and 12 cm discs on the same disc tray.
- Do not use irregular shaped CDs. (See page 15.)
CAUTION
Do not touch the loading drawer and carousel while they are in motion, and do not attempt to rotate the carousel by hand; doing so could result in incorrect operation of the unit and/or damage to the discs.
4 Press [▲OPEN/CLOSE] again to close the loading drawer.
Note
Do not attempt to close the drawer by hand.
5 Press the desired disc button ([DISC 1]–[DISC 5]). Play will begin from the selected disc. If a disc is not on the selected disc tray, the changer plays the disc at the next number.
SL-PD9 only
The disc indicator lights when there is a disc in the corresponding tray.
For remote control SL-PD9 only
Press [DISC] and then within 7 seconds or so, press [DISC 1]—[DISC 5] to select the disc you want.
The changer plays all the tracks on all the discs in order and stops automatically when the last track on the last disc finishes playing. The first disc will then be at the playing position.
text_image
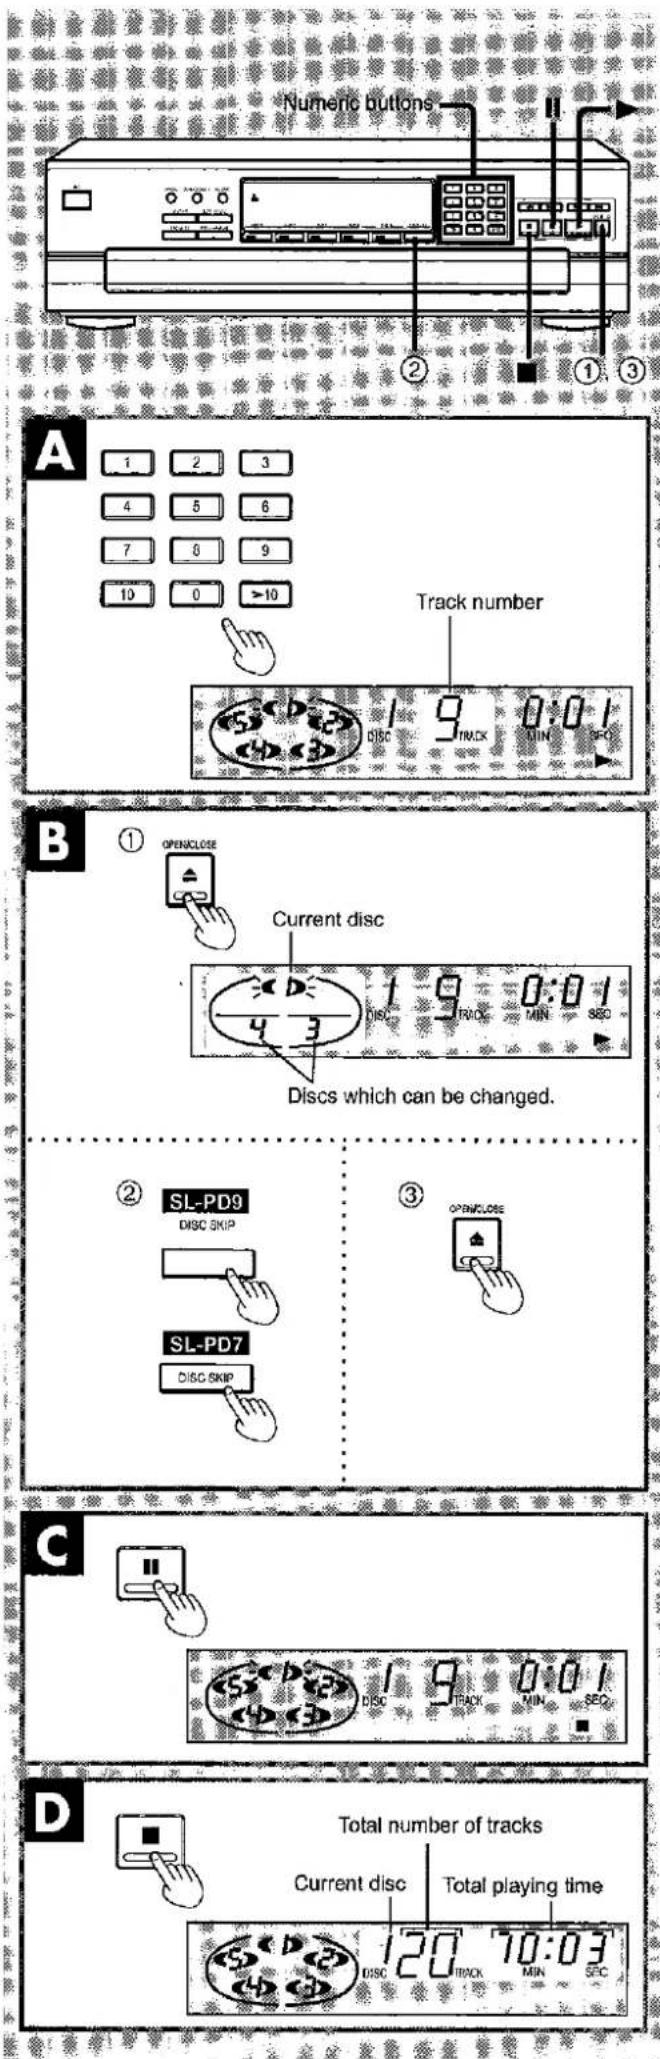
Numeric buttons Track number 1 2 3 4 5 6 7 8 9 10 0 >10 DISC 9 0:01 MIN SFO B ① OPENCLOSE Current disc Discs which can be changed. ② SL-PD9 DISC SKIP SL-PD7 DISC SKIP ③ OPENCLOSE DISC 9 0:01 MIN SEC C Total number of tracks Current disc Total playing time DISC 120 10:03 MIN SEC
text_image
Basic operationsA To directly access a desired track
Press the numeric button(s) to select the track.
To select a two-digit track number over 10 (or to select a two-digit track from the remote control for SL-PD9) Press [>10] ([≥10] on the remote control for SL-PD9) and then the two numbers you want within 7 seconds or so.
For example
Track no. 20: [>10] ([≥10] on the remote control for SL-PD9) ↓ [2]→[0]
B To exchange discs during play
While playing a disc, it is possible to change the other discs without interrupting play.
① Press [▲OPEN/CLOSE] to open the loading drawer.
② Press [DISC SKIP] to rotate the disc trays and exchange the discs.
The carousel will move by one disc tray. Pressing again moves the carousel in the opposite direction by two disc trays.
③ Press [▲OPEN/CLOSE] to close the loading drawer.
Note
If you play a disc with the loading drawer open, discs other than the current disc cannot be played.
C To temporarily stop play
Press [III].
Press [▶] to resume play.
D To stop play
Press [■].
The display will show the total number of tracks and the total playing time of the current disc.
The total playing time displayed includes the silent sections between tracks. For this reason, it may be a few seconds longer than the playing time indicated on the disc.
Press [▶] to re-start play.
CAUTION
Do not move this changer with a compact disc inside the unit. If a disc comes off the disc tray, it might be scratched or the changer might become incapable of playing.
(Refer to "Cautions concerning the moving of this unit" on page 15.)
text_image
RANDOM MODE A RANDOM MODE DISC 11 TRACK 0:01 DISC 11 DISC RND MIN SEC B RANDOM MODE DISC 5 8 TRACK 0:01 DISC 5 8 TRACK MIN SEC FULLAND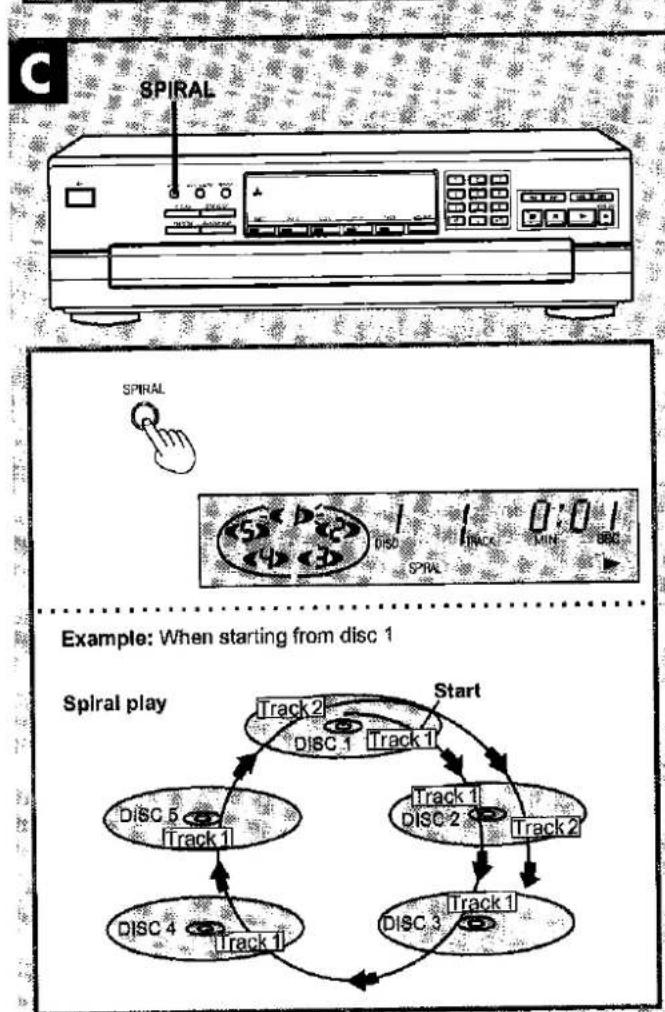
flowchart
graph TD
    A["Start"] --> B["Track 2"]
    B --> C["Disc 1"]
    C --> D["Track 1"]
    D --> E["Disc 5"]
    E --> F["Track 1"]
    F --> G["Track 4"]
    G --> H["Track 1"]
    H --> I["Track 3"]
    I --> J["Track 1"]
    J --> K["Track 2"]
    K --> L["Disc 2"]
    L --> M["Track 2"]
    M --> N["Disc 3"]
    N --> O["Track 1"]
    O --> P["Start"]
    style A fill:#f9f,stroke:#333
    style B fill:#ccf,stroke:#333
    style C fill:#cfc,stroke:#333
    style D fill:#fcc,stroke:#333
    style E fill:#cff,stroke:#333
    style F fill:#ffc,stroke:#333
    style G fill:#cfc,stroke:#333
    style H fill:#fcc,stroke:#333
    style I fill:#cfc,stroke:#333
    style J fill:#fcc,stroke:#333
    style K fill:#cfc,stroke:#333
    style L fill:#fcc,stroke:#333
    style M fill:#cfc,stroke:#333
    style N fill:#fcc,stroke:#333
    style O fill:#cfc,stroke:#333

text_image
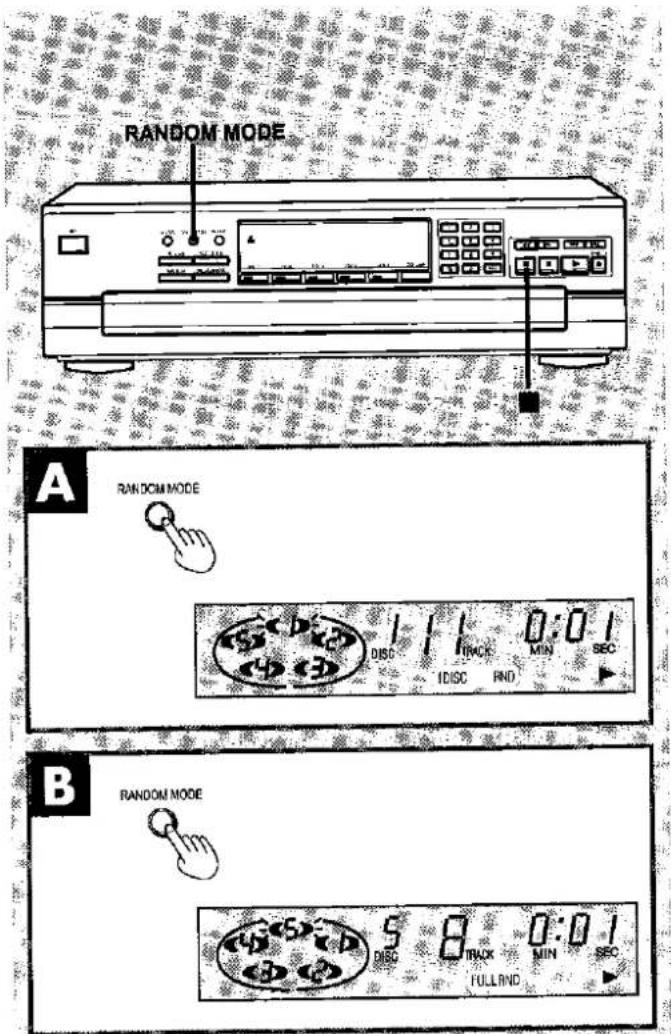
Random playAll of the tracks will be played one time each in random order. There are two types of random play as described below.
A One disc random play
The changer will play all tracks on the current disc in a random order. Then it will choose a new disc randomly, excluding the discs already played, and play all tracks on that disc in a random order.
In the stop or play mode
Press [RANDOM MODE] so that the "1 DISC RND" indicator illuminates.
Every time you press the button:
1 DISC RND → FULL RND → (off)

B Full random play
Each track to be played back is selected randomly from all of the tracks on all of the discs, excluding the tracks that have already been played.
In the stop or play mode
Press [RANDOM MODE] so that the "FULL RND" indicator illuminates.
Every time you press the button:
1 DISC RND → FULL RND → (off)

The changer will stop automatically when all the tracks on all discs have been played once.
To cancel random play mode
Press [■].
The "1 DISC (or FULL) RND" indicator will go out.
C Spiral play
The changer plays the first tracks on all the loaded discs in sequence, followed by the second tracks on all the discs, and so on.
In the stop or play mode
Press [SPIRAL].
Spiral play will begin with the first track on the disc situated at the playing position.
The changer will stop automatically when all the tracks on all discs have been played once.
For your reference
When a disc with fewer tracks finishes playing, that disc will be skipped and the changer will continue playing the remaining track on the other discs in spiral sequence.
To cancel spiral play mode
Press [SPIRAL] again.
The "SPIRAL" indicator will go out.
The changer will return to sequential play mode from the current track on the current disc which is playing.
text_image
1 2 3 5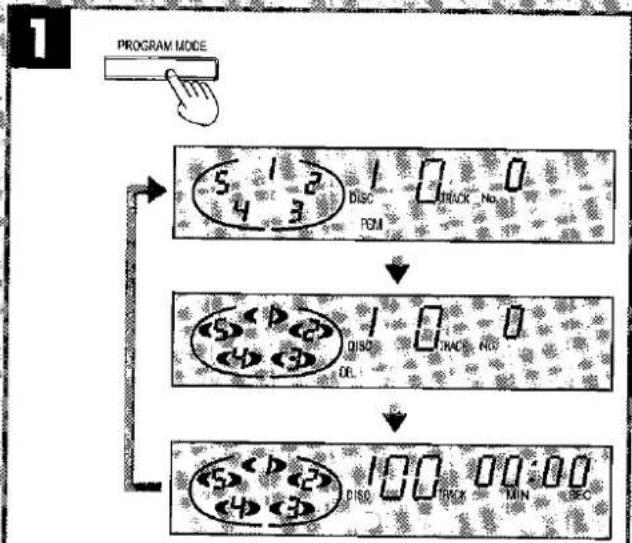
flowchart
graph TD
    A["PROGRAM MODE"] --> B["5 1 2 3 DISC NO. POM"]
    B --> C["5 < D > 2 DISC NO. OL"]
    C --> D["5 < D > 2 DISC NO. 3"]
    D --> E["100 00:00 MIN BEC"]
text_image
2 SL-PD9 DISC 1 DISC 2 DISC 3 DISC 4 DISC 5 SL-PD7 DISC 1 DISC 2 DISC 3 DISC 4 DISC 5 5 1 2 3 4 5 6 7 8 9 10 4 <3 DSC TAX No. PUM Specified disc number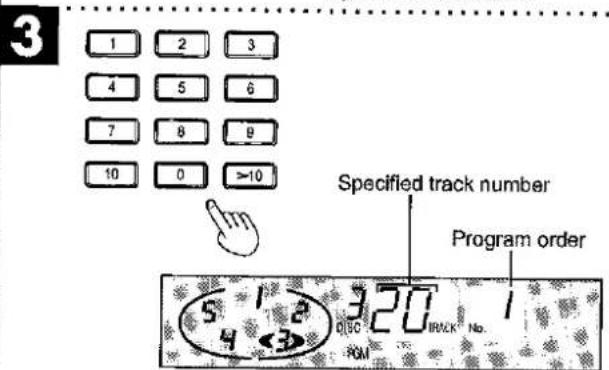
text_image
3 1 2 3 4 5 6 7 8 9 10 0 >10 Specified track number Program order 5 1 2 3 20 DISC No. 4 <3> ROM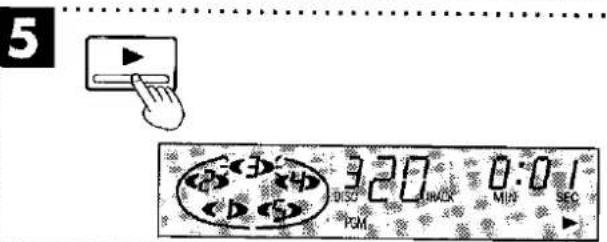
text_image
5 320 0:01 DISC UNACK MIA SEC PGMProgram play
This unit has two program play modes; program (PGM) and delete (DEL).
Program mode allows you to select and play your favourite tracks in the order you want to hear them.
Delete mode allows you to program the unit not to play certain tracks. This mode can be used in combination with sequential and random play.
Up to 32 tracks can be selected for each mode.
text_image
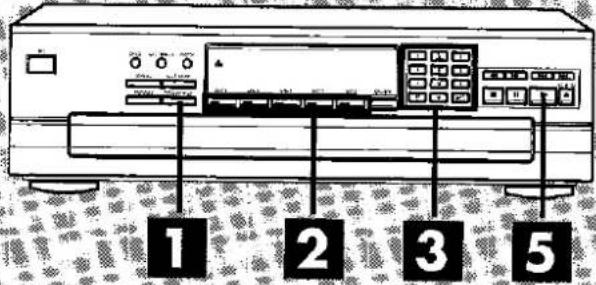
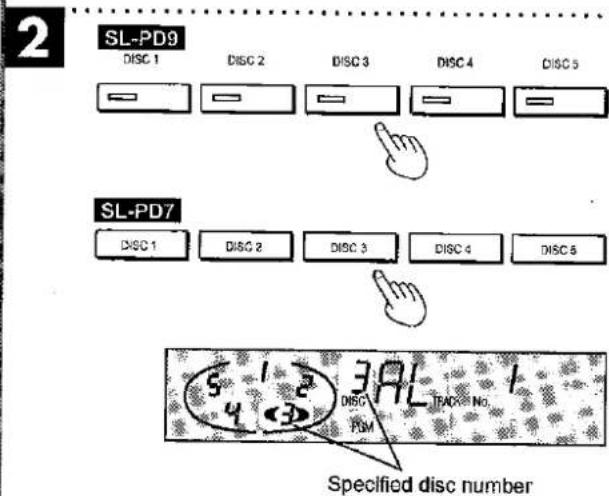
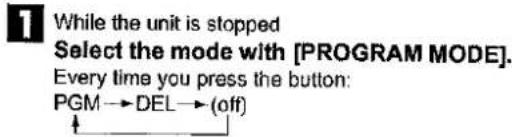
While the unit is stopped Select the mode with [PROGRAM MODE]. Every time you press the button: PGM→DEL→(off)2 Press [DISC (1 to 5)] to select the required disc. "AL" appears on the display to indicate all the tracks on the disc are selected. Repeat the above if you want to make selection by disc only. The number of programmed items increases by one each time a [DISC] button is pressed.
3 Press the numeric button(s) to select a track. To select a two-digit track number over 10 (or to select a two-digit track from the remote control for SL-PD9) Press [>10] ( ≥ 10] on the remote control for SL-PD9) and then the two numbers you want within 7 seconds or so. For example Track no. 20: [>10] ( ≥ 10] on the remote control for SL-PD9) ↓ [2]→[0]
4 Repeat steps 2 and 3 to complete the selection. If a non-existing disc or track number is entered, the selection is initially recorded but erased automatically during playback. "-F" is displayed if you attempt to enter a 33rd item.
5 Press [▶] to start play. Additional selections can be made during play by repeating steps 2 and 3.
To use random play and delete mode together
After step 4, make your random play mode selection (see page 9).
To cancel program play
While the unit is stopped Press [PROGRAM MODE] to select "(off)" mode.
The contents of the program remain in the unit's memory even after the unit is turned off.
To use the program again
-
Press [PROGRAM MODE] to select the required mode.
-
Press [▶].
For your reference
The program remains in the memory for up to two weeks even if the unit is disconnected from its power source.

text_image
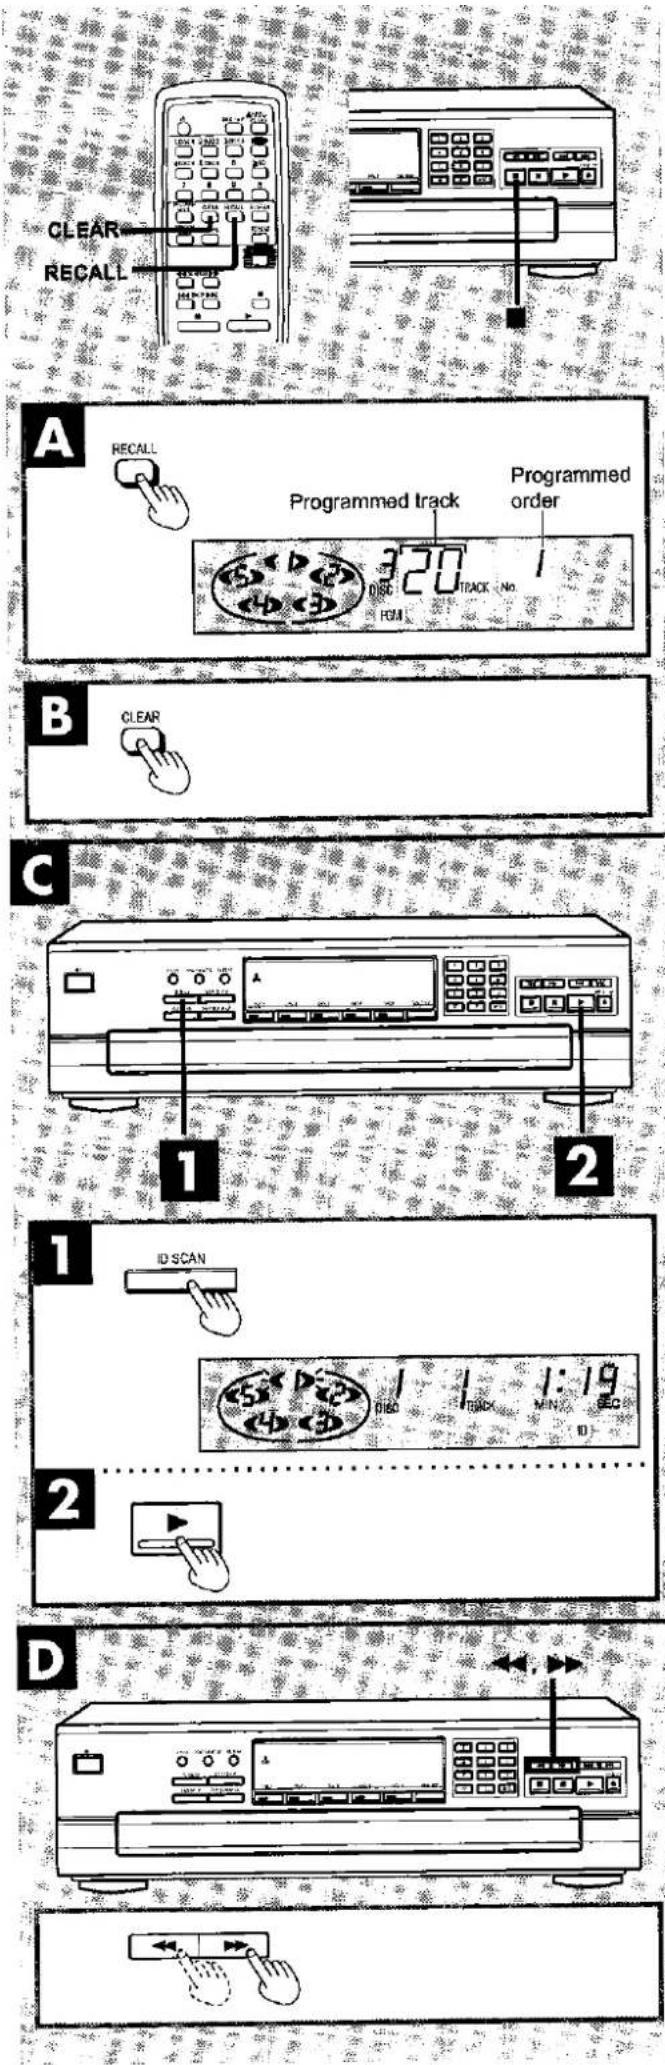
ProgramlasySL-PD9 only (Remote control only)
A To confirm the selections
Press [RECALL].
Each time you press the button, the tracks and discs you programmed appear on the display in the order they were selected.
To cancel selections
While the unit is stopped
Press [■]. The entire program is cancelled.
SL-PD9 only (Remote control only)
B To clear the last Item in the program
Press [CLEAR].
To clear a specific item
-
Press [RECALL] until the item is displayed.
-
Press [CLEAR].

text_image
© ID scan functionThis function is convenient to use when searching for a desired track.
The function will search from the beginning of the track for a loud section, and will play 10 seconds of the track centering around that point.
The order of scanning is the same as for play mode.
1 Press [ID SCAN].
ID scan will start.
2 When the desired track has been found: Press [▶].
The changer will play the track from the beginning.
To cancel ID scan
Press [ID SCAN].
The "ID" indicator will go out.
The changer will continue to play from the track being played.

text_image
D Search functionYou can search rapidly forward or backward on the disc for specific sections.
In the play or pause mode
Press and hold [◀◀] or [▶▶].
[◀◀]: You can search backward.
[▶▶]: You can search forward.
Release the button when you reach the desired point.
The changer will return to the previous mode (play or pause).
In sequential play mode
You can search forward over discs and backward within the current disc.
In other play modes
You can search forward or backward only within the current track.
For your reference
The search function will begin slowly, and then, if the button is held pressed for longer than 3 seconds, it will change to high-speed search.
Searching in the play mode will decrease the sound level by 12 dB (1/4).
A
natural_image
Line drawing of a vintage electronic device with control panel and buttons (no text or symbols)DISC SKIP
text_image
SL-PD9 DISC SKIP SL-PD7 DISC SKIP Disc number at the playing position 20.0 00:00 DISC TRACK MRR SECB
natural_image
Line drawing of a vintage electronic device with front panel, buttons, and display (no text or symbols)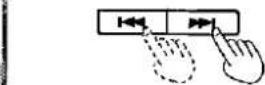
text_image
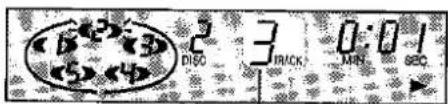
2 DISC 3 RICK 0:01 MIN SECTrack number at the playing position
Skip function
A To skip discs
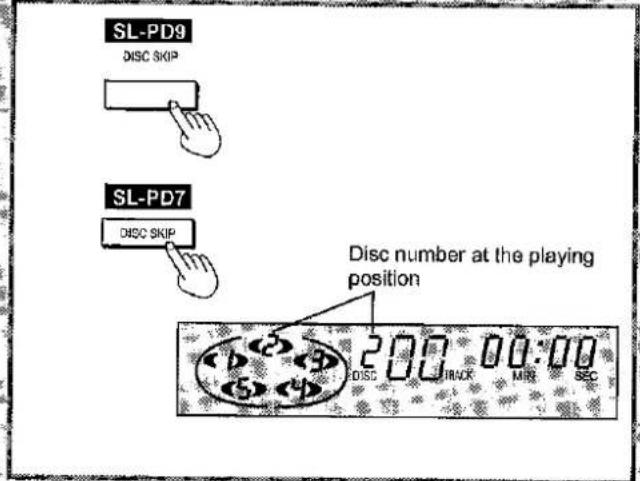
Use this function to skip discs when selecting a disc to which you wish to listen, and when loading and unloading the discs.
You can use this function in stop, sequential play, one disc random play and delete play modes.
Press [DISC SKIP] to rotate the disc tray.
In stop mode
When the loading drawer is closed, pressing [DISC SKIP] changes the disc tray to the next one.
When the loading drawer is open, pressing [DISC SKIP] moves the carousel by two disc trays.
In play mode
When the loading drawer is closed, pressing [DISC SKIP] changes the disc and the changer plays the track on the next disc.
If a disc is not on the selected disc tray, the changer plays the disc at the next number.
When the loading drawer is open, pressing [DISC SKIP] moves the carousel by one disc tray. Pressing again moves the carousel in the opposite direction so that you can change all discs except the one being played.
B To skip tracks
Use this function to skip tracks when selecting a track to which you wish to listen.
Press either [◀◀] or [▶▶] until you reach the desired track.
[◀◀]: You can skip backward.
[▶▶▶]: You can skip forward.
In sequential/program/delete play mode
In sequential play mode, you can skip only within the current disc. In program play mode, you can skip from one track to another in the programmed sequence.
In delete play mode, you can skip tracks only within the current disc excluding the tracks to be deleted.
[◀◀]: You can skip to the beginning of the track being played. If you press this button again quickly, you can skip to the beginning of the previous track.
Remember that in a backward skip, the current track is included in the count.
[▶▶▶]: You can skip as many tracks as the number of times you press the button.
In random play mode
[◀◀]: You can skip to the beginning of the current track.
[▶▶▶]:You can skip to the beginning of a next track in random order.
In spiral play mode
[◀◀]: You can skip to the beginning of the current track.
[▶▶]:You can skip to the beginning of the track on the next disc.
You can also skip tracks when the changer is in the stop mode (except during random play and spiral play) or pause mode.
text_image
A REPEAT REPEAT 100° 00:00 DISC TRACK MIN SEC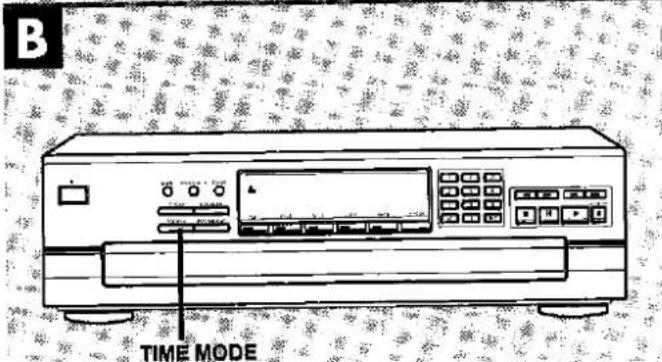
text_image
B TIME MODE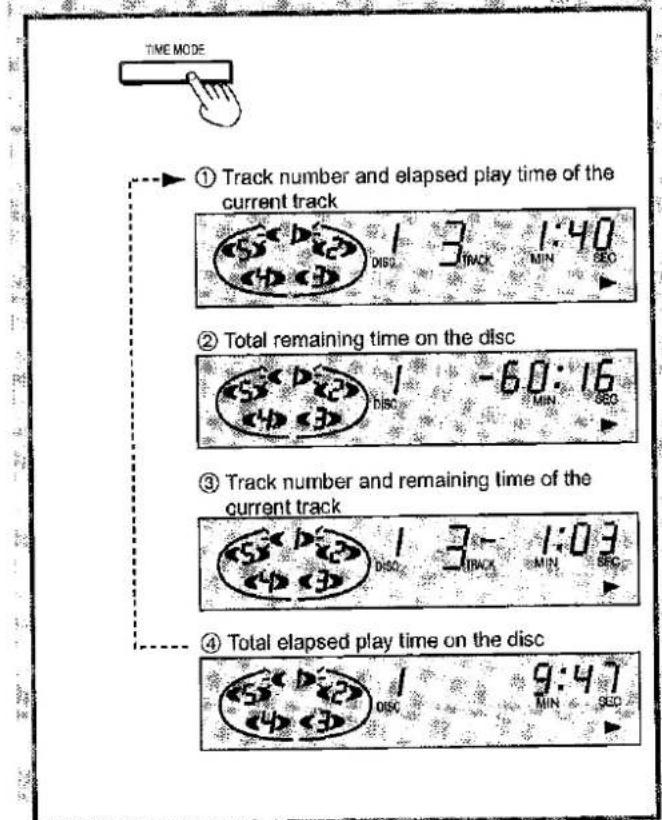
text_image
TIME MODE ① Track number and elapsed play time of the current track 1 3 1:40 DISC MIN GEO ② Total remaining time on the disc 1 -60:16 DISC MIN GEO ③ Track number and remaining time of the current track 1 3 1:03 DISC MIN GEO ④ Total elapsed play time on the disc 1 9:47 DISC MIN GEOA Repeat function
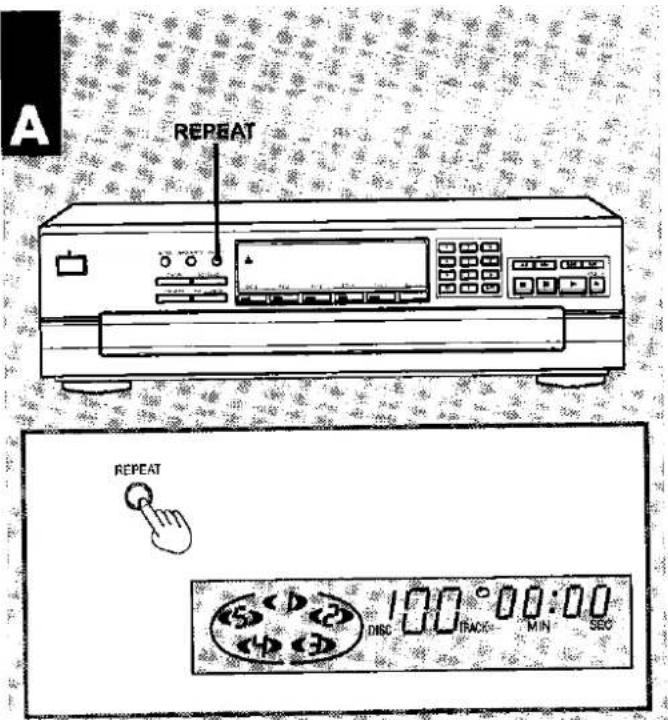
Play will continue endlessly in accordance with the specific play mode selected.
Before or during play
Press [REPEAT].
In sequential play mode
All tracks of all discs will be played repeatedly.
In program play mode
The changer plays only the programmed selections in the programmed sequence repeatedly.
In delete play mode
The changer plays the discs and tracks excluding the selections to be deleted repeatedly:
In random play mode
When the changer has played all the tracks on all the loaded discs, it will select a new random sequence and play continuously. The sequence differs each time.
In spiral play mode
The changer plays all tracks of all discs repeatedly in the sequence of spiral play.
To cancel repeat mode
Press [REPEAT] again.
The "○" indicator will go out.
B Time mode selection
The various time information of the current disc can be displayed.
In the play or pause mode
Press [TIME MODE].
Every time you press the button, the display changes in the order shown in the diagram.
In all play modes
When track number 21 or greater is playing, display ③ shows "--:-.". ① is displayed if play is stopped and then started again.
In program/delete/random/spiral mode
The displayed information will alternate between displays ① and ③ each time the button is pressed.
During operation of the edit guide function
The remaining play time on side A or side B will be shown in display ②, and the elapsed play time for side A or side B will be shown in display ④.
flowchart
graph TD
    A["Example: Recording from a disc containing seven tracks onto a 60-minute tape."] --> B["3"]
    B --> C["1"]
    C --> D["4"]
    D --> E["5"]
    E --> F["3"]
    F --> G["4"]

    subgraph Section A
        H["Side A (30 min)"]
        I["Track 1"]
        J["Track 2"]
        K["Track 3"]
        L["Track 4"]
        M["Side B (30 min)"]
        N["Track 5"]
        O["Track 6"]
        P["Track 7"]
    end

    subgraph Section B
        Q["SL-PD9 DISC SKIP"]
        R["SL-PD7 DISC SKIP"]
        S["Specified disc number"]
        T["500 MIN 00:00 DISC"]
    end

    subgraph Section C
        U["EDIT GUIDE"]
        V["5 -46 MIN EDIT"]
        W["Number of tracks to be recorded"]
        X["Tracks to be recorded"]
        Y["Side A"]
        Z["4 -7 ~ 4 TRACK EDIT"]
    end

    subgraph Section D
        AA["Remaining time on side A"]
        AB["1:14 MIN SEC EDIT"]
        AC["Number of tracks to be recorded"]
        AD["Tracks to be recorded"]
        AE["Side B"]
        AF["8-3-5~7 INVCK EDIT"]
        AG["Remaining time on side B"]
        AH["8-3:23 MIN EDIT"]
    end

text_image
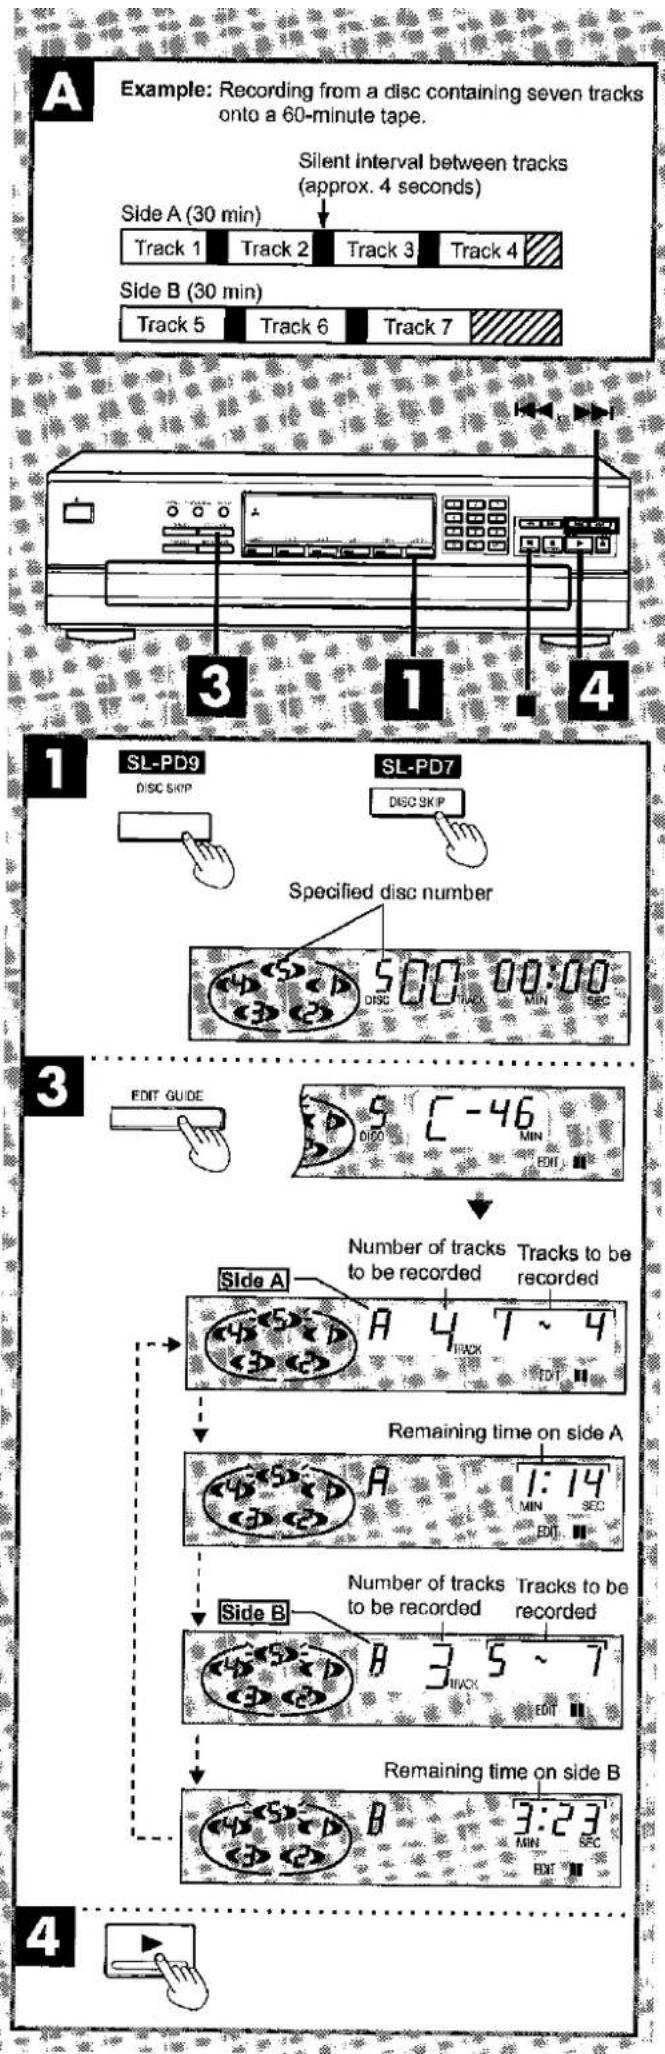
Edit guide functionA When recording, the changer will automatically program the tracks for tape sides A and B in accordance with the length of the tape so that none of the tracks will be interrupted before they are completed.
In addition, the program will also include a silent interval of approximately 4 seconds between tracks.
1 Press [DISC SKIP] to select the disc to be recorded.
2 Prepare the tape deck for recording.
Set the Dolby NR, reverse mode, recording level, etc., as instructed in the Operating Instructions for the tape deck.
Note
Rewind the tape so recording is possible from its beginning.
3 Press [EDIT GUIDE] to select the tape length.
Each time you press the button, the display showing the tape length changes as follows.

Choose the length of the tape you will use.
More precise time settings are also possible.
(Refer to "To enter a desired recording time other than 46, 60 or 90 minutes" below.)
The data of the tracks to be recorded is displayed as shown in the diagram.
In this example, disc 5 can be recorded with tracks 1-4 on side A and tracks 5-7 on side B of the cassette tape.
- Start recording on the tape deck and then immediately:
Press [▶].
When the last track set for recording on side A is finished, the changer will enter the pause mode. Set the tape to the position from which recording will begin on side B, and then perform step 4 once again.
When all the programmed tracks on the specified disc finish playing, the changer will automatically stop. The edit guide mode will be cancelled at the same time.
To enter a desired recording time other than 46, 60 or 90 minutes
- Select "C---" in step 3.
- Enter the total recording time in minutes (1-99) using the numeric buttons.
For example
To use 52-minute tape, press [5] then [2].
You can also specify the tape length by pressing [◀◀] or [▶▶] buttons.
Press either [◀◀] or [▶▶] from each step C-46, C-60, C-90 or C---. For example
To use 52-minute tape, select C-46 and then press and hold [▶▶] until the display shows "52".
The maximum allowable playing time for editing is 99 minutes.
To stop recording
Press [■] and then press the stop button on the tape deck.
Note
Depending on the disc, a little of the beginning of the next track may be recorded onto the end of the track.
text_image
A ①, ②, ⑥ ④ ③, ⑤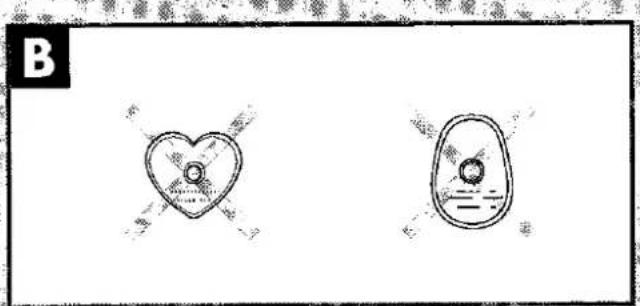
text_image
B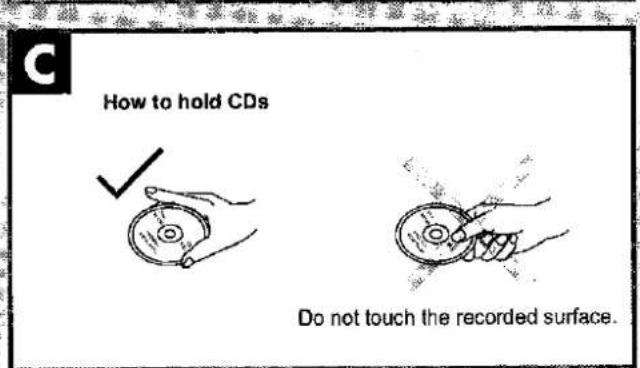
text_image
How to hold CDs Do not touch the recorded surface.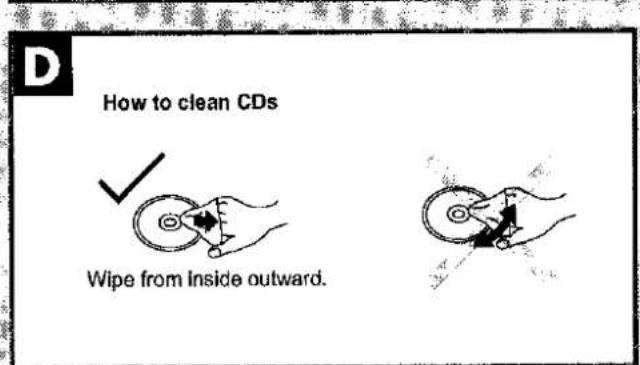
text_image
D How to clean CDs Wipe from inside outward.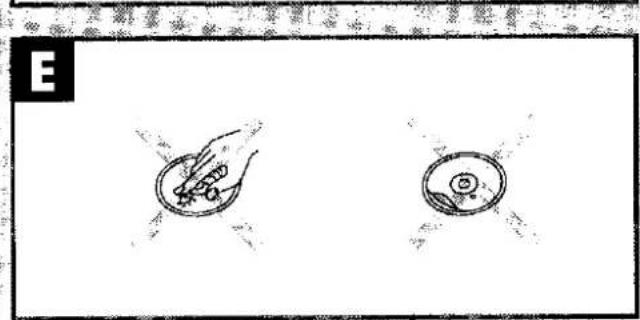
natural_image
Two hand-drawn bowls, one with a spoon and the other with a leaf, placed side by side on a plain background (no text or symbols)- 2017年,公司与上海浦东发展银行股份有限公司签订了《关于使用部分闲置募集资金进行现金管理的协议》。
Counish concerning the moving of this unit
CAUTION
Before moving the changer to another location, be sure to carry out the "Preparations for moving the unit" described below.
Failure to do so will expose the compact discs and the changer to the risk of severe damage.
A Preparations for moving the unit
All of the discs must be removed so that the trays are completely empty.
Use the following procedure.
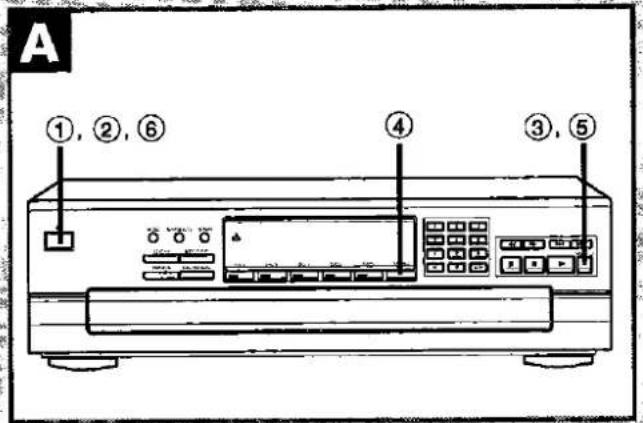
① Press [∅/l] to switch off the unit.
② Press [∅/!] to switch on the unit.
(If there is a disc in the play section, it will be returned to the disc tray at this time.)
③ Press [▲OPEN/CLOSE] to open the loading drawer.
④ Press [DISC SKIP] to rotate the disc trays and remove the discs from all disc trays.
⑤ Press [▲OPEN/CLOSE] to close the loading drawer.
⑥ Press [∅/l] to switch off the unit.
If you have pressed a wrong button by mistake, return to step ①.
Concerning CDs
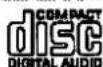
With this changer, you can play CDs having this mark:
B However, do not use irregular shaped CDs. CDs of the sort can damage the unit.
C \~ E Handling precautions
- If you are taking the CD from a cold to a warm environment, moisture may form on the CD. Wipe this off with a soft, dry, lint-free cloth before using the CD.
- Do not write on the label side with a ball-point pen or other writing instrument.
- Do not use record cleaning sprays, benzine, thinner, static electricity prevention liquids or any other solvent.
- Do not attach labels or stickers to CDs. (Do not use CDs with exposed adhesive from tape or left over peeled off stickers.)
- Do not use scratch-proof protectors or covers other than those specified for use with this system.
- Do not use CDs printed with label printers available on the market.
Storage precautions
Be sure to store CDs in their cases to protect them from dust, scratches, and warping.
Do not place or store CDs in the following places
- Locations exposed to direct sunlight
• Humid or dusty locations - Locations directly exposed to a heat vent or heating appliance
• In the glove compartment or on the rear deck of an automobile - Locations exposed to direct sunlight
- Humid or dusty locations
- Locations directly exposed to a heat vent or heating appliance
- In the glove compartment or on the rear deck of an automobile
Maintenance
To clean this unit, wipe with a soft, dry cloth.
If the surfaces are extremely dirty, use a soft cloth dipped in a soap-and-water solution or a weak detergent solution.
- Never use alcohol, paint thinner or benzine to clean this unit.
- Before using chemically treated cloth, read the instructions that came with the cloth carefully.
Troubleshooting guide
Before requesting service for this unit, check the chart below for a possible cause of the problem you are experiencing. Some simple checks or a minor adjustment on your part may eliminate the problem and restore proper operation.
If you are in doubt about some of the check points, or if the remedies indicated in the chart do not solve the problem, refer to the directory of Authorized Service Centers (enclosed with this unit) to locate a convenient service center, or consult your dealer for instructions.
Reference pages are shown as black circled numbers 7.
| Problem | Probable cause(s) | Suggested remedy |
| Changer does not play. | A disc(s) or other foreign object(s) has fallen inside the changer. | Open the loading drawer, and then remove the object. |
| Moisture has collected in the changer. | Allow the changer to dry out for about one hour before using it. | |
| The disc in the changer does not play. | The disc is upside down. | Make sure the label is facing upward. 7 |
| The disc is dirty. | Wipe the disc with a soft cloth. 15 | |
| The disc is scratched. | Replace the disc with a new one. | |
| The disc is warped. | ||
| The disc is not within specified standards. | ||
| Play stops before changing to the next disc. | The loading drawer is open. | Press the [▲OPEN/CLOSE] button to close the loading drawer. |
| A certain music passage can't be played correctly. | The disc is dirty. | Wipe the disc with a soft cloth. 15 |
| The disc is scratched. | Replace the disc with a new one. | |
| There is noise from the tuner or disturbance on the TV screen. | Caused by high-frequency signals from this changer. | Use the changer further away from the tuner or TV. If the tuner or TV's antenna is the indoor type, use an outdoor one. |
| When program play is started, an error message (-E) appears on the display. | Play was started without a track being programmed. | Program a track. 10 |
| An error message (-E) appears on the display, and the changer stops operating. | The mechanism of the changer has been improperly adjusted. | Turn the unit off and then back on again. However, if the loading drawer is fully open, take out the compact disc(s) at the front position and then turn the unit off and then back on again. |
| The loading drawer stops in the middle of opening. | ||
| SL-PD9 only The changer does not respond correctly to remote commands. | The batteries have run out. | Replace batteries with new ones. 5 |
| There is an obstruction between the remote control and the changer. | Remove the obstruction. 5 | |
| The batteries are inserted incorrectly. The (+) and (−) polarities are reversed. | Reinsert batteries so that the polarities are correct. 5 |
Technical specifications
AUDIO
| No. of channels | 2 (left and right, stereo) |
| Frequency response | 2-20000 Hz, ±1 dB |
| Output voltage | 2 V (at 0 dB) |
| Dynamic range | 92 dB |
| S/N | 100 dB |
| Total harmonic distortion | 0.007% (1 kHz, 0 dB) |
| Wow and flutter | Below measurable limit |
| DA converter | MASH (1 bit) |
| Output impedance | Approx. 1 kΩ |
| Load impedance | More than 10 kΩ |
PICKUP
| Wavelength | 780 nm |
| Bølgelengde | 780 nm |
| Laser-styrke | Ingen farlig strålning sendes ut |
GENERAL
| Power supply | AC 50 Hz, 230–240 V |
| Power consumption | 9 W |
| Dimensions (W×H×D) | 430×125×374 mm |
| Mass | 4.5 kg |
Note
Specifications are subject to change without notice. Mass and dimensions are approximate.