DeeBot D66 - Robotstøvsuger ECOVACS - Gratis brugsanvisning og manual
Find enhedens vejledning gratis DeeBot D66 ECOVACS i PDF-format.

Brugerspørgsmål om DeeBot D66 ECOVACS
0 spørgsmål om dette apparat. Besvar dem du kender, eller stil dit eget.
Stil et nyt spørgsmål om dette apparat
Download vejledningen til din Robotstøvsuger i PDF-format gratis! Find din vejledning DeeBot D66 - ECOVACS og tag din elektroniske enhed tilbage i hånden. På denne side er alle dokumenter nødvendige for brugen af din enhed offentliggjort. DeeBot D66 af mærket ECOVACS.
BRUGSANVISNING DeeBot D66 ECOVACS
ECOVACS
Deebot
6 Series User Guide
Quick User Guide
Please read the following before using your Deebot:
1. Safety Instructions
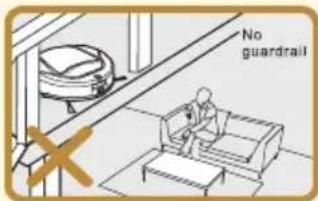
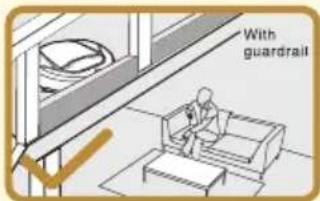
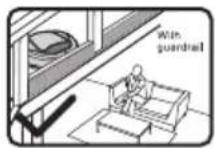
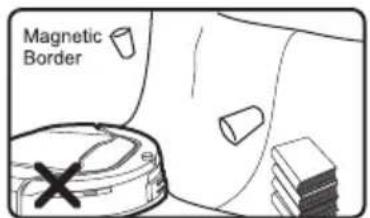
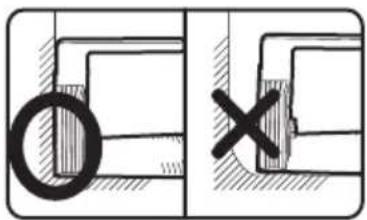
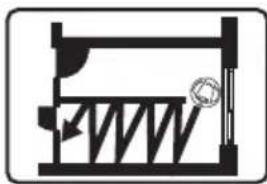
The Magnetic Tape or Virtual Wall may NEVER be used to confine an elevated area where the Robot could fall down and hurt a person or cause considerable damage to the room below A physical barrier needs to be installed like one shown.

natural_image
Line drawing of a sofa with a pillow placed on the backrest and a circular object partially visible on the floor (no text or symbols)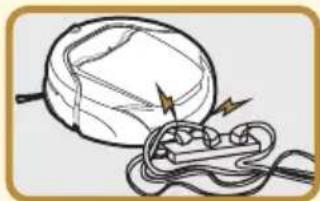
natural_image
Illustration of a battery connected to wires with lightning bolts (no text or symbols)Please be aware that Deebot needs 10 cm or 4 inches of clearance underneath furniture so that it will not become trapped.
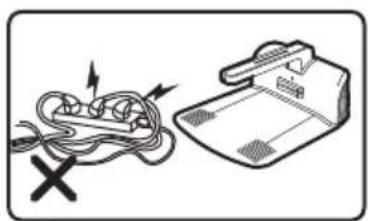
Power cords must NOT lie in the path as they might become entangled with the Robot.

natural_image
Illustration of a cartoon-style helmet with a ladder and tie, set against a brick wall background (no text or symbols)This Deebot can not be used on a carpet whose pile length is over 2 cm.

Please do NOT place any obstacles in this area.

Place the Charger Dock against the wall according to the picture.
natural_image
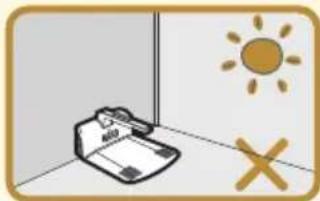
Illustration of a clipboard with a pen, sun symbol, and cross mark (no text or symbols present)Please do not place Charger Dock directly in sun light.
2. Preparation for use
natural_image
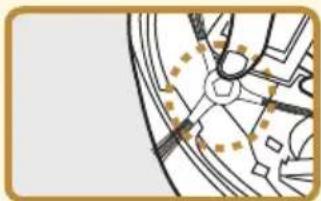
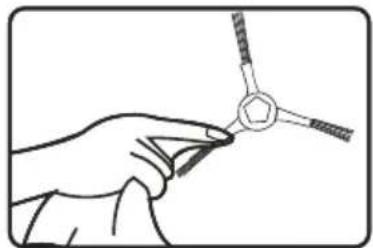
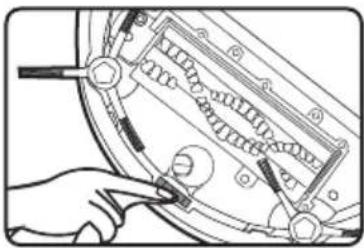
Pure mechanical component diagram without any text, numbers, or symbols- Install the Side Brush by matching the brush hub color to the slot color and then press down in the center of the Brush until you hear a "click" noise.
natural_image
Pure diagram of a mechanical component with no text, numbers, or symbols visible- Press this switch ⚙ to turn on the robot.
natural_image
Simple line drawing of a desk with a lamp and a tray, no text or symbols present- Install Charger Dock according to the picture.

natural_image
Illustration of a computer mouse with a screen showing an open button (no text or symbols)- Indicator flashes when Deebot is charging; Indicator light extinct when Deebot is fully charged.
In order to achieve the best performance of battery, please constantly charge the Deebot for 12 hours in the first use and do this three times.
3. Operation
-
Press this switch ⚙ to turn ON the robot and press again to turn it OFF.
-
Press this key ▶II to let the robot work. Press any key or lift it up to pause the robot.
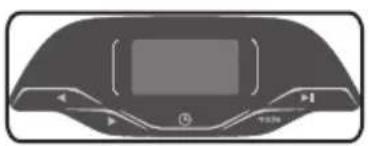
4. LCD Screen
Please refer to LCD Screen section in Instruction Manual.
This Quick User Guide is for general reference to refresh your memory on how Deebot works. We ask you to read the Instruction Manual to learn about the Safety concerns and how to properly set up, operate and maintain Deebot. This can be easily read while Deebot is charging before the first time use.
Welcome and congratulations on your purchase of a Deebot.
We trust the purchase of your new product will help you keep your home clean and provide you more quality time to do other things.
Before you go any further, we ask you to record your model number, serial number and date of purchase below. We also suggest that you attach your Receipt to this page for safe keeping.
MODEL#____
SERIAL#
DATE OF PURCHASE ____ / ____ / ____
Should you have any problems in getting your product to function properly, we ask you to call us first before contacting or returning the product to the place where you purchased it.
Call 1-8 - for assistance.
(Provide 1-8 ____.____ phone numbers also provide address of US business Office and WEB site for Service Stations).
To find an authorized Service Center nearest you, please turn to page ____.
Thank you for your choice!
Content(This User Guide Is for all Deebot 6 Series products)
1. Safety Instructions User Guide....3
1.1 User Guide....3
1.2 Child Safety....3
1.3 Precautionary Items....4
1.4 Power Supply for the Robot....6
1.5 Battery Charging, Replacement and Disposal.7
1.6 Recycling Packaging Material....7
1.7 When the Product Has Problems....7
1.8 Correct Disposal of Product....7
2. Packed Contents and Product Specifications.8
2.1 Packed Contents....8
2.2 Product Specifications....8
3. Part Name....9
3.1 Main unit 10
3.2 Screen 10
4. Charging Dock....10
4.1 Installation....10
4.2 Placement of Charging Dock....11
4.3 Charging Robot's Batteries....12
5. Turn on/Pause/Turn off....12
5.1 Turn ON....12
5.2 Pause....13
5.3 Turn OFF....13
6. Mode Selection.... 13
6.1 Auto Mode....13
6.2 Intensive Mode....14
6.3 Edge Mode....14
6.4 Spot Mode....14
6.5 Back to Charge Mode....14
7. Time Schedule....15
7.1 Programmed cleaning time setting.....15
7.2 Current time setting....15
7.3 Set or cancel cleaning frequency....16
8. Remote Control....16
8.1 Battery Placement....17
8.2 Use of Remote Control.....17
9. Virtual Wall....17
9.1 Battery Placement....18
9.2 Use of Virtual Wall....18
10. Day-to-day Storage....19
11. Maintenance....19
11.1 Cleaning Robot and Charger Dock....19
11.2 Dust box cleaning....19
11.3 Dust Box and Sponge Filters Cleaning.....20
11.4 Sponge filter replacement....20
11.5 Agitator brush cleaning....20
11.6 Side brush cleaning....21
11.7 Cleaning Driving Wheels....21
11.8 Clean Drop Sensors....22
11.9 Clean of Dust Sensors....22
11.10 Replacing Robots Battery....22
12. Alarm Function....23
13. Common Failure....24
14. Other Questions and Answers....25
1. SAFETY INSTRUCTIONS
Please follow these basic Safety Instructions to best assure you or the product is not harmed in the initial set-up and use of the product. Should at anytime you have any questions, please call our 1-800 number for assistance.
1.1 User Guide

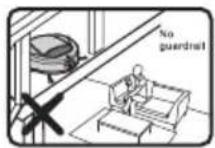
The Virtual Wall may NEVER be used to confine an elevated area where the Robot could fall down and hurt a person or cause considerable damage to room below. A physical barrier must be erected if the Robot is to be used in such elevated space
natural_image
Front view of a dark, curved device with a screen and control buttons (no visible text or symbols)- Be careful in unpacking the product so as not to loose or break anything.
- Immediately dispose of all plastic bags before reading these to prevent children from playing with the bags.
- Do NOT dispose of the rest of the packaging material until you check the Instruction Book to make sure you have all the contents. Reference packed contents and product specifications chapter for contents.
- Read the Instruction Book carefully and use your Robot according to the detailed instructions. Store this Instruction Book in a convenient place for easy reference by all users.
- Do NOT press HARD on the LCD as you may damage or break the glass. Please do NOT touch the LCD if it is broken to avoid injury to yourself.
- Improper operation of the Robot may cause injury to a person or may require your Robot to be serviced by a Service Technician.
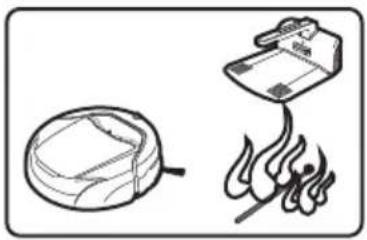
- NEVER vacuum up HOT ashes or cigarettes as they could ignite the contents in the Dust Box and cause a fire in your home.
- Use in the Outdoors, Business or in areas with combustible material is prohibited. It will void your Warranty.
- In keeping with our name ECOVACS, we strongly urge you to recycle the packaging materials.
- Attempt to repair or alter the operation of this Robot will void the warranty and may allow damage to be done to your property or yourself. All repair work must be done by a qualified Service Technician. Call our 1–800 number for the nearest Service Station to you.
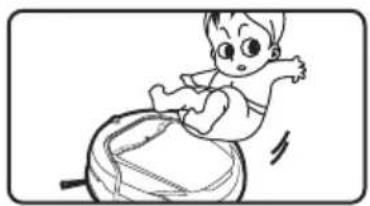
1.2 Child Safety
natural_image
Cartoon illustration of a baby sitting on a large object, no text or symbols present● The Robot is NOT a toy and children should NOT be allowed to play with it.
● Children should NOT be allowed to be alone in the same room that the Robot is operating.
- Adult supervision is required at all times when the child is in the same room the Robot is operating in.
1.3 Precautionary Items
natural_image
Simple line drawing of a cable being twisted and crossed out, with no text or symbols present.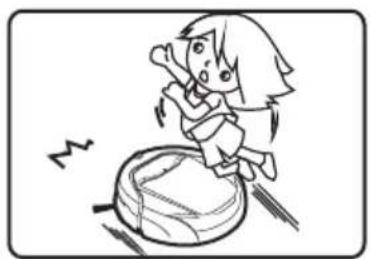
natural_image
Cartoon illustration of a girl sitting on a large object with motion lines indicating speed (no text or symbols)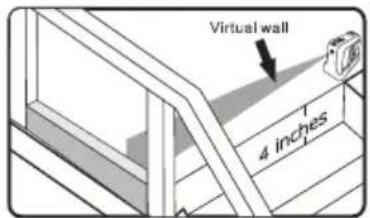
- We recommend the first time you use your Robot you be present to make sure there are no obstructions which might cause a problem to either the Robot or the objects in your home.
- If Pets are part of the everyday household activity, you need to observe how the Pet and the Robot inner act with each other.
- Following precautions should be taken to prevent accidents from happening while your Robot is working:
— Objects easy to knock over should be removed from the path or Virtual Wall used to block the Robots path.
— Table cloth, curtains, and throws should be kept off of the floor so they will NOT obstruct the Robot's freedom to move within the room.
— Power cords for lamps, radios, TV, etc., must NOT lie in the path as they might be damaged by the Robot or become entangled with the Robot and cause damage to the Robot or pull the item from its resting place.
— Objects such as magazines, newspapers, socks, etc., may obstruct the Robot during use or cause damage to the product.
● People in the home should be informed when the Robot is functioning, especially those who maybe hard of hearing or have poor eyesight.
● Charging Dock should be kept in a space where people will NOT easily trip over when walking in the room.
- Robot cannot detect a staircase if the height is less than 4 inches/5cm. Also, if the top step of the staircase has a reflective surface such as mirror, glass, marble, tile, etc., it may cause the Drop Sensor NOT to function and cause the Robot to fall down the stairs. We strongly recommend that you operate the Robot at the Step to make sure the Robot can detect the drop off. Should you find that the Robot does NOT detect the Step, then you must place the virtual wall at the edge to the bare surface or place a guardrail.
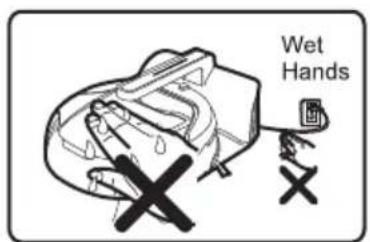
- Keep wet hands from the plug or Robot.
Use a DRY soft cloth for daily and weekly cleaning of the plug, cord, Charger Dock and Robot. Unplug the Charger Dock before cleaning with a damp cloth. A damp soft cloth that has been rung dry of water could be used to wipe the surfaces for better cleaning. A WET cloth may NOT be used as water may get into the Robot or Charger Dock and cause electrical problems resulting in a Service Call.
natural_image
Line drawing of a hand holding a wrapped object, no text or symbols present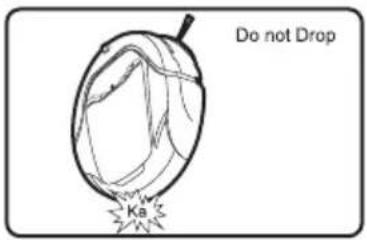
- Do NOT drop the Robot, should this happen, run the Robot to see that everything is okay before letting it operate by itself without you being present.
natural_image
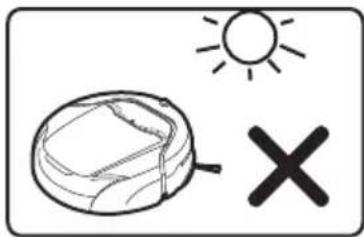
Simple line drawing of a frying pan and a cooking pot with flames (no text or symbols)- Keep the Robot away from hot sources such as heater, fireplace, radiator, kitchen oven, direct sunlight, etc., as the plastic could become distorted and discolored.
natural_image
Simple line drawing of a sun, a bowl, and a cross symbol (no text or labels)1.4 Power Supply for the Robot
- The Robot's power supply is from a NI-MH rechargeable battery and only accompanying ECOVACS charging dock may be used.
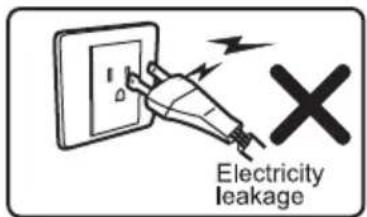
- Do NOT use the Robot if the power supply cord to the charging dock becomes damaged. Call our 1-800 number or visit our Web Site for the nearest Service Center to send the Charger Dock for repair.
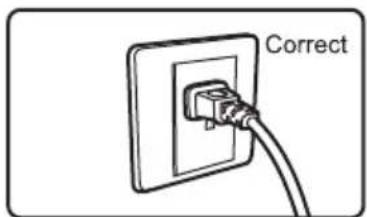
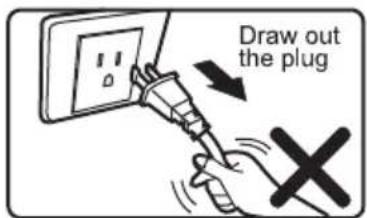
- Do NOT remove the plug from the wall receptacle by pulling on the power supply cord as it may damage the cord or internal wiring. Grasp the plug to remove from the receptacle.
- Do NOT twist or pinch the power supply cord to avoid damage to the insulation.
- Do NOT move the Charging Dock by pulling on the power supply cord as you may damage internal wiring.
- Keep power supply cord away from warm/hot places or sharp edges to avoid damage to the insulation.
- Turn the Robot OFF and remove the Charging Dock plug from the receptacle when you are not using the Robot for an extended period of time.
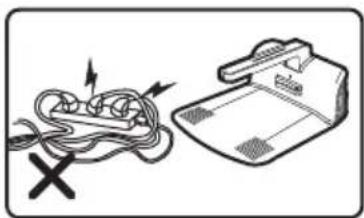
- Do NOT plug the Charger Dock into an extension cord that is NOT rated for the Charger Dock. Too many units plugged into an extension cord could overload the extension cord and cause a fire. We do NOT recommend you doing this with our Charger Dock.
natural_image
Diagram showing a cord being twisted with a device and a cross mark, no text or symbols present1.5 Battery Charging, Replacement and Disposal
natural_image
Silhouette of a person sorting trash into a bin (no text or symbols)- Approved ECOVACS batteries and Charger Dock must be used to prevent potential danger and damage to the Robot, and to NOT VOID the Warranty.
- Call our 1-800 number or visit our Web site to order replacement parts. Model and serial number will be required when ordering.
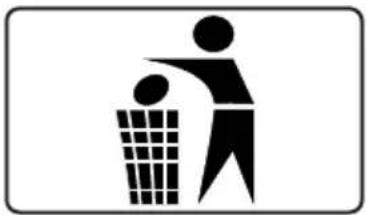
- ECOVACS, being an environmental friendly company asks you to dispose of used batteries in compliance with your local environmental legislation, as the batteries hazardous substance will pollute the environment.
1.6 Recycling Packaging Material
natural_image
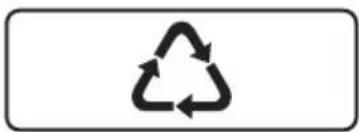
Simple recycling symbol icon with three chasing arrows inside a rounded rectangle (no text or labels)- Please recycle the packaging material in accordance with your local guidelines.
1.7 When the Product Has Problems
- Should the power supply cord become damaged, do NOT attempt to repair by yourself.
- Should the Robot stop functioning, reference Alarm Function chapter in this Instruction Book or call our 1-800 number to talk to an experienced
- Technician.
As with the power supply cord, should the Robot require service, please have a certified Service Technician handle your repair. Otherwise, your Warranty will be void and you could possibly cause yourself or your property damage by - attempting to do it yourself.
1.8 Correct Disposal of Product
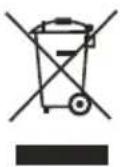
- This marking indicates the Robot and Charger Base should be disposed with other household wastes throughout the EU. To prevent possible harm to the environment or human health from uncontrolled waste disposal, recycle responsibly to promote the sustainable reuse of material resources. To return your used device, please use the return and collection systems or contact the retailer where the product was purchased. They can take this product for environmental safe recycling
- In the U.S., please dispose of product at an accredited disposal site in compliance with your local requirements.
2. Packed Contents and Product Specifications
2.1 Packed Contents
natural_image
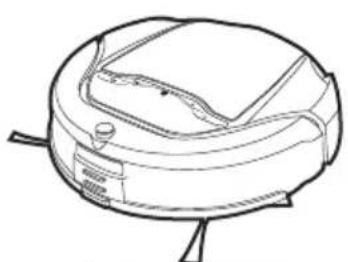
Line drawing of a robotic vacuum cleaner (no text or symbols)Robot
natural_image
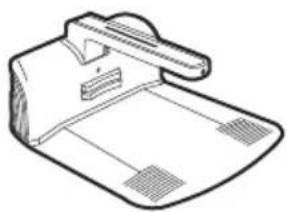
Line drawing of a mechanical device with no visible text or symbolsCharger Dock
natural_image
Line drawing of a mechanical component with ports and a central opening (no text or symbols)Virtual Wall (for specific model)
Remote Control
(for specific model)

natural_image
Line drawing of a car's front wheel and side rim (no text or symbols)User Guide
Batteries for Remote Control
Batteries for Virtual Wall

Brush Clean-up Tool
2.2 Product Specification
| Functional Specifications | D66 | D68 | Charger dock | D66 | D68 |
| Working voltage (DC) | 12V mm | 12V mm | Input voltage | 220-240V | 220-240V |
| Rated wattage (DC) | 30W | 30W | Rated output voltage | 14.5V mm | 14.5V mm |
| Volume of dust box (L/Q) | 0.7 | 0.7 | Rated frequency | 50Hz | 50Hz |
| Noise level(dB) | ≤60 | ≤60 | Virtual wall (for specific types) | ||
| Charging time (H) | 3 | 3 | Voltage | 3V mm | |
| Working time on a battery charge | 60min | 60min | Remote control (for specific types) | ||
| Cleaning surface on a battery charge | 120-150m ^2 /1219-1614ft ^2 | about 150m ^2 /1614ft ^2 | Voltage | 3V mm | |
| Effective distance | ≤5m | ||||
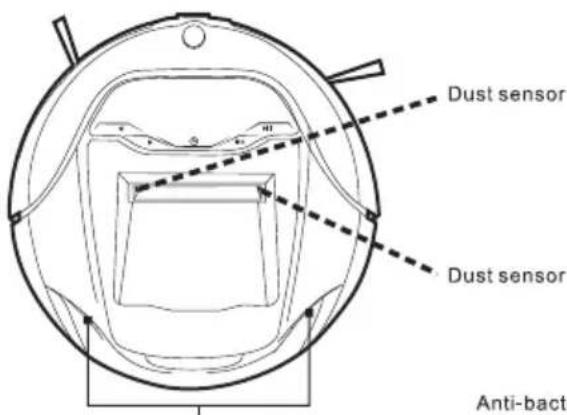
3.Part Name
3.1 Main unit
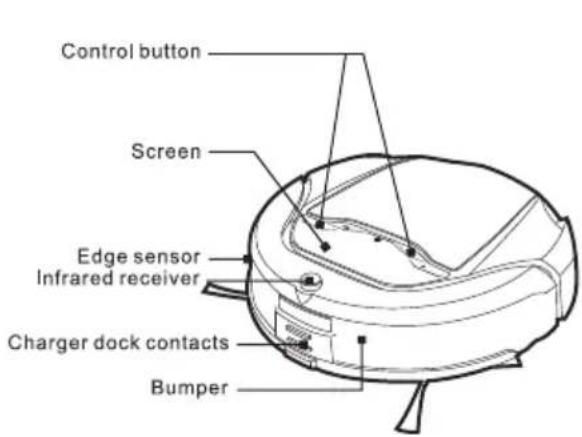
Front view
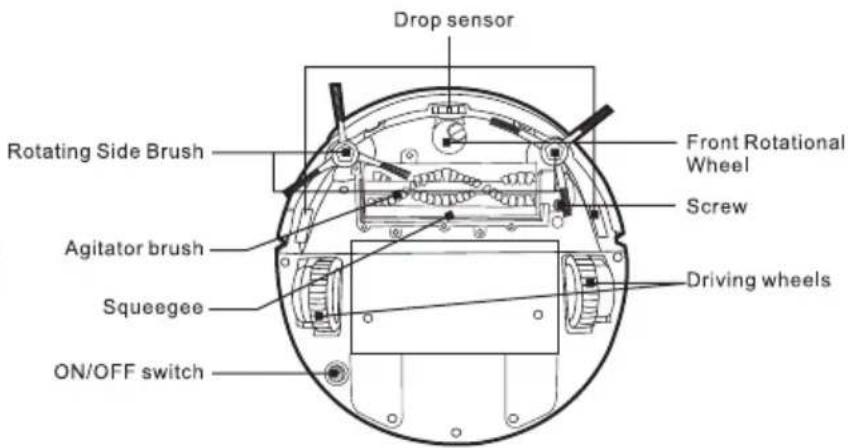
Bottom view
Charging indicator
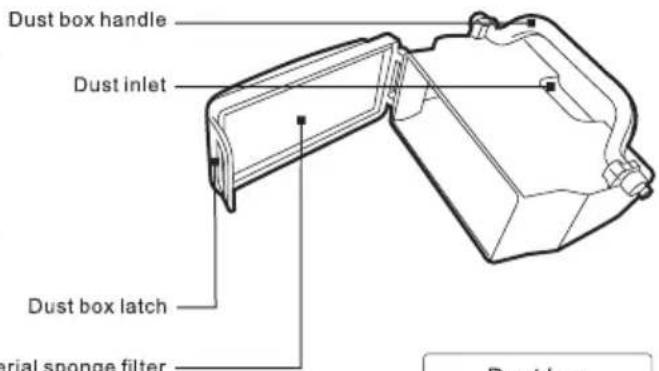
Dust box
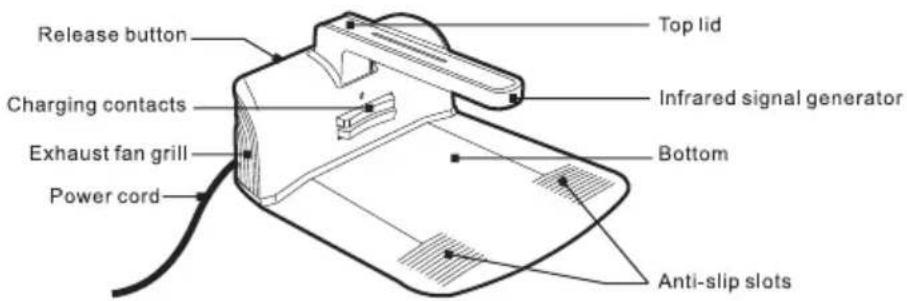
Front view of charger dock
3.2 Screen
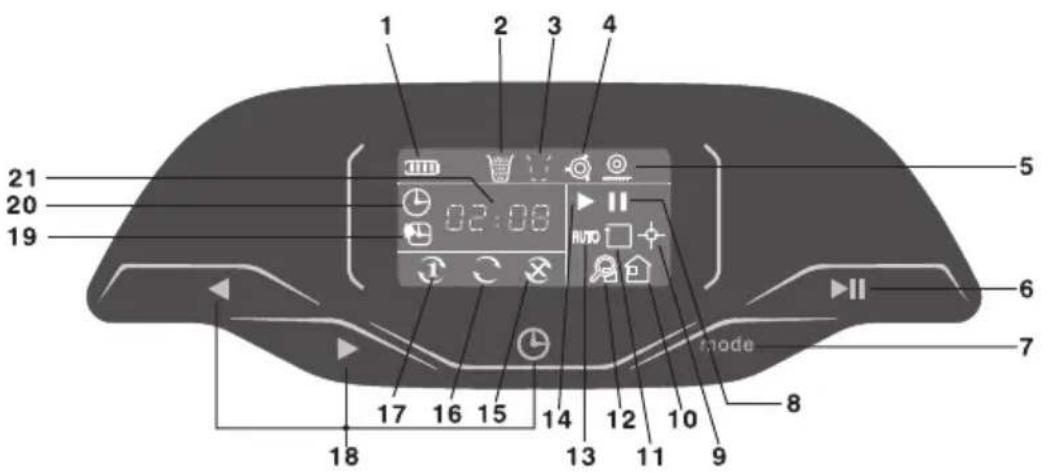
- Battery charge status
- Dust box full
- Dust box missing
- Agitator brush not working
- One or both driving wheels not on floor
- On/Pause key
-
Mode selection key
-
Pause status
- Spot mode
- Back to charge mode
- Edge mode
- Intensive mode
- Auto mode
-
Working status
-
Cleaning schedule on HOLD
- Cleaning schedule Every Day
- Cleaning schedule Current Day
- Time adjust key
- Schedule programmed cleaning
- Current time in 24 hour mode
- 24 hour time display
4.Charging Dock
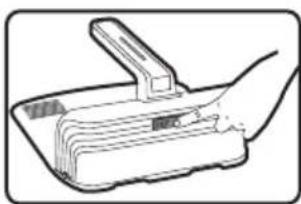
4.1 Installation

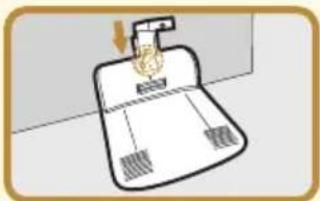
Take out the top lid and base of charging dock from the packaging. As shown by the picture, first plug the power cord into the receptacle. then connect top lid and base, and the installation of charging dock is completed if "click" sound is heard.
natural_image
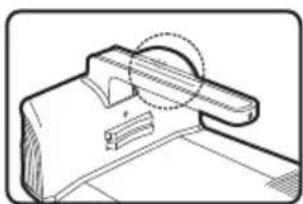
Line drawing of a hand holding a tray with a handle (no text or symbols)Push the release button on the back to lock the top lid. You may push the button again should you have the need to take the top portion off the base.
natural_image
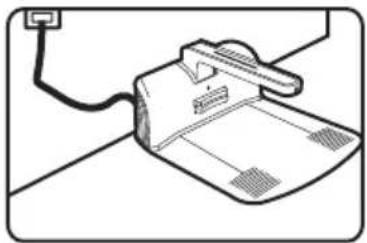
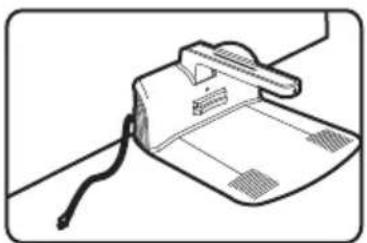
Technical line drawing of a mechanical component with no visible text or symbolsConnect the Charger Dock with power.
4.2 Placement of Charging Dock
natural_image
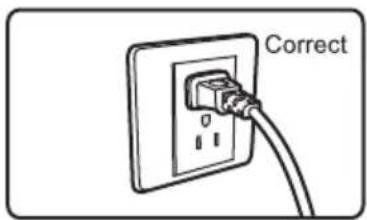
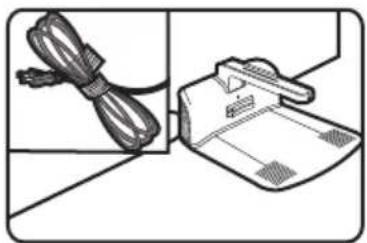
Line drawing of a printer with a cable and paper, no text or symbols present- Place the Charger Dock close to an outlet soan extension cord is not used. Robot should also be out of the way of walking traffic so no one will trip over the Charging Dock and cause injury to themselves, someone else or to cause breakage to something should they fall.
- Place the Charger Dock against the wall according to the picture. It must be placed close to a Receptacle so the Charger Dock's power supply cord will reach.
natural_image
Illustration of a cordless cable and a handheld device on a cutting board (no text or symbols)● The Power Supply Cord of the Charger Dock must NOT be in the path of the Robot when entering or leaving the Charger Dock.
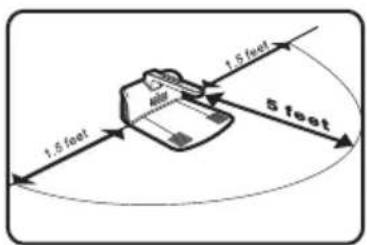
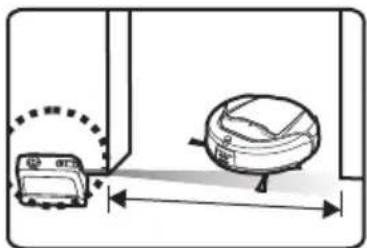
- Please ensure there are NO obstacles within a rectangular box of 5 feet and 1.5 feet on each side of the Charger Dock so the Robot can easily find the Charger Dock to recharge the battery. A reflective surface, such as mirror, glass, etc. should NOT be directly opposite the Charger Dock so that it will NOT affect the infrared signal and keep the Robot from finding the Charger Dock. Do NOT place close to stairs as it will affect its ability to Dock or even fall down the stairs.
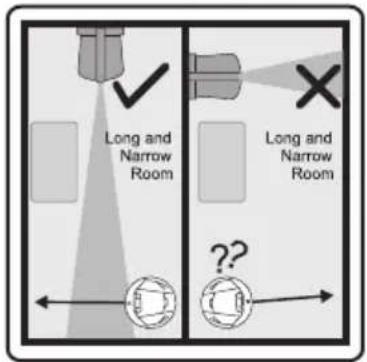
● The Charger Dock should be placed in the room so the Robot can find the Charger Dock's beam as quickly as possible and follow the beam to the source.
natural_image
Simple line drawing of a bathroom sink with a bag and a question mark (no text or symbols)*The room layout is too complicated; therefore, the machine cannot quickly find the Charger Dock.
- Depending on the room size and the number of pieces of furniture in the room, it may take a while for the Robot to find the Charger Dock. If you find this to be happening, you may want to relocate the Charger Dock to a new spot to see if the Robot can find it easier.
Warning:
Do NOT place the Charger Dock near stairs or a drop off as it may affect the automatic return for charging and may cause the Drop Sensor from properly functioning.
▶ Do NOT place in a well traveled path by people of the household.
4.3 Charging Robot's Batteries
natural_image
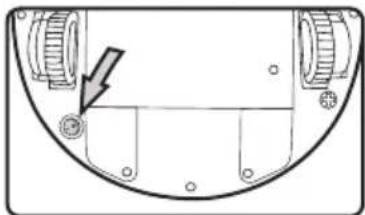
Technical diagram of a mechanical component with a highlighted section and arrow (no text or symbols)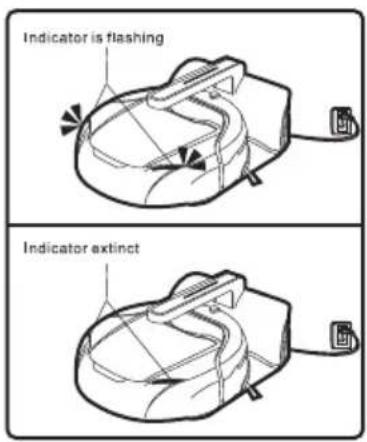
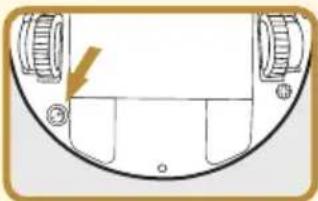
- Press this button Ⓤ to turn ON the robot before charging.
- Before using for the first time, charge the Robot for a minimum of 5 hours. Run the Robot until it wants to seek the Charger Dock to recharge. Do this for 2 or 3 times to achieve the best performance for the battery.
- In normal use, the charging time is about 4–5 hours.
● A warmer or cooler room may require a longer charging time. - When the Robot's battery gets low during use, it will quit cleaning the floor and seek out the Charger Dock for recharging its battery.
- While the Robot is charging in the Charger Dock, the Battery Icon will blink. Once the Robot's battery is fully charged, the Battery indicator will extinct.
- So the Robot is ready to go out and clean the floor at anytime, you may leave the Robot in the Charger Dock. Once the battery is fully charged, the current will decrease for charging the battery so that it will not hurt the battery.
- When the Robot is placed in the Charger Dock, the Robot will automatically turn itself ON and go in to the PAUSE mode where it will wait for the next scheduled floor cleaning.
- If you have set the cleaning "on a schedule" in advance, the Robot will automatically exit from the Charger Dock to work in the "Auto Mode" when the scheduled time arrives.
- If Robot is NOT going to be used for 1 or 2 months, unplug the Charger Dock and turn the Robot OFF with the switch on the bottom of Robot. When you want to use the Robot again, we suggest you recharge the battery as mentioned above to regain best performance for the battery. Charging Robot's Batteries.
5. Turn on/Pause/Turn off
5.1 Turn ON
natural_image
Diagram of a mechanical component with a circular feature and a downward arrow, no text or symbols present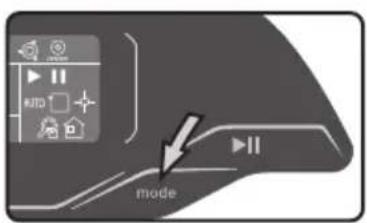
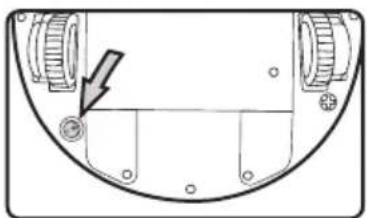
- Turning the Robot over, turn the 📷 switch ON so the Robot will be able to operate and charge its batteries when placed in the Charging Dock.
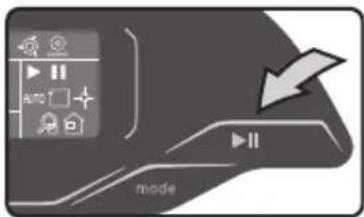
- Press the "mode" Key to select cleaning mode. Press ▶II to start the Robot in the selected operation mode. For Cleaning Mode information, refer to section 6 on Mode Selection.
5.2 Pause
- Pressing the Pause ▶ Mode, you will Pause the operation of the Robot.
● During the Pause Mode, you can select one of the various operating Modes. - You may press any key on the LCD to cause the Robot to enter the Pause Mode.
5.3 Turn OFF
natural_image
Technical diagram of a mechanical component with no visible text or symbols- Pressing the Ⓞ key you will turn off the robot and the batteries will not charge when the Robot is in the Charging Dock.
● After you turned the robot off, put it back into the Charger Dock to prevent members of family from tripping over the Robot.
- If the Robot is NOT going to be used for a month or more, it is recommended to turn the Robot OFF by depressing the ⏻ button on the bottom and unplug the Charger Dock.
6.Mode Selection
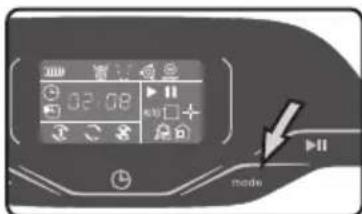
- By pressing the "mode" Key, you may select one of the five Modes of operation that you want the Robot to do.
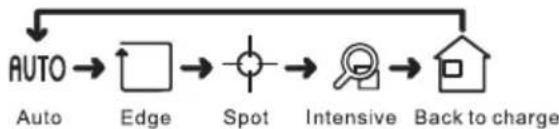
flowchart
graph LR
    A["AUTO"] --> B["Edge"]
    B --> C["Spot"]
    C --> D["Intensive"]
    D --> E["Back to charge"]
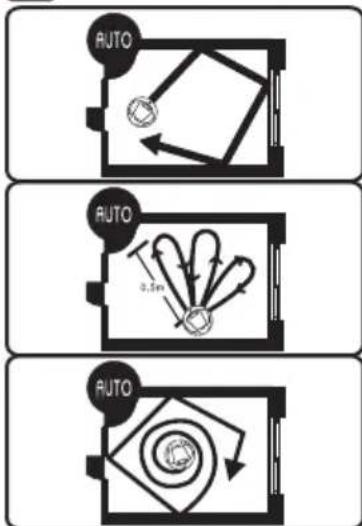
AUTO 6.1 Auto Mode
flowchart
graph TD
    A["AUTO"] --> B["Speed 0.5m"]
    B --> C["Directional Arrow to Auto"]
    C --> D["→"]
    D --> E["→"]
    E --> F["→"]
    F --> G["→"]
    G --> H["→"]
- When the Robot's battery gets low on its charge, the Robot will turn off the Agitator Brush and the suction motor and head back to the Charger Dock.
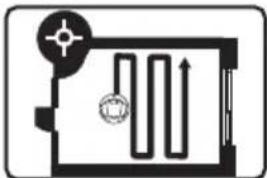
- In Auto Mode, the Robot will clean the room in a random pattern, changing direction each time it meets an obstacle.
- Should the Robot detect a light collection of dust/dirt while cleaning, it will stop and fan out to clean the area. After it has sensed the area is clean, it will go back to Auto Mode to randomly clean the room.
natural_image
Pure mechanical cross-section diagram without any text, numbers, or symbols- When this robot comes to a small area, it will program its cleaning path automatically, moving in a "zigzag" pattern (for D68 only).

6.2 Intensive Mode
natural_image
Pure mechanical diagram showing gear and linkage without any text or symbols- In Intensive Mode, the Robot's cleaning pattern is the same as in Auto Mode, except the robot will travel at a slower pace, thus increasing the vacuuming efficiently. You may want to select this mode if you think the floor is particularly dirty.

6.3 Edge mode
flowchart
graph TD
    A["Start"] --> B{Direction}
    B -->|Left| C["Path to Start"]
    B -->|Right| D["End"]
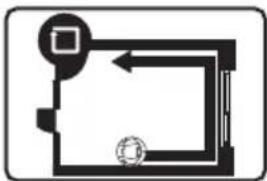
- In Edge Mode, the Robot will clean the dirt/dust accumulated alongside the wall / corners etc. where the Robot may not clean when in other cleaning modes.

6.4 Spot Mode(For D68)
natural_image
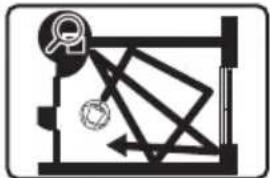
Pure schematic diagram of a room with pipes and a circular component, no text or symbols present- In Spot Mode, the Robot will clean a specific area. The Robot will first move in a straight line, then turn right, moving in a zigzag pattern. After cleaning for a while, it will return to the original point and give an audial signal.
- You are required to move the Robot there either physically by lifting and placing or by driving with the Remote.
- Should the Robot meet an obstacle, it will change its path and continue to clean in the zigzag path.

6.4 Spot Mode(For D66)
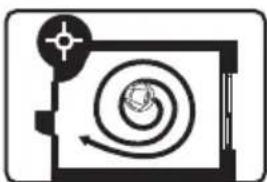
natural_image
Pure electrical circuit lines without any symbols- In this Mode setting, the Robot will clean in a spiral outward path, taking about 2 minutes.
- You are required to move the Robot there either physically by lifting and placing or by driving with the Remote.
- Should the Robot meet an obstacle, it will change its path and continue to clean in the spiral path for 2 minutes.
- When the Robot has finished the Spiral Cleaning, it will stop and give an audible signal, letting you know it is finished and is waiting to be returned to the Charger Dock. You may do this physically by lifting and taking the unit to the Charger Dock or by driving it to the Charger Dock with the Remote.

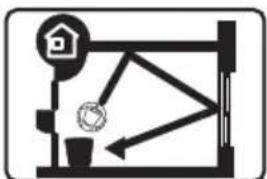
6.5 Back to Charge Mode
natural_image
Simple line drawing of a mechanical or architectural structure with no text, numbers, or symbols.- When the Robot's battery runs low, the Robot will stop cleaning and will seek out the Charger Dock to recharge its battery.
- At anytime you want to send the Robot back to the Charger Dock, you should press the Pause button and then select this Mode. Then press the Pause ▶II button so the Robot will seek out the Charger Dock.
7.Time schedule
7.1 Programmed cleaning time setting
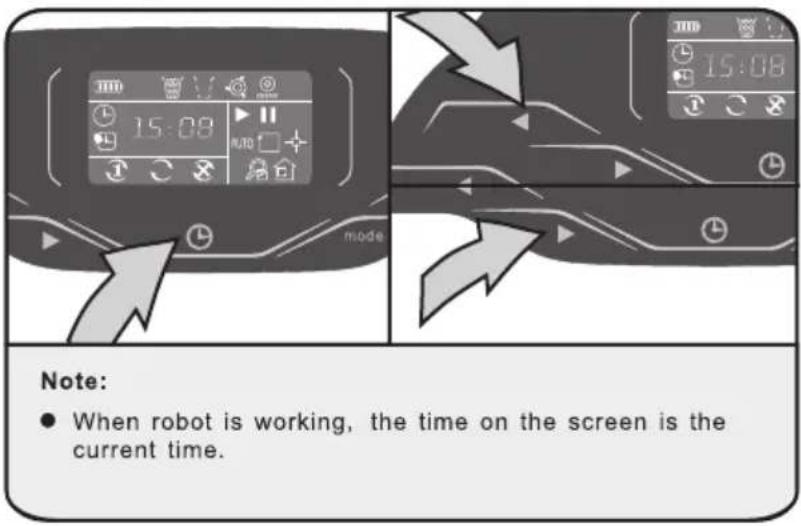
- After power is ON, continue to press ⏻ for about 3 seconds when ⏻ on LCD is lit and the number with time is flashing.
- Set hour via ◀ and ▶ increase or decrease one hour each time. Press ⏱ to confirm.
3 Then set minute via ◀ and ▶ increase or decrease five minutes each time. When you finish programing the time, Press ⏻ to confirm the programmed time. After that you will automatically go to set the current time setting.
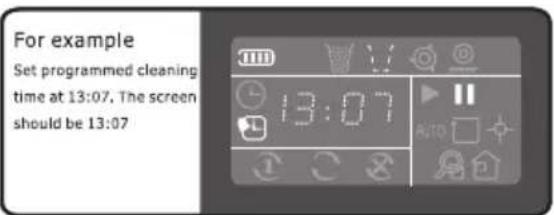
7.2 Current time setting
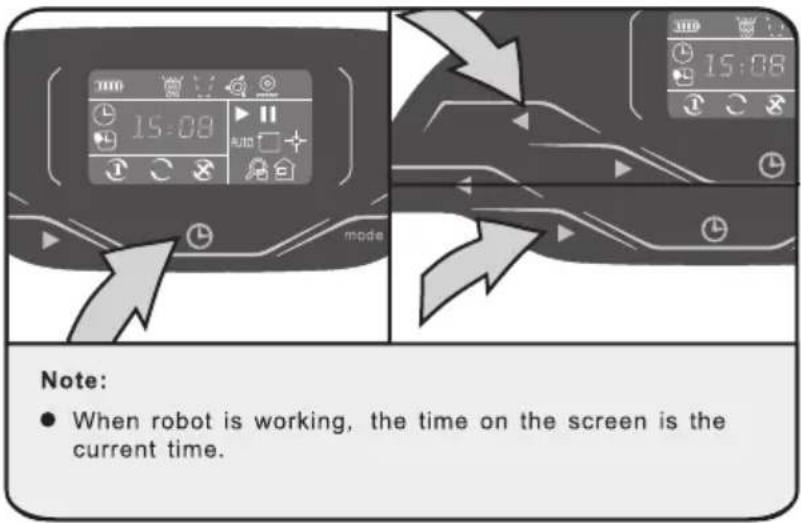
- After setting the programmed cleaning time, it will automatically go to the current time setting. The Ⓗ disappears, and the number will blink on the LCD.
- Set hour and minute via ◀ and ▶ increase or decrease one hour or minute by pressing once each time. Then press ⏻ to confirm the current time setting. Then go to the cleaning frequency setting.
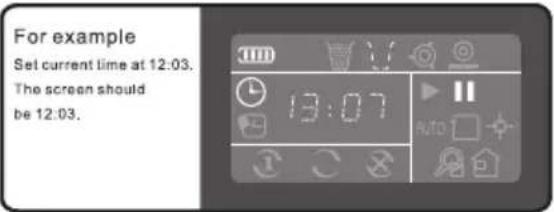
When the Robot is turned OFF, Robot will NOT start working on the scheduled time. If you have already programmed the scheduled cleaning time, you must turn the Robot ON and keep it in ready mode so when it is time to clean, it will automatically leave the Charger Dock to clean.
7.3 Set or cancel cleaning frequency
▶ No matter in which cleaning mode the robot operated last time, it will work in the Auto Mode in the next scheduled time.
If robot is working under "edge mode" or "spot mode", the robot will not work according to scheduled time when that time comes.
Press ⏻ to set cleaning frequency
One day only
Clean every day
Programmed cleaning time on HOLD
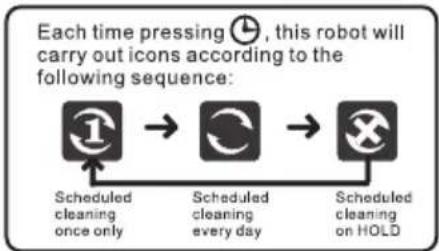
flowchart
graph LR
    A["Scheduled cleaning once only"] --> B["Scheduled cleaning every day"]
    B --> C["Scheduled cleaning on HOLD"]
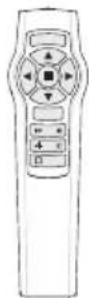
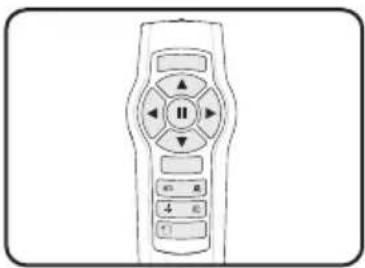
8.Remote Control
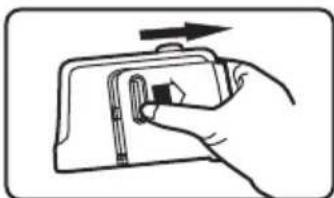
8.1 Battery Placement
natural_image
Top-down line drawing of a car viewed from the side, showing front and rear sections (no text or symbols)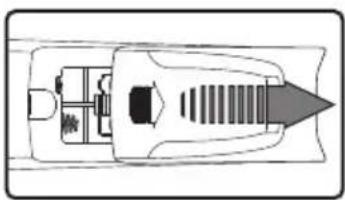
natural_image
Top-down schematic of a vehicle or engine component with internal parts and a directional arrow (no text or symbols)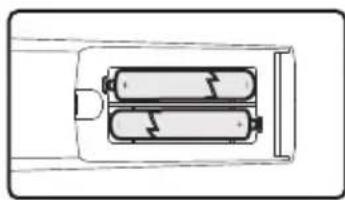
natural_image
Diagram of two cylindrical batteries inside a rectangular housing (no text or symbols)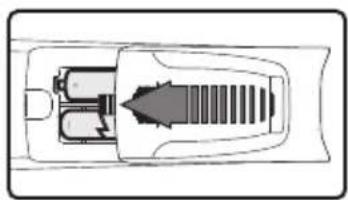
natural_image
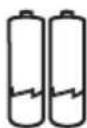
Top-down schematic of a vehicle showing internal components and airflow direction (no text or labels)▶ Remote control uses two AAA (7#) batteries.
When installing the two AAA batteries, be sure to note the direction of positive and negative polarities.
If the batteries are low on energy, please replace both batteries so Remote will work properly.
▶ Properly dispose of batteries in accordance with local legislation.
▶ Do not leave the Remote in direct sunlight or near hot sources as the Remote could distort and render itself useless.
If the Remote is NOT going to be used for an extended period of time, please remove the batteries so the Remote will NOT become damaged.
8.2 Use of Remote Control
natural_image
Line drawing of a remote control device with buttons and dials (no text or symbols)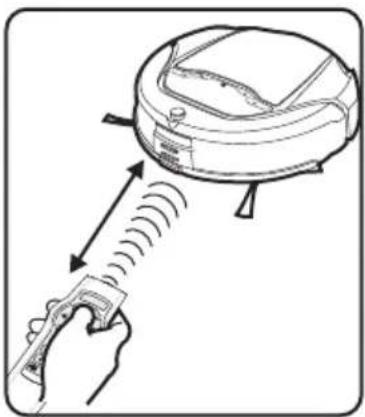
natural_image
Line drawing of a robotic vacuum cleaner with motion lines indicating vibration or vibration (no text or symbols)You can control the Robot via Remote Control:
- You can control cleaning mode, going back to Charger Dock and direction within five meters through the function key on it.
- Choose preferred cleaning Mode.
AUTO Auto Cleaning Mode/ Edge Mode/ Spot Cleaning Mode/
Intensive cleaning mode/ Go Back Charging dock
● Drive robot to appointed area via using direction control button.
Direction control key: There are four direction control, ahead, backward, left hand and right hand. You can use remote control to drive robot to any appointed area.
- While maneuvering the Robot with the Direction Control keys, the Robot is NOT cleaning the carpet.
Pause key: temporarily stop current operating and make it stay where it is.
- While Robot is working in any of the Cleaning Modes or Charging Dock Mode, you may press Pause▶II Key first and then use the Direction Control Keys to maneuver the Robot.
- The Remote will not control the Robot when the Robot is in close proximity to the Charging Dock, Virtual Wall unit or other infrared transmitters in the home as the Remote's signal will not be received by the Remote. Should this occur, you must move the Robot physically or by manually pressing the appropriate key on the Screen.
9. Virtual Wall
9.1 Battery Placement
natural_image
Illustration of a hand inserting a device into a folder with an arrow indicating rotation (no text or symbols)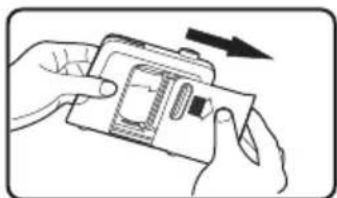
natural_image
Illustration of hands holding a device with an arrow indicating direction (no text or symbols)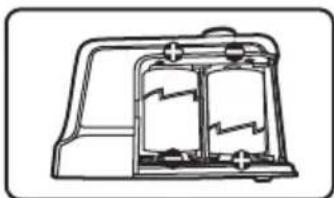
natural_image
Technical line drawing of a mechanical component with internal compartments and mounting holes (no text or symbols)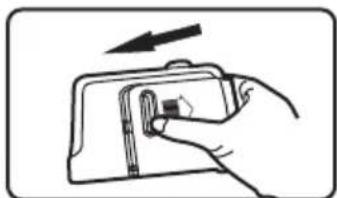
natural_image
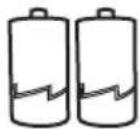
Hand holding a wallet with a small square object inserted, no text or symbols visible▶ Virtual Wall uses two C batteries.
When installing the two C batteries, be sure to note the direction of positive and negative polarities.
If the batteries are low on energy, please replace both batteries so Virtual Wall will work properly.
▶ Properly dispose of batteries in accordance with local legislation.
Do not leave the Virtual Wall in direct sunlight or near hot sources as the Virtual Wall could distort and render itself useless.
If the Virtual Wall is NOT going to be used for an extended period of time, please remove the batteries so the Virtual Wall will NOT become damaged.
9.2 Use of Virtual Wall
Virtual Wall can be used to keep the Robot within a room, an area, away from wires or precious objects. The Infrared Beam extends for 2m/6 feet.
● Virtual Wall also emits an infrared beam so the Robot will not hit the unit.
When you use Virtual Wall, please place the end marked with "ECOVACS" in front of the area that you do NOT want the Robot to move into.
Should you want the Robot to stay inside a room, it is best to place the Virtual Wall outside of the room at the Door opening so the Robot will clean the room properly.
The Virtual Wall must be turned ON each time it is to be used. The Virtual Wall will turn OFF after two hours of operation.
▶ Should you find that the Robot will cross the infrared beam, check the batteries in the Virtual Wall unit and replace both batteries. Properly dispose of batteries in accordance with local legislation.
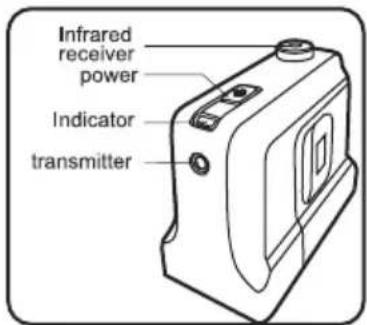
POWER SWITCH: Press this key and Virtual Wall will turn on and emit an infrared beam to block the Robot from going where you do not want it to go.
INDICATOR: Will glow RED when Virtual Wall is turned ON and indicates infrared beam is being emitted.
TRANSMITTER: where infrared beam is emitting from.
INFRARED RECEIVER: Receives the Infrared beam.
10.Day to Day Storage
natural_image
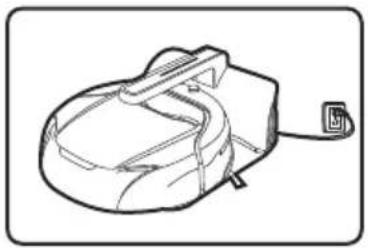
Line drawing of a mechanical device with a cable and attached component (no text or symbols)- For daily or weekly use, the Robot should be left in the Charging Dock. A feature of the Charging Dock is once the battery is fully charged, the charging current reduces so it will not affect the battery life.
- Should you want to store the Robot for an extended period of time, make sure the Battery is fully charged. But to assure that the battery will last for a long time, you need to take the Robot out of storage every 3 months to run and charge.
11.Maintenance
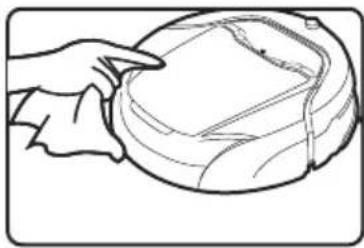
11.1 Cleaning Robot and Charger Dock
natural_image
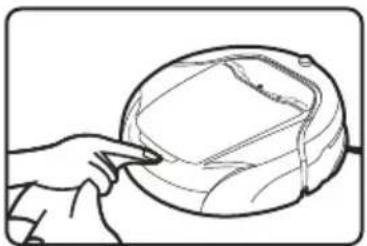
Diagram of a device interior showing a curved panel with a button and an arrow pointing to the left side (no text or symbols present)● Turn the Robot vacuum cleaner OFF by pressing

natural_image
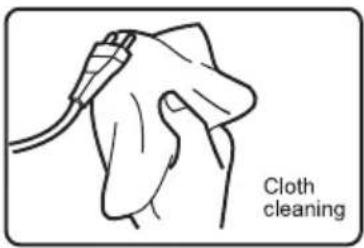
Line drawing of a hand pointing at a circular object with internal lines (no text or symbols)- A cloth dampened with a mild detergent - not containing citric or pine additives - and wrung dry may be used to clean the Robot. It may also be used to wipe the Charger Dock ONLY after it had been UNPLUGGED from the receptacle.
natural_image
Line drawing of a printer with a strap and cable, no text or symbols presentNOTE: NEVER use a solvent or a liquid that contains a citric or pine additive as they all will do harm to your unit.
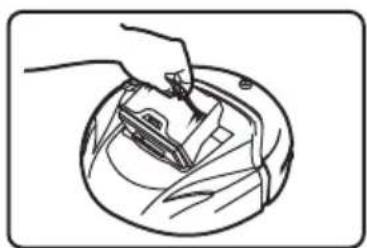
11.2 Dust box cleaning
natural_image
Line drawing of a hand holding a ball, no text or symbols presentPlease follow the below steps:
- Turn the Robot vacuum cleaner OFF by pressing 📷.
- Release the cover latch.
natural_image
Line drawing of a hand holding a tool over a circular object with a pen (no text or symbols)11.3 Dust Box and Sponge Filter Cleaning
- Open the lock at the side of dust box.
- Pour out debris and clean Sponge filter into waste basket.
- You may rinse the dirt from the dust box and filter under running water to get them clean. A mild detergent soap can be used in the cleaning process.
- The Dust Box and Filter MUST be dry before assembling back into the Robot.
11.4 Sponge filter replacement
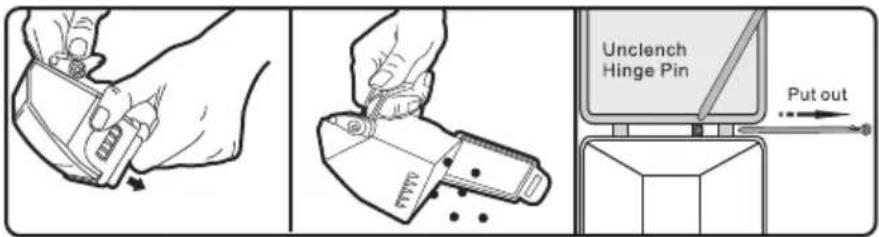
- Open the dust box and empty it.
- Unclench the Hinge Pin.
- Replace the Dust Box door with a new one that contains the new filter and aligning the Door to the Dust Box, re-insert the Hinge Pin.
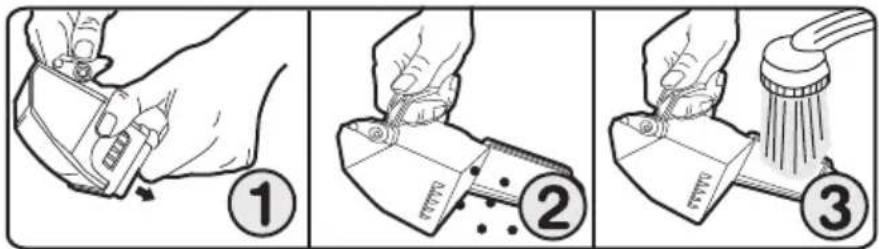
11.5 Agitator brush cleaning
Note: please look at the agitator brush once a week and check for hair, threads, etc. being wrapped around the agitator brush. If it is wrapped, please clean the agitator brush with the supplied tool.
natural_image
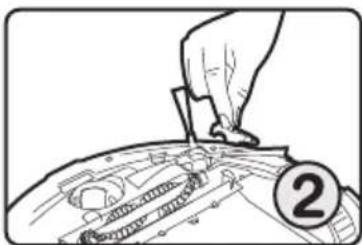
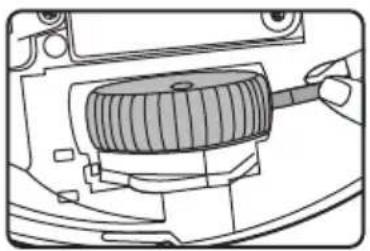
Line drawing of a hand pressing down on a mechanical component, with no visible text or symbolsRemove the two screws using a coin or a screw driver.
natural_image
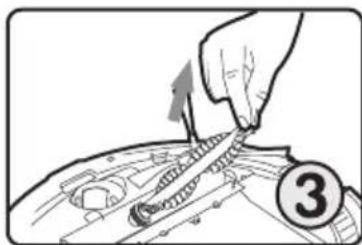
Line drawing of a hand pressing down on a mechanical component (no text or symbols)Remove the frame by lifting up on the end where the screws were and pulling the frame back to release the two tabs on the front of the frame.
natural_image
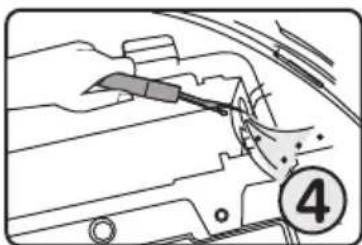
Illustration of a hand using a tool to adjust or install a mechanical component, with no visible text or symbols.Remove the agitator by lifting on the end opposite the belt and removing the agitator from under the belt.
natural_image
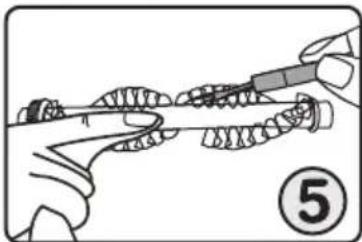
Line drawing of a car interior with a tool applying material to the engine compartment, marked with number 4 (no text or symbols on the diagram itself)Remove any hair, dust and debris from the crevices on each side of the agitator chamber.
natural_image
Illustration of hands using a tool to apply a tool to a surface (no text or symbols present)Using the supplied tool, proceed to cut the hair, threads, etc. from the agitator. Then remove and dispose of the debris into the waste basket
natural_image
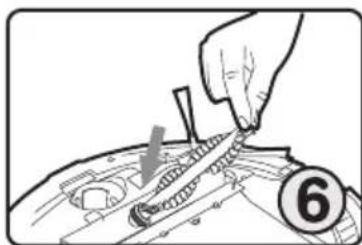
Hand installing or adjusting a mechanical component with a numbered circle (6) nearby, no visible text or symbols on the main subject.Place the agitator with the gear end in the belt loop and then place the agitator down into the crevices on each end.
natural_image
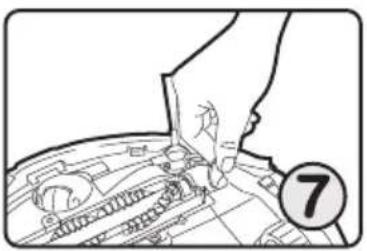
Line drawing of a hand inserting a component into a car's engine compartment, with a numbered circle marker (7) nearby (no text or symbols on the diagram itself)Replace the two screws and with a coin or screw driver, seat the two screws into the frame until they have stopped.
natural_image
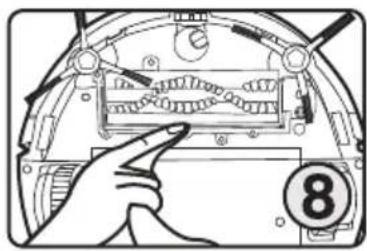
Hand pointing at a mechanical component with no visible text or symbolsFinally, wipe away any dirt or dust on the squeegee with a clean cloth.
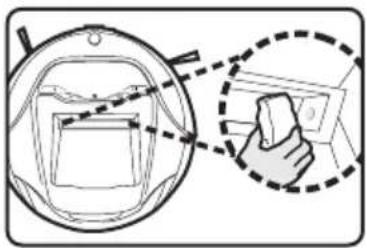
11.6 Side brush cleaning
natural_image
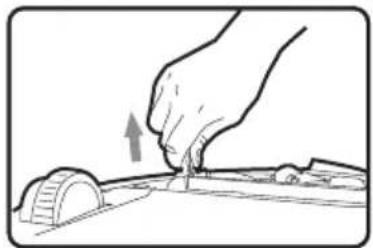
Hand using a tool to mark a circular component, no text or symbols visibleTake the side brush and pull it out.
natural_image
Line drawing of a hand holding a small mechanical component (no text or symbols)Clean any dirt or dust on the side brush and the side brush slot with a clean cloth. Should the Side Brush appear to be damaged so that it is not cleaning properly, replace with the same color Side Brush.
natural_image
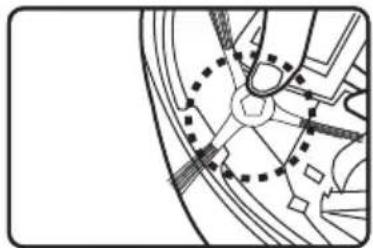
Pure mechanical diagram showing gear and cam mechanism without any text or symbolsAfter cleaning, replace the Side Brush by matching the brush hub color to the slot color and then press down in the center of the Brush until you hear a "click" noise. Give a slight tug on the brush to make sure it is securely assembled.
11.7 Clean Driving Wheels
natural_image
Technical line drawing of a mechanical component with a threaded shaft and housing (no text or symbols)Please remove any hair or dirt on driving wheels with the supplied tool.
Note:
The Robot will make you aware when the driving wheels become entangled and show on LCD as 🔒.
11.8 Clean Drop Sensors
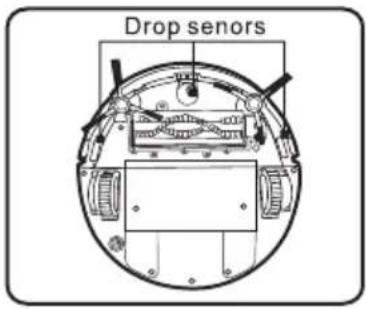
Drop sensors are on the bottom at the sides and front of the robot. They can detect a drop off that exceeds 8 cm. The sensors should be wiped clean after every cleaning for maximum efficiency.
natural_image
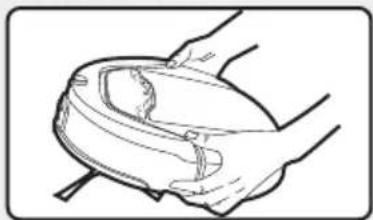
Illustration of a hand holding a tool interacting with a mechanical component (no text or symbols visible)- Turn off the robot and empty the dust box.
- Turn over the robot and put it on a flat surface.
- Wipe the drop sensors with a clean cloth.
11.9 Clean of Dust Sensors
natural_image
Diagram showing a hand holding a small object inside a circular frame, with no visible text or symbols.There is a pair of Dust Sensors in the front of the dust inlet. They can sense the dust concentration thus allowing the Robot to intensify the cleaning of that area before resuming the normal cleaning pattern. We suggest cleaning these sensors every time you empty the Dust Box.
- Turn off the robot. 2. Take out and empty the dust box. 3. Wipe the dust sensors with a clean cloth.
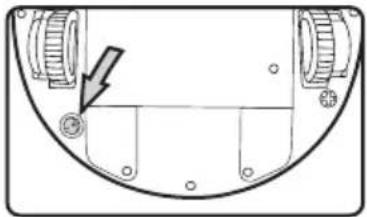
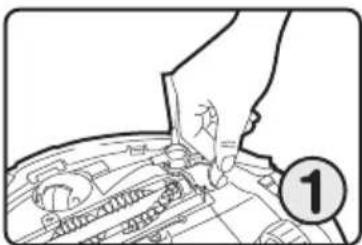
11.10 Replacing Robots Battery
Only use ECOVACS approved replacement parts for your Robot. Use of parts that are not approved by ECOVACS are dangerous and will invalidate your warranty. Before attempting to change the Batteries, make sure your Robot is turned OFF.
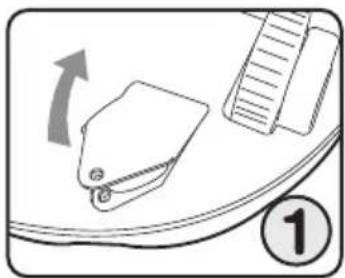
natural_image
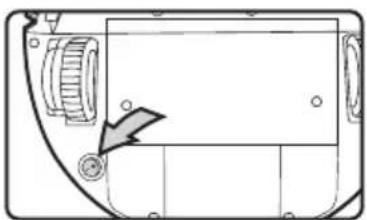
Illustration of a clipboard with an arrow indicating rotation, next to a ruler and a numbered circle (1), no text or symbols present.Turn the Robot over onto a flat surface and turn the Robot OFF. Remove the screw from the Battery cover, remove the Battery cover.
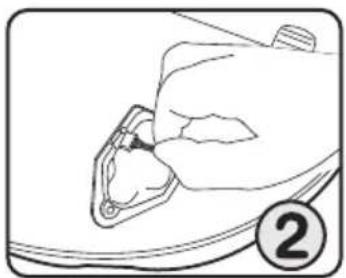
natural_image
Line drawing of a hand holding a small object, possibly a device or tool, with no visible text or symbols.Disconnect the old Battery by removing the Battery connector from its socket.
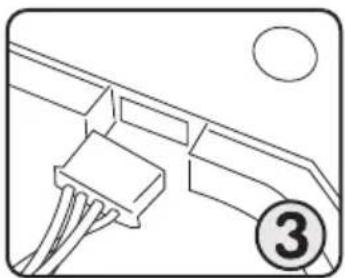
natural_image
Pure electrical connector diagram without any text, numbers, or symbolsConnect the new Battery to the socket. Carefully lower the Battery pack into the Battery compartment. Refit the Battery cover and tighten Battery cover screw.
12. Alarm Function

Note:
The Robot vacuum cleaner will stop working in the following situations and will sound an alarm and the charging indicator will flash. Please notice the symbol being lit on the screen for help in diagnosing the problem.
| Icon | Cause of failure | Solution | Instruction |
 | 1.Dust box is FULL .2.Dust Sensors need cleaning . | 1.Empty dust box.2.Clean dust on dust sensors. | Alarm will sound and the ICON will appear on the LCD for you to empty the Dust box and to clean the sensors. |
 | Dust box is not properly installed nor seated in the Robot vacuum cleaner. | Open the cover, remove the Dust box and then place back in, making sure the handle is seated and the Dust box is seated in the opening. Close the Cover making sure it latches. | |
 | 1.Agitator brush or driving wheel is tangled by hair or cloth.2.Side brush is blocked. | 1.Reference Maintenance chapter to clean the agitator brush and the drive wheels.2.Clean the side brush and remove obstruction. Replace it with new brush if necessary. Reference Maintenance chapter. | |
 | Driving wheel is suspended. | Move Robot so wheels are touching the floor. | This alarm may also alert you to the possibility that a child or pet is playing with the unit and requires your immediate attention. |
 | Low battery. | Put the robot vacuum cleaner back in the Charging Dock so it will charge. |
13.Common Failure
| No. | Problem | Solution |
| 1 | Robot vacuum cleaner is in trouble. | The Robot vacuum cleaner will get itself into trouble at times and will need your help. Because of some tight spots between furniture, walls and other items, the cleaner may keep changing direction by going in a circle. In this case you will have to retrieve it and place it in the open again.It could also become tangled in:1. a power cord,2. curtains,3. carpet fringe,4. newspapers/ magazines. |
| 2 | The Robot vacuum cleaner keeps moving backwards, left or right while Robot is operating. | 1. The bumper on the front of unit may not be functioning properly. To see if this is the cause, place your hand in front of the bumper and gently hit with your hand; the cleaner should change direction. Repeat this on the two sides. If the robot does not respond, Service of the robot will be required.2. Turn the Robot over and with a dry cloth, clean the three sensors on the bottom of the unit to remove dust. |
| 3 | Robot fails to detect the stairs. | Robot is able to detect most drop off's within 8 cm height difference from the floor. However, its performance will weaken when it is on a hard floor surface and the step is of a high reflective surface. To correct the problem, you can put a Virtual Wall unit in front of the stairs or a physical barrier before the stairs to prevent the unit from falling down the stairs. |
| 4 | The reduction of cleaning ability. | Turn the Robot vacuum cleaner off. You may want to reference the various sections in this Instruction Manual for help in accomplishing the following:1. Remove the Dust Box, empty and clean the filter of any accumulated lint, dust or dirt.2. Clean the sensors on each side of Dust Box opening.3. Check to see that the opening leading to the Dust Box is free from any obstacles so that dirt can be vacuumed into the Dust Box.4. reassemble the Dust Box.5. turn the unit over and remove the cover and remove the Agitator roll.6. clean the agitator of any hair, threads, or debris stuck in the agitator brushes.7. clean the recesses for the agitator and make sure there is no obstacle in the agitator opening to prevent dirt from being vacuumed up into the Dust Box.8. Clear the Drive wheels of any obstructions.9. Turn the unit over and with unit on the floor and turned ON, listen that the vacuum motor is running and the agitator is turning.Should the problem continue to exist, call our Service Center for advice. |
| 5 | It is too noisy when the Robot vacuum cleaner is working. | Turn the Robot vacuum cleaner OFF and check the following:1. Remove and empty the Dust Box, after checking that opening in the unit is not blocked, reinstall the Dust Box.2. Turn the unit over and remove the agitator:a. Clean the agitator of any obstruction.b. Clean the recesses that the agitator sits in.c. Check that opening to the Dust Box is not obstructed.d. Reinstall the agitator.3. Check the side brushes for:a. not being caught on the unit.b. the three brushes are not entangled, and.c. the brush will revolve freely when in the operating mode.Should the problem continue to exist, call our Service Center for advice. |
14. Other Questions and Answers
- How long does the Robot vacuum clean when fully charged?
Answer: Depends on size and obstacles in the room but battery will last for about 60 minutes. - Can the Robot vacuum cleaner run without you being present to watch over it?
Answer: Yes, but family members should be informed for their own safety so they will not trip over the unit. - Is robot able to clean under furniture?
Answer: With the flat design, it can clean under furniture with a clearance of 4 inches/10 cm from the floor - What is the life expectancy of the units battery?
Answer: In general, the battery can be charged and discharged over 500 times. - Why does robot fail to finish cleaning?
Answer: In low battery mode, Robot will find its way back to the Charging Dock. - What is the cleaning area covered by Robot when battery is fully charged?
Answer: In general, it is around 120-150 square meters/ 1219-1614 square feet? but depends on the obstacles in the room. - How does Robot work once it meets obstacles?
Answer: In general, the Robot does not stop working but will change direction and go around obstacle.
- Why is debris being left on the floor?
Answer: Could be caused by one of the following reasons: 1. Dust Box is full,
-
Inlet behind agitator and in front of Dust Box is clogged or
-
Debris is clinging to the Drive Wheels.
-
Why does robot fail to start cleaning on Scheduled time?
Answer: a) The Robot vacuum cleaner is not on standby status when it is in the Charging Dock,
b) the scheduled time has been accidentally cancelled,
c) or the frequency has been changed from daily to clean once or temporarily suspended, or
d) the Robot vacuum cleaner is without power.
- Why is the Robot vacuum cleaner not being charged and the Charging Indicator light on the Robot is not lit?
Answer: a) Check to see if the battery is still plugged into the unit, reference Replacing Robots Battery chapter.
b) Check that the Charging Dock is plugged in and the Charger light is lit; reference Charging Dock Installation chapter for proper assembly and knowing that it is plugged in and working.
If you can not find the source of the trouble, please call the Service Center.
13. Why does the remote control not work?
Answer: a. the Robot vacuum cleaner must be within 16 feet / 5m of the Remote Control,
b. Batteries may need replacing in the remote,
c. the cleaner may be in LOW battery and not able to respond,
d. the lenses on the remote and the Robot vacuum cleaner may have to be cleaned with a dry cloth,
e. the Robot vacuum cleaner is too close to the Charging dock or a Virtual Wall and their transmitters are interfering with
f. receiving the Remote's signal, or there are other infrared devices, such as wi-fi router in the immediate area that is interfering with the cleaner receiving the Remote's signal.
14. Why does Virtual Wall not work?
Answer:
a) check that the unit was turned ON, remember, the unit will automatically turn OFF after 2 hours of operation,
b) the batteries could be weak and require changing,
c) the length of the beam is 6 feet / 2m, so make sure it is covering the entire opening that you want blocked, and
d) make sure the unit is properly placed to confine the area to be cleaned.
15. Is it difficult for the Robot vacuum cleaner to clean in corners because of its round design?
Answer: The Robot vacuum cleaner will clean along walls and into corners very efficiently. This is the reason for the side brushes. However, there may be cases where the reach into the very sharp corner may not be complete and you will have to clean the corner with a broom.
16. Why does the Robot vacuum cleaner slow down or move backwards sometimes when it is cleaning?
Answer: The Robot vacuum cleaner will change its cleaning pattern according to the concentration of the debris it detects. It will then go back to the original cleaning made that was programmed.
17. Is there any danger to furniture, children or pets when robot is cleaning?
Answer: No, there is a soft vinyl guard on the bumper on the front of the Robot vacuum cleaner. The cleaner travels at a slow speed and the bumper has soft springs so that the bumping action is very light.
18. Would robot affect my pet?
Answer: Robot makes a low noise when operating, which should not be upsetting to your pet. We do suggest you observe your pet's reaction the first time you run the Robot vacuum cleaner.
19. What should be noticed when cleaning the carpet?
Answer: Robot is not able to clean carpet nap over 0.7 inch / 2cm. Please fold carpet fringes under the rug in advance of cleaning.
20. Does it matter if you leave the Robot vacuum cleaner on the Charging dock when it is not working?
Answer: NO, the charging current will reduce on its own once it detects the battery is fully charged. However, we must realize that children will think of the cleaner as a toy so we need to be mindful of the unit being accessible to them at all times.
21. Is there any danger to touch the Charging dock metal parts where the Robot vacuum cleaner makes contact to recharge itself?
Answer: With the Charging dock plugged into the receptacle, the metal contacts do not have a current to them until the Robot vacuum cleaner comes in contact with them and then the voltage is 24 volts DC with very small current.
- How to avoid Agitator brush and Side brush being tangled by power cord?
Answer: You must pick the cords up off the floor or use a Virtual Wall unit to keep the Robot vacuum cleaner away from the wires.
- How can I stop the robot from operating on scheduled time since I will be away from home for some time?
Answer: You can cancel a scheduled cleaning time. Please refer to Set cancel cleaning frequency chapter.
- How can I move the robot?
Answer: Lift the unit with your hands keeping the front of the unit higher than the back so the dirt in the Dust box will not fall out through the Agitator opening.
natural_image
Line drawing of a hand holding a small object, possibly a container or device, with no visible text or symbols.- How to use robot most effectively?
Answer: Put the Charging dock with the Robot vacuum cleaner in the room that is going to be cleaned so you utilize the most time to clean and the least amount of time for the cleaner to find the Charging dock.
- What should I do if the Robot vacuum cleaner ran over and vacuum up a liquid?
Answer: Power off immediately
①Take out dust box, empty and let it dry.
②Wipe the sponge filter and let it dry.
③Wipe the area dry where the Dust Box assembles.
④Turn the unit over and take out agitator and clean it and set aside to dry
⑤Wipe the interior where the agitator assembles.
⑥once everything is dry, reassemble the unit and turn it on and watch it run to make sure it runs properly.
If there is a problem in the unit running properly after having followed the above instructions, turn unit off immediately and contact our Service Center.
- How to clean the screen?
Answer: Clean the screen with soft dry cloth to wipe away fingerprints or other dirt.
- Why is the side brush easy to distort?
Answer: The side brush is made up of many fine, long filaments that whisk the floor lightly so as not to mar the floors surface.
The filaments are designed to get the dust, lint, debris into the agitator area and then sucked into the Dust box, and because of this, it can become entangled with lint, debris and become twisted onto itself. If the brush runs over a power cord, the filaments can become wrapped around the cord and may become distorted. For replacement, the brushes are color coded so that the correct one will be assembled to the correct side of the cleaner, reference Side brush cleaning chapter for instructions.
- The Robot vacuum cleaner's working time has shortened and the cleaner cannot be charged?
Answer: Batteries become weak over time from use and re-charging. You may do the following to reactivate the batteries:
let the Robot vacuum cleaner charge for 3 minutes and then remove for 1 minute. repeat this cycle two more times, the fourth time you put the cleaner back into the Charging dock, let it charge for 12 continuous hours before using again.
After doing the above, if there is still a problem, please contact our Service Center for more information.
Enjoy Smarter Life
ECOVACS