
SFXHCP2 - Højttaler JBL - Gratis brugsanvisning og manual
Find enhedens vejledning gratis SFXHCP2 JBL i PDF-format.


Brugerspørgsmål om SFXHCP2 JBL
0 spørgsmål om dette apparat. Besvar dem du kender, eller stil dit eget.
Stil et nyt spørgsmål om dette apparat
Download vejledningen til din Højttaler i PDF-format gratis! Find din vejledning SFXHCP2 - JBL og tag din elektroniske enhed tilbage i hånden. På denne side er alle dokumenter nødvendige for brugen af din enhed offentliggjort. SFXHCP2 af mærket JBL.
BRUGSANVISNING SFXHCP2 JBL
Thanks for choosing the JBL SoundEffects system for your home. SoundEffects products are designed to fit the way you live. This guide will help you get started.
For specific questions not answered here, refer to guides accompanying related SoundEffects products; contact your JBL SoundEffects dealer, or in the USA call us at 800-336-4JBL.
First.
Check the contents to see that everything that should be in the box is in the box.
Two Sat2 speakers with detachable brackets and removable grille

Two Sat2 speakers with removable grille

One Center speaker with removable, invertible grille

One Bass2 subwoofer with integrated 100W amplifier

Warranty Terms (USA only)
Special features
Identical voicing. The center and Sat2 speakers are identical. Common voicing is ideal in a home theater. When speakers share the same "voice," there is no perceptible hand-off between them when sounds move across the front of the room (from the left, to the center, to the right or vice versa).
Bass2 special features
The Bass2 integrated an-plifier has several features with which you should be familiar.
Auto-on/off. The integrated amplifier in the Bass2 130- and 120-volt versions have no on/off switch. Once plugged into an AC outlet, the amp will turn on automatically whenever it receives a signal. An LED will light to indicate a signal is being received, and will remain illuminated for a few minutes after the signal ceases. (230-volt models include a functional power switch. To turn the unit off manually, rotate the volume control fully counterwise. For normal operation rotate the volume control clockwise. The bi-color LED glows red (when switched off, and green during normal operation.)
Volume control. A volume adjustment on the front of the Bass2 amplifier allows you to fine-tune bass volume relative to the overall volume of the system, increasing placement flexibility.

A complete home cinema system
Model SFXHCP2
Next.
Determine where to position the speakers in the room
While SoundEffects loudspeakers sound good anywhere, the positions suggested here will enhance your listening enjoyment.
Front Sat2 placement

The Sat2s should be equidistant from the center of the TV screen and at the same height as the center channel speaker.
All SoundEffects speakers are video-shielded, so that they can be placed directly alongside the TV screen without video interference.

On stands. Vertically, on SoundEffects floor stands (sold separately).

On shelves. Vertically or horizontally, with rubber feet attached.
Bass2 placement

The Bass2 subwoofer can be positioned anywhere in the room (within reach of an AC electrical outlet) because its sound is nondirectional.
Positioning the Bass2 in a corner, a placement option made possible by its versatile corner shape, actually increases bass response.

Horizontally along a baseboard, alongside furnishings, etc.
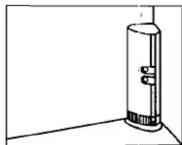
Vertically against a wall, in a corner, or freestanding in the room.
Center placement and mounting options

Ideally, the Center speaker should be positioned as close to the TV screen as possible, centered left to right.

On the TV cabinet (or on a shelf directly above the TV screen). Make sure no objects are in front of the speaker that may obstruct the sound.
Rear Sat2 placement and mounting options
Two of the Sat2s included in this package are intended for use as surround sound speakers for your home theater system.
Surround sound speakers are designed to reproduce movie sound effects from behind listeners without "localizing" the sound. Unlike stereo sound, where listeners should perceive each instrument or voice originating from a particular point in the room, listeners in a home theater should not be able to tell where surround sound originates.

The surrounds should be installed at the rear of the room (on shelves, on the wall or on individual stands). Position speakers behind and above your listening position, as far apart as possible, and equidistant from the center of the listening area.

On stands. On individual SoundEffects floor stands (available separately).
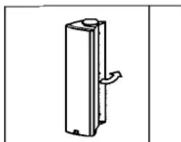
On the wall (or ceiling). Horizontally or vertically, with the accompanying brackets and mounting hardware.
Rear Sat2 installation

Mounting the Sat2 bracket. If the mounting option you have chosen requires using the brackets, install them now as shown.

1 Identify left and right speakers. (Recessed bracket moldings on rear speaker cabinets should face in; semicircular notch on bracket should face out.)
2 Loosen knobs and remove bracket (rear speakers only).
3 Using the bracket as a guide, mark anchor points on the wall.
If mounting on wood wall, proceed to step 6.
4 Carefully drill 3/16" holes for the plastic anchors.
5 Gently tap plastic anchors into holes.
6 Pass screws through bracket holes and tighten.
7 Return speakers to brackets, angle them toward your primary listening position, and tighten knobs.
Notice to Purchaser. JBL assumes no responsibility or liability for injuries or property damage – direct, indirect, or consequential – resulting from the improper installation of SoundEffects loudspeakers.
Then.
Connect and install
your Sat2 speakers
Before attaching any wires always make sure that your receiver or other power source is turned off.
Connection tips
Depending on where you plan to put the speakers, there should be plenty of wire to connect all of the components. Speaker wire is available from your dealer or most audio, electronics or department stores.
Carefully plan your wire paths, allowing plenty of extra wire to hide in corners, along baseboards, etc. A recessed wire channel on the Sat2s allow you to easily conceal wires. Wait to conceal wires until after you test the system. (Use a minimum of 16 guage wire)
Speaker wire preparation
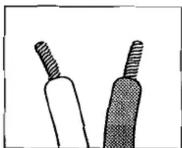
Separate and strip the ends of the speaker wire as shown.
Speakers and electronic terminals have corresponding (+) and (−) terminals. It is important to connect both speakers identically: (+) red speaker to (+) red amplifier and (−) black speaker to (−) black amplifier. Wiring "out of phase" results in thin sound, weak bass and poor stereo effect.
The two wires in any speaker cable are typically differentiated in one of the following ways: one wire is copper and the other silver, or one has a raised rib or a thin colored line on its insulated cover and the other doesn't. Either wire can attach to (+) or (−) as long as all components are connected identically.

Press down on the terminal button and insert one of the stripped wire ends; then release the button to secure the wire in place.
Assure that no strands from either wire cross between terminals and touch the opposite connection. The "short circuit" that results may damage components in your system.
Be careful not to insert the stripped end of the wire too far into the terminal, which may cause you to connect to insulation instead of wire.
Sat2 installation
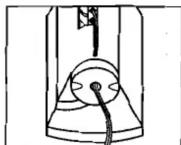
For all 4 satellite speakers, thread the speaker wire through the hole on either end of the speaker, then feed it through the recessed wire channel.
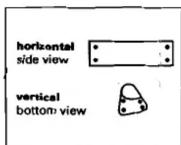
Positioning rubber feet. If mounting Sat2s or center on a shelf, attach the rubber feet as shown.
Rotating the logo on the ride.
Depending on the position of your Sat2s or center, you may wish to rotate the logo to maintain an upright orientation.
1 Remove grille from speaker.
2 Press in on pin on back of logo while rotating face of logo to upright orientation relative to intended speaker placement.
3 Release pin. Spring-loaded logo will lock in place.
4 Replace grille.
Bass2 installation
Where you place the Bass2 in your room will affect the volume setting you select. If you can position the Bass2 in a corner you will not need to turn the volume up as far to achieve the desired bass impact.

The small door at the base of the Bass2 provides access to all speaker and amplifier connections and concasis them once they are connected.
The fit on the door is intentionally snug to prevent vibration. To open it, slip the edge of a coin or a screwdriver in the seam nearest the volume control and lift it open. To close, press the door firmly along the edge of the seam.
Caution: To avoid cutting or otherwise damaging the AC power cord or other speaker wires, be sure it is aligned with the opening provided before closing the door.
Connection
You will need to run 1 speaker cable from each of the 4 Sat2s and from the Center to your receiver (or amplifier). You will also need to run 2 speaker cables from the Bass2 to your receiver (or amplifier).
Connecting the rear Sat2s After connecting one end each of the speaker cables to each of the Sat2s, connect the other end of each of those cables to the "Rear (or Surround) right and left" terminals on the back of your receiver or amplifier).
Connecting the Center After connecting one end of the speaker cable to the Center connect the other end of that speaker cable to the "Center" terminal on the back of your receiver (or amplifier).
Connecting the front Sat2s and Bass2
Your Bass2 subwoofer has both line-level and speaker-level input connections. Review your receiver instruction manual to see which outputs your equipment provides, then follow the appropriate instructions below.
Speaker level input
Connect one end of each of the speaker cables to each of the Sat2s.
Connect one end of each of the speaker cables to each of the connections on the Bass2 (you do not need to be concerned with which is the right and left cable here).
Connect the other end of one of the speaker cables from one of the Sat2s to the unconnected end of one of the speaker cables from the Bass2 by twisting the 2 positive (one from the Sat2 and one from the Bass2) wires together, and then separately, the 2 negative wires. Repeat this process for the other Sat2 and the other speaker cables from the Bass2.
Line Input
Use the RCA (phono) input jacks labeled "Line Input" when connecting from a line-level device, such as a pre-amp, crossover, signal processor, or when using any of the line-level outputs on the rear of your receiver.

flowchart
graph TD
    A["Set2 left"] --> B["Receiver"]
    C["Sats2"] --> D["Receiver"]
    E["Set2 right"] --> F["Receiver"]
    B --> G["L"]
    B --> H["R"]
    D --> I["L"]
    D --> J["R"]
    style A fill:#f9f,stroke:#333
    style C fill:#f9f,stroke:#333
    style E fill:#f9f,stroke:#333
    style B fill:#ccf,stroke:#333
    style D fill:#ccf,stroke:#333
    style F fill:#ccf,stroke:#333
Connect the ends of each of these speaker cables to the "Main (or front) Left and Right" terminals on the back of your receiver (or amplifier).
If your receiver has a subwoofer output, it must not include a low-pass filter. If it has a low-pass filter built in, it will conflict with the low-pass filter in the Bass2. Do not use this method of hookup. If you are not sure if your receiver's subwoofer output includes a low-pass filter, consult your owner's manual or the manufacturer.
If your receiver has a single RCA output for sending the signal to the subwoofer, connect it to both R & L input jacks by using a "y" adapter (not included).

After connecting one end each of the speaker cables to each of the Sat2s, connect the other end of those cables to the "Front right and left" terminals on the back of your receiver (or amplifier).
Finally.
For music applications, take a "test drive"
1 Make sure the Mode Selector button on the back of the Bass2's amplifier is set to "speaker mode" (i.e., the button is up).
2 With the Bass2 amplifier turned all the way down (counterclockwise), plug the amplifier into a standard wall socket.
3 Confirm that the receiver/amplifier powering the stereo channel is turned off and its volume is turned all the way down. Next, center its balance control. If it has an A/B speaker switch, set it to match the speaker output terminals to which the Sat2s and Bass2s are connected.
4 Now, turn on your receiver/amplifier and CD player or other music source (if it has a power switch, turn it on too) and play a disc.
5 Turn up the volume control gently on the receiver/amplifier until you hear sound from the left and right stereo speakers.
6 Turn up the volume control (clockwise) about halfway on the Bass2 amplifier until you hear sound from it as well.
7 Turn up the bass control on your amplifier/receiver halfway, then use the volume control on the Bass2 amplifier to adjust the bass volume.
8 Rotate the balance control all the way to the left. Sound should come only from the left Sat2 speaker. If sound comes from the right speaker with the balance control left, the speaker wires connecting the receiver to the speaker terminals on the back of the receiver/amplifier are reversed. Turn all components off, switch both sets of speaker wires and return to step 3.
Balance your Dolby® Pro Logic Surround Sound system
Pro Logic-equipped devices (AV Receivers, surround sound processors or decoders, Pro Logic TVs or other sources) include a "test tone" you can use to balance the volume of all the speakers in a surround sound system.
Refer to the instructions accompanying your Pro Logic component for selecting the test tone mode and using it to balance speaker levels in your home theater.
Troubleshooting
No sound at all from any of the speakers.
• The tape monitor button on your receiver/amplifier may be pushed in, preventing use of the CD player, FM tuner or other input stereo music source. Check button position.
- If your receiver/amplifier has both "A" and "B" sets of speaker outputs, the wrong set of speakers may be selected. Select the other set or switch the wires to the preferred set.
- The sound source (CD player, cassette deck, videocassette, laserdisc, etc.) may not be turned "on," not activated or not selected on the front panel of the receiver/amplifier. Check settings.
No sound from the left speakers or no sound from the right speakers.
• The balance control may be turned all the way to the left or right. Check balance.
• One of the connections between the sound source and the receiver/amplifier is faulty or has become disconnected. Check connections.
- Wire to the speakers has become disconnected at the speaker or the receiver/amplifier. Check connections.
Speakers play at low volumes and shut off as volume is increased or sound is intermittent.
• There may be a short circuit in one of the connections. Check connections.
Bass is very weak.
• The Bass2 amplifier may not be plugged into a live outlet.
- Check the volume control on the front of the Bass2 amplifier. The green LED on the face of the amplifier should indicate the power is "on" when it is receiving a signal and is plugged in.
- The polarity (+ and -) of one speaker may be reversed. Check the phasing of all subwoofer and satellite connections.
• The subwoofer may not be connected. Check connections.

Sauafiketian
Sat2 and Center
Recommended Power 10 - 120 watts
Impedence 8 ohms (nominal)
Sensitivity 90 dB @ 1W / 1m
(in-room)
Frequency Response 120 Hz - 20 kHz (± 3 dB)
Bass2
Amplifier Power 100 watts (continuous)
Impedance 48 kilo-ohms (line) / 1 kilo-ohm (speaker)
Sensitivity user-adjustable
Frequency Response 40 Hz - 120 Hz (±3dB)
The quick brown fox jumps over the lazy dog.
Satz and Center
HXWxD
Inches 14 x 4-3/8 x 6
Millimeters 356 x 111 x 152
Weight 3.5 lbs. / 1.6 kg
Bass2
H×W×D
Inches 30 × 10-1/4 × 8-1/2
Millimeters 762 x 260 x 152
Weight 27 lbs. / 12 kg
Refinements may be made on occasion to existing products without notice, but will always meet or exceed original specifications unless otherwise stated.
The quick brown fox jumps over the lazy dog.
Sat2 and Center
- 3/4" titanium composite dome high frequency drivers
• Video-shielded
• Diffraction-limiting foam satellite baffles
- Reversible logo
• Recessed wire channels
Bass2
- Triple chamber bandpass subwoofers
• High-efficiency corner-loading design
• Integrated 100W amplifier
- Detachable base with concealed wire spool
- Recessed wire channels and concealed amplifier connectors and wire terminals

WARNING: To reduce the risk of fire or electric shock, do not expose this appliance to warm moisture.
CAUTION: To prevent electric shock do not use this (potentized) play with an extension cord, receptacle or other outlets unless the blade can be fully inserted to prevent blade exposure.
The lightning flash with arrowheads symbol, within an equilateral triangle, is intended to allow the user to the presence of uninsulated dangerous voltage within the product's enclosure that may be of sufficient magnitude to constitute a risk of electric shock to persons.
The extimation point within an equilateral triangle is intended to alert the user to the presence of important operating and maintenance (servicing) instructions in the literature accompanying the appliance.


Mærke : JBL
Model : SFXHCP2
Kategori : Højttaler