WNM 100 - Måling PCE Instruments - Gratis brugsanvisning og manual
Find enhedens vejledning gratis WNM 100 PCE Instruments i PDF-format.

Brugerspørgsmål om WNM 100 PCE Instruments
0 spørgsmål om dette apparat. Besvar dem du kender, eller stil dit eget.
Stil et nyt spørgsmål om dette apparat
Download vejledningen til din Måling i PDF-format gratis! Find din vejledning WNM 100 - PCE Instruments og tag din elektroniske enhed tilbage i hånden. På denne side er alle dokumenter nødvendige for brugen af din enhed offentliggjort. WNM 100 af mærket PCE Instruments.
BRUGSANVISNING WNM 100 PCE Instruments

PCE INSTRUMENTS
Whiteness Meter
PCE-WNM 100
INSTRUCTION MANUAL
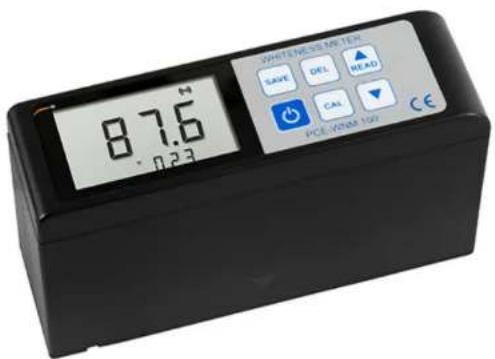
WHITENESS METER PCE-WNM 100
1. APPLICATIONS & FEATURES
* Whiteness Meter is mainly used to directly measure the whiteness value of object or powder with flat surface.
* Can be widely used in whiteness measurement of textile printing and dyeing, paint, chemical building materials, paper board, plastic products, white cement, ceramics, enamel, talc powder, starch, flour, salt, detergent, cosmetics and other substances.
* It consists of Light Source, Optical System, Detection System, Data Process and Display System. The whiteness Calculation Formula of the instrument is blue light whiteness R457.
* Use of high quality imported components, good reliability.
* The optical path design is reasonable, simple. Adopt filter system with correction, the whiteness can be reflected quantitatively.
* No preheating after starting, measurements can be taken after simple calibration, easy to operate.
1
*Pass strict inspection and testing, the instrument conforms to the JJG 512-2002 Whiteness Meter Verification Regulation. Also conforms to GB3978, GB3979, GB7973, GB7974, ISO2470, GB8904.2, QB1840, GB2913, GB13025.2, GB1543, ISO2471 GB10339, GB5950, GB12911, GB2409 and other standards.
* Able to memory 254 groups of measurement data.
* Use USB data output and RS-232 data output to connect with PC.
* Provide Bluetooth data output choice.
- OPERATING PRINCIPLE The light source of the instrument is long-life LED with 457nm, conforming to the light source requirement in the JJG 512-2002 National Metrological Whiteness Meter Verification Regulation. The measurement of the instrument adopts the principle of photoelectric effect. The diffuse reflectance Radiant Brightness Energy Value of the sample surface is receive by the optical cell. Then, the value is amplified by high-precision auto
zeroing operation amplifier, inputted to the calibration circuit for energy calibration. Then, the whiteness value of the sample is directly shown on the digital display.
3. NOTE
This instrument is a metrological appliance, is strictly forbidden to disassemble. please read the instructions carefully before use.
* There should be no corrosive gas or vibration source in the operating environment.
* There should be no light exposure and magnetic field interference.
* The ambient air should be dry and no dust, etc.
* If the instrument is not to be used for any extended period, remove batteries to prevent battery leakage corroding internal circuit.
* To keep the measuring sensor clean, not to touch the optical element with hand, so as not to affect the spectral characteristics.
3
4. SPECIFICATIONS
Range: 0\~120
Resolution: 0.1
Illumination condition: 45/0
Illuminant: LED 457 nm
Whiteness Formula:
Blue Light Whiteness WB=R457
Measuring Aperture:
18x11 mm Rectangle
Zero Drift: ≤0.1
Stability of Display: ≤0.5
Repeatability of Measurement: ≤0.1
Operating Condition:
Temperature: 0\~40 °C
Humidity: <85 %RH
Power Supply:
Lithium Battery
Size: 140x45x75 mm
Weight: 305 g (Including Batteries)
Standard Accessories:
Main Unit
Standard White Board
Optical Cleaning Cotton Cloth
AC Adaptor
Carrying Case
Operation Manual
4
- PANEL DESCRIPTIONS
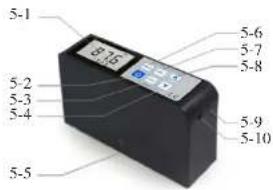
5-1 Display
5-2 Power key
5-3 Calibration Key
5-4 Minus Key
5-5 Sensor of Button
5-6 Save Key
5-7 Delete Key
5-8 Read/Plus Key
5-9 RS232C Interface
5-10 AC Interface
5

5-11 Measurement Symbol
5-12 Reading Symbol
5-13 Coupling Symbol
5-14 Measurement Value
5-15 Data Group
6. MEASUREMENT PROCEDURE
6.1 Important Notice
6.1.1 Before using the instrument, it is necessary to carefully read the manual, and operate in strict accordance with the stipulated working conditions and usage methods.
6.1.2 The standard white board is used for calibration of the instrument. It is necessary to keep the surface clean with no exposure to dust. Avoid artificially affecting its nominal value.
6.1.3 Keep the optical components of the instrument clean, do not rub or touch
6
them with hands. If there is dust on optical components, use wash ear ball to blow off dust on the surface or wipe with lens wiping paper. If there is oil or mildew on optical components, use absorbent cotton dipped in absolute alcohol to wipe the surface. When the instrument is not to be used for any extended period, sheathe it in a dust cover, which is self-made.
6.1.4 Before starting up, clean the measuring aperture with optical cleaning cotton cloth. In order to avoid contamination of the whiteboard and test samples.
6.1.5 Test sample surface should be flat or even. The consistency of the longitudinal and transverse directions of the tested samples should be maintained in the repeatability test. For samples without flat or even surface(such as powder, particles, fiber), it is necessary to prepare a sample board. For details see 6.2 Sample Preparation.
6.2 Sample Preparation
7
one. The instrument can store up to 254 groups of data.
6.4.2 To browse the stored data, just press the Read/Plus Key, the Measurement Symbol disappears on the display, while the Reading Symbol appears, indicating it is in browsing state. Press the Read/Plus Key or Minus Key to browse the data in the instrument.
6.4.3 To quit browsing state, just press the Power Key.
6.5 Data Deleting There are two ways to delete the data, single delete and delete all.
A. Single data can be deleted in the browsing state. Press Read/Plus Key or Minus Key to call out the data to be deleted, press the Delete Key, the current data is immediately deleted. After deleting the last group of data, Err1 is displayed on the screen, which indicates that all the data has been removed.
B. To move all the data, just press and hold the DEL delete key for about 3
11
6.2.1 If the uneven surface of the sample can not be improved, or there are difference between the horizontal textures and vertical textures, measure the sample at different positions or angles, adopt the average whiteness value as the whiteness value.
6.2.2 For paper, cloth and various fiber fabric, it is necessary to overlap them till opaque. If the whiteness value does not change when increasing the number of samples, it is opaque.
6.2.3 For powder or small granular samples, shall be put in powder containers, flatten with bright and clean glass plate. Different preparing conditions bring different test results, so, in order to establish the whiteness relationship between the same kind of samples, the preparing method must be unified, including weight, particle size and pressing method. So that the samples have approximate density and surface roughness. If higher accuracy is required, adopt the constant pressure
8
seconds in the measuring state. Then, all the data stored will be deleted. Err1, which indicates all the data has been removed, is also displayed on the screen.
- TRANSFERRING READINGS TO A COMPUTER
7.1 USB, RS232 Connection Operation
7.1.1 When RS-232C Data Cable with Software is purchased, data can be transferred to computer.
7.1.2 Put the RS232 CD into CD-ROM of computer and install the software.
7.1.3 Connect instrument with computer through USB.RS232 Cable.
7.1.4 Switch on your gauge and ensure the Reading Screen is displayed.
7.1.5 Start the software and follow the instructions included with the software Demo. EXE.
7.2 Bluetooth Connection Operation When Bluetooth connection module and the adapter is purchased, data can be transferred to the computer. For detailed operation please see Bluetooth Adapter
12
6.2.4 For fibrous materials, such as cotton, chemical fiber, wool, silk, etc. Firstly sort them out, comb into a vertical surface, and then placed in a self-made test box for measurement. Sampling method (including quantity) should be unified. It is suggested to prepare a few more samples for measurement and adopt the average value.
6.3 MEASUREMENT & CALIBRATION
6.3.1 Instrument has been debugged, calibrated before leaving the factory, can be used for a period of time (length of the time depends on the environment). There is no need to preheat after starting, measurement can be directly taken. Press the power key to start, the Measurement Symbol M is displayed on the screen, indicating it is in the measuring state. When measuring, place the instrument on the sample, fully attached the sensor to the surface of the sample, the coupling sign appears on the screen. Read or store the data when the
9
Operation Instructions.
- MAINTENANCE
8.1 Illuminant Lens
It is forbidden to touch it with hands, so as not to leave a trace, effecting spectral transmittance. After being used for a long time, use cotton dipped in Absolute Alcohol to carefully wipe the lens surface with tweezers, and then use dry cotton to wipe and clean it.
13
reading is stable. (for the details of Data pow Storing, see 6.4.1)
6.3.2 After 'being used' for a period of time, the instrument needs to be calibrated. Just place the Standard White Board on horizontal table, place the instrument on the Standard White Board, attach the sensor tightly on the standard white Board, press and hold the CAL Calibration Key for about 1 second, signal CAL is displayed on the screen, the calibration is correlated.
the calibration is complete 6.4 Data Storing and Browsing
6.4.1 After starting, the Measurement Symbol is on the display, indicating the instrument is in a state of measurement, data storage can be operated. Meanwhile, the display also shows the number of stored data. When measuring, the sensor is completely attached to the sample surface, the coupling sign appears on the screen, after the reading is stable, press the Save Key, the data is stored in the instrument, the stored data groups plus
10