
PV-DV400 - Videokamera PANASONIC - Gratis brugsanvisning og manual
Find enhedens vejledning gratis PV-DV400 PANASONIC i PDF-format.


Brugerspørgsmål om PV-DV400 PANASONIC
0 spørgsmål om dette apparat. Besvar dem du kender, eller stil dit eget.
Stil et nyt spørgsmål om dette apparat
Download vejledningen til din Videokamera i PDF-format gratis! Find din vejledning PV-DV400 - PANASONIC og tag din elektroniske enhed tilbage i hånden. På denne side er alle dokumenter nødvendige for brugen af din enhed offentliggjort. PV-DV400 af mærket PANASONIC.
BRUGSANVISNING PV-DV400 PANASONIC
Digital Video Camcorder
Operating Instructions
Models No. PV-DV200
PV-DV400
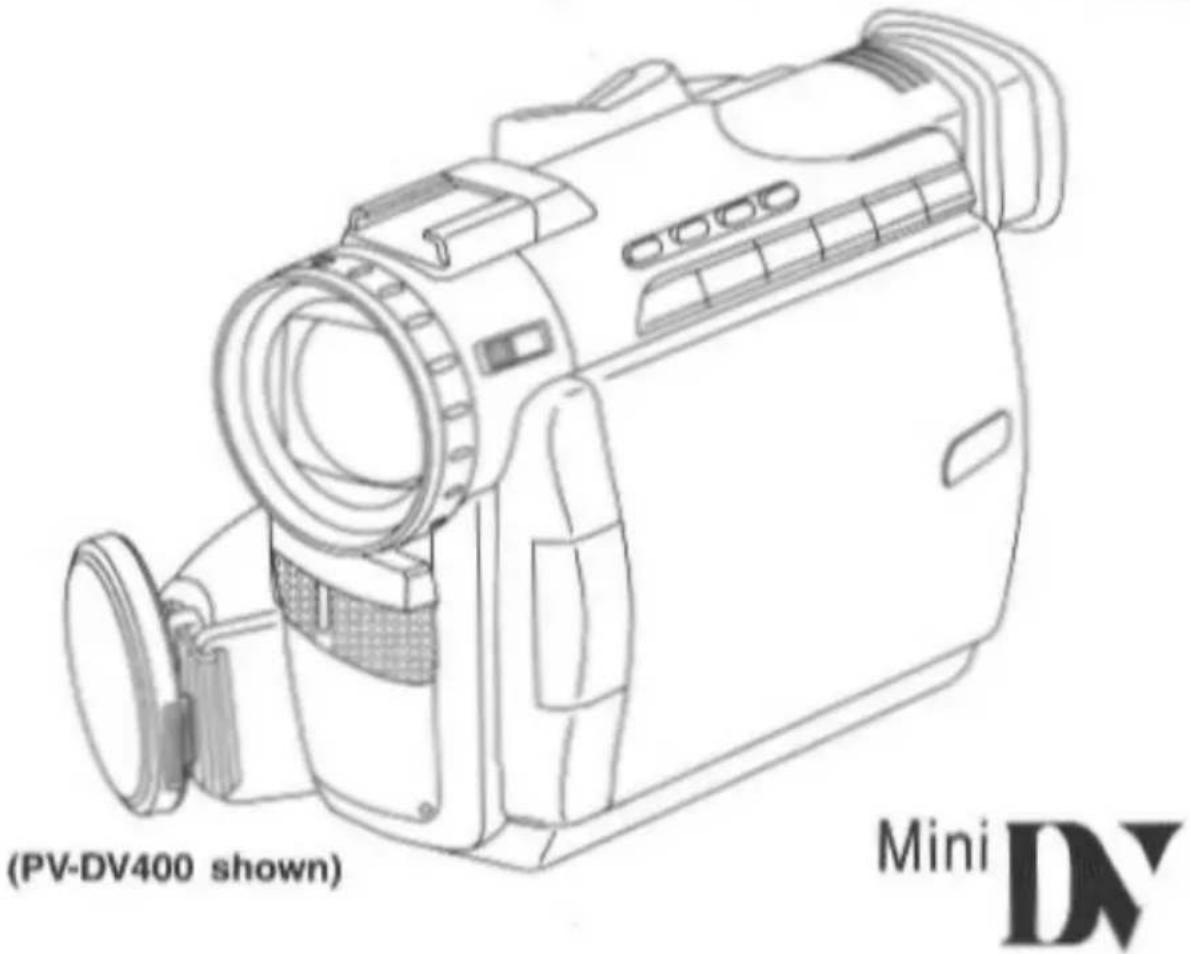

Before attempting to connect, operate or adjust this product, please read these instructions thoroughly.
Spanish Quick Use Guide is included.
Guía para rápida consulta en español está incluida.
For assistance, call 1-800-211-PANA(7262)
Things You Should Know
Thank you for choosing Panasonic!
You have purchased one of the most sophisticated and reliable products on the market today. Used properly, we're sure it will bring you and your family years of enjoyment. Please take time to fill in the information below. The serial number is on the tag located on the underside of your Palmcorder. Be sure to retain this manual as your convenient Palmcorder information source.
Date of Purchase
Dealer Purchased From
Dealer Address
Dealer Phone No.
Model No.
Serial No.
Unpack your Camcorder
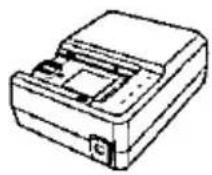
1 pc. AC Adaptor
(PV-DAC10)
with AC Cable and DC
Cable


1 pc. Lens Cap
(LSYF0395)

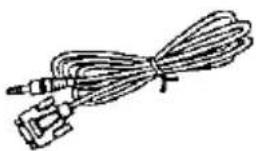
1 pc. PC Connection
Cable for Windows
(LSJA0276)
1 pc. Battery Pack
(PV-DBP8 or PV-DBP8A)

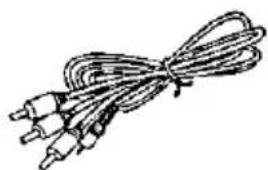
1 pc. A/V Cable
(LSJA0280)
natural_image
Line drawing of a bundle of three connected cables (no text or symbols)1 pc. MultiMediaCard
(LSFT0198)
1 pc. Shoulder
Strap (LSFC0013)

1 pc. PHOTOVU LINK
DRIVER & CARD LINK
DRIVER (LSFT0196)
Microsoft and Windows are registered trademarks of Microsoft in the United States and other countries.
Things You Should Know
Safety Precautions
WARNING: TO PREVENT FIRE OR SHOCK HAZARD, DO NOT EXPOSE THIS EQUIPMENT TO RAIN OR MOISTURE.
Your Mail D' Palmcorder is designed to record and play back in Standard Play (SP) mode and Long (LP) mode.
It is recommended that only cassette tapes that have been tested and inspected for use in VCR machines with the ^Mini mark be used.

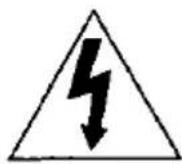
This symbol warns the user that uninsulated voltage within the unit may have sufficient magnitude to cause electric shock. Therefore, it is dangerous to make any kind of contact with any inside part of this unit.

This symbol alerts the user that important literature concerning the operation and maintenance of this unit has been included. Therefore, it should be read carefully in order to avoid any problems.
The above markings are located on the appliance bottom cover.
This device complies with Part 15 of the FCC Rules. Operation is subject to the following two conditions: (1) This device may not cause harmful interference, and (2) this device must accept any interference received, including interference that may cause undesired operation.
Note: This equipment has been tested and found to comply with Part 15 of the FCC Rules. These limits are designed to provide reasonable protection against harmful interference when operated in a residential environment.
If this equipment does cause interference to radio or television reception, which can be determined by turning the equipment off and on, use the equipment in another location and/or utilize an electrical outlet different from that used by the receiver.
If necessary, consult the dealer or an experienced radio/TV technician for help. You may find the booklet, 'Something About Interference' available from FCC local regional offices helpful.
FCC Warning: To assure continued FCC compliance, use only the provided shielded interface cable when connecting digital video camera to computer in accordance with instruction herein. Also, any changes or modifications to this equipment could void the user's authority to operate.
Important Safeguards
- Read Instructions → All the safety and operating instructions should be read before the unit is operated.
- Retain Instructions — The safety and operating instructions should be retained for future reference.
- Heed Warnings — All warnings on the unit and in the operating instructions should be adhered to.
- Follow Instructions — All operating and maintenance instructions should be followed.
- Cleaning — Unplug this video unit from the wall outlet before cleaning. Do not use liquid or aerosol cleaners. Use a dry cloth for cleaning.
- Attachments — Do not use attachments not recommended by the video product manufacturer as they may be hazardous.
- Water and Moisture — Do not use this video unit near water — for example near a bath tub, wash bowl, kitchen sink, or laundry tub, in a wet basement, or near a swimming pool, and the like.
- Accessories — Do not place this video unit on an unstable cart, stand, tripod, bracket, or table. The video unit may fall, causing serious injury to a child or adult, and serious damage to the unit. Use only with a cart, stand, tripod, bracket, or table recommended by the manufacturer, or sold with the video unit. Any mounting of the unit should follow the manufacturer's
instructions and should use a
mounting accessory recommended by the manufacturer. An appliance and cart combination should be moved with care. Quick stops, excessive force, and uneven surfaces may cause the appliance and cart combination to overturn. - Ventilation — Slots and openings in the cabinet are provided for ventilation and to ensure reliable operation of the video unit and to protect it from overheating. These openings must not be blocked or covered. Never place the video unit on a bed, sofa, rug, or other similar surface, or near or over a radiator or heat register. This video unit should not be placed in a built-in installation such as a bookcase or rack unless proper ventilation is provided or the manufacturer's instructions have been adhered to.
- Power Sources — This video unit should be operated only from the type of power source indicated on the marking label. If you are not sure of the type of power supply to your home, consult your appliance dealer or local power company. For video units intended to be operated from battery power, or other sources, refer to the operating instructions.

natural_image
Silhouette of a person pushing a large ladder inside a circle (no text or symbols)-
Grounding or Polarization — This video unit may be equipped with either a polarized 2-wire AC (Alternating Current) line plug (a plug having one blade wider than the other) or 3-wire grounding type plug, a plug having a third (grounding) pin.
The 2-wire polarized plug will fit into the power outlet only one way. This is a safety feature. If you are unable to insert the plug fully into the outlet, try reversing the plug. If the plug still fails to fit, contact your electrician to replace your obsolete outlet. Do not defeat the safety purpose of the polarized plug. The 3-wire grounding type plug will fit into a grounding type power outlet. This is a safety feature. If you are unable to insert the plug into the outlet, contact your electrician to replace your obsolete outlet. Do not defeat the safety purpose of the grounding type plug. -
Power-Cord Protection — Power-supply cords should be routed so that they are not likely to be walked on or pinched by items placed upon or against them, paying particular attention to cords of plugs, convenience receptacles, and the point where they exit from the unit.
-
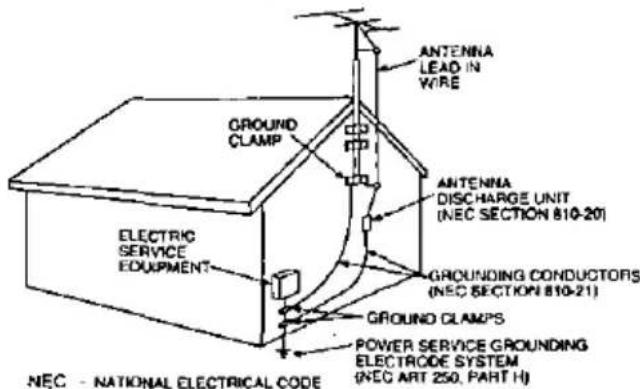
Outdoor Antenna Grounding — If an outside antenna or cable system is connected to the video unit, be sure the antenna or cable system is grounded so as to provide some protection against voltage surges and built-up static charges. Part 1 of the Canadian Electrical Code, in USA Section 810 of the National Electrical Code, provides information with respect to proper grounding of the mast and supporting structure, grounding of the lead-in wire to an antenna discharge unit, size of grounding conductors, location of antenna discharge unit, connection to grounding electrodes, and requirements for the grounding electrode.
- Lightning \~ For added protection of this video unit receiver during a lightning storm, or when it is left unattended and unused for long periods of time, unplug it from the wall outlet and disconnect the antenna or cable system. This will prevent damage to the video unit due to lightning and power-line surges.
Important Safeguards
- Power Lines — An outside antenna system should not be located in the vicinity of overhead power lines or other electric light or power circuits, or where it can fall into such power lines or circuits. When installing an outside antenna system, extreme care should be taken to keep from touching such power lines or circuits as contact with them might be fatal.
- Overloading — Do not overload wall outlets and extension cords as this can result in a risk of fire or electric shock.
- Objects and Liquids — Never push objects of any kind into this video unit through openings as they may touch dangerous voltage points or short out parts that could result in a fire or electric shock. Never spill liquid of any kind onto the video unit.
- Servicing — Do not attempt to service this video unit yourself as opening or removing covers may expose you to dangerous voltage or other hazards. Refer all servicing to qualified service personnel.
- Damage Requiring Service — Unplug this video unit from the wall outlet and refer servicing to qualified service personnel under the following conditions: a. When the power-supply cord or plug is damaged.
b. If any liquid has been spilled onto, or objects have fallen into the video unit.
c. If the video unit has been exposed to rain or water.
d. If the video unit does not operate normally by following the operating instructions. Adjust only those controls that are covered by the operating instructions, as an improper adjustment of other controls may result in damage and will often require extensive work by a qualified technician to restore the video unit to its normal operation.
e. If the video unit has been dropped or the cabinet has been damaged.
1. When the video unit exhibits a distinct change in performance — this indicates a need for service.
-
Replacement Parts — When replacement parts are required, be sure the service technician has used replacement parts specified by the manufacturer or have the same characteristics as the original part. Unauthorized substitutions may result in fire, electric shock or other hazards.
-
Safety Check—Upon completion of any service or repairs to this video unit, ask the service technician to perform safety checks to determine that the video unit is in safe operating order.
Precautions
USE & LOCATION
- TO AVOID SHOCK HAZARD ... Your Camcorder and power supply should not be exposed to rain or moisture. Do not connect the power supply or operate your Camcorder if it gets wet. Your Camcorder has been designed for outdoor use, however it is not designed to sustain direct exposure to water, rain, sleet, snow, sand, dust, or a direct splashing from a pool or even a cup of coffee. This action could permanently damage the internal parts of your Camcorder. Do not attempt to disassemble this unit. There are no user serviceable parts inside. Unplug your Camcorder from the power supply before cleaning.
• DO NOT AIM YOUR CAMCORDER AT THE SUN OR OTHER BRIGHT OBJECTS
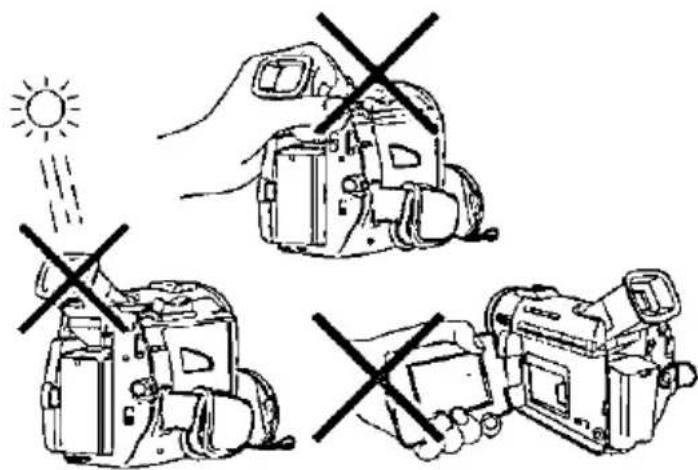
• DO NOT LEAVE THE PALMCORDER WITH THE EVF AIMED DIRECTLY AT THE SUN AS THIS MAY CAUSE DAMAGE TO THE INTERNAL PARTS OF THE EVF - DO NOT EXPOSE YOUR CAMCORDER TO EXTENDED HIGH TEMPERATURE ... Such as, in direct sunlight, inside a closed car, next to a heater, etc... This action could permanently damage the internal parts of your Camcorder.
- AVOID SUDDEN CHANGES IN TEMPERATURE ... If the unit is suddenly moved from a cold place to a warm place, moisture may form on the tape and inside the unit.
• DO NOT LEAVE YOUR CAMCORDER OR THE POWER SUPPLY TURNED ON WHEN NOT IN USE. - STORAGE OF YOUR CAMCORDER ... Store and handle your Camcorder in a manner that will not subject it to unnecessary movement (avoid shaking and striking). Your Camcorder contains a sensitive pick-up device which could be damaged by improper handling or storage.
CARE
• TO CLEAN YOUR CAMCORDER ... Do not use strong or abrasive detergents when cleaning your Camcorder body.
- TO PROTECT THE LENS ... Do not touch the surface of the lens with your hand. Use a commercial camcorder lens solution and lens paper when cleaning the lens. Improper cleaning can scratch the lens coating.
• TO PROTECT THE FINISH OF YOUR CAMCORDER ... Before handling your Camcorder, make sure your hands and face are free from any chemical products, such as suntan lotion, as it may damage the finish.
Table of Contents
Getting Started
Things You Should Know 2
Important Safeguards 4
Precautions 5
Quick Guide 8
Supplying Power 11
Cassette Information 14
Color Enhancement Light (Optional) 16
Attaching the Shoulder Strap 17
Setting the Clock 19
Using the Palmcorder Menu 20
MENU OSD 21
Electronic Viewfinder/LCD Monitor Indications 26
Basic Operation
Camera Recording 30
Remote Control (Optional) 33
Playback Your Recordings 35
Special Features
Card PhotoShot 41
Recording images From a Tape 42
Playback Still Images 43
Delete Specific Image Pages 45
Delete All Image Pages 46
Format the MultiMediaCard 47
Photo Title 48
Dual Digital Electronic Image Stabilization System (D.E.I.S.) 50
Zoom 51
Digital PhotoShot 52
Index Search 52
White Balance 53
Recording Still Pictures 53
IR FILTER 53
Program AE 54
Digital Functions 55
Focus 56
Audio/Video Fade In/Out 57
Backlight 57
High Speed Shutter 58
Audio Dubbing using the External or Built-in Microphone 59
Memory-Stop Editing 60
Copying your Tapes to S-VHS or VHS Cassette 61
Copying from Digital Equipment (dubbing) 62
PC Connection with DV Interface Cable (IEEE 1394) 63
PC Connection 64
Software Installation (Windows 95/98) 65
CARD LINK 66
PHOTOVU LINK 69
Printer Connection 71
For Your Information
Palmcorder Accessory System 72
Palmcorder Accessory Order Form 73
Notes On Operations 74
Specifications 76
Before Requesting Service 77
Request for Service Notice 79
Index of Controls 80
Warranty 85
Spanish Quick Use Guide/Guía Para Uso Rápido 87
Index 90
This operating Instruction book is designed for use with models PV-DV200 and PV-DV400. The PV-DV400 is the model used for illustrative purposes.
Features may vary, so please read carefully.
Differences between models
| Model Number | PV-DV200 | PV-DV400 |
| LCD Monitor | 63.5 mm (2.5 inch)Liquid Crystal Display | 76.2 mm (3.0 inch)Liquid Crystal Display |
| Viewfinder | Black and White | Color |
| IR FILTERSwitch | No | Yes |
| WIND-CUT | No | Yes |
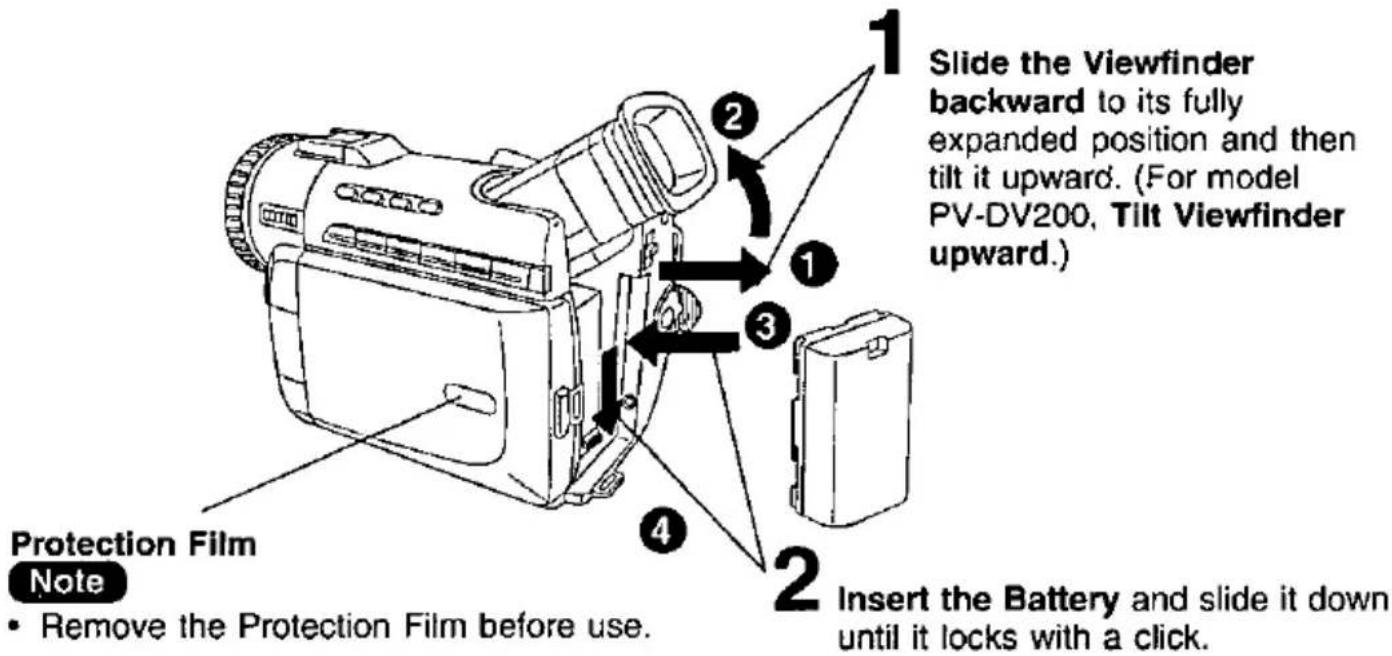
Quick Guide
Insert the Battery
Before you begin...
- Charge the Battery (page 11).
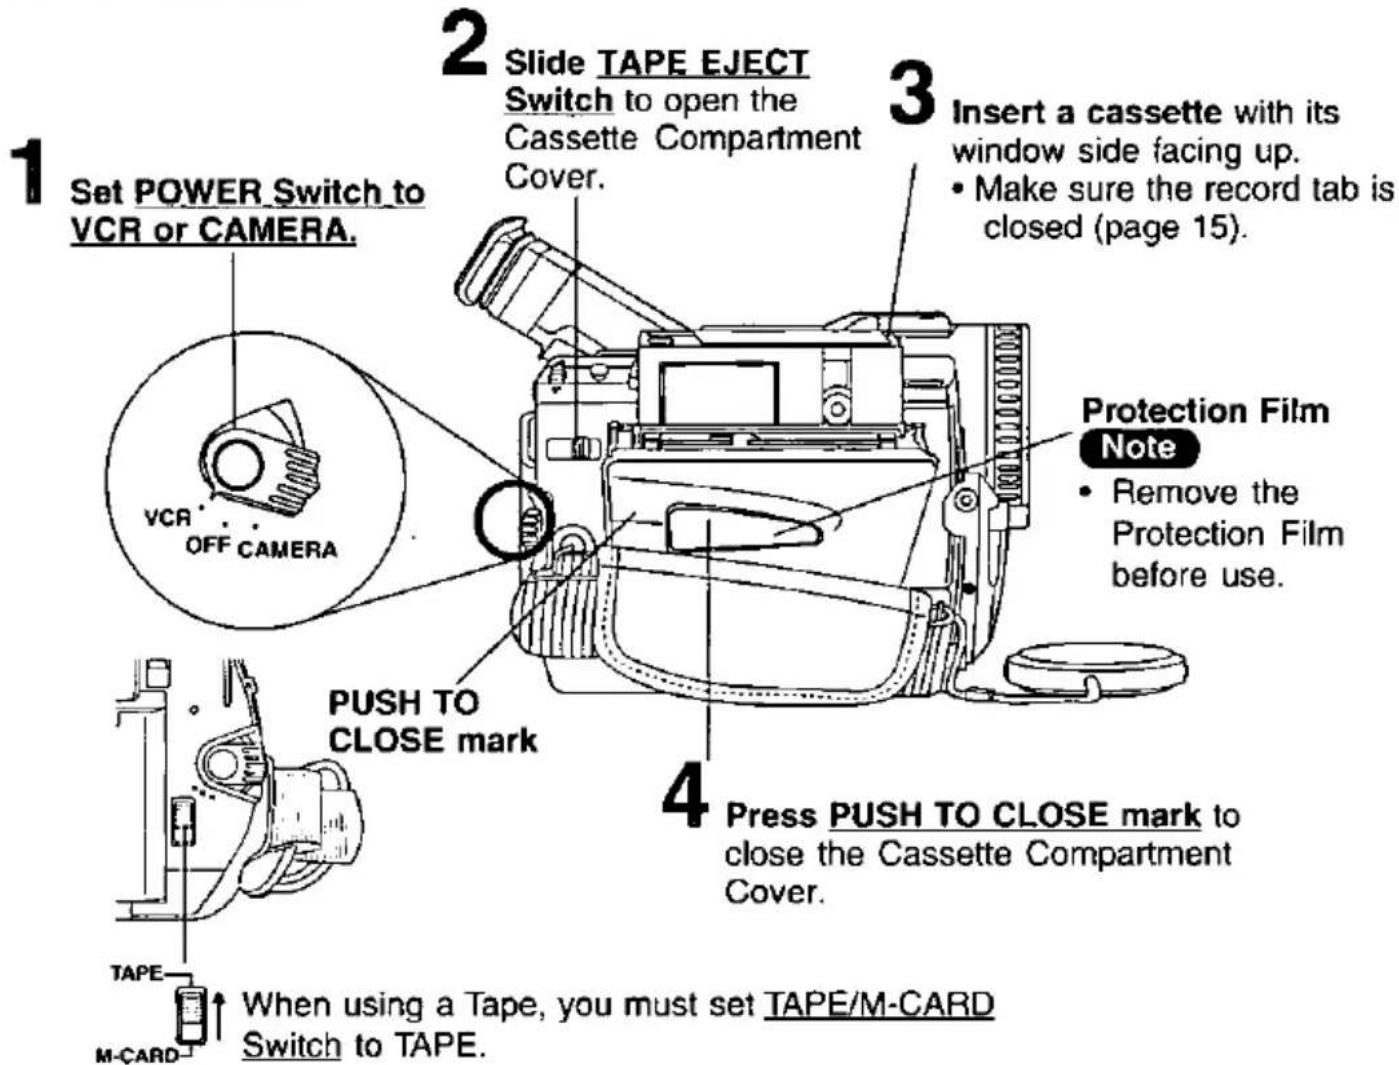
Insert Cassette
Camera Recording
When the LCD monitor is fully open, the Viewfinder automatically turns OFF.
2
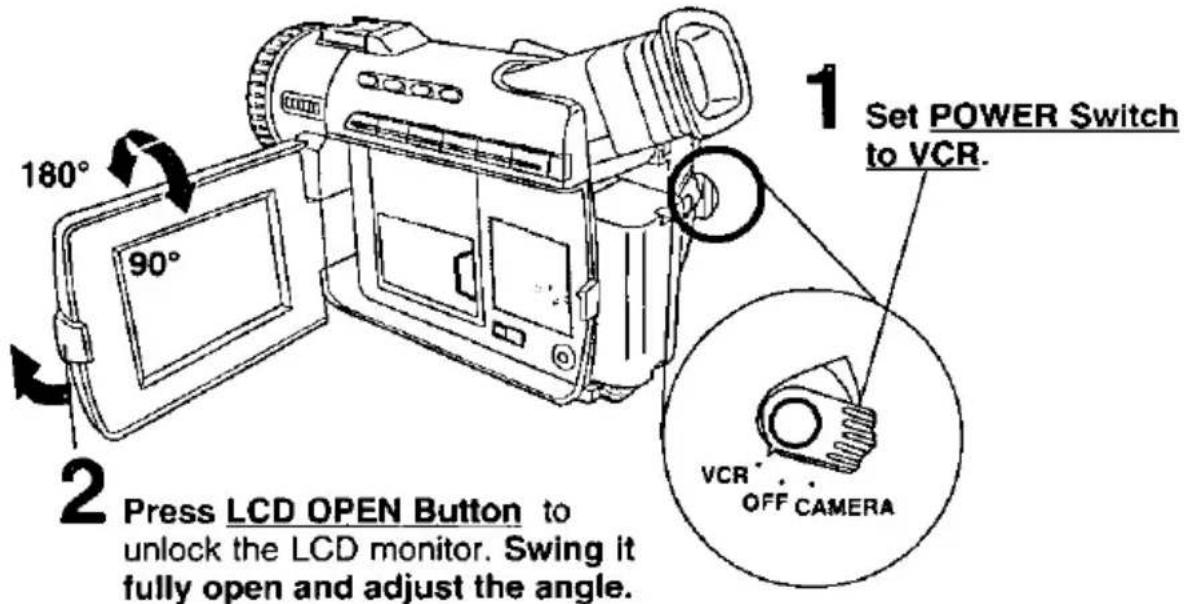
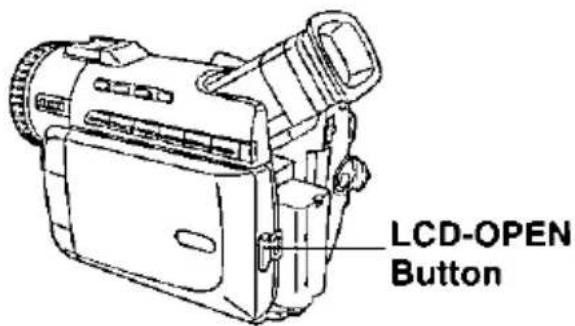
Press LCD-OPEN Button to unlock the LCD monitor. Swing it fully open and adjust the angle.
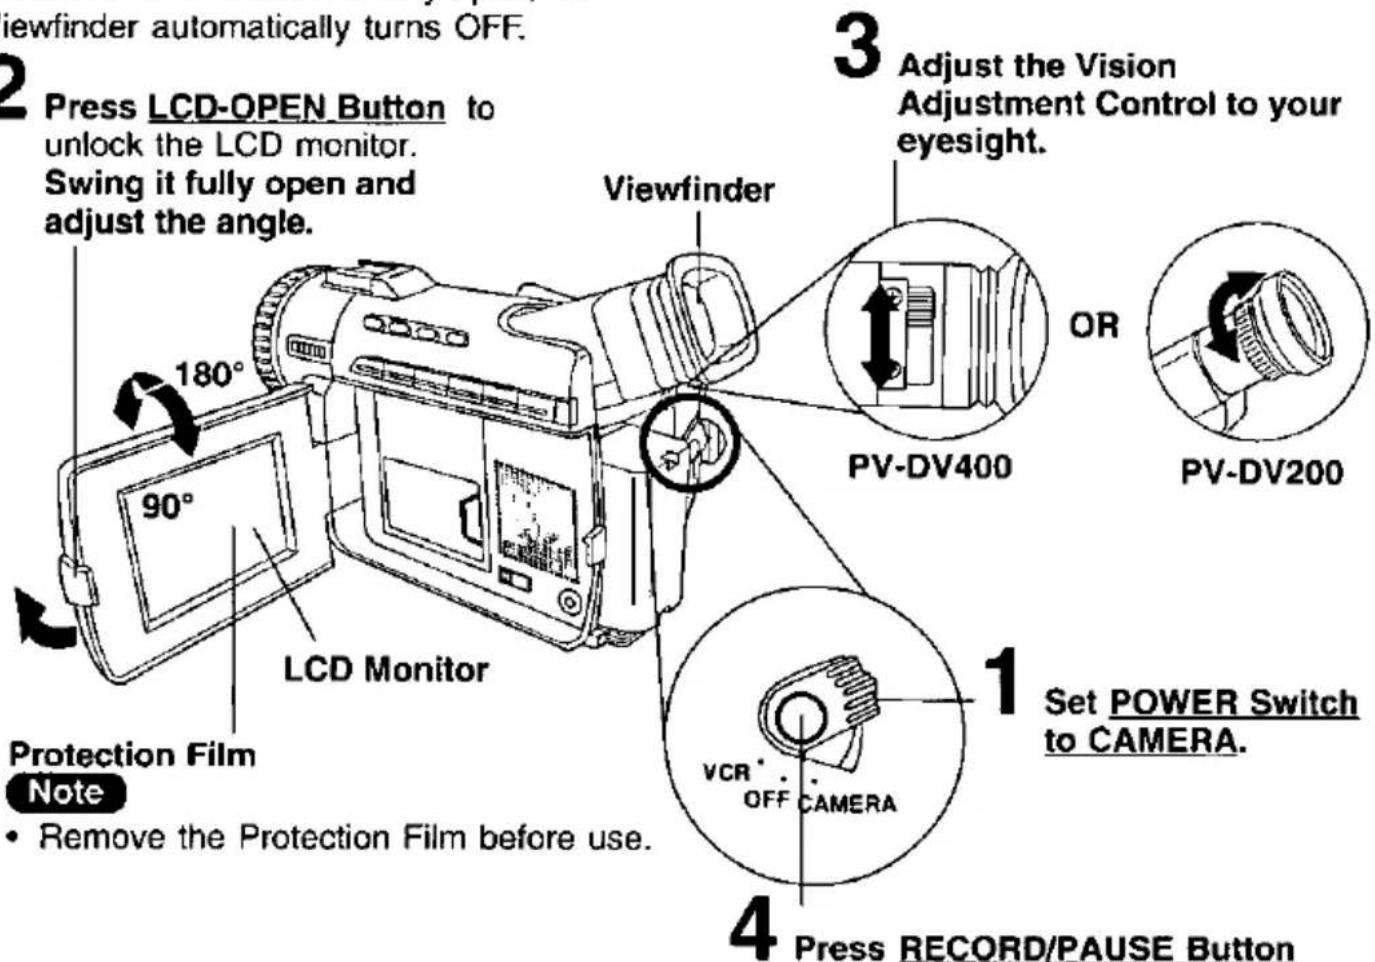
- Remove the Protection Film before use.
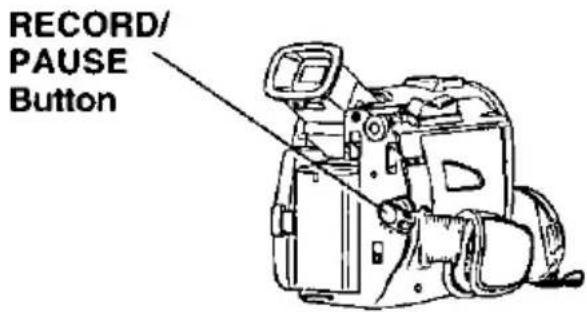
Press RECORD/PAUSE Button to start recording. Press RECORD/PAUSE Button again to pause recording.
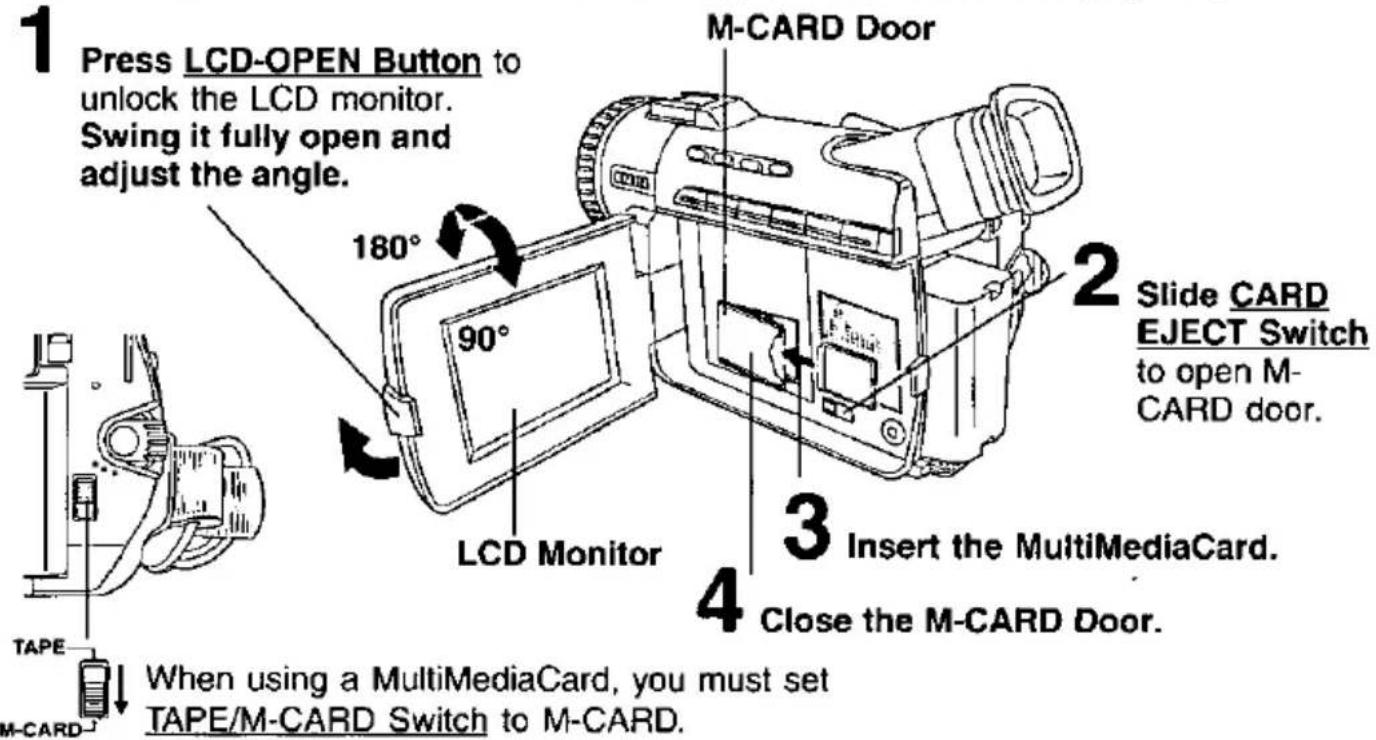
Insert MultiMediaCard
Be sure to insert the MultiMediaCard before using the Card PhotoShot (page 41).
Press LCD-OPEN Button to unlock the LCD monitor. Swing it fully open and adjust the angle.
Quick Guide
To Watch Playback in the LCD (Liquid Crystal Display)
Before you begin...
- Charge the Battery (page 11).
When the LCD monitor is fully open, the Viewfinder automatically turns OFF.
Charge the Battery Pack on the AC Adaptor
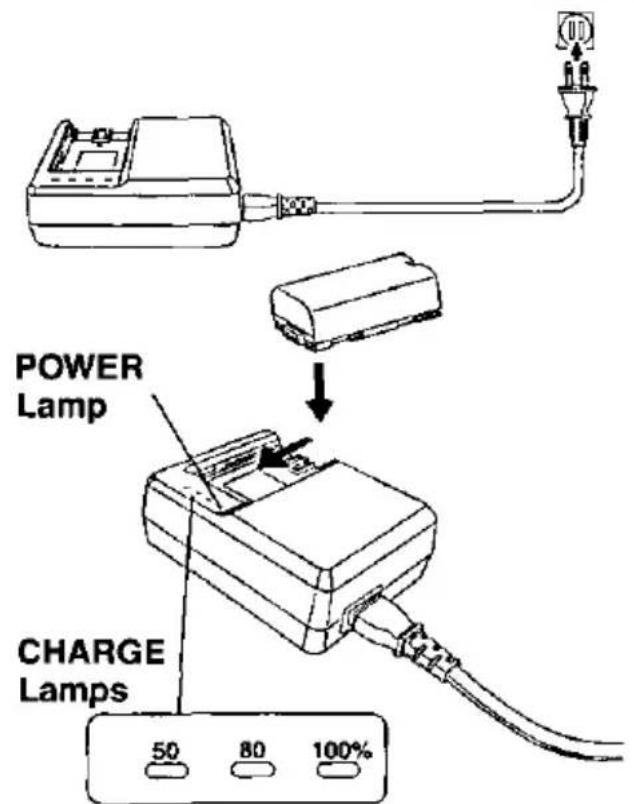
Charge Lamps
- The three Charge Lamps "50%", "80%" and "100%" flash and then remain lit one after another to indicate how much the Battery has been charged. When all three lamps are lit, charging is finished.
- The Charge Lamps give a good approximate indication of the charging condition under normal ambient temperature. However, when charging at high or low temperature, the charge lamps may differ considerably from the actual charging condition.
1 Connect and plug in the Cable as shown.
• POWER Lamp will light.
2 Attach the battery as shown to charge.
- Charge lamps on the AC Adaptor will flash and then turn solid red to indicate current charge level. When all 3 lamps are constantly on, the battery is fully charged. (approx. 1 hour) Expect approx. 1 hour 15 minutes of operation when fully charged (EVF usage).
3 Remove the Battery.
Slide the Battery out and then lift up.
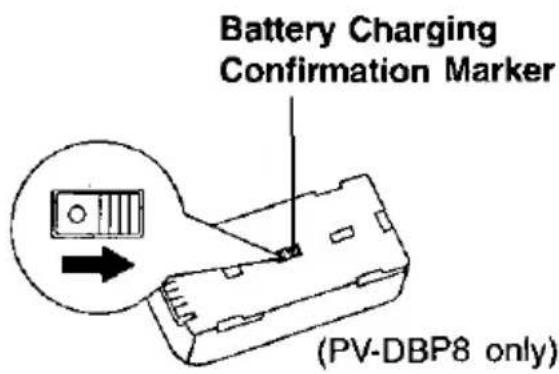
Battery Charging Confirmation Marker Use this marker as a reminder to yourself when the battery is fully charged or in need of a charge. This marker performs no function and is for your reference only.
- The Battery is no longer serviceable if the operation time is very short, even after a sufficient charge.
Note
• PV-DBP8A has no marker.
Supplying Power
Insert/Remove the Battery Pack
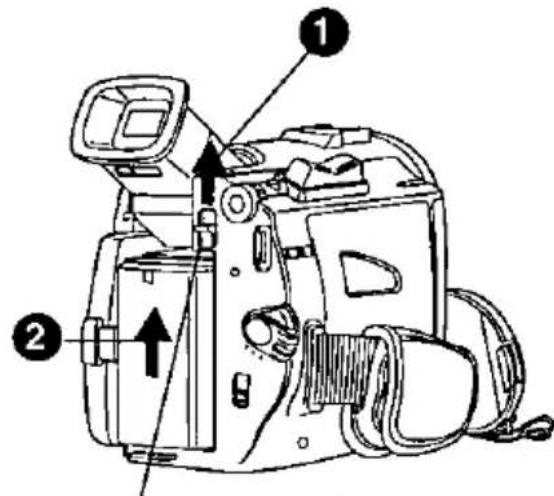
BATTERY RELEASE Switch
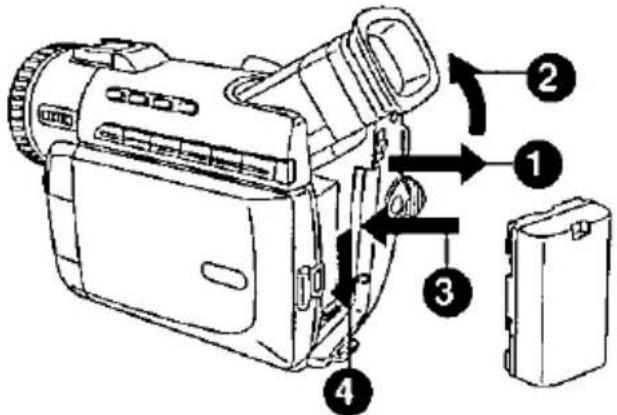
1 Slide the Viewfinder backward to its fully extended position and then tilt it upward. (For model PV-DV200, Tilt Viewfinder upward.)
2 Insert the Battery and slide it down until it locks with a click.
To remove the Battery:
Slide the Battery upward while sliding the BATTERY RELEASE.
Battery Care
Caution:
- Charge only with specified charger.
• The Battery can be charged within a temperature range of 32^ F ( 0^ C) and 104^ F ( 40^ C). - The Battery may be warm after charging or just after use. This is normal.
- Do not use an insufficiently charged or worn out Battery.
• In extreme cold surroundings, Battery charging time will increase.
Safety precautions:
- Do not get the Battery near, or dispose of in fire.
- Do not directly connect (short circuit) the positive (+) and negative (−) terminals.
- Never attempt to disassemble or reassemble the Battery.
To avoid damage to the Battery:
- Do not drop or jar the Battery.
- Use the Battery with specified models only.
- If the Battery is used in extremely high temperatures, a safety device will automatically prevent operation.
To insure longer battery life:
- While not in use, remove Battery from the Palmcorder and AC Adaptor and store in a cool, dark, dry place. If you leave the Battery in the Palmcorder or on AC Adaptor, the Battery will no longer be rechargeable.
- Keep the Battery terminals clean.
AC Adaptor
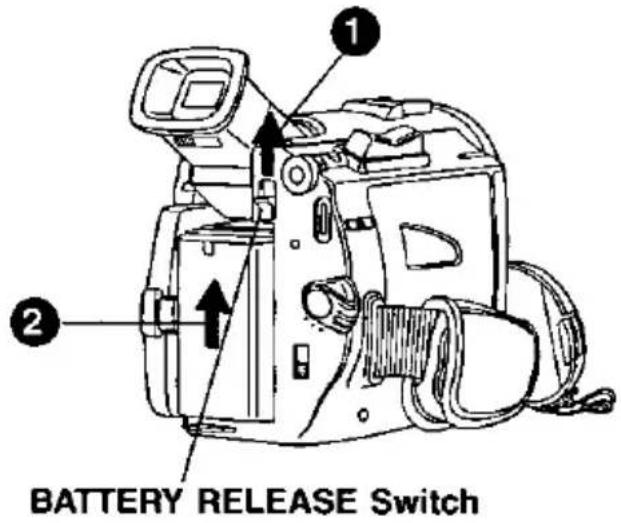
1 Slide the Battery upward while sliding the BATTERY RELEASE to remove the Battery (page 12).
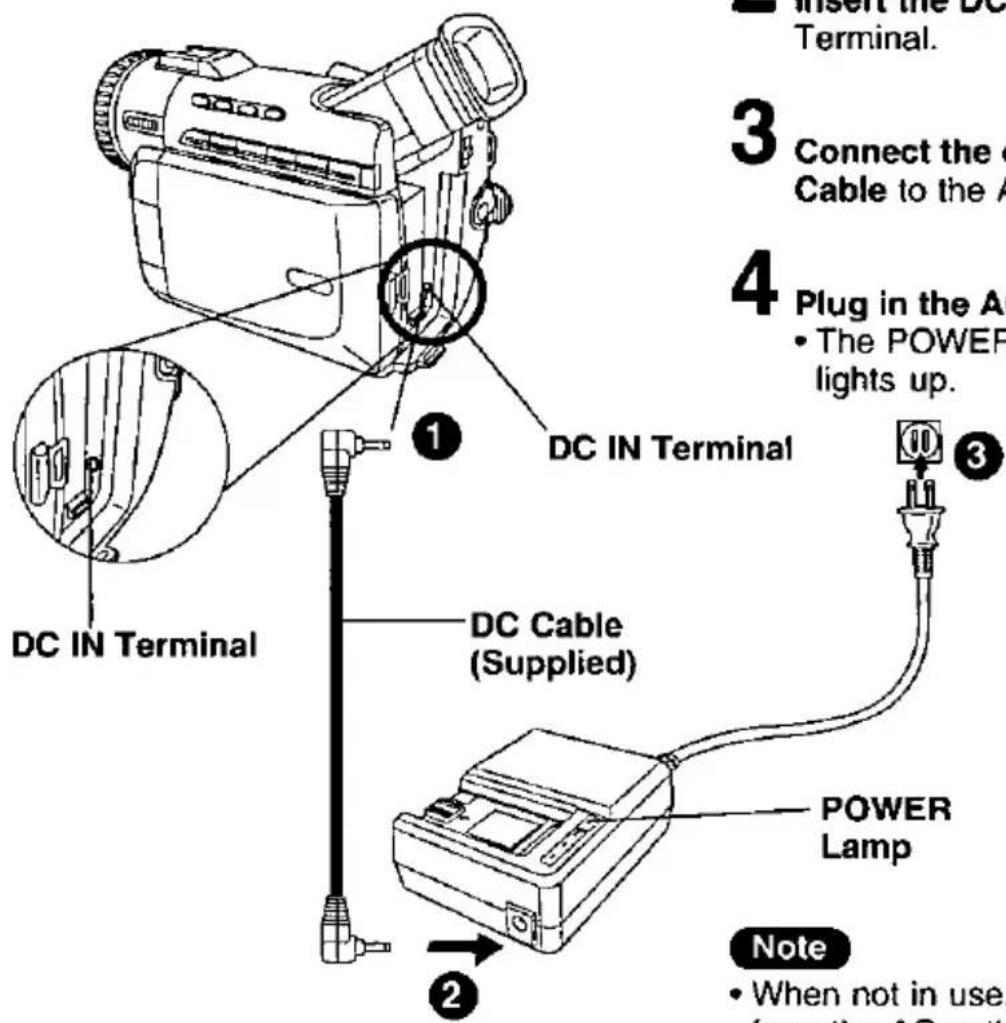
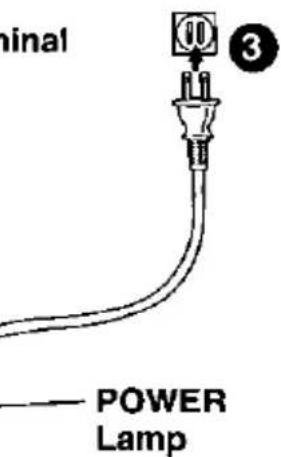
2 Insert the DC Cable into the DC IN Terminal.
3 Connect the other end of the DC Cable to the AC Adaptor as shown.
4 Plug in the AC Adaptor.
• The POWER Lamp of the AC Adaptor lights up.
Note
- When not in use, unplug the AC Adaptor from the AC outlet. (AC Adaptor consumes 1W of electric power when plugged into an AC outlet even when not in use.)
Cassette Information
Cassette Insertion
Before you begin...
- Connect the Palmcorder to a power source (pages 12, 13).
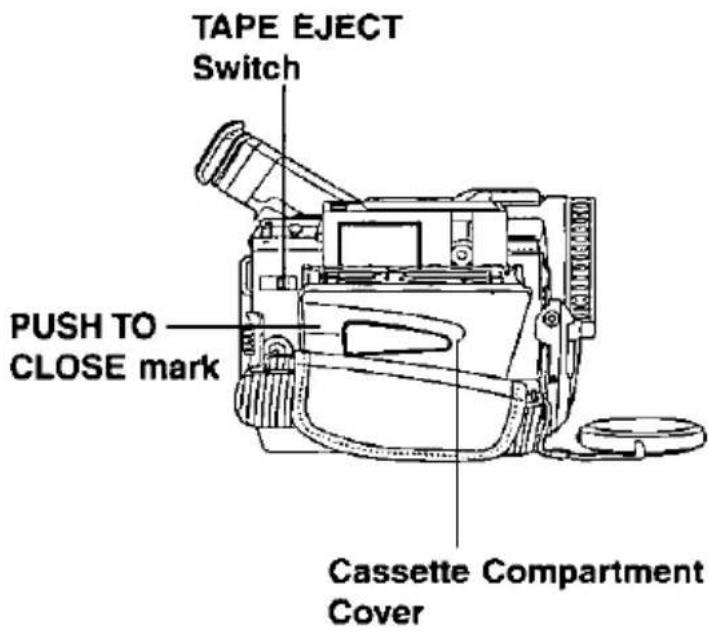
1 Slide TAPE EJECT to open the Cassette Compartment Cover.
2 Insert a cassette with its window side facing up.
3 Press PUSH TO CLOSE mark to close the Cassette Compartment Cover.
Cassette Ejection
- If the Palmcorder is connected to a power source, the cassette can be inserted and ejected without turning the Palmcorder on.
1 Slide TAPE EJECT to open the Cassette Compartment Cover.
2 Pull the cassette tape straight out.
Hint for recording position when inserting Cassette
- When you insert a cassette that is partially recorded, use the Edit Search Function to search for the position from which you want to record again. Especially when you want to record again on a cassette that is already fully recorded, be sure to first locate the position where you want to add the new recording, before starting to record.
Note:
- If hand strap is tight it may prevent Cassette Compartment Cover from fully opening for tape insert or eject. Loosen hand strap if necessary.
- When inserting the cassette, make sure it faces in the right direction and then push in completely.
Record Speed/Playback Time
Use only those tapes having the ^M ^N ^Y logo indicating the 6.35mm digital standard.
| Cassette type | Record Speed/Playback time | |
| SP | LP | |
| AY-DVM30EA | 30 minutes | 45 minutes |
| AY-DVM60EA | 60 minutes | 90 minutes |
| AY-DVM80EA | 80 minutes | 120 minutes |
Erase Protection
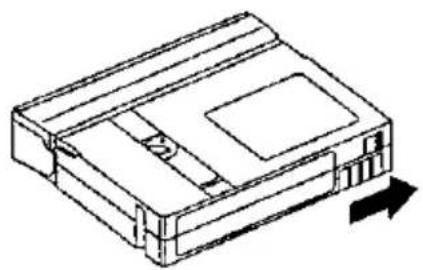
Cassettes have a sliding record tab to ensure recordings are not accidentally erased.
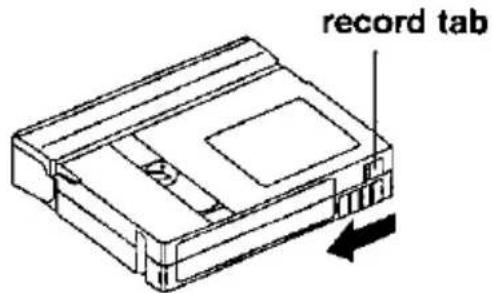
1 To prevent accidental erasure Slide the tab to the left (open).
natural_image
Isometric line drawing of a rectangular electronic device with internal components and an arrow indicating rotation (no text or symbols)2 To record again Slide the tab to the right (close).
Color Enhancement Light (Optional)
Using the Light
To brighten the natural colors in a scene.
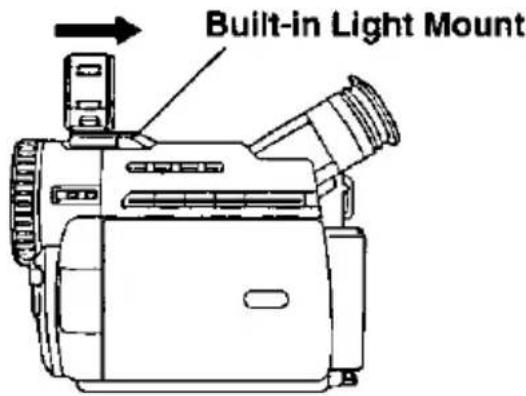
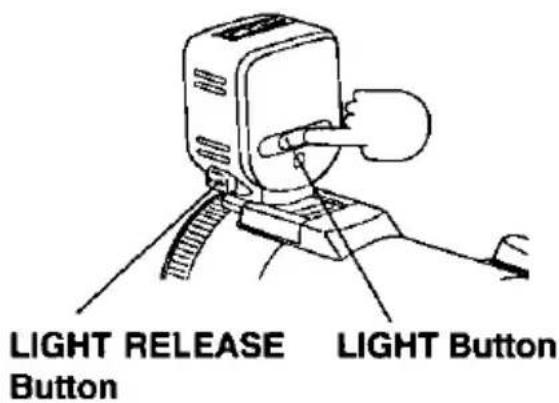
Before you begin...
- Connect the Palmcorder to a power source (pages 12, 13).
- Set POWER to CAMERA.
1 Slide Light into the Built-in Light Mount. Be sure it locks into place.
2 Press LIGHT ON.
3 Press LIGHT again to OFF.
To remove the Light:
Press LIGHT RELEASE and slide the Light out of the mount.
Caution:
This light becomes hot during operation. Make sure nothing covers the Light during operation.
Note
• Using the light will reduce battery operating time.
- If using the enhancement Light for an extended period of time, be sure to provide ventilation when using it in a hot environment.
- Be sure LIGHT is set to OFF when not in use.
- Do not attempt to lift or carry the Palmcorder by holding the Enhancement Light.
- If light bulb needs to be replaced, take Light to your nearest authorized service center.
Attaching the Shoulder Strap
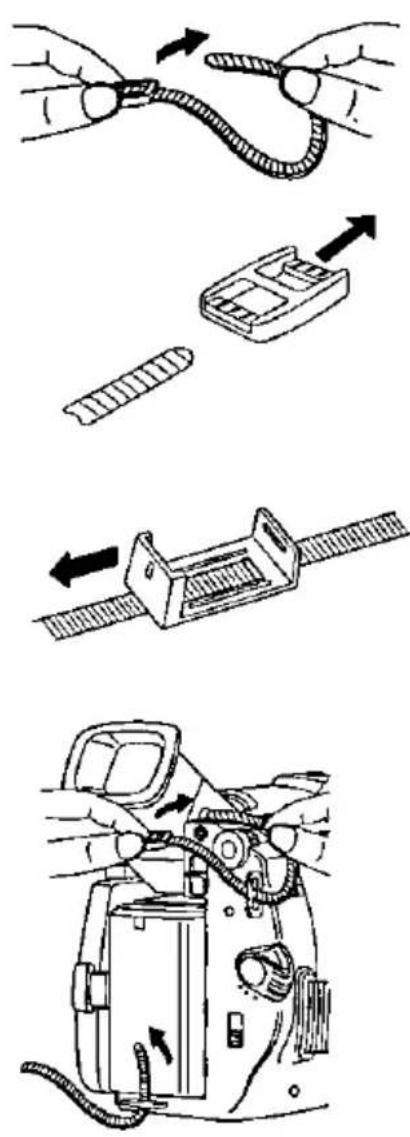
1 Undo the two strap ends from their buckles.
2 Remove the buckles from one end of the strap.
3 Thread the strap (with no buckle) through the Light Holder so that it faces outward. Then reinsert the buckle.
4 Thread the strap ends through the Strap Attachment Rings.
5 Reinsert the strap ends through their buckles.
• Make sure the straps are not twisted.
Adjust the Length
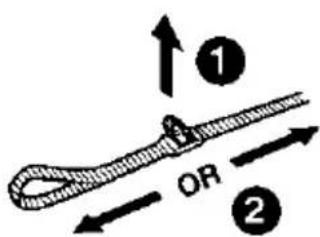
1 Loosen the strap from the Buckle and create a loop.
2 Pull the strap firmly through the Buckle to shorten or lengthen the strap.
Attaching the Shoulder Strap
Attach the Light (Optional)
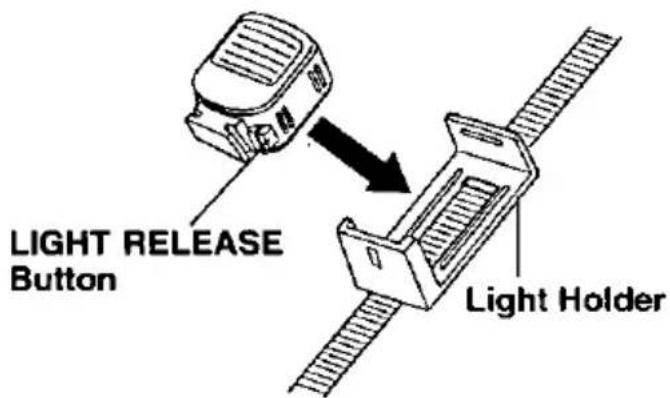
1 Insert the Light into the Light Holder for Storage.
2 To remote the Light, press LIGHT RELEASE and slide Light out from the holder.
Hand Strap
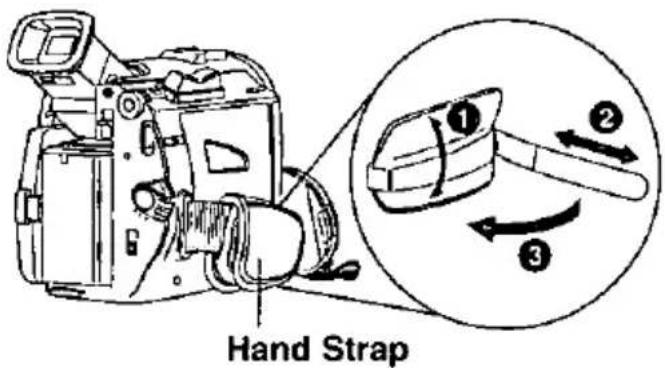
Adjust the length of the Hand Strap to the size of your hand as illustrated.
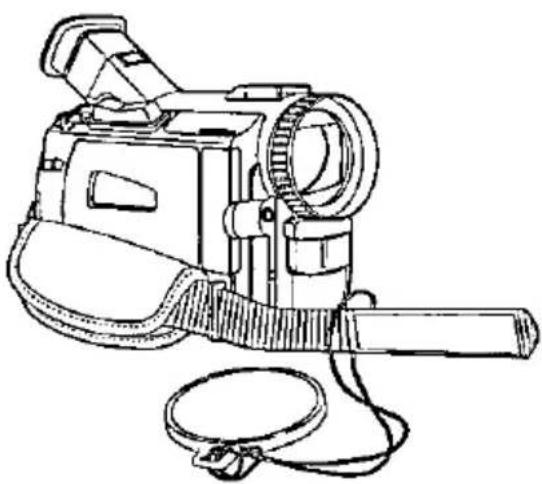
Lens Cap
natural_image
Line drawing of a vintage video camera with attached strap and cable (no text or symbols)Attaching the Lens Cap Cord to the Hand Strap
Remove the Hand Strap from the front clasp and run the Strap through the Lens Cap Loop.
Reattach the Hand Strap.
Set the Date and Time
The date and time is calculated, including leap year, up to DEC 31 2089.
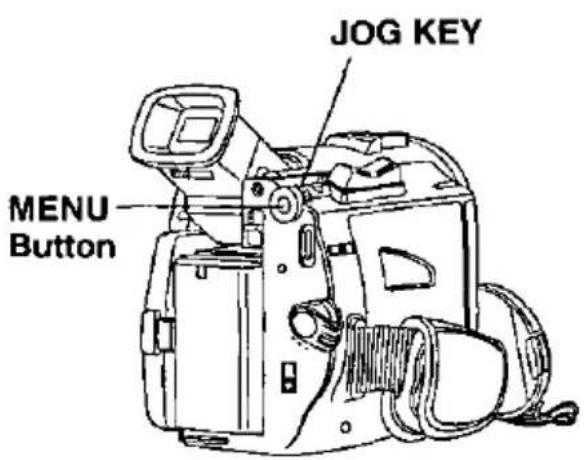
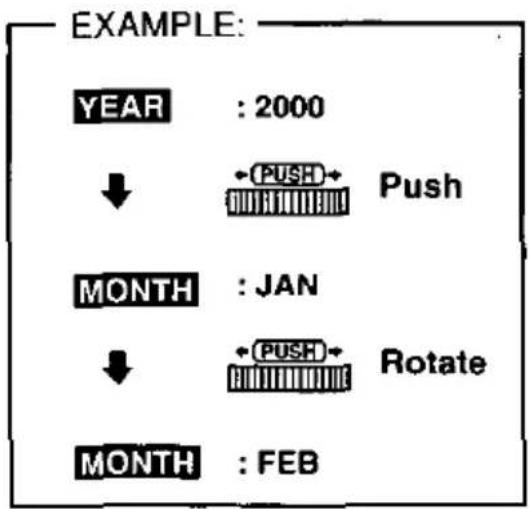
Note
- If you should pass the current year, continue pressing down on the JOG KEY until the year appears again.
- A built-in battery maintains clock operation. If the Palmcorder is not connected to a power source for a few months, the built-in battery may discharge and "CLOCK BATTERY" indication appears (page 29).
Before you begin...
- Connect the Palmcorder to a power source (pages 12, 13).
- Set POWER to CAMERA or VCR.
1 Press MENU to display the Camera or VCR mode menu screen (page 21).
CAMERA MENU
VCR MENU
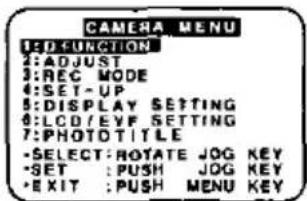
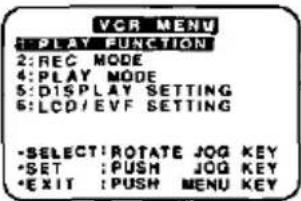
2 Rotate JOG KEY to select DISPLAY SETTING, and then press JOG KEY to display the DISPLAY SETTING menu screen.
- DISPLAY SETTING menu is displayed.
3 Rotate JOG KEY to select CLOCK-SET, and then press JOG KEY to set to ON (pages 22, 24). • The DATE/TIME SETTING menu appears.
4 Rotate JOG KEY to select the desired numbers, then, press JOG KEY down to fix that portion and move to the next. Adjust the shaded items for the year, month, day, hour, and minute.
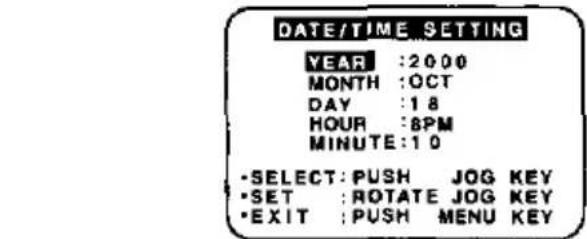
When time setting is completed, press the MENU to start the clock.
Using the Palmcorder Menu
The Palmcorder features two menu displays: one for CAMERA mode (recording) and the other for VCR mode (Playback) (pages 21\~25).
- While the Menu screen is displayed, you cannot record or play the tape.
- While recording, the Menu screen will not be displayed.
- While in playback, the Menu screen can be displayed.
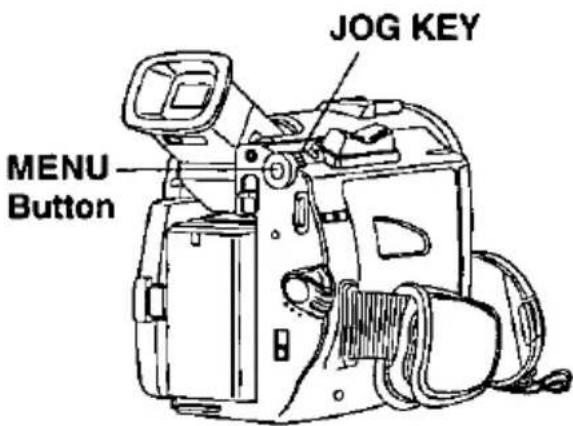
Displaying the MENU
Before you begin...
- Connect the Palmcorder to a power source (pages 12, 13).
- Set POWER to CAMERA.
1 Press MENU to display the CAMERA or VCR menu.
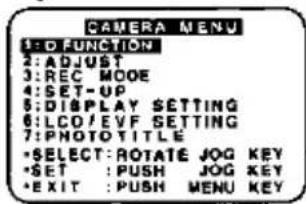
(CAMERA MENU)
(VCR MENU)
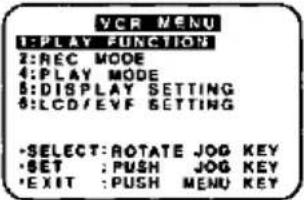
(EX. PV-DV400)
2 Rotate JOG KEY select a menu item.
Setting the MENU Items (EX. VCR Mode menu)
1 Press down on the JOG KEY to set your selection.
2 Rotate JOG KEY to select a menu item.
• The characters of your selection will be inversely displayed.
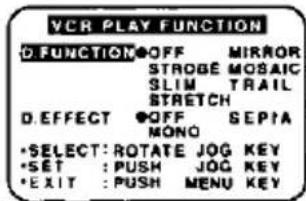
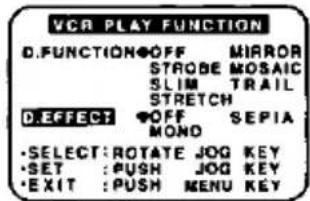
3 Press down on the JOG KEY to set your selection.
- The "●" mark will indicate your selection.
4 Press MENU twice to exit the menu.
Camera and VCR main menu
CAMERA MENU
1 : D. FUNCTION
2: ADJUST
3:REC MODE
4:SET-UP
5: DISPLAY SETTING
6 : LCD/EVF SETTING
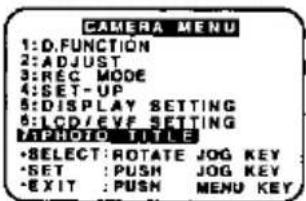
7: PHOTO TITLE
CAMERA MENU
1 : D. FUNCTION
CAMERA FUNCTION menu is displayed. To select one of the 9 digital functions (MIRROR, STROBE, MOSAIC, SLIM, TRAIL, STRETCH, GAIN-UP, WIPE, or MIX).
2: ADJUST
CAMERA ADJUST menu is displayed. To select PROG. AE, W. BALANCE, or H.S.S (High Speed Shutter).
3 : REC MODE
CAMERA REC-MODE menu is displayed. To select REC-SPEED, AUDIO-REC, INDEX, SHUTTER, SELF-REC, or WIND-CUT.
4:SET-UP
CAMERA SET-UP menu is displayed. To select REMOTE, TALLY LED, BEEP, or IR-COLOR.
5 : DISPLAY SETTING
DISPLAY SETTING menu is displayed. To select DISPLAY, C.RESET, DATE/TIME, or CLOCK-SET.
6 : LCD/EVF SETTING (PV-DV400 only)
LCD/EVF SETTING menu is displayed. To select LCD BRIGHTNESS or LCD COLOR.
6 : LCD SETTING (PV-DV200 only)
LCD SETTING menu is displayed. To select LCD BRIGHTNESS, LCD COLOR, or EVF BRIGHTNESS.
7: PHOTO TITLE
PHOTO TITLE menu is displayed. To select TITLE or MODE.
VCR MENU
1 : PLAY FUNCTION
2:REC MODE
3:PLAY MODE
4: DISPLAY SETTING
5: LCD/EVF SETTING
VCR MENU
1: PLAY FUNCTION
VCR PLAY FUNCTION menu is displayed. To select D. FUNCTION or D.EFFECT.
2: REC MODE
VCR REC MODE menu is displayed. To select REC-SPEED, AUDIO-REC.
3 : PLAY MODE
VCR PLAY MODE menu is displayed. To select INDEX, AUDIO, REMOTE, or B.SEARCH.
4: DISPLAY SETTING
DISPLAY SETTING menu is displayed. To select DISPLAY, C.RESET, DATE/TIME, or CLOCK-SET.
5 : LCD/EVF SETTING (PV-DV400 only)
LCD/EVF SETTING menu is displayed. To select LCD BRIGHTNESS or LCD COLOR.
5 : LCD SETTING (PV-DV200 only)
LCD SETTING menu is displayed. To select LCD BRIGHTNESS, LCD COLOR, or EVF BRIGHTNESS.
Camera Mode Menu Screen
| CAMERA FUNCTION | ||
| D. FUNCTION | OFF | MIRROR |
| STROBE | MOSAIC | |
| SLIM | TRAIL | |
| STRETCH | ||
| GAIN - UP | ||
| WIPE | MIX | |
| CAMERA ADJUST | ||
| PROG. AE | OFF |  |
| W.BALANCE | AUTO | |
| H. S. S | SET |  |
| CAMERA REC MODE | ||
| REC - SPEED | SP | LP |
| AUDIO - REC | 12 bit | 16 bit |
| INDEX | DAY | 2HOUR |
| SHUTTER | OFF | ON |
| SELF - REC | NORMAL | MIRROR |
| WIND - CUT | OFF | ON |
| CAMERA SET-UP | ||
| REMOTE | OFF | |
| VCR1 |  | |
| TALLY LED | OFF | ON |
| BEEP | OFF | ON |
| IR - COLOR | B/W |  |
| GREEN | ||
| DISPLAY SETTING | ||
| DISPLAY | OFF |  |
| MEMORY | T.CODE | |
| C.RESET | OFF |  |
| DATE/TIME | OFF | |
| D/T |  | |
| CLOCK - SET | OFF | ON |
 | ||
| LCD/EVF SETTING | ||
| LCD BRIGHTNESS | ||
| LOW||||---- |  | |
| LCD COLOR | ||
| LOW||||---- |  | |
| EVF BRIGHTNESS | ||
| LOW||||---- |  | |
Camera Mode Menu Screen
CAMERA FUNCTION
• DIGITAL FUNCTION (page 55) To select one of the 9 digital functions. Setting to OFF cancels the previously selected digital function.
CAMERA ADJUST
- PROG. AE (page 54)
To select one of the 5 Program AE modes. Setting to OFF cancels the previously selected Program AE mode.
• W.BALANCE (page 53) To select one of the 3 White Balance modes.
• H. S. S (High Speed Shutter) (page 58) To select a desired shutter speed.
CAMERA REC MODE
- REC-SPEED (page 15)
SP: Normal recording speed mode.
LP: Recording time is 1.5 times as long as in the SP mode. For example, 120 minutes of recording is possible on a 80 minutes tape.
• AUDIO-REC (page 59)
12 bit: The sound is recorded in the 12 bit/32 kHz mode.
16 bit: The sound is recorded in the 16 bit/48 kHz high-quality mode.
- INDEX (page 39) DAY: An index signal is recorded when recording is restarted after the date has changed since the last recording.
2 HOUR: An index signal is recorded when recording is restarted after a lapse of more than 2 hours.
• SHUTTER (page 52)
When set to ON, still pictures taken in the Photo Shot mode are recorded with a visual shutter effect and click sound.
• SELF-REC (page 31)
NORMAL: During self-recording, the picture on the LCD Monitor is the same as it will be recorded.
MIRROR: During self-recording, the picture on the LCD Monitor is horizontally reversed.
- WIND-CUT (PV-DV400 only) (page 30) To reduce sound distortion caused by wind hitting the microphone. However, this slightly deteriorates the sound reproduction in the bass range.
CAMERA SET-UP
• REMOTE (page 34)
VCR1: To receive signals from the Remote Control set to VCR1.
VCR2: To receive signals from the Remote Control set to VCR2.
OFF: To prevent reception of signals from the Remote Control.
• TALLY-LED (page 30)
Tally LED lights during recording when set to ON.
• BEEP
Set to ON to beep when starting and stopping camera recording or when unusual conditions occur. To cancel the beep, set to OFF.
Palmcorder will beep:
• Once when you start recording
• Twice when you stop recording
• Repeatedly when warning of unusual conditions (pages 28, 29).
- IR-COLOR (PV-DV400 only) (page 53) To select one of the 3 IR-COLOR modes after slide IR FILTER Switch to ON.
DISPLAY SETTING
• DISPLAY (page 26)
To select the desired type of display and counter indication displayed on the LCD Monitor or in the viewfinder.
• C.RESET (page 26)
Setting to ON, resets the counter to zero.
• DATE/TIME (page 27)
To display the date and time on the screen.
• CLOCK-SET (page 19)
When set to ON, the date and time can be set on the screen.
LCD/EVF SETTING (PV-DV400 only)
• LCD/EVF SETTING (page 31)
Setting to ON displays the menu for adjusting the LCD brightness and color level and the viewfinder brightness.
LCD SETTING (PV-DV200 only)
• LCD SETTING (page 31)
Setting to ON displays the menu for adjusting the LCD brightness and LCD color.
Photo Rec Mode Menu Screen
CARD SETTING
REC MODE NORMALOFINE
CARD SETTING
• REC MODE (page 41)
To select Photo Rec Mode.
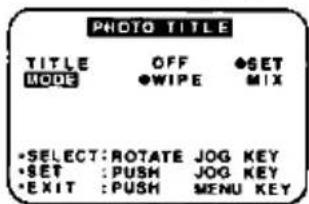
| PHOTO TITLE | ||
| TITLE | ●OFF | SET |
| MODE | WIPE | ●MIX |
| VCR Mode Menu Screen | ||
| VCR PLAY FUNCTION | ||
| D. FUNCTION | ●OFF | MIRROR |
| STROBE | MOSAIC | |
| SLIM | TRAIL | |
| STRETCH | ||
| D. EFFECT | ●OFF | SEPIA |
| MONO | ||
| VCR REC MODE | ||
| REC - SPEED | ●SP | LP |
| VCR PLAY MODE | ||
| INDEX | ●PHOTO | SCENE |
| AUDIO | ●ST1 | ST2 |
| MIX | ||
| REMOTE | OFF | |
| ●VCR1 | VCR2 | |
| B.SEARCH | ●OFF | ON |
| DISPLAY SETTING | ||
| DISPLAY | OFF | ●LINEAR |
| MEMORY | T.CODE | |
| C.RESET | ●OFF | ON |
| DATE/TIME | OFF | |
| ●D/T | DATE | |
| CLOCK - SET | ●OFF | ON |
| LCD/EVF SETTING | ||
| LCD BRIGHTNESS | ||
| LOW | | | | — — — — HIGH | ||
| LCD COLOR | ||
| LOW | | | | — — — — HIGH | ||
| EVF BRIGHTNESS | ||
| LOW | | | | — — — — HIGH | ||
PHOTO TITLE
• TITLE (page 48)
Photo Title is recorded.
• MODE (page 48)
To select one of the 2 Photo Title modes.
VCR Mode Menu Screen
VCR PLAY FUNCTION
• DIGITAL FUNCTION (page 55)
To select one of the 6 digital functions. Setting to OFF cancels the previously selected digital function.
• D. EFFECT (page 55)
To select one of the 2 digital picture effects for playing back. Setting to OFF cancels the previously select digital effect.
VCR REC MODE
• REC-SPEED (page 15)
SP: Normal recording speed mode.
LP: Recording time is 1.5 times as long as in the SP mode. For example, 120 minutes of recording is possible on a 80 minutes tape.
VCR PLAY MODE
- INDEX (page 39) To select the desired Index Search function.
PHOTO: To search for Photo shot pictures.
SCENE: To search for scenes marked with Index signal.
• AUDIO (page 59)
To select the desired audio playback mode after performing audio dubbing in the 12 bit mode.
ST1: The original sound alone is played back.
ST2: The dubbed sound alone is played back.
MIX: The original sound and the dubbed sound are played back together.
• REMOTE (page 34)
VCR1: To receive signals from the Remote Control set to VCR1.
VCR2: To receive signals from the Remote Control set to VCR2.
OFF: To prevent reception of signals from the Remote Control.
• B.SEARCH (Blank Search) (page 33)
Select ON to go directly to a blank portion of the tape.
DISPLAY SETTING
• DISPLAY (page 26)
To select the desired type of display and counter indication displayed on the LCD Monitor or in the viewfinder.
• C.RESET (page 26)
Setting to ON, resets the counter to zero.
• DATE/TIME (page 27)
To display the date and time on the screen.
• CLOCK-SET (page 19)
When set to ON, the date and time can be set on the screen.
LCD/EVF SETTING (PV-DV400 only)
• LCD/EVF SETTING (page 31)
Setting to ON displays the menu for adjusting the LCD brightness and color level and the viewfinder brightness.
LCD SETTING (PV-DV200 only)
• LCD SETTING (page 31)
Setting to ON displays the menu for adjusting the LCD brightness and LCD color.
Photo Play Mode Menu Screen
CARD SETTING
DISPLAY
OFF
ON
DCF
OFF
ON
CARD SETTING
• DISPLAY (page 43)
Select to OFF to cancel all Display on the screen.
- DCF (page 43)
Select to OFF to cancel DCF No. on the screen.
Electronic Viewfinder/LCD Monitor Indications
Here are some of the basic indications which will appear on the Palmcorder EVF and LCD Monitor. All indications except, the Date and Time, will NOT be recorded onto the tape.
![a b c d LP 0 h 0 0 m 0 0 s 0 0 f PAUSE R 0 : 1 2 IR - FILTER EIS300 x D.ZOOM1 WARNING O X ※ MF SE PIA 1/1000 VOLUME [-] | | | | — — ( + ) 12 : 3 4 : 5 6 A M JAN 2 2 0 0 0](/content/2026/05/1012515/images/aaf4cf2e0dcba77a78f40854e9f2ee6f3354bba3a0c5cf9402c54c0637f8941e.jpg)
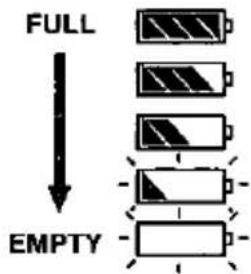
a. Battery Remaining
b. Tape Remaining
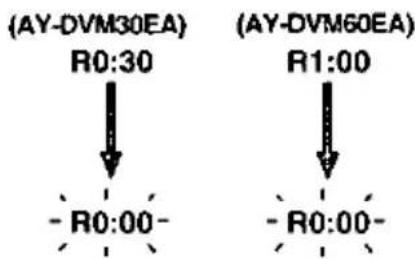
- It will take several seconds for the tape remaining indicator to operate after the tape starts moving.
c. Digital Zoom and other Digital Function (page 51)
This display appears when the digital zoom function has been activated.
d. Playback Effect (page 55)
This display appears when SEPIA or MONO is selected in VCR menu.
e. Tape Speed Indication (page 22)
Indicates the tape speed (SP or LP).
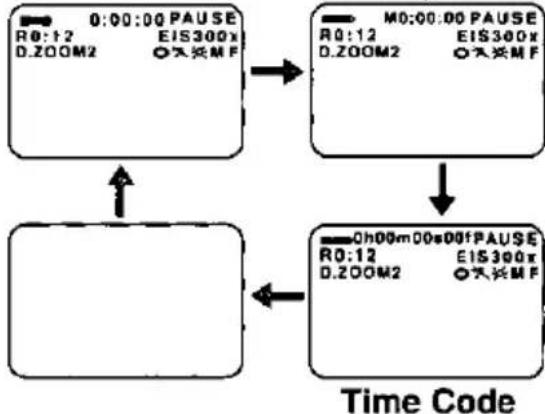
f. Display On/Off and Counter/Time Code The indication switches as shown below when the desired "DISPLAY" mode is selected from the menu (page 23).
- When selecting OFF, all displays turn off.
Linear Time Counter Memory Counter
flowchart
graph TD
    A["0:00:00 PAUSE\nR0:12\nD.ZOOM2\nEIS300x\nO*天MF"] --> B["M0:00:00 PAUSE\nR0:12\nD.ZOOM2\nEIS300x\nO*天MF"]
    B --> C["Oh00m00s00fPAUSE\nR0:12\nD.ZOOM2\nEIS300x\nO*天MF"]
    C --> D["Time Code"]
Memory Counter M 0:00:00
The Palmcorder will stop whenever it reaches the point where the counter was previously set to M 0:00:00 during audio dub, fast forward or rewind.
Time Code 0h00m00s00f
The Palmcorder calculates and displays exactly where you are on any tape in terms of hours, minutes, seconds, and frames (30 frames = 1 second).
• This display can not be reset.
IMPORTANT NOTE:
Display must be set to ON for MF, AE, W.BALANCE or BACK LIGHT indications to be displayed on the EVF or LCD Panel when selected.
Electronic Viewfinder/LCD Monitor Indications
![i j k LP 0 h 0 0 m 0 0 s 0 0 f PAUSE R 0 : 1 2 IR-FILTER EIS300x D,ZOOMI WARNING ◎ × ※ MF SEPIA 1/1000 r g VOLUME [-] I | | | | — — — [+] 12:34:56AM JAN 2 2000 h](/content/2026/05/1012515/images/ee6a05b41da06441a1d63042a665b61c212163880d372112e88d1b5e35428931.jpg)
g. Volume Display (page 35)
The volume bar appears when the volume of the built-in speaker is being adjusted.
h. Date and Time Indication
(pages 23, 25)
As shown below, the date and time indication changes each time the DATE/TIME is selected from the Palmcorder's MENU (pages 23, 25) or the DATE/TIME Button is pressed on the remote (optional).
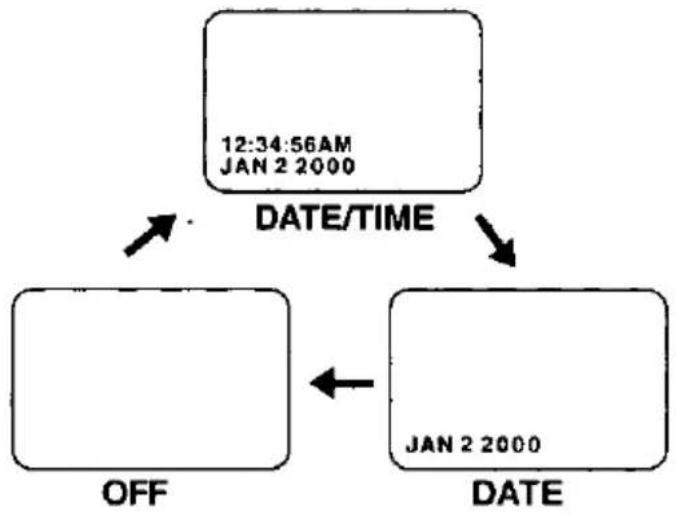
flowchart
graph TD
    A["12:34:56AM\nJAN 2 2000"] -->|DATE/TIME| B["OFF"]
    B --> C["DATE"]
    C --> D["JAN 2 2000"]
I. WARNING indication (pages 28, 29) The warning displays appear in the EVF and the LCD monitor.
j. IR FILTER (PV-DV400 only) (page 53) This display appears when IR FILTER is set ON.
k. Tape Mode Indications
REC Recording.
PHOTO Photo Shot Recording.
PAUSE Paused during recording.
PLAY Playback.
R ▷ Repeat Playback.
CHK Recording Check.
FF Fast forward.
REW Rewind.
FF Search.
◀◀ REW Search.
BLANK Blank Search.
SEARCH Index Search.
● Mirror feature recording.
II Paused during Mirror feature recording.
I. Digital EIS Indications (page 50)
m. Zoom Magnification Level (page 51)
n. Manual Focus Indication (page 56)
o. White'Balance Indication (page 53)
p. PROGRAM-AE Indication (page 54)
q. Backlight Indication (page 57)
r. Shutter Mode indication (page 58)
Electronic Viewfinder/LCD Monitor Indications
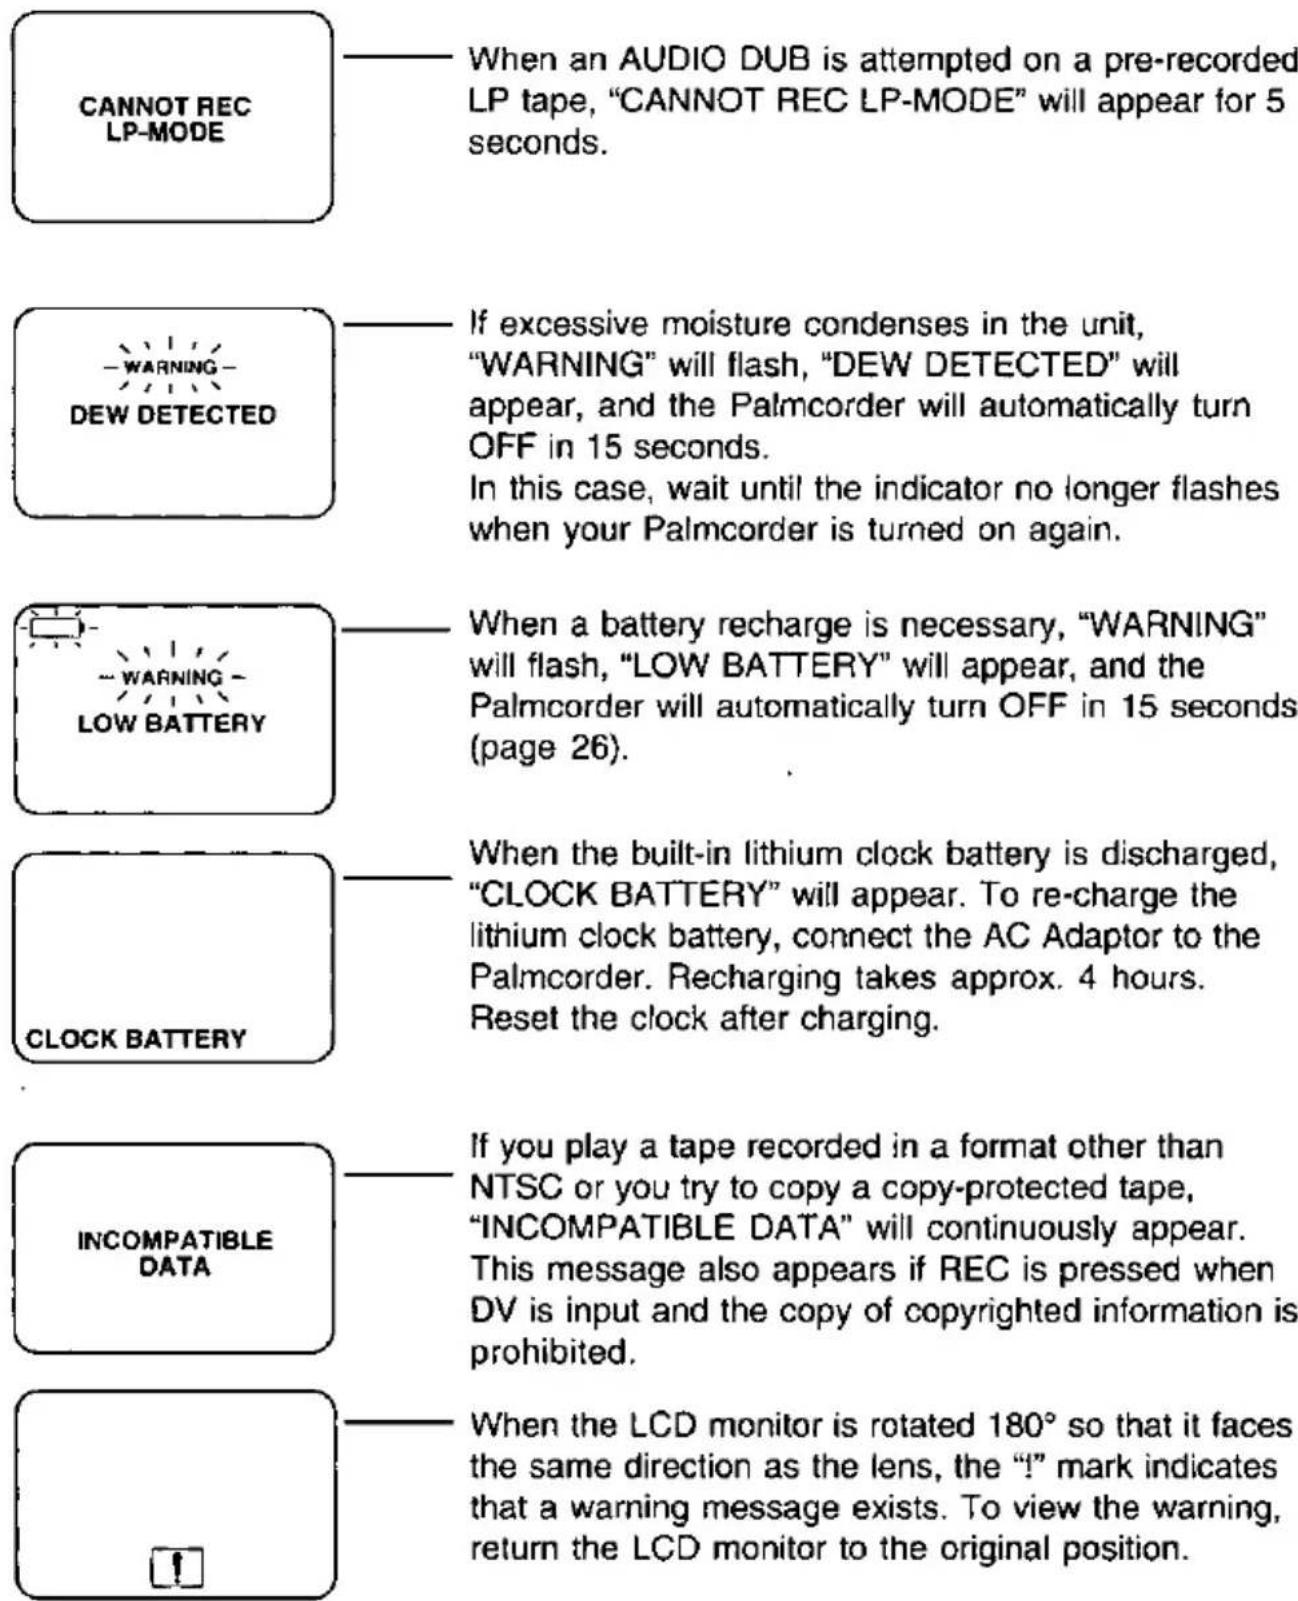
The following warning displays appear in the EVF and the LCD monitor.
Warning Indications

If the Palmcorder is in CAMERA mode without a cassette inserted, "☐" will flash and "TAPE NOT INSERTED" will appear for 5 seconds. Recording will not start.

If the Palmcorder is in CAMERA mode with the cassette sliding record tab opened, "☐o" will flash and "CHECK REC TAB" will appear for 5 seconds. Recording will not start.

When Audio dub is performed and the sliding record tab is open, or a blank portion of tape is detected, "QO" will flash and "CANNOT REC" will appear for 5 seconds.

When the tape is about to end in REC mode, "☐ END" will flash and "TAPE END" will appear for 5 seconds.

When a incompatible tape is detected, "INCOMPATIBLE TAPE" will appear for 5 seconds.

If the video heads require cleaning, "NEED HEAD CLEANING" will appear for 5 seconds.

When the Palmcorder and remote are not set to the same mode (VCR1 or VCR2), "CHECK REMOTE MODE" will also appear for 5 seconds when the Palmcorder is first turned on.
Electronic Viewfinder/LCD Monitor Indications
Camera Recording
Simple Recording
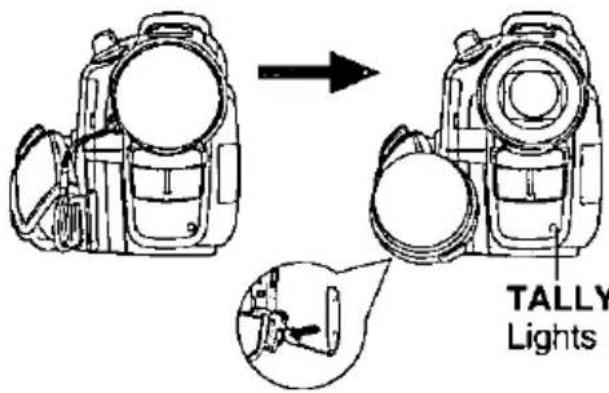
TALLY LED
Lights during recording.
WARNING:
- Do not lift or carry the Palmcorder by the EVF or the LCD Monitor.
Before you begin...
- Connect the Palmcorder to a power source (pages 12, 13).
- Insert a cassette with record tab closed (page 15).
Remove the lens cap and clip it to the hook.
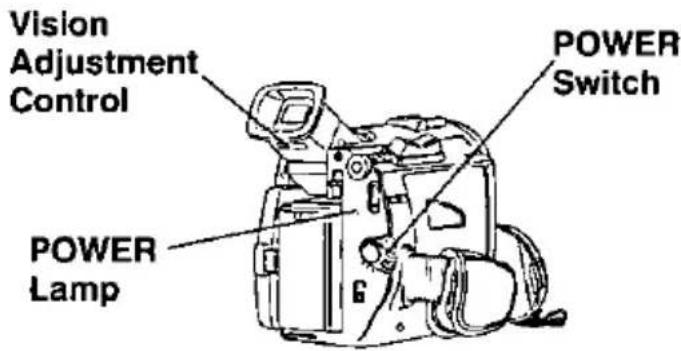
1 Set POWER to CAMERA.
• The POWER lamp lights red.
- Be sure POWER is fully turned to CAMERA position.
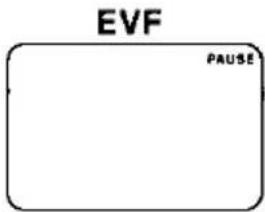
Record/Pause mode.
2 Record/Pause mode With the Viewfinder Eye Cup up to your eye, adjust the Vision Adjustment Control to your eyesight (page 9).
3 Press RECORD/PAUSE to start recording.
The Tally LED will be on.
To turn the Tally LED off, see TALLY LED on page 23.
Press RECORD/PAUSE again to pause recording.
• To reduce microphone wind noise, set the WIND-CUT (PV-DV400 only) to ON (see WIND-CUT on page 23).
- When the Palmcorder is aimed at excessively bright objects, or bright lights, a vertical bar may appear in the picture. This is a normal characteristic of the CCD pick-up device. Try to avoid this whenever possible.
To conserve power
After 5 minutes, the Record/Pause mode will automatically change to Standby mode. To resume recording, set POWER to OFF and then ON again.
Camera Recording
Using the LCD Monitor
The LCD (Liquid Crystal Display) monitor can be used while recording.
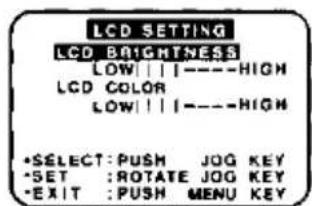
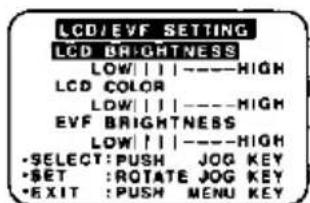
If you adjust the LCD Brightness or color.
1 Press MENU to display the main menu screen.
2 Rotate JOG KEY to select LCD/EVF SETTING from the main menu screen (pages 22, 24).
3 Press JOG KEY to display the LCD/EVF SETTING screen.
4 Press JOG KEY to select BRIGHTNESS or COLOR, then rotate JOG KEY to adjust them.
5 Press MENU twice to exit this mode.
Self Recording
Before you begin...
- Connect the Palmcorder to a power source (pages 12, 13).
- Insert a cassette with record tab closed (page 15).
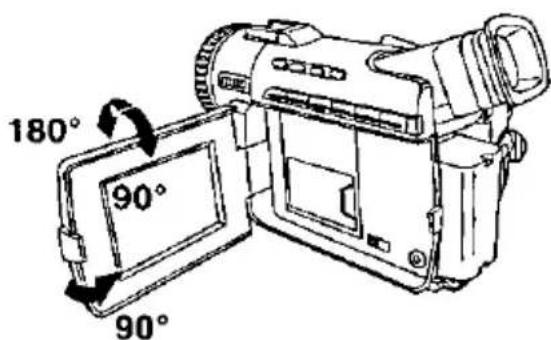
1 Press LCD-OPEN to unlock the LCD monitor.
2 Swing the LCD monitor fully open and adjust the angle.
• The LCD monitor will automatically turn on.
- When the LCD monitor is completely closed, it will shut off automatically to save power.
- Adjust the LCD Brightness and/or color of the LCD monitor if necessary.
3 Start recording (page 30).
Note
• Using the LCD monitor will reduce battery operating time.
- Close the LCD monitor completely when not in use.
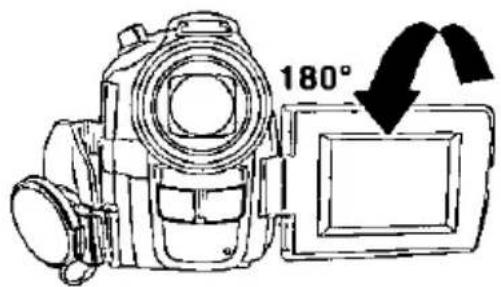
(PV-DV200)
(PV-DV400)
Rotate the LCD monitor 180 degrees so that it faces in the same direction as the lens while in the CAMERA mode to record yourself.
The picture in the LCD monitor will appear reversed.
Set SELF-REC to MIRROR (page 23) on the Camera mode menu screen to see the picture as it is actually being recorded.
Camera Recording
Recording Check
To playback the final few seconds of the last recorded scene in the Recording Pause Mode.
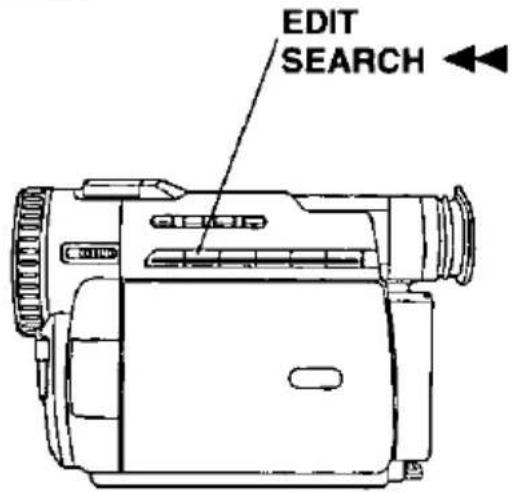
Edit Search
You can visually search for scenes in CAMERA mode to maintain proper continuity when taping.
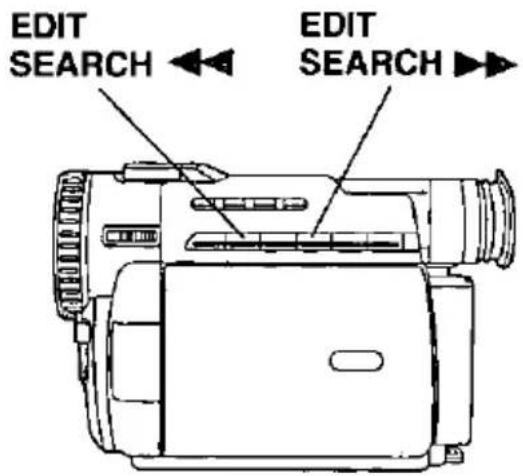
Press EDIT SEARCH ◀◀ briefly in the recording Pause Mode.
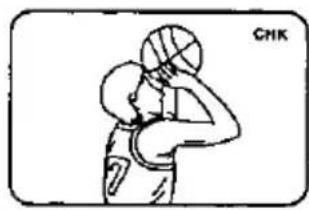
The [CHK] indication appears.
After checking, the Movie Camera returns to the Recording Pause Mode.
- For Recording Check, the Movie Camera must be in the same mode (SP or LP) as used for recording, otherwise the playback picture is distorted.
natural_image
Line drawing of a basketball player in mid-pose position (no text or symbols)1 Set POWER to CAMERA.
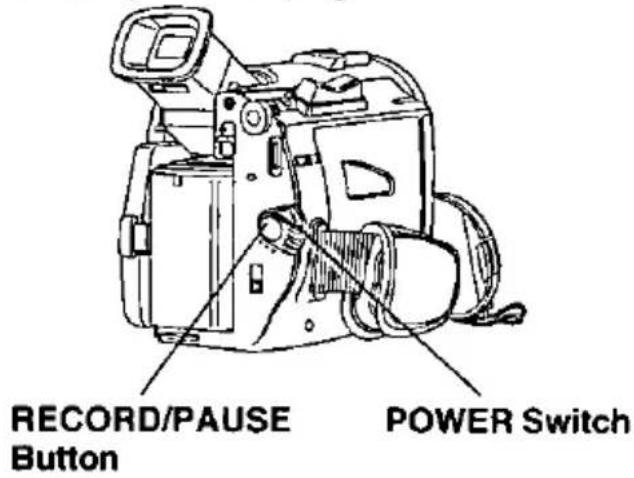
2 In RECORD/PAUSE mode, hold down EDIT SEARCH ▶▶ to perform a forward visual search or EDIT SEARCH ◀◀ to perform a reverse visual search. Releasing the button stops the search.
3 Press RECORD/PAUSE to continue recording.
Note
- During Edit Search, the picture will have a mosaic pattern. The sound will be muted when using reverse visual search.
- Make sure the SP/LP tape speed setting is the same as the recording to eliminate distortion during edit search.
natural_image
Abstract geometric pattern with scattered squares and triangles, no text or symbols presentCamera Recording / Remote Control
Blank Search
You can go directly to a blank portion of tape and start recording exactly where you left off.
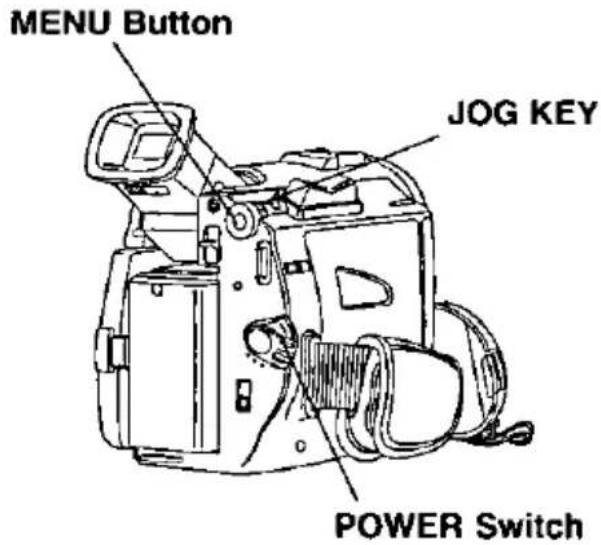
1 Set the POWER to VCR.
• The POWER lamp lights red.
- Be sure POWER is fully turned to VCR position.
2 Press MENU to display the VCR mode menu screen.
3 Rotate JOG KEY to select PLAY MODE, then press JOG KEY to display the VCR PLAY MODE menu screen.
4 Rotate JOG KEY to select BSEARCH in the VCR PLAY MODE menu (page 25).
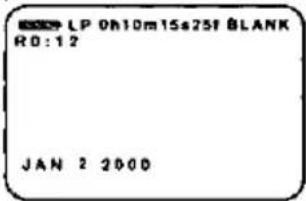
5 Press JOG KEY to select ON. • "BLANK" will appear on the screen.
Remote Control (Optional, page 72)
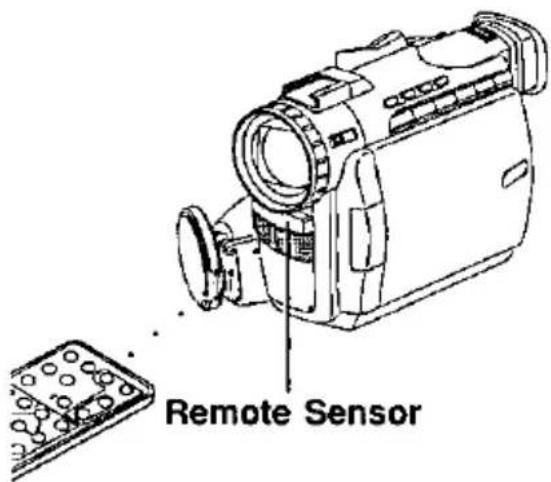
You can operate the major functions of your Palmcorder from up to approximately 16 feet (5 m) away (indoors). Aim the IR Remote Control toward the front of the Palmcorder and press the desired buttons (Remote Sensor is located under the lens).
To operate Camera functions:
Set POWER to CAMERA.
To operate VCR functions:
Set POWER to VCR.
Controlled Functions
Rec/Pause (page 30)
Tele (Zoom) (page 51)
Wide (Zoom) (page 51)
Date/Time (page 27)
Reset (page 60)
PhotoShot (page 52)
Display On TV (page 40)
Counter/Time Code (page 26)
Audio Dubbing (page 59)
Record (page 62)
Menu (page 20)
Play (page 35)
FF/Search (page 36)
REW/Search (page 36)
Pause/Select (pages 20, 36)
Stop/Set (pages 20, 35)
Slow/Frame Advance (Forward) (pages 36, 38)
Slow/Frame Advance (Backward) (pages 36, 38)
Index Search (Forward) (page 39)
Index Search (Backward) (page 39)
Speaker Volume (page 35)
Remote Control (Optional)
Remote Controlling Two Palmcorders
You can control any two Panasonic Digital Video Camcorder with one Remote control (Optional, page 72). In order for the remote to distinguish between the two units, it is necessary to set one of the Palmcorders to VCR 2. On the remote, press VCR 1 or VCR 2 to control the desired Palmcorder.
Optional
For VCR 2 : Press these buttons at same time.
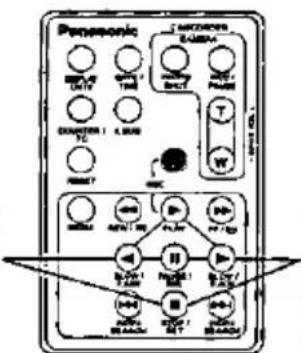
For VCR 1: Press these buttons at same time.
- When the Palmcorder and remote are not set to the same mode (VCR1 or VCR2), "CHECK REMOTE MODE
(REMOTE)" will appear.
REMOTE
1 Set the POWER to VCR or CAMERA.
• The POWER lamp lights red.
- Be sure POWER is fully turned to VCR or CAMERA position.
2
Press MENU to display the VCR or CAMERA mode menu screen.
3
Rotate JOG KEY to select CAMERA SET-UP in the CAMERA mode menu screen or VCR PLAY MODE in the VCR mode menu screen, then press JOG KEY to display the CAMERA SET-UP or VCR PLAY MODE menu screen.
4
Rotate JOG KEY to select REMOTE, and then press JOG KEY to select VCR 2 on one Palmcorder (pages 23, 25). Leave the other Palmcorder set to VCR1.
5
Set the Remote Control (Optional, page 72) to VCR 1 or VCR 2 to correspond with the Palmcorder you wish to control. (See illustration at left.)
• After replacing the Remote Control Battery, the remote will default to VCR 1.
Replace the Battery
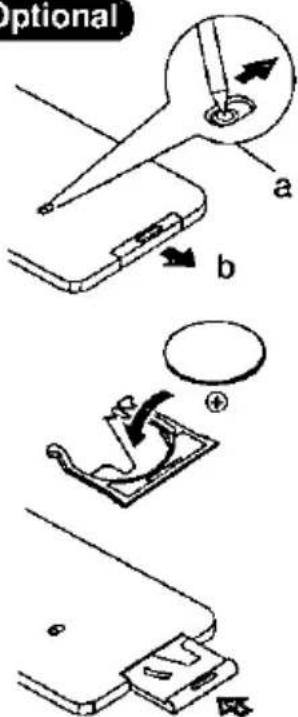
Optional
1
Insert a slender pointed object, such as the tip of a ball-point pen into the slot so that it fits into the hole (as shown a). Then, while sliding to the right, pull the Battery Tray out with your fingernail.
2
Insert the battery into the Battery Tray with the ⊕ mark facing down. Do not reverse the polarity.
3
Insert the Battery Tray.
Replace battery with Panasonic PART NO. VSBW0004 (CR2025) only. Use of another battery may present a risk of fire or explosion.
Caution-battery may explode if mistreated. Dispose of used battery promptly. Keep away from children. Do not recharge, disassemble or dispose of in fire.
Playback your Recordings
Playback using the LCD Monitor
You can also use the LCD monitor to playback your recording.
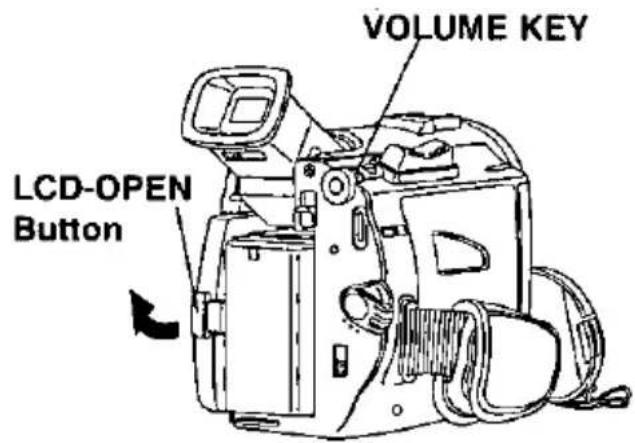
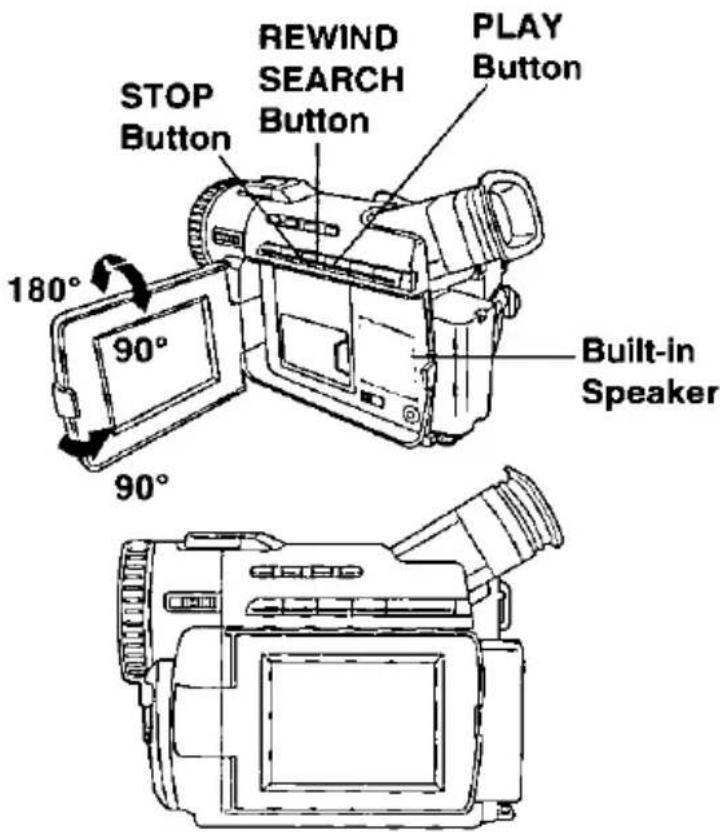
You can place the Palmcorder on a table, etc. for viewing. Rotate the LCD Monitor 180° and swing it up against the Palmcorder body as shown.
Before you begin...
- Connect the Palmcorder to a power source (pages 12, 13).
- Insert a recorded cassette.
- Set Power to VCR.
1 Press LCD-OPEN to unlock the LCD monitor and swing open.
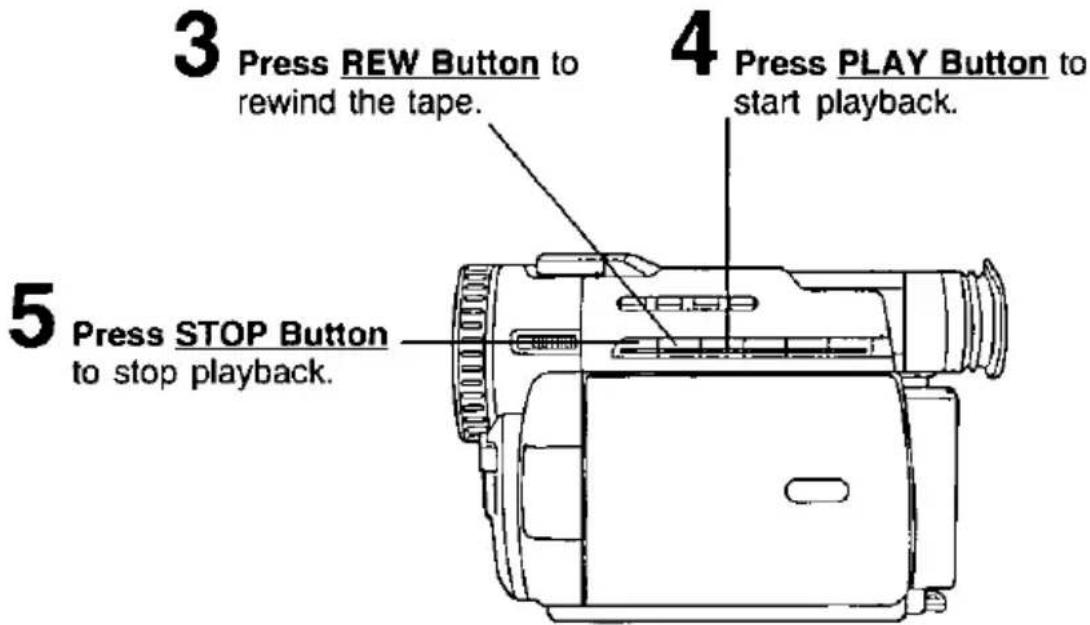
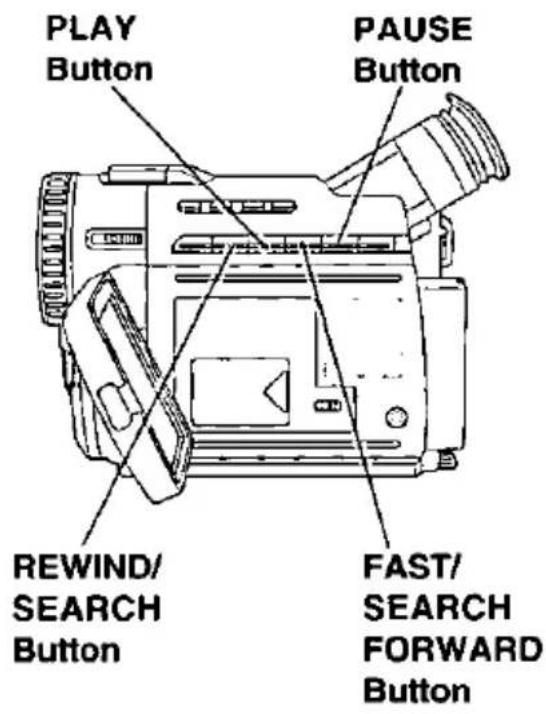
2 Press REWIND/SEARCH to rewind the tape.
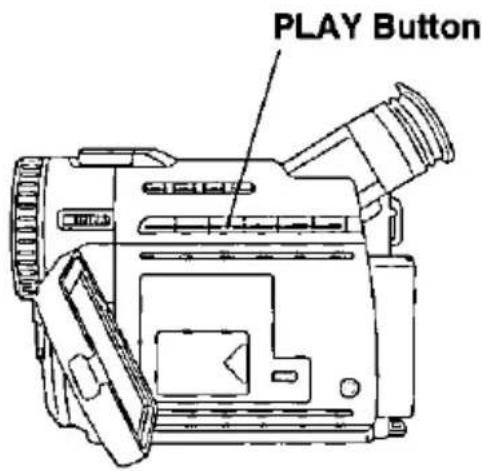
3 Press PLAY to start playback.
To adjust the volume:
Hold down VOLUME KEY until the volume setting screen appears (page 27). Then rotate VOLUME KEY to adjust the volume of the built-in speaker. To disappear the volume setting screen, hold down VOLUME KEY again.
-
Adjust the picture on the LCD monitor if needed (page 31).
4 Press STOP to stop playback. -
When the tape reaches its beginning during rewind or rewind search, it will stop automatically.
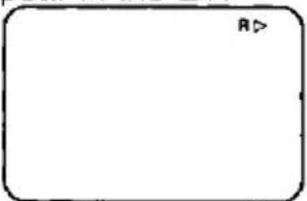
- If you press PLAY for more than 5 seconds, the Palmcorder will start the Repeat Playback mode when the tape reaches its end. The letter "R ▷" will appear in the EVF
and LCD monitor. To exit the Repeat Playback mode, turn the Palmcorder OFF.
Note
- When a tape recorded in LP mode on another digital video camera is played back on this unit, the picture may appear mosaic.
- Using the LCD monitor reduces battery operating time.
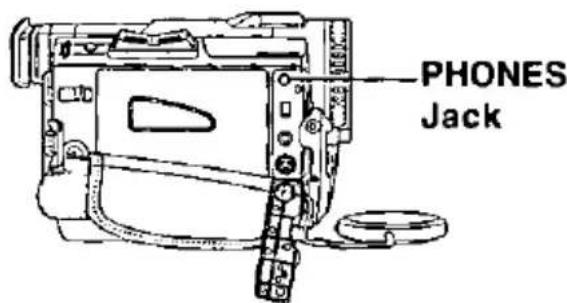
- Connect earphones (not supplied) to the PHONES Jack.
Playback Your Recordings
Special Effect Features During Playback
(Sound is muted during all special effects)
Rapid Visual Search
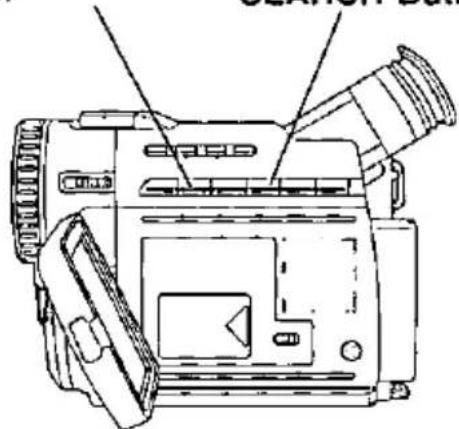
A During playback, hold down FAST FORWARD/SEARCH or REWIND/SEARCH.
The search will continue for as long as the button is held down.
B OR Press FAST FORWARD/SEARCH or REWIND/SEARCH once for a continuous rapid visual search. Press PLAY to release.
Note
- When executing a rapid visual search, the picture may become bluish for an instant or mosaic. This is normal during this mode.
natural_image
Abstract black-and-white geometric pattern with no text or symbolsSTILL Picture
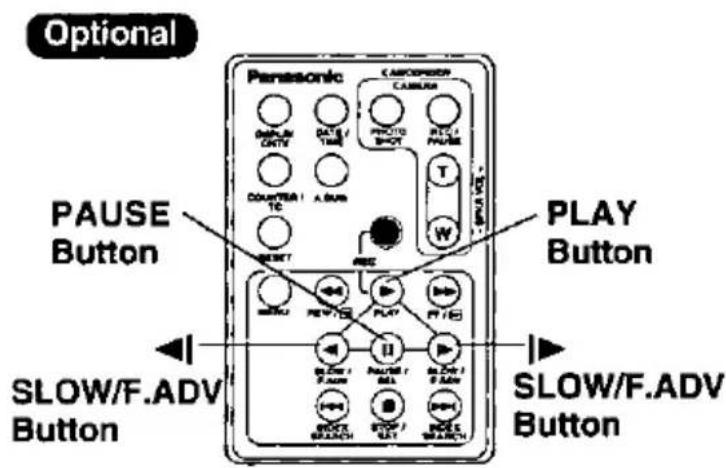
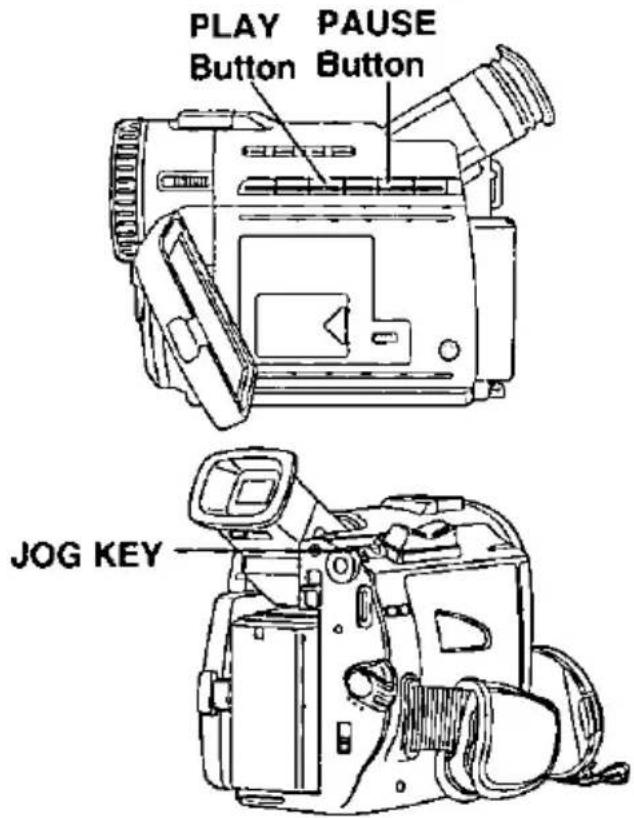
Press PAUSE during playback. Press PLAY or PAUSE to release.
Note
• To protect the tape and video heads, your Palmcorder's operating modes will revert as follows: STILL → STOP (after 5 minutes.)
Slow Motion Playback
Optional Remote Control Only (page 72)
Forward Slow = Press ▶ SLOW/F.ADV during play.
Reverse Slow = Press ◀ SLOW/F.ADV during play.
Press PLAY to release. (During reverse slow motion playback, time code indication may not change regularly.)
Note
- Palmcorder will automatically STOP when in slow motion for more than 10 minutes.
- During slow motion playback, picture may move up and down. This is normal.
- When you start or stop slow motion playback, the picture may become bluish for an instant.
Playback Your Recordings
Special Effect Features During Playback Continued
(Sound is Muted during all special effects)
natural_image
Line drawing of a digital camera with attached cable and lens (no text or symbols)JOG KEY
REWIND/SEARCH Button
FAST FORWARD/SEARCH Button
natural_image
Line drawing of a digital camera with lens and control panel (no text or symbols)Variable Speed Search
1 Press PLAY to start playback.
2 Press PLAY again.
3 Rotate the JOG KEY to adjust the playback speed.
- Rotate JOG KEY downward for forward playback.
- Rotate JOG KEY upward for reverse playback.
To return to normal playback:
Press PLAY. Playback will continue at normal speed.
Note
- The Variable Speed Search function offers a choice of six playback speeds (1/5x, 1x, 2x, 5x, 10x, 20x) both in forward and reverse directions.
- The review playback at the 1x speed is playback in reverse direction.
- During the Variable Speed Search (at a speed other than 1x), mosaic-like patterns will appear in the picture.
- During the Variable Speed Search, sound is muted.
Fast Forward/Rewind Check
Monitor normal picture playback during fast forward or rewind.
- Hold down FAST FORWARD/SEARCH during fast forward.
- Hold down REWIND/SEARCH during rewind.
• The picture will appear for as long as the button is held down.
Playback Your Recordings
Special Effect Features During Playback Continued
(Sound is Muted during all special effects)
Frame by Frame Advance
Optional Remote Control Only (page 72)
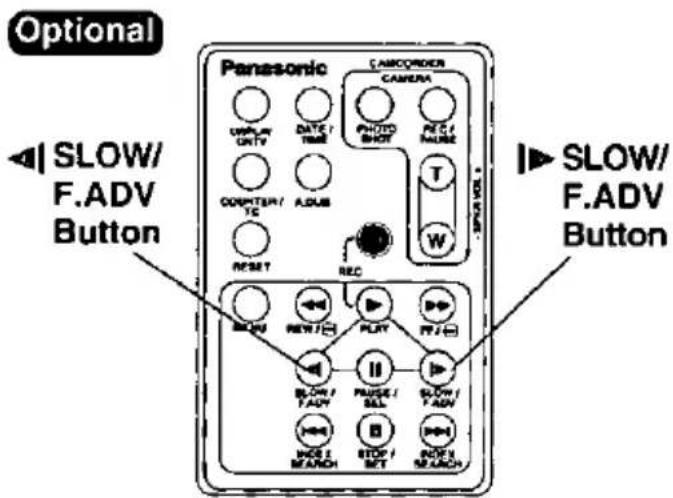
Press PAUSE during playback.
Press |▶ SLOW/F.ADV to do a frame by frame advance.
Press ◀ SLOW/F.ADV to do a frame by frame reverse.
Press PLAY to release.
Note
- If you hold down SLOW/F.ADV, you can see a continuous series of still images at a slower speed than normal slow mode.
- During frame by frame advance, a few frames may move automatically, and the picture may become bluish for an instant.
Jog Frame by Frame Search
(Palmcorder only)
During Still mode, rotate the JOG KEY to advance or reverse the picture one frame at a time.
Playback Your Recordings
Top Scan
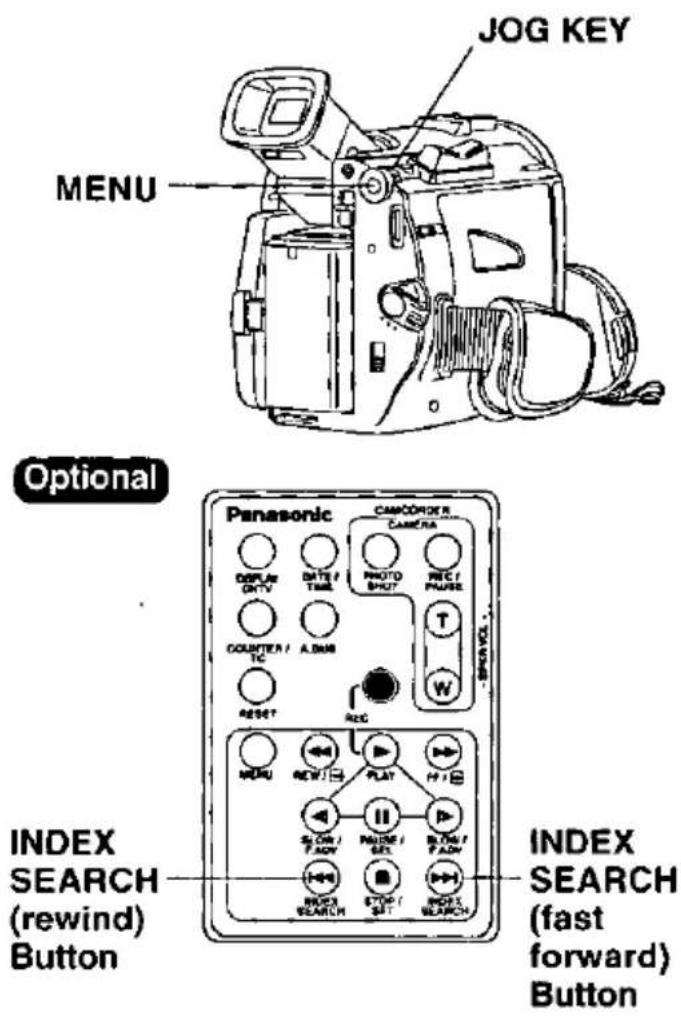
If you hold down the INDEX SEARCH more than 2 seconds, the Palmcorder will scan for scenes (or PhotoShots) and playback the first few seconds of each.
To cancel this function, press PLAY or STOP.
Index Forward/Reverse Search
Optional Remote Control Only (page 72)
Search for a particular scene by using the electronic index marks placed at the beginning of each recording.
1 Set the POWER to VCR.
• The POWER lamp lights red.
- Be sure POWER is fully turned to VCR position.
2 Press MENU to display the VCR mode menu screen.
3 Rotate JOG KEY to select PLAY MODE, then press JOG KEY to display the VCR PLAY MODE menu screen.
4 Rotate JOG KEY to select INDEX, and then press JOG KEY to select PHOTO or SCENE.
1 Place the Palmcorder in the VCR STOP mode.
2 Press INDEX SEARCH fast forward or rewind the number of recordings (indexes) forward or back you want to view. The Palmcorder will advance or rewind to the desired recording and automatically PLAY.
- The number of times you pressed the button is displayed in the EVF and the LCD monitor if you set INDEX on the VCR menu to SCENE (page 24).
(Ex., if you press the button three times, "S3" will appear.)
- If the interval between scenes is less than 1 minute, index search may not operate properly.
- Response time between pressing the button and change in the scene number is quite slow. Do not press the INDEX SEARCH rapidly and continuously.
- It won't playback when the tape reached beginning during Reverse Index Search mode.
Playback Your Recordings
Connections
TV with AUDIO/VIDEO IN Jacks.
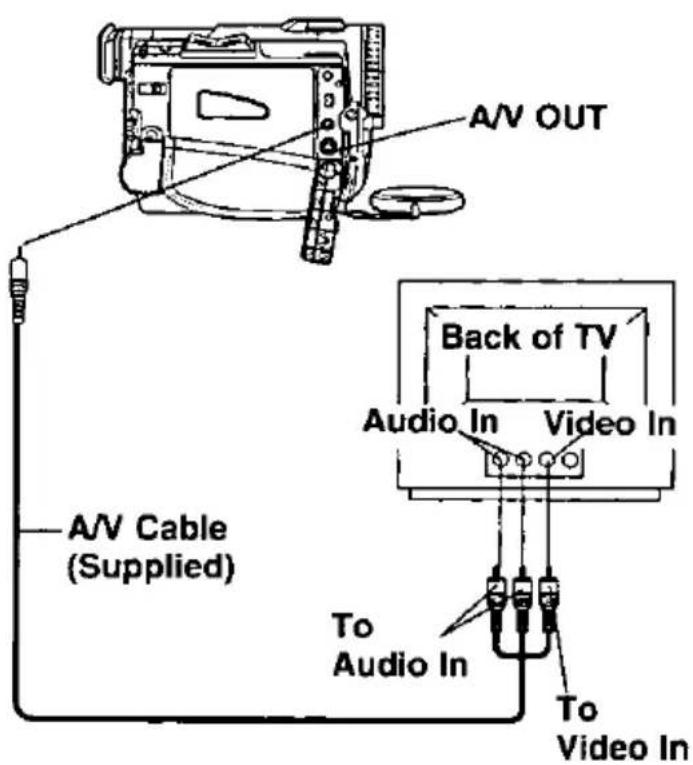
TV with S-VIDEO IN Jacks.
For best Chrominance and Luminance, it is suggested to use the S-Video connection if available on your TV.
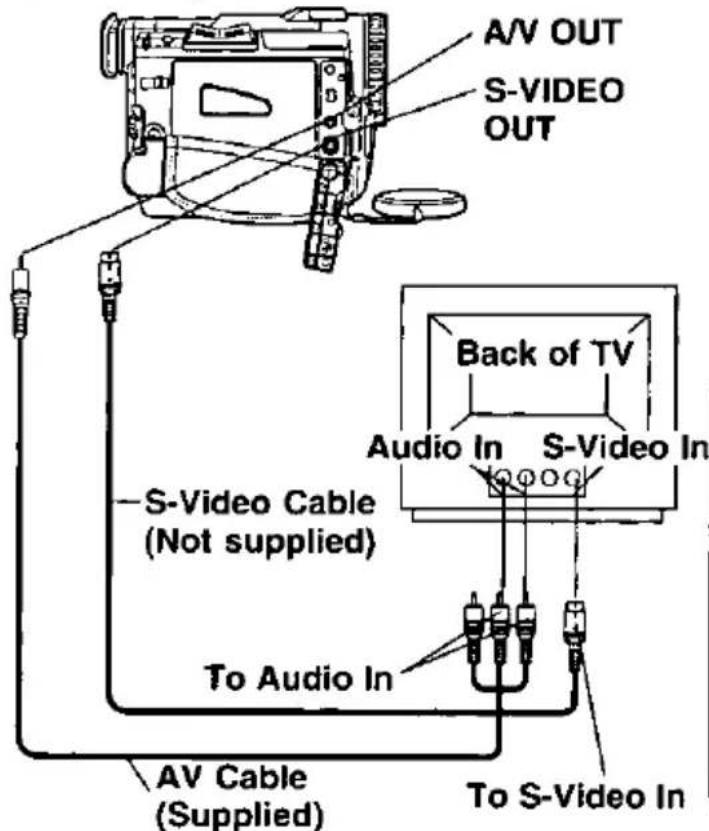
1 Set POWER to CAMERA.
You can now view what the Palmcorder is recording on your TV.
Or, to playback a tape, set POWER to VCR.
You can now playback a recorded tape on your TV.
2 Turn your TV ON and set it to LINE INPUT or S-VIDEO.
Check your TV operating instructions for further information.
3 Start playback or begin a recording.
Note
- Please fully connect the A/V cable to both the Camcorder and the TV.
- Make sure the Palmcorder and TV are turned off while connecting.
Optional Remote Control Only (page 72)
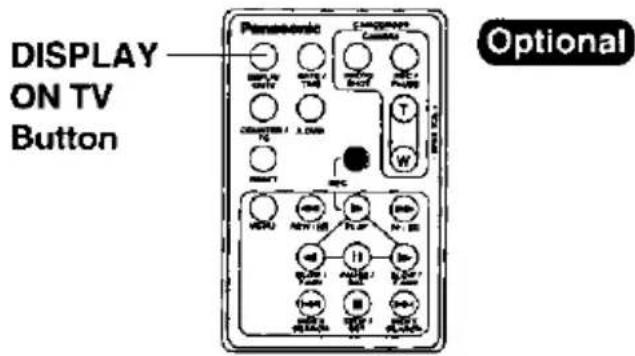
You can display the various EVF and LCD indications on your TV by pressing DISPLAY ON TV on remote control. Press again to remove the indications.
CATV System Installer
This reminder is provided to call the CATV system installer's attention to Article 820-40 of the NEC in USA (and to the Canadian Electrical code in Canada) that provides guidelines for proper grounding and, in particular, specifies that the cable ground shall be connected to the grounding system of the building, as close to the point of cable entry as practical.
You can record still images to a MultiMediaCard.
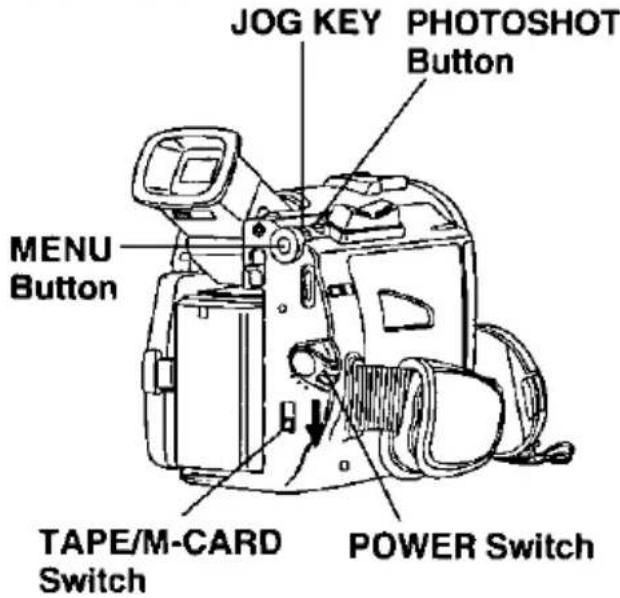
Image Resolution and Capacity (8MB MultiMediaCard)
| REC Mode | Image Resolution | Capacity |
| FINE | 640 x 480 | Approx. 60 images |
| NORMAL | 320 x 240 | Approx. 240 images |
- The number of images given for each mode applies when all images are taken in same mode.
- You can change recording modes at any time before capturing an image.
- The number of images that can be captured may differ depending on the subject. After capturing an image, the number may not decrease, or it may decrease by two. This is normal.
Note
- While "PROCESSING" is displayed, do not turn off the Digital Video Camera or unplug the AC Adaptor (supplied) because this will cause irreversible damage to the memory.
Before you begin...
- Connect the Palmcorder to a power source (pages 12, 13).
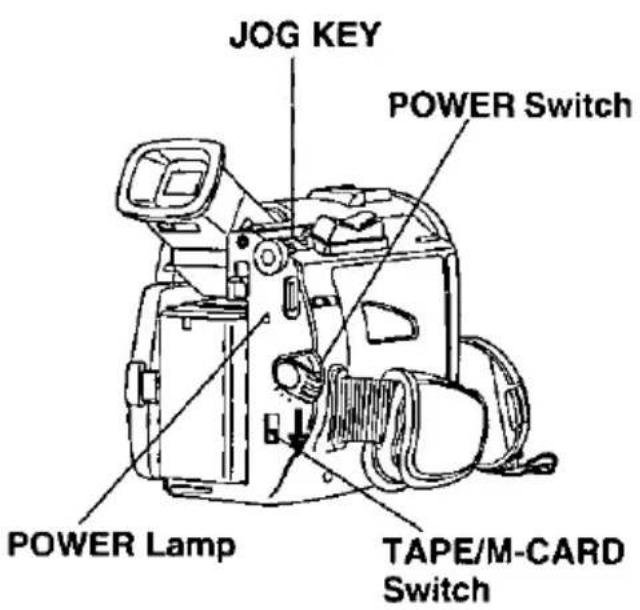
- Set POWER to OFF before inserting a MultiMediaCard (page 9).
1 Set POWER to CAMERA.
• The POWER lamp lights red.
- Be sure POWER is fully turned to CAMERA position.
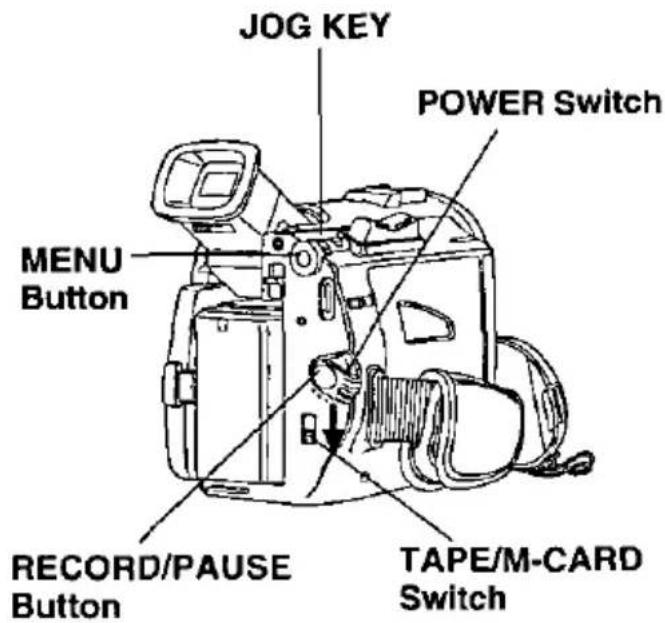
2 Set TAPE/M-CARD to M-CARD.
(page 9).
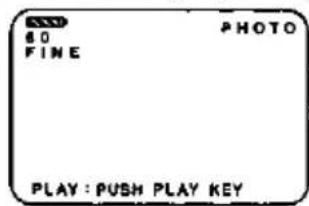
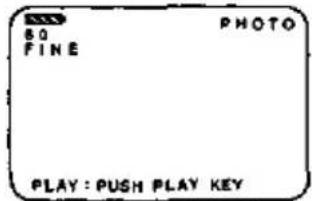
- "PLAY: PUSH PLAY KEY" is displayed for 10 seconds (page 43).
3 Press MENU to display CARD SETTING menu, then press JOG KEY to select NORMAL or FINE.
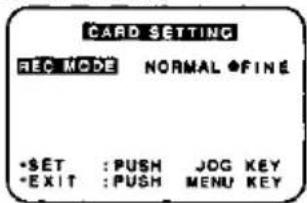
- Press MENU to exit this menu.
4 Press PHOTOSHOT to record an image.
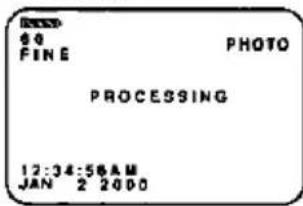
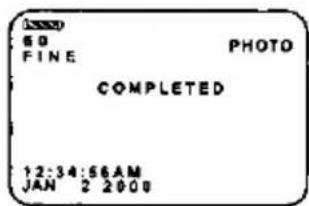
• The PhotoShot image is recorded to the MultiMediaCard.
- When SHUTTER is set to ON (page 23), still pictures are recorded with a visual shutter effect and click sound. If set to OFF, only the visual shutter effect will occur.
Recording images From a Tape
You can record still images from a cassette tape to a MultiMediaCard.
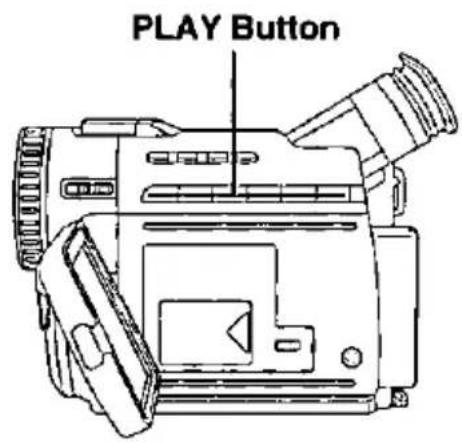
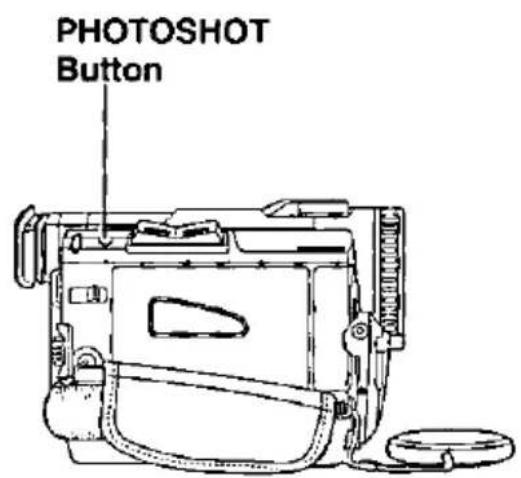
Before you begin...
- Connect the Palmcorder to a power source (pages 12, 13).
- Insert a MultiMediaCard (page 9).
1 Set POWER to VCR.
• The POWER lamp lights red.
- Be sure POWER is fully turned to VCR position.
2 Set TAPE/M-CARD to M-CARD.
(page 9).
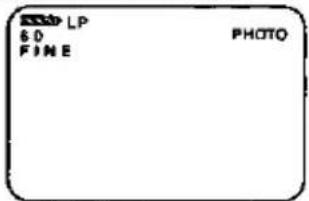
3 Press MENU to display the CARD SETTING menu screen, then press JOG KEY to select NORMAL or FINE.
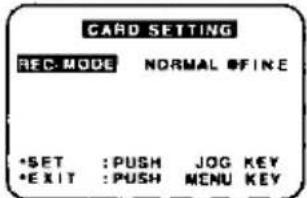
- Press MENU to exit this menu.
4 Press PLAY to start playback of the cassette tape. And then, press PAUSE to select an image.
5 Press PHOTOSHOT to record a desired image to the MultiMediaCard.
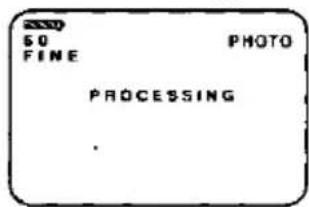
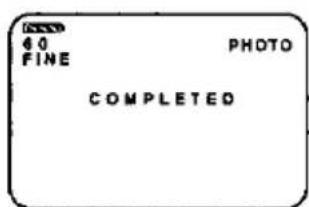
- When PHOTOSHOT is pressed in PLAY or SLOW mode, the screen goes to STILL mode.
• To playback the images of the MultiMediaCard, see page 43. - When Variable Speed Search is done (page 37), this feature can not be used.
6 Repeat steps 4-5 to record another image to the MultiMediaCard.
Playback Still Images
You can display the images of the MultiMediaCard.
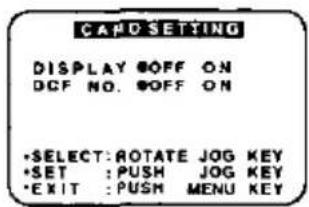
DISPLAY : Select OFF to cancel all Display on the screen.
DCF : Select OFF to cancel DCF No. on the screen.
Note
- If the file number is changed, the Palmcorder cannot read the file.
Before you begin...
- Connect the Palmcorder to a power source (pages 12, 13).
- Insert a recorded MultiMediaCard (page 41).
1 Set POWER to CAMERA.
• The POWER lamp lights red.
- Be sure POWER is fully turned to CAMERA position.
2 Set TAPE/M-CARD to M-CARD. (page 9).
- "PLAY: PUSH PLAY KEY" is displayed for 10 seconds.
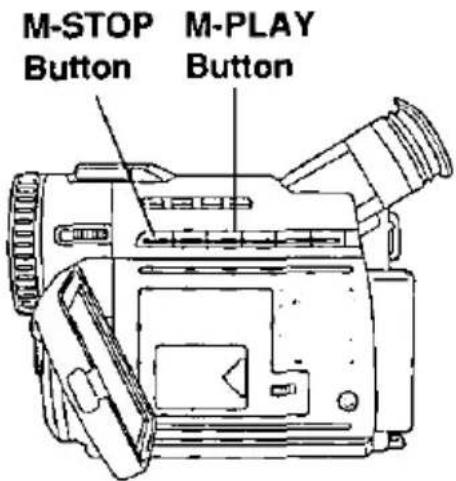
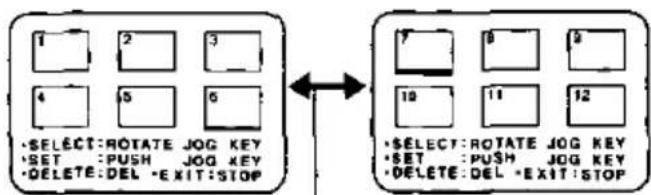
3 Press M-PLAY to display the Multi playback screen.
- "PLEASE WAIT" is displayed on the screen.
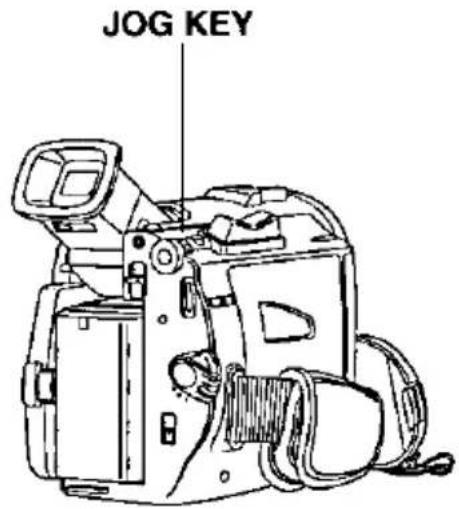
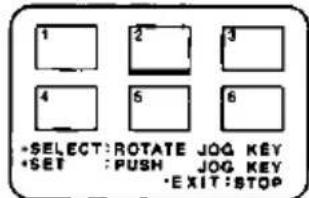
Then rotate JOG KEY to select image. - Rotate JOG KEY to scroll through Multi image screen pages (each page contains 6 images).
- The selected image is underlined in green. The color of image numbers is white for FINE mode and green for NORMAL mode.
flowchart
graph LR
    A["1"] --> B["2"] --> C["3"]
    D["4"] --> E["5"] --> F["6"]
    G["•SELECT:ROTATE JOG KEY"] --> H["•SET :PUSH JOG KEY"]
    I["•DELETE:DEL EXIT:STOP"] --> J["•EXIT:STOP"]
    K["7"] --> L["8"] --> M["9"]
    N["10"] --> O["11"] --> P["12"]
    Q["•SELECT:ROTATE JOG KEY"] --> R["•SET :PUSH JOG KEY"]
    S["•DELETE:DEL EXIT:STOP"] --> T["•EXIT:STOP"]
"PLEASE WAIT" is displayed.
- Press MENU for the display CARD SETTING menu screen.
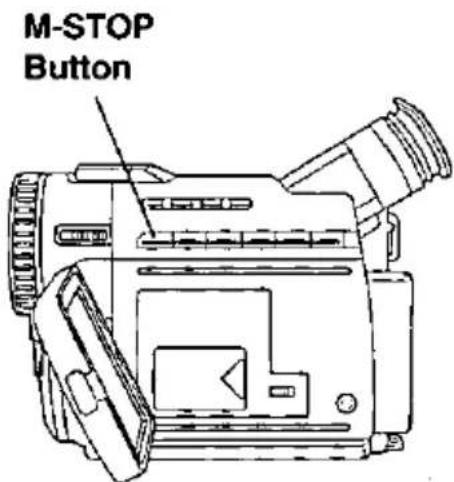
- Press M-STOP to return to the Card PhotoShot REC Mode (page 41).
Note
- While "PLEASE WAIT" is displayed, do not turn off the Digital Video Camera or unplug the AC Adaptor (supplied) because this will cause irreversible damage to the memory.
Playback Still Images
4 Press JOG KEY to display the selected image as a full-size screen.
- "PLEASE WAIT" is displayed on the screen.
- Rotate and press JOG KEY to return to the previous image, next image, or Multi playback image
screen.
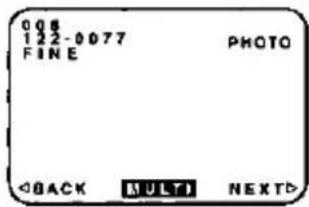
5 Rotate JOG KEY to select BACK, MULTI, or NEXT, and then press JOG KEY to set.
- Select BACK to go to the previous image.
Select MULTI to go to the multi image screen.
Select NEXT to go to the next image. - Press M-STOP to return to the Card PhotoShot REC Mode (page 41).
Precautions for the MultiMediaCard
- While the MultiMediaCard is being read, do not remove it, turn off the power, or subject it to vibrations and shocks.
- Do not leave the MultiMediaCard in a place with high temperature, exposed to direct sunlight, or where electromagnetic waves and static electricity can be generated.
- Electromagnetic waves, static electricity, malfunction of the Digital Video Palmcorder or of the MultiMediaCard itself could erase the data recorded on it. To prevent the loss of picture data, we recommend that you make a backup copy on a cassette or on the computer.
- Do not bend or drop the MultiMediaCard as this could damage the MultiMediaCard or the captured contents.
- Do not touch the connector on the rear edge of the MultiMediaCard with your fingers and take care that no dirt, dust or water enters it.
- Do not affix other labels to the MultiMediaCard face or back as Card insertion/removal may become impossible.
Delete Specific Image Pages
You can delete unwanted images and increase the remaining image memory.
Warning:
Once deleted, images cannot be restored.
DELETE PAGE
You can delete unwanted images.
DELETE ALL
You can delete all images.
FORMAT
You can delete all data.
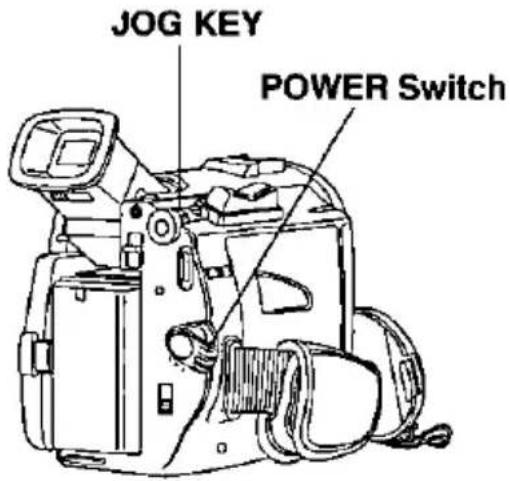
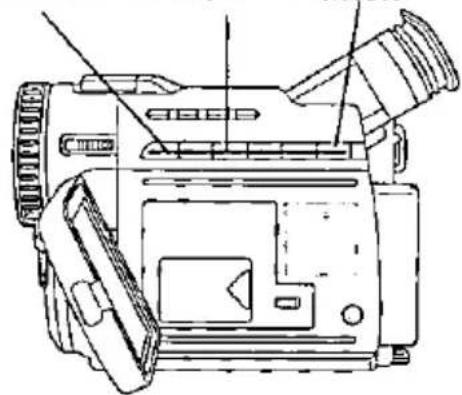
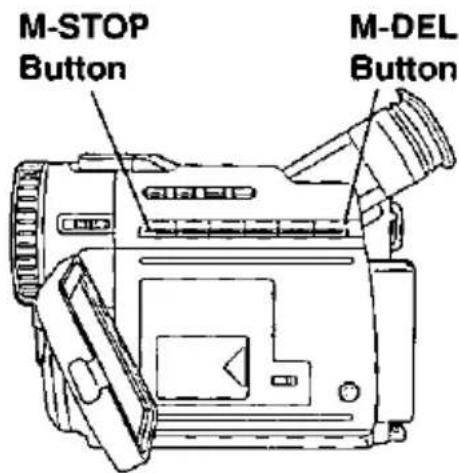
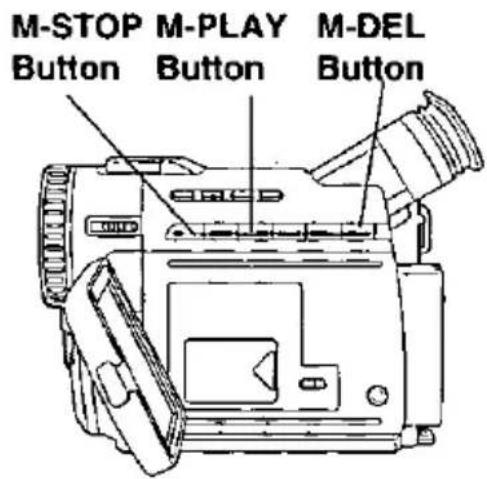
M-STOP M-PLAY M-DEL Button Button Button
natural_image
Line drawing of a digital camera with external components (no text or symbols)Note
- While deleting image, do not turn off the Digital Video Camcorder or unplug the AC Adaptor (supplied) because this will cause irreversible damage to the memory, resulting in reduced image storage capacity.
Before you begin...
- Connect the Palmcorder to a power source (pages 12, 13).
- Insert a recorded MultiMediaCard (page 41).
1 Do steps 1 and 3 on page 43.
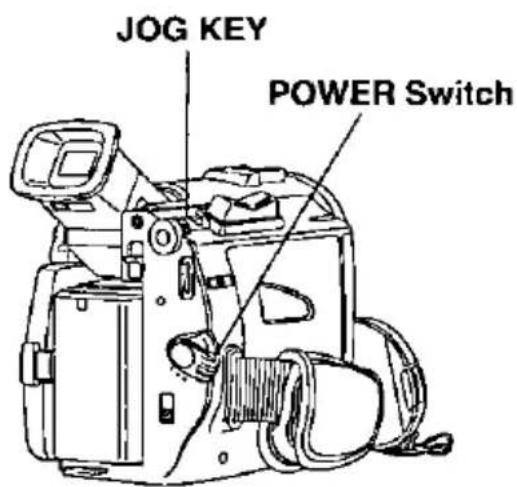
2 Press M-DEL to display the DELETE menu, then rotate and press JOG KEY to select PAGE.
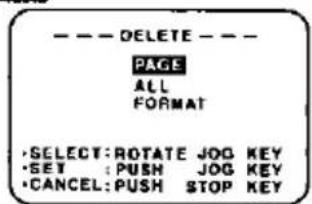
- Multi playback image screen will be displayed.
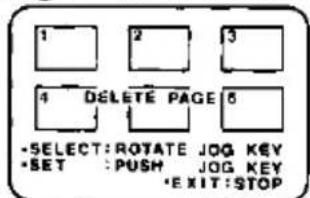
3 Rotate and press JOG KEY to select and set the image to be deleted.
- You can select as many images as you like for deletion.
- Press JOG KEY to cancel the selected image.
- Press M-DEL to delete the selected image.
• To cancel delete, press M-STOP.
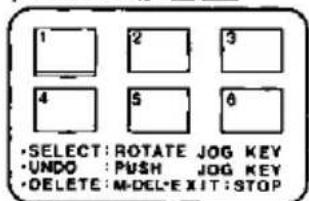
4 Press M-DEL to delete selected page.
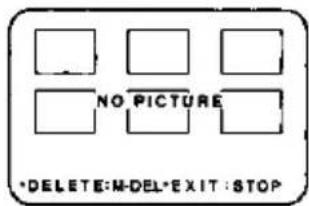
• The screen below is displayed.
- "PLEASE WAIT" is displayed on the screen.
- Press M-DEL to set. Images set for deletion are underlined in red.
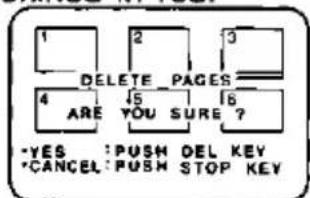
• To delete, press M-DEL.
• To cancel delete, press M-STOP.
• To delete other image pages, repeal step 4.
• To exit, press M-STOP.
Delete All Image Pages
You can delete all images from a
MultiMediaCard easily with this operation. Warning:
Once deleted, images cannot be restored.
Before you begin...
- Connect the Palmcorder to a power source (pages 12, 13).
- Insert a recorded MultiMediaCard (page 41).
1 Do steps 1 and 3 on page 43.
2 Press M-DEL to display the DELETE menu. Then, rotate and press JOG KEY to select ALL.
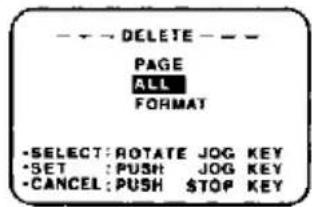
• The screen below is displayed.
• To cancel delete, press M-STOP. The Multi playback image screen is displayed.
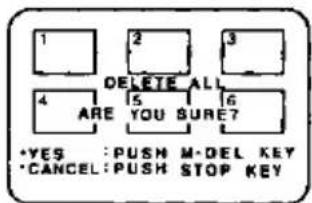
3 Press M-DEL to delete all images.
- "PLEASE WAIT" is displayed on the screen.
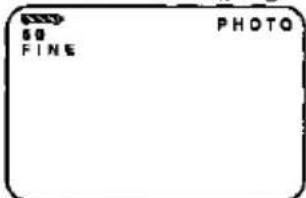
- Press M-STOP to return to the Card PhotoShot REC Mode screen (page 41).
Note
- While deleting image, do not turn off the Digital Video Camcorder or unplug the AC Adaptor (supplied) because this will cause irreversible damage to the memory, resulting in reduced image storage capacity.
Format the MultiMediaCard
You can easily format your MultiMediaCard using this operation. Warning: Formatting permanently removes all image data.
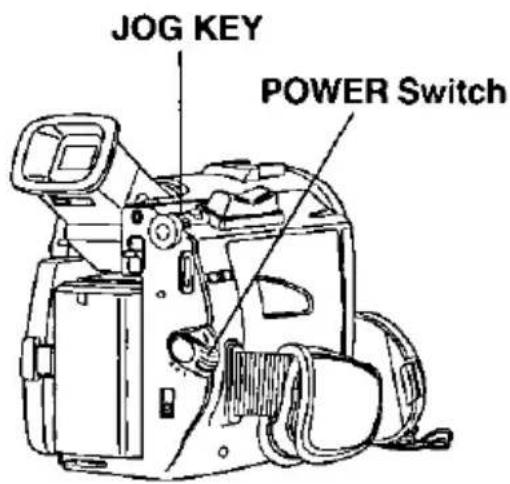
Before you begin...
- Connect the Palmcorder to a power source (pages 12, 13).
- Insert a recorded MultiMediaCard (page 41).
1 Do steps 1 and 3 on page 43.
2 Press M-DEL to display the DELETE menu, then rotate and press JOG KEY to select FORMAT.
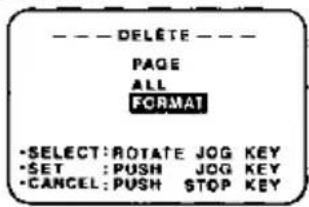
• The screen below is displayed.
• To cancel format, press STOP.
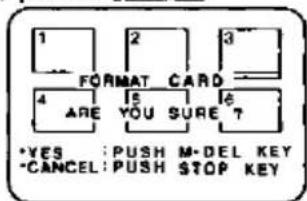
3 Press M-DEL to format the MultiMediaCard.
- "PLEASE WAIT" is displayed on the screen as all images are deleted from memory. Deletion is complete when "NO PICTURE" is displayed.
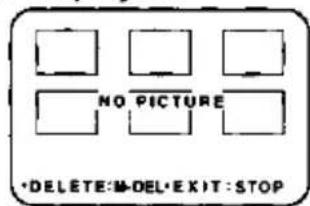
- Press M-STOP to return to the Card PhotoShot REC Mode screen.
Note
- While deleting image, do not turn off the Digital Video Camcorder or unplug the AC Adaptor (supplied) because this will cause irreversible damage to the memory, resulting in reduced image storage capacity.
Photo Title
You can record PhotoShot images from a MultiMediaCard to a cassette to be used as a WIPE or MIX effect.
Note
When Photo Title is set to ON, the selected image and Title will appear before each recording is made.
WIPE : Successive scenes are separated in a way which simulates the drawing of a curtain.
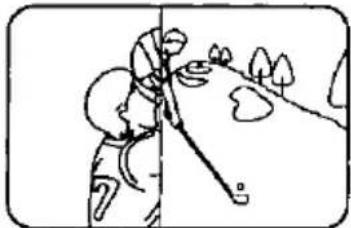
natural_image
Illustration of a person aiming a rifle with a tree in the background (no text or symbols)MIX : The current scene is mixed with the title image when the scene changes.
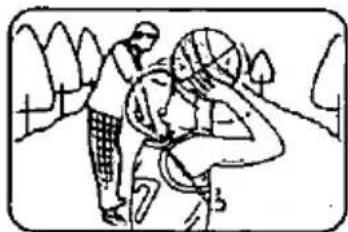
natural_image
Illustration of two people in a garden setting, one seated and one standing, with no visible text or symbols.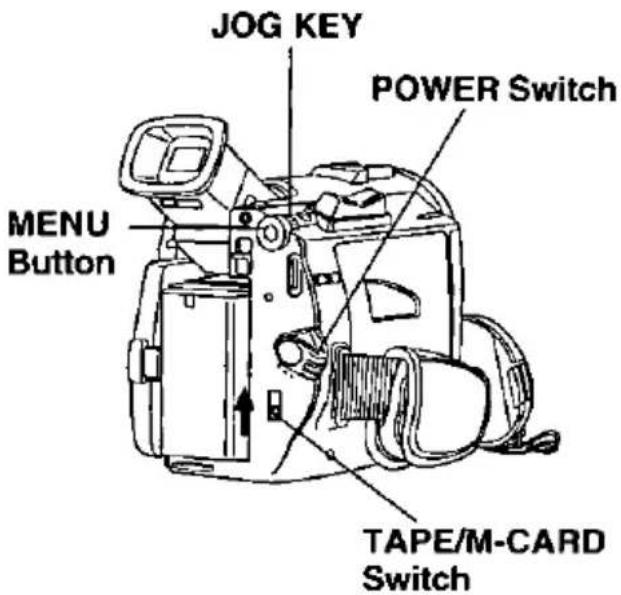
Before you begin...
- Connect the Palmcorder to a power source (pages 12, 13).
- Insert a recorded MultiMediaCard (page 41).
1 Set POWER to CAMERA.
• The POWER lamp lights red.
- Be sure POWER is fully turned to CAMERA position.
2 Set TAPE/M-CARD to TAPE (page 8). 3 Press MENU to display the CAMERA menu screen. Then rotate and press JOG KEY to select PHOTO TITLE.
4 Rotate and press JOG KEY to select MODE and TITLE.
1st : Select and set MODE.
2nd: Select and set TITLE to "SET".
- "PLEASE WAIT" is displayed on the screen.
• The Multi image screen is displayed.
5 Rotate and press JOG KEY to select and set an image.
- "PLEASE WAIT" is displayed while image is processed.
• After Photo Title is preformed, Digital Function turns off.
• There are 12 pre-installed files.
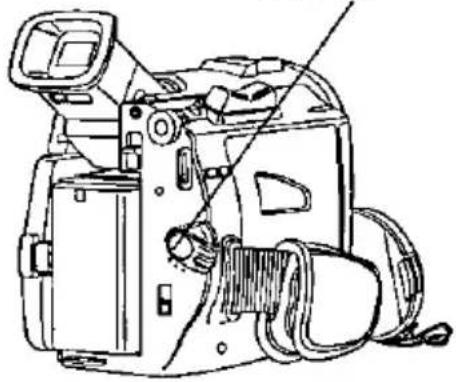
RECORD/PAUSE Button
natural_image
Line drawing of a digital camera with attached cable and lens (no text or symbols)6 PHOTO TITLE SET screen is displayed.

• After 3 seconds, the screen goes back to the Camera mode screen.
7 Press REC/PAUSE to start recording with Photo Title.
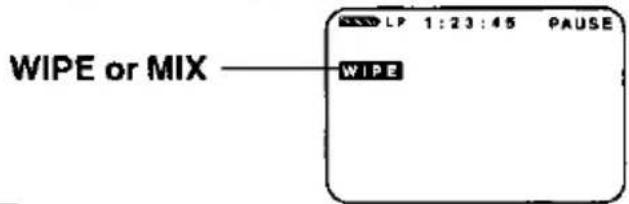
- WIPE or MIX screen is displayed at beginning of next recording. Then the Photo Title setting will be cleared automatically.
Special Features
Dual Digital Electronic Image Stabilization System (D.E.I.S.)
The feature helps to compensate for any unintentional hand or body movement. It can be used in both the Recording and Playback (VCR) modes.

Note
- Digital Functions are turned off automatically when the EIS and Digital Zoom are selected.
Camera mode
1
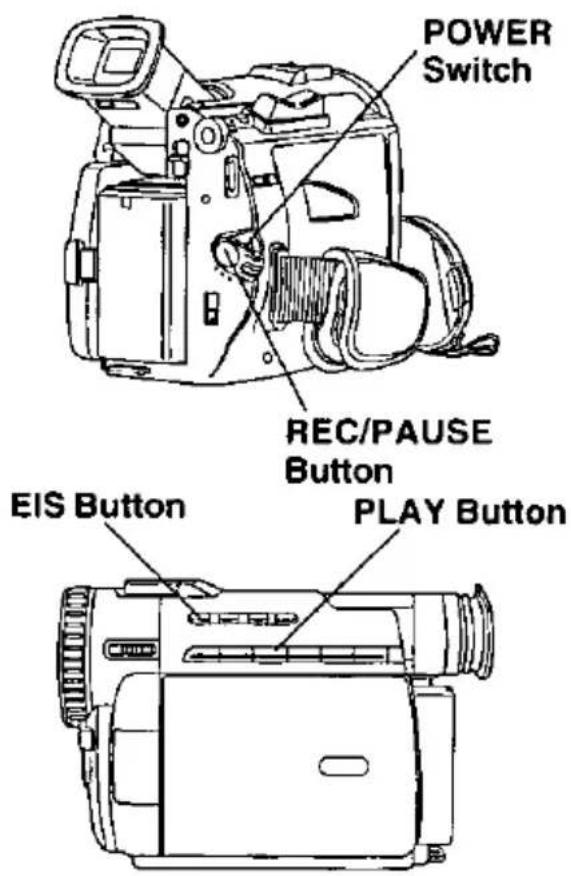
Set POWER to CAMERA.
• The POWER lamp lights red.
- Be sure POWER is fully turned to CAMERA position.
2
Press EIS to stabilize the picture.
• Picture flicker may be observed when taping under fluorescent lighting conditions.
• The EIS indicator flashes when the light level is inadequate.
- Turn D.E.I.S. OFF during recording when using a tripod.
3
Press REC/PAUSE to start recording.
4
Press EIS again to cancel.
- Be sure that D.E.I.S. is turned off when not needed.
D.E.I.S. may not function when...
- Palmcorder movement is too extreme.
- Recording a subject with distinct horizontal or vertical stripes.
• Recording in low light situations. - Recording a subject under a great amount of fluorescent light.
- Recording a scene with very fast motions.
VCR mode
1
Set POWER Switch to VCR.
• The POWER lamp lights red.
- Be sure POWER is fully turned to VCR position.
2
Press PLAY to start playback.
3
Press EIS to stabilize the picture.
4
Press EIS Button again to cancel.
- Be sure that D.E.I.S. is turned off when not needed.
Note
- When using D.E.I.S in VCR mode, the size of the scene may appear slightly larger.
Zoom
You can gradually zoom in for close ups or zoom out for wide angle shots.
Zoom slowly : By lightly pressing the "T" (Telephoto) or the "W" (Wide Angle) side of the POWER ZOOM Switch.
Zoom quickly : By applying more pressure.
Note
The zooming speed ranges from a slow 22 seconds to a fast 2 seconds according to the amount of pressure applied to the POWER ZOOM Switch.
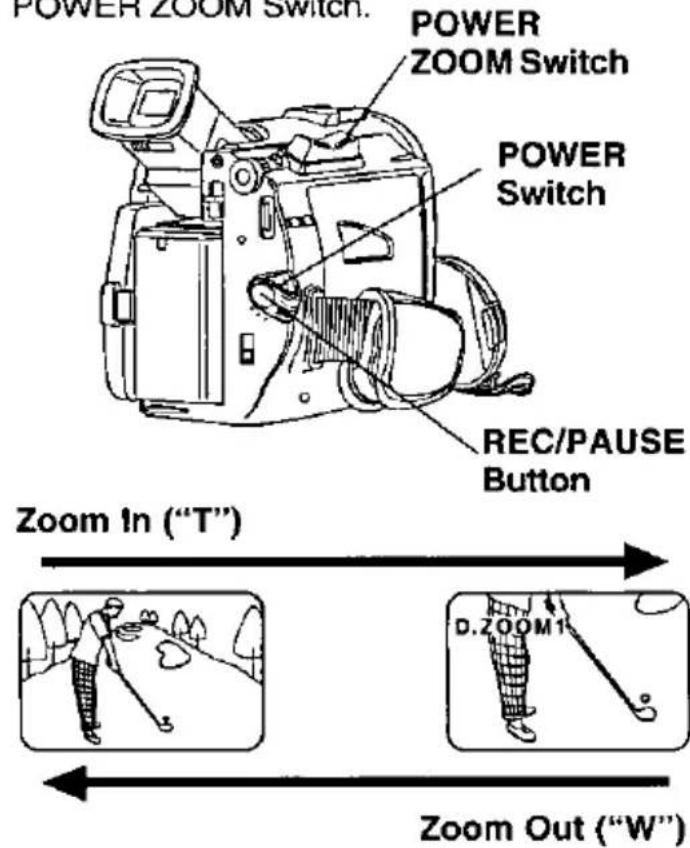
Note
- Digital Functions are turned off automatically when the EIS and Digital Zoom are selected.
Digital Zoom
Camera mode
1 Set POWER to CAMERA.
• The POWER lamp lights red.
- Be sure POWER is fully turned to CAMERA position.
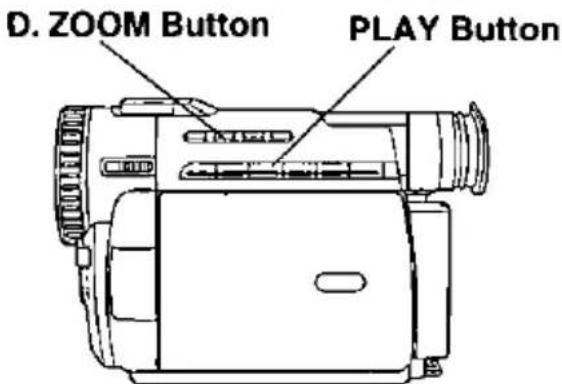
2 Press D.ZOOM to select D.ZOOM1 or D.ZOOM2.
once : D.ZOOM1 (from 18x to 36x) twice : D.ZOOM2 (from 18x to 300x) three times : Turn off D.ZOOM
3 Press REC/PAUSE to start recording and press POWER ZOOM to zoom in or zoom out.
• The magnification level is always displayed in the EVF or the LCD monitor when DISPLAY is set to ON (pages 23, 25)
4 Press D.ZOOM to turn off Digital Zoom so that no indication appears.
Note
- The normal optical zoom functions from 1x to 18x.
- Because the image is enlarged digitally, the picture may become distorted when higher magnification levels are used.
- When the level falls below 18x, the normal zooming function will resume.
- Focus distance becomes 4 feet (1.2m) if the lens is in full telephoto.
VCR mode
1 Set POWER to VCR.
• The POWER lamp lights red.
- Be sure POWER is fully turned to VCR position.
2 Press PLAY to start playback. 3 Press D.ZOOM.
- The center portion of the image doubles in size.
4 Press D.ZOOM again for normal image size.
Special Features
Digital PhotoShot
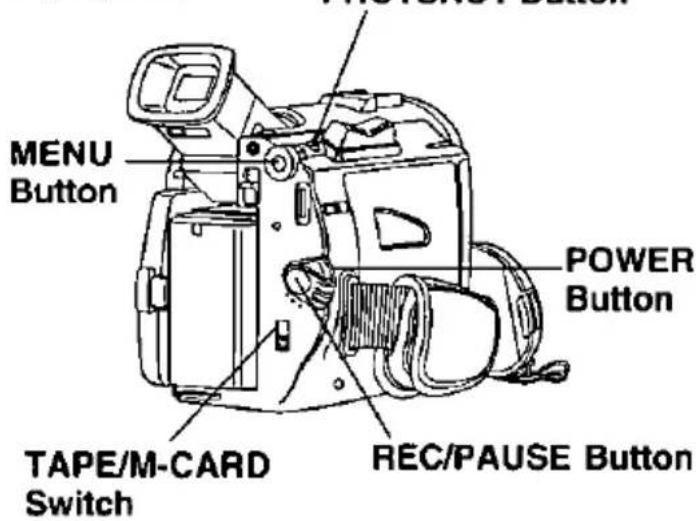
Use this feature to record a seven second (approx.) still image from the current camera picture. Audio is also recorded for on the spot narration. Or, you can add narration later with the Audio Dubbing feature to make an interesting slide show, etc. (page 59). PHOTSHOT Button
Index Search (Photo/Scene)
Optional Remote Control Only (page 72)
Optional
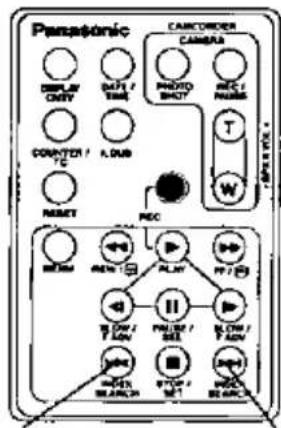
INDEX SEARCH
(rewind Button)
INDEX SEARCH
(fast forward
Button)
Note
• The picture quality will deteriorate slightly.
- The tape remaining indicator will not appear while PHOTOSHOT feature is used.
- In the Photo/Scene Index Search mode, the shutter sound effect may not be able to be heard even when SHUTTER is set to on.
- Photo Index Search may fail to detect a recorded PhotoShot image if the image is 3 seconds or less.
Before you begin...
- Set POWER to CAMERA.
1 Set TAPE/M-CARD Switch to TAPE.
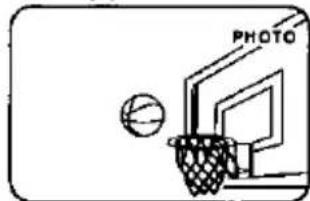
2 Press PHOTOSHOT in Record/Pause mode. "PHOTO" will appear in the
EVF or the LCD monitor.
natural_image
Simple line drawing of a basketball going through a hoop with a 'PHOTO' label (no other text or symbols)- If SHUTTER on the menu screen is set to ON, a sound effect similar to the shutter of a film camera will be heard when the PHOTOSHOT is pressed.
• The Tally Lamp will be on. - When PHOTOSHOT is pressed, the playback image will take approximately 7 seconds to process. After that, the Camera mode screen will be displayed.
1 Set POWER to VCR.
• The POWER lamp lights red.
- Be sure POWER is fully turned to VCR position.
2 Press MENU to display the VCR mode menu screen.
3. Rotate JOG KEY to select PLAY MODE, and press JOG KEY to display the VCR PLAY MODE menu screen.
4 Rotate JOG KEY to select INDEX, and press JOG KEY to select PHOTO or SCENE.
5 Press INDEX SEARCH fast forward or rewind on the remote control (Optional, page 72) to advance or rewind the tape to playback a PhotoShot scene. To view the next PhotoShot, INDEX SEARCH must be pressed again.
White Balance
Auto White Balance automatically maintains optimum color balance in most lighting conditions. However, when using Digital Functions, etc., you may get better results using the manual adjustment.
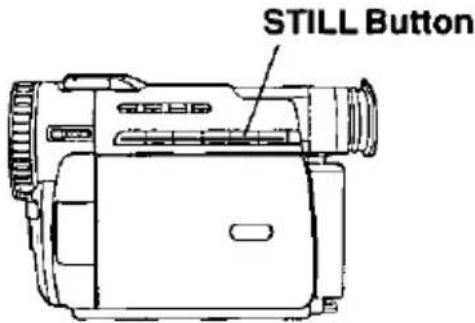
Recording Still Pictures
You can record still pictures of any desired duration together with sound.
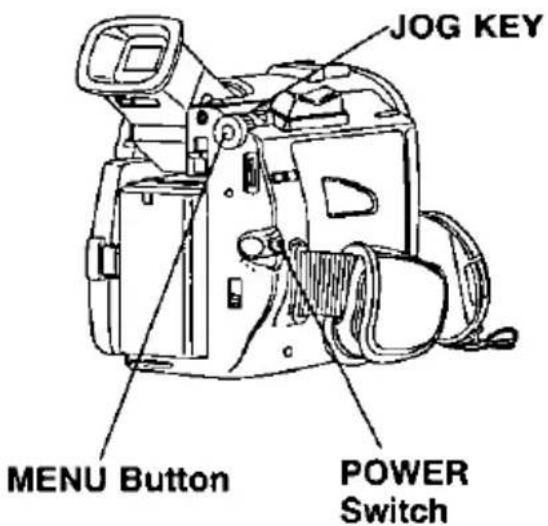
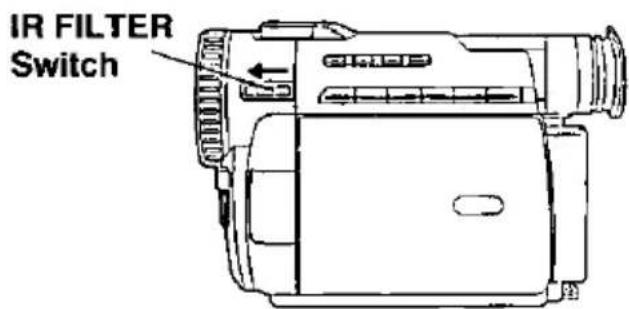
IR FILTER (PV-DV400 Only)
The IR FILTER allows you to record subjects in a comparatively dark place.
1 Set POWER to CAMERA.
• The POWER lamp lights red.
- Be sure POWER is fully turned to CAMERA position.
2 Press MENU to display the menu screen.
3 Press JOG KEY to select ADJUST, and then press JOG KEY to display the CAMERA ADJUST menu screen.
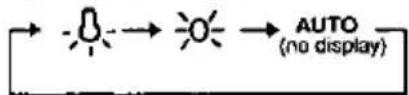
4 Rotate JOG KEY to select W.BALANCE, and then press down on JOG KEY repeatedly to select either AUTO, Indoor halogen lamp "-0", Outdoors "-0".
flowchart
graph LR
    A["→"] --> B["→"]
    B --> C["→ AUTO\n(no display)"]
: When the source illumination is a halogen lamp.
※ : When shooting outdoors on a sunny day.
AUTO : Automatically maintains optimum color balance in most lighting conditions.
1 While in RECORD mode, press STILL and hold for 2 seconds to capture still picture. The captured still picture will be recorded together with the sound.
2 Press STILL once again to release the still picture. The camera will resume recording real-time pictures.
1 Set POWER to CAMERA.
2 Slide IR FILTER to ON.
- Black and white image appears.
- You can select color of image B/W, green, or blue (page 22).
- To cancel this feature, slide IR FILTER to OFF.
Note
- The subject can be up to 3 m (9 feet) away.
Special Features
Program AE
The Auto Exposure feature can be used to make quality recordings in a variety of scene situations.
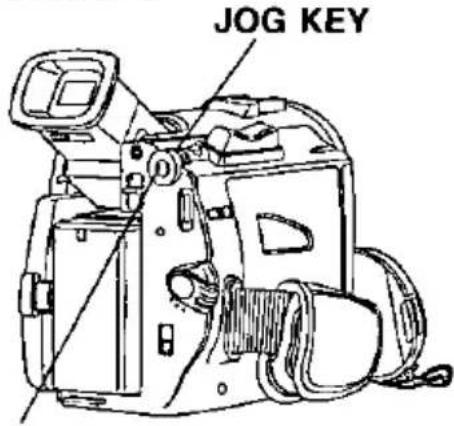
MENU Button
flowchart
graph TD
    A["(No display)"] --> B["SPORTS"]
    B --> C["PORTRAIT"]
    C --> D["LOW-LIGHT"]
    D --> E["SPOT-LIGHT"]
    E --> F["SURF&SNOW"]
Note
SPORTS mode
- The recorded images will not be so blurred when they are viewed later using slow or still picture playback.
- When playing back a sports mode recording, the movement may appear slightly jerky.
- Do not use this mode when recording under fluorescent, mercury or sodium lighting. These types of lights will affect the color and brightness of the images.
- A vertical band of light might appear when recording objects that are brightly illuminated or which are highly reflective.
- If the amount of light is insufficient, the SPORTS "X" indicator will flash in the EVF or the LCD monitor.
• The image may flicker if this mode is used indoors.
1 Set POWER to CAMERA.
• The POWER lamp lights red.
- Be sure POWER is fully turned to CAMERA position.
2 CAMERA position. Press MENU to display the menu screen.
3 Screen. Press JOG KEY to select ADJUST, and then press JOG KEY to display the CAMERA ADJUST menu screen.
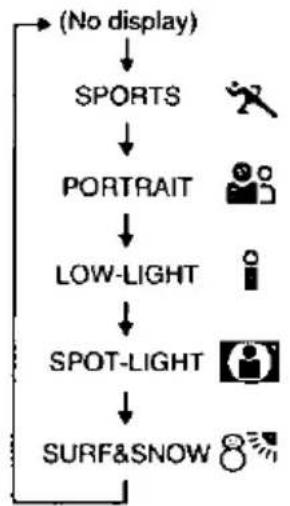
4 the CAMERA ADJUST menu screen. Rotate JOG KEY to select PROGIAE, and then press JOG KEY to select one of the five modes shown below.
5 below. Repeat steps 4\~5 to select OFF to cancel this feature.
- Sports mode For recording fast action scenes.
- Portrait mode For recording only subjects in the foreground, while ignoring subjects in the background.
- Low-light mode For recording in extreme low light conditions.
- Spot-light mode Recording in situations where subjects are under a spotlight(s).
- Surf & Snow mode 8 ^39 For recording in locations with a high degree of "Dazzle", such as snow slopes and the seashore.
PORTRAIT mode
- The image may flicker if this mode is used indoors.
LOW-LIGHT mode
- Scenes recorded in extremely low light levels may not come out properly.
SPOT-LIGHT mode
- If the recorded subject is extremely bright, the picture may appear whitish.
SURF&SNOW mode
- If the recorded subject is extremely bright, the picture may appear whitish.
- It is not possible to select the SPORTS mode and PORTRAIT mode together with the GAIN UP in the Digital function camera menu.
Special Features
Other Digital Functions
Use the following features to add interest and professionalism to your recordings or playback. Select from eleven special effects.
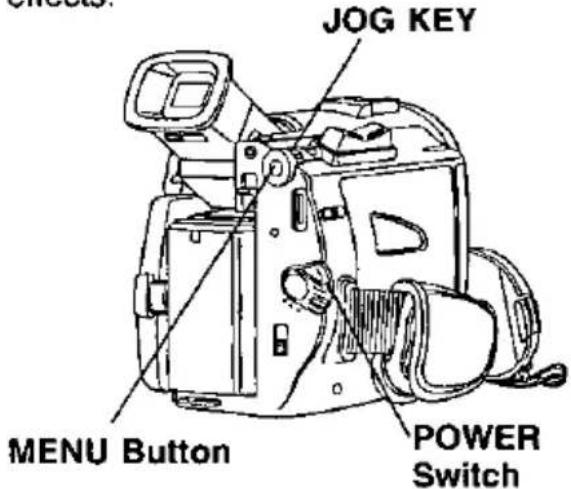
Types of Digital Function
MIRROR
Symmetrical image from the current camera picture.
STROBE
The recording appears as a sequence of still frames.
MOSAIC
The picture appears in a mosaic pattern.
SLIM
The picture is expanded vertically.
TRAIL
The subject being recorded creates a trail when in motion.
STRETCH
The picture is expanded horizontally.
GAIN UP (Not available during playback) Picture sensitivity is increased.
- Only Manual Focus is available.
WIPE
Successive scenes are separated in a way which simulates the drawing of a curtain.
MIX
The current scene is mixed in with the following scene during scene changes.
SEPIA (Only available during playback) The picture is played back in sepia, brownish color, giving it an antique look.
MONO (Monotone) (Only available during playback)
The picture is played back in black-and-white.
1 Set POWER to CAMERA or VCR.
• The POWER lamp lights red.
- Be sure POWER is fully turned to CAMERA or VCR position.
2 CAMERA or VCR position. Press MENU to display the menu screen.
3 screen. Press JOG KEY to select DIFUNCTION in the CAMERA mode menu screen or PLAY FUNCTION in the VCR mode menu screen, then press JOG KEY to display the CAMERA FUNCTION or VCR PLAY FUNCTION
3 menu screen. Rotate JOG KEY to select DIFUNCTION, and then press JOG KEY repeatedly to select one of the
4 Digital Function listed at the left. To cancel the Digital Function, press down on JOG KEY to select OFF.
Note
- The EIS and Digital Zoom features are turned off automatically when one of the Digital Functions listed at left is selected.
• Refer to the Types of Digital Effects at the left.
To use the WIPE function:
a. In Camera mode, set the "D.FUNCTION" item in the main menu screen to "WIPE" (page 22).
b. Press RECORD/PAUSE to start recording.
c. Press RECORD/PAUSE to pause the recording. The last scene will be memorized.
d. Press RECORD/PAUSE to start recording again. The new scene will take the place of the memorized scene.
To use the MIX function:
a. In Camera mode, set the "D.FUNCTION" item in the main menu screen to "MIX" (page 22). Then, perform steps b-d above.
The memorized scene and the new scene will appear mixed as the scene changes from one to the other.
Note
- When Photo Title is set, WIPE/MIX mode becomes Photo Title. Photo Title is finished, Digital Function become OFF.
Special Features
Auto Focus
The Palmcorder automatically adjusts the focus over the entire zoom range.
Manual Focus
Use Manual Focus (MF) when recording ...
• a subject through glass.
- a scene where the subject is far from the Palmcorder and there are objects in the foreground.
- a subject with distinct horizontal stripes.
- a subject not centered in the Viewfinder.
- subjects with shiny surfaces.
• an obliquely angled subject.
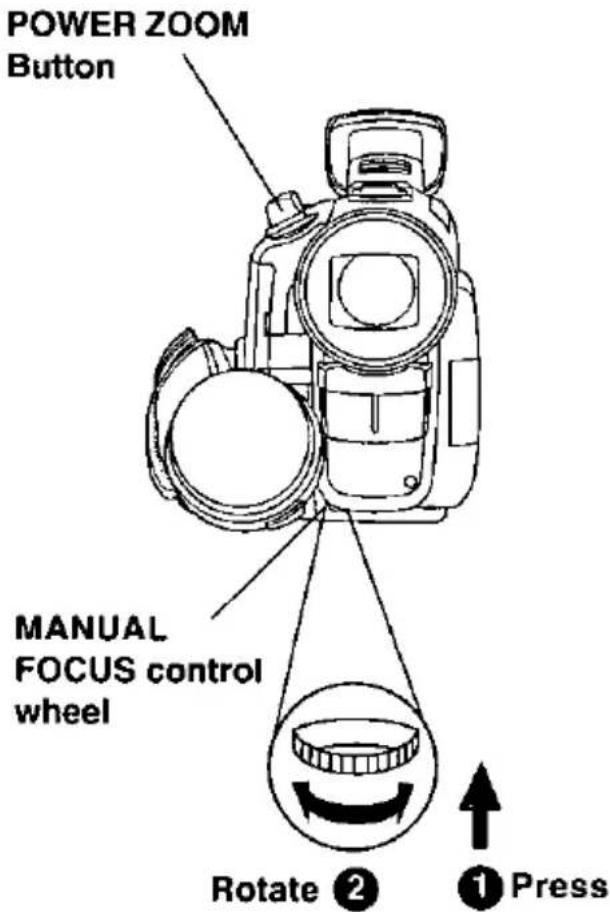
- a bright, flat subject such as a white wall.
• in low light situations. - a scene with fast motions, like a golf swing.
- Re-focusing may be required when your Palmcorder is aimed at a new scene.
1 Press MANUAL FOCUS control wheel so that "MF" (Manual Focus) appears in the EVF or the LCD monitor.
EVF/LCD Monitor
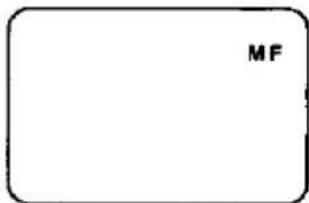
2 Press and hold POWER ZOOM to the "T" side (Full Telephoto) until the lens is zoomed in all the way (subject at maximum size).
3 Turn MANUAL FOCUS control wheel until the picture is in focus.
- It may be necessary to back away from the subject to focus the image properly.
4 Press POWER ZOOM to "W" or "T" as desired.
• The subject will remain in focus over the entire zooming range.
- It may be necessary to back away from the subject to focus the image properly.
Macro Focus (for close-ups)
Press the "W" side of POWER ZOOM to the wide angle position.
Auto Focus will function with the subject as close as 1 inch (25mm) in front of the lens.
Audio/Video Fade In/Out
This feature allows you to make smoother scene transitions for a more professional look.
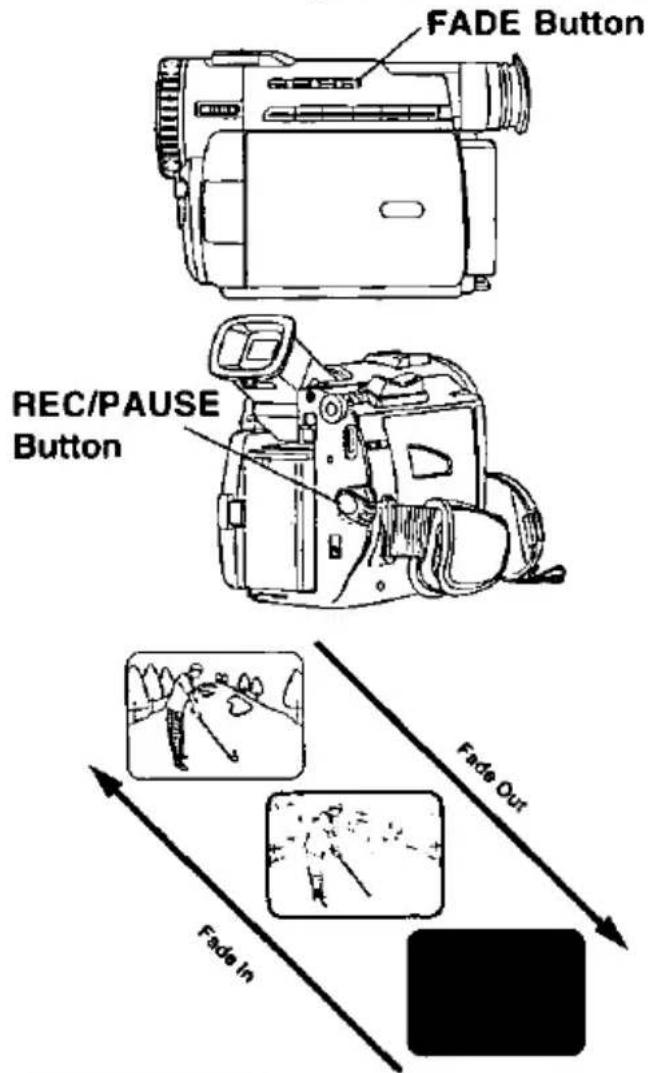
Fade In:
Starting the first scene with "fade in" is very effective.
In Record/Pause mode, hold down FADE until the picture fade out.
Then, press RECORD/PAUSE to start recording.
Release FADE and the picture will gradually fade in.
Fade Out:
Use to create a soft ending or (together with fade in) for a soft transition from one scene to the next.
During recording, hold down FADE until the picture fade out.
Then, press RECORD/PAUSE to pause the recording.
Backlight
Use when recording a subject that is darker than the surrounding scene, in a shadowed area, or when the light source is in the back of your subject.
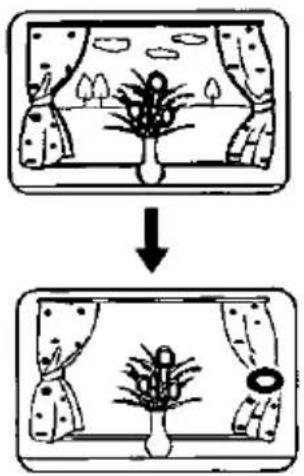
flowchart
graph TD
    A["Window with plants and curtains"] --> B["Window with potted plant and curtains"]
EVF or LCD monitor indication.
Press BACK LIGHT to activate the Backlight feature.
The Indicator "○" will appear in the EVF or LCD monitor.
Press BACK LIGHT again to cancel the Backlight feature.
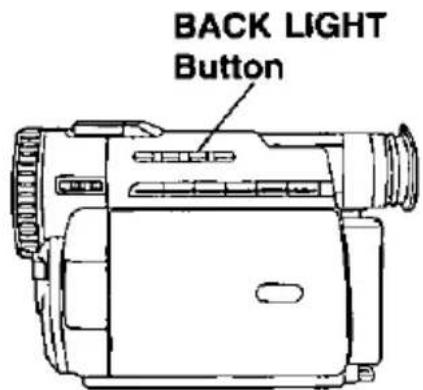
Note
- The Indicator "○" will not appear in the EVF or LCD monitor when OFF is selected in the DISPLAY menu.
Special Features
High Speed Shutter
To record high speed motion (e.g. tennis stroke) for improved STILL or SLOW MOTION playback, when watching the tape on this Camcorder.
Before you begin...
- Connect the Camcorder to a power source (pages 12, 13).
- Set POWER Switch to CAMERA.
- Insert a cassette with record tab (page 15).
- Set TAPE/M-CARD Switch to TAPE.
Auto Shutter
In the AUTO mode (no indication in the EVF) and LCD monitor, the Camcorder will automatically adjust the shutter speed (up to 1/350).
- AUTO mode is automatically selected whenever the POWER Switch is set to CAMERA.
Manual Selection
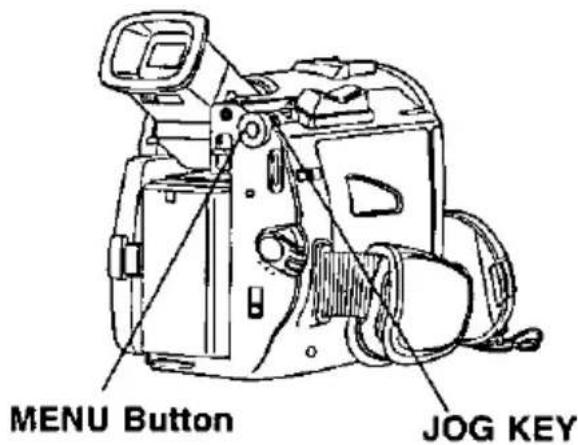
1 Press MENU to display the camera mode menu in the EVF or the LCD monitor.
2 Rotate and press JOG KEY to select ADJUST, and then rotate and press JOG KEY to select HIS.S. • SHUTTER SPEED menu is displayed.
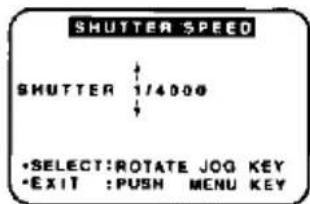
Note
- For proper color reproduction, it is recommended that you use this feature outdoors. For indoor High Speed Shutter recording, additional halogen or tungsten light should be provided. Fluorescent light will degrade the picture quality.
- This feature requires ample light. More light is required for the fastest shutter speeds.
- The Auto Focus system may not operate properly in insufficient light when using the High Speed Shutter.
- When PROG.AE is ON, you cannot manually select the shutter speed.
3 Rotate JOG KEY to obtain one of the following shutter speeds.
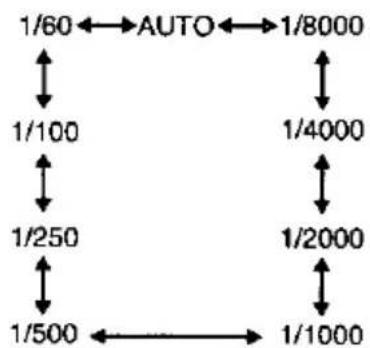
flowchart
graph TD
    A["1/60"] --> B["AUTO"]
    B --> C["1/8000"]
    C --> D["1/4000"]
    D --> E["1/2000"]
    E --> F["1/1000"]
    F --> G["1/500"]
    G --> H["1/250"]
    H --> I["1/100"]
    I --> J["1/60"]
Audio Dubbing using the External or Built-in Microphone
The original sound can be replaced with new sound using the built-in Palmcorder microphone or an external microphone.
External Microphone with M3 connector (not supplied)
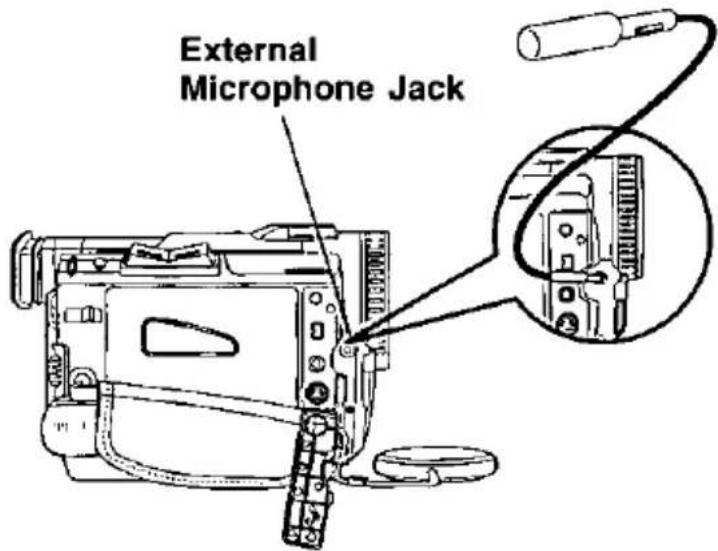
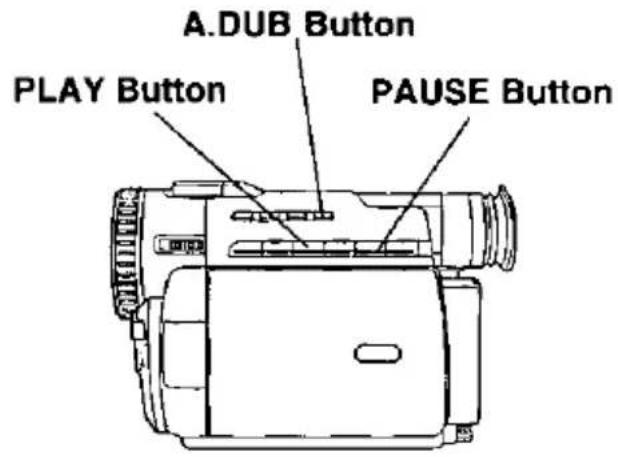
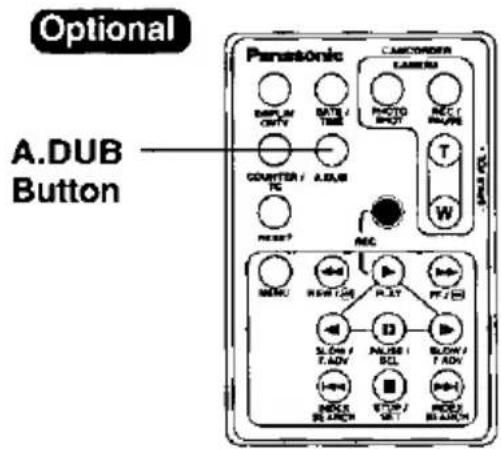
Before you begin...
- Connect the external Microphone (if used).
• Turn On the Palmcorder. - Insert a pre-recorded tape to be dubbed.
The AUDIO-REC setting in CAMERA MENU mode should be as follows:
12 bit The original sound is recorded on ST (Stereo) 1, and the new sound will be recorded on ST (Stereo) 2.
16bit The original sound is replaced with the new sound.
- Select 12 bit if you do not want the original sound to be completely replaced during an audio dub.
- If you dub over a tape which has both 12 bit and 16bit audio recordings on it, keep in mind that the original 16bit audio portion will be completely replaced.
1 Set POWER to VCR.
2 Press PLAY. Then press PAUSE where you want dubbing to begin.
3 Press A.DUB on this unit (for three seconds) or the remote control (optional, page 72) to put the Palmcorder in the Audio Dub mode.
- "A.DUB" flashes in the EVF or the LCD monitor. LCD/EVE Indica
LCD/EVF Indication
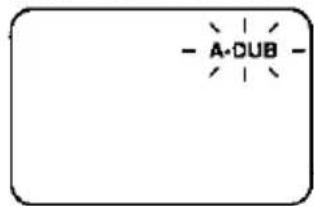
(Continued on next page.)
Special Features
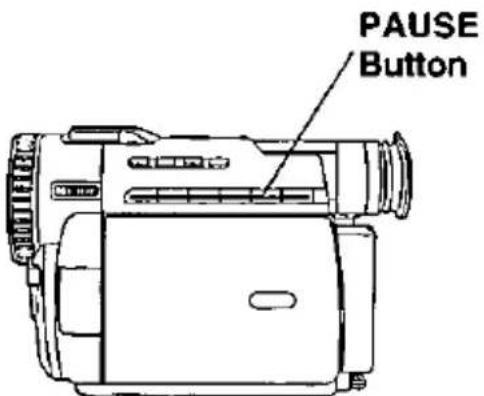
To listen to the desired audio sound, set the AUDIO setting of the VCR mode MENU (page 22) as follows:
AUDIO (The following selections are available for 12 bit AUDIO dubbed recording only)
ST 1 Set this position to listen to the original sound.
ST 2 Set this position to listen to the audio dubbed sound.
MIX Set this position to listen to both the original sound and the audio dubbed sound.
Note
- 16 bit dubbed sound completely erases the original 16 bit recorded sound.
- If you select 12 bit AUDIO recording and dubbed the sound with the AUDIO-MIX on, the sound will be stereo regardless of the AUDIO-OUT setting.
- If you recorded in LP mode, you can not use the A-DUB feature.
Memory-Stop Editing (Optional Remote Control Only, page 72)
You can set an automatic Edit stopping point.
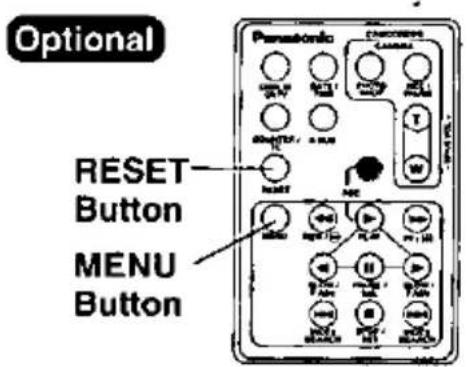
4 Press PAUSE to start Audio Dubbing. • Connect Palmcorder to TV in order to monitor the sound (page 40).
Only NTSC (National Television Standards Committee) recorded tapes can be audio dubbed. The following screen appears if the tape was not recorded in NTSC format.
INCOMPATIBLE TAPE
5 Press PAUSE to stop Audio Dubbing.
- If the microphone used for dubbing gets too near the speaker of your TV, a howling noise (feedback) may occur.
- If the tape position lies or starts in a blank section, you can not use the A-DUB feature.
Before step 2, locate the point at which you want the dubbing to stop.
Press MENU to display the VCR menu screen.
Rotate JOG KEY to select DISPLAY SETTING, and then press JOG KEY to display the DISPLAY SETTING menu.
Rotate JOG KEY to select DISPLAY, and then press JOG KEY to set to MEMORY.
Then, press RESET on the remote control to reset the Counter Memory to M 0:00:00.
Now, rewind to the editing start point, and continue with steps 2-5. The tape will now stop automatically at "M 0:00:00".
Special Features
Copying your Tapes to S-VHS or VHS Cassette
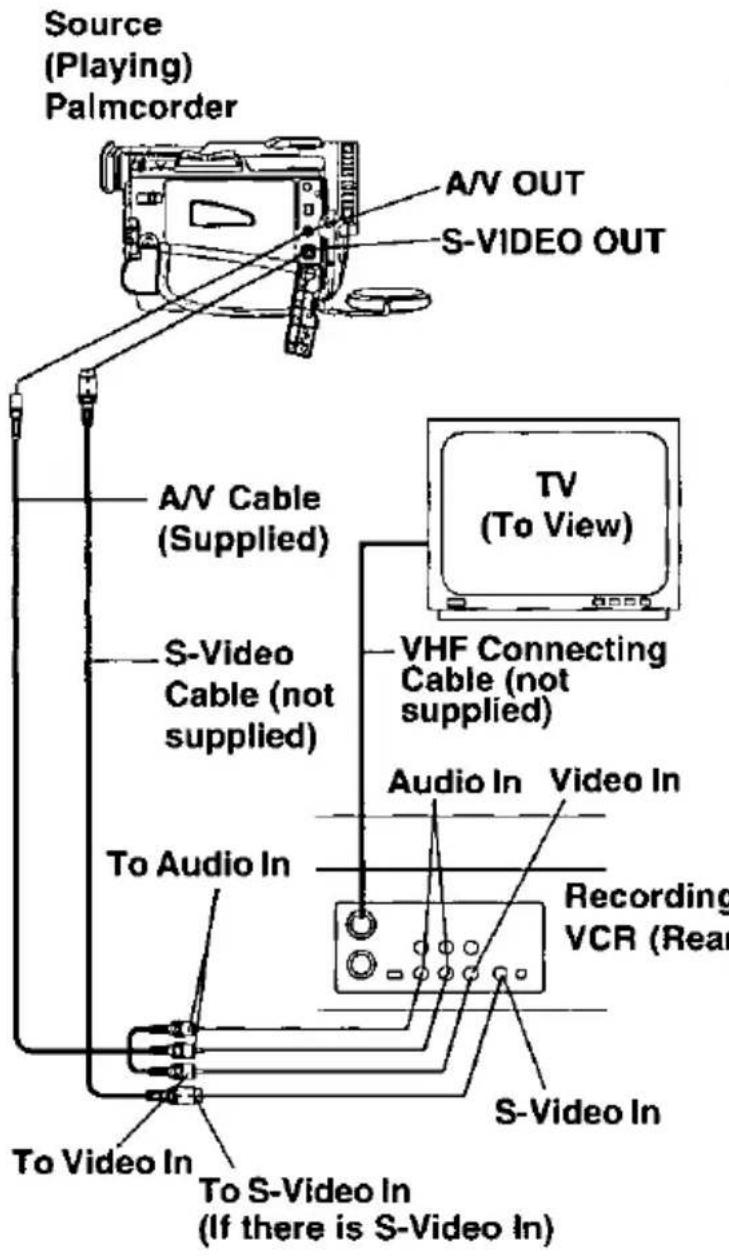
Monitor with your TV
- Turn the TV ON and select its VCR channel (either CH3 or CH4).
- Set the VCR/TV Selector on the recording VCR to VCR.
Before you begin...
- Connect both Palmcorder and VCR to their power sources.
- Connect the Palmcorder to a VCR as illustrated below.
- Turn ON both units.
- Set the recording VCR's Input Signal Selector to LINE.
- Set the Palmcorder POWER Switch to VCR.
1 Insert a pre-recorded tape into the source (playing) Palmcorder and a blank tape with record tab in place into the target VCR (Recorder).
2 Press PLAY on the Palmcorder. When the tape reaches the point you want to start dubbing, press PAUSE.
3 Press REC or simultaneously REC and PLAY (depends on VCR) and then pause the recorder.
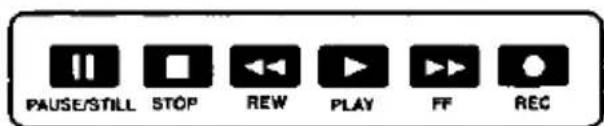
VCR Buttons
4 VCR Buttons
Simultaneously, press PAUSE on both units to begin the copying.
5 Press STOP on both units when copying is completed.
Note
- For technical reasons, dubbing a tape may reduce its quality.
- Press DISPLAY on the Palmcorder remote control (optional, page 72) to eliminate EVF/LCD Monitor indications to be recorded on the tape.
- If the Time Code is displayed in the EVF or LCD monitor, this display cannot be reset.
CAUTION:
Unauthorized exchanging and/or copying of copyrighted recordings may be copyright infringement.
Special Features
Copying from Digital Equipment (dubbing)
High quality digital-to-digital copying can be accomplished if both Palmcorders incorporate the digital in/out IEEE 1394 interface (DV interface cable is not supplied).
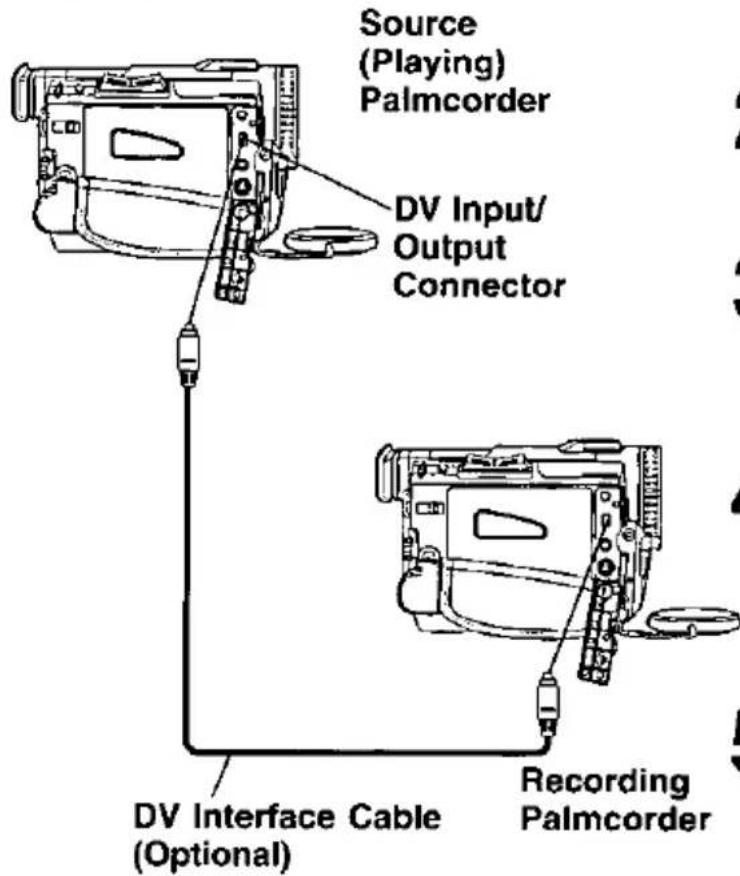
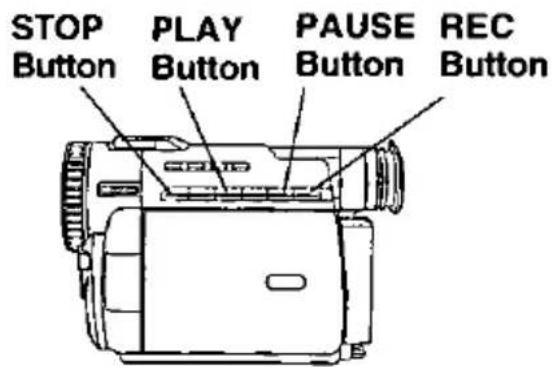
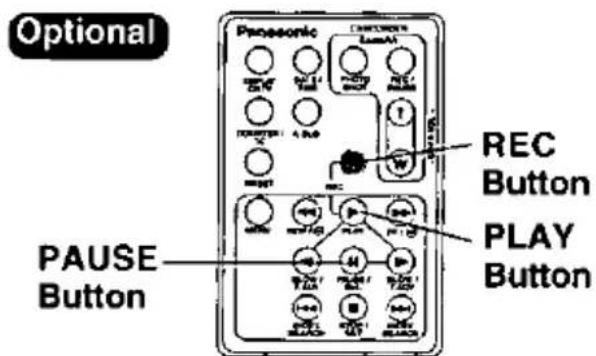
Before you begin...
- Connect both Palmcorders to their power sources.
- Connect the two Palmcorders using the DV interface cable (4-pin to 4-pin).
• Turn both Palmcorders ON.
1 Insert a pre-recorded tape into the source (playing) Palmcorder, and set POWER to VCR.
2 Insert a blank tape with the record tab in place into the target (recording) Palmcorder and set POWER to VCR.
3 Press PLAY on the source Palmcorder. When the tape reaches the point you want to start dubbing, press PAUSE.
4 Hold down REC and press PLAY the target (recording) Palmcorder or remote control (optional, page 72). Press PAUSE to pause the tape at the starting point of the dub.
5 Simultaneously, press PAUSE Buttons on both units to begin the dubbing.
6 Press STOP on recording unit, and then press STOP on playing unit to end dubbing.
Note
- When two Palmcorders are used for dubbing, it is recommended that the remote control VCR1 or VCR2 setting should be should used to avoid mis-operation.
- When two Palmcorders are connected using the DV interface cable (not supplied), a Video Editing Controller cannot be used.
- Do not connect both an S-Video Cable or A/V Cable and a DV Interface Cable.
CAUTION:
Unauthorized exchanging and/or copying of copyrighted recordings may be copyright infringement.
PC Connection with DV Interface Cable (IEEE 1394)
A live image can be transferred directly to your PC (Personal Computer) via a DV Interface Cable (not supplied) using products and software from Digital Origin (formerly Radius) or Canopus.
Using these products allows you to capture live images onto your PC, edit the captured image, etc.
Note:
- For more detailed information, please their web site at: http://www.digitalorigin.com/DVP http://www.justedit.com
- For assistance on Digital Origin products, call 1-800-572-3487 For assistance on Canopus products, call 1-888-868-2533
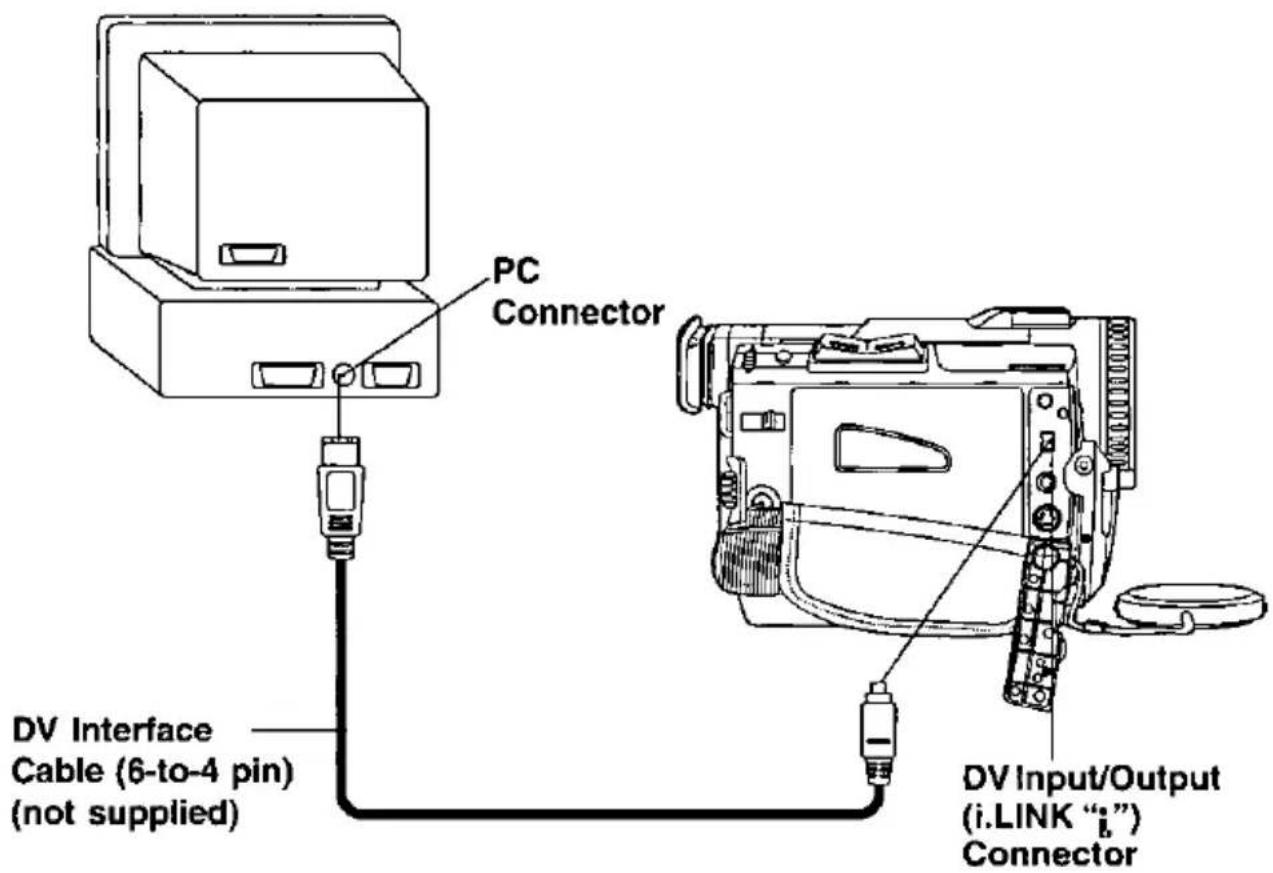
PC Connection
PHOTOVU Link & CARD LINK Driver
An image stored in the DV Tape can be transferred to your PC (Personal Computer).
System Requirements for PHOTOVU LINK & CARD LINK Driver
• IBM PC/AT or compatible.
- Intel® Pentium® Processor
• Microsoft Windows® 95 or Windows® 98
• RAM: 16 MB or more
- 2 MB minimum available hard disk space.
• 256 color monitor (full color recommended).
• 3.5 inch 1.44 MB floppy disk drive (for installation).
- RS-232C serial port (D-Sub 9-pin). An adaptor (D-Sub 9-pin male to a D-Sub female) is required for a D-Sub 25-pin.
- Mouse or other pointing device.
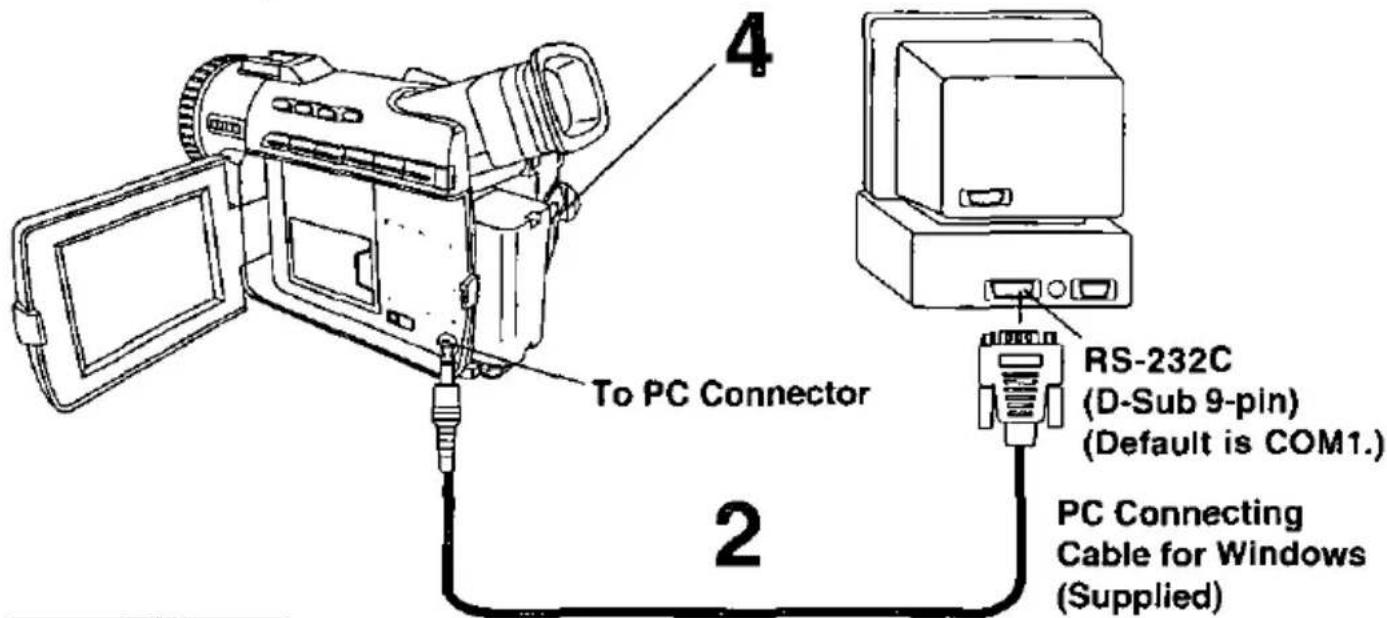
Connection
1 Turn off your PC.
2 Connect the Digital Video Camcorder to your PC (Windows) using the RS-232C PC connecting cable (supplied).
- Before connecting the Palmcorder to the PC, make sure the PC power is off to insure that images are transferred properly.
3 Turn on your PC.
4 Set the Palmcorder POWER to VCR.
Note
- For extended periods of use, it is recommended to use the AC Adaptor as a power source.
- Refer to PC or Windows manual to identify which COM port to be used for connection.
Software Installation (Windows 95/98)
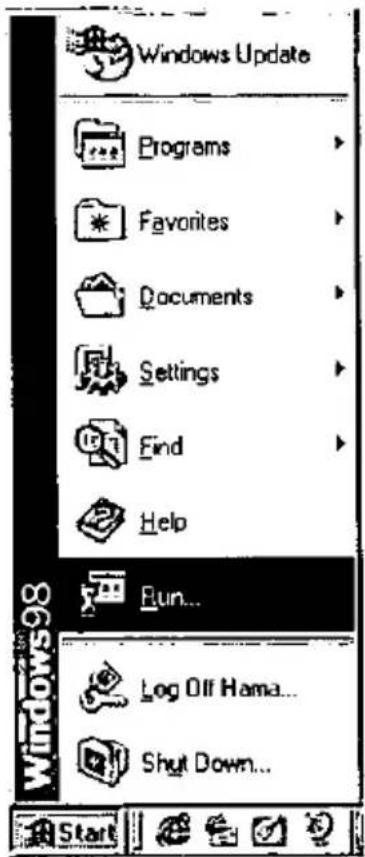
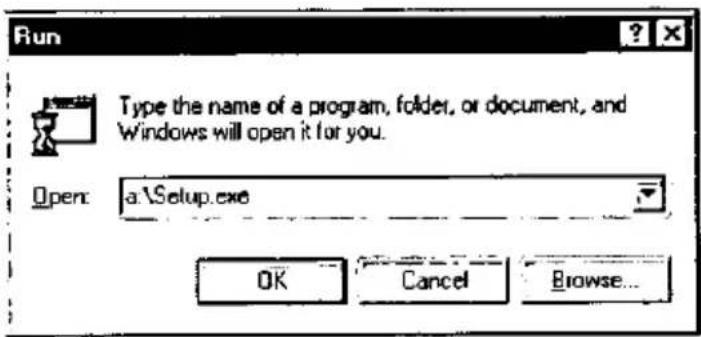
Before you begin...
- Your PC is in the power on mode.
1 Turn on PC (Personal computer) and start up Windows.
2 Insert PHOTOVU LINK & CARD LINK DRIVER Disk (Windows 95/98) into a floppy disk drive.
3 Click on Start, then "Run..."
4 Type in "a:\setup.exe" and click OK.
- If your 3.5 inch floppy disk drive is not "A", use appropriate letter.
5 Follow instructions as they appear on PC screen until the installation is complete.
- Setup window will disappear when the installation is complete.
CARD LINK
CARD LINK: You can transfer images between the MultiMediaCard and a PC.
Running the Software (Windows 95/98)
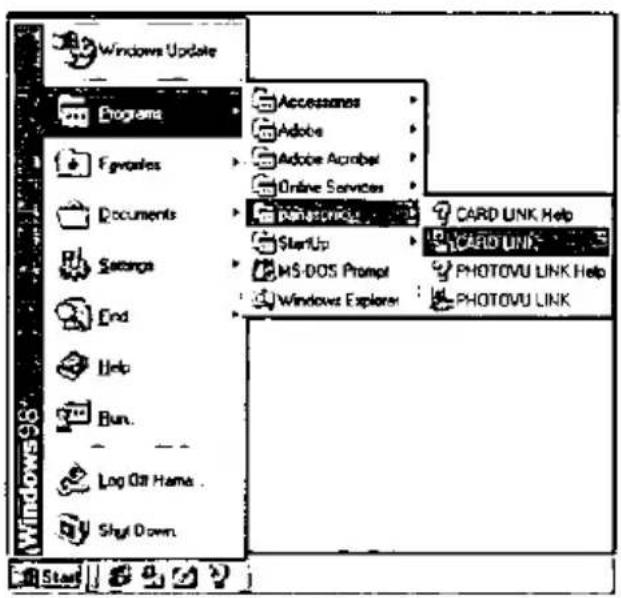
Before you begin...
- Insert the MultiMediaCard (page 9).
- Make Camcorder-PC connections (page 64).
- Turn your PC on.
- Set Camcorder POWER to CAMERA.
- Set TAPE/M-CARD Switch to M-CARD (page 9).
1 Click on Start, "Programs", "panasonic", then "CARD LINK".
2 "CARD LINK" is opened.
Note
• COM Port and Baudrate are automatically selected.
Refer to Help for information about application operations and other Error messages.
Using MultiMediaCard Image Data
Pictures captured with Camcorder can be transferred to your PC.
Before you begin...
- Insert the MultiMediaCard (page 9).
• Make Camcorder-PC connections (page 64). - Turn your PC on.
- Set Camcorder POWER to CAMERA.
- Set TAPE/M-CARD Switch to M-CARD (page 9).
1 Repeat step 1 and 2 on page 66 to run the Software.
2 "Preview Window" screen appears automatically.
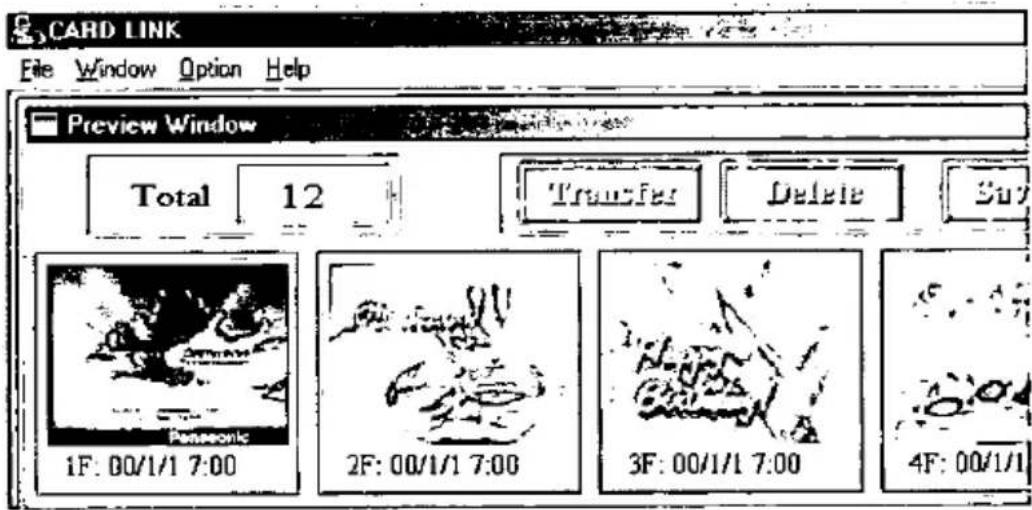
Note
- If, while transferring the image to your PC, the displayed picture appears abnormal, restart the PC application and turn Camcorder POWER off, and then back on.
3 Select the image data you want to transfer to your PC.
- The selected image will be under lined in green.
4 Click on:
Transfer
• The picture image is transferred to your PC and displayed. Transfer Dialog will appear on the PC. The image is captured when the full screen image appears on the PC.
Delete
- Confirmation Dialog will appear on the PC. Click "OK". A image of the MultiMediaCard is deleted.
Save
- The picture image is transferred to your PC and displayed. Save window appears. [File Save] dialog box appears.
CARD LINK
Using PC Image Data
You can use JPEG or Bitmap files for Photo Title (page 48) from your computer by transferring them to the Camcorder via PC connection.
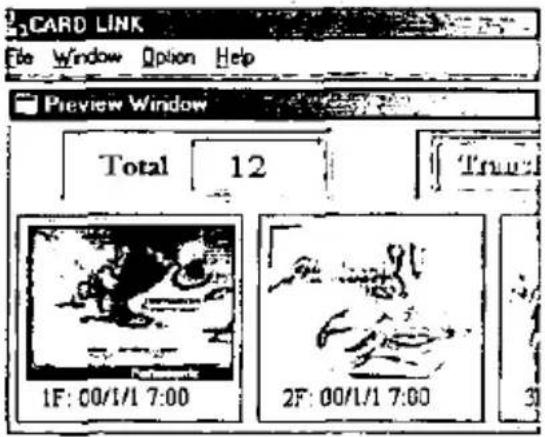
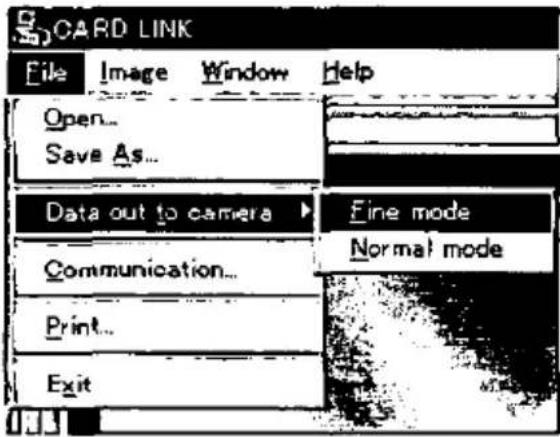
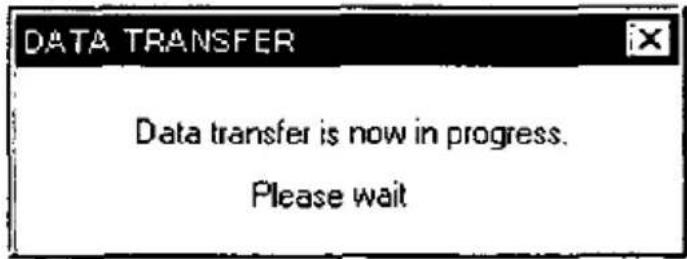
Before you begin...
- Insert the MultiMediaCard (page 9).
- Make Camcorder-PC connections (page 64).
- Turn your PC on.
- Set Camcorder POWER to CAMERA.
- Set TAPE/M-CARD Switch to M-CARD (page 9).
1 Repeat step 1 and 2 on page 66 to run the Software.
2 "Preview window" screen appears automatically.
3 Click on "File", then Click on "Open".
- At your computer, please select and open the data (.jpg or .bmp) you want to transfer to the Camcorder.
4 Click on "File", then select "Data out to camera", then select Fine or Normal mode.
• DATA TRANSFER screen appears.
- Your computer image data is transferred to the Camcorder.
PHOTOVU LINK: You can transfer images from your Camcorder tape to a PC.
Running the Software (Windows 95/98)
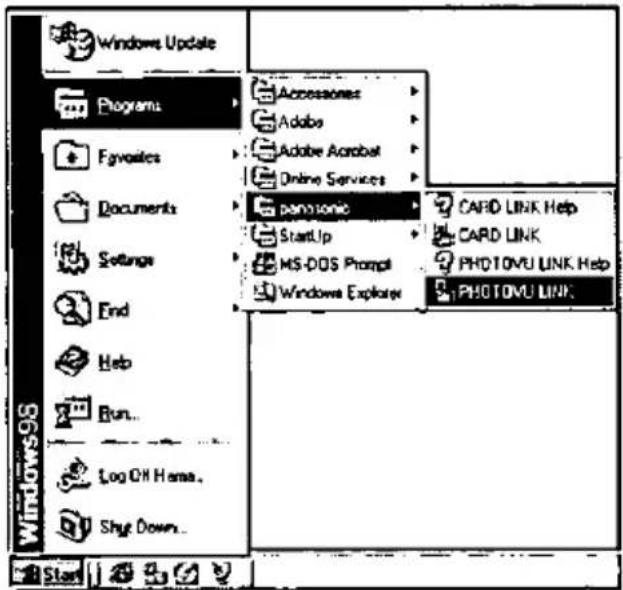
Before you begin...
- Insert the Tape (page 8).
- Make Camcorder-PC connections (page 64).
- Turn your PC on.
- Set Camcorder POWER to VCR.
- Set TAPE/M-CARD Switch to Tape (page 8).
1 Click on Start, "Programs", "panasonic", then "PHOTOVU LINK".
2 "PHOTOVU LINK" is opened.
Note
• COM Port and Baudrate are automatically selected.
Refer to Help for information about application operations and other Error messages.
PHOTOVU LINK
Using Tape Image Data
An image stored in the DV Tape can be transferred directly to your PC via an RS-232C connection.
Before you begin...
- Insert the Tape (page 8).
- Make Camcorder-PC connections (page 64).
- Turn your PC on.
- Set Camcorder POWER to VCR.
- Set TAPE/M-CARD Switch to Tape (page 8).
1 Repeat step 1 and 2 on page 69 to run the Software.
2 "Preview Window" screen appears.
3 Search and Select a video footage or a scene you want to transfer to your PC using VCR Operation Buttons on the "Preview window" screen. Then click on "Transfer" to transfer selected image from camcorder to "Preview Window" in PLAY or STILL mode.
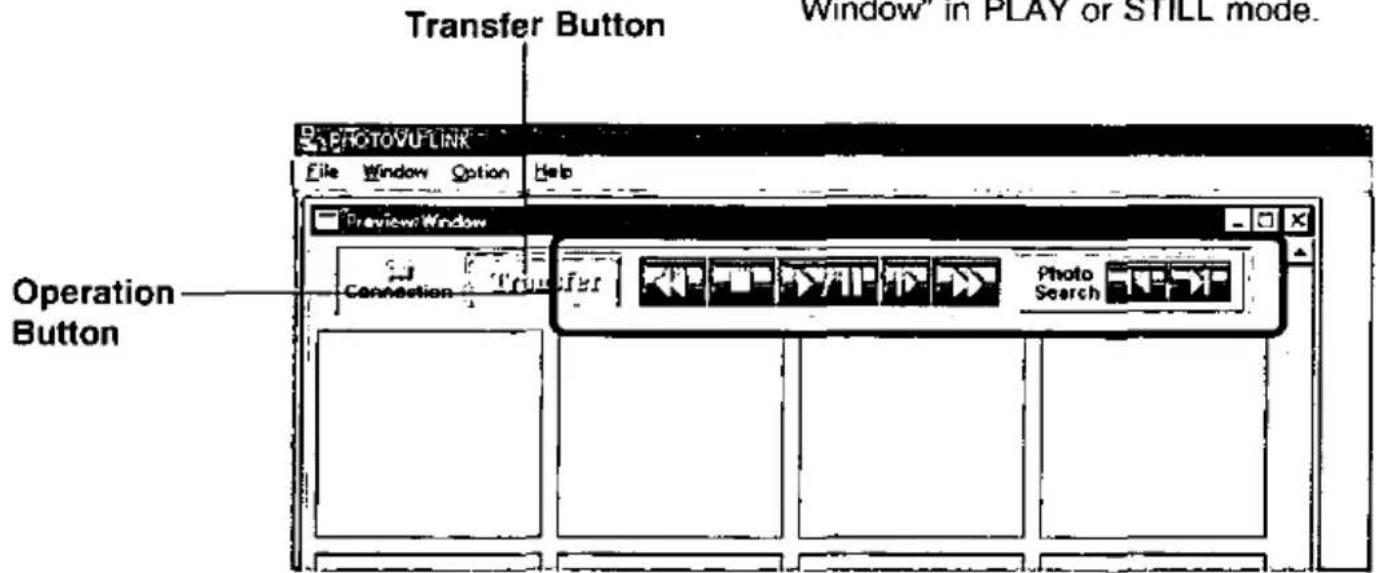
4 Save Transferred image to PC. Click on "File" then "Save As".
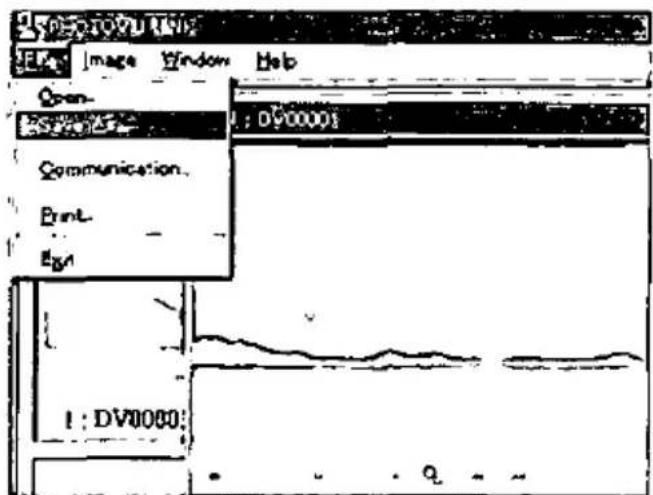
Note
- If, while transferring the image to your PC, the displayed picture appears abnormal, close PHOTOVU LINK and turn Camcorder POWER off, and reset PHOTOVU LINK, and turn Camcorder Power ON.
- Photo Search may fail to detect a recorded PhotoShot image if the image is 3 seconds or less.
Using the Digital Photo Printer
You can print out images by using a digital Photo Printer (Optional).
Before you begin...
- Connect both Palmcorder and Digital Photo Printer to their power sources.
- Connect the Palmcorder and Digital Photo Printer using a A/V cable (supplied) or S-Video Cable (not supplied).
- Connect the Digital Photo Printer and your TV using a Video cable (not supplied) and turn the TV on.
- If different video sources are connected simultaneously to the S-VIDEO IN Socket and the VIDEO IN Socket, the video for S-VIDEO IN Socket takes precedence.
- To listen to sound from the Palmcorder, connect the audio output from the Palmcorder directly to the television AUDIO IN socket.
- Please refer to the printer's operating instructions for detail on printing.
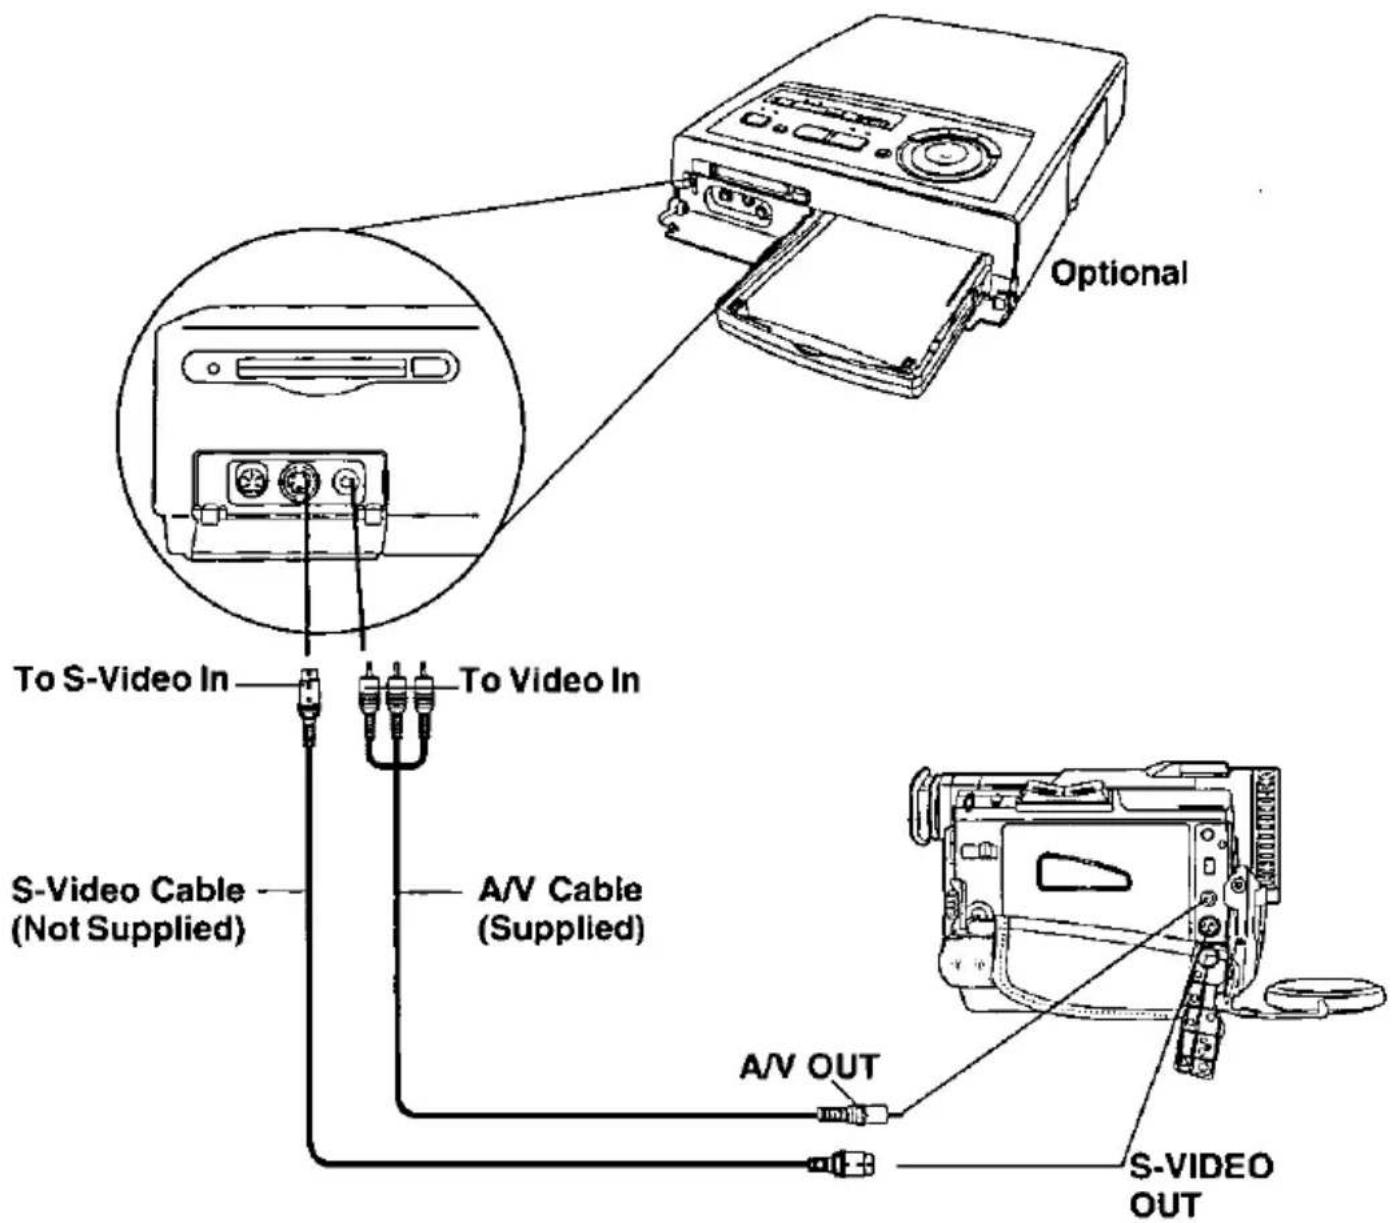
Palmcorder Accessory System
| Accessory # | Figure | Description | Price |
| PV-DAC10 | 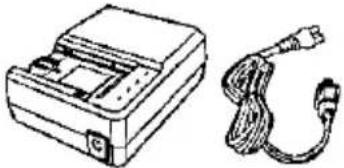  | AC Adaptor with AC Cable and DC Cable | 140.00 |
| CGR-D120A/1B (Same as PV-DBP8/DBP8A) |  | 800mAh / 1 h 15 min Battery Pack | 60.00 |
| CGR-D220A/1B (Same as PV-DBP9/DBP9A) |  | 1600mAh / 2 h 50 min Battery Pack | 100.00 |
| CGR-D815A/1B | 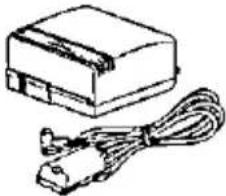 | 5300mAh / 9 h Battery Pack | 200.00 |
| PV-DDC9 | 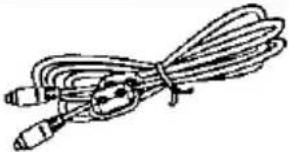 | DV Interface Cable (4-pin to 4-pin) | 45.00 |
| PV-DLT9 |  | Color Enhancement Light | 39.95 |
| PV-DRC9 |  | IR Remote Control | 29.95 |
| PV-PD2100 | 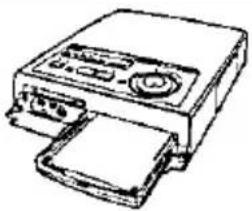 | Digital Video Printer | 599.95 |
Palmcorder Accessory Order Form
Please photocopy this form when placing an order.
- Palmcorder Model # ____
- Items Ordered
| Accessory # | Description | Price Each | Quantity | Total Price |
| Subtotal | ||||
| Your State & Local Sales Tax | ||||
| Shipping & Handling | 5.00 | |||
| Total Enclosed | ||||
- Method of payment (check one)
☐ Check of Money Order enclosed (NO C.O.D.SHIPMENTS)
□ VISA Credit Card # ____
□ MasterCard Expiration Date ____
□ Discover Customer Signature ____
Make Check or Money Order to: MATSUSHITA ACCESSORIES
(Please do not send cash)
- Shipping information (UPS delivery requires complete street address)
Ship To:
Mr.
Mrs.
Ms
First Last
Street Address
City State Zip
Phone #:
Day ( )
Night ( )
TO OBTAIN ANY OF OUR OMNIMOVIE/PALMCORDER ACCESSORIES YOU CAN DO ANY OF THE FOLLOWING:
VISIT YOUR LOCAL PANASONIC DEALER
OR
CALL PANASONIC'S ACCESSORY ORDER LINE AT 1-800-332-5368
[6 AM-5 PM M-F, 6 AM-10:30 AM SAT, PACIFIC TIME]
OR
MAIL THIS ORDER TO: PANASONIC SERVICES COMPANY ACCESSORY ORDER OFFICE
20421 84th Avenue South Kent, WA. 98032
Notes On Operations
Cleaning EVF (Electronic Viewfinder)
PV-DV200
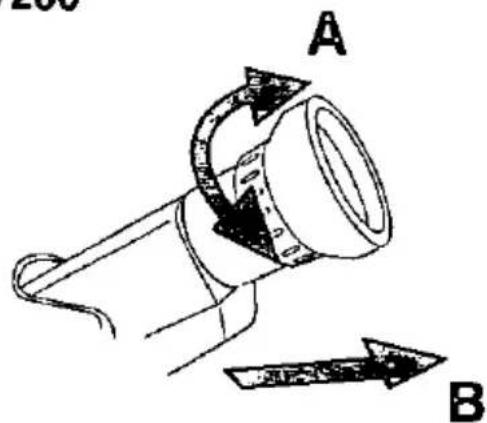
1 Turn the Eyepiece counterclockwise 1/8 of a turn.
2 Pull the Eyepiece free. Remove any lint or dust particles with a soft clean cloth being careful not to scratch the glass surfaces.
3 To re-install the Eyepiece Line up the marks on the Eyepiece with the grooves inside the EVF shaft and attach. Turn it clockwise 1/8 of a turn to lock in place.
PV-DV400
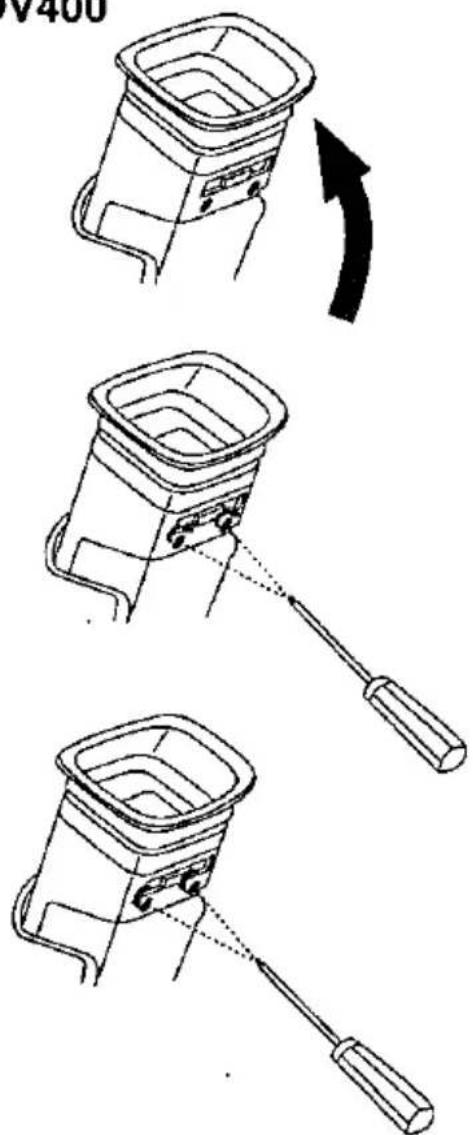
1 Slide the Viewfinder backward to its fully expanded position and then tilt it upward.
2 Remove the EVF Eyepiece 2 screws with a screwdriver (+).
3 Turn the Eyepiece counterclockwise 1/8 of a turn.
4 Pull the Eyepiece free. Remove any lint or dust particles with a soft clean cloth being careful not to scratch the glass surfaces.
5 To re-install the Eyepiece Line up the marks on the Eyepiece with the grooves inside the EVF shaft and attach. Turn it clockwise 1/8 of a turn to lock in place.
6 Replace the EVF Eyepiece screws and tighten with a screwdriver.
- If you lose EVF Eyepiece screw, order Part No.XQN2+BV4FXK for replacement.
Rough Values of Brightness
Your Palmcorder has been designed for normal scene illumination of 150 footcandles (1500 lx). However, the Palmcorder may be used at F1:1.6, if illumination is more than 0.5 footcandles (5 lx).
The table below shows the color temperature for reference.
| PALMCORDER SETTINGS | NATURALIGHT CONDITIONS | KELVINCOLOR TEMPERATURE | ARTIFICIAL LIGHT SOURCE | COLORINT MIXTURE |
| (Amber Filter Range) | ·Fair weather, blue sky | 10,000 | ·Color television | Bluish |
| ·Slightly cloudy sky | 8,000 | |||
| ·Cloudy or rainy sky | 7,000 | |||
| 6,500 | ·Fluorescent lamp (Daylight) | |||
| ·Sunlight in clear weather at midday | 6,000 | ·Camera flash bulb | ||
| 5,500 | ||||
| ·Average sunlight in clear weather | 5,000 | ·Blue lamp for photography | ||
| ·Sunlight 2 hours after sunrise and before sunset | 4,500 | ·Fluorescent lamp (White) | Whitish | |
| 4,000 | ·Normal flash bulb | |||
| 3,500 | ·Fluorescent lamp (Off-white) | |||
| ·Sunlight 40 min. after sunrise and before sunset | 3,200 | ·Tungsten lamp for photography | ||
| ·Halogen lamp | ||||
| ·Sunlight 30 min. after sunrise and before sunset | 2,800 | ·Iodine lamp | ||
| ·Sunlight 20 min. after sunrise and before sunset | ·Tungsten lamp | Yellowish | ||
| ·Acetylene lamp | ||||
| ·Kerosene lamp | ||||
| 2,000 | ·Candlelight | Reddish |
Specifications
| Power Source: | Digital Video Camera: 7.2 V DC (Battery)7.8 V DC (AC Adaptor)AC Adaptor: 110/120/220/240 V AC, 50/60 HzBattery: Lithium-Ion Type DC 7.2 V |
| Power Consumption: | Digital Video Camera: 7.2 V DC 6.5 W (Max. 9.5 W)AC Adaptor: 18 W1 W (when not in use.) |
| Video Signal: | EIA Standard (525 lines, 60 fields) NTSC color signal |
| Video Recording System: | 2 rotary heads. helical scanning system |
| Audio: | 12 bit (32kHz) 4 tracks16 bit (48kHz) 2 tracks |
| Pick-Up System and Device: | One integral color filter Charge Coupled Device (CCD) |
| Lens: | 18:1 zoom lens, F1:1.6 with auto iris controlFocal length: 3.9 mm - 70.2 mmPower zoom functionLens filter diameter: 49 mm |
| Viewfinder: | 0.4 inch (10.2 mm) Electronic Viewfinder (PV-DV200)0.44 inch (11.2 mm) Liquid Crystal Electronic Viewfinder (PV-DV400) |
| LCD Monitor: | 2.5 inch (63.5 mm) Liquid Crystal Display (PV-DV200)3.0 inch (76.2 mm) Liquid Crystal Display (PV-DV400) |
| Minimum Illumination Required: | 5 lx (F1:1.6) 0.5 footcandles0 lx (IR Filter ON) (PV-DV400 only) |
| Operating Temperature: | 32 °F~104 °F (0 °C~40 °C) |
| Operating Humidity: | 10 %-75 % |
| Weight: | Digital Video Camera:(PV-DV200) 1.57 lbs.0.71 kg(PV-DV400) 1.5 lbs.0.68 kgAC Adaptor: 0.4 lbs.0.18 kg |
| Dimensions: | Digital Video Camera:(PV-DV200) 3-3/8 (W) x 4-1/4 (H) x 7-3/8 (D) inch85 (W) x 107.5 (H) x 188 (D) mm(PV-DV400) 3-3/8 (W) x 4-1/4 (H) x 6-3/8 (D) inch85 (W) x 107.5 (H) x 163 (D) mmAC Adaptor: 4 (W) x 1-5/8 (H) x 3-1/8 (D) inch103 (W) x 40 (H) x 79 (D) mm |
Weight and dimensions shown are approximate.
Designs and specifications are subject to change without notice.
Before Requesting Service
Cleaning Care for Video Heads
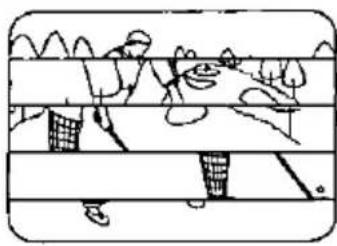
natural_image
Simple line drawing of a person sitting on a bench with baskets, surrounded by trees (no text or symbols)Clogged Video
Head
(a) Video Head Cleaning: Normally, your Palmcorder will not require head cleaning. However, it is possible that the heads may become clogged due to dust in the air, damaged tape, long term use, etc. If "NEED HEAD CLEANING" appears for 5 seconds in the EVF or LCD monitor, the heads may require cleaning.
(b) Cleaning the Heads: It is recommended that head cleaning be performed by a qualified service technician. Please contact your nearest Panasonic Service Center. An alternate solution is to obtain a head cleaning cassette. Please use Panasonic cleaning cassette (AY-DVMCL). Be sure to follow the cleaning instructions carefully. Excessive use of the cleaning cassette could shorten head life.
Use this cassette only when a head clogging symptom occurs.
Refer servicing to qualified service personnel.
Caution for Tape Operations
- When you go from function to function (PLAY, FF, REW etc.), please note that the unit will not accept a new function operation until the previous operation is complete.
- The POWER Button, and all function buttons, (PLAY, FF, REW, etc.) are only operational after the tape has been completely loaded.
Lens Hood Area Operation Caution
- With a Wide or Telephoto Conversion Lens (optional) attached, the four corners of the screen may darken when zoom is set to maximum wide angle.
- Attaching the lens hood, a Wide or Telephoto conversion lens (optional), etc. after a filter (optional) has been attached, the four corners of the screen may darken when zoom is set to maximum wide angle.
- With two filters (optional) attached, the four corners of the screen may darken when zoom is set to maximum wide angle.
Self Diagnostic System
If any of the following numbers appear on-screen, the camcorder may have a problem. Do not remove the battery (if attached) and write down the displayed number on page 79. Then, take the camcorder to a service center for repair.
| Error No. | Description |
| U11 | Card Error |
| U12 | Card Error |
| U13 | Card Error |
| U14 | Card/Camcorder Dialogue Error |
| U15 | No Card Memory |
| U16 | Captured image limit exceeded |
| U17 | Captured image limit exceeded |
| U30 | Error other than above |
Before Requesting Service
If you have a problem with your Palmcorder, it may be something you can correct yourself. Check the list below for symptoms and corrections.
| Symptom | Correction |
| No picture in the EVF or LCD Monitor ... | Make sure the Power Source is connected. (pp. 12, 13)Make sure the POWER switch is set to ON. (pp. 30, 35)Check the Dew Indicator. (p. 29)Make sure the battery is fully charged. (p. 11)Make sure all necessary cables are connected correctly and firmly. (p. 13) |
| Video cassette can't be inserted ... | Make sure the Lens Cap is removed. (p. 30)Make sure the Power Source is connected. (pp. 12, 13) |
| Video cassette can't be removed ... | Insert the cassette with the window side facing up. (p. 8) |
| No operation starts when operation buttons are pressed ... | Make sure the Power Source is connected. (pp. 12, 13) |
| Recording cannot be done ... | Check the Dew Indicator. (p. 29)Make sure the record tab is closed. (p. 15)Check the Battery Indicator. (p. 26) |
| Auto Focus does not operate ... | Make sure the FOCUS is set to AUTO. (p. 56)Make sure the unit is ON with CAMERA mode. (p. 30) |
| Sound from microphone can't be monitored ... | Make sure the unit is set to REC or Record/Pause mode. |
| Sound can't be heard ... | Make sure the Audio on the VCR MENU is set to ST1. (pp. 25, 60) |
Request for Service Notice
Please photocopy this form when making a request for service notice.
Request for Service Notice:
In the unlikely event this product needs service.
- Please include your proof of purchase. (Failure to due so will delay your repair.)
• To further speed your repair please provide an explanation of what is wrong with the unit and any symptom it is exhibiting.
Mail this completed form and your Proof of Purchase along with your unit to:
Panasonic Services Company
1705 N. Randall Road
Elgin, IL. 60123-7847
Attn: Camcorder Repair
Please write the displayed Self Diagnostic number here. (page 77)

Index of Controls
Front View
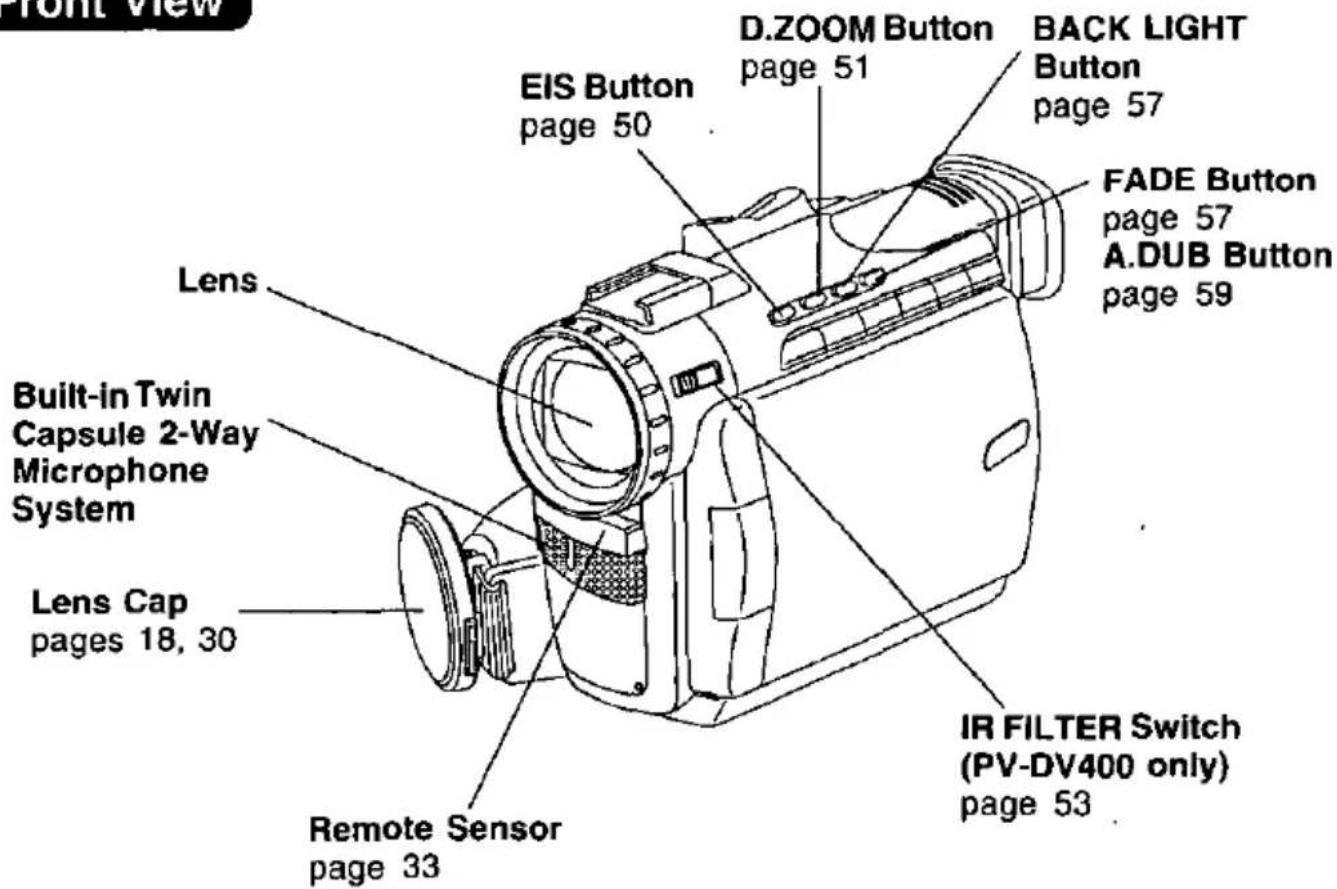
Side View
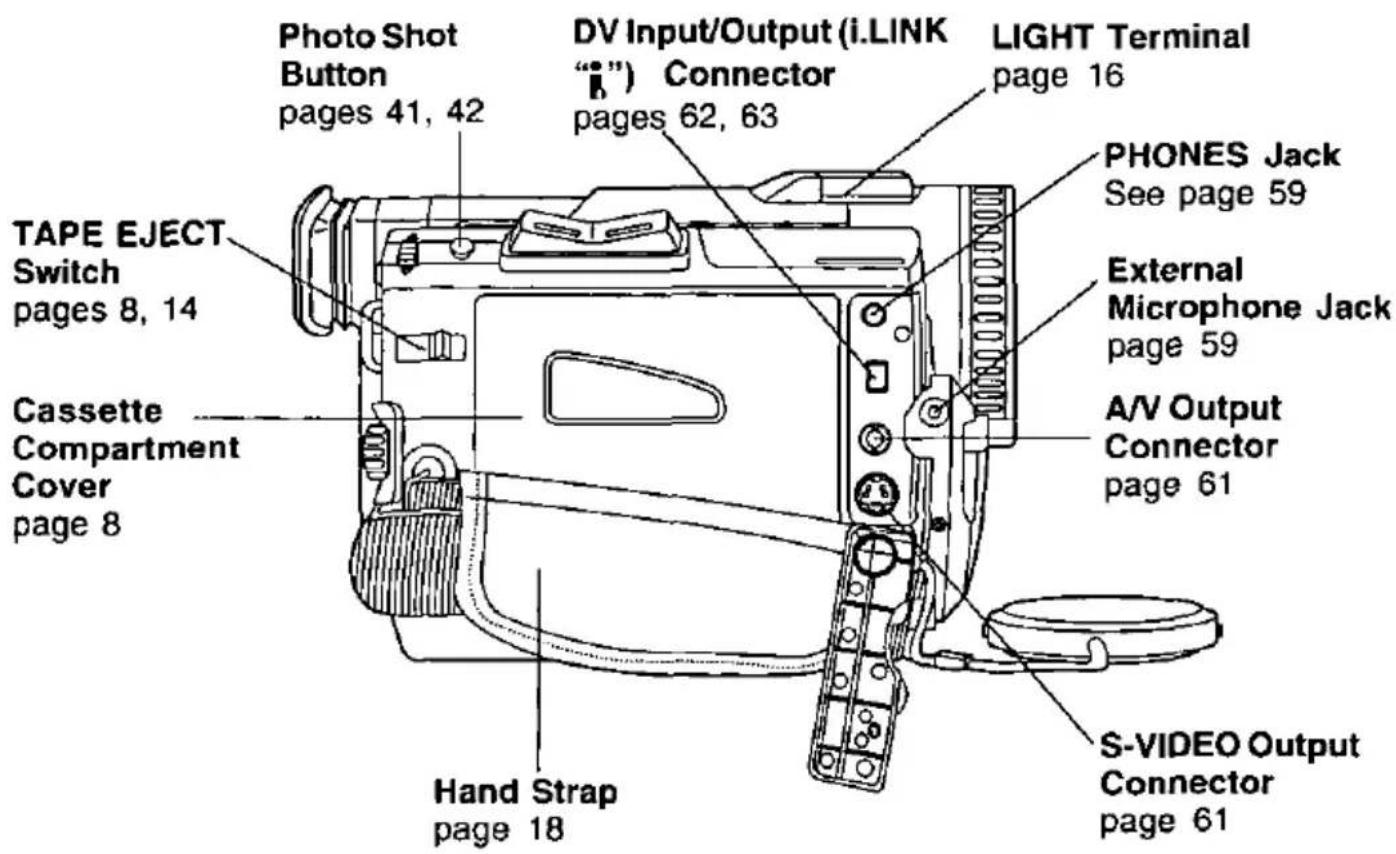
Rear View
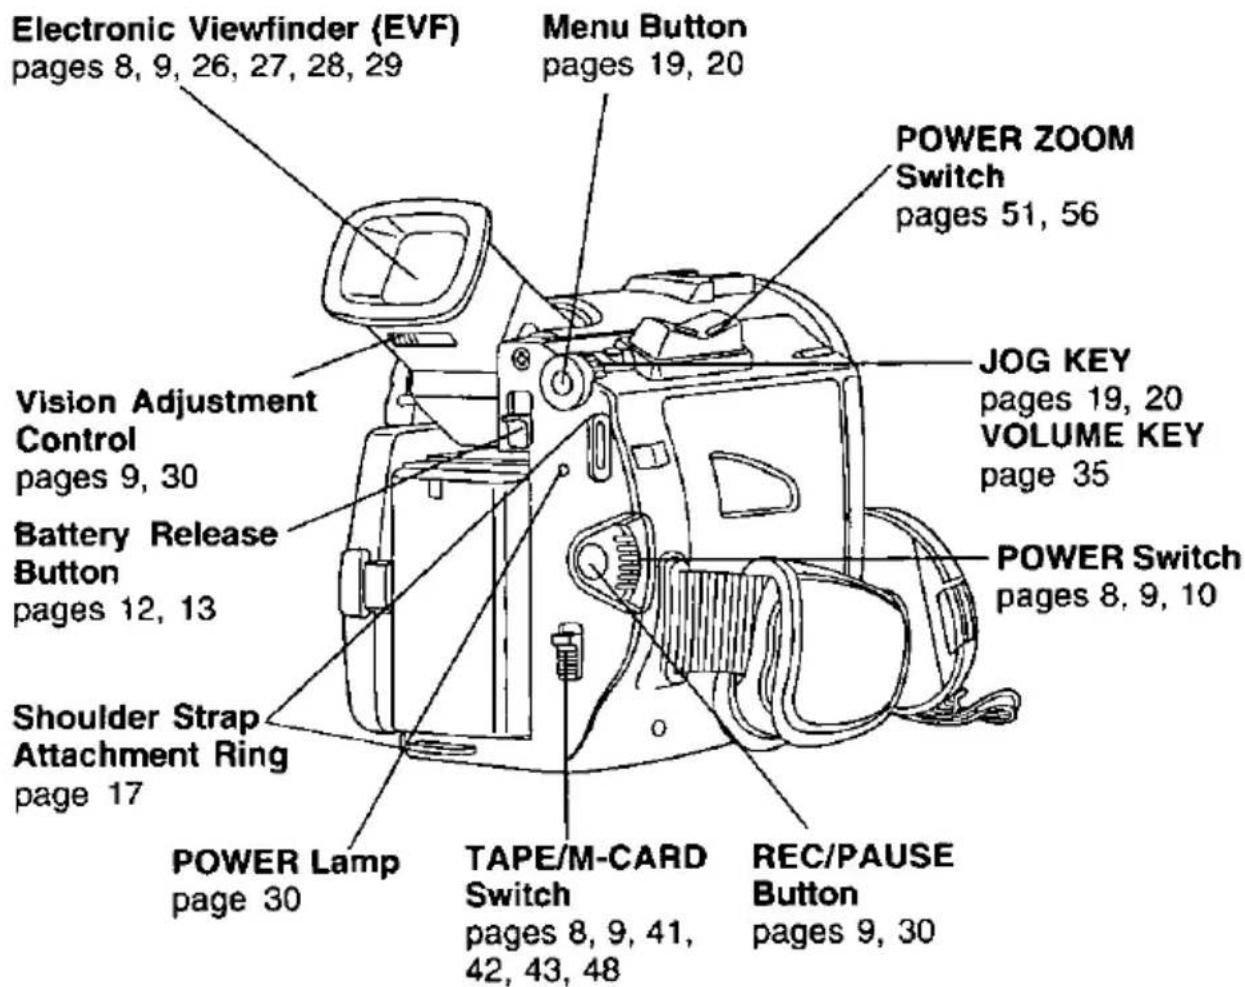
Rear View
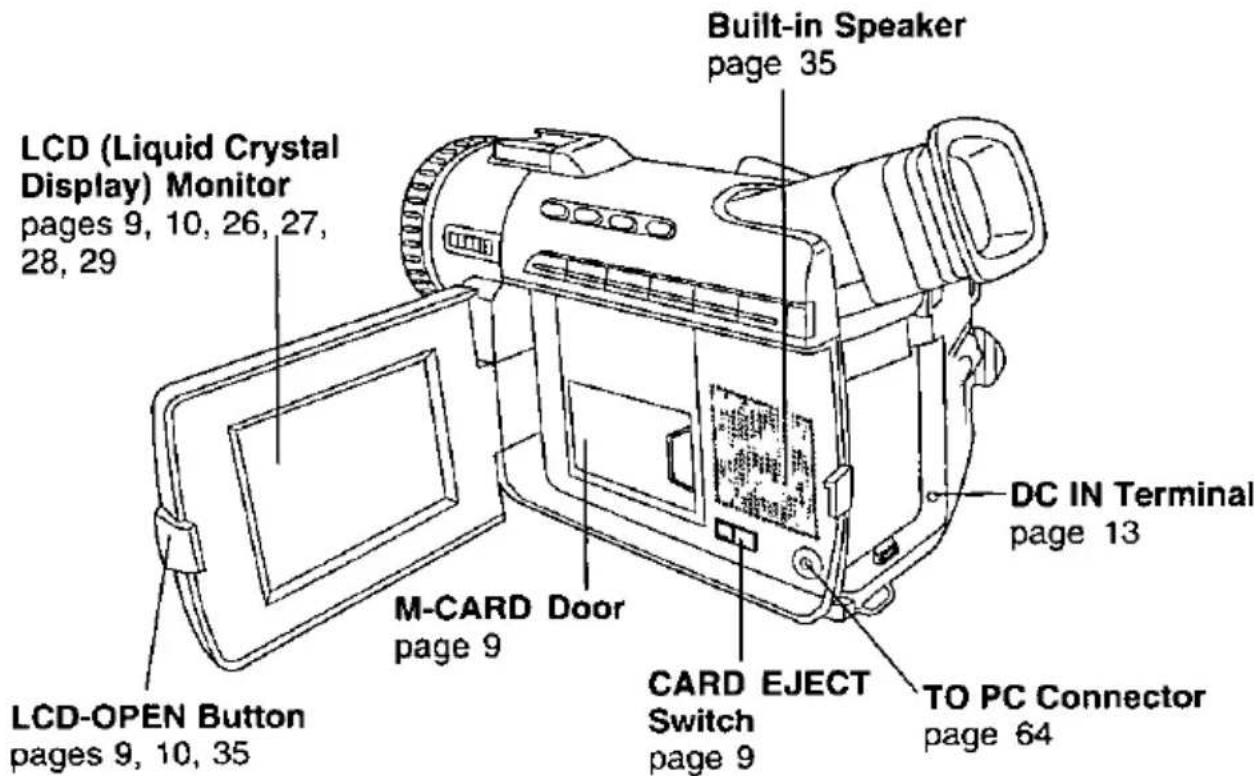
Index of Controls
Side View
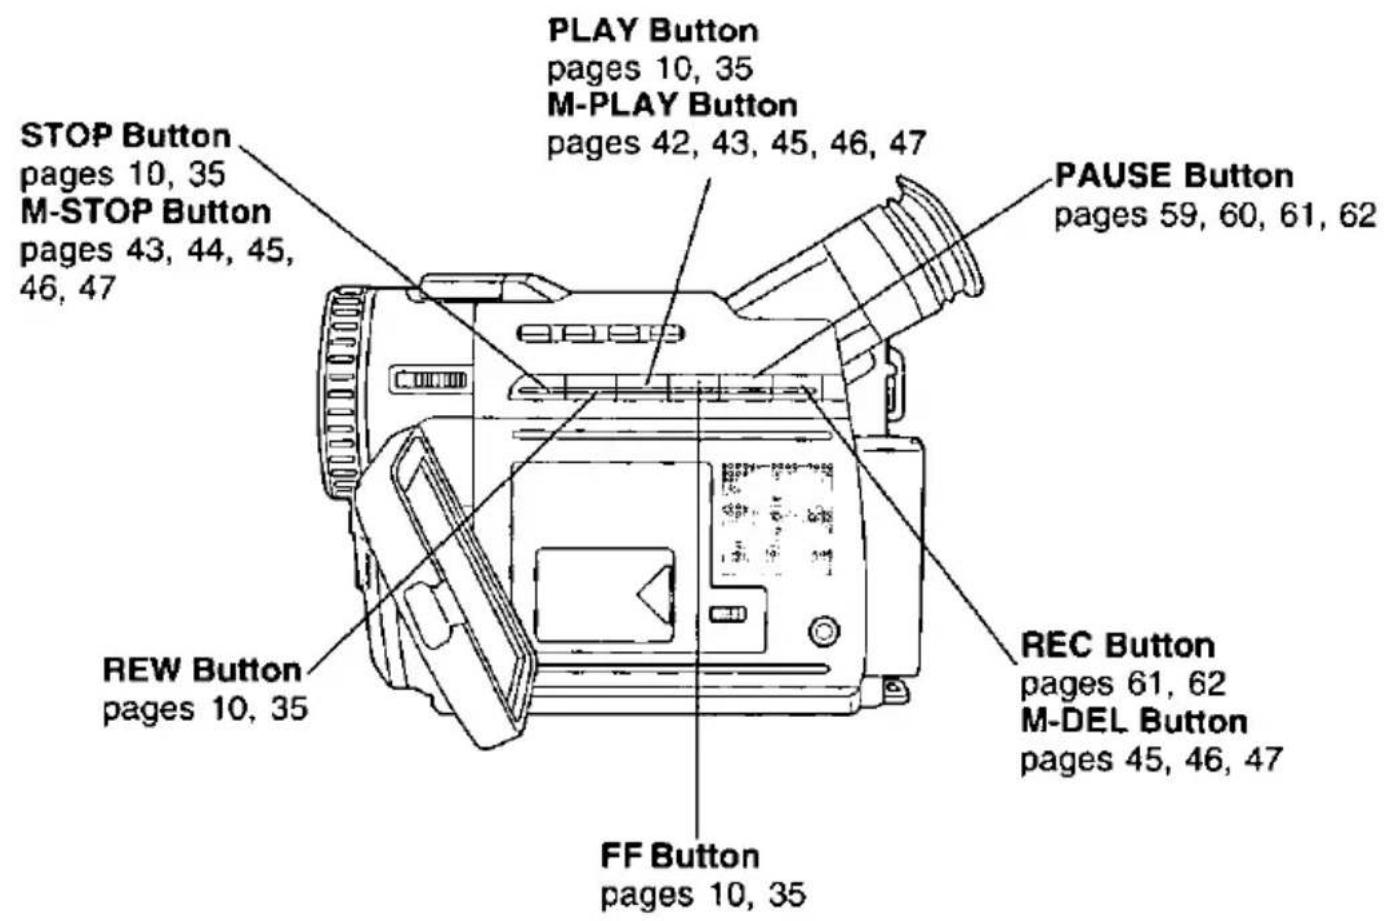
Underside View
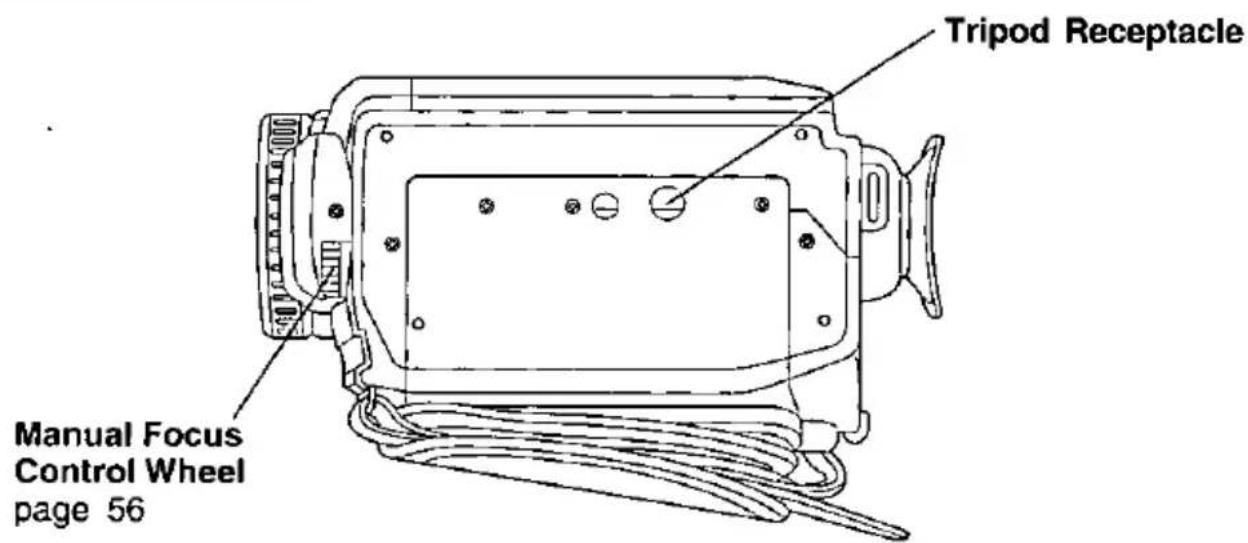
Color Enhancement Light
natural_image
Simple line drawing of a portable electronic device with ventilation slots and buttons (no text or symbols)LIGHT RELEASE Button
page 16
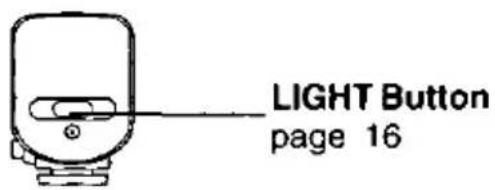
AC Adaptor
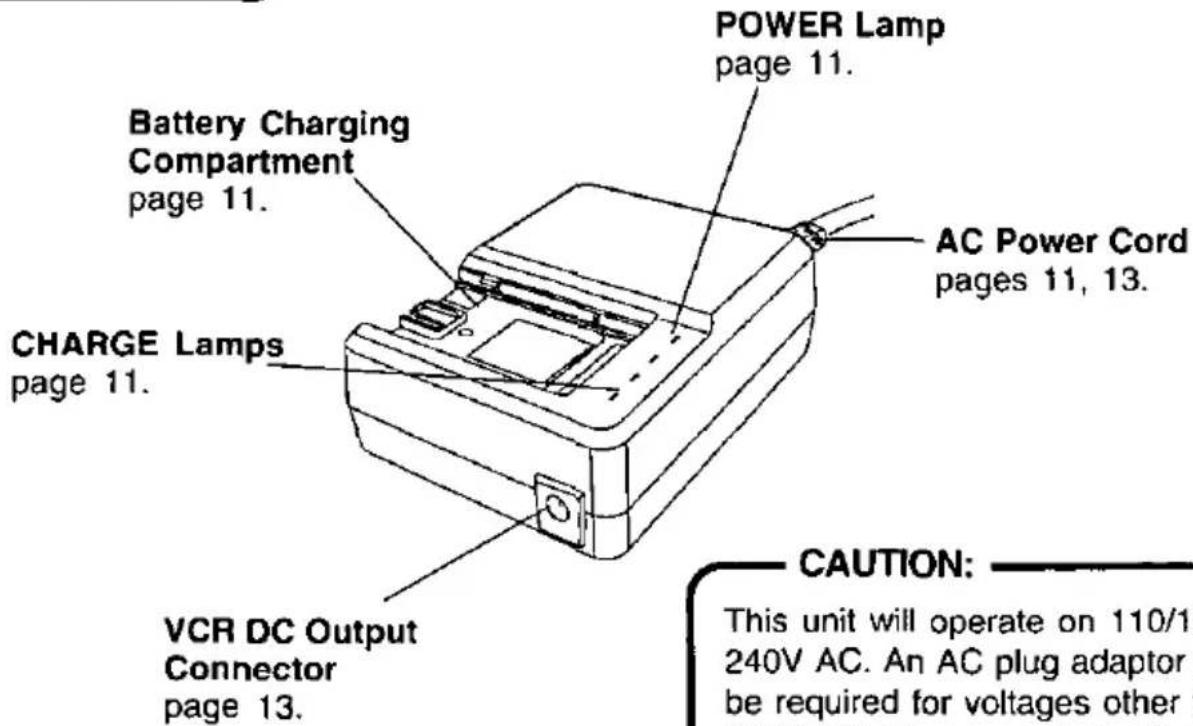
CAUTION:
This unit will operate on 110/120/220/240V AC. An AC plug adaptor may be required for voltages other than 120V AC. Please contact either a local or foreign electrical parts distributor for assistance in selecting an alternate AC plug.
We recommend using the accessory power plug adaptor (VJSS0070) in an area which has special AC outlets.
Index of Controls
Remote Control (Optional)
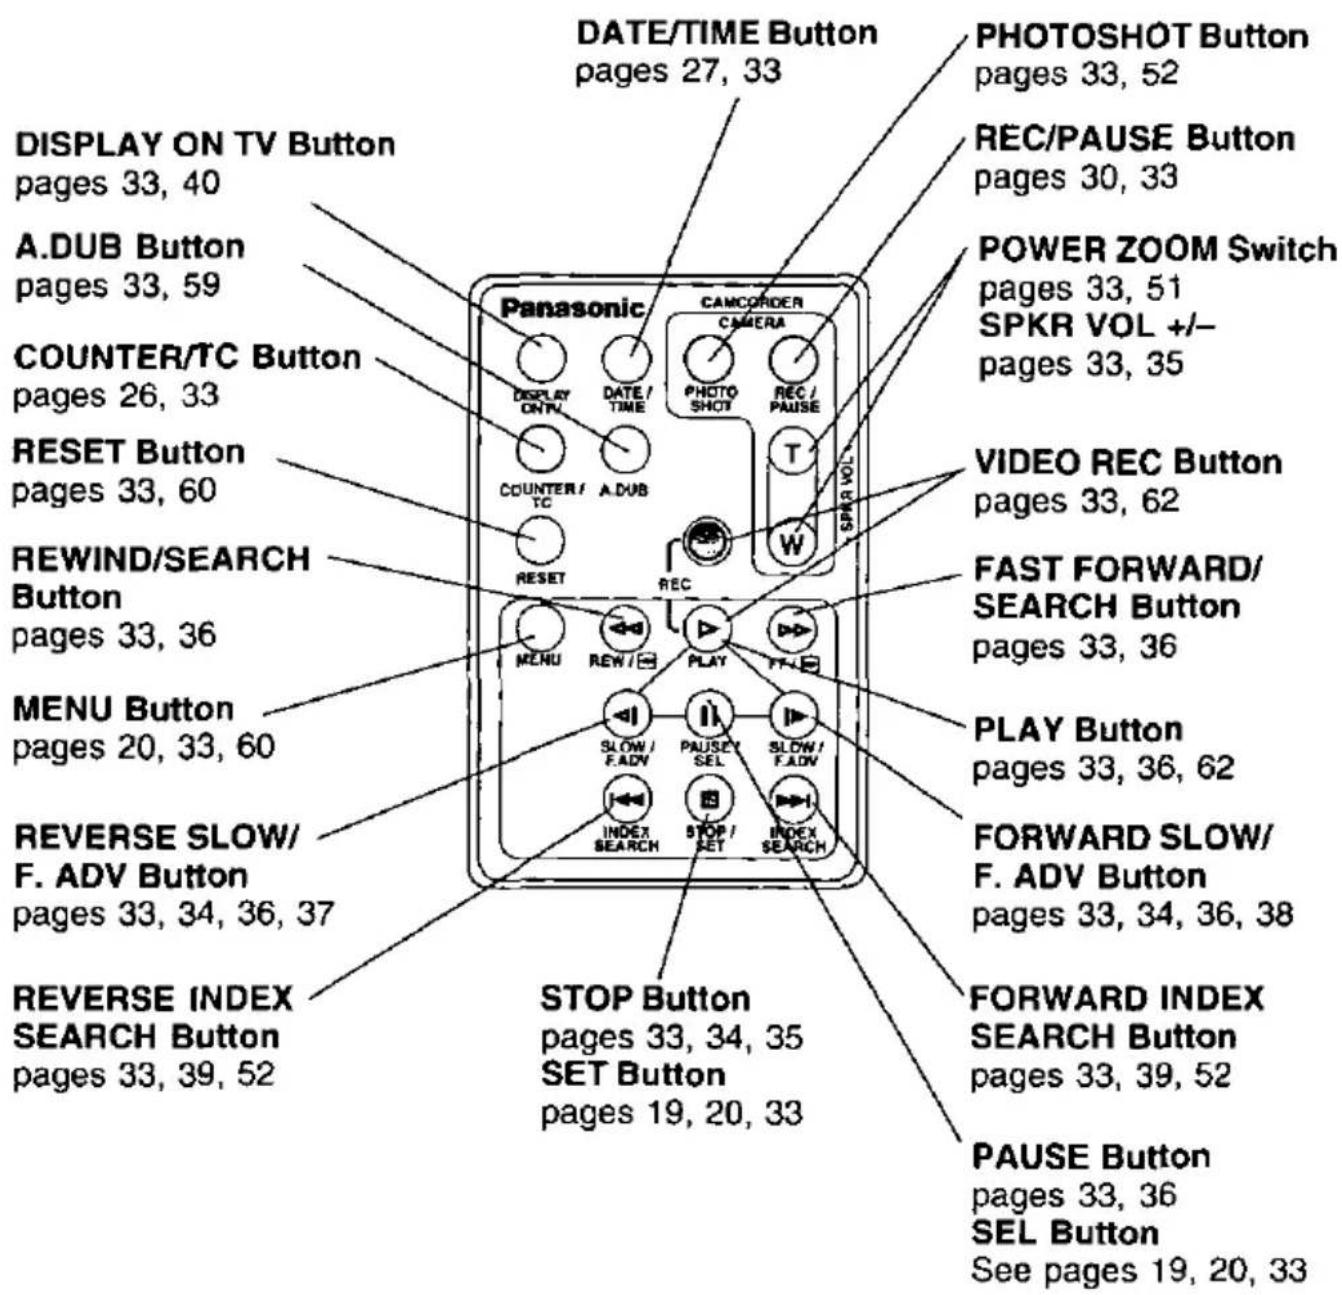
Panasonic Consumer Electronics Company, Division of Matsushita Electric Corporation of America One Panasonic Way Secaucus, New Jersey 07094
Panasonic Sales Company, Division of Matsushita Electric of Puerto Rico, Inc. Ave. 65 de Infantería. Km. 9.5 San Gabriel Industrial Park, Carolina, Puerto Rico 00985
PANASONIC/QUASAR Video Products Limited Warranty
Panasonic Consumer Electronics Company or Panasonic Sales Company (collectively referred to as "the Warrantor") will repair this product with new or refurbished parts, free of charge, in the USA or Puerto Rico, in the event of a defect in materials or workmanship as follows (all time periods commence from the date of the original purchase):
| PRODUCT | PARTS | LABOR |
| CAMCORDER | ONE (1) YEAR, EXCEPT CCD IMAGE SENSORCCD IMAGE SENSOR - SIX (6) MONTHS | NINETY (90) DAYSNINETY (90) DAYS |
| VCR | ONE (1) YEAR | NINETY (90) DAYS |
| A/V MIXER | ONE (1) YEAR | NINETY (90) DAYS |
| MONITOR-VCR | ONE (1) YEAR, EXCEPT CRTCRT - TWO (2) YEARS | NINETY (90) DAYSCRT- NINETY (90) DAYSCUSTOMER PAYS ALLLABOR CHARGESAFTER 90 DAYS |
Monitor-VCR In-home or carry-in Service: 22" (diagonal) CRT / LCD and Larger Monitor-VCR Carry-in Service: 21" (diagonal) CRT / LCD and smaller
Batteries (if included) - New rechargeable batteries in exchange for defective rechargeable batteries for ten (10) days. Non-rechargeable batteries are not warranted.
Tape (if included) - New video cassette tape in exchange for a defective video cassette tape for five (5) days.
In-home, carry-in or mail-in service, as applicable, in the USA can be obtained during the warranty period by contacting a Panasonic Services Company (PASC) Factory Service Center listed in the Service Directory. Or call toll free 1-800-211-PANA(7262), to locate an authorized PASC Service Center. Carry-in or mail-in service in Puerto Rico can be obtained during the warranty period by calling the Panasonic Sales Company telephone number listed in the Service Center Directory. This warranty is extended only to the original purchaser. A purchase receipt or other proof of the date of the original purchase is required before warranty service is rendered.
This warranty only covers failures due to defects in materials and workmanship which occur during normal use and does not cover normal maintenance, including, but not limited to, video and audio head cleaning. The warranty does not cover damage which occurs in shipment, or failures which are caused products not supplied by the warrantor, or failures which result from accident, misuse, abuse, neglect, mishandling, misapplication, alteration, modification, faulty installation, set-up adjustments, improper antenna, inadequate signal pickup, maladjustment of consumer controls, improper operation, power line surge, improper voltage supply, lightning damage, commercial use such as hotel, office, restaurant, or other business or rental use of the product, or service by anyone other than a PASC Factory Service Center or a PASC authorized Service Center, or damage that is attributable to acts of God.
LIMITS AND EXCLUSIONS
There are no express warranties except as listed above. THE WARRANTOR SHALL NOT BE LIABLE FOR INCIDENTAL OR CONSEQUENTIAL DAMAGES (INCLUDING, WITHOUT LIMITATION, DAMAGE TO TAPES) RESULTING FROM THE USE OF THIS PRODUCTS, OR ARISING OUT OF ANY BREACH OF THE WARRANTY. ALL EXPRESS AND IMPLIED WARRANTIES, INCLUDING THE WARRANTIES OF MERCHANTABILITY AND FITNESS FOR PARTICULAR PURPOSE, ARE LIMITED TO THE APPLICABLE WARRANTY PERIOD SET FORTH ABOVE. Some states do not allow the exclusion or limitation of incidental or consequential damages, or limitations on how long an implied warranty lasts, so the above exclusions or limitations may not apply to you.
This warranty gives you specific legal rights and you may also have other rights which vary from state to state.
If a problem with this product develops during or after the warranty period, you may contact your dealer or Service Center. If the problem is not handled to your satisfaction, then write to the Customer Satisfaction Center at the Panasonic Consumer Electronics Company address above. SERVICE CALLS WHICH DO NOT INVOLVE DEFECTIVE MATERIALS OR WORKMANSHIP AS DETERMINED BY THE WARRANTOR, IN ITS SOLE DISCRETION, ARE NOT COVERED. COSTS OF SUCH SERVICE CALLS ARE THE RESPONSIBILITY OF THE PURCHASER. warvid 10/20/97
Warranty
For Product Information, operating Assistance, Literature Request, Dealer Locations, and all Customer Service inquires please contact:
1-800-211-PANA(7262), Monday-Friday 9am-9pm Saturday-Sunday 9am-7am, EST.
Web Site: http://www.panasonic.com
You can purchase parts, accessories or locate your nearest service center by visiting our Web Site.
Accessory Purchases:
1-800-332-5368 (Customer Orders Only)
Panasonic Service Company 20421 84th Avenue South, Kent, WA 98032
(6 am to 5 pm Monday - Friday; 6 am to 10:30 am Saturday; PST)
(Visa, Master Card, Discover Card, American Express, Check)
Product Repairs
Centralized Factory Service Center
Panasonic Services Company
MAIL TO :
1705 N. Randall Road,
Elgin, IL 60123-7847
Attention: Digital Camera Repair
Please carefully pack and ship, prepaid and insured, to the Elgin centralized repair Factory
Service Center. While there will be added handling delays, you may bring your unit to one of the following locations who will then forward the unit to Elgin for repair.
Customer's in Puerto Rico, please ship or carry in to location below ("Service in Puerto Rico").
Factory Service Center Locations
CALIFORNIA
550 Katella Avenue
Cypress, CA 90630
800 Dubuque Avenue
S. San Francisco,
CA 94080
20201 Sherman Way
Suite 102
Canoga Park, CA 91306
3878 Ruffin Road
Suite A
San Diego, CA 92123
COLORADO
1640 South Abilene
Street Suite D
Aurora, CO 80012
FLORIDA
3700 North 29th Avenue
Suite 102
Hollywood, FL 33020
GEORGIA
8655 Roswell Road
Suite 100
Atlanta, GA 30350
ILLINOIS
9060 Golf Road
Nites, IL 60714
1703 North Randall Road
Elgin, IL 60123
(Pick-up / Drop-off only)
MARYLAND
62 Mountain Road
Glen Burnie MD 21061
MASSACHUSETTS
60 Glacier Drive,
Suite G
Westwood, MA 02090
MICHIGAN
37048 Van Dyke Avenue
Sterling Heights, MI
48312
MINNESOTA
7850-12th Avenue South
Airport Business Center
Bloomington, MN 55425
OHIO
2236 Waycross Road
Civic Center Plaza
Forest Park, OH 45240
PENNSYLVANIA
2221 Cabot Blvd. West
Suite B
Langhome, PA 19047
Chartiers Valley
Shopping Center
1025 Washington Pike
Bridgeville, PA 15017
TENNESSEE
3800 Ezel Road
Suite 806
Nashville, TN 37211
TEXAS
7482 Harwin Drive
Houston, TX 77036
13615 Welch Road
Suite 101
Farmers Branch,
TX 75244
WASHINGTON
20425-84th Avenue
South
Kent, WA 98032
HAWAII
99-859 Iwaiwa Street
Aiea, Hawaii 96701
Phone (808) 488-1996
Fax (808) 486-4369
Service in Puerto Rico
Matsushita Electric of Puerto Rico, Inc. Panasonic Sales Company/ Factory ServiceCenter:
Ave. 65 de Infantería. Km. 9.5 San Gabriel Industrial Park Carolina, Puerto Rico 00985
Phone (787) 750-4300 Fax (787) 768-2910
Spanish Quick Use Guide/Guía Para Uso Rápido
Inserte de la batería
Antes de comenzar...
• Cargue la battería (página 11).
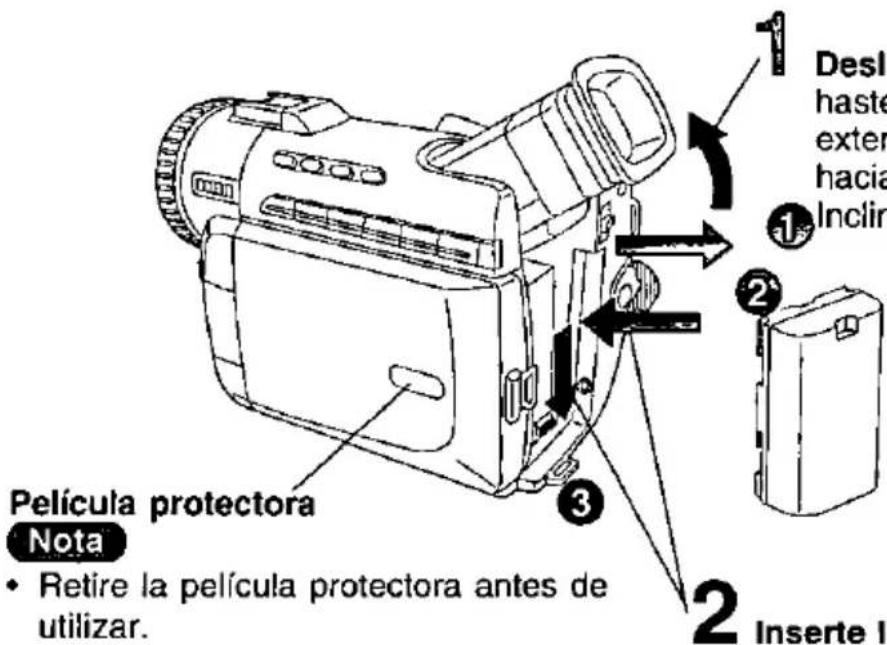
Deslice el visor hacia atrás, haste la posición de totalmente extendido, y luego inclínelo hacia arriba. (PV-DV200: Incline el visor hacia arriba.)
Inserte el Cassette
Inserte la batería y deslícela hacia abajo hasta que quede trabada en posición (se escuchará un "clic").
1 Ajuste el interruptor de alimentación (POWER) a la posición VCR.
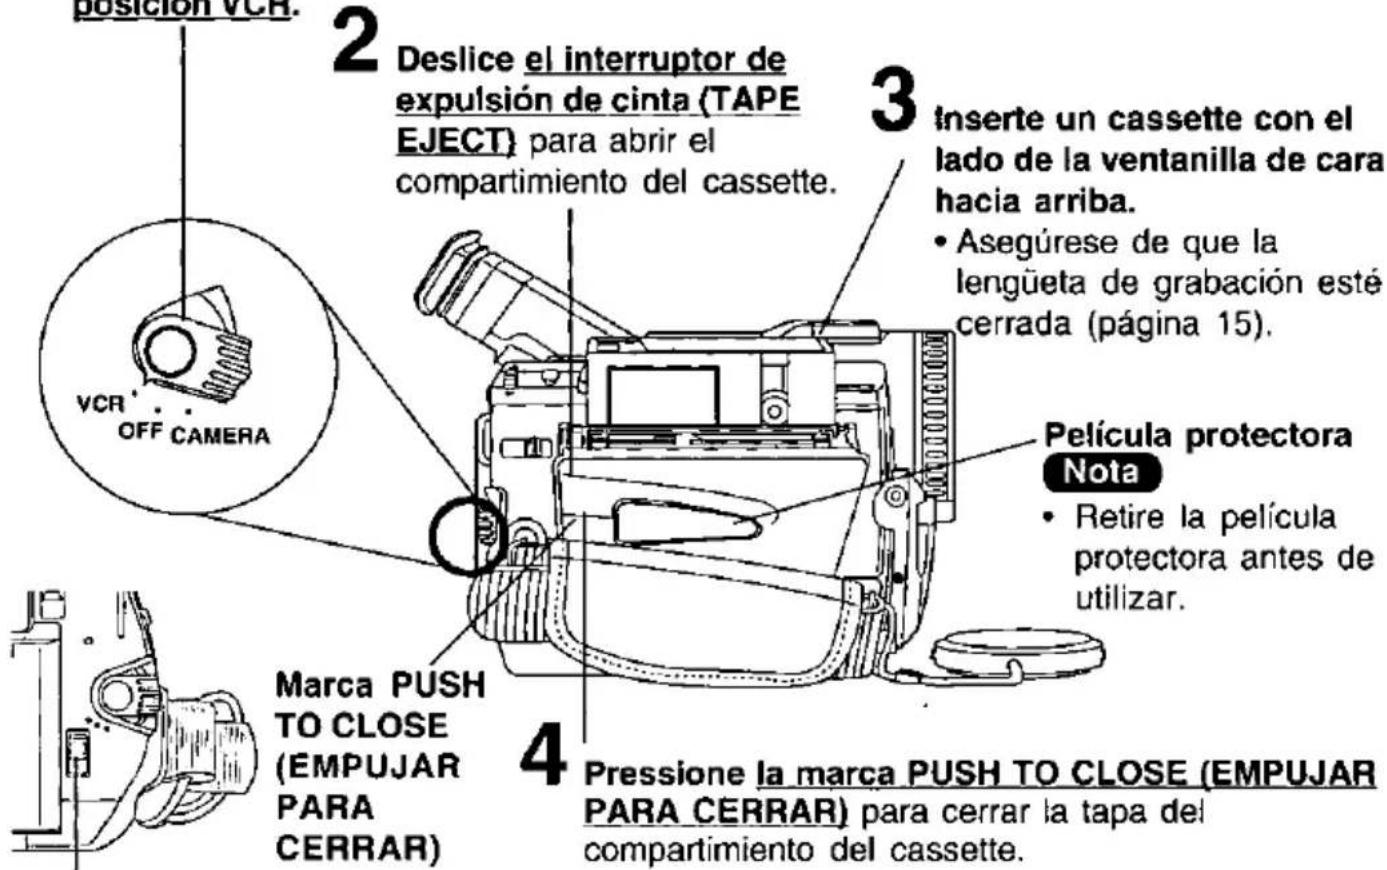
TAPE M-CARD ↑ Al utilizar una Cinta, debe usted adjustar el TAPE/M-CARD Switch (interruptor TAPE/M-CARD) a TAPE.
Spanish Quick Use Guide/Guía Para Uso Rápido
Grabación con la cámara
Cuando el monitor LCD se enchuentra complemente adjerto, el visor se apaga automáticamente.
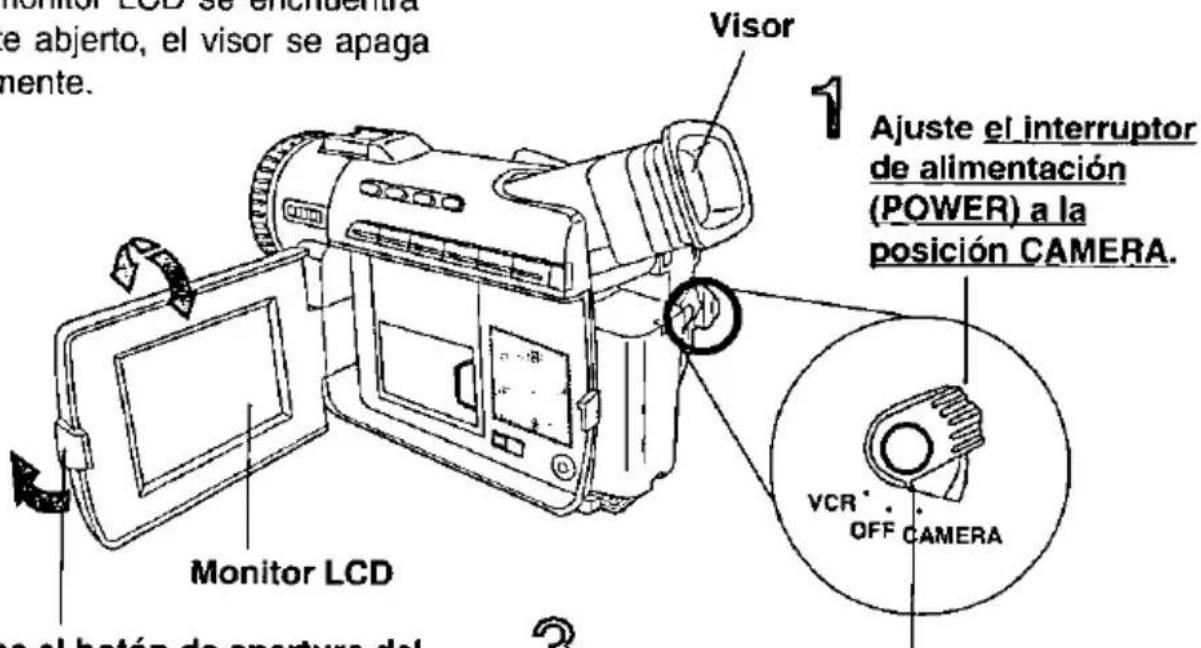
2 Presione el botón de apertura del LCD (LCD-OPEN) para destrabar el monitor LCD. Gírela hasta abrir completamente y ajusta el ángulo.
3 Presione el botón de grabación/pausa (RECORD/PAUSE) para iniciar la grabación. Vuelva a pulsar el botón de grabación/pausa (RECORD/PAUSE) para hacer una pausa en la grabación.
Introducir la MultiMediaCard (Tarjeta MultiMedia)
Asegúrese de introducir la MultiMediaCard (Tarjeta MultiMedia) antes de utilizar la Card PhotoShot (Tarjeta Foto Dispara) (página 41).
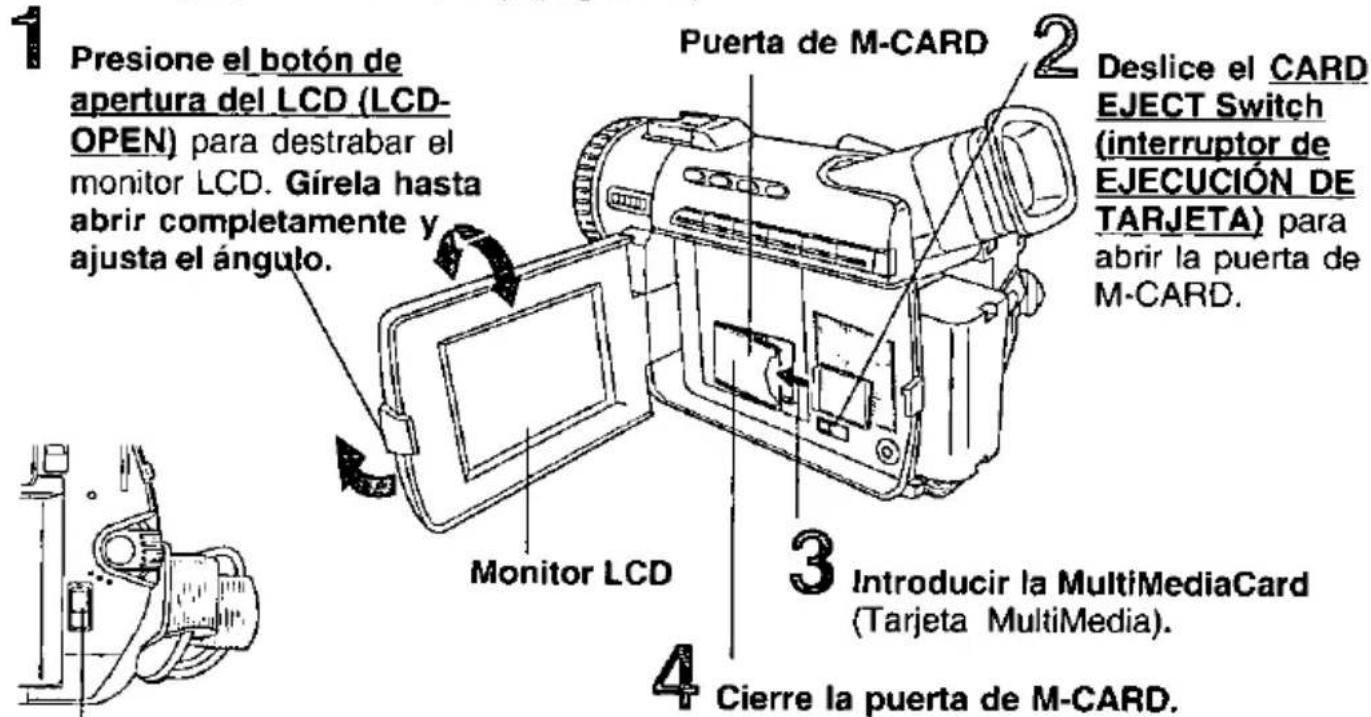
TAPE M-CARD Al utilizar una MultiMediaCard (Tarjeta MultiMedia), debe usted ajustar el TAPE/M-CARD Switch (interruptor TAPE/M-CARD) a M-CARD.
Spanish Quick Use Guide/Guía Para Uso Rápido
Para ver la reproducción en el LCD (pantalla de visualización de cristal líquido)
Antes de comenzar...
• Cargue la battería (página 11).
Cuando el monitor LCD se enchuentra complemente abjerto, el visor se apaga automáticamente.
2
Presione el botón de apertura del LCD (LCD-OPEN) para destrabar el monitor LCD. Gírela hasta abrir completamente y ajusta el ángulo.
1
Ajuste el interruptor de alimentación (POWER) a la posición VCR.
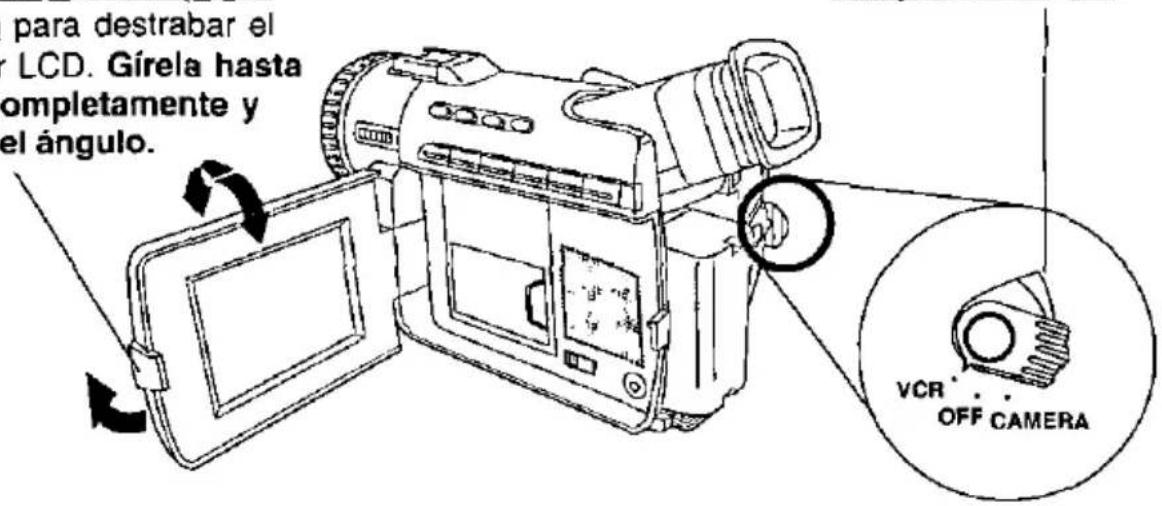
3
Presione el botón de rebobinado (REW) para rebobinar la cinta.
4
Presione el botón de rebobinado (REW) para rebobinar la cinta.
5
Presione el botón de parada (STOP) para detener la reproducción.
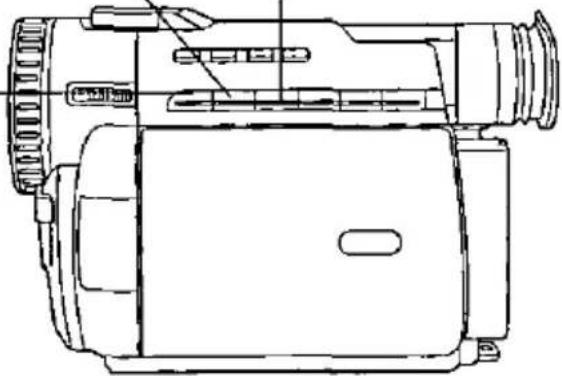
natural_image
Technical line drawing of a digital camera with no visible text or symbolsIndex
A
AC Adaptor 2, 11, 13, 72, 83
Accessories (Optional) 72
Accessories (Supplied) 2
Audio/Video Cable 2, 40, 61
Audio/Video Fade In/Out 57
Auto Focus 56
B
Backlight 57
Battery Charging Confirmation Marker 11
Battery Pack 2, 8, 11, 12, 72
Battery Remaining Indication 26
Battery Warning 29
Before Requesting Service 77
Blank Search 33
C
CARD EJECT Switch 9
Camera Recording 30, 31, 32, 33
Cleaning Care for Video Heads 77
Clock Battery 29
Clock Set 19
Color Enhancement Light (Optional) 16
Copying from Digital Equipment 62
Copying your Tapes 61
D
Date and Time Indication 27
DC Power Cable 2, 13, 72
DEW Indication 29
Digital E.I.S. 50
Digital Functions 55
Digital Photo Shot 52
Digital Video Cassette Tape 2,15
Digital Zoom 51
Dubbing over Audio(Microphone) 59, 60
DV Interface Cable 62, 63, 72
E
Edit Search 32
Erase Protection Tab 15
EVF/LCD Monitor Indications
26, 27, 28, 29
F
Fade In/Out 57
H
Hand Strap 18
High Speed Shutter 58
J
Jog Search 38
L
Lens Cap 2, 18, 30
M
Macro Focus 56
Manual Focus 56
Memory Counter 26
MENU OSD 21, 22, 23, 24, 25
MultiMediaCard 2,9
M-CARD Door 9
P
PC Connection 63, 64
PC Connection Cable 2,64
PLAY Indicator 26, 27
Playback 35, 36, 37, 38, 39, 40
Power Supply 11, 12, 13
Program AE 54
R
REC Indicator 27
Recording Still Pictures 53
Remote Control 33, 34, 72, 84
Request for Service Notice 79
S
Safety Precautions 3
Set the Date and Time 19
Shoulder Strap 2,17
Special Effects Playback 36, 37, 38, 39
Specifications 76
STILL Picture 36
T
Tally LED 30
Tape Remaining Indications 26
Tape Speed 15
Tape Warning 28
V
VHF Connecting Cable 61, 62
Volume Display 28, 29
W
Warranty 85, 86
White Balance 53
Z
Zoom In/Out 51
Panasonic Consumer Electronics Company, Division of Matsushita Electric Corporation of America
One Panasonic Way Secaucus, New Jersey 07094
Printed in Japan LSQT0212A S0100A0
Panasonic Sales Company, Division of Matsushita Electric of Puerto Rico, Inc. ("PSC")
Ave. 65 de Infantería, Km. 9.5 San Gabriel Industrial Park Carolina, Puerto Rico 00985

- Operating Instructions
- Models No. PV-DV200
- PV-DV400
- Things You Should Know
- Thank you for choosing Panasonic!
- Unpack your Camcorder
- Safety Precautions
- WARNING: TO PREVENT FIRE OR SHOCK HAZARD, DO NOT EXPOSE THIS EQUIPMENT TO RAIN OR MOISTURE.
- The above markings are located on the appliance bottom cover.
- Important Safeguards
- Precautions
- USE & LOCATION
- CARE
- Table of Contents
- Getting Started
- Basic Operation
- Special Features
- For Your Information
- Quick Guide
- Insert the Battery
- Before you begin...
- Insert Cassette
- Camera Recording
- Insert MultiMediaCard
- To Watch Playback in the LCD (Liquid Crystal Display)
- Charge the Battery Pack on the AC Adaptor
- Charge Lamps
- Note
- Supplying Power
- Insert/Remove the Battery Pack
- To remove the Battery:
- Battery Care
- Caution:
- Safety precautions:
- To avoid damage to the Battery:
- To insure longer battery life:
- AC Adaptor
- Cassette Information
- Cassette Insertion
- Cassette Ejection
- Hint for recording position when inserting Cassette
- Note:
- Record Speed/Playback Time
- Erase Protection
- Color Enhancement Light (Optional)
- Using the Light
- To remove the Light:
- Attaching the Shoulder Strap
- Adjust the Length
- Attach the Light (Optional)
- Hand Strap
- Lens Cap
- Set the Date and Time
- Using the Palmcorder Menu
- Displaying the MENU
- Setting the MENU Items (EX. VCR Mode menu)
- Camera and VCR main menu
- CAMERA MENU
- : D. FUNCTION
- 2: ADJUST
- : REC MODE
- 4:SET-UP
- : DISPLAY SETTING
- : LCD/EVF SETTING (PV-DV400 only)
- : LCD SETTING (PV-DV200 only)
- 7: PHOTO TITLE
- VCR MENU
- 1: PLAY FUNCTION
- 2: REC MODE
- : PLAY MODE
- 4: DISPLAY SETTING
- : LCD/EVF SETTING (PV-DV400 only)
- : LCD SETTING (PV-DV200 only)
- Camera Mode Menu Screen
- CAMERA FUNCTION
- CAMERA ADJUST
- CAMERA REC MODE
- CAMERA SET-UP
- DISPLAY SETTING
- LCD/EVF SETTING (PV-DV400 only)
- LCD SETTING (PV-DV200 only)
- Photo Rec Mode Menu Screen
- CARD SETTING
- REC MODE NORMALOFINE
- PHOTO TITLE
- VCR Mode Menu Screen
- VCR PLAY FUNCTION
- VCR REC MODE
- VCR PLAY MODE
- Photo Play Mode Menu Screen
- Electronic Viewfinder/LCD Monitor Indications
- g. Volume Display (page 35)
- h. Date and Time Indication
- k. Tape Mode Indications
- Warning Indications
- WARNING:
- Set POWER to CAMERA.
- Record/Pause mode With the Viewfinder Eye Cup up to your eye, adjust the Vision Adjustment Control to your eyesight (page 9).
- Press RECORD/PAUSE to start recording.
- To conserve power
- Using the LCD Monitor
- Recording Check
- Edit Search
- Camera Recording / Remote Control
- Blank Search
- Set the POWER to VCR.
- Press MENU to display the VCR mode menu screen.
- Rotate JOG KEY to select PLAY MODE, then press JOG KEY to display the VCR PLAY MODE menu screen.
- Rotate JOG KEY to select BSEARCH in the VCR PLAY MODE menu (page 25).
- Press JOG KEY to select ON. • "BLANK" will appear on the screen.
- Remote Control (Optional, page 72)
- To operate Camera functions:
- To operate VCR functions:
- Controlled Functions
- Remote Control (Optional)
- Remote Controlling Two Palmcorders
- Optional
- Replace the Battery
- Playback your Recordings
- Playback using the LCD Monitor
- Special Effect Features During Playback
- Rapid Visual Search
- STILL Picture
- Slow Motion Playback
- Special Effect Features During Playback Continued
- Variable Speed Search
- To return to normal playback:
- Fast Forward/Rewind Check
- Frame by Frame Advance
- Jog Frame by Frame Search
- (Palmcorder only)
- Top Scan
- Index Forward/Reverse Search
- Optional Remote Control Only (page 72)
- Rotate JOG KEY to select INDEX, and then press JOG KEY to select PHOTO or SCENE.
- Connections
- TV with S-VIDEO IN Jacks.
- Turn your TV ON and set it to LINE INPUT or S-VIDEO.
- Start playback or begin a recording.
- CATV System Installer
- Set TAPE/M-CARD to M-CARD.
- Press MENU to display CARD SETTING menu, then press JOG KEY to select NORMAL or FINE.
- Press PHOTOSHOT to record an image.
- Recording images From a Tape
- Set POWER to VCR.
- Press MENU to display the CARD SETTING menu screen, then press JOG KEY to select NORMAL or FINE.
- Press PLAY to start playback of the cassette tape. And then, press PAUSE to select an image.
- Press PHOTOSHOT to record a desired image to the MultiMediaCard.
- Repeat steps 4-5 to record another image to the MultiMediaCard.
- Playback Still Images
- Set TAPE/M-CARD to M-CARD. (page 9).
- Press M-PLAY to display the Multi playback screen.
- Precautions for the MultiMediaCard
- Delete Specific Image Pages
- DELETE PAGE
- DELETE ALL
- FORMAT
- Do steps 1 and 3 on page 43.
- Press M-DEL to display the DELETE menu, then rotate and press JOG KEY to select PAGE.
- Rotate and press JOG KEY to select and set the image to be deleted.
- Press M-DEL to delete selected page.
- Delete All Image Pages
- Press M-DEL to display the DELETE menu. Then, rotate and press JOG KEY to select ALL.
- Press M-DEL to delete all images.
- Format the MultiMediaCard
- Press M-DEL to display the DELETE menu, then rotate and press JOG KEY to select FORMAT.
- Press M-DEL to format the MultiMediaCard.
- Set TAPE/M-CARD to TAPE (page 8). 3 Press MENU to display the CAMERA menu screen. Then rotate and press JOG KEY to select PHOTO TITLE.
- Rotate and press JOG KEY to select MODE and TITLE.
- Rotate and press JOG KEY to select and set an image.
- Dual Digital Electronic Image Stabilization System (D.E.I.S.)
- Camera mode
- 1
- Set POWER to CAMERA.
- 2
- 3
- Press REC/PAUSE to start recording.
- 4
- D.E.I.S. may not function when...
- VCR mode
- Set POWER Switch to VCR.
- Press PLAY to start playback.
- Press EIS to stabilize the picture.
- Press EIS Button again to cancel.
- Zoom
- Digital Zoom
- Press D.ZOOM to select D.ZOOM1 or D.ZOOM2.
- Press REC/PAUSE to start recording and press POWER ZOOM to zoom in or zoom out.
- Press D.ZOOM to turn off Digital Zoom so that no indication appears.
- Press PLAY to start playback. 3 Press D.ZOOM.
- Press D.ZOOM again for normal image size.
- Digital PhotoShot
- Index Search (Photo/Scene)
- White Balance
- Recording Still Pictures
- IR FILTER (PV-DV400 Only)
- Press MENU to display the menu screen.
- Press JOG KEY to select ADJUST, and then press JOG KEY to display the CAMERA ADJUST menu screen.
- Rotate JOG KEY to select W.BALANCE, and then press down on JOG KEY repeatedly to select either AUTO, Indoor halogen lamp "-0", Outdoors "-0".
- While in RECORD mode, press STILL and hold for 2 seconds to capture still picture. The captured still picture will be recorded together with the sound.
- Press STILL once again to release the still picture. The camera will resume recording real-time pictures.
- Slide IR FILTER to ON.
- Program AE
- SPORTS mode
- CAMERA position. Press MENU to display the menu screen.
- Screen. Press JOG KEY to select ADJUST, and then press JOG KEY to display the CAMERA ADJUST menu screen.
- the CAMERA ADJUST menu screen. Rotate JOG KEY to select PROGIAE, and then press JOG KEY to select one of the five modes shown below.
- below. Repeat steps 4\~5 to select OFF to cancel this feature.
- PORTRAIT mode
- LOW-LIGHT mode
- SPOT-LIGHT mode
- SURF&SNOW mode
- Other Digital Functions
- Types of Digital Function
- MIRROR
- STROBE
- MOSAIC
- SLIM
- TRAIL
- STRETCH
- WIPE
- MIX
- To use the WIPE function:
- To use the MIX function:
- Auto Focus
- Manual Focus
- Macro Focus (for close-ups)
- Audio/Video Fade In/Out
- Fade In:
- Fade Out:
- Backlight
- High Speed Shutter
- Auto Shutter
- Manual Selection
- Audio Dubbing using the External or Built-in Microphone
- Memory-Stop Editing (Optional Remote Control Only, page 72)
- Copying your Tapes to S-VHS or VHS Cassette
- Monitor with your TV
- VCR Buttons
- Copying from Digital Equipment (dubbing)
- PC Connection with DV Interface Cable (IEEE 1394)
- PC Connection
- PHOTOVU Link & CARD LINK Driver
- System Requirements for PHOTOVU LINK & CARD LINK Driver
- Connection
- Software Installation (Windows 95/98)
- CARD LINK
- Running the Software (Windows 95/98)
- Using MultiMediaCard Image Data
- Transfer
- Delete
- Save
- Using PC Image Data
- PHOTOVU LINK
- Using Tape Image Data
- Using the Digital Photo Printer
- Palmcorder Accessory Order Form
- Notes On Operations
- Cleaning EVF (Electronic Viewfinder)
- Rough Values of Brightness
- Specifications
- Before Requesting Service
- Cleaning Care for Video Heads
- Head
- Caution for Tape Operations
- Lens Hood Area Operation Caution
- Self Diagnostic System
- Request for Service Notice
- Request for Service Notice:
- Index of Controls
- Rear View
- Side View
- Underside View
- Color Enhancement Light
- PANASONIC/QUASAR Video Products Limited Warranty
- Monitor-VCR In-home or carry-in Service: 22" (diagonal) CRT / LCD and Larger Monitor-VCR Carry-in Service: 21" (diagonal) CRT / LCD and smaller
- LIMITS AND EXCLUSIONS
- Warranty
- Web Site: http://www.panasonic.com
- Accessory Purchases:
- Product Repairs
- Centralized Factory Service Center
- Factory Service Center Locations
- CALIFORNIA
- COLORADO
- FLORIDA
- GEORGIA
- ILLINOIS
- MARYLAND
- MASSACHUSETTS
- MICHIGAN
- MINNESOTA
- OHIO
- PENNSYLVANIA
- TENNESSEE
- TEXAS
- WASHINGTON
- HAWAII
- Service in Puerto Rico
- Spanish Quick Use Guide/Guía Para Uso Rápido
- Inserte de la batería
- Antes de comenzar...
- Inserte el Cassette
- Grabación con la cámara
- Introducir la MultiMediaCard (Tarjeta MultiMedia)
- Para ver la reproducción en el LCD (pantalla de visualización de cristal líquido)
- 5
- Index
- A
- B
- C
- D
- E
- F
- H
- J
- L
- M
- P
- R
- S
- T
- V
- W
- Z
Mærke : PANASONIC
Model : PV-DV400
Kategori : Videokamera