SDW60B12 - 洗碗机 Sandstrøm - 免费用户手册
免费查找设备手册 SDW60B12 Sandstrøm PDF格式.


| 产品类型 | 独立式洗碗机 |
| 品牌 | Sandstrøm |
| 型号 | SDW60B12 |
| 容量 | 12套 |
| 宽度 | 60厘米 |
| 高度 | 84.5厘米 |
| 深度 | 55厘米 |
| 重量 | 40千克 |
| 能效等级 | A+ |
| 年能耗 | 260千瓦时 |
| 年耗水量 | 2660升 |
| 噪音水平 | 44分贝 |
| 程序数量 | 6 |
| 程序包括 | 节能、强力、快速、玻璃、普通、预冲洗 |
| 烘干系统 | 冷凝烘干 |
| 进水连接 | 仅冷水 |
| 功耗(待机) | 0.5瓦 |
| 电源线长度 | 1.5米 |
| 可调节上篮 | 是 |
| 餐具篮 | 是,可拆卸 |
| 盐和漂洗剂指示灯 | 是 |
| 儿童锁 | 是 |
| 安全功能 | 防溢水、门锁 |
| 维修评分 | 7.0 / 10 |
| 备件供应 | 10年内可用 |
常见问题 - SDW60B12 Sandstrøm
用户关于以下问题的提问 SDW60B12 Sandstrøm
0 问题 关于此设备。回答您知道的问题或提出自己的问题。
提出关于此设备的新问题
下载您的设备说明 洗碗机 免费PDF格式!查找您的手册 SDW60B12 - Sandstrøm 并重新掌握您的电子设备。本页发布了使用您的设备所需的所有文档。 SDW60B12 品牌 Sandstrøm.
用户手册 SDW60B12 Sandstrøm
Sandstrøm
Instruction Manual
Freestanding Dishwasher
SDW60B12
natural_image
Interior kitchen scene with white tiled wall, potted plant, and plates (no visible text or symbols)
natural_image
Black rectangular container with a metallic horizontal stripe at the top (no text or symbols visible)
bar
| Category | Value | |---|---| | Category 1 | 100 | | Category 2 | 100 | | Category 3 | 100 | | Category 4 | 100 | | Category 5 | 100 | | Category 6 | 100 | | Category 7 | 100 | | Category 8 | 100 | | Category 9 | 100 | | Category 10 | 100 | | Category 11 | 100 | | Category 12 | 100 | | Category 13 | 100 | | Category 14 | 100 | | Category 15 | 100 | | Category 16 | 100 | | Category 17 | 100 | | Category 18 | 100 | | Category 19 | 100 | | Category 20 | 100 | | Category 21 | 100 | | Category 22 | 100 | | Category 23 | 100 | | Category 24 | 100 | | Category 25 | 100 | | Category 26 | 100 | | Category 27 | 100 | | Category 28 | 100 | | Category 29 | 100 | | Category 30 | 100 | | Category 31 | 100 | | Category 32 | 100 | | Category 33 | 100 | | Category 34 | 100 | | Category 35 | 100 | | Category 36 | 100 | | Category 37 | 100 | | Category 38 | 100 | | Category 39 | 100 | | Category 40 | 100 | | Category 41 | 100 | | Category 42 | 100 | | Category 43 | 100 | | Category 44 | 100 | | Category 45 | 100 | | Category 46 | 100 | | Category 47 | 100 | | Category 48 | 100 | | Category 49 | 100 | | Category 50 | 100 | | Category 51 | 100 | | Category 52 | 100 | | Category 53 | 100 | | Category 54 | 100 | | Category 55 | 100 | | Category 56 | 100 | | Category 57 | 100 | | Category 58 | 100 | | Category 59 | 100 | | Category 60 | 100 | | Category 61 | 100 | | Category 62 | 100 | | Category 63 | 100 | | Category 64 | 100 | | Category 65 | 100 | | Category 66 | 100 | | Category 67 | 100 | | Category 68 | 100 | | Category 69 | 100 | | Category 70 | 100 | | Category 71 | 100 | | Category 72 | 100 | | Category 73 | 100 | | Category 74 | 100 | | Category 75 | 100 | | Category 76 | 100 | | Category 77 | 100 | | Category 78 | 100 | | Category 79 | 100 | | Category 80 | 100 | | Category 81 | 100 | | Category 82 | 100 | | Category 83 | 100 | | Category 84 | 100 | | Category 85 | 100 | | Category 86 | 100 | | Category 87 | 100 | | Category 88 | 100 | | Category 89 | 100 | | Category 90 | 100 | | Category 91 | 100 | | Category 92 | 100 | | Category 93 | 100 | | Category 94 | 100 | | Category 95 | 100 | | Category 96 | 100 | | Category 97 | 100 | | Category 98 | 100 | | Category 99 | 100 | | Total (Total) |Contents
Unpacking....5
Installation 6
Location 6
Product Overview....10
Internal View....10
Rear View....10
Control Panel Overview 11
Before Operating 12
To Open the Door....12
To Close the Door 12
Adding the Detergent Powder and Tablet 13
Adding Rinse Aid 14
Adjusting Rinse Aid Reservoir....14
Adding Salt 15
Adjusting of Salt Consumption 15
Loading the Dishwasher 17
Before Loading the Dishwasher 17
Upper Basket......17
Adjusting the Upper Basket....17
Hinged Cup Rack 18
Loading the Upper Basket for 12 Place Settings....18
Lower Basket 18
Hinged Spikes....18
Loading the Lower Basket for 12 Place Settings ....19
Cutlery Basket....19
Wash Cycle Table....20
Starting a Wash Cycle 21
Changing or Cancelling a Programme 21
Delay Start....22
At the End of a Programme....22
Switching off the Dishwasher....22
Unloading the Dishwasher 22
Half Load 23
Cleaning After Use....23
External Care 23
The Door and the Door Seal 23
The Control Panel 23
External Care 24
Filtering System....24
Spray Arms....24
Frost Precaution 25
Maintenance For Prolonged Period of Non-Operation 25
Moving the Dishwasher 25
Helpful Tips and Guide 26
Fault Code 26
Technical Problems....27
Disposal of Dishwasher 28
Disposal of Packing Material 28
Specifications....29
Safety Warnings....30
Thank you for purchasing your new Sandstrøm Freestanding Dishwasher.
You must spend some time reading this installation/instruction manual in order to fully understand how to install and operate it.
Read all the safety instructions carefully before use and keep this installation/instruction manual for future reference.
Unpacking
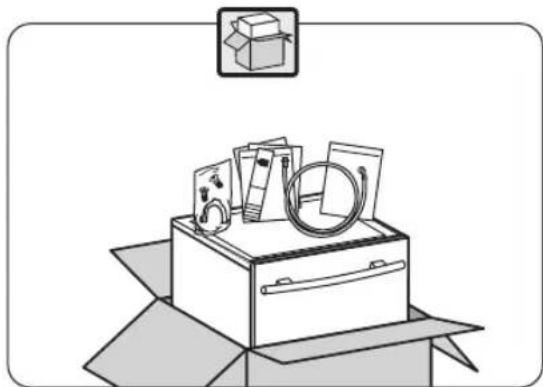
Remove all packaging from the dishwasher. Retain the packaging. If you dispose of it please do so according to local regulations.
The following items are included:

This product has been wet tested to ensure correct operation. As a result some water may remain inside the unit. This is normal and safe. Remove any water droplets from the exterior if necessary.

natural_image
Line drawing of a rectangular kitchen appliance with a lid and handle (no text or symbols)The Main Unit - Front View
natural_image
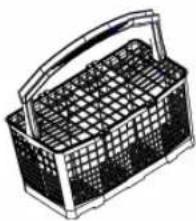
Line drawing of a wireframe basket with a handle and grid pattern (no text or symbols)Cutlery Basket P.N.: 42021073

Water Supply Hose
P.N.: 42005932

Salt Funnel
P.N.: 42005853
Instruction Manual P.N.: 52065297

If items are missing or damaged please contact Partmaster (UK only). Tel: 0844 800 3456 for assistance.
Location
When selecting a position for your freestanding dishwasher you should make sure the installation surface is flat and firm, and the room is well ventilated. Avoid locating your dishwasher near a heat source, eg. cooker, boiler or radiator. Extreme cold ambient temperatures may also cause the appliance not to perform properly. This dishwasher is not designed for use in a garage or outdoors.
Do not drape the dishwasher with any covering.

All parts removed must be saved for any future reinstallation. Ensure the dishwasher is unplugged and empty. 2 people are required to handle the dishwasher during installation.
-
Please ensure the dishwasher is installed by a qualified technician. Refer to the tools (not included) required.
-
If installing under a worktop, ensure there is clearance each side of the unit to allow slight sideways movement for servicing when required. Good levelling is essential for correct closure and sealing of the door. When the unit is correctly levelled, the door should not catch the inner liner on either side of the cabinet. The adjustable feet may be loosened or tightened in order to obtain the optimum levelling of the unit.

If installing under a worktop, you must treat the worktop to protect its underside against the steam rising from the dishwasher. If you are not sure how to do this, please consult an appropriately-qualified professional.
natural_image
Illustration of an open box with scattered items including a bag, rings, and boxes (no text or symbols)
natural_image
Illustration of various office tools including screwdriver, scissors, pencil, clip, and door switch (no text or symbols present)
* images are for indication only; please refer to your individual model for actual details.
INSTALLATION
- Do not connect the unit to the mains before installation. Ensure you are not installing the unit right in front of the mains socket. This is to avoid potential damage to the back of the unit and to allow disconnection from the supply mains.
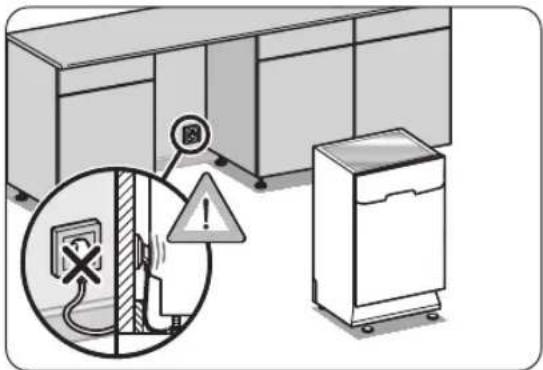

If installing under a worktop, you must treat the worktop to protect its underside against the steam rising from the dishwasher. If you are not sure how to do this, please consult an appropriately-qualified professional.

- Position the dishwasher next to a water tap and a drain. Ensure the water inlet and drain hoses are not kinked or squashed. The unit must not stand on the mains cable.

* images are for indication only; please refer to your individual model for actual details.
INSTALLATION
-
Make sure your plumbing is suitable for use with the dishwasher. If in doubt contact a qualified plumber. This unit MUST BE connected to COLD WATER MAINS using the new water inlet hose. OLD HOSE SETS MUST NOT BE RE-USED. The water pressure from the water mains needs to be at a minimum of 0.04 MPa and a maximum of 1.00MPa.
-
Connect one end of the water supply hose to your dishwasher, and then connect the other end of the hose to your water mains. Please ensure the black rubber seals, one in each end, are in place.
- After connecting the hose, turn on your water mains and check for leaks.
- Connect the dishwasher to the mains socket, which must remain accessible to allow disconnection of the appliance from the mains supply.

You may use a Y-adaptor (not included) for additional water feed for another appliance, for instance a washing machine. This is only applicable for cold water mains. A Y-adaptor is available from most DIY stores.
- Do not bend your drain hose.
- Ensure your hose is not kinked or squashed.


natural_image
Cross-sectional diagram of mechanical components with no visible text or symbols* images are for indication only; please refer to your individual model for actual details.
INSTALLATION
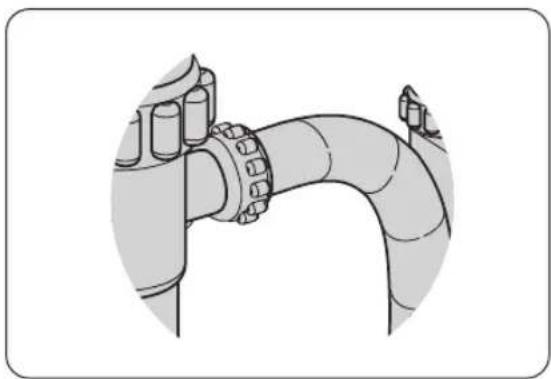
- You may use a U-shaped drain hose holder (not included) to secure your drain hose and to avoid kinking it.

- Secure the water drain hose to the waste pipe to avoid it coming off during the washing process.
natural_image
Illustration of a pipe joint with flanged ends and a valve (no text or symbols)
natural_image
Diagram of a kitchen appliance with a hand inserting a pipe into the door, showing internal components and no text or symbols.
- The waste pipe must only be connected to the foul drains and not the surface water drainage system.
- The water drain hose should be placed between 50 cm and 110 cm from the floor level and must not be extended, otherwise the unit may not be able to expel the waste water properly.
- Please close the water tap after use.
- The supplied plug for this appliance should remain accessible or a switch for disconnection from the supply must be incorporated in the fixed wiring with at least 3 mm contact separation in all poles.
Internal View

Rear View

* images are for indication only; please refer to your individual model for actual details.
Control Panel Overview

1. On/Off Mode Button
• To turn the dishwasher on and off.

In Off Mode the appliance is still connected to the mains supply. To turn off completely the mains plug should be disconnected.
2. Display Window
• Shows the selected programme, programme time, time delay and error codes.
3. Program Button
- Press repeatedly to select your required washing programme.
4. Delay Timer Button
- Press repeatedly to preset the delay timer and delay the starting time by up to 19 hours.
• Each press of this button increases the delay start time by 1 hour intervals.
5. Tablet Detergent Button
- Press to select when you use combined detergents that include salt and rinse aid.
6. Prewash Button
- Press to select an extra pre-wash washing cycle.
7. Half Load Button
- Press to select the half load washing cycle.
• Each press will cycle through the half load options.
Half load indicator
- Illuminates when the half load washing cycle is selected.
8. Salt Refill Indicator
- Illuminates when the softening salt in the dishwasher needs to be refilled.
Rinse Aid Low Indicator
- Illuminates when the rinse aid in the dishwasher needs to be refilled..
End of program indicator
- Illuminates when the selected washing program is completed. The dishwasher also gives a buzzer sound for 5 times when the program is completed.
Before Operating
To Open the Door
- First open the door slightly to avoid water spillage.
- Pull the door handle to open the door.

If the door is opened during operation, all functions are automatically interrupted.
To Close the Door
• After loading the dishes, push the baskets fully into the dishwasher.
- Lift the door upwards and push until it clicks into position.
- Do not slam the dishwasher door.

When purchasing new crockery and cutlery, please make sure they are dishwasher-proof. Some items are not suitable for dishwashers, for examples:
- Wooden cutlery and crockery or items with wooden parts may discolour and fade. The glue used in these items is not dishwasher-proof either, and the wooden handles may come loose after being washed in a dishwasher.
- Craft items, antiques, valuables vases and decorative glassware are also not suitable for dishwashers.
- Plastic items (e.g. tupperware) which are not heat resistant may melt or lose shape due to the high temperatures in the dishwasher.
• Copper, brass, tin and aluminium items may discolour or become matt. - Clouding may occur on glasses and delicate glassware after frequent washing. Do not wash delicate glassware, or glassware containing lead crystal in a dishwasher. Please wash delicate glassware by hand instead.
- Silver and aluminium parts have a tendency to discolour during washing. Residues like egg white, egg yolk and mustard often cause discolouring and staining on silver. Therefore, please clean the residues from silver immediately after use.
Adding the Detergent Powder and Tablet
Only use detergents specifically designed for use in dishwashers. To be more environmentally friendly, please use no more than the correct amount of detergent. Fill the detergent dispenser with detergent power or tablet. See the detergent manufacturers instructions for the correct amount to use. If using tablets read the manufacturers recommendations on the tablet packaging in order to determine where the tablet should be placed (e.g. cutlery basket, detergent compartment etc.)
Please follow the steps below to fill the detergent dispenser.
- Push the button on the lid of the detergent dispenser in the direction of the arrow until the flap springs open.
- Fill the detergent dispenser with detergent powder to both main wash detergent chamber and pre-wash detergent chamber, or insert the detergent tablet to the main detergent chamber. The marking indicates the filling level.

All programmes with pre-wash need an additional detergent dosage that must be placed in the pre-wash detergent chamber. If using tablets please check the detergent manufacturers instructions. Please refer to the wash cycle table. This detergent will take effect during the pre-wash phase.

- Close the lid firmly so that it clicks into place.

Irritant

• WARNING! Keep detergent out of the reach of children.
- Irritating to eyes. Avoid contact with eyes.
- In case of contact with eyes, rinse immediately with plenty of water and seek medical advice.
• If swallowed, seek medical advice immediately.
- If using tablets press the Tablet Detergent button, the indicator will light. This will reduce the amount of salt and rinse aid required from the appliance.

- Combined detergents produce sufficient results under certain usage conditions only. Read the detergent manufacturers instructions for correct usage.
- Combined detergent tablets can contain detergent + rinse aid + salt + various extra functions.
- Check if the detergent used is appropriate for the hardness of the mains water that you will be using.
- If using tablets, continue to use rinse aid but reduce it to its lowest setting (1).
- If the water hardness of your water is above level 4 then it is necessary to fill the salt container with dishwasher salt.
- It is not recommended to use tablets in fast programs.
- If you have problems using the combined detergent tablets please contact the detergent manufacturer and not the appliance manufacturer.
Adding Rinse Aid
Rinse aid helps to ensure water does not cling and leave marks on crockery during the drying phase and helps crockery dry faster after it has been washed. Only pour rinse aid that is for domestic dishwashers into the reservoir. This model is designed to use liquid rinse aid only.
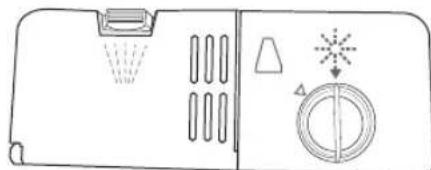
Please follow the steps below to pour the rinse aid into the storage reservoir, and the amount will dispense automatically.
-
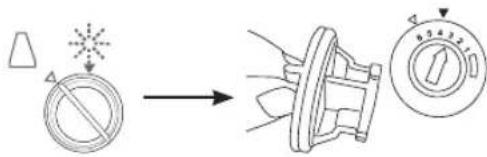
Turn the cap and open. When the cap open marking is aligned, you may lift the cap up.
-
Pour the rinse aid until the rinse aid indicator turns completely black in colour and close the cap.
-
Be careful not to overfill the reservoir. Wipe up any spills.
natural_image
Line drawing of a refrigerator interior with shower, seat, and circular dial (no text or symbols)
- Rinse aid refill indicator will illuminate when the reservoir is running out of rinse aid and requires refilling.
- Alternatively, you can judge the amount of rinse aid by checking the rinse aid indicator next to the reservoirs cap when the indicator is black, it means it is full. When it is clear, it means it is almost empty.
Adjusting Rinse Aid Reservoir
The rinse aid reservoir has six settings. Both the recommended setting and the factory setting is "4". If the dishes are not drying properly or are spotted, adjust the dial to the next higher number until your dishes are spot-free.

- If the water hardness in your area is soft, you may not need rinse aid as it may cause white film to develop on your dishes.
- If there are some rinse aid residue left in the washing compartment or your dishes, please turn the rinse aid dispenser dial to 1.
- If you decide to use a detergent tablet, you do not need to add rinse aid into the rinse aid reservoir.
* images are for Indication only; please refer to your individual model for actual details.
Adding Salt
If the water in your area is hard, deposits will form on your dishes and utensils. As such, this appliance contains a salt reservoir for you to reduce the hardness of the water.
Please follow the steps below to pour the salt into the salt reservoir and to correspond to the water hardness level in your area.
- Remove the lower basket and unscrew the reservoir cap.
- Place the funnel provided over the salt reservoir. Pour in approximately 1 kg to 2 kg of dishwasher salt.
- Fill the reservoir with water until it overflows (first use only).
- Clean any excess salt from around the reservoir opening and then screw the cap on again firmly.
- Run the "Rinse" wash programme P8 immediately (without any crockery in the dishwasher) to remove any traces of salt from the compartment.


natural_image
Diagram of a funnel pouring liquid into a circular mechanical component (no text or symbols)
- The salt refill indicator on the control panel will illuminate when the reservoir is running out of salt and requires refilling.
- The salt refill indicator will cease to illuminate within a few days, depending on how quickly the salt dissolves.
- If you decide to use a detergent tablet, you may not need to add salt, this depends upon the water hardness in your area and the type of tablet being used. Check with your water supplier and the detergent tablet manufacturers instructions.
Adjusting of Salt Consumption
Salt consumption must be adjusted to correspond to the water hardness level in your area. If you don't know how hard the water in your home is, please ask the company that supplies water in your area.
It is recommended that adjustments should be made in accordance with the following chart.
| Water Hardness | Set Hardness Level | ||
| German °dh | French °fh | British °Clark | |
| 0-5 0-9 0-6 1 | |||
| 6-11 10-20 7-14 2 | |||
| 12-17 21-30 15-21 3 | |||
| 18-22 31-40 22-28 4 | |||
| 23-31 41-55 29-39 5 | |||
| 32-50 56-90 40-63 6 | |||

- 1^ dh (German degree) = 0.18 mmol/l
- 1^ (French degree) = 0.1 mmol/l
• 1°Clark (British degree) = 0.142 mmol/l

- Do not use everyday table salt or cooking salt as they contain insoluble substances which could damage the dishwasher.
- Do not pour detergent into the salt container. This will damage the dishwasher.
To optimise your dishwasher for the local water hardness, please follow the steps below and refer to the above table.
- After resetting the dishwasher, press and hold the Program button and then press the ⏻ On/Off Mode button.
- Keep the Program button pressed until "SL" disappears from the display window.
- Release the Program button, the display window will display the latest entered water hardness setting.
- Press the Program button repeatedly to adjust the water hardness level.
- After adjusting the water hardness level, press the ⏻ On/Off Mode button to save the setting.
Loading the Dishwasher
Before Loading the Dishwasher
In general, please observe the following notes before loading your cutlery and crockery in the basket.
- Remove lipstick stains and any food residues from crockery and dishes. Rinse if necessary.
- Dishes and cutlery must not lay inside one another or cover each other.
- Loading your cutlery and crockery so that water can access all surfaces.
- Ensure all items are securely positioned.
- Hollow items such as cups, glasses, pans, etc. must be placed upside down in the basket.
- Wide or broad items should be placed at an angle so that water can run off them freely. The spray arms must not be blocked by items which are too tall or hang through the baskets. If in doubt, test for free movement by manually rotating the spray arm.
- Ensure that small items cannot fall through the holders in the basket.
- CAUTION: Do not wash items soiled with ash, sand, wax, lubricating grease or paint in the dishwasher. These items can damage the dishwasher. Ash does not dissolve and will be distributed in the dishwasher.

For safety reasons, do not operate the dishwasher without the dishwasher basket in place.
Upper Basket
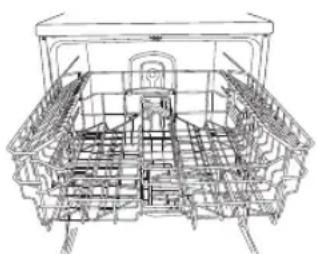
We recommend using the upper basket for small and lightweight items such as cups, saucers, glasses, dessert bowls, etc. Shallow pans or casserole dishes can also be placed in the dishwasher basket. Long items such as soup ladles, mixing spoons and long knives should be placed horizontally at the front of the upper basket.
natural_image
Technical line drawing of a mechanical assembly or frame structure (no text or symbols)Adjusting the Upper Basket
More space can be created for large items on the upper or lower baskets by adjusting the height of the upper basket. There is a lift mechanism for the upper basket (Lift the basket to raise, lift again to lower). Ensure that basket is stable after adjusting the height.
Hinged Cup Rack
To make room for taller items in the dishwasher basket, lift and push the cup rack upwards. You can lean the tall glasses against it. You can also remove it when it is not required for use.

Loading the Upper Basket for 12 Place Settings
For optimum placement of crockery in the upper basket, please refer to the follow list and the accompanying image.
- Cups
- Medium serving bowl
- Large serving bowl
- Glasses
- Saucers
- Small serving bowl

Lower Basket
We recommend that the large and most difficult to clean items are placed in the lower basket, such as plates, serving platters, saucepans, serving bowls, pots, pans, lids, etc. We recommend placing serving dishes and lids at the side of the basket to avoid blocking the rotation of the spray arms.

natural_image
Technical line drawing of a car interior frame with internal compartments and battery pack (no text or symbols)Hinged Spikes
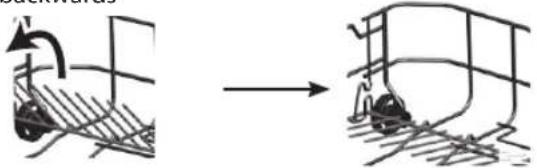
The spikes are used for holding plates and platters. They can be lowered to make more room for large items. Please refer to the steps below to lower the spikes.
fold backwards
natural_image
Diagram showing a mechanical assembly before and after transformation, with no visible text or symbols.Loading the Lower Basket for 12 Place Settings
For optimum placement of crockery in the upper basket, please refer to the following list and image.
- Dessert dishes
- Oval platter
- Dinner plates
- Soup plates
- Cutlery basket

Cutlery Basket
To make unloading much easier, cutlery should be grouped in zones and placed in the cutlery basket. Please refer to the list and image below for optimum placement.
- Spoons
- Forks
- Knives
- Teaspoons
- Dessert spoons
- Gravy ladle
- Serving spoons
- Serving forks


- Do not let any items extend through the bottom of baskets.
- To avoid the risk of injury, please load your knives and forks with the handles facing upwards. Do not hold them by their sharp edges.
- The cutlery basket comes with a cover, and is designed with slots for different types of cutlery. If you use the basket without the cover, it may reduce the washing results of your cutlery.
- Please ensure the cover is securely locked to the basket before operation.
- To comply with Standard of Performance, i.e. EN50242, please ensure all the cutlery is loaded according to the instructions in this manual.

natural_image
Circular diagram showing a grid of vertical lines with a central black line and two curved lines below, resembling a mechanical or electrical component (no text or symbols)
natural_image
Illustration of two hands holding a plant stem with a checkmark and a cross symbol (no text or labels)Wash Cycle Table
| Programme | Cycle Selection information | Process | Detergent Amount | Running Time (min.) | Energy Consumption (Kwh) | Water Consumption (l) |
| P1AutoIntensive | Automatically adjust the washing time with temperature and amount of water by determining the soil level of dishes. | Automatically adjust the washing time with temperature and amount of water by determining the soil level of dishes | • pre-wash (5g)• main wash (25g) | 111-183 | 1.22-1.8 13.3-24.6 | |
| P2AutoNormal | • pre-wash (5g)• main wash (25g) | 100-127 | 1.12-1.3 10.9-18.5 | |||
| P3AutoDelicate | • main wash (25g) | 64-92 | 0.81-0.96 10.6-17.7 | |||
| P4Hygiene | Dishes with dense dirt waiting for a long time or requiring hygienic washing | • Pre-wash• Wash (60°C)• Cold Rinse• Hot Rinse• Dry | • pre-wash (5g)• main wash (25g) | 123 | 1.55 15 | |
| P555-60°C | Soups, sauces, pasta, eggs, pilaf, potato and oven dishes, fried foods | • Pre-wash• Wash (60°C)• Cold Rinse• Hot Rinse• Dry | • pre-wash (5g)• main wash (25g) | 55 | 1.07 11 | |
| P6ECO 50 °C * | Coffee, milk, tea, cold meats, vegetables not kept for long | • Pre-wash• Wash (50°C)• Cold Rinse• Hot Rinse• Dry | • pre-wash (5g)• main wash (25g) | 162 | 0.95 | 9.0 |
| P7Quick | Coffee, milk, tea, cold meats, vegetables not kept for long | • Pre-wash• Wash (40°C)• Cold Rinse• Hot Rinse• Dry | • main wash (25g) | 30 | 0.88 11 | |
| P8Pre-Wash | Pre-wash to rinse and loosen residue awaiting full load then select a programme | • Pre-wash 15 0.02 4.2 | ||||
| Extra Hygiene (P4 Hygiene + Prewash button) | Dishes with dense dirt waiting for a long time or requiring hygienic washing. | • Pre-wash• Pre-wash (50°C)• Wash (70°C)• Cold Rinse• Warm Rinse• Hot Rinse• Dry | • pre-wash (5g)• main wash (25g) | 161 | 1.75 22.7 |
* To comply with Standards of Performance, i.e., EN50242, the economy setting is used as reference.

Condensing dry technology
• Energy is saved by drying the dishes using the remaining heat after the last rinse cycle.
- Wash cycle times are extended due to this drying method.
- Some wash programmes do not have a drying function, please refer to the Wash Cycle Table for more details.
Starting a Wash Cycle
- Ensure the unit is connected to the mains power and the water supply is fully opened (water pressure between 0.04MPa and 1.00MPa).
- Open the door. Pull out the lower and upper baskets, load the dishes and push the baskets back. It is recommended that the lower basket is loaded first, and then the upper basket.
- Pour in the detergent or place the detergent tablet in the detergent compartment and close firmly afterwards.
- Press the ⏻ On/Off Mode button.
- Select the wash cycle programme based on the loading and soil requirements. Please refer to the section "Wash Cycle Table".
- The display will indicate the selected programme.
- If the items are very soiled then pressing the Pre-Wash button (ensure indicator is lit) will provide an additional pre-wash (using this can increase programme time, energy consumption and water usage).
- Close the dishwasher door. Do not slam the door.
- The washing cycle will begin shortly.

If you open the dishwasher's door during the washing cycle and then close it, the dishwasher will continue the current washing programme after 10 seconds.
Changing or Cancelling a Programme
To change the programme if the washing cycle has already started, follow the steps below.
-
Open the door slightly to avoid water spillage before opening the door fully. Check if the unit has dispensed the detergent or detergent tablet. This will depend on how long the washing cycle was running for. The last selected programme will appear on the window display.
-
If the detergent dispenser lid is opened, we suggest you allow the wash cycle to finish.
-
If the detergent dispenser lid is still closed, press and hold down the Program button for 3 seconds to cancel the programme. End of program indicator flashes and the display window shows "1". You can then select the required new programme button and close the dishwasher door. The unit will start the new washing cycle shortly.
At the End of a Programme
At the end of the programme, the dishwasher will beep and the end of program indicator will turn on.

It is advisable to leave the door closed until you are ready to unload the crockery. Do not leave the door only partially open. Do not leave the appliance unattended with the door fully open as this could present a trip hazard.
Switching off the Dishwasher
To save energy, please remember to switch the dishwasher off using the ⏻ On/Off Mode button. The dishwasher will continue to use a small amount of electricity in the Off mode. To use no electricity remove the mains plug from the mains supply.

If the dishwasher is not going to be used for a period of time, please disconnect the dishwasher from the mains supply and switch off the water supply.
Unloading the Dishwasher
Allowing dishes to cool down before unloading is important because dishes tend to break and chip more easily when they are hot. Allow the items to cool before unloading.

Do not leave the appliance unattended with the door fully open as this could present a trip hazard.
We suggest:
Unload the lower basket first, followed by the cutlery basket and then the upper basket. This will prevent water drops from the upper basket from falling on to the dishes in the lower basket.
Delay Start
The starting time of a washing programme can be delayed and adjusted. Please follow the steps below.
- Open the dishwasher door and load your soiled dishes and crockery.
- Press the ⏻ On/Off Mode button to turn on the dishwasher.
- Select your preferred programme.
- Press the Delay Start button.
- Set the required delay start time using the Delay Start button.

Each press of this button increases the delay start time by 1 hour increments.
- Close the door. The unit will start the programme at the assigned time automatically.
Half Load
In case you do not have enough dishes for a full load, the half load option can be selected. Three types of wash cycles can be selected: lower basket, upper basket and both baskets. This will help save hot water and electricity. To use these functions, please follow the steps below.
- Open the dishwasher door and load your soiled dishes and crockery onto the basket.
- Press the ⏻ On/Off Mode button to turn on the dishwasher.
-
Select your preferred programme.
-
Press the "1/2" button, the half load indicator will light up.

If you have few dishes to wash, you can also activate the half-filled function. If you have dishes in both baskets, press the 1/2 button repeatedly until both indicators are lit.

If you have dishes only in the upper basket, press the 1/2 button repeatedly until the upper indicator is lit. Only dishes on the upper basket will be washed. Make sure there are no dishes in the lower basket while using this feature.

If you have dishes only in the lower basket, press the 1/2 button repeatedly until the lower indicator is lit. Only dishes on the lower basket will be washed. Make sure that there are no dishes in the upper basket while using this feature.
- Close the door and the unit will start the programme.
Cleaning After Use
External Care
The Door and the Door Seal
Clean the door seals regularly with a soft damp cloth to remove food deposits.
When the dishwasher is being loaded, food and drink residues may drip onto the sides of the dishwasher door. These surfaces are outside the wash cabinet and are not accessed by water from the spray arms. Any deposits should be wiped off these surfaces before the door is closed.
The Control Panel
If cleaning is required, the control panel should be wiped with a soft damp cloth ONLY.

- ATTENTION: To avoid penetration of water into the door lock and electrical components, do not use a spray cleaner of any kind.
- Never use abrasive cleaners or scouring pads on the outer surfaces because they may scratch the finish. Some paper towels may also scratch or leave marks on the surface.
External Care
Filtering System
The filtering system in the base of the wash cabinet retains coarse debris from the washing cycle. The collected coarse debris may cause the filters to clog. Check the condition of the filters regularly and clean them if necessary under running water.
Please follow the steps below to clean the filters in the wash cabinet.
- Ensure the dishwasher is switched off.
- Turn the coarse filter anti-clockwise and gently lift it out.
- Gently lift the main filter and the fine filter with care.
- Rinse all the filters under running water, including the filter cylinder, and then refit all filters in the reverse order.
- Gently refit the main filter back with care.
- Gently rescrew the coarse filter in clockwise direction. There will be a slight click when located correctly.

natural_image
Three-step diagram showing a hand holding a cylindrical object, a mechanical component with arrows indicating motion, and a final device with directional arrows (no text or symbols)
- Do not over tighten the filters.
- Put the filters back in sequence securely, otherwise coarse debris could get into the system and cause a blockage.
- WARNING: NEVER use the dishwasher without filters in place. Improper replacement of the filter may reduce the performance level of the appliance and damage dishes and utensils.
Spray Arms
Particles of food can get stuck in the spray arm jets and bearings. The spray arms should be checked and cleaned regularly.
- Ensure the dishwasher is switched off.
- Check whether or not the holes for the upper and lower spray arms are clogged. If there is any clogging, remove the spray arms and clean them under running water.
- You can remove the lower spray arm by pulling it upwards, while the upper spray arm nut can be removed by turning the nut to the left.
- Ensure that the nut is correctly fitted and turned to the right when refitting the upper spray arm.
Frost Precaution
Avoid placing the dishwasher in a location where the temperature can get below 0^ C. If your appliance is left in an unheated place over the winter, you are advised to:
- Disconnect the unit from the water inlet.
- Turn on the unit. Select any washing cycle and let it run for 1 minute only. This drains out all the excessive water that remains in the unit.
- Disconnect from the mains.
- Empty the dishwasher.
- Close the dishwasher's door.
- Disconnect the unit from the water drain. Use a suitable receptacle to catch any residual water in the pipes.
Should you encounter any difficulties with the above steps, please ask a service technician for assistance.
Maintenance For Prolonged Period of Non-Operation
If you are not going to use the unit for any prolonged period of time, you are advised to:
- Disconnect the dishwasher from the mains.
- Disconnect the dishwasher from the water inlet and drain. Use a suitable receptacle to catch any residual water in the pipes.
- Slightly open the door to prevent unpleasant smells building up in the compartment.
- Ensure the washing compartment of the dishwasher is clean.
Should you encounter difficulties to do the above steps, please ask a service technician for assistance.
Moving the Dishwasher
If you have to move the unit, for instance due to moving house, please do the following:
- Disconnect the dishwasher from the mains.
- Disconnect the dishwasher from the water inlet and drain. Use a suitable receptacle to catch any residual water in the pipes.
- Remove the dishwasher from the current location with the hoses discharged.

- Avoid over tilting the unit during transportation.
- 2 people are required to handle the dishwasher during installation.
Helpful Tips and Guide

- Repairs should only be carried out by a qualified technician in strict accordance with current local and national safety regulations. Unauthorised or incorrect repairs could cause personal injury or damage to the unit.
- Before calling for service, please refer to Helpful Tips and Guide to solve some general problems by yourself.
Fault Code
| Codes Possible Causes Remedy | ||
| F1 Alarm is due to water overflow | Power off your machine and | turn off the water supply to the appliance.Contact the service agent. |
| F2 The waste water in the machine cannot be discharged | Water discharge hose is clogged.The filters of your machine may be clogged.Restart your machine and cancel the program.If the error continues, contact the service agent. | |
| F3 | Error of continuous water input | Turn off the water supply to the appliance.Contact the service agent. |
| F5 | Inadequate water supply | Make sure the water input tap is fully open and that there is Water supplied to the house.Close the water input tap,separate the water input hose from the tap and clean the filter at the connection end of the hose.Restart your machine, contact the service agent if the error resumes. |
| F6 Faulty heater sensor • Contact the service agent. | ||
| F7 Overheating error (temperature in the machine is too high) | Contact the service agent. | |
| F8 Heater error • Contact the service agent. | ||
| F9 | Divisor position error | Contact the service agent. |
| FE | Faulty electronic card | Contact the service agent. |
Technical Problems
| Technical Problems | ||
| Problem Possible Causes Remedy | ||
| The dishwasher does not start. | The door is not properly closed. | Close the door firmly. |
| The unit is not connected to the mains. | Insert the plug to the mains. | |
| The unit is not switched on. | Press the On/Off Mode button and select a programme. | |
| The drain pump is not working properly. | The anti-flooding system has operated. | Disconnect from the mains.Disconnect the water inlet.Call a qualified technician. |
| General Problems | ||
| Problem Possible Causes Remedy | ||
| Detergent residue is left at the end of the programme. | The detergent slot was still damp when detergent was added. | Make sure the slot is dry before adding detergent. |
| The detergent dispenser lid cannot be closed properly. | Clogged detergent residue is blocking the catch. | Clean the catch. |
| Knocking noise in the wash cabinet. | A spray arm may is knocking against an item in a basket. | Interrupt the programme, and rearrange the items which are obstructing the spray arm. See the section “Loading the dishwasher”. |
| Smearing appears on glassware and cutlery. | The rinse aid dosage is set too high. | Adjust the dial of the rinse aid dispenser to a lower setting. |
| Dishes, cutlery and glasses are not dry. | The amount of rinse aid may be insufficient, or the rinse aid reservoir is almost empty. | Replenish the reservoir, adjust the rinse aid dispenser dial to a higher setting or change the brand of rinse aid. |
| Crockery was taken out of the dishwasher too soon. | Leave the crockery in the dishwasher until you hear the audible sound. | |
| White residue is visible on cutlery and crockery, clouding occurs on glassware; film can be wiped off. | Not enough rinse aid was used. | Replenish the reservoir, adjust the rinse aid dispenser dial to a higher setting or change the brand of rinse aid. |
| There is not enough salt in the salt reservoir. | Fill the salt reservoir. | |
| The salt reservoir cap has not been screwed on correctly. | Ensure that it screws back on correctly. | |
| Unsuitable detergent has been used. | Change your detergent. Use a dishwasher standard powder detergent or tablet. | |
| Glassware is dull and discoloured; film cannot be wiped off. | The glassware is not dishwasher proof. The surfaces are affected. | Wash the non-dishwasher proof glassware by hand instead. |
| General problems (continue) | ||
| Problem Possible Causes Remedy | ||
| Tea or lipstick stains have not been completely removed. | The wash temperature of the selected programme was too low. | Select a programme with a higher wash temperature. |
| The bleaching effect of the detergent used is too low. | Change your detergent. | |
| Forgot to pre-rinse or remove the stains with a napkin prior to washing. | Pre-rinse or remove the stains with a napkin prior to washing. | |
Disposal of Dishwasher
- When disposing of your old dishwasher, first make it unusable. Disconnect from the electricity and water supplies, cut off the cable and the plug from the mains cable. Make the door lock inoperative, so that children cannot accidentally shut themselves in. Make appropriate arrangements for the disposal of the dishwasher.
- At the end of its working life, the product must not be disposed of as urban waste. It must be taken to a local authority waste collection centre or to a dealer providing this service. Disposing of a household appliance separately avoids possible negative consequences for the environment and health deriving from an inappropriate disposal and enables the constituent materials to be recovered to obtain significant savings in energy and resources. As a reminder of the need to dispose of household appliances separately, the product is marked with a crossed-out wheeled dustbin.
- Please ensure that it presents no danger to children while being stored for disposal.
Disposal of Packing Material
Please dispose of the plastic wrappings and bags safely and keep out of the reach of babies and young children.
Specifications
| Model SDW60B12 | |
| Dimensions 596mm(W) x 598mm(D) x 845mm(H) | |
| Water Pressure Required 0.03 - 1.00MPa | |
| Power Consumption 2200W | |
| Rated Voltage 220-240V~50Hz | |
| Capacity 12 Place Settings | |
| Energy Efficiency Class A1 | |
| Annual Energy Consumption 23 kWh | |
| Energy Consumption of the Standard Cleaning Cycle 0.95 kWh | |
| Off Mode Power Consumption 0.05W | |
| Left-on Mode Power Consumption 1.9W | |
| Annual Water Consumption 220 litres | |
| Drying Efficiency Class A3 | |
| Standard Cleaning Cycle E4 D 50°C | |
| Program Duration of the Standard Cleaning Cycle | 162 min |
| Noise Level | 47 dB(A) re 1 pW |
| Mounting | Free standing |
| Could be built-in | Yes |
Features and specifications are subject to change without prior notice.
Note:
1 A + + + (highest efficiency) to D (lowest efficiency)
2 Based on 280 standard cleaning cycles using cold water fill and the consumption of the low power modes. Actual energy consumption will depend on how the appliance is used.
3 A (most efficient) to G (least efficient)
4 This is the program used for the Energy label information and is suitable for cleaning soiled normally soiled tableware. It is the most efficient programme in terms of its combined energy and water consumption for that type of tableware.
5 The device meets the European standards and the directives in the current version at delivery:
- LVD 2006/95/EC
- EMC2004/108/EC
- ERP 2009/125/EC
6 The above values have been measured in accordance with standards under specified operating conditions. Results may vary greatly according to quantity and pollution of the dishes, water hardness, amount of detergent, etc.
Safety Warnings
For your continued safety and to reduce the risk of injury or electric shock, please follow all the safety precautions listed below.
- Read all instructions carefully before using the dishwasher and keep them for future reference.
- Retain the manual. If you pass the dishwasher onto a third party, make sure to include this manual.
- Keep ventilation openings in the dishwasher enclosure clear of obstructions.
- Choose a location for your dishwasher away from heat sources such as radiators or fires.
• Children should be supervised to ensure that they do not play with the dishwasher.
- Keep mains cable out of reach from children.
- This dishwasher is not intended for use by persons (including children) with reduced sensory or mental capabilities, or lack of experience and knowledge unless they have been given supervision or instructions concerning the use of the dishwasher by a person responsible for their safety.
- Keep children away from detergents and rinse aids. These may cause chemical burns in the mouth, throat and eyes or asphyxiation.
- Keep children away from the dishwasher when the door is open.
- Switch off and disconnect from the mains supply before fitting or removing tools/attachments, after use and before cleaning.
- Keep your fingers away from moving parts and fitted attachments.
- Never use a damaged machine.
- If the mains cable is damaged, it must be replaced by the manufacturer, its service agent or a qualified technician in order to avoid a hazard.
- Keep the mains cable and plug away from water.
- Never exceed the maximum capacities.
• 2 people are required to lift this dishwasher.
- Only use the dishwasher for its intended domestic use.
- This appliance is intended to be used in households and similar places such as:
- Staff kitchen areas in shops, offices and other work places.
- By clients in motels, hotels and Bed & Breakfast establishments.
WARNING

IT IS HAZARDOUS FOR ANYONE OTHER THAN AUTHORISED SERVICE PERSONNEL TO CARRY OUT SERVICING OF REPAIRS WHICH INVOLVE THE REMOVAL OF COVERS.

TO AVOID THE RISK OF AN ELECTRICAL SHOCK DO NOT ATTEMPT REPAIRS YOURSELF.
- Do not sit or stand on the door or dish rack.
- Do not move your dishwasher by holding the door or its edges. Hold the dishwasher around its sides or base when moving it.
- Do not touch the heating element during or immediately after use.
- Do not operate your dishwasher unless all enclosure panels are properly in place. Open the door very carefully when there is a programme running as there is a risk of hot water spraying out of the appliance.
- Do not place any heavy objects on the open door. The appliance could tip.
-
When loading items to be washed:
-
Locate sharp items so that they will not damage the door seal;
- Warning: Knives and other utensils with sharp points must be loaded in the basket with the points downwards or placed horizontally.
- Do not allow plastic items to come into contact with heating element.
- Check that the detergent receptacle is empty after completion of the wash cycle.
- Do not wash plastic items unless they are marked dishwasher safe or equivalent.
- Use only detergent and rinse aids designed for an automatic dishwasher.
- The supply plug for this appliance should remain accessible or a switch for disconnection from the supply must be incorporated in the fixed wiring with at least 3mm contact separation in all poles.
• The door should not be left in the open position since this could present a tripping hazard. - For energy saving, always remember to switch the dishwasher off when you have finished using it. The dishwasher should not be left unattended when in use.
- Remove the door to the washing compartment when removing an old dishwasher from service or discarding it.
• During installation, the power supply cord must not be excessively or dangerously bent or flattened. - Do not tamper with controls.
- The appliance is to be connected to the water mains using new hose sets. Old hose sets must not be re-used.
- The maximum number of place settings to be washed is 12.
- The maximum permissible inlet water pressure is 1Mpa, and the minimum permissible inlet water pressure is 0.03Mpa.

Earthing Instructions
WARNING: THIS APPLIANCE MUST BE EARTHED.
- This appliance is equipped with a mains cable having an equipment-earthing conductor and an earthing plug.
- The plug must be plugged into an appropriate outlet that is installed and earthed in accordance with local standards and requirements.

- Improper connection of the equipment-earthing conductor could result in a risk of electric shock.
- The wires in the cord are coloured as follows:
- Green and Yellow = Earth,
- Blue = Neutral,
- Brown = Live.
- Check with a qualified electrician or service representative if you are in doubt whether the appliance is properly earthed or the plug does not fit correctly.
- Never modify the plug provided with the appliance.
| If you require a replacement for any of the items listed below, please quote their corresponding part numbers: | |
| Replacement Part Part Number | |
| Cutlery Basket | 42021073 |
| Water Supply Hose | 42005932 |
| Salt Funnel | 42005853 |

Visit Partmaster.co.uk today for the easiest way to buy electrical spares and accessories. With over 1 million spares and accessories available we can
deliver direct to your door the very next day. Visit www.partmaster.co.uk or call 0844 800 3456 (UK customers only). Calls charged at National Rate.
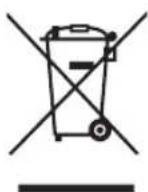
This symbol on the product or in the instructions means that your electrical and electronic equipment should be disposed at the end of its life separately from your household waste. There are separate collection systems for recycling in the EU.
For more information, please contact the local authority or your retailer where you purchased the product.

bar
| Category | Value | |---|---| | Category 1 | 100 | | Category 2 | 100 | | Category 3 | 100 | | Category 4 | 100 | | Category 5 | 100 | | Category 6 | 100 | | Category 7 | 100 | | Category 8 | 100 | | Category 9 | 100 | | Category 10 | 100 | | Category 11 | 100 | | Category 12 | 100 | | Category 13 | 100 | | Category 14 | 100 | | Category 15 | 100 | | Category 16 | 100 | | Category 17 | 100 | | Category 18 | 100 | | Category 19 | 100 | | Category 20 | 100 | | Category 21 | 100 | | Category 22 | 100 | | Category 23 | 100 | | Category 24 | 100 | | Category 25 | 100 | | Category 26 | 100 | | Category 27 | 100 | | Category 28 | 100 | | Category 29 | 100 | | Category 30 | 100 | | Category 31 | 100 | | Category 32 | 100 | | Category 33 | 100 | | Category 34 | 100 | | Category 35 | 100 | | Category 36 | 100 | | Category 37 | 100 | | Category 38 | 100 | | Category 39 | 100 | | Category 40 | 100 | | Category 41 | 100 | | Category 42 | 100 | | Category 43 | 100 | | Category 44 | 100 | | Category 45 | 100 | | Category 46 | 100 | | Category 47 | 100 | | Category 48 | 100 | | Category 49 | 100 | | Category 50 | 100 | | Category 51 | 100 | | Category 52 | 100 | | Category 53 | 100 | | Category 54 | 100 | | Category 55 | 100 | | Category 56 | 100 | | Category 57 | 100 | | Category 58 | 100 | | Category 59 | 100 | | Category 60 | 100 | | Category 61 | 100 | | Category 62 | 100 | | Category 63 | 100 | | Category 64 | 100 | | Category 65 | 100 | | Category 66 | 100 | | Category 67 | 100 | | Category 68 | 100 | | Category 69 | 100 | | Category 70 | 100 | | Category 71 | 100 | | Category 72 | 100 | | Category 73 | 100 | | Category 74 | 100 | | Category 75 | 100 | | Category 76 | 100 | | Category 77 | 100 | | Category 78 | 100 | | Category 79 | 100 | | Category 80 | 100 | | Category 81 | 100 | | Category 82 | 100 | | Category 83 | 100 | | Category 84 | 100 | | Category 85 | 100 | | Category 86 | 100 | | Category 87 | 100 | | Category 88 | 100 | | Category 89 | 100 | | Category 90 | 100 | | Category 91 | 100 | | Category 92 | 100 | | Category 93 | 100 | | Category 94 | 100 | | Category 95 | 100 | | Category 96 | 100 | | Category 97 | 100 | | Category 98 | 100 | | Category 99 | 100 | | Total (Total) |- Sandstrøm
- Instruction Manual
- Contents
- Unpacking....5
- Installation 6
- Product Overview....10
- Control Panel Overview 11
- Before Operating 12
- Loading the Dishwasher 17
- Wash Cycle Table....20
- Starting a Wash Cycle 21
- Changing or Cancelling a Programme 21
- Delay Start....22
- At the End of a Programme....22
- Switching off the Dishwasher....22
- Unloading the Dishwasher 22
- Half Load 23
- Cleaning After Use....23
- Frost Precaution 25
- Unpacking
- Location
- INSTALLATION
- Control Panel Overview
- On/Off Mode Button
- Display Window
- Program Button
- Delay Timer Button
- Tablet Detergent Button
- Prewash Button
- Half Load Button
- Salt Refill Indicator
- Before Operating
- To Open the Door
- To Close the Door
- Adding the Detergent Powder and Tablet
- Adding Rinse Aid
- Adjusting Rinse Aid Reservoir
- Adding Salt
- Adjusting of Salt Consumption
- Loading the Dishwasher
- Before Loading the Dishwasher
- Upper Basket
- Adjusting the Upper Basket
- Hinged Cup Rack
- Loading the Upper Basket for 12 Place Settings
- Lower Basket
- Hinged Spikes
- Loading the Lower Basket for 12 Place Settings
- Cutlery Basket
- Wash Cycle Table
- Starting a Wash Cycle
- Changing or Cancelling a Programme
- At the End of a Programme
- Switching off the Dishwasher
- Unloading the Dishwasher
- Delay Start
- Half Load
- Cleaning After Use
- External Care
- The Door and the Door Seal
- The Control Panel
- Filtering System
- Spray Arms
- Frost Precaution
- Maintenance For Prolonged Period of Non-Operation
- Moving the Dishwasher
- Helpful Tips and Guide
- Disposal of Dishwasher
- Disposal of Packing Material
- Specifications
- Note:
- Safety Warnings
- WARNING
- Earthing Instructions
- WARNING: THIS APPLIANCE MUST BE EARTHED.
品牌 : Sandstrøm
型号 : SDW60B12
类别 : 洗碗机