Inground Trampoline - Bạt nhún Jump Star - Hướng dẫn sử dụng miễn phí
Tìm hướng dẫn sử dụng thiết bị miễn phí Inground Trampoline Jump Star ở định dạng PDF.

Câu hỏi của người dùng về Inground Trampoline Jump Star
0 câu hỏi về thiết bị này. Trả lời những câu bạn biết hoặc đặt câu hỏi riêng.
Đặt câu hỏi mới về thiết bị này
Tải xuống hướng dẫn cho thiết bị của bạn Bạt nhún ở định dạng PDF miễn phí! Tìm hướng dẫn của bạn Inground Trampoline - Jump Star và lấy lại thiết bị điện tử của bạn. Trên trang này được đăng tải tất cả các tài liệu cần thiết để sử dụng thiết bị của bạn. Inground Trampoline thương hiệu Jump Star.
HƯỚNG DẪN NGƯỜI DÙNG Inground Trampoline Jump Star

natural_image
Circular trampoline with blue cover and star logo, no visible text or symbols on the tray itselfJumpStar Inground Trampolines
CHILDREN SHOULD BE SUPERVISED BY A RESPONSIBLE ADULT AT ALL TIMES

DO NOT attempt or allow somersaults. Landing on the head or neck can cause serious injury, paralysis or death, even when landing in the middle of the bed.

DO NOT allow more than one person on the trampoline. Use by more than one person at the same time can result in serious injury.

8.2FT (251cm)

10FT (305cm)

12FT (366cm)

13FT (397cm)

14FT (427cm)

15FT (457cm)

FT (487cm)
ASSEMBLY INSTRUCTIONS
To assemble this trampoline all you need is our special spring loading tool provided with this product.
During periods of non-use. This trampoline can be easily disassembled and stored.
Please read the assembly instructions before beginning to assemble the product.
PRIOR TO ASSEMBLING
Please refer to page for part descriptions and numbers. The assembly steps use these descriptions and numbers as reference for your convenience.
Make sure that you have all parts listed. If you are missing any parts, please refer to page for Instructions on how to attain any parts.
To prevent any injuries to your hands from pinch points during assembly, please use gloves to protect your hands.
PARTS LIST
Please select your trampoline size.
| Number | Description | 8.2' | 10' | 12' | 13' | 14' | 15' | 16' |
| 1 | Top rail with T-section | 6 | 8 | 8 | 8 | 8 | 10 | 10 |
| 2 | Bottom rail T-section | 6 | 8 | 8 | 8 | 8 | 10 | 10 |
| 3 | Bottom rail | 6 | 8 | 8 | 8 | 8 | 10 | 10 |
| 4 | Galvanized springs | 54 | 64 | 72 | 80 | 88 | 100 | 110 |
| 5 | Jump mat | 1 | 1 | 1 | 1 | 1 | 1 | 1 |
| 6 | Frame pad | 1 | 1 | 1 | 1 | 1 | 1 | 1 |
| 7 | Elastic bungees | 12 | 16 | 16 | 16 | 16 | 20 | 20 |
| 8 | Black PP plates | 6 | 8 | 8 | 8 | 8 | 10 | 10 |
| 9 | Black PP plate patches | 6 | 8 | 8 | 8 | 8 | 10 | 10 |
| 10 | Spring tool | 1 | 1 | 1 | 1 | 1 | 1 | 1 |
| 11 | ‘U’ Clamps | 12 | 16 | 16 | 16 | 16 | 20 | 20 |
FRAME ASSEMBLY
All parts with the same number are interchangeable. Most connections have a “spring button”, this creates a safe connection between parts. During assembly make sure that all parts click together properly.
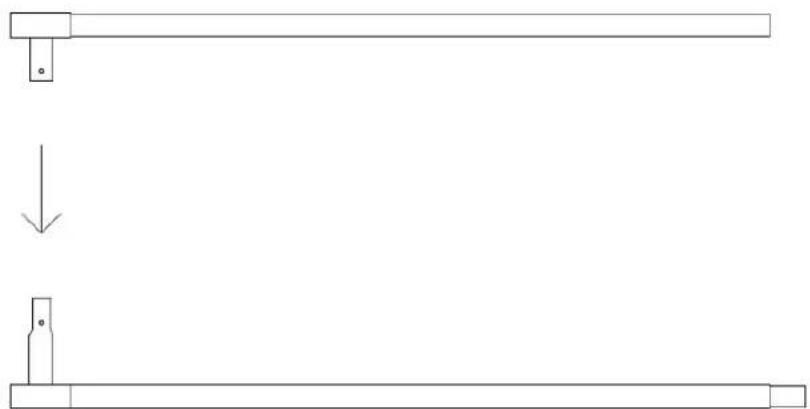
STEP 1:
Connect the T-section(2) to the bottomrail(3).

natural_image
Pure mechanical part diagrams showing a shaft and a rectangular shaft with an arrow indicating direction (no text or symbols)STEP 2:
Connect the top rail with T-section(1) to the assembled section from step 1.
natural_image
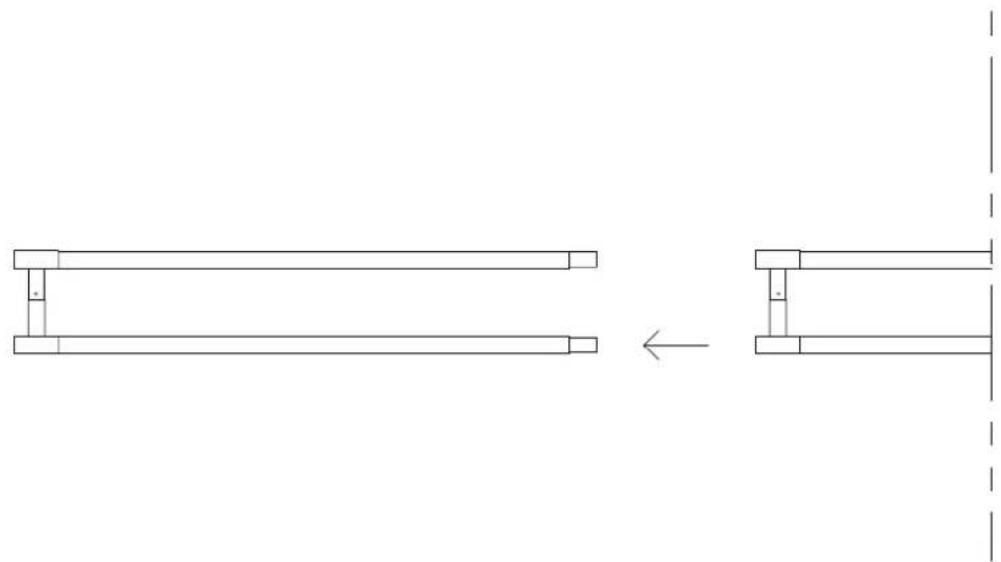
Pure diagram of three horizontal bars with a downward arrow, no text or symbols presentSTEP 3:
Assemble the sections from step 2 to a full circle.
natural_image
Pure mechanical assembly diagram showing two horizontal bars with a right-angle arrow indicating transformation (no text or symbols)STEP 4:
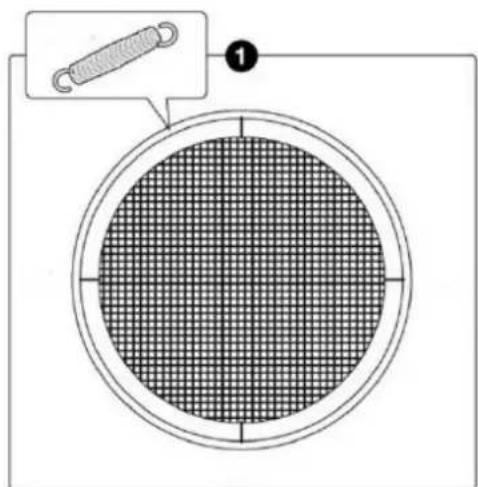
While assembling the jumping mat you will need the mat(5), springs(4) and the spring tool(10). This step is best done with 2 persons.
ATTENTION: While attaching the springs there will be a lot of tension on the spring, be aware of sharp ends of the springs.
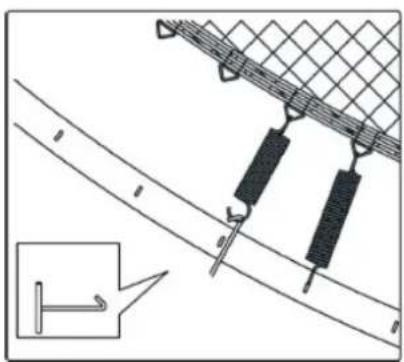
How does the spring tool work?
a. Place the small eye of the spring in the V-ring on the mat, then place the spring tool in the extended hook of the spring.
b. Pull the spring towards you and place the extended hook in the frame.
natural_image
Technical diagram showing a mesh fence and two hanging weights attached to a diagonal line, with an inset detail of a hook (no text or symbols present)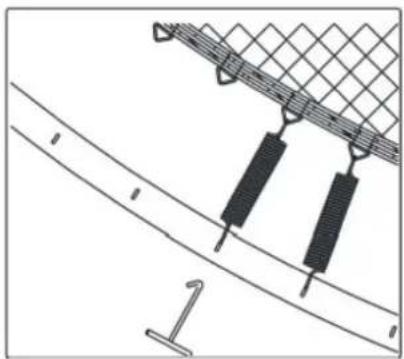
natural_image
Technical line drawing of a cable or wire connection with two black components and a mesh fence (no text or symbols)The springs should be evenly distributed over the mat, see the image below how to divide the springs
natural_image
Circular grid pattern with a magnified inset showing a coiled spring attached to the top edge (no text or symbols)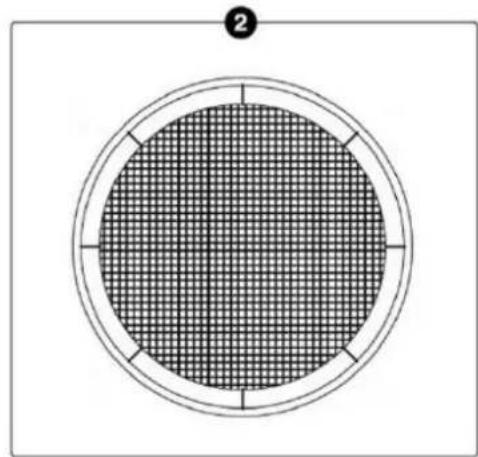
natural_image
Circular diagram with a grid pattern inside, enclosed by concentric rings (no text or symbols)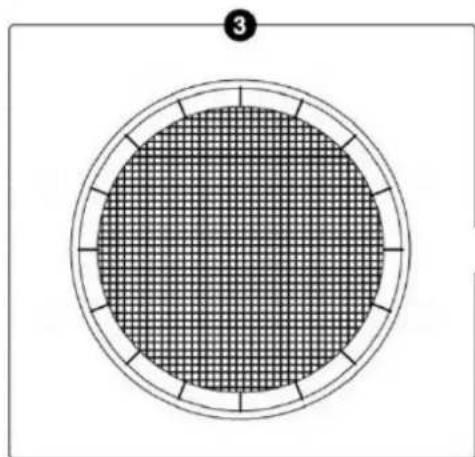
natural_image
Circular diagram with a grid pattern inside, no text or symbols present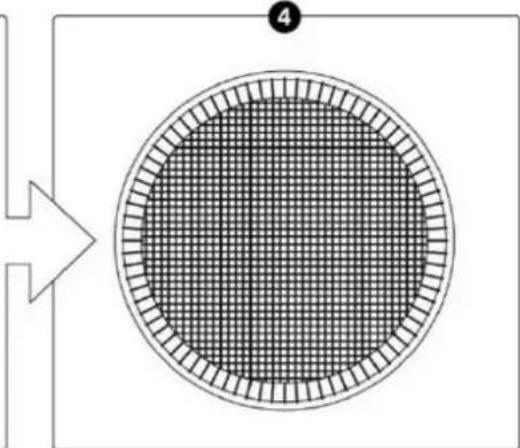
natural_image
Circular grid pattern inside a square frame with an arrow pointing to the left side (no text or symbols)STEP 5:
Place the pad(6) on the frame so the springs and frame are completely covered. Also make sure the safety instructions are on the entrance side of the trampoline.
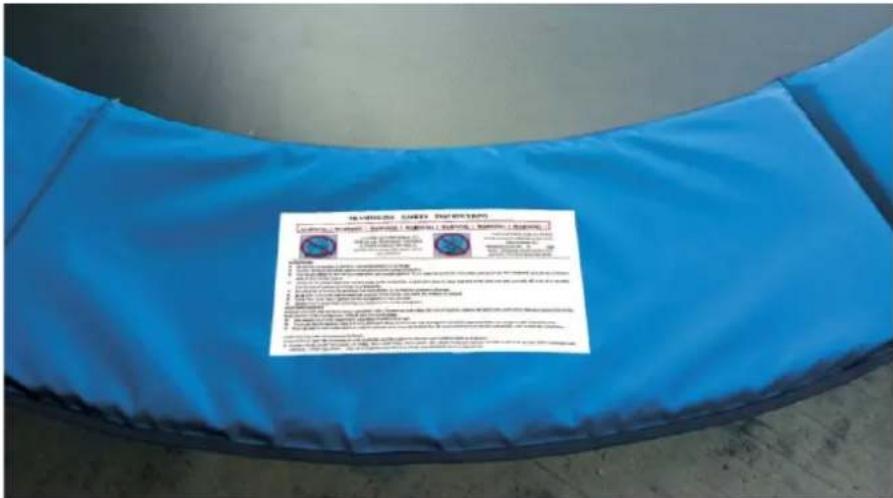
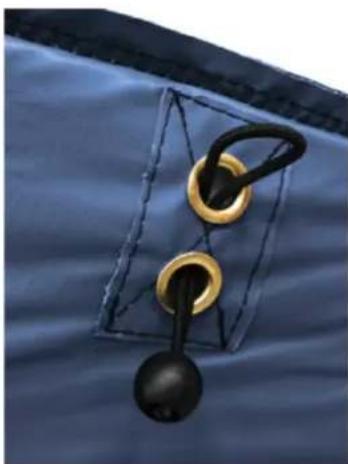
On the bottom side of the pad there are eyelets to connect the pad to the frame. Pull the elastic bungee(7) through the eyelets and tie it around the frame.
natural_image
Close-up of a blue fabric with two gold rings and a black ball attached to a dark rectangular frame (no text or symbols visible)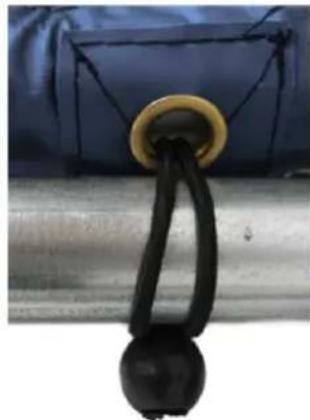
natural_image
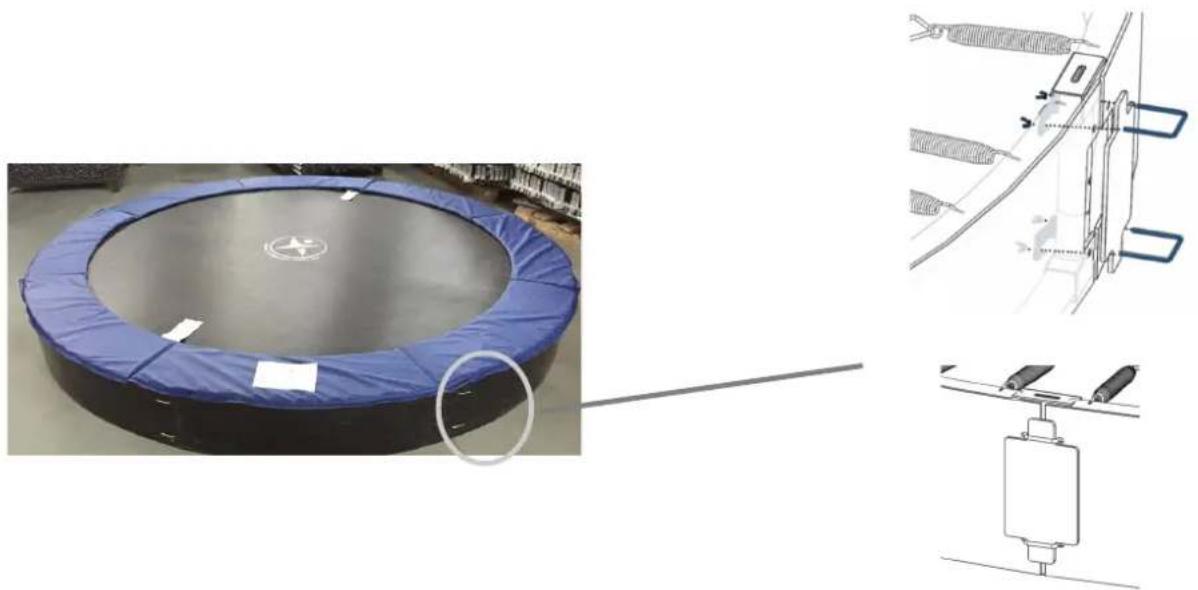
Close-up of a blue fabric with a yellow circular button and black string, attached to a metallic cylindrical object (no text or symbols visible)STEP 6: Attach the black PP-plates (8) and black PP plate patches (9) to the trampoline frame with U clamps.
natural_image
Exterior view of a blue trampoline with a star logo, alongside technical diagrams of mechanical components (no text or symbols)STEP 7:
Place the trampoline in the hole. Below are the dimensions of the hole per trampoline diameter.
HOLE DIMENSIONS
(Round Trampolines)
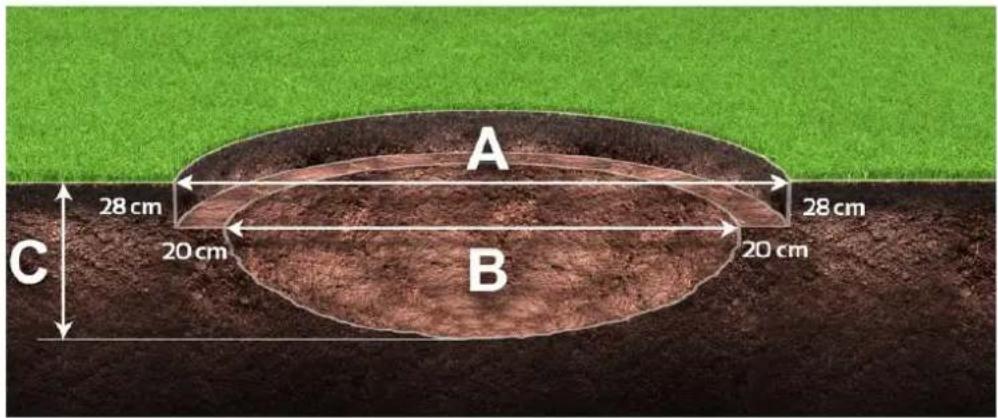
A-Trampoline size
| 8.2FT (251cm) | 211cm | 75cm |
| 10FT (305cm) | 265cm | 75cm |
| 12FT (366cm) | 326cm | 90cm |
| 13FT (397cm) | 357cm | 90cm |
| 14FT (427cm) | 387cm | 90cm |
| 15FT (457cm) | 417cm | 90cm |
| 16FT (487cm) | 447cm | 90cm |
B- Hole diameter
C- Hole depth
TO UNASSEMBLE
- To disassemble the trampoline, follow assembly instructions in reverse order.
- Do not attempt to disassemble any frame components before the springs and the mat have been removed.
- Use gloves to protect your hands from pinch points.
HOW DO I USE THIS PRODUCT
LESSON PLAN
The following paragraphs and diagrams are suggested in order to learn basic steps and bounces before moving on-to more difficult, complicated bounces. Before using the trampoline, you should read and understand all safety instructions.
Lesson 1
A. Mounting and dismounting demonstration of proper techniques.
B. The basic bounce demonstration and practice.
C. Braking (check the information on use section) and practice. Learn to brake on command.
D. Hands and knees demonstration and practice. Stress should be on four-point landing and alignment.
Lesson 2
A. Review and practice of techniques learned in Lesson1.
B. Knees bounce demonstration and practice. Learn the basic down to knee and back up before trying half twist to left and right.
C. Seat bounce demonstration and practice. Learn basic seat bounce then add a knee bounce, hands and knees;
D. Repeat.
Lesson 3
A. Review and practice skills and techniques learned in previous lessons.
B. Front drop demonstration. To avoid mat burns, teach the front bounce position. All students should be requested to assume the prone position (face down on the ground) while the instructor checks for faulty positions that could cause injury.
C. Start with a hands and knees bounce and then extend body into prone position, and on the mat and return to feet.
D. Practice routine hands and knees bounce, front Bounce, back to feet, seat bounce, back to feet, seat bounce, back to feet.
Lesson 4
A. Review and practice skills and techniques learned in previous lessons.
B. Half turn demonstration.
C. Start from front drop position and as you make contact with mat, push off with arms in either the right or left direction and turn head and shoulders in same direction.
D. During turn, be sure to keep back parallel to mat and head up.
E. After completing turn, land in front drop position
F. After completing this lesson, the student now has a basic foundation of trampoline bounces. Jumpers should be encouraged to try and develop their own routines with the emphasis on control and form.
G. A game that can be played in order to encourage students to try and develop routines is “BOUNCE”. In this game, players count off from 1 to 10. Player one starts with a maneuver. Player two has to do Player one’s maneuver and add on another. Player cannot do the routine properly in the correct sequence. The first person to miss, receives the letter “B”. This continues until someone spells out the word “BOUNCE”. The last remaining contestant is deemed the winner! Even when playing this game, it is important to perform your routines under control and not try difficult or highly skilled bounces that you have not yet mastered.
REMEMBER! THIS TRAMPOLINE IS ONLY SUITABLE FOR ONE PERSON AT A TIME.
A certified trampoline instructor should be contacted to further develop your trampoline skills.
BASIC TRAMPOLINE BOUNCE
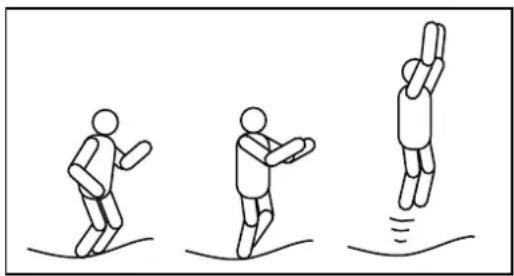
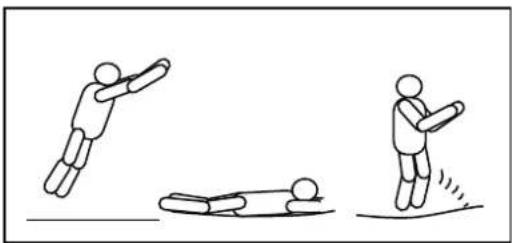
THE BASIC BOUNCE
natural_image
Three stick figures in motion, showing different actions: jumping, throwing, and falling (no text or symbols)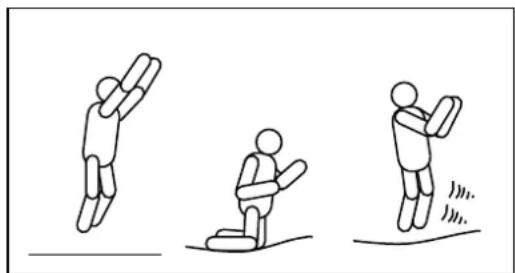
natural_image
Three stick figures in various poses: jumping, holding a box, and rolling down on ground (no text or symbols)- Start from standing position, feet shoulder width apart and with bead up and eyes on mat.
- Swing arms forward and up and around in a circular motion.
- Bring feet together while in mid-air and point toes downward.
-
Keep feet shoulder width apart when landing on mat.
-
Start with basic bounce and keep it low.
- Land on knees keeping back straight, body erect and use your arms to maintain balance.
- Bounce back to basic bounce position by swinging arms up
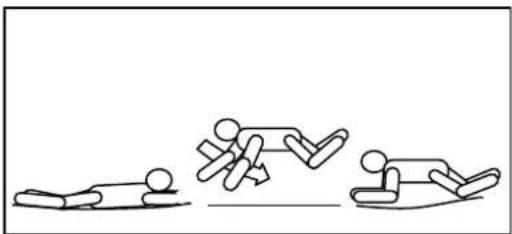
THE SEAT BOUNCE
natural_image
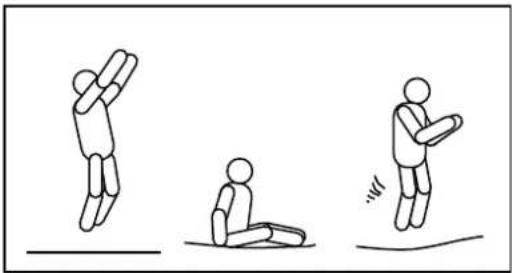
Three stick figures in various poses: jumping, kneeling, and holding a tray (no text or symbols)THE FRONT BOUNCE
natural_image
Three stick figures demonstrating different physical actions: swinging a bat, rolling a ball, and kicking a rope (no text or symbols)180 DEGREE TURN BOUNCE
natural_image
Simple line drawing of three stick figures in different positions on a horizontal surface (no text or symbols)- Land in a flat sitting position.
- Place hands on mat besides hips.
-
Return to erect position by pushing with hands
-
Start with front bounce position.
- Land in prone (face down) position and keep hand and arms extended forward on mat.
- Push off the mat with arms to return to standing position.
1.Start with front bounce position.
2. Push off with left or right hands and arms (depending on which way you wish to turn).
3. Maintain head and shoulders in the same direction and keep back parallel to mat and head up.
4. Land in prone position by return to standing position by pushing up with hands and arms.
ALWAYS START YOUR JUMP AT THE BROKEN CIRCLE. WHEN YOU LAND MORE THAN 1F (30cm) AWAY FROM THE EDGE OF THE BROKEN CIRCLE, STOP YOUR JUMP IMMEDIATELY!! RESTART YOUR JUMP AT THE BROKEN CIRCLE.
CARE AND MAINTENANCE
This trampoline was designed and manufactured with quality materials and craftsmanship. If maintenance is provided, it will provide all jumpers with years of exercise, fun, and enjoyment as well as reduce the risk of injury.
Please follow the guidelines listed below:
This trampoline is designed to withhold a certain amount of weight during use. Please make sure that only one person at any one time uses the trampoline. Jumpers should wear either socks or gymnastics shoes when using the trampoline. Please be aware that trainers or tennis shoes should NOT be worn while using the trampoline. In order to prevent the trampoline mat from getting cut or damaged please do not allow any pets onto the mat. Jumpers should remove all sharp objects from their person (including jewelry) prior to using the trampoline. Any type of sharp or pointed objects should be kept off the trampoline mat at all times.
Always inspect the trampoline before each use for worn, abused or missing parts. A number of conditions could arise that may increase your chances of getting injured. Please be aware that the following could represent potential hazards:
- Punctures, frays, holes, or tears in the trampoline mat or frame pad.
- Sagging trampoline mat.
- Loose stitching or any kind of deterioration of the mat or frame pad.
- Bent or broken frame parts.
- Broken, stretched, missing, or damaged springs.
- Damaged, missing, or insecurely attached frame pad.
IF YOU FIND ANY OF THE PREVIOUS CONDITIONS, OR ANYTHING ELSE THAT YOU FEEL COULD CAUSE HARM TO ANY USER, THE TRAMPOLINE SHOULD BE UNASSEMBLED OR SECURED FROM USE UNTIL THE CONDITION(S) HAVE BEEN RESOLVED.
Enjoy your trampoline!

JumpStar Trampolines Pty Ltd Unit 4/29 Mcintyre Way, Kenwick WA 6107 Email: info@jumpstarcom.au www.jumpstar.com.au