JCF84180 - Tủ lạnh Juno Electrolux - Hướng dẫn sử dụng miễn phí
Tìm hướng dẫn sử dụng thiết bị miễn phí JCF84180 Juno Electrolux ở định dạng PDF.

Câu hỏi của người dùng về JCF84180 Juno Electrolux
0 câu hỏi về thiết bị này. Trả lời những câu bạn biết hoặc đặt câu hỏi riêng.
Đặt câu hỏi mới về thiết bị này
Tải xuống hướng dẫn cho thiết bị của bạn Tủ lạnh ở định dạng PDF miễn phí! Tìm hướng dẫn của bạn JCF84180 - Juno Electrolux và lấy lại thiết bị điện tử của bạn. Trên trang này được đăng tải tất cả các tài liệu cần thiết để sử dụng thiết bị của bạn. JCF84180 thương hiệu Juno Electrolux.
HƯỚNG DẪN NGƯỜI DÙNG JCF84180 Juno Electrolux
www.electrolux.com
www.juno-electrolux.de
Juno
Electrolux
Thinking of you
Gebrauchsanweisung
Instruction book
Kühl-Gefriergerät
fridge-freezer
ANC number: 2223 347-53-00 27072006
JCF 84180
We were thinking of you
when we made this product
electrolux 3
Willkommen bei Electrolux!
Wir möchten uns bedanken, dass Sie sich für ein erstklassiges Produkt vor Electrolux entschieden haben, welches Ihnen sicherlich viel Freude bereiten wird. Es ist unser Bestreben, eine breite Vielfalt von Qualitätsprodukten anzubieten, die helfen, Ihr Leben etwas komfortabler zu machen. Sie finden einige Beispiele auf der vorletzten Seite in diesem Heft. Bitte nehmen Sie sich einige Minuten, diese Benutzerinformation zu lesen, um voll von den Vorteilen Ihres neuen Gerätes profitieren zu können. Wir sind sicher, dass wird Ihr Leben zukünftig etwas leichter machen. Wir wünschen eine gute Zeit.
Mit dem W Andreieck und/oder durch Signalwörter (Warnung!, Vorsicht!, Achtung!) sind
Hinweise hervorgehoben, die für Ihre Sicherheit oder für die Funktionsfähigkeit des Gerätes wichtig sind. Bitte unbedingt beachten.
Nach Adiesem AZeichen Aerhalten ASie Aergänzende Alinformationen Azur ABedienung und praktischen Anwendung des Gerätes.
Mit Ader ABlume Asind ATips Aund AHinweise Azum Awirtschaftlichen Aund umweltschonenden Einsatz des Gerätes gekennzeichnet.

Das Symbol Aauf dem Produkt oder seiner Verpackung weist darauf
hin, Adass Adieses AProdukt Anicht Aals Anormaler Al-laushaltsabfall Azu Abehandeln Ais sondern Aan Aeinem ASammelpunkt Afür Adas ARecycling Avon Aelektrischen Aund elektronischen AGeräten Aabgegeben Awerden A Amuss. ADurch Alhren ABeitrag Azum korrekten AEntsorgen Adieses AProdukts Aschützen ASie Adie AUmwelt Aund Adie Gesundheit Ihrer Mitmenschen. Umwelt und Gesundheit werden durch falsches Entsorgen gefährdet. Weitere Informationen über das Recycling dieses Produkts erhalten Sie von Ihrem Rathaus, Ihrer Müllabfuhr oder dem Geschäft, in dem Sie das Produkt gekauft haben.
www.electrolux.com
| Albania | +35 5 4 261 450 | Pr. Pieter Bogdani Nr. 7 Tirano |
| Belgicus/België/Belgiion | +32 2 363 04 44 | Bergensesteenweg 719, 1502 Lembeek |
| Česká republika | +420 2 61 12 61 12 | Budőjovická 3, Praha 4, 140 21 |
| Danmark | +45 70 11 74 00 | Sjaelandsgade 2, 7000 Fredericia |
| Deutschland | +49 180 32 26 622 | Muggenhofer Str. 135, 90429 Nürnberg |
| Eesti | +37 2 66 50 030 | Mustamäe tee 24, 10621 Tallinn |
| España | +34 902 11 63 88 | Carretera M-300,Km.29,900 Alcalá de Henares Madrid |
| France | www.electrolux.fr | |
| Great Britain | +44 8705 929 929 | Addington Way, Luton, Bedfordshire LU4 9QQ |
| Hellas | +30 23 10 56 19 70 | 4, Limnou Str., 54627 Thessaloniki |
| Hrvatska | +385 1 63 23 338 | Slavonska avenija 3, 10000 Zagreb |
| Ireland | +353 1 40 90 753 | Long Mile Road Dublin 12 |
| Italia | +39 (0) 434 558500 | C.so Lino Zanussi, 26 - 33080 Porcia (PN) |
| Latvija | +37 17 84 59 34 | Kr. Barona iela 130/2, LV-1012, Riga |
| Lietuva | +370 5 2780609 | Verkių 29, LT-09108 Vilnius |
| Luxembourg | +35 2 42 43 13 01 | Rue de Bilbourg, 7, L-1273 Hamm |
| Magyarország | +36 1 252 1773 | H-1142 Budapest XIV, Erzsébet királyné útja 87 |
| Nederland | +31 17 24 68 300 | Vennootsweg 1, 2404 CG - Alphen aan den Rijn |
| Norge | +47 81 5 30 222 | Risløkkvn. 2 , 0508 Oslo |
| Österreich | +43 18 66 400 | Horziggasso 9, 1230 Wien |
| Polska | +48 22 43 47 300 | ul. Kolejowa 5/7, Warsaw |
| Portugal | +35 12 14 40 39 39 | Quinta da Fonte-Edificio Gonçalves Zarco-Q 35-2774-518 Paço de Arcos |
| Romania | +40 21 451 20 30 | Str. Garli Progresului 2, S4, 040671 RO |
| Schweiz-Suisse-Svizzera | +41 62 88 99 111 | Industriestrasse 10, CH-5506 Mågenwil |
| Slovenija | +38 61 24 25 731 | Tržaška 132, 1000 Ljubljana |
| Slovensko | +421 2 43 33 43 22 | Electrolux Sloveča s.r.o., Electrolux Domica spotskõle SK, Seberinho 1, 32° 03 Barstava |
| Suomi | +35 8 26 22 33 00 | Konepajannranta 4, 28100 Pori |
| Sverige | +46 (0)771 76 76 76 | Electrolux Servico, St: Göransgatan 143, S-105 45 Stockholm |
| Türkiye | +90 21 22 93 10 25 | Tarlabagi caddesi no : 35 Taksim Istanbul |
| Россия | +7 095 937 7837 | 129090 Москва, Олимпийский проспект, 16, БЦ "Олимпик" |
EUROPEAN GUARANTEE
This appliance is guaranteed by Electrolux in each of the countries listed at the back of this user manual, for the period specified in the appliance guarantee or otherwise by law. If you move from one of these countries to another of the countries listed, the appliance guarantee will move with you subject to the following qualifications:-
- The appliance guarantee starts from the date you first purchased the appliance which will be evidenced by production of a valid purchase document issued by the seller of the appliance.
- The appliance guarantee is for the same period and to the same extent for labour and parts as exists in your new country of residence for this particular model or range of appliances.
- The appliance guarantee is personal to the original purchaser of the appliance and cannot be transferred to another user.
- The appliance is installed and used in accordance with instructions issued by Electrolux and is only used within the home, i.e. is not used for commercial purposes.
- The appliance is installed in accordance with all relevant regulations in force within your new country of residence.
- The provisions of this European Guarantee do not affect any of the rights granted to you by law.
INHALT
| Warnungen und wichtige HinweiseA | 6 |
| GebrauchA9 | |
| Reinigung der InnenteileA9 | |
| BedienungsblendeA9 | |
| Gebrauch des GefrierschrankesA9 | |
| InbetriebnahmeA9 | |
| TemperaturregelungA9 | |
| SchnelligefriervorgangA10 | |
| Einfrieren von frischen LebensmittelnA10 | |
| Aufbewahrung der TiefkühlkostA10 | |
| Eiswürfelbereitung | 10 |
| Kälteakku | 10 |
| Gebrauch des Kühlschrankes | 11 |
| Inbetriebnahme | 11 |
| Temperaturregelung | 11 |
| Hinweise zum richtigen Kühlen von Lebensmitteln und Getränken | 11 |
| Höhenverstellbare Abstellregale | 12 |
| Flaschenhalterung | 12 |
| Höhenverstellung der Innentürablagen | 13 |
| Kontrolle der Feuchtigkeit | 13 |
| Auftauen | 13 |
| TipsA | 14 |
| Tips für das Kühlen | 14 |
| Tips für das Einfrieren | 14 |
| Tips für Tiefkühlkost | 15 |
| Wartung | 15 |
| Regelmäßige Reinigung | 15 |
| Stillstandzeiten | 16 |
| Innenbeleuchtung | 16 |
| Abtauen | 16 |
| Störungen | 17 |
| InstallationA | 17 |
| Ausstellung | 17 |
| Elektrischer Anschluß | 17 |
| Türanschlagwechsel | 18 |
| Montageanleitung für den integrierten Einbau | 19 |
| Garantie/KundendienstA | 22 |
| Europäische GarantieA | 23 |
| www.electrolux.comA24 | |
i WARNUNGEN UND WICHTIGE HINWEISE
Es ist sehr wichtig, daß diese Bedienungsanleitung mit dem betreffenden Gerät aufbewahrt wird. Sollte dieses Gerät verkauft bzw. einer anderen Person gegeben werden, so ist es nötig, die Anleitung beizufügen, damit der neue Besitzer über den Betrieb des Gerätes bzw. die entsprechenden Warnungen.
Sollte dieses Gerät mit Magnet-Türverschluß als Ersatz für ein altes Gerät dienen, das noch mit einem Schnappschoß ausgerüstet ist, so machen Sie bitte dieses Schloß unbrauchbar, bevor Sie das Gerät beiseite stellen oder zum Müll geben. Sie verhindern damit, daß spielende Kinder sich selbst einsperren und damit in Lebensgefahr kommen.
Diese Warnungen wurden zu Ihrem bzw. dem Schutz anderer erarbeitet. Wir bitten Sie daher, diese aufmerksam zu lesen, bevor das Gerät in Betrieb genommen wird.
Sicherheit
- Dieses Gerät wurde hergestellt, um von Erwachsenen benutzt zu werden. Es ist unbedingt darauf zu achten, daß Kinder es nicht anfassen oder es als Spielzeug verwenden.
- Es ist gefährlich, die Eigenschaften dieses Gerätes zu ändern.
• Vor der inneren bzw. äußeren
Reinigung des Gerätes sowie beim Auswechseln der Glühlampe (bei damit ausgestatteten Geräten) das Gerät spannungslos machen.
- Eis aus dem Gefrier- bzw. Frosterfach nicht sofort essen, es könnte Kälte-Brandwunden verursachen.
- Dieses Gerät ist schwer. Beim Versetzen bitte darauf achten!
- Beachten Sie, dan während der Bewegung des Gerätes der Kältemittelkreislauf nicht beschädigt wird.
- Das Gerät darf nicht in unmittelbarer Nähe von Heizkörpern oder Gasherden aufgestellt wwerden.
• A Ein Standort mit direkter Sonneneinstrahlung sollte vermieden w/werden. - Eine ausreichende Luftzirkulation an der Geräterückseite muß gewährleistet sein. Jegliche Beschädigung des Kühlkreislaufes ist zu vermeiden.
- NUR FÜR GEFRIERSCHRÄNKE (Einbaugeräte ausgenommen): ein optimaler Aufstellungsort ist der Keller.
- Keine Elektrogeräte (z.B. Eismaschinen) in das Gerät stellen.
Störungen-Kundendienst
- Sollte die Installation des Gerätes eine Änderung der elektrischen Hausinstallation verlangen, so darf diese nur von Elektro-Fachkräften durchgeführt werden.
Place the small square on the guide again and fix it with the screws supplied.
Should the lining up of the furniture door be necessary, use the clearance of slots.
At the end of operations, it is necessary to check if the door of the furniture closes properly.
natural_image
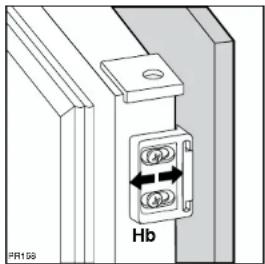
Technical diagram of a mechanical or electrical component with two labeled parts (Hb and PR109), no readable text or symbols beyond labels.Fix cover (Hd) on guide (Hb) until it clips into place.
text_image
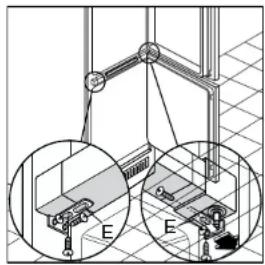
Hb Hd P16271In case of side fixing of the appliance, it will be sufficient to lose the screws fixing the bracket (E) and to position it as shown in figure.
natural_image
Technical diagram of a mechanical assembly with two views (E) showing different components, no text or symbols present.Place guide (Ha) on the inside part of the furniture door, up and down as shown in the figure and mark the position of external holes. After having drilled holes, fix the guide with the screws supplied.
text_image
ca. 50 mm 80° 21 mm 80° ca. 50 mm 21 mmFix cover (Hc) on guide (Ha) until it clips into place.
text_image
Ha 0.5 9008 HcOpen the appliance door and the furniture door at 90°. Insert the small square (Hb) into guide (Ha). Put together the appliance door and the furniture door and mark the holes as indicated in the figure.
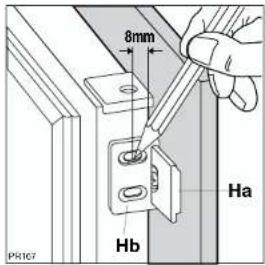
text_image
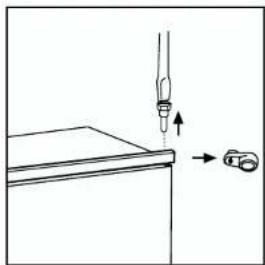
8mm Ha Hb PR167Remove the brackets and mark a distance of 8 mm from the outer edge of the door where the nail must be fitted (K).
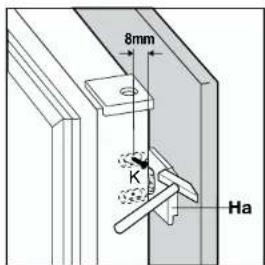
text_image
8mm K Ha- Eventuelle Reparaturen dürfen nur von einem Kundendienst oder sonstigen autorisierten Stellen durchgeführt werden.
- Es ist wichtig, daß nur Original-Ersatzteile verwendet werden.
- ADieses Gerät enthält im Kältekreislauf Kohlenwasserstoff. Aus diesem Grund darf die Wartung und das Nachfillen ausschließlich von autorisiertem Fachpersonal durchgeführt werden.
- ABenutzen Sie nie Metallgegenstände um das Gerät zu reinigen, da es beschädigt werden könnte.
- Tritt eine Störung oder ein Defekt ein, versuchen Sie nicht, das Gerät selbst zu reparieren. Elektrogeräte dürfen nur von Elektro-Fachkräften repariert werden, da durch unsachgemäße Reparaturen erhebliche Folgeschäden entstehen können. Wenden Sie sich bitte an die nächste Kundendienststelle.
Gebrauch
• Die Haushaltskühl- und Gefriergeräte sind nur zur Einlagerung bzw. zum Einfrieren von Nahrungsmitteln bestimmt.
- Die beste Leistung erzielt man bei Raumtemperaturen von +18°C bis +43°C (Klasse T); +18°C bis +38°C (Klasse ST); +16°C bis +32°C (Klasse N); +10°C bis +32°C (Klasse SN); die Geräteklasse ist auf dem Typschild angegeben.
Zu beachten: Wird dieses Gerätes bei anderen Umgebungstemperaturen
betrieben als den in der entsprechenden Klimaklasse angegebenen Werten, sind folgende Hinweise zu beachten: sinkt die Umgebungstemperatur unter den angegebenen Mindestwert ab, könnte die Lagertemperatur im Gefrierabteil nicht mehr garantiert sein; es wird daher empfohlen, die eingelagerten Lebensmittel so rasch als möglich zu verbrauchen.
•AEinaufgetautes Produkt darf nicht wieder eingefroren werden.
- AFür das Aufbewahren bzw. das Einfrieren der Lebensmittel sind die Anweisungen des Herstellers zu befolgen.
•Aln allen Kühl- und Gefriergeräten bedecken sich im Laufe der Zeit alle kälteführenden Teile mit einer Reit bzw. Eissicht. Diese Schicht wird je nach Modell automatisch oder mit der Hand abgetaut.
•ADie Reifsicht niemals mit Metallgegenständen abkratzen, das Gerät könnte beschädigt werden. Dazu nur den mitgelieferten Plastikschaber verwenden.
- AZum Lösen der festgefrorenen Eisschalen keine scharfkantigen oder spitzn Gegenstände benutzen.
•AEs sollten keine kohlensäurehaltigen Getränke in das Gefrier- bzw. Frosterfach eingestellt werden, sie könnten platzen.
Aufstellung
- Sich vergewissem, daß das Gerät nach der Installation nicht auf dem Netzkabel steht.
Wichtig: Beschädigte Versorgungskabel müssen durch ein Spezialkabel bzw. einen Spezialsatz ersetzt werden, die beim Hersteller oder den Kundendienststellen erhältlich sind. - Während das Gerät in Betrieb ist, werden der Verflüssiger und der Kompressor, die sich auf der Rückseite des Gerätes befinden, heiß. Es ist darauf zuachten, dass die Luft um das Gerät frei zirkulieren kann, damit die Wärme abgeführt werden kann. Eine ungenügende Luftzirkulation kann einen unregelmässigen Betrieb bzw. Schäden am Gerät verursachen. Achten Sie auf die Installationsanweisungen.
- Teile, die heiß werden (z.B. Kompressorgehäuse, Verflüssiger und zugehörige Rohre), sollen nicht frei zugänglich sein. Wo es auch immer möglich ist, soll das Gerät mit der Rückseite gegen eine Wand gestellt werden.

Umweltnormen
Dieses Gerät enthält im Kühlkreislauf und in der Isolierung kein ozonschädigendes Gas. Das Gerät darf nicht mit dem Hausmüll entsorgt werden. Eine Beschädigung des Kältemittelkreislaufs, insbesondere des Wärmetauschers auf der Rückseite des Gerätes, muß verhindert werden. Auskunft über Abholtermine oder Sammelplätze gibt die örtliche Gemeindeverwaltung an. Die in diesem Gerät verwendeten und mit dem Symbol ♣ gekennzeichneten Materialien, sind recyclingfähig.
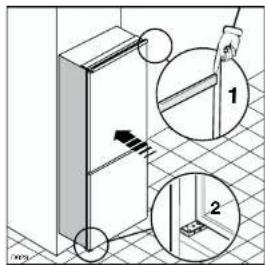
Fit the appliance in the niche by making sure that it stands against the interior surface of the unit on the side where the door hinges of the appliances are fitted. Insert the appliance until the upper strip butts up against the unit (1) and make sure that the lower hinge is in line with the surface of the unit (2).
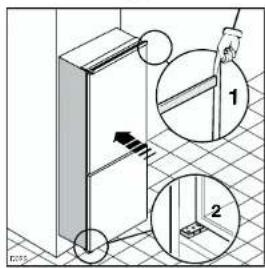
text_image
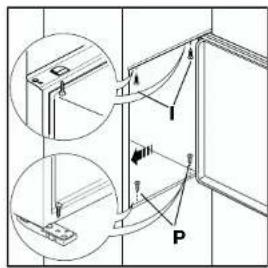
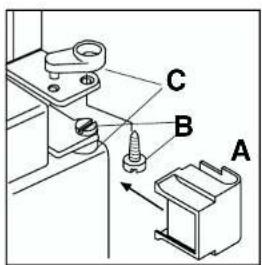
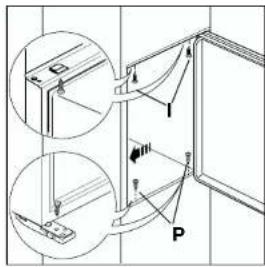
Diagram illustrating door door installation steps with labeled components and directional arrowsFasten the appliance with 4 screws provided in the kit included with the appliance. (I = short) - (P = long).
text_image
Technical diagram showing mechanical assembly with labeled components and cross-sectional viewsApply covers (C-D) on joint cover lugs and into hinge holes. Snap vent grille (B) and hinge cover (E) into position.

text_image
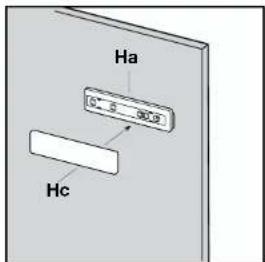
Technical diagram showing labeled components A, B, C, D, and E with mechanical connections and detail viewsSeparate parts Ha, Hb, Hc, Hd as shown in the figure
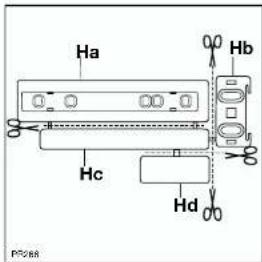
text_image
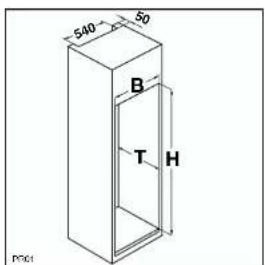
Ha Hb Hc Hd P2068i Instructions for totally built-in appliances
Building-in instructions
Dimensions of housing
Height 1780 mm
Depth 550 mm
Width 560 mm
text_image
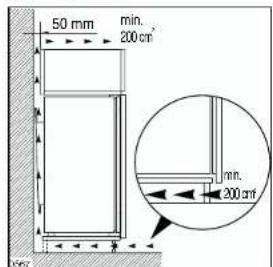
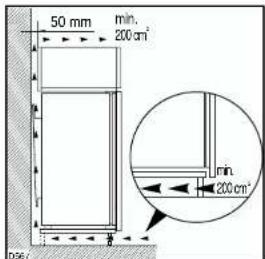
50 mm min. 200 cm mm. 200 cmFor safety reasons, minimum ventilation must be as shown in Fig.
Attention: keep ventilation openings clear of obstruction.
It is necessary that the niche is provided with a ventilation conduct having the following dimensions:
Depth 50 mm
Width 540 mm
text_image
540 50 B T H PNC1Apply joint the sealing strip as shown in figure.
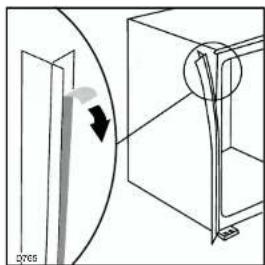
natural_image
Diagram showing a door opening and a cabinet with a circular component, no text or symbols present
GEBRAUCH
Reinigung der Innenteile
Bevor Sie das Gerät in Betrieb nehmen, beseitigen Sie den typischen «Neugeruch» am besten durch Auswaschen der Innenteile mit lauwarmem Wasser und einem neutralen Reinigungsmittel Sorgfältig nachtrocknen.

Bitte keine Reinigungs- bzw. Scheuermittel verwenden, die erät beschädigen könnten.
Bedienungsblende

text_image
1 O 1 5 2 6 3 a 9 0 3 S 5A.ABetriebs-Leuchtanzeige
B.ATemperaturregler
C.ASuper-Leuchtanzeige
D.ASchnellgefrierschalter
Gebrauch des Gefrierschrankes
Inbetriebnahme
Den Stecker in die Steckdose einsetzen. Thermostatknopf von der Stellung «O» (STOP) aus im Uhrzeigersinn drehen.
Das Aufleuchten der Kontrollampe zeigt an, daß das Gefrierabteil in Betrieb ist. Den Stillstand erhält man durch Drehen des Thermostatknopfes auf das Symbol «O».
Temperaturregelung
Die Temperatur wird automatisch geregelt und kann erhöht werden (wärmer) durch Drehen des Thermostatknoples auf niedrigere Einstellungen oder verringert (kälter) durch das Drehen auf höhere Zahlen. Die richtige Einstellung erhält man, unter Berücksichtigung folgender, die Innentemperatur beeinflussender Fäktoren:
•ARaumtemperatur,
•AHäufigkeit des Türöffnens,
•AMenge der eingelagerten Lebensmittel,
•AAufstellung des Gerätes.
Die mittlere Einstellung ist meistens die geeigneteste.
10 electrolux
electrolux 39
Schnellgefriervorgang
Zur Durchführung des Schnellgefriervorganges den Schnellgefrierschalter drücken. Die gelbe Anzeige (D) leuchtet auf. Die Schnellgefrier-Funktion beschleunigt das Einfrieren frischer Lebensmittel und schützt gleichzeitig die bereits eingelagerte Ware vor unerwünschter Erwärmung.
Wird diese Funktion nicht manuell beendet, schaltet das Gerätes die Schnellgefrier-Funktion nach 52 Stunden ab. Die gelbe Anzeige erlischt.
Durch erneutes Drücken des Schnellgefrierschalter kann die Funktion jederzeit manuell beendet werden. Die gelbe Anzeige erlischt.
Einfrieren von frischen Lebensmitteln
Das 4 Sterne-Gefrierfach eignet sich zur langfristigen Einlagerung von Tiefkühlkost sowie zum Einfrieren frischer Kost.
Für das Einfrieren von Lebensmitteln mindestens 3 Stunden vor der Einlagerung der Lebensmittel den Schnellgefrierschalter einzuschalten.
Die einzufriereden Lebensmittel in das unteres Fach legen.
Aufbewahrung der Tiefkühlkost
Nach einem längeren Stillstand oder bei der ersten Inbetriebnahme des Gerätes muß vor der Einlagerung der Tiefkühlkost die höchste Stellung des Thermostatknopfes gewählt
werden. Nach ca. 2 Std. kann dieser auf eine mittlere Stellung zurückgedreht werden.
Wichtig Im Falle einer Stromunterbrechung während der Lagerung von Tiefkühlkost bzw. von eingefrorenen Lebensmitteln soll die Tür des Gefrierfaches nicht geöffnet werden. Die Tiefkühlkost verdirbt nicht, wenn es sich um eine kurze Unterbrechung handelt (bis 6-8 Std.) und das Gerät voll ist. Wenn das nicht der Fall ist, ist es nötig, die tiefgefrorenen Lebensmittel innerhalb kurzer Zeit zu verbrauchen (eine Temperaturerhöhung der Tiefkühlkost verkürzt die Aufbewahrungsdauer).
Eiswürfelbereitung
Das Gerät hat eine oder mehrere Eiswürfelschalen, welche mit Wasser aufgefüllt in das Gefrierfach gestellt werden.
Bitte zur Entnahme der Eiswürfelschalen kleine Metallgegenstände beenutzen!
Kälteakku
Der Gefrierschrank ist mit 2 Kälte-Akkus ausgestattet, der sich im obersten Vorfrostfach befindet. Im Falle einer Störung z.B. Stromausfall wird die Aufbewahrungsduer durch den Akku verlängert.
Door reversibility
The appliance is supplied with the right door opening. To change the opening direction of the door proceed as in the following instructions before installing it.
- Unscrew the upper pin and remove the spacer
natural_image
Simple line drawing of a mechanical component with an arrow indicating direction (no text or symbols)- Remove the upper door
- Remove the hinge cover (A). Unscrew the pins (B) and the spacers (C) and refit them on the middle hinge of the opposite side. Snap the hinge cover (A).
text_image
Technical diagram showing labeled mechanical components A, B, and C with directional arrows indicating movement or assembly.- Refit the upper door, the upper pin and the spacer on the opposite side
- Unscrew the lower pin and remove the spacer and refit them on the opposite side.
text_image
Diagram showing a mechanical assembly with labeled parts and directional arrows indicating motion or force38 electrolux
electrolux 11
INSTALLATION Location
The appliance should be installed well away from sources of heat such as radiators, boilers, direct sunlight etc.
Electrical connection
Before plugging in, ensure that the voltage and frequency shown on the serial number plate correspond to your domestic power supply. Voltage can vary by ±6% of the rated voltage.
For operation with different voltages, a suitably sized auto-transformer must be used.
The appliance must be earthed.
The power supply cable plug is provided with a contact for this purpose. If the domestic power supply socket is not earthed, connect the appliance to a separate earth in compliance with current regulations, consulting a specialist technician. The Manufacturer declines all responsibility if the above safety precautions are not observed.
CE This appliance complies with the following E.E.C. Directives:
• 87/308 E□EQ of 2/6/87 relative to radio interference suppression.
- 73/23 EEEOf 19.2.73 (Low Voltage Directive) and subsequent modifications;
- 89/336 EEEOf 3.5.89 (Electromagnetic Compatibility Directive) and subsequent modifications.
ATTENTION!
It must be possible to disconnect the appliance from the mains power supply; the plug must therefore be easily accessible after installation.
Gebrauch des Kühlschrankes
Inbetriebnahme
Der Thermostat ist der selbe fuer das Kühl - und Gefrierfach.
Temperaturregelung
Die Temperatur wird automatisch geregelt und kann erhöht werden (wärmer) durch Drehen des Thermo-stalknopfes auf niedrigere Einstellungen oder verringert (kälter) durch das Drehen auf höhere Zahlen. Die richtige Einstellung erhält man, unter Berücksichtigung folgender, die Innentemperatur beeinflussender Faktoren:
•ARaumtemperatur,
•AHäufigkeit des Türöffnens,
•AMenge der eingelagerten Lebensmittel,
•AAufstellung des Gerätes.
Die mittlere Einstellung ist meistens die geeigneteste.
Wichtig 1 Höchste Kälteeinstellung bei hoher Raum-temperatur und erheblicher Lebensmittelmenge kann fortdauernden Kühlschrank-Betrieb verur-sachen, dabei kann sich eine Reif- oder Eis-schicht an der hinteren Innenwand bilden. In diesem Falle den Thermostatknopf auf wämere Temperaturen stellen, damit das automatische Abtauen, mit folglich geringerem SStromverbrauch, gewährleistet werden kann.
Hinweise zum richtigen Kühlen von Lebensmitteln und Getränken
Um die besten Leistungen des Kühlschrankes zu erreichen, beachten Sie bitte folgendes:
- AKeine warmen Speisen oder dampfenden Flüssigkeiten in den Kühlschrank einstellen.
- AGeruchverbreitende Lebensmittel müssen abgedeckt oder eingewickelt werden.
-
ADie Lebensmittel müssen so eingelagert werden, daß die Kälte um sie frei zirkulieren kann.
-
electrolux
electrolux 37
Höhenverstellbare Abstellregale
Der Abstand zwischen den verschiedenen Abstellregalen kann je nach Wunsch geändert werden. Dazu die Regale herausnehmen und auf das gewünschte Niveau einsetzen.
Zum besseren Raumnutzung können die vorderen Halbteile auf die rückwärtigen hinaufgelegt werden.
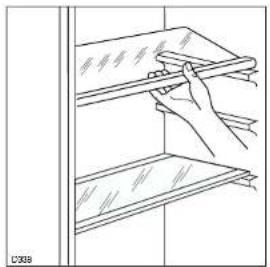
natural_image
Line drawing of a hand installing or adjusting a shelf panel on a rack (no text or symbols)Flaschenhalterung
Die an einer Ablage eingehängte Flaschenhalterung dient zur Aufstellung von Flaschen oder Dosen. Um die Halterung abzunehmen, die Ablage rüvkwärtig anheben und durch leichten Druck herausziehen. Die Halterung abnehmen und die Ablage wieder einsetzen.
natural_image
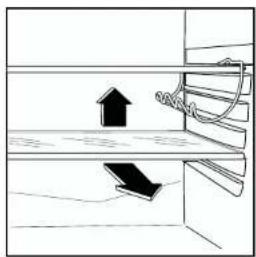
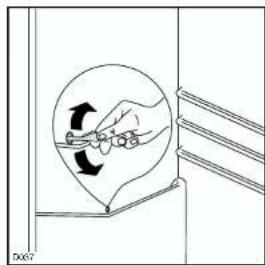
Diagram showing a mechanical or electrical component with an upward arrow and a downward arrow, no text or symbols present.Defrosting
Frost is automatically eliminated from the evaporator of the refrigerator compartment every time the motor compressor stops, during normal use. The defrost water drains out through a trough into a special container at the back of the appliance, over the motor compressor, where it evaporates.
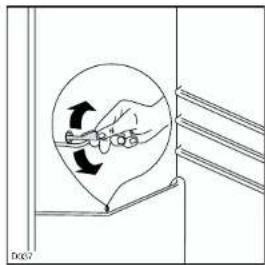
natural_image
Diagram showing a hand holding a tool inside a circular frame, with arrows indicating rotation (no text or symbols)It is important to periodically clean the defrost water drain hole in the middle of the refrigerator compartment channel to prevent the water from overflowing and dripping onto the food inside. Use the special cleaner provided, which you will find already inserted into the drain hole.
The inner walls of the freezer are automatically defrosted.
CUSTOMER SERVICE AND SPARE PARTS
If the appliance is not functioning properly, check that:
- Athe plug is firmly in the wall socket and the mains power switch is on;
- Athere is an electricity supply (find out by plugging in another appliance);
- Athe thermostat knob is in the correct position.
- Alf there are water drops on the bottom of the cabinet, check that the defrost water drain opening is not obstructed (see "Defrosting" section).
- Alf your appliance is still not working properly after making the above checks, contact the nearest service centre.
To obtain fast service, it is essential that when you apply for it you specify the model and serial number of your appliance which can be found on the guarantee certificate or on the rating plate located inside the appliance, on the bottom left-hand side.
36 electrolux
electrolux 13
MAINTENANCE

Unplug the appliance before carrying out any maintenance operation.
Warning
This Aappliance Acontains Ahydrocarbons in Aits Acooling Aunit; Amaintenance Aand recharging Amust Atheretore Aonly Abe carried out by authorized technicians.
Interior light
If it becomes necessary to replace the lamp, press on the rear hook and at the same time slide the cover in the direction indicated by the arrow.
Replace the lamp with one of the same power (the maximum power is shown on the light diffuser).
Periodic cleaning
Clean the inside with warm water and bicarbonate of soda.
Rinse and dry thoroughly.
Clean the condenser (black grill) and the compressor at the back of the appliance with a brush or a vacuum cleaner. This operation will improve the performance of the appliance and save electricity consumption.
Periods of non-operation
When the appliance is not in use for long periods, take the following precautions:
- Aremove the plug from the wall socket;
- Aremove all food;
- Adefrost and clean the interior and all accessories;
- Aleave the door ajar to allow air to circulate to prevent unpleasant smells.
natural_image
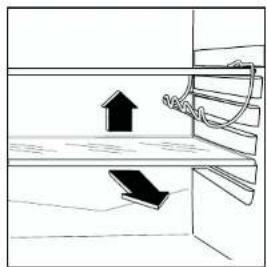
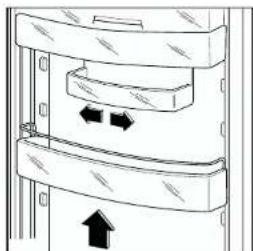
Technical line drawing of a mechanical assembly with a magnified inset showing internal components (no text or symbols)Höhenverstellung der Innentürablagen
Zur Einlagerung von Lebensmittel-Packungen verschiedener Größe, sind die Abstellregale der Innentür höhenverstellbar.
Hierzu wie folgt vorgehen:
das Abstellregal stufenweise in Pfeilrichtung drücken bis es frei wird; dann in der gewünschten Höhe wieder anbringen.
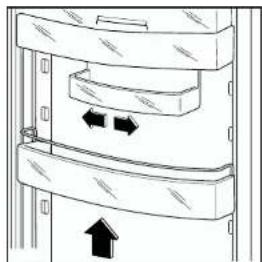
natural_image
Diagram of a mechanical or electrical component with arrows indicating direction (no text or symbols)Kontrolle der Feuchtigkeit
In der Glasplatte ist eine Vorrichtung mit Schlitzen (verstellbar durch Schiebehebel) vorgesehen, mit der die Temperatur in der bzw. den Gemüseladen reguliert werden kann.
Bei geschlossenen Schlitzen erzielt man eine wärmere Temperatur und höhere Feuchtigkeit. Bei geöffneten Schlitzen erzielt man eine kältere Temperatur und niedrigere Feuchtigkeit.
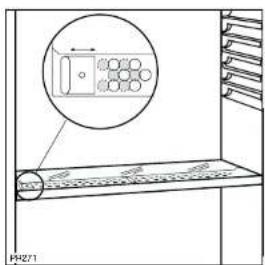
text_image
PR271Auftauen
Die eingefrorenen oder tiefgekühlten Lebensmittel sollten vor dem Gebrauch aufgetaut werden, indem man sie am besten im Kühlabteil oder je nach der zur Verfügung stehenden Zeit bei Raumtemperatur auftaut. Kleine Stücke können eingefroren gekocht werden. Selbstverständlich verlängert sich dabei die Kochzeit.
14 electrolux
electrolux 35
i TIPS
Tips für das Kühlen
Nachstehend einige praktische Ratschläge:
Fleisch (alle Sorten) in Plastikfolie einpacken und auf die Glasplatte, die sich über der Gemüseschale (über den Gemüseschalen) befindet, legen.
In dieser Lage kann das Fleisch längstens 1-2 Tage aufbewahrt werden.
Gekochte Nahrungsmittel, kalte Platten, uuswzugedeckt aufbewahren. Sie können auf jeden beliebigen Rost gelegt werden.
Obst und Gemüse: nach vorherigem Säubern und Waschen in der Gemüseschale (in den Gemüseschalen) aufbewahren.
Butter und Käse: in speziellen Behältem aufbe-wahren oder in Alubzw. Plastikfolie einpacken, um den Kontakt mit der Luft zu vermeiden.
Milch in Flaschen: gut verschlossen auf die Konsol der Innentür stellen.
Wenn Bananen, Kartoffeln, Zwiebeln und Knoblauch nicht verpackt sind, sollen sie nicht in den Kühlschrank gegeben w. werden.
Tips für das Einfrieren
Für ein einwandfreies Einfrieren der Lebensmittel geben wir folgende Ratschläge:
- ADas Gefriervermögen des Gefrierabteils (in 24 Std.) kann auf dem Typenschild abgelesen werden.
- ADer Gefriervorgang dauert ca. 24 Stunden. In dieser Zeit sollte keine zusätzliche Ware in das Gefrierabteil eingelegt werden.
•ADie Nahrungsmittel vor dem Einfrieren in kleine Portionen einteilen, damit der Gefriervorgang beschleunigt wird; dies ermöglicht das spätere Auftauen von kleineren Portionen.
•ADie Lebensmittel in Alu- oder Polyäthylenfolien luftdicht verpacken.
•AEs soll vermieden werden, daß die einzufrierenden Lebensmittel mit den bereits eingefrorenen in Berührung kommen, um eine Wärmeübertragung an diese zu verhindern.
•ASpeiseeis, direkt aus dem Gefrierfach genommen, kann Kälte-Brandwunden verursachen.
•AEs ist empfehlenswert, auf der Verpackung das Einfrierdatum zu notieren, damit die Aufbewahrungszeit eingehalten werden kann.
Es sollten keine kohlensäurehaltigen Getränke in das Gefrierfach eingestellt werden, da sie explodieren können.
i HINTS
Hints for refrigeration
Useful hints:
Meat (all types): wrap in polythene bags and place on the glass shelf above the vegetable drawer.
For safety, store in this way only one or two days at the most.
Cooked foods, cold dishes, etc.: these should be covered and may be placed on any shelf.
Fruit and vegetables: these should be thoroughly cleaned and placed in the special drawer(s) provided.
Butter and cheese: these should be placed in special airtight containers or wrapped in aluminium foil or polythene bags to exclude as much air as possible.
Milk bottlethese should have a cap and should be stored in the bottle rack on the door.
Bananas, potatoes, onions and garlic, if not packed, must not be kept in the refrigerator.
Hints for freezing
To help you make the most of the freezing process, here are some important hints:
- Athe maximum quantity of food which can be frozen in 24 hrs. is shown on the rating plate;
- Athe freezing process takes 24 hours. No further food to be frozen should be added during this period;
•Aprepare food in small portions to
enable it to be rapidly and completely frozen and to make it possible subsequently to thaw only the quantity required;
- Awrap up the food in aluminium foil or polythene and make sure that the packages are airtight;
- Ado not allow fresh, unfrozen food to touch food which is already frozen, thus avoiding a rise in temperature of the latter;
- Awater ices, if consumed immediately after removal from the freezer compartment, can possibly cause frost bums;
- Ait is advisable to show the freezing-in date on each individual pack to enable you to keep a tab of the storage time;
• A do not put carbonated liquids (fizzy drinks, etc.) in the freezer compartment as they may burst.
Hints for storage of frozen food
To obtain the best performance from this appliance, you should:
- Amake sure that the commercially frozen foodstuffs were adequately stored by the retailer;
- be sure that frozen foodstuffs are transferred from the foodstore to the freezer in the shortest possible time;
- Anot open the door frequently or leave it open longer than absolutely necessary.
- AOnce defrosted, food deteriorates rapidly and cannot be refrozen.
- ADo not exceed the storage period indicated by the food manufacturer.
34 electrolux
electrolux 15
Movable shelves
The walls of the refrigerator are equipped with a series of runners so that the shelves can be positioned as desired.
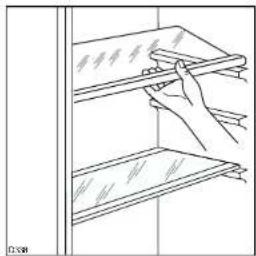
natural_image
Line drawing of a hand cleaning or installing a shelf with a tray (no text or symbols)Bottle holder
The bottle holder hooked onto one of the internal shelves can be used to store bottles or cans. To remove this holder, lift the back of the shelf, press and pull it out. Slide the holder out and refit the shelf.
natural_image
Diagram showing a mechanical or architectural component with an upward arrow and a downward arrow, no text or symbols present.Positioning the door shelves
To permit storage of food packages of various sizes, the door shelves can be placed at different heights.
To make these adjustments proceed as follows: Gradually pull the shelf in the direction of the arrows until it comes free, then reposition as required.
natural_image
Diagram of a door handle mechanism with arrows indicating movement or force (no text or symbols)Humidity control
The glass shelf incorporates a device with slits (adjustable by means of a sliding lever), which makes it possible to regulate the temperature in the vegetable drawer(s).
Close the slots to obtain a warmer temperature and greater humidity.
Open the slots to obtain a cooler temperature and less humidity.

text_image
FR271Tips für Tiefkühlkost
Um optimale Leistungen des Gerätes zu erhalten, sich vergewissern,
- Adaß die Tiefkühlkost beim Verkäufer gut aufbewahrt wurde
- Adaß der Transport vom Verkäufer zum Verbraucher in kurzer Zeit erfolgt.
- ATür so wenig wie möglich öffnen und nicht offen lassen.
•AEinmal aufgetaute Lebensmittel verderben schnell und können kein ein zweites Mal eingefroren werden. - ADas Haltbarkeitsdatum auf der Tiefkühlkostverpackung sollte nicht überschritten werden.
WARTUNG

Vor jeder Reinigungsarbeit immer den Netzstecker aus der Steckdose ziehen.

Achtung
Dieses Gerät enthält im Kältekreislauf Kohlen-wasserstoff. Aus diesem Grund darf die Wartung und das Nachfüllen ausschließlich von autorisiertem Fachpersonal durchgeführt werden.
Regelmäßige Reinigung
Benutzen Sie nie Metallgegenstände um das Gerät zu reinigen, da es beschädigt werden könnte. Den Innenraum mit lauwarmem Wasser und Natron reinigen.
Gut nachwaschen und sorgfältig trocknen.
Den Kondensator und den Motorkompressor mit einer Bürste oder einem Staubsauger reinigen. Dies begünstigt den guten Betrieb mit folglicher Stromersparnis
16 electrolux
electrolux 33
Stillstandszeiten
Bei längerem Stillstand des Gerätes, müssen Sie folgendermaßen vorgehen:
- Aden Stecker aus der Steckdose ziehen;
•Aalle Lebensmittel herausnehmen;
•AGerät abtauen, Innenraum und Zubehörteile reinigen; die Türer offen lassen, um im Innern eine gute Luftzirkulation zu gewährleisten und somit Geruchsbildung zu vermeiden.
Innenbeleuchtung
Um die Lampe su wechseln, drücken die hintere Kupplung und gleichzeitig nehmen die Abdeckung in der Pfeil-Richtung heraus.
Die maximale Leistung ist am Leuchtkörper aangegeben.

natural_image
Technical line drawing of a mechanical assembly with an inset showing a component detail (no text or symbols)Abtauen
Die sich auf dem Verdampfer des Kühlschrankes bildende Reifschicht taut jedesmal in den Stillstand-zeiten des Motorkompressors von selbst ab. Das Tauwasser läuft durch eine Rinne in eine Plastik-schale auf der Rückseite des Gerätes (über dem Kompressor) und verdunstet dort.
natural_image
Illustration of a hand holding a tool inside a circular frame, with arrows indicating motion direction (no text or symbols)Wir empfehlen, das in der Mitte der Abtauwasserrinne des Kühlraumes befindliche Ablaufloch für das Abtauwasser regelmäßig zu reinigen, um zu vermeiden, daß das Abtauwasser auf die eingelagerten Lebensmittel tropft. Verwenden Sie den dafür vorgesehenen Reiniger, der sich schon im Ablaufloch befindet.
Das Abtauen der Innenwände des Gefrierabteils erfolgt automatisch.
Use of the refrigerator
Operation
The thermostat is valid for both freezer and refrigerator compartments.
Temperature regulation
The temperature is automatically regulated and can be increased to achieve a higher temperature (warmer) by rotating the thermostat knob toward lower settings or reduced (colder) rotating the knob towards higher settings.
However, the exact setting should be chosen keeping in mind that the temperature inside the refrigerator depends on:
•Aroom temperature;
- Ahow often the door is opened;
•Athe quantity of food stored;
•Alocation of appliance.
A medium setting is generally the most suitable.
⚠️ Important
If the ambient temperature is high or the appliance is fully loaded, and the appliance is set to the lowest temperatures, it may run continuously causing frost to form on the rear wall. In this case the dial must be set to a higher temperature to allow automatic defrosting and therefore reduced energy consumption.
Fresh food refrigeration
To obtain the best performance:
- Ado not store warm food or evaporating liquids in the refrigerator;
- Ado cover or wrap the food, particularly if it has a strong flavour.
- APosition food so that air can circulate freely round it.
Thawing
Deep-frozen or frozen food, prior to being used, can be thawed in the refrigerator compartment or at room temperature, depending on the time available for this operation.
Small pieces may even be cooked still frozen, directly from the freezer: in this case, cooking will take longer.
32 electrolux
electrolux 17
Quick-freezing
For quick-freezing, push the Normal/Super button (D). The super control light (C) will then light up.
The Quick-freezing function accelerates the freezing of fresh food and, at the same time, protects foodstuffs already stored from undesirable warming.
If this function is not ended manually, the appliance switches off the Quick-freezing function after 52 hours. The yellow light goes out.
This function can be ended manually at any time by pressing the Normal/Super button again. The yellow light goes out.
Freezing fresh food
The 4-star compartment is suitable for long term storage of commercially frozen food and for freezing fresh food.
To freeze fresh foods it is not necessary to move the thermostat knob from the normal setting. Push the Normal/Super push button at least 3 hours before loading food.
Place the food to be frozen in the lower in the freezer compartment as this is the coldest part.
Storage of frozen food
When first starting-up or after a period out of use, before putting the products in the compartment let the appliance run for at least two hours on the coldest setting, then turn the thermostat knob to the normal operating position.
⚠️ Important
If there is a power failure when food is in the freezer, do not open the door of the freezer compartment. The frozen food will not be affected if the power cut is of short duration (up to 6-8 hours) and the freezer compartment is full, otherwise, it is recommended that the food should be used within a short time (a temperature increase of the frozen food shortens its safe storage period).
Ice-cube production
This appliance is equipped with one or more trays for the production of ice-cubes. Fill these trays with water, then put them in the freezer compartment.
Do not use metallic instruments to remove the trays from the freezer.
Cold accumulator
The freezer contains two cold accumulators which increases storage times in the event of a power cut or breakdown. It is located in the upper compartment.
STORUNGEN
Falls das Gerät Störungen aufweisen sollte, überprüfen Sie zuerst folgendes:
• ASteckt der Netzstecker in der Steckdose?
- ABefindet sich der Hauptschalter der elektrischen Anlage in der richtigen Stellung?
- Alst die Stromzufuhr unterbrochen? Befindet sich der Thermostatknopf in richtiger Stellung?
- AWasserpfütze auf dem Boden des Kühlfaches:
- AAbtauwasserloch verstopft? (siehe Abschnitt "Abtauen")
Sollten Sie nach o.e. Prüfungen zu keinem Resultat kommen, so wenden Sie sich bitte an unseren nächsten Kundendienst.
Um ein rasches Beheben des Schadens zu ermöglichen, ist es beim Anruf an den Kundendienst notwendig, die Modell- und Seriennummer anzugeben, die Sie dem Garantieschein oder dem Typenschild (- linke Seite – unten) entnehmen können.
INSTALLATION
Austellung
Das Gerät sollte nicht in der Nähe von Wärmequellen wie Heizkörpern oder Öfen aufgestellt und vor direkter Sonneneinstrahlung geschützt werden. Die beste Leistung erzielt man erfahrungsgemäß bei
Raumtemperaturen. Für den Einbau bitte den entsprechenden Abschnitt durchlesen.
Elektrischer Anschluß
Bevor Sie den Stecker in die Steckdose einstecken, überprüfen Sie bitte, daß die auf dem Typenschild des Gerätes angegebene Spannung sowie Frequenz mit dem Anschlußwert des Hauses übereinstimmen. Eine Abweichung von ±6% von der Nominalspannung ist zulässig. Für die Anpassung des Gerätes an andere Spannungen muß ein Spartransformator angemessener Leistung vorgeschaltet werden.
Das Gerät muß unbedingt vorschriftsmäßig geordet werden. Zu diesem Zweck ist der Stecker des Speisekabels mit dem dafür vorgesehenen Kontakt versehen. Sollte die Netzleitung im Haus nicht mit einer Erdleitung versehen sein, so muß das Gerät an eine getrennte Erdleitung vorschriftsmäßig und unter Hinzuziehung eines Fachmanns angeschlossen werden.
Die Erzeugerfirma lehnt jede Verantwortung ab, falls diese Unfallverhütungsvorschrift nnicht beachtet wird.
18 electrolux
Dieses Gerät entspricht der folgende EWG R Richtlinie:
CE • 87/308 EWG vom 2.6.87 (Deutschland-Ausführung) bzw. der ÖVE-Richtlinie Nr. F 61/84 (Österreich-Ausführung) bezüglich Funkentstörung.
- 73/23 EWG vom 19/02/73 (Niederspannung) und folgende Änderungen;
- 89/336 EWG vom 03/05/89 (Elektromagnetische Verträglichkeit) und folgende Änderungen.
ACHTUNG!
Es muß möglich sein, das Gerät vom Netz zu trennen; nach der Installation muß die Steckdose daher zugänglich bleiben.
Türanschlagwechsel
Das Gerät wird mit Türanschlag von rechts geliefert. Falls einen Türanschlag links erfordert wird; gehen Sie wie folgt vor bevor Sie das Gerät einbauen.
- Obere Schamierstift abschrauben und Kunststoffteil entfernen.

natural_image
Simple line drawing of a mechanical component with an arrow indicating direction (no text or symbols)-
Obere Tür abnehmen.
-
Schamierabdeckung (A) abnehmen. Schamierstifte (B) und Kunststoffteile (C) abschrauben und auf mittlere Schamier der gegenüberliegenden Seite wieder anschrauben. Schamierabdeckung (A) aufstecken.

text_image
Technical diagram showing labeled mechanical components A, B, and C with a screw inserted into component A- Obere Tür wieder einsetzen.
text_image
Diagram showing a mechanical assembly with labeled parts and directional arrows indicating motion or force- Oberen Schamierstift mit den Kunststoffteil und auf gegenüberliegende Seite wieder anmontieren.
- Untere Scharnierstift abschrauben und Kunststoffteil entfernen und auf gegenüberliegende Seite wieder anmontieren.
electrolux 31
i USE
Cleaning the interior
Before using the appliance for the first time, wash the interior and all internal accessories with luke-warm water and some neutral soap so as to remove the typical smell of a brand-new product, then dry thoroughly.

Do not use detergents or abrasive powders, as these will damage the finish.
Control panel

text_image
1 2 3 4 5 6 7 8 9 10 11 12 13 14 15 16 17 18 19 20 21 22 23 24 25 26 27 28 29 30 31 32 33 34 35 36 37 38 39 40 41 42 43 44 45 46 47 48 49 50 51 52 53 54 55 56 57 58 59 60 61 62 63 64 65 66 67 68 69 70 71 72 73 74 75 76 77 78 79 80A. Pilot light
B. Thermostat knob
C. Super control light
D. Normal/Super push button
Operation
Use of the freezer
Insert the plug into the wall socket. The pilot light (A) will light up, indicating that the appliance is powered. Turn the thermostat knob (B), clockwise, beyond the «O» (STOP) position.
Temperature regulation
The temperature is automatically regulated and can be increased to achieve a higher temperature (warmer) by rotating the thermostat knob toward lower settings or reduced (colder) rotating the knob towards higher settings.
However, the exact setting should be chosen keeping in mind that the temperature inside the refrigerator depends on:
- room temperature;
• how often the door is opened;
• the quantity of food stored; - location of appliance.
A medium setting is generally the most suitable.
before connecting the appliance to allow the oil to flow back in the compressor.
- There are working parts in this product which heat up. Always ensure that there is adequate ventilation as a failure to do this will result in component failure and possible food loss. See installation instructions.
- Parts which heat up should not be exposed. Wherever possible the back of the product should be against a wall.

Environment Protection
This appliance does not contain gasses which could damage the ozone layer, in either its refrigerant circuit or insulation materials. The appliance shall not be discarded together with the urban refuse and rubbish. Avoid damaging the cooling unit, especially at the rear near the heat exchanger. Information on your local disposal sites may be obtained from municipal authorities. The materials used on this appliance marked by the symbol are recyclable.
Montageanleitung für den integrierten Einbau Nischenmaße
Höhe A1780 mm
Tiete A550 mm
Breite A560 mm
Aus Gründen der Sicherheit muß eine Mindestbelüftung gesichert sein, wie aus der Abb.hervorgeht.
Achtung: Die Ventilations - Öffnungen müssen immer saubergehalten w/werden.
text_image
50 mm min. 200 cm min. 200 cmFerner ist auch am hinteren Einbauschrankteil ein Lüftungskamin mit filgenden Massen notwendig: TiefeA50 mm BreiteA540 mm
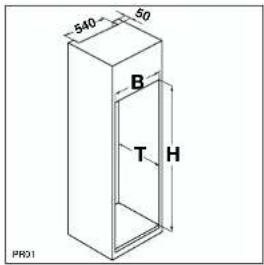
text_image
540 50 B T H PRO1Fugenabdeckprofil am Gerät, wie in Abbildung gezeigt ankleben.
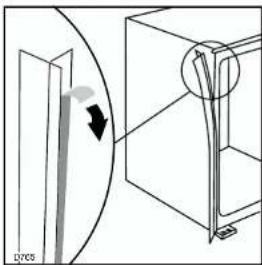
natural_image
Technical line drawing showing a mechanical assembly with an arrow indicating direction (no text or symbols)Gerät in die Nische einschieben, bis die Anschlagleiste (1) oben am Möbel anliegt und die vordere Kante des Scharriers mit der Türöffnungsseite bündig an der Nischenseitenwand ansteht (2).
text_image
Diagram showing a door mechanism with labeled parts and directional arrows, including numbered annotations 1 and 2.Gerät mit den 4 beiliegenden Schrauben befestigen. (I = kurz) (P = lang)
text_image
Technical diagram showing mechanical assembly with labeled parts I and P, including inset views of structural components.In die Befestigungs- und Scharnierlöcher beiliegende Abdeckkappen (C-D) eindrücken. Belüttungsgitter (B) und Scharnierabdeckung (E) aufstecken
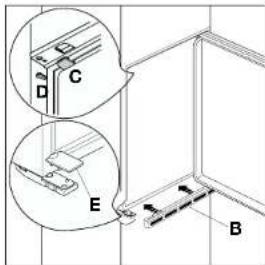
text_image
Technical diagram showing labeled mechanical components with annotations A, B, C, D, and EDie Teile Ha Hb Hc, Hd abnehmen, wie in der Abb. gezeigt wird.
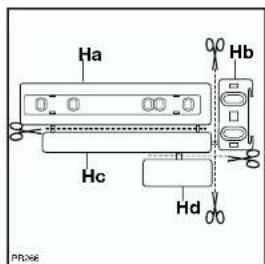
text_image
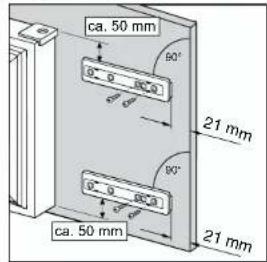
Ha Hb Hc Hd PROVEDie Schiene (Ha) auf der Innenseite der Möbeltür oben und unten auflegen (siehe Abb.) und die Position der äußeren Bohrlöcher anzeichnen. Nachdem die Löcher gebohrt wurden, die Schiene mit den mitgelieferten Schrauben befestigen.
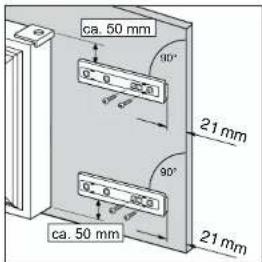
text_image
ca. 50 mm 90° 90° 90° 90° 21 mm 21 mm ca. 50 mmDie Abdeckung (Hc) in die Schiene (Ha) eindrücken, bis sie einrastet.
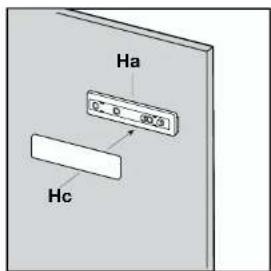
text_image
Ha HcUse
- AThe domestic refrigerators and freezers are designed to be used specifically for the storage of edible foodstuffs only.
- ABest performance is obtained with ambient temperature between +18°C and +43°C (class T); +18°C and +38°C (class ST); +16°C and +32°C (class N); +10°C and +32°C (class SN). The class of your appliance is shown on its rating plate.
Warning: when the ambient temperature is not included within the range indicated for the class of this appliance, the following instructions must be observed: when the ambient temperature drops below the minimum level, the storage temperature in the freezer compartment cannot be guaranteed; therefore it is advisable to use the food stored as soon as possible.
- AFrozen food must not be re-frozen once it has been thawed out.
- AManufacturers' storage recommendations should be strictly adhered to. Refer to relevant instructions.
- AThe inner lining of the appliance consists of channels through which the refrigerant passes. If these should be punctured this would damage the appliance beyond repair and cause food loss, DO NOT USE SHARP INSTRUMENTS to scrape off frost or ice. Frost may
be removed by using the scraper provided. Under no circumstances should solid ice be forced off the liner. Solid ice should be allowed to thaw when defrosting the appliance.
- ADo not place carbonated or fizzy drinks in the freezer as it creates pressure on the container, which may cause it to explode, resulting in damage to the appliance. Do not use a mechanical device or any artificial means to speed up the thawing process other than those recommended by the manufacturer. Never use metal objects for cleaning your appliance as it may get damaged.
Installation
- ADuring normal operation, the condenser and compressor at the back of the appliance heat up considerably. For safety reasons, minimum ventilation must be as shown in the instructions.
Attention: keep ventilation openings clear of obstruction.
- Care must be taken to ensure that the appliance does not stand on the electrical supply cable.
Important: if the supply cord is damaged, it must be replaced by a special cord or assembly available from the manufacturer or its service agent.
- If the appliance is transported horizontally, it is possible that the oil contained in the compressor flows in the refrigerant circuit. It is advisable to wait at least two hours

SAFETY INFORMATION
It is most important that this instruction book should be retained with the appliance for future reference. Should the appliance be sold or transferred to another owner, or should you move house and leave the appliance, always ensure that the book is supplied with the appliance in order that the new owner can be acquainted with the functioning of the appliance and the relevant warnings.
If this appliance featuring magnetic door seals is to replace an older appliance having a spring lock (latch) on the door or lid, be sure to make that spring lock unusable before you discard the old appliance. This will prevent it from becoming a death-trap for a child.
These warnings are provided in the interest of safety. You must read them carefully before installing or using the appliance.
General Safety
- This appliance is designed to be operated by adults. Children should not be allowed to tamper with the controls or play with the product.
- It is dangerous to alter the specifications or modify this product in any way.
- ABefore any cleaning or maintenance work is carried out, be sure to switch off and unplug the appliance.
• This appliance is heavy. Care should be taken when moving it -
Ice lollies can cause frost burns if consumed straight from the appliance.
-
Take utmost care when handling your appliance so as not to cause any damages to the cooling unit with consequent possible fluid leakages.
• The appliance must not be located close to radiators or gas cookers. - Avoid prolonged exposure of the appliance to direct sunlight.
• There must be adequate ventilation round the back of the appliance and any damage to the refrigerant circuit must be avoided. - For freezers only (except built-in models): an ideal location is the cellar or basement.
- Do not use other electrical appliances (such as ice cream makers) inside of refrigerating appliances.
Service/Repair
- AAny electrical work required to install this appliance should be carried out by a qualified electrician or competent person
- This product should be serviced by an authorized Service Centre, and only genuine spare parts should be used.
- Under no circumstances should you attempt to repair the appliance yourself. Repairs carried out by inexperienced persons may cause injury or more serious malfunctioning. Refer to your local Service Centre, and always insist on genuine spare parts.
- AThis appliance contains hydrocarbons in its cooling unit; maintenance and recharging must therefore only be carried out by authorized technicians.
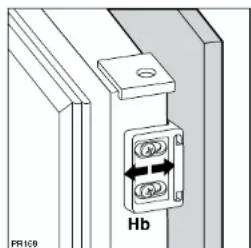
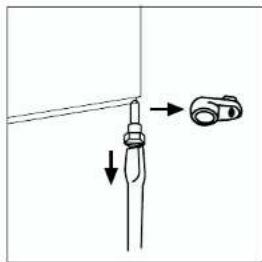
Gerätetür und Möbeltür auf ca. 90° öffnen. Den Winkel (Hb) in der Schiene (Ha) einsetzen. Gerätetür und Möbeltür zusammenhalten und die Bohrlöcher anzeichnen (siehe Abb.).
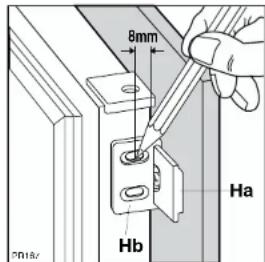
text_image
8mm Ha Hb 2019cDie Winkeleisen entfernen und 8 mm vom äusseren Rand der Tür mit dem Nagel (K) kennzeichnen.
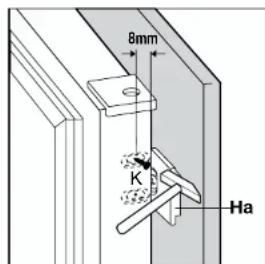
text_image
8mm K HaDen Winkel wieder auf der Schiene anbringen und mit den mitgelieferten Schrauben befestigen.
Für eine allfällig notwendige Ausrichtung der Möbeltür, den Spielraum der Langlöcher nutzen.
Nach Beendigung der Arbeiten den einwandfreien Verschluß der Gerätetür überprüfen.
text_image
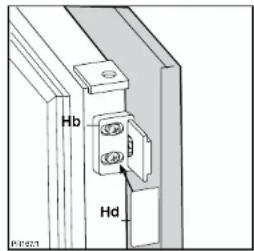
PR198 HbDie Abdeckung (Hd) in die Schiene (Hb) eindrücken, bis sie einrastet.
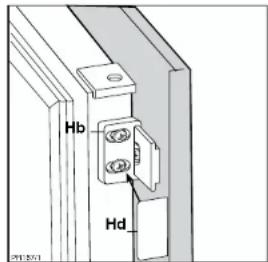
text_image
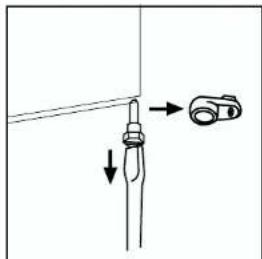
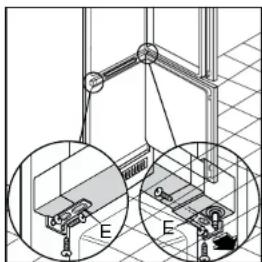
Hb HdDas Gerät ist mit 2 Winkeln (E) ausgestattet. Diese sind zur seitlichen Befestigung des Gerätes am Möbel zu verwenden
natural_image
Technical diagram of a mechanical assembly with two views (E) showing internal components and connections, no readable text or symbols present.GARANTIE/KUNDENDIENST
Der Endabnehmer dieses Gerätes (Verbraucher) hat bei einem Kauf dieses Gerätes von einem Unternehmer (Händler) in Deutschland im Rahmen der Vorschriften über den Verbrauchsgüterkauf gesetzliche Rechte, die durch diese AGarantie Anicht Aeingeschränkt werden. ADiese AGarantie Äräumt Adem AVerbraucher Aalso Azusätzliche ARechte Aein. ADies vorausgeschickt, Aleisten Awir, AElectrolux AVertriebs AGmbH, Agegenüber Adem AVerbrauche Garantie Afür Adieses AGerät Afür Aden AZeitraum Avon A24 AMonaten Aab AÜbergabe Azu Ac folgenden Bedingungen:
- Mit dieser Garantie haften wir dafür, daß dieses neu hergestellte Gerät zum Zeitpunkt der Übergabe vom Händler an den Verbraucher die in unserer Produktbeschreibung für dieses Gerät aufgeführten Eigenschaften aufweist. Ein Mangel liegt nur dann vor, wenn der Wert oder die Gebrauchstauglichkeit dieses Gerätes erheblich gemindert ist. AZeigt Asich Ader AMangel Anach AAblauf Avon Asechs A(6) AMonaten Aab Adem Übergabezeitpunkt, Aso Ahat Ader AVerbraucher Anachzuweisen, Adaß Adas AGerät Abereil zum Übergabezeitpunkt mangelhaft war. Nicht unter diese Garantie fallen Schäden oder Mängel Aaus Anicht Avorschriftsmäßiger AHandhabung sowie ANichtbeachtung der Einbauvor-schriften und Gebrauchsanweisungen.
- Dieses Gerät fällt nur dann unter diese Garantie, wenn es von einem Unternehmer in einem der Mitgliedstaaten der Europäischen Union gekauft wurde, es bei Auftreten des AMangels Ain ADeutschlandbetrieben Awird Aund AGarantieleistungen Aauch Ain Deutschland erbracht Awerden können. Mängel müssen Auns innerhalb Avon Azwei (2) Monaten nach Kenntnis angezeigt werden.
- Mängel dieses Gerätes werden wir innerhalb angemessener Frist nach Mitteilung des Mangels unentgeltlichbeseitigen; die zu diesem Zweck erforderlichen Aufwendungen, insbesondere ATransport-,Wege-,AArbeits- Aund AMaterialkosten Awerden Avon Auns getragen. ÄÜber Adiese ANachbesserung Ahinausgehende AAnsprüche Awerden Adurch diese Garantie dem Verbraucher nicht eingeräumt.
- Bei Großgeräten (stationär betriebene Geräte) ist im Garantiefall unter der für den Endabnehmer kostengünstigen Rufnummer 0180 322 66 22 * die nächstgelegene Kundendienststelle Azu Abenachrichtigen, Avon Awelcher AOrt, AArt Aund AWeise Ader Garantieleistungen Afestgelegt Awerden. ANach-besserungsarbeiten Awerden, Asoweit möglich, am Aufstellungsort, sonst in unserer Kundendienstwerkstatt durchgeführt.
- Garantieleistungen Abewirken Aweder Aeine AVerlängerung Anoch Aeinen ANeubeginn Ader Garantiezeit für dieses Gerät; ausgewechseite Teile gehen in unser Eigentum über 6. Mängelansprüche aus dieser Garantie verjähren in zwei (2) Jahren ab dem Zeitpunkt der AÜbergabe Ades AGERätes Avom AHändler Aan Aden AVerbraucher, Ader Adurch AOrigi Kautbeleg (Kassenzettel, Rechnung) zu belegen Aist; Awenn dieses Gerät gewerblich oder bei AWaschgeräten Aund AWäschetrocknern-in AGemeinschaftsanlagen Agenutzt wird, beträgt die Verjährungsfrist sechs (6) Monate.
Electrolux Vertriebs GmbH
Muggenhofer Straße 135
D-90429 Nürnberg
* EUR 0,09 / Minute (Deutsche Telekom Stand Jan. 2002)
CONTENTS
| Safety InformationA | 28 |
| Use | 31 |
| Cleaning the interior | 31 |
| Control panel | 31 |
| Operation | 31 |
| Use of freezer | 31 |
| Temperature regulation | 31 |
| Quick-freezing | 32 |
| Freezing fresh food | 32 |
| Storage of frozen food | 32 |
| Ice-cube production | 32 |
| Cold accumulator | 32 |
| Use of the refrigerator | 33 |
| Operation | 33 |
| Temperature regulation | 33 |
| Fresh food refrigeration | 33 |
| Thawing | 33 |
| Movable shelves | 34 |
| Bottle holder | 34 |
| Positioning the door shelves | 34 |
| Humidity control | 34 |
| HintsA | 35 |
| Hints for refrigeration | 35 |
| Hints for freezing | 35 |
| Hints for storage of frozen food | 35 |
| Maintenance | 36 |
| Periodic cleaning | 36 |
| Periods of non-operation | 36 |
| Interior light | 36 |
| Defrosting | 37 |
| Customer service and spare parts | 37 |
| InstallationA | 38 |
| Location | 38 |
| Electrical connection | 38 |
| Door reversibility | 39 |
| Instructions for totally built-in appliances | 40 |
| European GuaranteeA | 44 |
| www.electrolux.comA | 45 |
The following symbols are used in this manual:


Important information concerning your personal safety and information on how to avoid damaging the appliance.
General information and tips
Environmental information

The symbol Add the product or on its packaging indicates that this product may not be treated as household waste. Instead it shall be handed over to the applicable collection point for the recycling of electrical and electronic equipment. By ensuring this product is disposed of correctly, you will help prevent potential negative Aconsequences Afor Athe Aenvironment Aand Ahuman Ahealth, Awhich Acould otherwise be caused by inappropriate waste handling of this product. For more detailed information about recycling of this product, please contact your local city office, your household waste disposal service or the shop where you purchased the product.
EUROPÄISCHE GARANTIE
Für dieses Gerät besteht in den am Ende dieses Handbuchs aufgeführten Ländern eine Garantie von Electrolux für den Zeitraum, der in der Gerätegarantie oder andernfalls gesetzlich festgelegt ist. Wenn Sie aus einem dieser Länder in ein anderes der unten aufgeführten Länder ziehen, wird die Gerätegarantie unter folgenden Voraussetzungen mit übertragen:
- ADie Gerätegarantie beginnt an dem Datum, an dem Sie das Gerät gekauft haben. Dies wird durch ein gültiges Kaufdokument bescheinigt, das von dem Verkäufer des Gerätes ausgestellt wurde.
•ADie Gerätegarantie gilt für denselben Zeitraum und in demselben Ausmaß für Arbeitszeit und Teile, wie sie für dieses spezielle Modell oder diese spezielle Gerätereihe in Ihrem neuen Aufenthaltsland gelten. - ADie Gerätegarantie ist personengebunden, d. h. sie gilt für den Erstkäufer des Geräts und kann nicht auf einen anderen Benutzer übertragen werden.
- ADas Gerät wird in Übereinstimmung mit der von Electrolux herausgegebenen Anleitung installiert und verwendet und wird nur im Privathaushalt eingesetzt, d. h. nicht für gewerbliche Zwecke genutzt.
- ADas Gerät wird in Übereinstimmung mit allen relevanten Bestimmungen installiert, die in Ihrem neuen Aufenthaltsland gelten.
- ADie Bestimmungen dieser europäischen Garantie haben keinerlei Auswirkungen auf die Rechte, die Ihnen gesetzlich zustehen.
www.electrolux.com
| Albania | +35 5 4 261 450 | Rr. Pjotor Bogdani Nr. 7 Tirane |
| Bolgique/Boglo/Bolgiøn | +32 2 363 04 44 | Bergensesteenweg 719, 1502 Lembeek |
| Česká ropublika | +420 2 61 12 61 12 | Budějovická 3, Praha 4, 140 21 |
| Danmark | +45 70 11 74 00 | Sjeallandsgade 2, 7000 Frodericia |
| Deutschland | +49 180 32 26 622 | Muggenhofer Str. 135, 90429 Nürnberg |
| Eesti | +37 2 66 50 030 | Mustamäe tee 24, 10621 Tallinn |
| España | +34 902 11 63 88 | Caratera M-300,Km.29,900 Alcalá de Henares Madrid |
| France | www.electrolux.fr | |
| Great Britain | +44 8705 929 929 | Addington Way, Luton, Bedfordshire LU4 9QQ |
| Hellas | +30 23 10 56 19 70 | 4, Limnou Str., 54627 Thessaloniki |
| Hrvatska | +385 1 63 23 338 | Slavonska avenija 3, 10000 Zagreb |
| Ireland | +353 1 40 90 753 | Long Mile Road Dublin 12 |
| Italia | +39 (0) 434 558500 | C.so Lino Zanussi, 26 - 33080 Porcia (PN) |
| Latvija | +37 17 84 59 34 | Kr. Barona isla 130/2, LV-1012, Riga |
| Lietuva | +370 5 2780609 | Verkių 29, LT-09108 Vilnius |
| Luxembourg | +35 2 42 43 13 01 | Rue de Bitbourg, 7, L-1273 Hamm |
| Magyarország | +36 1 252 1773 | H-1142 Budapest XIV, Erzsebet királyné Útja 87 |
| Nederland | +31 17 24 68 300 | Venncotsweg 1, 2404 CG - Alphen aan den Rijn |
| Norge | +47 81 5 30 222 | Rislokkvn. 2 , 0508 Oslo |
| Östonroich | +43 18 66 400 | Horziggasso 9, 1230 Wien |
| Polska | +48 22 43 47 300 | ul. Kolejowa 5/7, Warsaw |
| Portugal | +35 12 14 40 39 39 | Quinta da Fonte-Edificio Gonçalves Zarco-Q 35-2774-518 Paço de Arcos |
| Romania | +40 21 451 20 30 | Str. Garli Progresului 2, S4, 040671 RO |
| Schweiz-Suisse-Svizzera | +41 62 88 99 111 | Industriestrasse 10, CH-5506 Mågenwil |
| Slovenija | +38 61 24 25 731 | Tržaška 132, 1000 Ljubljana |
| Slovensko | +421 2 43 33 43 22 | Beckolux Sockalis r.o., Beckolux Comile sotrebde SK, Sebemiro 1, 82103 Bratislava |
| Suorni | +35 8 26 22 83 00 | Konepajannanta 4, 28100 Pori |
| Sverige | +46 (0)771 76 76 76 | Boctrolux Servico, Stt Göransgstan 143, S-105 45 Stockholm |
| Türkiye | +90 21 22 93 10 25 | TarlabagaAcaddesi no : 35 Taksim Istanbul |
| Россия | +7 095 937 7837 | 129090 Москва, Олимпийский проспект, 16, БЦ "Олимпик" |
Welcome to the world of Electrolux
You've chosen a first class product from Electrolux, which hopefully will provide you with lots of pleasure in the future. Electrolux ambition is to offer a wide variety of quality products that would make your life even more comfortable. You can look at some Aexamples Aon the Acover Ain this Amanual. ABut now Ait's time Ato Astudy this manual Aand Astart Ausing Aand Aenjoying Athe Abenefits Afrom Ayour Anew Amachine. promise that it'll make your life a little easier. Good luck!