SP817BB - Điện thoại Telstra - Hướng dẫn sử dụng miễn phí
Tìm hướng dẫn sử dụng thiết bị miễn phí SP817BB Telstra ở định dạng PDF.

Câu hỏi của người dùng về SP817BB Telstra
0 câu hỏi về thiết bị này. Trả lời những câu bạn biết hoặc đặt câu hỏi riêng.
Đặt câu hỏi mới về thiết bị này
Tải xuống hướng dẫn cho thiết bị của bạn Điện thoại ở định dạng PDF miễn phí! Tìm hướng dẫn của bạn SP817BB - Telstra và lấy lại thiết bị điện tử của bạn. Trên trang này được đăng tải tất cả các tài liệu cần thiết để sử dụng thiết bị của bạn. SP817BB thương hiệu Telstra.
HƯỚNG DẪN NGƯỜI DÙNG SP817BB Telstra
Telstra SP817BB – BIG BUTTON MULTI TELEPHONE
User Guide
To fully benefit from the features of this Australian designed telephone, please read the User Guide and keep it handy for future reference.
INDEX
TELSTRA SP817BB OVERVIEW 3
ITEMS SUPPLIED WITH YOUR TELEPHONE 4
INSTALLATION OF YOUR TELEPHONE 5
Desk Stand 5
Wall Mounting....5
GETTING STARTED....7
TELEPHONE OPERATION
Handsfree Operation....7
Making a Call 8
Answering an Incoming Call 8
Adjusting the Ringer Volume....8
Adjusting the Ringer Pitch or Switching the Ringer off....8
Adjusting the Receive Volume Level (Normal Mode)......8
Muting the Transmit Signal....8
Last Number Redial....9
MEMORY PROGRAMMING
Programming the One-Touch Memory Buttons....9
Dialling from One-Touch Memory Buttons....9
Programming the Two-Touch Memory Buttons 9
Dialling from Two-Touch Memory Buttons....9
Hot Key Dialling....10
Hot Key Answer....10
OTHER OPERATION MODES
VOICE AID MODE....11
Adjusting the Transmit Send level (Voice Mode)....11
AUXILIARY INPUT....11
Making a Call....12
Answering an Incoming Call....12
Hot Diallin g....12
PABX MODE....12
HEADSET MODE 12
Makin g a Call....13
Answering an Incoming Call....13
OTHER IMPORTANT INFORMATION
RESETTING THE PHONE TO FACTORY DEFAULT ....13
SAFETY INSTRUCTIONS 13
RENTAL TERMS AND CONDITIONS ....13
TELEPHONE FAULTS....13
CARE OF YOUR TELEPHONE....14
TROUBLE SHOOTING 14
SPECIFICATIONS....15
STORED TELEPHONE NUMBERS 16
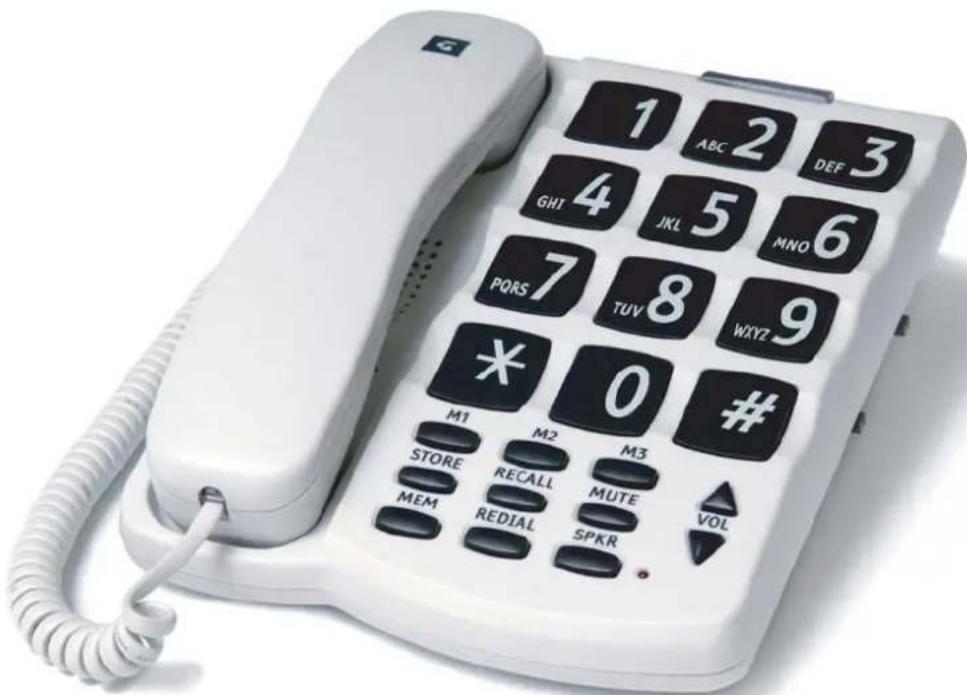
TELSTRA SP817BB OVERVIEW
TELSTRA SP817BB OVERVIEW. (Cont.)
ITEMS SUPPLIED WITH YOUR TELEPHONE
The following items should have been supplied in the box:
Telephone Base

Handset

Desk/Wall Mount Bracket

HandsetC ord

LineCord

Adaptor plug
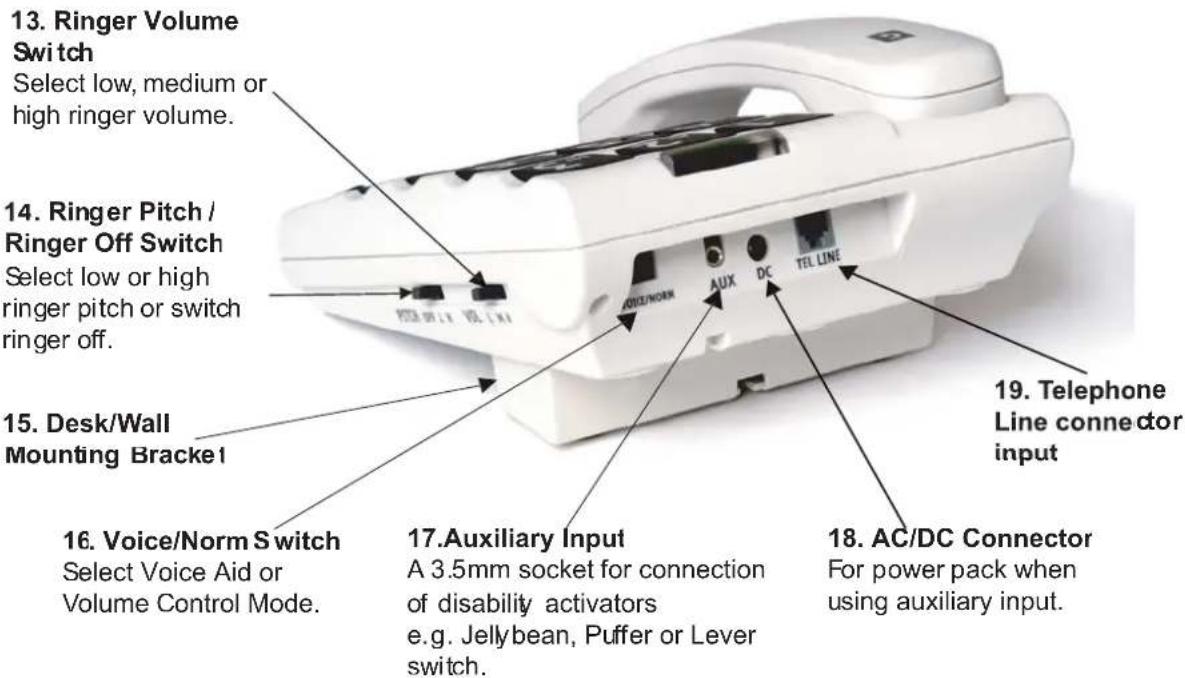
INSTALLATION OF YOUR TELEPHONE
Desk Stand
A reversible Desk/Wall Mounting Bracket is supplied with the telephone. This can be used as a desk stand to raise the angle of the telephone.
For desktop installation attach the Desk/Wall Mounting Bracket as per the diagram below. Arrow symbols are embossed on the base of the telephone and the Desk/Wall Mounting Bracket to show the correct installation.
natural_image
Technical line drawing of a mechanical device with mounting holes and internal components (no text or symbols)Wall Mounting
The telephone can be wall mounted on a standard telephone wall plate. To wall mount your telephone:
Step 1 Remove and reverse the handset hook as follows:
-
Slide out
-
Reverse
-
Replace


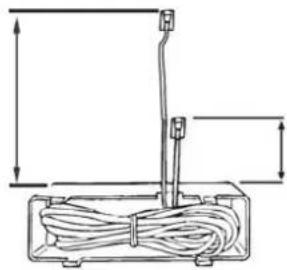
Step 2 Coil the Line Cord and fit inside the Desk/Wall Mounting Bracket as follows:
approx 17cm (plugs into phone)
natural_image
Technical line drawing of a cable assembly with a vertical rod and base, showing no text or symbols.approx 8cm (plugs into wall socket)
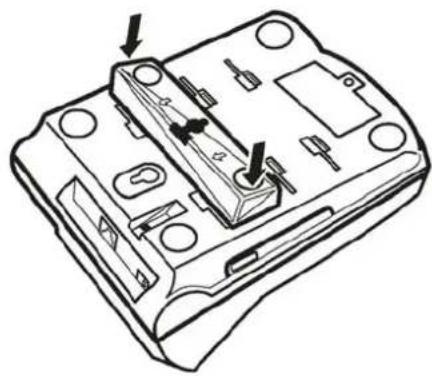
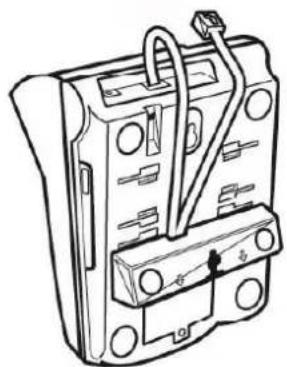
Step 3 Attach the Desk/Wall Mounting Bracket to the base of the telephone as follows:
natural_image
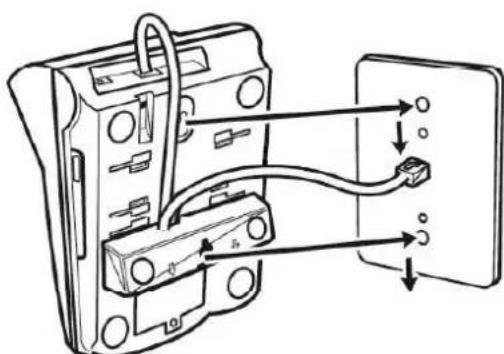
Technical line drawing of an electrical contactor or relay device (no text or symbols visible)Step 4 Plug the long end of the Line Cord into the telephone and the short end into the wall socket as follows:
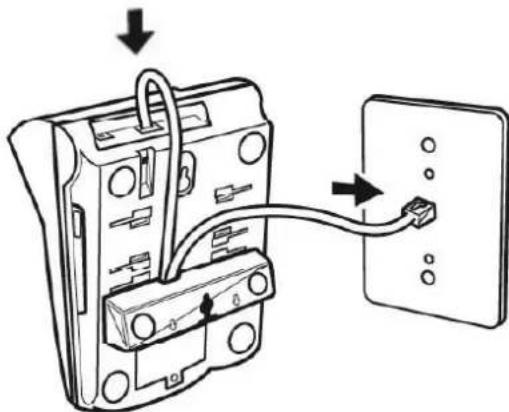
Step 5 Place the telephone on the wall plate ensuring that both posts are inserted into the slots on the back of the telephone and the wall mounting bracket. Push down to lock the telephone into place on the wall plate as follows:
GETTING STARTED
When you unpack the telephone you will need to ensure the Line Cord is plugged into the socket at the rear of the telephone and the handset is plugged into the socket on the side of the telephone.
Plug the Line Cord into your telephone line socket, lift the handset and check for dial tone, then replace the handset. This ensures the telephone is powered up and will operate correctly. Repeat this step whenever the telephone has been disconnected from the line or appears to be working incorrectly.
TELEPHONE OPERATION
Handsfree Operation
The telephone can be operated in Handsfree (Speaker) Mode which allows you to listen to the call and speak to the other party without using the handset. When using Handsfree Mode ensure you are facing the telephone and speak in a clear voice. Wait for the other party to finish speaking before you speak. If you try to speak at the same time, they may not hear you as the telephone will not send and receive simultaneously while in Handsfree Mode. Ensure there is no background noise when using Handsfree Mode (eg. radio, TV, machinery, etc.) as this may interfere with the call.
Telephone operations such as making calls and storing numbers can be performed in Handsfree Mode by pressing SPKR instead of lifting the handset. Programming functions cannot be performed using SPKR.
While on a handset call you can change to Handsfree Mode by pressing SPKR. The handset can be replaced in the cradle or left off-the-hook. While in Handsfree Mode you can change to Handset Mode by lifting the handset or pressing SPKR if the handset has not been placed back in the handset cradle.
The speaker volume can be adjusted by pressing VOL ▲ or VOL▼ until you obtain the desired receive level.
Note: The selected Handsfree volume setting will be retained until it is changed and is independent of the handset volume setting.
Making a Call
Lift the handset or press SPKR and dial the desired number.
To end the call, replace the handset or press SPKR.
Answering an Incoming Call
While the telephone is ringing, lift the handset or press SPKR and talk to the calling party.
Adjusting the Ringer Volume
The ringer has three levels, low L, medium M and high H.
Set the Ringer Volume Switch to the desired position.
Adjusting the Ringer Pitch or Switching the Ringer off
The ringer pitch can be adjusted for High H or low L pitch or the ringer can be switched off.
Set the Ringer Pitch Switch to the desired position.
Adjusting the Receive Volume Level (Normal Mode)
When the Voice/Norm Switch is in the Normal position, the receive volume level can be adjusted by pressing VOL ▲ or VOL ▼ until you obtain the desired receive level.
Note: The selected volume setting will be retained until it is changed or you change from Normal to Voice Mode.
Note: The handset also provides magnetic coupling for use with hearing aids with a T position switch.
Muting the Transmit Signal
To mute the transmit signal while on a handset, handsfree or headset call, press MUTE and the Speaker Light will flash slowly to indicate that the caller cannot hear you.
To turn mute off, press MTE.
Note: Mute is automatically switched off when you end the call by replacing the handset or pressing SPKR.
Last Number Redial
Lift the handset or press SPKR, wait for the dial tone and then press REDIAL
Redials the last number dialled.
MEMORY PROGRAMMING
Programming the One-Touch Memory Buttons (M1, M2, M3)
Lift the handset or press SPKR, press STORE and dial the phone number, then press the desired memory location M1 to M3, then replace the handset or press SPKR.
Note: Hang up after programming each memory button. Use the REDIAL button to enter 1.5 sec pause if required.
Note: Maximum of 30 digits (including Pauses and Recall) can be stored in each memory location.
Dialling from One-Touch Memory Buttons
Lift the handset, wait for the dial tone and press M1 to M3.
Programming the Two-Touch Memory Buttons
Lift the handset or press SPKR, press STORE and dial the phone number, then press MEM and press the desired memory location 1 to 0, then replace the handset or press SPKR.
Note: Hang up after programming each memory button. Use the REDIAL button to enter 1.5 sec pause if required.
Note: Maximum of 30 digits (including Pauses and Recall) can be stored in each memory location.
Dialling from Two-Touch Memory Buttons
Lift the handset or press SPKR, wait for the dial tone, then press MEM and press the desired memory location 1 b 0.
Hot Key Dialling
This is a convenient feature that allows you to make a call without lifting the handset or pressing SPKR. Your telephone offers different levels of hot key dialling:
Level 1 – All hot keys are disabled.
Level 2 – MEM, REDIAL, M1, M2 and M3 are hot keys.
Level 3 – MEM, REDIAL, M1, M2, M3 and 0 to 9 are not keys.
Simply press a hot key and your phone will automatically go into Handsfree Mode and dial the stored number.
Note: You will hear a short pause of about 2 seconds between pressing a hot key and the start of dialling when using Hot Key Dialling.
When you initially connect your telephone, Level 2 Hot Key Dialling is enabled.
To program the desired level of Hot Key Dialling – Lift the handset, press STORE, press VOL ▲, press VOL▼, press MUTE then:
press 1 for Level 1
press 2 for Level 2
press 3 for Level 3
Then replace the handset.
Hot Key Answer
Allows you to answer an incoming call by pressing any button while the telephone is ringing. The incoming call will be answered in Handsfree or Headset Mode.
Your telephone offers 2 levels of Hot Key Answer: On or Off. When you initially connect your telephone, Hot Key Answer is On i.e. pressing any key while the phone is ringing will answer the call.
To program the desired level of Hot Key Answer – Lift the handset, press STORE, press VOL ▲, press VOL▼, press MUTE then:
press 5 for Hot Kye Answer Off
press 4 for Hot Key Answer On
Then replace the handset.
OTHER OPERATION MODES
VOICE AID MODE
Your telephone can be switched to Voice Aid Mode. This mode is useful for people with speech impairment/soft voices who find that others have difficult hearing them. When the telephone is in Voice Aid Mode, the VOL ▲ and VOL▼ buttons adjust the transmit level rather than the receive volume level.
Adjusting the Transmit Send Level (Voice Mode)
When the VOICE/NORM Switch is in the Voice Mode position the transmit level can be adjusted by pressing the VOL ▲ or VOL▼ buttons until you obtain the desired transmit level.
Note: The selected transmit send level setting will be retained until it is changed or you switch from Voice to Normal Mode.
Note: The handset earpiece volume is set to Normal and cannot be adjusted when the telephone is in Voice Mode.
Note: Voice Aid Mode only operates when using the handset, it does not affect handsfree operation.
AUXILIARY INPUT
An auxiliary device such as a Jellybean, Puffer or Lever Switch (with a 3.5mm mono plug) can be connected to the Auxiliary Input. Activating the auxiliary device will answer, initiate and release calls in Handsfree or Headset Mode.
A power pack is needed when using an auxiliary switch with this telephone. For more information regarding the connection and use of an Auxiliary Input device and the supply of a power pack, call the Telstra Disability Enquiry Hotline on FREECALL ^™ on 1800 068 424 (a free call from most fixed phones).
AUXILIARY INPUT (cont)
Making a Call
Activate the auxiliary device, listen for dial tone, dial the number or press M1 to M3. To end the call, activate the auxiliary device again.
Answering an Incoming Call
Activate the auxiliary device. The call will be answered in Handsfree or Headset Mode. To end the call, activate the auxiliary device again.
Hot Dialling
If a number is stored in the memory location #, activation of the auxiliary device will automatically dial the stored number.
To store a number in memory location # – Lift the handset or press SPKR, press STORE, dial the number, then press MEM and press the # button, then replace the handset or press SPKR.
PABX MODE
If you are using your Telstra Big Button Telephone behind a PABX or KeySystem, you should program your phone for PABX operation. This will automatically insert a PABX access pause between the first and second digit when you use REDIAL.
To program PABX Mode – Lift the handset, press STORE, press
VOL ▲, press ⓄL▼, press MUTE then:
press 7 for PABX Mode On
press 8 for PABX Mode Off
Then replace the handset.
HEADSET MODE
You can replace the handset with a headset and your telephone can be programmed for Headset Mode, which allows you to make and receive calls using the headset.
To connect the headset, unplug the handset from your phone and plug the headset into the handset socket. Leave the handset in the handset cradle.
To program your telephone for Headset Mode – Lift the handset, press STORE, press VOL ▲, press ⬇L▼, press MUTE then:
pres s* for Headset Mode
press 0 for Normal Mode
Then replace the handset.
Making a Call
To make a call in Headset Mode press SPKR, listen for dial tone, dial the number or press M1 to M. The call will be presented to the headset. To end the call press SPKR.
Answering an Incoming Call
To answer an incoming call press SPKR. To end the call press SPKR
Note: While on a headset call the Speaker Light will have a long flash.
Note: Lifting the handset while in Headset Mode performs the same function as pressing SPKR.
OTHER IMPORTANT INFORMATION
RESETTING THE PHONE TO FACTORY DEFAULT
To reset the telephone programming to factory default – Lift the handset, press STORE, press VOL ▲, press VOL▼, press MUTE then dial #,#,#.
Note: This will clear all memories and settings.
IMPORTANT SAFETY INSTRUCTION'S

Do not use the telephone during an electrical storm as it is possible to get a shock. Refer to the Telstra White Pages ^® directory for further information.
RENTAL TERMS AND CONDITIONS
Your rental telephone is subject to the terms and conditions set out in Part A – General of the Basic Telephone Service Section of Our Customer Terms, which is available for inspection at most Telstra shops or at: www.telstra.com.au/customerterms/index.htm.
TELEPHONE FAULTS
Please refer to the Troubleshooting section before reporting your fault. If your telephone is still faulty please call 13 2203 (residential customers).
CARE OF YOUR TELEPHONE
- Avoid hard knocks and do not drop the telephone.
- Keep the telephone away from heaters.
- Clean the telephone with a damp cloth. Do not use detergents or immerse the telephone in water.
- The performance of the telephone may be affected by electro-magnetic interference if placed near radio transmitters, diathermy machines, welding machines etc.
TROUBLE SHOOTING
No Dial Tone
Check that the telephone Line Cord is correctly plugged into the telephone socket at the back of your telephone and the other end is plugged into your wall socket.
Check that the Handset Cord connectors at both ends are pushed in firmly until they click.
Check that no other telephone extension is in use.
Telephone Does Not Ring
Check Ringer Pitch Switch to ensure your ring er is not switched off.
Check that no other telephone extensions are off-the-hook.
Check to ensure that you do not have too many telephone extensions in your home or offi ce.
Volume Control Does Not Work
Check that the VOICE/NORM Switch is in the Normal position.
Cannot Dial
Reset your telephone to factory default.
Ring Flasher Does Not Work
Check that no other telephone extensions are off-the-hook.
Check to ensure that you do not have too many telephone extensions in your home or offi ce.
SPECIFICATIONS
Receiver Volume
Ringer Volume
Transmitter Boost (Voice Aid)
Hearing aid compatibility
Headset wiring configuration
Auxiliary Input Wiring
- Ad justable from -4dB to +25dB.
- Maximum 82dB SPL @ 1 metre.
- Adjustable from 0dB to +20dbB.
- Ad justable from -31.6dB to -8.9dB Radial Field strength.
- As per Telstra T200 /T400/T1000 wiring.
- 3.5mm Mono phono plu g, activated by momentary contact of the Tip/Sleeve.
Auxiliary Input
DC Connector Specification
- Dry contact closure.
- 2.5mm D C connector.
STORED TELEPHONE NUMBERS
| KEY | NAME | NUMBER |
| M1 | ||
| M2 | ||
| M3 | ||
| MEM, 1 | ||
| MEM, 2 | ||
| MEM, 3 | ||
| MEM, 4 | ||
| MEM, 5 | ||
| MEM, 6 | ||
| MEM, 7 | ||
| MEM, 8 | ||
| MEM, 9 | ||
| MEM, 0 | ||
| # | ||