2945LF - Tivi SYLVANIA - Hướng dẫn sử dụng miễn phí
Tìm hướng dẫn sử dụng thiết bị miễn phí 2945LF SYLVANIA ở định dạng PDF.

Câu hỏi của người dùng về 2945LF SYLVANIA
0 câu hỏi về thiết bị này. Trả lời những câu bạn biết hoặc đặt câu hỏi riêng.
Đặt câu hỏi mới về thiết bị này
Tải xuống hướng dẫn cho thiết bị của bạn Tivi ở định dạng PDF miễn phí! Tìm hướng dẫn của bạn 2945LF - SYLVANIA và lấy lại thiết bị điện tử của bạn. Trên trang này được đăng tải tất cả các tài liệu cần thiết để sử dụng thiết bị của bạn. 2945LF thương hiệu SYLVANIA.
HƯỚNG DẪN NGƯỜI DÙNG 2945LF SYLVANIA
VIDEO CASSETTE RECORDER 2945LF
natural_image
Line drawing of a front-mounted electronic device with control panel and buttons (no text or symbols)INSTRUCCIONES EN ESPAÑOL INCLUIDAS.
WARNING:
TO REDUCE THE RISK OF FIRE OR ELECTRIC SHOCK, DO NOT EXPOSE THIS APPLIANCE TO RAIN OR MOISTURE.

CAUTION
RISK OF ELECTRIC SHOCK DO NOT OPEN

CAUTION: TO REDUCE THE RISK OF ELECTRIC SHOCK, DO NOT REMOVE COVER (OR BACK). NO USER SERVICEABLE PARTS INSIDE. REFER SERVICING TO QUALIFIED SERVICE PERSONNEL.
THIS SYMBOL INDICATES THAT DANGEROUS VOLTAGE CONSTITUTING A RISK OF ELECTRIC SHOCK IS PRESENT WITHIN THIS UNIT.

THIS SYMBOL INDICATES THAT THERE ARE IMPORTANT OPERATING AND MAINTENANCE INSTRUCTIONS IN THE LITERATURE ACCOMPANYING THE APPLIANCE.
The caution marking is located on the rear of the cabinet.
IMPORTANT SAFEGUARDS
- Read instructions- All the safety and operating instructions should be read before the appliance is operated.
- Retain Instructions-The safety and operating instructions should be retained for future reference.
3.Heed Warnings-All warnings on the appliance and in the operating instructions should be adhered to. - Follow Instructions-All operating and use instructions should be followed.
- Cleaning-Unplug this video product from the wall outlet before cleaning. Do not use liquid cleaners or aerosol cleaners. Use a damp cloth for cleaning.
EXCEPTION: A product that is meant for uninterrupted service and, that for some specific reason, such as the possibility of the loss of an authorization code for a CATV converter, is not intended to be unplugged by the user for cleaning or any other purpose, may exclude the reference to unplugging the appliance in the cleaning description otherwise required in item 5.
- Attachments-Do not use attachments not recommended by the video product manufacturer as they may cause hazards.
- Water and Moisture-Do not use this video product near water, for example, near a bath tub, wash bowl, kitchen sink, or laundry tub, in a wet basement, or near a swimming pool, and the like.
- Accessories-Do not place this video product on an unstable cart, stand, tripod, bracket, or table. The video product may fall, causing serious injury to a child or adult, and serious damage to the appliance. Use only with a cart, stand, tripod, bracket, or table recommended by the manufacturer, or sold with the video product. Any mounting of the appliance
should follow the manufacturer's instructions and should use a mounting accessory recommended by the manufacturer. An appliance and cart combination should be moved with care. Quick stops, excessive force, and uneven surfaces may cause the ap-
PORTABLE CART WARNING (Symbol provided by RETAC)
natural_image
Silhouette of a person climbing a ladder inside a circle (no text or symbols)S3125A
pliance and cart combination to overturn.
- Ventilation-Slots and openings in the cabinet are provided for ventilation and to ensure reliable operation of the video product and to protect it from overheating, and these openings must not be blocked or covered. The openings should never be blocked by placing the video product on a bed, sofa, rug, or other similar surface. This video product should not be placed in a built-in installation such as a bookcase or rack unless proper ventilation is provided or the manufacturer's instructions have been adhered to.
- Power Sources-This video product should be operated only from the type of power source indicated on the marking label. If you are not sure of the type of power supply to your home, consult your appliance dealer or local power company. For products intended to operate from battery power, or other sources, refer to the operating instructions.
- Grounding or Polarization- This video product is equipped with a polarized alternating-current line plug (a plug having one blade wider than the other). This plug will fit into the power outlet only one way. This is a safety feature. If you are unable to insert the plug fully into the outlet, try reversing the plug. If the plug should still fail to fit, contact your electrician to replace your obsolete outlet. Do not defeat the safety purpose of the polarized plug.
- Power Cord Protection-Power supply cords should be routed so that they are not likely to be walked on or pinched by items placed upon or against them, paying particular attention to cords at plugs, convenience receptacles, and the point where they exit from the appliance.
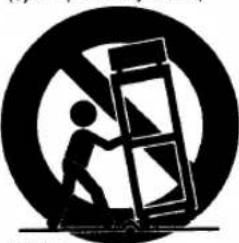
- Outdoor Antenna Grounding-If an outside antenna or cable system is connected to the video product, be sure the antenna or cable system is grounded so as to provide some protection against voltage surges and built-up static charges. Article 810 of the National Electrical Code, ANSI/NFPA No. 70, provides information with regard to proper grounding of the mast and supporting structure, grounding of the lead-in wire to an antenna discharge unit, size of grounding conductors, location of antenna-discharge unit, connection to grounding electrodes, and requirements for the grounding electrode. (Fig. A)
text_image
FIGURE A EXAMPLE OF ANTENNA GROUNDING AS PER NATIONAL ELECTRICAL CODE ANTENNA LEAD IN WIRE GROUND CLAMP ANTENNA DISCHARGE UNIT (NEC SECTION 810-20) ELECTRIC SERVICE EQUIPMENT GROUNDING CONDUCTORS (NEC SECTION 810-21) GROUND CLAMPS POWER SERVICE GROUNDING ELECTRODE SYSTEM (NEC ART 250, PART H) NEC - NATIONAL ELECTRICAL CODE S2898A-
Lightning-For added protection for this video product during a lightning storm, or when it is left unattended and unused for long periods of time, unplug it from the wall outlet and disconnect the antenna or cable system. This will prevent damage to the video product due to lightning and power-line surges.
-
Power Lines-An outside antenna system should not be located in the vicinity of overhead power lines or other electric light or power circuits, or where it can fall into such power lines or circuits. When installing an outside antenna system, extreme care should be taken to keep from touching such power lines or circuits as contact with them might be fatal.
-
Overloading-Do not overload wall outlets and extension cords as this can result in a risk of fire or electric shock.
17.Object and Liquid Entry-Never push objects of any kind into this video product through any openings as they may touch dangerous voltage points or short-out parts that could result in a fire or electric shock. Never spill liquid of any kind on the video product.
-
Servicing-Do not attempt to service this video product yourself as opening or removing covers may expose you to dangerous voltage or other hazards. Refer all servicing to qualified service personnel.
-
Damage Requiring Service-Unplug this video product from the wall outlet and refer servicing to qualified service personnel under the following conditions:
a. When the power-supply cord or plug is damaged.
b. If liquid has been spilled, or objects have fallen into the video product.
c. If the video product has been exposed to rain or water.
d. If the video product does not operate normally by following the operating instructions. Adjust only those controls that are covered by the operating instructions as an improper adjustment of other controls may result in damage and will often require extensive work by a qualified technician to restore the video product to its normal operation.
e. If the video product has been dropped or damaged in any way.
f. When the video product exhibits a distinct change in performance-this indicates a need for service.
-
Replacement Parts-When replacement parts are required, be sure the service technician has used replacement parts specified by the manufacturer or have the same characteristics as the original part. Unauthorized substitutions may result in fire, electric shock or other hazards.
-
Safety Check-Upon completion of any service or repairs to this video product, ask the service technician to perform safety checks to determine that the video product is in proper operating condition.
-
Heat-This video product should be situated away from heat sources such as radiators, heat registers, stoves, or other products (including amplifiers) that produce heat.
LOCATION
For safe operation and optimum performance of your VCR, keep the following in mind when selecting a place for its installation:
- Shield it from direct sunlight and keep it away from sources of intense heat.
- Avoid dusty or humid places.
- Avoid places with insufficient ventilation for proper heat dissipation. Do not block the ventilation holes on the sides of the VCR.
• Install unit in a horizontal position. - Avoid locations subject to strong vibration.
- Do not place the VCR near strong magnetic fields.
- Avoid moving VCR to locations where temperature differences are extreme.
- Do not place the VCR directly on top of the TV.
AVOID THE HAZARDS OF ELECTRICAL SHOCK AND FIRE
- Do not handle the power cord with wet hands.
- Do not pull on the power cord when disconnecting it from AC wall outlet. Grasp it by the plug.
- If, by accident, water is spilled on your VCR, unplug the power cord immediately and take the unit to our Authorized Service Center for servicing.
- Do not put your fingers or objects into the VCR cassette holder.
- Do not place anything directly on top of the VCR.
WARNING
Moisture condensation may occur inside the unit when it is moved from a cold place to a warm place, or after heating a cold room or under conditions of high humidity. Do not use the VCR at least for 2 hours until its inside is dry.
FCC WARNING- This equipment may generate or use radio frequency energy. Changes or modifications to this equipment may cause harmful interference unless the modifications are expressly approved in the instruction manual. The user could lose the authority to operate this equipment if an unauthorized change or modification is made.
IMPORTANT COPYRIGHT INFORMATION
Unauthorized recording or use of broadcast television programming, video tape, film or other copyrighted material may violate applicable copyright laws. We assume no responsibility for the unauthorized duplication, use, or other acts which infringe upon the rights of copyright owners.
A NOTE ABOUT RECYCLING
This product's packaging materials are recyclable and can be reused. Please dispose of any materials in accordance with your local recycling regulations.
Batteries should never be thrown away or incinerated but disposed of in accordance with your local regulations concerning chemical wastes.
The serial number of this product may be found on the back of the VCR. No other VCR has the same serial number as yours. You should record the number and other vital information here and retain this book as a permanent record of your purchase to aid identification in case of theft. Serial numbers are not kept on file.
| Date of Purchase | |
| Dealer Purchase from | |
| Dealer Address | |
| Dealer Phone No. | |
| Model No. | |
| Serial No. |
TABLE OF CONTENTS
■ IMPORTANT SAFEGUARDS.... 2
■ PRECAUTIONS.... 4
LOCATION 4
AVOID THE HAZARDS OF ELECTRICAL SHOCK AND FIRE 4
WARNING 4
■ FEATURES 6
■ SUPPLIED ACCESSORIES.... 6
■ VIDEO CASSETTE TAPE INFORMATION.... 7
■ OPERATING CONTROLS AND FUNCTIONS.... 8
■ PREPARATION FOR USE.... 10
ANTENNA/CABLE CONNECTIONS ..... 10
SETTING THE CH3/CH4 SWITCH.... 13
A/V TERMINALS.... 13
INSTALLING THE BATTERIES 13
■ SET UP FOR USE 14
CHANNEL SET UP (Automatic) 14
CLOCK SET UP 15
TO DELETE OR ADD CHANNELS 16
CHANNEL SET UP AGAIN 16
SELECTING THE LANGUAGE 16
■ PLAYBACK 17
NORMAL PLAYBACK 17
PICTURE SEARCH.... 17
STILL PICTURE.... 17
VERTICAL HOLD CONTROL 18
TRACKING ADJUSTMENT 18
SLOW MOTION 18
COUNTER MEMORY 18
■ SPECIAL PLAYBACK.... 19
AUTO REPEAT PLAYBACK 19
RENTAL PLAYBACK.... 19
INDEX SEARCH 20
QUICK-FIND 21
TIME SEARCH 21
■ RECORDING 22
VIEWING AND RECORDING THE SAME PROGRAM.... 22
SKIPPING UNWANTED SCENES DURING RECORDING 22
RECORDING ONE PROGRAM AND VIEWING ANOTHER 22
TO MONITOR THE PROGRESS OF YOUR RECORDING 22
OTR (One Touch Recording) 23
■ TIMER RECORDING 24
AUTOMATIC TIMER RECORDING...... 24
TODAY TIMER RECORDING 26
TIMER PROGRAM EXTENSION 27
HINTS FOR TIMER RECORDING.... 28
AUTO RETURN 28
AUTO SATELLITE LINK USING A SATELLITE TUNER(not supplied).. 29
■ COPYING A VIDEO TAPE.... 30
■ ON SCREEN DISPLAY.... 30
■ DIGITAL DISPLAY.... 31
■ SPECIAL FEATURES .... 31
REAL TIME TAPE COUNTER.... 31
AUTO REWIND 31
■ CONTROLLING YOUR TV OR CABLE CONVERTER WITH THE VCR'S REMOTE... 32
REMOTE CONTROL OF THE TV 32
REMOTE CONTROL OF THE CABLE CONVERTER .... 33
■ TROUBLESHOOTING GUIDE ...... 34
■ MAINTENANCE 34
■ SPECIFICATIONS.... 35
■ CABLE CHANNEL DESIGNATIONS ...... 35
■ WARRANTY...... Back Cover
- Rotary 4-head Record/Playback System— 4-heads ensure excellent picture quality and special effects playback.
● Bilingual on-screen menu display selectable in English or Spanish
● Infrared remote control - Real time tape counter— This shows the elapsed recording or playback time in hours, minutes, and seconds. (Does not work in blank areas of the tape)
- 181 channel capability PLL frequency synthesizer tuner with direct station call— (A converter may be necessary to view scrambled cable channels.)
● Digital Display see page 31. - Auto power on and off system— Automatically turns the VCR when you insert the cassette, turns off after auto-rewind, and ejects when the beginning of the tape is reached.
- Auto counter reset— (Automatically resets tape counter "0:00:00" when a tape is inserted.)
- Auto rewind when the end of a tape is reached— (Does not occur when using the timer recording).
- Direct Button Operation— When a tape is in the VCR and the power is off, just press the PLAY, REW or F.FWD button on the main unit and it will automatically turn on the VCR and perform the desired function. (Does not occur when using the timer recording).
- 2 Step Picture Search Operation— You can view a video program at a high speed or super high speed in either a forward or reverse direction. (Super high speed is available in LP and SLP mode only)
- Still— "Freeze" the picture at any time, for close viewing of a particular scene.
- Digital Auto Tracking (DTR)—Automatically adjusts the tracking for each tape you play.
- Auto Repeat— Allows you to repeat the playing of a tape indefinitely without pressing the PLAY button.
- Rental Play Mode—Improves playback picture quality of worn tapes, such as rental tapes.
● Three different playback tape speeds : SP/LP/SLP
● Two different recording tape speeds : SP/SLP
- OTR (One Touch Recording)— Instant timed recording for 30 to 480 minutes is possible at the push of the REC/OTR button.
- 1 Year, 8 events (including Today, Daily and Weekly Timer Recording)—The built-in timer allows you to record up to 7 programs at different times on different channels up to 1 year in advance. The Today Timer Recording uses program number 8. The daily timer allows recordings to be made of daily broadcasts from Monday through Friday, and the weekly timer allows recording to be made once a week up to the end of the tape.
- Today Timer Recording— Allows you to easily record one program within 24 hours.
- Auto Return— After timer recording is finished, the VCR can return to the beginning of the recording automatically.
● Auto Head Cleaner— Automatically cleans video heads as you insert or remove a cassette.
- Quick-Find- Lets you search and confirm the contents of the recorded program(s) using the index mark.
- Auto Satellite Link— When the start time which you set comes on and the VCR receives the signals using the audio/video input jacks on the rear panel of the VCR from your satellite tuner, the VCR will turn itself on, and record. Then when there is no signals for more than 2 seconds, the VCR stops and turns itself off automatically.
- Time Search—Lets you set the VCR to advance the tape by entering the desired playback time you want to skip.
- Index Search— Lets you index the start of a recording.
- Slow Motion— You can view the video program at a slower than normal playback speed. Slow speed can be controlled by pressing the F.FWD button (faster) or the REW button (slower).
- Timer Program Extension— Allows you to shift the time schedule of a One Time Program for timer recording.
SUPPLIED ACCESSORIES
| Coaxial CablePART NO.(WPZ0102LG006/ 5750398/WPZ0102BB001) | Remote Control UnitPART NO. (N9393UD) | Batteries(AA × 2) |
- If you need to replace these accessories, please refer to the PART NO. under the illustrations and call 1-800-968-3429.
- Depending on your antenna system, you may need different types of Combiners (Mixer) or Separators (Splitter). Contact your local electronics store for these items.
- We do not recommend the use of universal remote controls. Not all of the functions may be controlled with a universal remote control.
If you decide to use a universal remote control with this unit, please be aware that the code number given may not operate this unit. In this case, please call the manufacturer of the universal remote control.
This VCR will operate with any cassette that has the VHS mark. For best results, we recommend the use of high-quality tapes. Do not use poor quality or damaged tapes.
PRECAUTIONS
- Avoid moisture. Moisture condensation may occur on the tape if it is moved from a cold place to a warm place or visa versa. Before using a tape with these conditions, to avoid damage of the tape and your VCR, wait until the tape has warmed to room temperature and the moisture has evaporated.
- Avoid extreme heat, high humidity and magnetic fields.
- Do not tamper with the cassette mechanism.
- Do not touch the tape with your fingers.
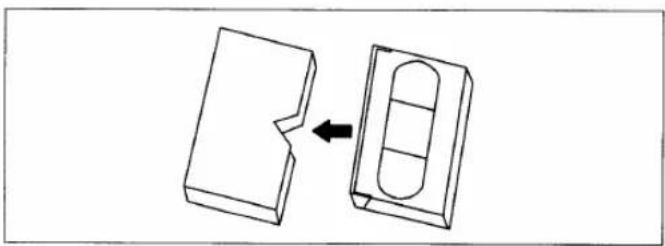
REMOVING A CASSETTE
1) In the Stop mode, press the STOP/EJECT button on the VCR. The cassette will be ejected.
2) Pull the cassette out of the cassette compartment.
3) Store the cassette in its case as shown.
natural_image
Diagram showing a mechanical component being cut into a housing, with an arrow indicating the process (no text or symbols present)TWO DIFFERENT TAPE SPEEDS
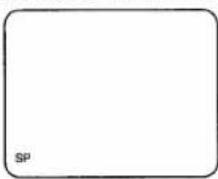
Before recording, select the tape speed from : SP mode (Standard Play) or SLP mode (Super Long Play).
The table below shows the maximum recording/play-back time using T60, T120 or T160 tapes in each mode.
| Tape Speed | Recording/Playback Time | ||
| Type of tape | T60 | T120 | T160 |
| SP mode | 1 hour | 2 hours | 2-2/3 hours |
| SLP mode | 3 hours | 6 hours | 8 hours |
Note: You can play back a tape recorded in LP mode (Long Play).
ERASE PREVENTION
You can prevent accidental erasing of a recording by breaking off the tab on the back edge of the cassette.
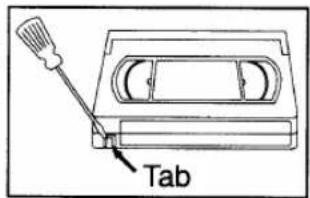
text_image
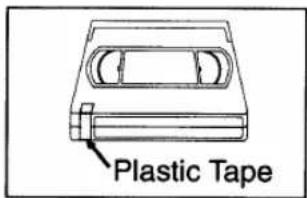
TabIf you decide to record on the tape again, cover the hole with plastic tape.
text_image
Plastic TapeINSERTING A CASSETTE
Insert the cassette in the direction as shown. Push in gently, but continuously, on the center-back of the cassette until it is drawn into the VCR.
The VCR will automatically turn on.
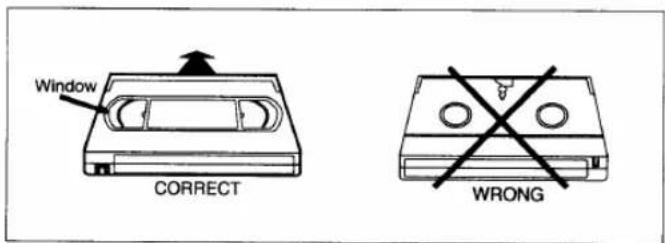
text_image
Window CORRECT WRONGNOTE:
- We do not recommend the use of universal remote controls. Not all of the functions may be controlled with a universal remote control.
If you decide to use a universal remote control with this unit, please be aware that the code number given may not operate this unit. In this case, please call the manufacturer of the universal remote control.
—VCR FRONT PANEL—
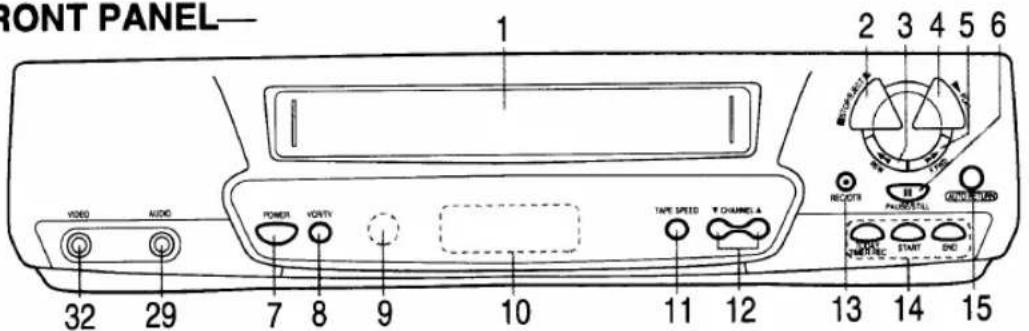
text_image
FRONT PANEL— 1 2 3 4 5 6 VIDEO AUDIO POWER VOUTY TAPE SPEED T CHANNEL A RECOTR PROGRESS 32 29 7 8 9 10 11 12 13 14 15 DATA START END—REMOTE CONTROL—
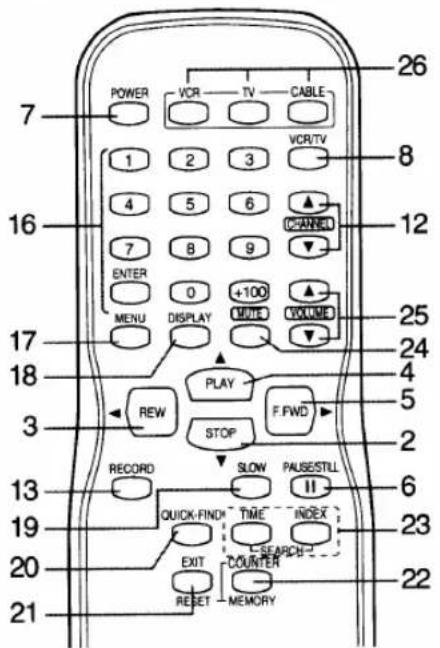
text_image
POWER VCR TV CABLE 1 2 3 VCR/TV 8 4 5 6 CHANNEL 7 8 9 ENTER 0 +100 MENU DISPLAY VOLUME VOLUME 12 17 25 24 18 4 5 3 REW PLAY F.PWD STOP 2 13 RECORD SLOW PAUSESTILL II QUICK-FIND* TIME INDEX 19 EXIT COUNTER 23 20 21 RESET MEMORY1. Cassette Compartment
- EJECT button—Press to remove the tape from the VCR. (only on the VCR)
STOP button— Press to stop the tape motion.
▼ button- Press to enter digits when setting program (For example: setting clock or timer program). Press to select the setting modes from the on screen menu. (only on the remote control)
- REW button- Press to rewind the tape, or to view the picture rapidly in reverse during the playback mode. (Rewind Search)
◀ button- Press to cancel a setting of timer program. Press to correct digits when setting program (For example: setting clock or timer program). Press
to add or delete channel numbers during channel preset. (only on the remote control)
- PLAY button- Press to begin playback.
▲ button- Press to enter digits when setting program (For example: setting clock or timer program). Press to select the setting modes from the on screen menu. (only on the remote control)
- F.FWD button—Press to rapidly advance the tape, or view the picture rapidly in forward during playback. (Forward Search)
▶ button— When setting program (For example: setting clock or timer program), press to determine your selection and proceed to the next step you want to input. Press to determine the setting modes from the on screen menu. Press to add or delete channel numbers during channel preset. (only on the remote control)
- PAUSE/ STILL button- Press to temporarily stop the tape during recording or to view a still picture during playback.
Frame Advance function—Press to advance the picture by one frame at a time during still mode.
-
POWER button- Press to turn VCR on and off. Press to activate timer recording.
-
VCR/TV button—Press to select TV or VCR mode. VCR position: to view playback, to monitor video recordings or watch TV using the VCR tuner.
TV position: to watch TV or to view one program while recording another.
-
Remote sensor window- Receives the infrared signals from the remote control.
-
Digital display- See page 31.
—REAR VIEW—
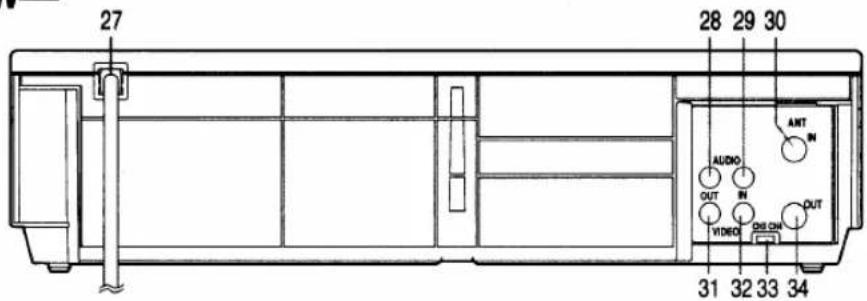
text_image
27 28 29 30 AUDIO OUT IN VIDEO OUT AMT IN OUT 31 32 33 34- TAPE SPEED button- Press to choose the desired recording speed : SP/SLP. (only on the VCR)
- CHANNEL ▲ or ▼ buttons— Press to select the desired channels for viewing or recording.
Tracking function— Press to minimize video ‘noise’ (lines or dots on screen) during playback or slow mode.
Press to stabilize the picture in the Still mode when the picture begins to vibrate vertically.
- RECORD button- Press for manual recording.
OTR button—Press to activate One Touch Recording. (only on the VCR) - TODAY TIMER REC button—Press to set a today timer program, or to check it. (only on the VCR)
START button- Press to enter desired start time during today timer setting. (only on the VCR)
END button- Press to enter desired end time during today timer setting. (only on the VCR) - AUTO RETURN button—Rewinds to the beginning of the timer recording.
- NUMBER buttons- Press to select desired channels for viewing or recording. To select channels from 1 to 9, first press "0" button then 1 to 9. (only on the remote control)
+100 button— When selecting cable channels which are higher than 99, press this button first, then press the last two digits. (To select channel 125, first press "+100" button then press "2" and "5"). (only on the remote control)
ENTER button- For details, see pages 32-33. (only on the remote control) - MENU button- Press to display the menu on the TV screen. Press to exit the menu on the TV screen. (only on the remote control)
- DISPLAY button- Press to display the counter or the current channel number and the current time on the TV screen. (only on the remote control)
-
SLOW button- Press to start slow motion playback. The slow speed can be controlled by pressing the F.FWD button (faster) or REW button (slower). (only on the remote control)
-
QUICK-FIND button- Quick Find mode. For more information, please read page 21. (only on the remote control)
- COUNTER RESET button- Press to reset counter to 0:00:00. (only on the remote control)
EXIT button- Press to exit the menu on the TV screen. (only on the remote control)
- COUNTER MEMORY button—Press to set counter memory on and off.(only on the remote control)
- SEARCH buttons
TIME SEARCH button- Time Search mode. For more information, please read page 21. (only on the remote control)
INDEX SEARCH button—Index Search mode. For more information, please read page 20. (only on the remote control)
- MUTE button- Press to mute the TV's sound. Press it again to resume the sound. (only on the remote control)
- VOLUME buttons— Press to adjust the desired TV's volume level by using either ▲ or ▼ button. (only on the remote control)
- VCR/TV/CABLE buttons— For details, see pages 32-33. (only on the remote control)
- Power cord- Connect to a standard AC outlet (120V/60Hz).
- AUDIO OUT jack- Connect to the audio input jack of your audio equipment or another VCR.
- AUDIO IN jack- Connect to the audio output jack of your audio equipment or another VCR.
- ANT. IN terminal- Connect to an antenna, Cable system or Satellite system.
- VIDEO OUT jack- Connect to the video input jack of your video camera or another VCR.
- VIDEO IN jack- Connect to the video output jack of your video camera or another VCR.
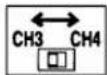
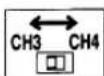
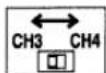
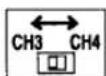
- CH3/CH4 selector switch- Use to select a video output channel (3 or 4) for VCR playback.
- ANT. OUT terminal- Connects to the antenna input terminal on your TV.
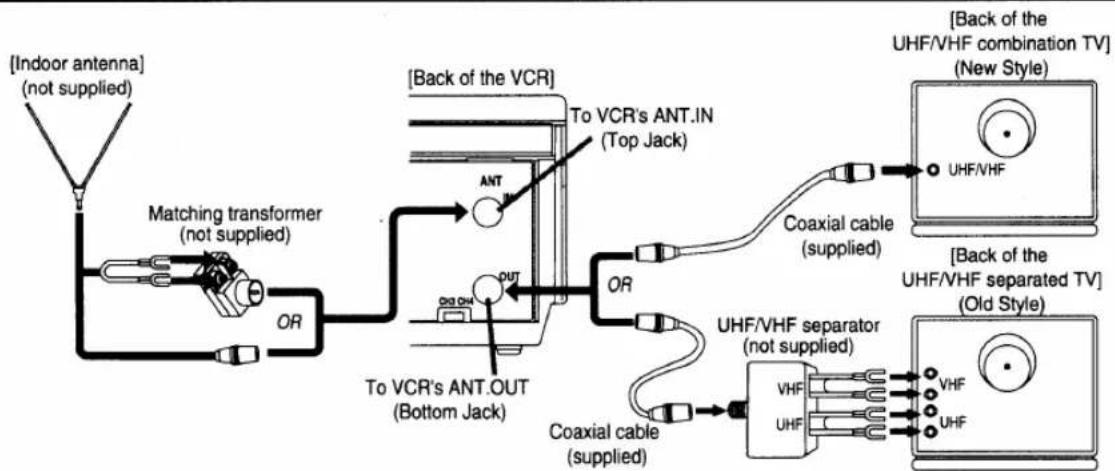
ANTENNA/CABLE CONNECTIONS
For some of the most common types of connections, please follow the drawings below. Use only one connection. For any further complex connections, please contact your local dealer or other qualified persons. (You may need additional accessories which are not supplied).
1 Disconnect the antenna or cable from your TV.
3 Connect one end of the coaxial cable (supplied) to the ANT.OUT (Bottom jack) of your VCR.
2 Connect the antenna or cable to the ANT.IN (Top jack) of your VCR.
4 Connect the other end of the coaxial cable (supplied) to the UHF/VHF antenna jack of your TV.
Fig.1: Indoor Antenna
flowchart
graph TD
    A["Indoor antenna (not supplied)"] --> B["Matching transformer (not supplied)"]
    B --> C["To VCR's ANT.OUT (Bottom Jack)"]
    C --> D["Back of the VCR"]
    D --> E["To VCR's ANT.IN (Top Jack)"]
    E --> F["Coaxial cable (supplied)"]
    F --> G["UHF/VHF separator (not supplied)"]
    G --> H["VHF"]
    G --> I["UHF"]
    H --> J["Back of the UHF/VHF combination TV (New Style)"]
    I --> K["Back of the UHF/VHF separated TV (Old Style)"]
You can record one channel while viewing another. The same goes for Automatic Timer Recording and One Touch Recording. For details, please refer to "Recording" on page 22.
Note: The connection of an indoor antenna with a VCR may not always give acceptable TV reception.
Fig.2: VHF/UHF Combination Antenna or Cable from the Cable Company
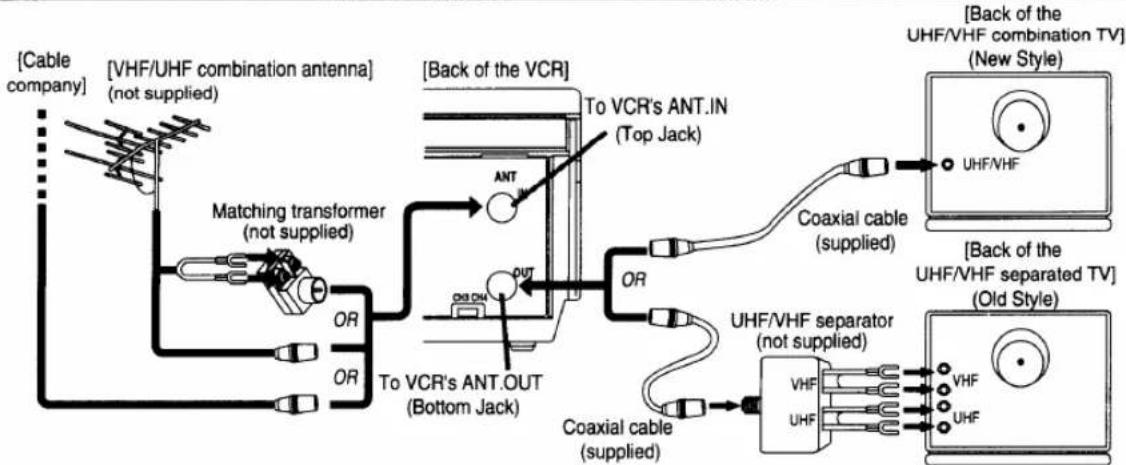
flowchart
graph TD
    A["Cable company"] --> B["[VHF/UHF combination antenna"] (not supplied]]
    B --> C["Matching transformer (not supplied)"]
    C --> D["To VCR's ANT.OUT (Bottom Jack)"]
    D --> E["Back of the VCR"]
    E --> F["To VCR's ANT.IN (Top Jack)"]
    F --> G["Coaxial cable (supplied)"]
    G --> H["UHF/VHF separator (not supplied)"]
    H --> I["VHF UHF"]
    H --> J["UHF"]
    E --> K["Coaxial cable (supplied)"]
    K --> L["UHF/VHF separator (top jack)"]
    L --> M["Back of the UHF/VHF combination TV (New Style)"]
    M --> N["UHF/VHF"]
    M --> O["UHF"]
    style A fill:#f9f,stroke:#333
    style B fill:#ccf,stroke:#333
    style C fill:#cfc,stroke:#333
    style D fill:#fcc,stroke:#333
    style E fill:#cff,stroke:#333
    style F fill:#ffc,stroke:#333
    style G fill:#fcc,stroke:#333
    style H fill:#ffc,stroke:#333
    style I fill:#cfc,stroke:#333
    style J fill:#cfc,stroke:#333
    style K fill:#fcc,stroke:#333
    style L fill:#ffc,stroke:#333
    style M fill:#cfc,stroke:#333
    style N fill:#cfc,stroke:#333
You can record one channel while viewing another. The same goes for Automatic Timer Recording and One Touch Recording. For details, please refer to "Recording" on page 22.
Continued on the next page.
Fig.3: VHF/UHF Separate Antenna
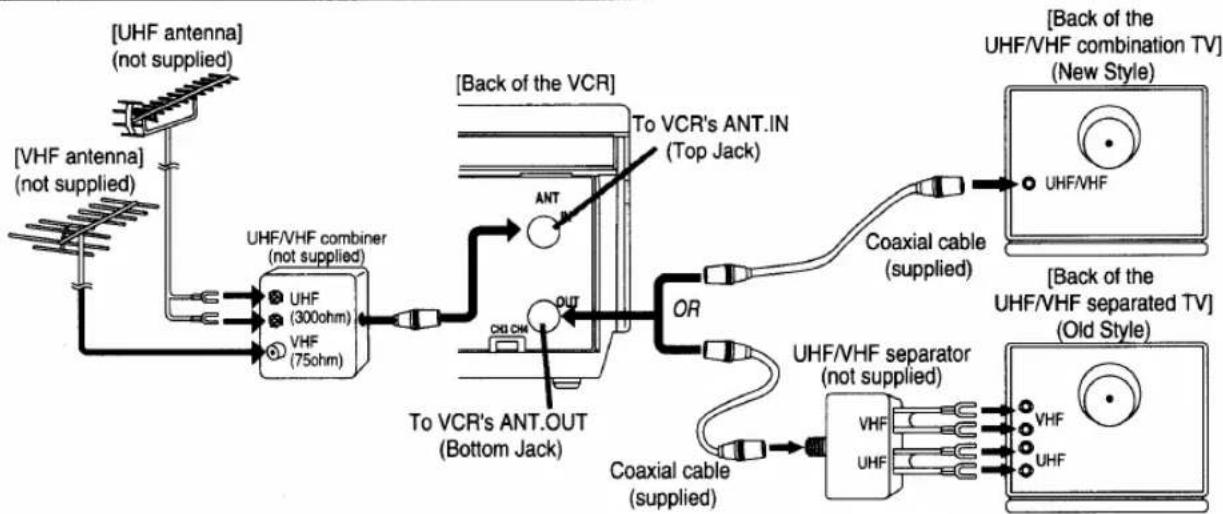
flowchart
graph TD
    A["[VHF antenna"] (not supplied)] --> B["UHF/VHF combiner (not supplied)"]
    C["[UHF antenna"] (not supplied)] --> B
    B --> D["To VCR's ANT.OUT (Bottom Jack)"]
    D --> E["OU"]
    E --> F["Ant"]
    F --> G["To VCR's ANT.IN (Top Jack)"]
    G --> H["Coaxial cable (supplied)"]
    H --> I["UHF/VHF separator (not supplied)"]
    I --> J["VHF"]
    I --> K["UHF"]
    L["Back of the UHF/VHF combination TV"] --> M["New Style"]
    N["Back of the UHF/VHF separated TV"] --> O["Old Style"]
You can record one channel while viewing another. The same goes for Automatic Timer Recording and One Touch Recording. For details, please refer to "Recording" on page 22.
Fig.4: Cable Box and Satellite Box
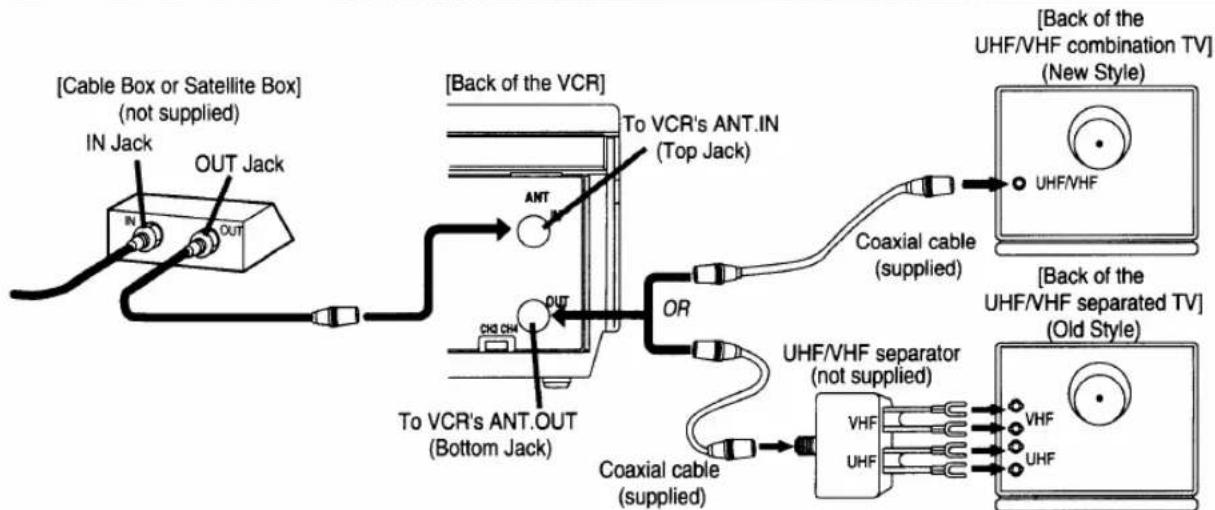
flowchart
graph TD
    A["IN Jack"] --> B["OUT Jack"]
    B --> C["Back of the VCR"]
    C --> D["To VCR's ANT.IN (Top Jack)"]
    D --> E["OU"]
    E --> F["CH3 CH"]
    F --> G["To VCR's ANT.OUT (Bottom Jack)"]
    G --> H["OU"]
    H --> I["ANT"]
    I --> J["Coaxial cable (supplied)"]
    J --> K["UHF/VHF separator (not supplied)"]
    K --> L["VHF"]
    K --> M["UHF"]
    N["Back of the UHF/VHF combination TV (New Style)"] --> O["UHF/VHF"]
    P["Back of the UHF/VHF separated TV (Old Style)"] --> Q["VHF"]
    P --> R["UHF"]
You can ONLY record and view the SAME channel when using this connection. There are no exceptions. The same goes for Automatic Timer Recording and One Touch Recording.
Note: Channel memory programming is NOT needed when using this connection.
RECORDING HINTS
1) Be sure to check that the "PWR." and the "VCR" indicators are both on.
2) Turn on the TV and Cable Box.
3) Set the channel to be recorded on the Cable Box.
4) Set the TV and VCR to channel 3 or 4.
5) Set the CH3/CH4 switch on the back of the VCR to match the channel set on the TV and VCR.
6) Press the RECORD button. For AUTOMATIC TIMER RECORDING, the VCR must stay on channel 3 or 4 at step [9] on page 25.
Continued on the next page.
Some customers with cable boxes may record one channel and view another, with either one of the connections below. Satellite systems: Neither of these connections below will work. For satellite owner wishing to record one channel and view another, please contact the manufacture of the satellite system.
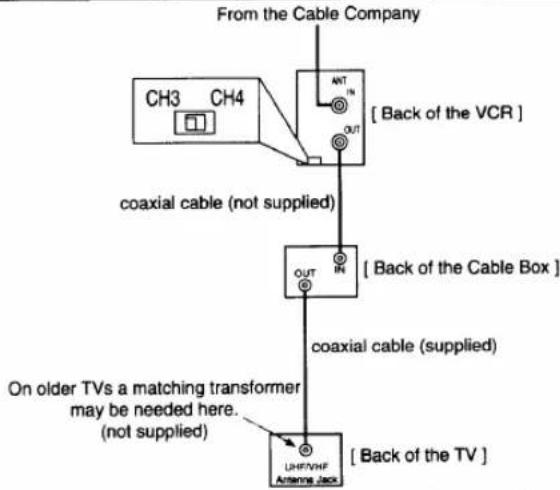
Fig.5:
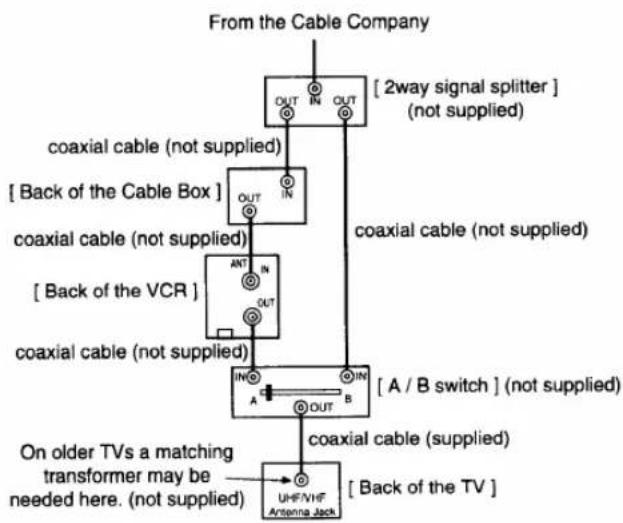
flowchart
graph TD
    A["From the Cable Company"] --> B["OUT IN OUT"]
    B --> C["coaxial cable (not supplied)"]
    B --> D["COALIN OUT"]
    D --> E["[Back of the Cable Box"]]
    E --> F["COAXIAL CABLE (not supplied)"]
    F --> G["COAXIAL CABLE (not supplied)"]
    G --> H["[Back of the VCR"]]
    H --> I["COAXIAL CABLE (not supplied)"]
    I --> J["COAXIAL CABLE (not supplied)"]
    J --> K["[A / B switch"] (not supplied)]
    K --> L["COAXIAL CABLE (supplied)"]
    L --> M["On older TVs a matching transformer may be needed here. (not supplied)"]
    M --> N["UHF/NHF Antenna Jack"]
    N --> O["[Back of the TV"]]
You can record a scrambled channel while viewing another.
RECORDING HINTS
1) Be sure to check that the "PWR." and the "VCR" indicators are both on.
2) Turn on the TV and Cable Box.
3) Set the channel to be recorded on the Cable Box.
4) Set the TV and VCR to channel 3 or 4.
5) Set the CH3/CH4 switch on the back of the VCR to match the channel set on the TV and VCR.
6) Press the RECORD button. For AUTOMATIC TIMER RECORDING, the VCR must stay on channel 3 or 4 at step [9] on page 25.
7) Set the A-B switch to the other side. For AUTOMATIC TIMER RECORDING, set the A-B switch to the other side after step [12] on page 25.
8) Select the channel to be viewed on the TV.
Note: If you wish to view the VCR menu, what you are recording or play a tape with this connection, make sure the A-B switch is on the correct side.
Fig.6:
flowchart
graph TD
    A["From the Cable Company"] --> B["CH3 CH4"]
    B --> C["coaxial cable (not supplied)"]
    C --> D["OUT IN"]
    D --> E["Coaxial cable (supplied)"]
    E --> F["On older TVs a matching transformer may be needed here. (not supplied)"]
    F --> G["Back of the TV"]
    style A fill:#f9f,stroke:#333
    style B fill:#ccf,stroke:#333
    style C fill:#cfc,stroke:#333
    style D fill:#fcc,stroke:#333
    style E fill:#cff,stroke:#333
    style F fill:#ffc,stroke:#333
    style G fill:#cfc,stroke:#333
This connection is good only if none of your channels are scrambled. You can record one channel while viewing another. Scrambled channels cannot be recorded with this connection.
RECORDING HINTS
1) Be sure to check that the "PWR." and the "VCR" indicators are both on.
2) Turn on the TV and Cable Box.
3) Set the channel to be recorded on the VCR.
4) Set the TV and Cable Box to channel 3 or 4.
5) Set the CH3/CH4 switch on the back of the VCR to match the channel set on the TV.
6) To view ONE channel while recording ANOTHER, the "VCR" indicator must be off.
For AUTOMATIC TIMER RECORDING, the "VCR" indicator must be off after step [11] on page 25.
7) Set the channel to be viewed on the Cable Box.
Note: If you wish to view the VCR menu, what you are recording or play a tape with this connection, the "VCR" indicator must be on and the Cable Box channel must match the channel selected on the back of the VCR. (CH 3 or 4)
Note to CATV system installer
This reminder is provided to call the CATV system installer's attention to Article 820-40 of the NEC that provides guidelines for proper grounding and, in particular, specifies that the cable ground shall be connected to the grounding system of the building, as close to the point of cable entry as practical.
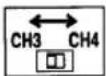
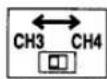
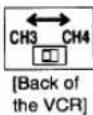
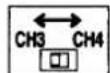
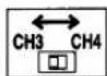
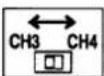
SETTING THE CH3/CH4 SWITCH
If your TV does not have A/V terminals:
When the VCR is in the Playback mode or when the VCR is in the VCR position, your TV will receive signals from the VCR on either channel 3 or 4.
To use the VCR with your TV, set the selector switch to CH3 or CH4 (which is located in the back of your VCR), whichever is not used for normal broadcasts in your area. Then set your TV to the same channel.
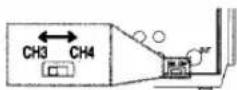
[Back of the VCR]
A/V TERMINALS
CONNECTING TO INPUT JACKS
When you copy a video tape, or watch a program recorded on an another source, use the audio/video input jacks on the VCR.
USING THE REAR JACK:
Fig.7:
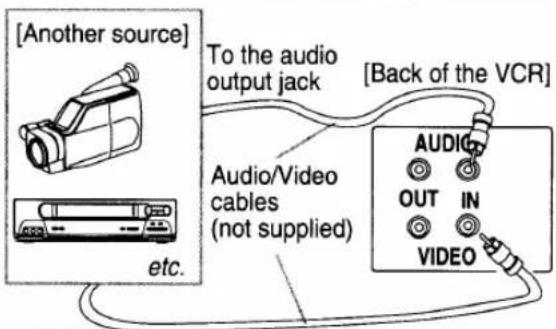
text_image
[Another source] To the audio output jack [Back of the VCR] Audio/Video cables (not supplied) AUDIO OUT IN VIDEO etc.To the video output jack
USING THE FRONT JACK:
You can use the audio and video input jacks on the front panel of the VCR instead of using the jacks on the back.
INPUT SELECT OF FRONT OR REAR
To use the audio/video input jacks, select the "L1" or "L2" position.
1) Be sure to check that the "PWR." and the "VCR" indicators are both on.
2) Turn on the TV and set the TV to channel 3 or 4. Now set the CH3/CH4 switch on the back of the VCR to match the channel selected on the TV.
3) Connect the audio/video cables to the audio/video input jacks on the back of the VCR. Now connect the other end of the cables to the audio/video output jacks on the source.
4)
- If you use the audio and video input jacks on the back of the unit, press 0, 0, 1 on the remote control to select the "L1" position.
- If you use the audio and video input jacks on the front of the unit, press 0, 0, 2 on the remote control to select the "L2" position.
You may also select the "L1" or "L2" setting by pressing the CHANNEL ▲ or ▼ button.
Note: "L1" or "L2" is found before the lowest memorized channel. (Example: CH2)
CONNECTING TO OUTPUT JACKS
If your TV has A/V input jacks,
You may connect your VCR's AUDIO/VIDEO OUTPUT jacks to the audio/video input jacks on back of your TV.
Direct audio/video connections usually result in a better picture and sound quality for tape playback. Please see your TV's owner's manual for A/V input connections.
Fig.8:
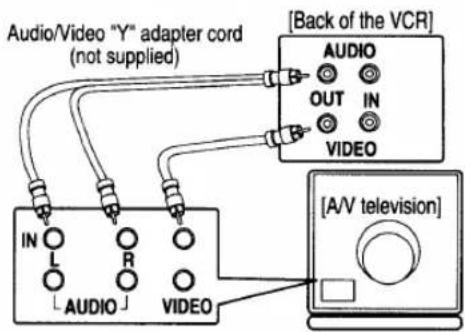
text_image
Audio/Video "Y" adapter cord (not supplied) [Back of the VCR] AUDIO OUT IN VIDEO IN L R AUDIO VIDEO [A/V television]INSTALLING THE BATTERIES
1) Open the battery compartment cover by pressing the cover on the remote unit in the direction of the arrow.
2) Insert 2 "AA" penlight batteries into the battery compartment in the direction indicated by the polarity (+/-) markings.
3) Replace the cover.
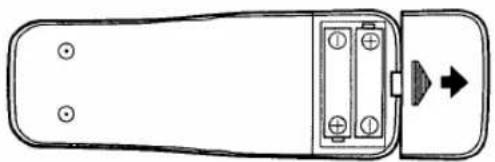
natural_image
Top-down schematic of a remote control device with buttons and an arrow indicating direction (no text or symbols)You can program the tuner to scan only the channels you receive in your area. You must use the remote control for this procedure.
NOTES:
- Channel memory programming is NOT needed when connected to a cable box or satellite box as in Fig 4 on page 11 or Fig 5 on page12. In this case with your remote, select the VCR to channel 3 or 4 the same channel as located on the back of VCR (CH3 or CH4). Then the channel you wish to record or view may be selected on the cable box or satellite box.
- Follow the steps below once. Repeat it only if there is a power failure or if the VCR is unplugged for more than 30 seconds. (In these cases, the programmed channels are erased.)
- You must follow the steps below before attempting to play or record a video tape. If you want to play or record a video tape BEFORE programming the tuner, you can cancel it by pressing the RESET/EXIT button. To program the tuner again, see "CHANNEL SET UP AGAIN" on page 16.
CHANNEL SET UP (Automatic)
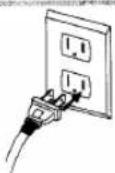
1 Plug in the VCR power cord
Plug the VCR power cord into a standard AC outlet. The "--:--" indicator flashes on the display.
Remember: If your cable box or satellite box is connected as in Fig 4 on page 11 or Fig 5 on page 12, you DO NOT have to set up the channels. Just select the TV and VCR to channel 3 or 4 and also have the CH3/CH4 switch on the back of the VCR to match the channel you selected (CH 3 or CH 4). Now select the Box to the channel you wish to view or record.
2 Select channel 3 or 4 on the TV
Turn on the TV and set the TV to channel 3 or 4. Now set the CH3/CH4 switch on the back of the VCR to match the channel selected on the TV.
[Back of the VCR]
3 Turn on the VCR
Press the POWER button to turn on the VCR. Both the "PWR." indicator and the "VCR" indicator on the display come on.
- Use the remote control for this procedure.

4 Select "ENGLISH" or "ESPAÑOL"
Select "ENGLISH" or "ESPAÑOL" = Spanish by using the PLAY/▲ or STOP/▼ button. Then, press the F.FWD/► button.
Note: This function effects only the language on the screen menu and not the audio source.
5 Begin channel preset
Press the F.FWD/▶ button once. The tuner scans and memorizes all active channels in your area.
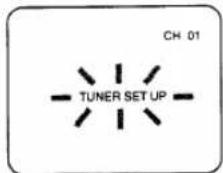
- The VCR distinguishes between standard TV channels and cable channels.
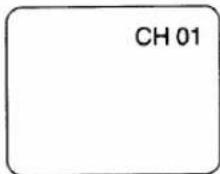
6 After scanning
The tuner stops on the lowest memorized channel. The TV screen returns to TV mode.
- If "TUNER SET UP" appears on the TV screen again, check the cable connections. Press the F.FWD/▶ button once again and the VCR will begin preset again.
TO SELECT A DESIRED CHANNEL
You can select the desired channel by using the CHANNEL ▲ or ▼ button or directly pressing the number buttons on the remote control.
Note for using the number buttons:
- When selecting cable channels which are higher than 99, press the +100 button first, then press the last two digits. (Example: to select channel 125, first press the +100 button then press "2" and "5").
- You must precede single-digit channel numbers with a zero (For example: 02, 03, 04 and so on).
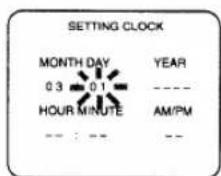
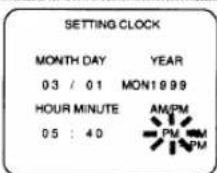
CLOCK SET UP
Set the clock accurately for proper automatic timer recording. We suggest that you use a TV or radio station as your time source.
In the example below, the clock is to be set to:
DATE
March 1st, 1999
SETTING TIME
5:40PM

- Use the remote control for this procedure.
- When the VCR is in the Menu mode, the following buttons only work (PLAY/▲, F.FWD/▶, REW/◀, STOP/▼, RESET/EXIT, POWER and MENU).
- Be sure to check that the "PWR." and the "VCR" indicators are both on.
- Turn on the TV and set the TV to channel 3 or 4. Now set the CH3/CH4 switch on the back of the VCR to match the channel selected on the TV.
[Back of the VCR]
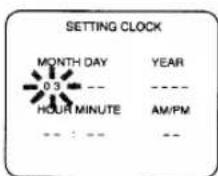
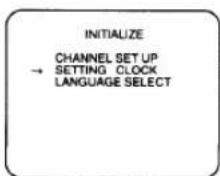
1 Select "SETTING CLOCK"
Press the MENU button. The SETTING CLOCK menu appears.

- The number buttons on the remote control do not work in this Menu mode.
- When you press the F.FWD/▶ button during steps [2] to [6], you may move to the next step.
- Press the REW/◄ button to go back one step from the current step during steps [3] to [7].
2 Select the month
Press the PLAY/▲ or STOP/▼ button until the desired month appears.
(Example: March → 03)
Then, press the F.FWD/▶ button.
3 Select the day
Press the PLAY/▲ or STOP/▼ button until the desired day appears.
(Example: 1st → 01)
Then, press the F.FWD/▶ button.
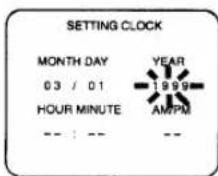
4 Select the year
Press the PLAY/▲ or STOP/▼ button until the desired year appears. (Example: 1999)
Then, press the F.FWD▶ button.
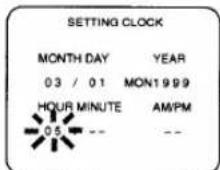
5 Select the hour
Press the PLAY/▲ or STOP/▼ button until the desired hour appears. (Example: 05)
Then, press the F.FWD▶ button.
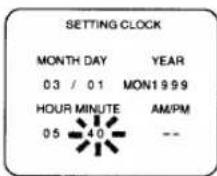
6 Select the minute
Press the PLAY/▲ or STOP/▼ button until the desired minute appears. (Example: 40)
Then, press the F.FWD/▶ button.
7 Select "AM" or "PM"
Press the PLAY/▲ or STOP/▼ button to point to "AM" or "PM". (Example: PM)
8 Start the clock
Press the RESET/EXIT or F.FWD/▶ button.
Although seconds are not displayed, they begin counting from 00 when you press the RESET/EXIT or F.FWD/▶ button. Use this feature to synchronize the clock with the correct time.
- When unplugging the AC-cord or if there is a power failure for more than 30 seconds, you may have to reset the clock.
- If the display shows an abnormal reading or no reading, unplug the power cord for more than 30 seconds. Then plug it back in and reset clock.
TO CHANGE CLOCK SETTING
1) Press the MENU button until the INITIALIZE menu appears.
2) Press the PLAY/▲ or STOP/▼ button to point to "SETTING CLOCK". Then, press the F.FWD/▶ button.
3) Follow steps [2] to [8].
TO DELETE OR ADD CHANNELS
The channels you no longer receive or seldom watch can be deleted from the memory. (Of course, you can later add the deleted channel into the memory again.)
- Use the remote control for this procedure.

- Be sure to check that the "PWR." and the "VCR" indicators are both on.
- Turn on the TV and set the TV to channel 3 or 4. Now set the CH3/CH4 switch on the back of the VCR to match the channel selected on the TV.
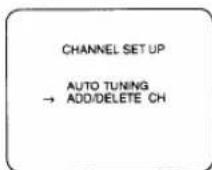
1 Select "INITIALIZE"
Press the MENU button until the INITIALIZE menu appears.
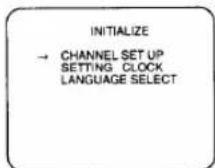
2 Select "CHANNEL SET UP"
Confirm "CHANNEL SETUP" is pointed to, then press the F.FWD/▶ button.
3 Select "ADD/DELETE CH" Press the PLAY/▲ or STOP/▼ button to point to "ADD/DELETE CH". Then, press the F.FWD/▶ button.
4 Enter the desired channel number
Press the number buttons or the PLAY/▲ or STOP/▼ button until your desired channel number appears. (Example: CH02)
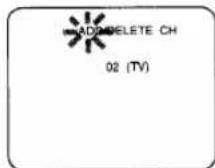
5 Delete it from memory
Press the F.FWD/▶ or REW/◀ button so that "DELETE" flashes on the TV screen.
- To delete another channel, repeat steps [4] and [5].
- If you press the F.FWD/▶ or REW/◀ button again, the channel is memorized again.
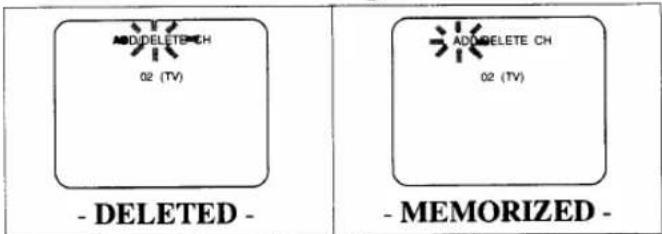
text_image
ADD DELETE CH 02 (TV) - DELETED - ADD DELETE CH 02 (TV) -MEMORIZED -6 Exit the preset mode
Press the RESET/EXIT button to return to TV mode.
NOTE: To confirm that channel(s) has been deleted or added, press the CHANNEL ▲ or ▼ button.
CHANNEL SET UP AGAIN
Remember: If your cable box or satellite box is connected as in Fig 4 on page 11 or Fig 5 on page 12, you DO NOT have to set up the channels. Just select the TV and VCR to channel 3 or 4 and also have the CH3/CH4 switch on the back of the VCR to match the channel you selected (CH 3 or CH 4). Now select the Box to the channel you wish to view or record.
- Use the remote control for this procedure.

1) Press the MENU button until the INITIALIZE menu appears.
2) Confirm "CHANNEL SET UP" is pointed to, then press the F.FWD/▶ button.
3) Confirm "AUTO TUNING" is pointed to, then press the F.FWD/▶ button. After scanning, the tuner stops at the lowest memorized channel.

- The VCR distinguishes between standard TV channels and cable channels.
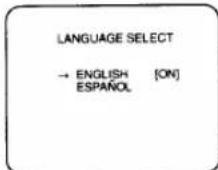
SELECTING THE LANGUAGE
If you want to change the language on the TV screen, follow the steps below:
Note: This function effects only the language on the screen menu and not the audio source.
- Use the remote control for this procedure.

1) Press the MENU button until the INITIALIZE menu appears.
2) Press the PLAY/▲ or STOP/▼ button to point to "LANGUAGE SELECT". Then, press the F.FWD/► button.
3) Select "ENGLISH" or "ESPAÑOL" = Spanish by using the PLAY/▲ or STOP/▼ button.
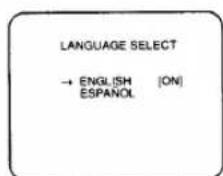
text_image
LANGUAGE SELECT → ENGLISH [ON] ESPAÑOL4) Press the RESET/EXIT button to return to TV mode.
NOTE: If for some reason the menu is in Spanish, press the MENU button until "PARA INICIAR" menu appears, press the PLAY/▲ button to point to "SELEC. IDIOMA", press the F.FWD/▶ button, press the PLAY/▲ button to point to "ENGLISH", then press the RESET/EXIT button.
NORMAL PLAYBACK
- Be sure to check that the "PWR." and the "VCR" indicators are both on.
- Turn on the TV and set the TV to channel 3 or 4. Now set the CH3/CH4 switch on the back of the VCR to match the channel selected on the TV.
[Back of the VCR]
1 Insert a prerecorded tape
Counter mode appears at 0:00:00 on the TV screen. If the erase-protection tab has been removed, the VCR will start playback automatically.
2 To begin playback Press the PLAY button.
NOTE: If any menu is activated on the TV screen, the PLAY button on the remote control does not function. Press the RESET/EXIT button to clear the menu. Then, press the PLAY button.
If a tape is already in the VCR with power off
2A) Using button on the VCR
Just press the PLAY button on the VCR. Power will automatically turn on and playback will start. (Direct Button Operation)
2B) Using button on the remote control
Press the POWER button to turn on the VCR, and then press the PLAY button on the remote control.
3 To stop playback Press the STOP button.
PICTURE SEARCH
This feature is very useful in finding or skipping over a particular scene on a tape. In this mode, the sound will be muted.
1) You may view a video tape at a high speed in either a forward or reverse direction by pressing the F.FWD or REW button. (in the SP / LP / SLP modes)
2) Press it again and the VCR will now search in super high speed. (in the LP / SLP modes only)
3) Press the PLAY button to return to normal speed.
STILL PICTURE
You can view a still picture on the TV screen during playback (the Still mode). Press the PAUSE/ STILL button during playback. Press the PLAY button to return to playback.
- You can advance the picture by one frame at a time by pressing the PAUSE/ STILL button during the still mode.
- If it is left in the Still mode for more than five minutes, the VCR will automatically switch to the Stop mode.
VERTICAL HOLD CONTROL
In the Pause/Still mode only, if the picture begins to vibrate vertically, stabilize the picture by pressing the CHANNEL ▲ or ▼ button.
NOTES:
- If the picture is distorted or rolling vertically, adjust the vertical hold control on your TV, if equipped.
- Most newer TV's do not have a user adjustable vertical hold control.
TRACKING ADJUSTMENT
- Tracking adjustment will be set automatically (Digital Tracking function) when you start playback. However when playing pre-recorded tapes or tapes recorded on units other than your own, noise lines (black and white streaks) may appear on the playback picture. If this occurs, you can adjust the tracking control manually by pressing the CHANNEL ▲ or ▼ button on the VCR until the streaks disappear.
To return to the DTR function, stop the tape once and start playback again.
- You can reduce the noise lines by pressing the CHANNEL ▲ or ▼ button in slow mode, too. Slow tracking adjustment will not be set automatically.
NOTE: In Still mode, press the SLOW button and press the CHANNEL ▲ or ▼ button until the streaks disappear. To return to Still mode, press the PAUSE/STILL button again.
SLOW MOTION
Press the SLOW button to reduce the playback speed. The VCR mutes the sound during slow motion. You can control the speed by pressing the F.FWD button (faster) or REW button (slower).
Press the PLAY button to return to normal playback.
NOTE: If it is left in the Slow mode for more than five minutes, the VCR will automatically switch to the Stop mode.
COUNTER MEMORY
Use this feature to memorize the beginning point that you want to return to. And you can search it easily by rewinding or fast forwarding.
- Use the remote control for this procedure.

- Be sure to check that the "PWR." and the "VCR" indicators are both on.
- Turn on the TV and set the TV to channel 3 or 4. Now set the CH3/CH4 switch on the back of the VCR to match the channel selected on the TV.
[Back of the VCR]
- This feature only works with a prerecorded tape.
1 Stop tape at your desired point
Insert a prerecorded tape. Rewind or fast forward the tape to the beginning point at which you want to mark.
2 Reset the counter to 0:00:00
Press the COUNTER RESET button on the remote control. If necessary press the COUNTER RESET button again to reset the counter to 0:00:00.
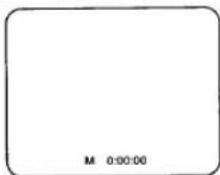
3 Select the Counter Memory mode
Press the COUNTER MEMORY button on the remote control until "M" appears on the TV screen.
- The COUNTER MEMORY button does not function if the Auto Repeat mode is set to [ON]. In this case, set the Auto Repeat mode to [OFF].
4 Begin recording or playback
Press the RECORD or PLAY button.
Press the STOP button when recording or playback is completed.
5 To activate the Counter Memory
Press the REW (or F.FWD) button, the VCR will stop automatically when the counter has returned to approximately 0:00:00.
NOTE: The displayed time will not change during blank portions on the tape.
TO EXIT THE COUNTER MEMORY
Press the COUNTER MEMORY button on the remote control so that "M" disappears from the TV screen.
On more information concerning the on screen display, please refer to page 30.
- Use the remote control for the following procedure.

- Be sure to check that the "PWR." and the "VCR" indicators are both on.
- Turn on the TV and set the TV to channel 3 or 4. Now set the CH3/CH4 switch on the back of the VCR to match the channel selected on the TV.
[Back of the VCR]
AUTO REPEAT PLAYBACK
The VCR has the auto repeat function that allows you to repeat a tape indefinitely without touching the PLAY button.
Make sure to insert a prerecorded tape.
1 Select "VCR SET UP"
Press the MENU button until the VCR SET UP menu appears.
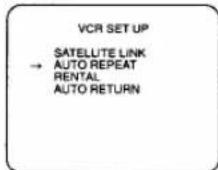
2 Select "AUTO REPEAT"
Press the PLAY/▲ or STOP/▼ button to point to "AUTO REPEAT".
3 Begin Auto repeat playback
Press the F.FWD/▶ button so that [ON] will appear next to "AUTO REPEAT" on the TV screen.
When in Stop mode, Repeat playback mode will start automatically.
If the on-screen menu still remains, press the RESET/EXIT button to exit the menu.
- Once you select the Auto Repeat mode, it stays in effect even after you turn off the VCR.
- The COUNTER MEMORY button does not function if the Auto Repeat mode is set to [ON]. In this case, set the Auto Repeat mode to [OFF].
- To stop playback, press the STOP button.
TO EXIT THE AUTO REPEAT MODE
Repeat steps [1] to [2], and press the F.FWD/▶ button. [ON] will then disappear from the menu. Then, press the RESET/EXIT button to return to TV mode.
Power failure: If there is a power failure for more than 30 seconds, Auto Repeat Playback will go to off.
RENTAL PLAYBACK
This function enables you to improve the picture quality when playing back worn cassettes such as rented tapes.
- Selecting ON or OFF must be done during play-back.
1 Insert rental tape into VCR
Begin playback.
2 Select "VCR SET UP"
Press the MENU button until the VCR SET UP menu appears.
3 Select "RENTAL"
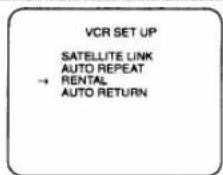
Press the PLAY/▲ or STOP/▼ button to point to "RENTAL".
4 Select "RENTAL" to [ON]
Press the F.FWD/▶ button so that "RENTAL ON" appears.
- Once you select the Rental mode, it stays in effect even after you turn off the VCR.
- To stop playback, press the STOP button.
TO EXIT THE RENTAL PLAY MODE
Repeat steps [1] to [3], and press the F.FWD/▶ button so that "RENTAL OFF" appears.
Power failure: If there is a power failure for more than 30 seconds, Rental Playback will go to off.
INDEX SEARCH
This feature provides a method of indexing a recording starting point so that it can be easily returned to in either fast forward or rewind mode.
- The index mark will be made automatically when the REC button is pressed. It will also be marked at the starting point of Timer recording, OTR, and recording by Auto Satellite Link.
- The index mark will not be recorded if the PAUSE/STILL button is pressed and released during recording.
- The time gap between making the index marks on the tape should be greater than 1 minute for SP recording and 3 minutes for SLP recording.
Example: You are watching program number 4 and want to fast forward to program number 7. You must skip three programs.
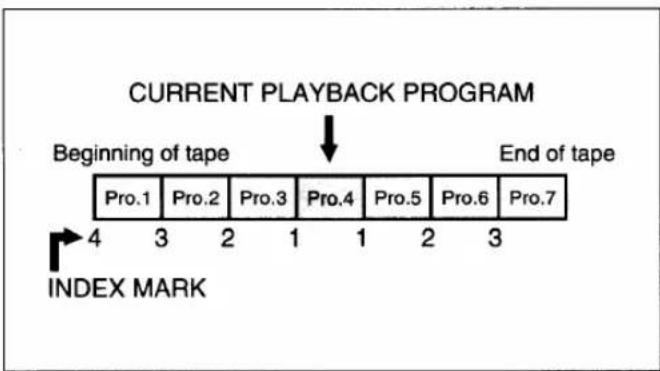
flowchart
graph TD
    A["Beginning of tape"] --> B["Pro.1"]
    A --> C["Pro.2"]
    A --> D["Pro.3"]
    A --> E["Pro.4"]
    A --> F["Pro.5"]
    A --> G["Pro.6"]
    A --> H["Pro.7"]
    I["INDEX MARK"] --> J["4 3 2 1 1 2 3"]
- You can choose the index search mode by pressing the INDEX SEARCH button on the remote control. Then continue with step [3].
1 Select "SEARCH SELECT"
Press the MENU button until the SEARCH SELECT menu appears.
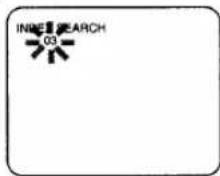
2 Select "INDEX SEARCH"
Press the PLAY/▲ or STOP/▼ button to point to "INDEX SEARCH". Then, press the F.FWD/► button.
3 Enter your desired number
Press the PLAY/▲ or STOP/▼ button until the number of programs that you want to skip appears.
(Example: "03" for 3 programs)
- The Index Search mode will be cancelled if the procedures are not activated in 30 seconds.
4 Begin Index Search
Press the REW or F.FWD button. The VCR begins re-winding or fast forwarding to the beginning of desired program.
NOTE: Every time an index signal is skipped, the number in the program indicator decreases by one.
5 After Index Search
When the preset program is reached, the VCR will start playback automatically.
- A video cassette must be inserted in the VCR for this function to work.
- The number of Index Searches can be set up to 20.
- This function will not operate in the recording mode.
- When you want to cancel the Index Search while in progress, press the STOP button.
QUICK-FIND
This function enables you to search and confirm the contents of the recorded program(s) using the index mark.
The VCR begins fast forwarding by selecting this function. When the VCR find the beginning of the program (=the index mark), the VCR begins playback video tape at high speed for 30 seconds. Then, return to fast forwarding again to the beginning of next program. The VCR repeats these operation to the tape end.
Concerning the index mark, please see "INDEX SEARCH" section.
- Tape must be fully rewound.
- You can begin the Quick-Find by pressing the QUICK-FIND button on the remote control. You can also begin the Quick-Find by the following procedure.
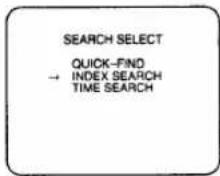
1 Select "SEARCH SELECT"
Press the MENU button until the SEARCH SELECT menu appears.
text_image
SEARCH SELECT → QUICK-FIND INDEX SEARCH TIME SEARCH2 Select "QUICK-FIND"
Confirm "QUICK-FIND" is pointed to, then press the F.FWD/▶ button. The VCR begins the Quick-Find.
TO SKIP TO THE BEGINNING OF NEXT PROGRAM
Press the QUICK-FIND button on the remote control.
TO VIEW AT NORMAL SPEED
Press the PLAY button. The Quick-Find is cancelled.
- A video cassette must be insert in the VCR for this function to work.
- This function will not operate in the recording mode.
- When you want to cancel the Quick-Find while in progress, press the STOP button.
- When the end of a tape is reached during the Quick-Find, the tape will automatically rewind to the beginning. After rewinding finishes, the VCR will eject the tape and turn itself to off.
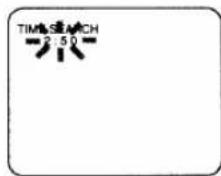
TIME SEARCH
The Time Search function makes it possible to quickly advance the tape to your desired position simply by entering the exact amount of playback time you want to skip.
Example: To watch a program after 2 hours and 50 minutes from the present position, in either direction.
- You can choose the time search mode by pressing the TIME SEARCH button on the remote control. Then continue with step [3].
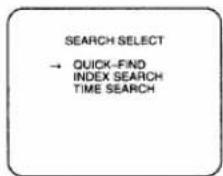
1 Select "SEARCH SELECT"
Press the MENU button until the SEARCH SELECT menu appears.
2 Select "TIME SEARCH"
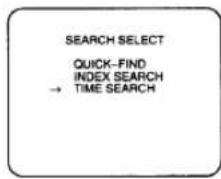
Press the PLAY/▲ or STOP/▼ button to point to "TIME SEARCH". Then, press the F.FWD/► button.
3 Enter your desired time Press the PLAY/▲ or STOP/▼ button until your desired time appears. ("2:50" stands for 2 hours 50 minutes)
- The Time Search mode will be cancelled if the procedures are not activated in 30 seconds.
4 Begin Time Search
By pressing the REW or F.FWD button, the VCR will rewind or fast forward to the specified point.
The time counts down as the searching progresses.
5 After Time Search
Playback starts automatically when 0:00 is reached.
- A video cassette must be inserted in the VCR for this function to work.
- Time Search can be set up to a maximum of 9 hours 59 minutes (9:59).
- This function will not operate in the recording mode.
- When you want to cancel the Time Search while in progress, press the STOP button.
- Please refer to the connection you are using, through pages 10, 11, or 12 on "ANTENNA/CABLE CONNECTIONS" before continuing.
- Be sure to check that the "PWR." and the "VCR" indicators are both on.
- Turn on the TV and set the TV to channel 3 or 4. Now set the CH3/CH4 switch on the back of the VCR to match the channel selected on the TV.
[Back of the VCR]
- Insert a cassette tape with its erase prevention tab in place. (If necessary, rewind or fast forward the tape to the point at which you want to begin recording.)
VIEWING AND RECORDING THE SAME PROGRAM
1 Select the channel to be recorded
Press the number buttons on the remote control or the CHANNEL ▼ or ▲ button.
CH 32
NOTE: If you have a cable box or satellite box connected to this VCR, please refer to "ANTENNA/CABLE CONNECTIONS" on pages 11 and 12 before proceeding to the next step.
2 Select the tape speed
Press the TAPE SPEED button on the VCR to select the desired tape speed (SP/SLP).
3 Begin recording
Press the RECORD button. The "REC" indicator appears on the display.

NOTE: If any menu is activated on the TV screen, the RECORD button on the remote control does not function. Press the RESET/EXIT button to clear the menu. Then, press the RECORD button.
4 Stop recording
Press the STOP button when recording is completed.
SKIPPING UNWANTED SCENES DURING RECORDING
Press the PAUSE/ STILL button to temporarily stop recording.
Press the PAUSE/STILL or RECORD button to resume recording.
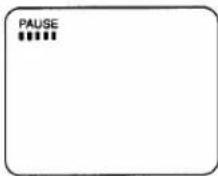
NOTE: When the VCR is in the Pause mode, you may view the pause time remaining with ■ marks on the TV screen. Each ■ mark represents one minute. After five minutes, the VCR will automatically switch to the Stop mode to prevent tape damage. When there is 1 minute remaining, one ■ will flash.
RECORDING ONE PROGRAM AND VIEWING ANOTHER
You can record one program while viewing another. To start recording, follow steps [1] to [3] under "VIEWING AND RECORDING THE SAME PROGRAM".
To select the channel you want to view at the TV, follow the steps below.
NOTE: If you have a cable box or satellite box connected to this VCR, please refer to "ANTENNA/CABLE CONNECTIONS" on pages 11 and 12 before proceeding to the next step.
4 Select the TV mode
Press the VCR/TV button so that the "VCR" indicator on the display disappears.
5 Select the channel on the TV
Set the TV to the channel you want to watch.
TO MONITOR THE PROGRESS OF YOUR RECORDING
1) Press the VCR/TV button so that the "VCR" indicator on the display comes on.
2) Turn on the TV and set the TV to channel 3 or 4. Now set the CH3/CH4 switch on the back of the VCR to match the channel selected on the TV.
[Back of the VCR]
OTR (One Touch Recording)
This function enables you to set the recording length simply by pressing the REC/OTR button on the VCR.
- Please refer to the connection you are using, through pages 10, 11, or 12 on "ANTENNA/CABLE CONNECTIONS" before continuing.
- You cannot use the remote control for this function.
- Be sure to check that the "PWR." and the "VCR" indicators are both on.
- Turn on the TV and set the TV to channel 3 or 4. Now set the CH3/CH4 switch on the back of the VCR to match the channel selected on the TV.
- Insert a cassette tape with its erase prevention tab in place. (If necessary, rewind or fast forward the tape to the point at which you want to begin recording.)
| PUSH(ES) | DISPLAY | RECORDED LENGTH |
| 1 push | (normal recording) | |
| 2 pushes | 0:30 | 30 minutes |
| 3 pushes | 1:00 | 60 minutes |
| ↓ | ↓ | ↓ |
| 17 pushes | 8:00 | 480 minutes |
| 18 pushes | (normal recording) | |
NOTE: If you have a cable box or satellite box connected to this VCR, please refer to "ANTENNA/CABLE CONNECTIONS" on pages 11 and 12 before proceeding to the next step.
1 Select the channel to be recorded
Press the number buttons on the remote control or the CHANNEL ▼ or ▲ button.
2 Select the tape speed
Press the TAPE SPEED button to select the desired tape speed (SP/SLP).
3 Begin OTR
Press the REC/OTR button on the VCR as many times as needed. The recording length will be determined by the number of times you press the REC/OTR
Each additional push will increase the recording time by 30 minutes. It can be set for up to 8 hours.
- Recording starts immediately when the REC/OTR button is pressed, whether you are watching the same or a different channel.
- When the REC/OTR button is pressed 18 times, the VCR returns to the normal recording mode.
- To stop the OTR operation, press the STOP button on the VCR or on the remote control.
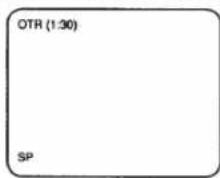
- To show the remaining time, press the DISPLAY button on the remote control so that "OTR" appears on the TV screen. (It will show up momentarily then disappear.)
- Recording stops when 0:00 is reached.
- Please note that in the SLP mode maximum recording time, assuming the tape is started at the beginning, is 8 hours using T-160 (or 6 hours using T-120).
- The TV that is connected to your VCR may be turned on or off during OTR.
- If the tape runs out before the end time, the VCR will switch to the Stop mode immediately, eject the tape and turn power off.
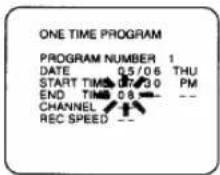
AUTOMATIC TIMER RECORDING
You may set the VCR to start and end a recording while you are away. You can set eight programs to record on specific days, daily or weekly within a 1 year period.
In the example below, the timer is being set to record:
DATE: May 6th, 1999
SETTING TIME: from 7:30PM to 8:30PM
CHANNEL: CH16
TAPE SPEED: SP
PROGRAM NO: No. 1

- Please refer to the connection you are using, through pages 10, 11, or 12 on "ANTENNA/CABLE CONNECTIONS" before continuing.
- Use the remote control for this procedure.
- Be sure to check that the "PWR." and the "VCR" indicators are both on to program it.
- Turn on the TV and set the TV to channel 3 or 4. Now set the CH3/CH4 switch on the back of the VCR to match the channel selected on the TV.
- Clock must be set to the correct time and date before setting the timer.
- Insert a cassette tape with its erase prevention tab in place. (If necessary, rewind or fast forward the tape to the point at which you want to begin recording.)
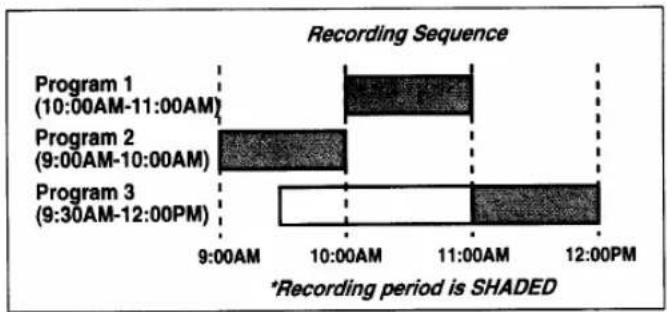
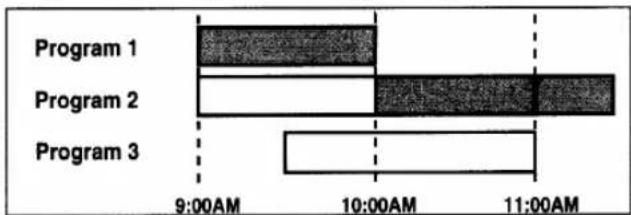
Avoid overlap of programs ...
There is a case that a program will not be performed. When programs overlap:
- The program with an earlier start time has priority.
- Once the earlier program finishes, the overlapping programs will begin recording in sequence.
- The illustration below demonstrates the sequence of recordings.
bar
Recording Sequence | Program | Time Period | Record Period (shaded) | | :--- | :--- | :--- | | Program 1 | 10:00AM-11:00AM | 10:00 | | Program 2 | 9:00AM-10:00AM | 10:00 | | Program 3 | 9:30AM-12:00PM | 11:00 | *Recording period is SHADED1 Select "TIMER PROGRAMMING"
Press the MENU button so that TIMER PROGRAMMING menu appears.
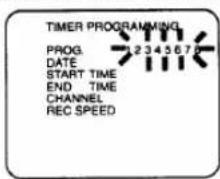
text_image
TIMER PROGRAMMING PROG. DATE START TIME END TIME CHANNEL REC SPEEDNOTE: If you have not yet set the clock, "SETTING CLOCK" appears. If so, follow the steps [2] to [8] on page 15. Then, set the timer recording.
2 Select your desired program number (1-7)
Program number which is not set up flashes.
Press the PLAY/▲ or STOP/▼ button until your desired program number appears. (Example: 1)
Then, press the F.FWD/▶ button.
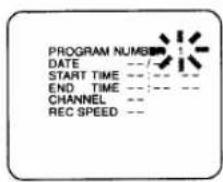
text_image
PROGRAM NUMBER DATE --/- START TIME --/- END TIME --/- CHANNEL -- REC SPEED --NOTE: The program number 8 is used for setting Today Timer Recording only. You cannot select number 8 in the procedure of Automatic Timer Recording.
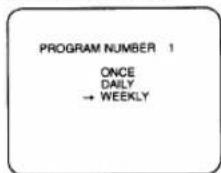
3 Select once, daily or weekly recording
For once recording :
Confirm "ONCE" is pointed to, then press the F.FWD/▶ button.
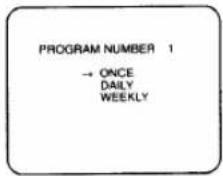
text_image
PROGRAM NUMBER 1 → ONCE DAILY WEEKLYFor daily recording: To record a TV program at the same time on the same channel from Monday through Friday.
Press the PLAY/▲ or STOP/▼ button to point to "DAILY", and then press the F.FWD/► button.
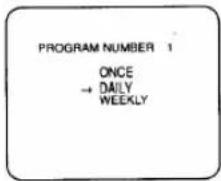
text_image
PROGRAM NUMBER 1 ONCE → DAILY WEEKLYFor weekly recording: To record a TV program at the same time on the same channel every week. (Example: every Monday on ch 7 at 5:00PM)
Press the PLAY/▲ or STOP/▼ button to point to "WEEKLY", and then press the F.FWD/► button.
- When you press the F.FWD/▶ button during steps [4] to [10], you may move to the next step.
- Press the REW/◄ button to go back one step from the current step during steps [2] to [10].
4 Set the date when you want to start
First, press the PLAY/▲ or STOP/▼ button until the desired month appears.
(Example: "05" for May)
Then, press the F.FWD▶ button.
Next, press the PLAY/▲ or STOP/▼ button until the desired day appears, and then press the F.FWD/▶ button. (Example: "06" for 6th)
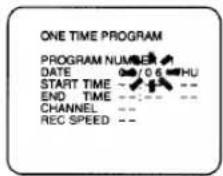
text_image
ONE TIME PROGRAM PROGRAM NUMBER DATE 0/06-HU START TIME - - - END TIME - - - CHANNEL - - REC SPEED - -5 Set the start hour
Press the PLAY/▲ or STOP/▼ button until the desired hour appears. (Example: 07)
Then, press the F.FWD▶ button.
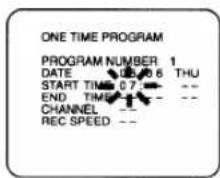
text_image
ONE TIME PROGRAM PROGRAM NUMBER 1 DATE 08/06 THU START TIME 07: -- END TIME -- CHANNEL -- REC SPEED --6 Set the start minute
Press the PLAY/▲ or STOP/▼ button until the desired minute appears. (Example: 30)
Then, press the F.FWD▶ button.
Next, press the PLAY/▲ or STOP/▼ button to point to "AM" or "PM". (Example: PM) Then, press the F.FWD/► button.
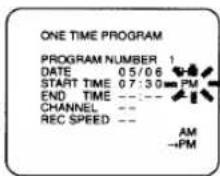
7 Set the end hour
Press the PLAY/▲ or STOP/▼ button until the desired hour appears. (Example: 08)
Then, press the F.FWD▶ button.
8 Set the end minute
Press the PLAY/▲ or STOP/▼ button until the desired minute appears. (Example: 30) Then, press the F.FWD/► button.
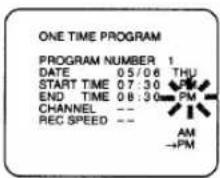
text_image
ONE TIME PROGRAM PROGRAM NUMBER 1 DATE 05/06 THU START TIME 07:30 PM END TIME 08:30 PM CHANNEL -- REC SPEED -- AM →PMNext, press the PLAY/▲ or STOP/▼ button to point to "AM" or "PM". (Example: PM) Then, press the F.FWD/▶ button.
9 Set the channel number
Press the PLAY/▲ or STOP/▼ button until the desired channel number appears. (Example: 16)
Then, press the F.FWD▶ button.
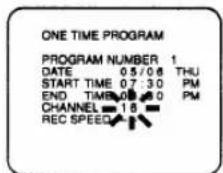
- Remember refer to "ANTENNA/CABLE CONNECTIONS" on pages 11 and 12 if you have a cable box or satellite box before setting the channel number.
10 Set the tape speed
Press the PLAY/▲ or STOP/▼ button until the desired tape speed appears. (Example: SP)
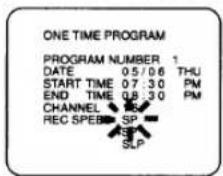
text_image
ONE TIME PROGRAM PROGRAM NUMBER 1 DATE 05/06 THU START TIME 07:30 PM END TIME 08:30 PM CHANNEL SP REC SPEED SLP11 Finish setting the program
Press the F.FWD/▶ button. Program 1 is now completed.
- To set another program, repeat steps [2] to [11].
- Press the RESET/EXIT button to return to original mode.
12 Set the timer
Press the POWER button to turn off. The "☑" indicator on the display comes on.
- Please see "HINTS FOR TIMER RECORDING" on page 28 for more information.
TODAY TIMER RECORDING
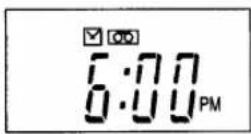
You may set the VCR to start and end recording one program within 24 hours by simply pressing the TODAY TIMER REC, START and END buttons on the VCR.
In the example below, the Today Timer is being set to record (current time is 6:00PM):
SETTING TIME
from 9:30PM to 11:00PM
CHANNEL
CH61
TAPE SPEED
SP
- This function cannot be done by the remote control.
• VCR power must be on to program it.
- Turn on the TV and set the TV channel to the same video output channel as located on the back of the VCR. (CH3 or 4)
[Back of the VCR]
- Press VCR/TV button so that the "VCR" indicator on the display comes on.
- Clock must be set to the correct time and date before setting the timer.
- Insert a cassette tape with its erase prevention tab in place. (If necessary, rewind or fast forward the tape to the point at which you want to begin recording.)
• Today Timer Recording controls program number 8.
Avoid overlap of programs ...
There is a case that a program will be recorded partially or not be performed when programs overlap:
- The program with an earlier start time has priority. Once the earlier program finishes, the overlapping programs will begin recording in sequence.
bar_stacked
| Program | Time (AM) | |---|---| | Program 1 | 9:00AM | | Program 2 | 10:00AM | | Program 3 | 11:00AM |In case of Today Timer Recording is set, Today Timer Recording has priority to other programs as illustrated.
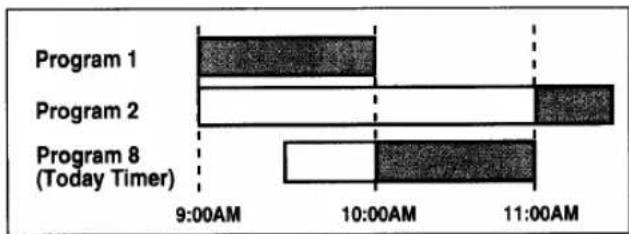
bar_stacked
| Time | Program 1 | Program 2 | Program 8 (Today Timer) | |---|---|---|---| | 9:00AM | Dark Gray | White | White | | 10:00AM | Dark Gray | White | White | | 11:00AM | Dark Gray | White | White |1 Select the program mode
Press the TODAY TIMER REC button on the VCR.
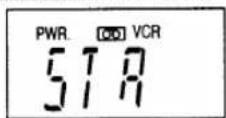
2 Set the start time
("STA" appears momentarily)
Press the START button on the VCR for a desired start time. (Example: 9:30PM)
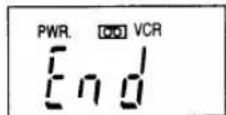
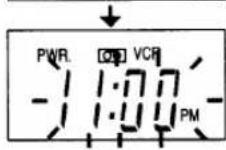
3 Set the end time
("End" appears momentarily)
Press the END button on the VCR for a desired end time. (Example:11:00PM)
4 Set the channel number
Press the CHANNEL ▼ or ▲ button on the VCR for a desired channel number. (Example: 61)

- Remember refer to "ANTENNA/CABLE CONNECTIONS" on pages 11 and 12 if you have a cable box or satellite box before setting the channel number.
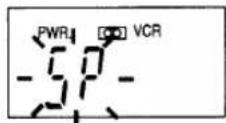
5 Set the tape speed
Press the TAPE SPEED button on the VCR for a desired tape speed (SP/SLP). (Example: SP)
6 Exit the program mode
Press the TODAY TIMER REC button to return to original mode.
7 Set the timer
Press the POWER button to turn the VCR off. The "☑" indicator is displayed with current time.
TO CANCEL A TODAY TIMER PROGRAM
- While setting a program; press the STOP/EJECT button on the VCR. This function cannot be done by the remote control.
- After setting a program; (power must be on) First, press the TODAY TIMER REC button. Then, press the STOP/EJECT button on the VCR. This function cannot be activated by the remote control.
- While recording is in progress; press the STOP/EJECT button on the VCR. This function cannot be activated by the remote control.
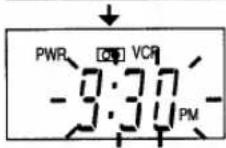
TO CHECK THE START/END TIME
1) Press the POWER button so that "☑" indicator appears.
2) Press the TODAY TIMER REC button once. The start time, the end time, the channel number and a tape speed will appear for 2 seconds each, and return to the Timer Stand-by mode.
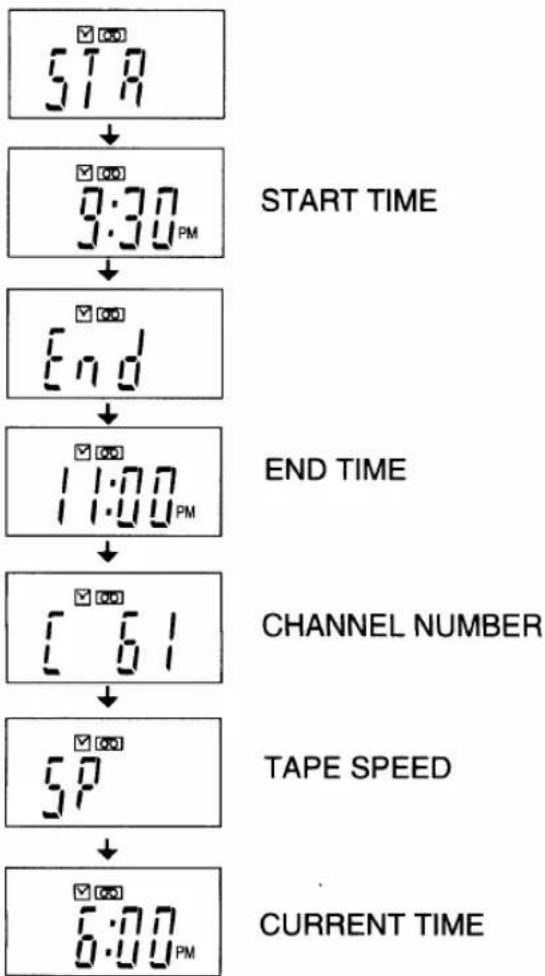
flowchart
graph TD
    A["5:8"] --> B["3:30 PM"]
    B --> C["End"]
    C --> D["11:00 PM"]
    D --> E["[61"]]
    E --> F["5P"]
    F --> G["6:00 PM"]
TIMER PROGRAM EXTENSION
To shift the time schedule of a One Time Program.
1) Turn the power on. Then, press the MENU button.
2) Select the program number which you want to shift forward using the PLAY/▲ or STOP/▼ button. The details of the selected program appears on the TV screen.
3) Press the RECORD button on the remote control when a program number is blinking.
Each additional push will shift forward the start/end time for recording by 10 minutes. It can be shift forward for up to 24 hours.
When the recording is already in progress, each additional push will shift forward the end time for recording by 10 minutes. It can shift forward up to 23:50 from the start time. In this case, the recording speed will automatically be set to SLP mode.
If you want to cancel while the setting, press the PAUSE/ STILL button on the remote control. The recording time returns to the original time.
4) Press the RESET/EXIT button to exit the setting menu.
NOTES:
- You can shift the time schedule of a One Time Program only.
- When you press the PAUSE/STILL button to cancel the setting while the recording is already in progress, the recording speed will stay in SLP mode.
HINTS FOR TIMER RECORDING
- If there is a power failure or the VCR is unplugged for more than 30 seconds, the clock setting and all timer settings will be lost.
- If the tape runs out before the end time, the VCR will switch to the Stop mode immediately, eject the tape and the VCR power will be turned off. The "☒" indicator will flash.
- If a tape is not in the VCR or does not have the erase-protection tab, the "☑" indicator flashes and timer recording cannot be performed. Please insert a recordable tape.
- The TV that is connected to your VCR may be turned ON or OFF when the VCR is in the timer-record mode.
TO CORRECT AN AUTOMATIC TIMER PROGRAM
1) Turn the power on.
2) Repeat steps [1] to [3] on page 24.
3) Go to the digit you want to change by using the F.FWD/▶ button or REW/◀ button.
4) Enter correct numbers by using the PLAY/▲ or STOP/▼ button.
5) Press the RESET/EXIT button to return to original mode.
6) Press the POWER button to return to timer stand-by mode.
TO STOP A STARTED AUTOMATIC TIMER PROGRAM
Press the STOP/EJECT button on the VCR.
NOTE: The STOP button on the remote control will not function in Automatic Timer Recording mode.
TO CANCEL OR CHECK THE START/END TIME
1) Turn the power on. Then, press the MENU button.
2) Select the program number which you want to check using the PLAY/▲ or STOP/▼ button. The details of the selected program appears on the TV screen.
You may cancel the entire program by pressing the REW/◄ button.
3) Press the RESET/EXIT button to return to original mode.
AUTO RETURN
When all the timer recordings are completed (the "☒" indicator on the VCR flashes), the VCR will rewind to the beginning of the first recorded program(s) automatically.
MANUAL OPERATION
Press the AUTO RETURN button on the VCR first when all the timer recordings are completed. The VCR will automatically turn on and rewind the tape.
- If you press any tape function button before pressing the AUTO RETURN button, auto return will not function.
AUTOMATICALLY OPERATION (from the menu)
1) Press the POWER button to turn on the VCR.
2) Press the MENU button repeatedly so that the VCR SET UP menu appears.
3) Press the PLAY/▲ or STOP/▼ button to point to "AUTO RETURN".
4) Press the F.FWD/▶ button so that [AUTO] appears next to "AUTO RETURN".
To cancel the auto return programming, press the F.FWD/▶ button so that [AUTO] disapp
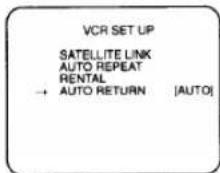
5) Press the RESET/EXIT button to return to original mode.
NOTE: If there are any remaining programs for Once, Daily and Weekly, or an Auto Satellite Link recording, this function will not activate.
If you program multiple timer recordings and you want to activate the auto return when only some of those are finished, press the POWER button to turn on the VCR then press the AUTO RETURN button. The VCR will rewind to the beginning of those programs.
WATCH THE RECORDED PROGRAM
Press the POWER button to turn on the VCR. Then, press the PLAY button.
AUTO SATELLITE LINK USING A SATELLITE TUNER(not supplied)
When the VCR receives the signals using the audio/video input jacks on the rear panel of the VCR from your satellite tuner, the VCR will turn itself on, and record. Then when there is no signals, the VCR stops and turns itself off automatically. If your satellite tuner has the EPG (Electronic Program Guide), you can set a timer program using it. For details, please see your satellite tuner's owner's manual. Also, you need to follow the steps below for the VCR.
- Connect the audio/video input jacks on the rear panel of the VCR to the audio/video output jacks on the satellite tuner.
- Press the TAPE SPEED button on the VCR to select the desired tape speed (SP/SLP).
- Clock must be set to the correct time and date before setting the timer.
Note for viewing/recording a program using your satellite tuner:
- If a broadcasting program has copy guard protection, you may not record clearly.
- When you record a program using the Auto Satellite Link feature, the beginning(a few seconds) of a program may be not recorded.
1 Insert a cassette tape with its erase prevention tab in place
If necessary, rewind or fast forward the tape to the point at which you want to begin recording.
2 Set the program to be recorded on the satellite tuner
Please see your satellite tuner's owner's manual.
3 Select "VCR SET UP"
Press the MENU button until the VCR SET UP menu appears.
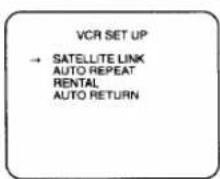
4 Select "SATELLITE LINK"
Confirm "SATELLITE LINK" is pointed to.
Then, press the F.FWD/▶ button. The current time appears next to "SATELLITE LINK" on the TV screen.
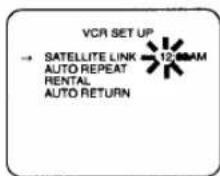
text_image
VCR SET UP → SATELLITE LINK AUTO REPEAT RENTAL AUTO RETURN 12.00AM- If you set the VCR to the stand-by mode of Auto Satellite Link, immediately press the F.FWD/▶ button again, then go to step 7.
- If you view the satellite tuner's program until the start time for an Auto Satellite Link, continue with step 5.
- If you have not yet set the clock, "SETTING CLOCK" appears. If so, follow the steps [2] to [8] on page 15. Then, set the timer recording.
5 Set the start hour
Press the PLAY/▲ or STOP/▼ button until the desired hour (AM or PM) appears. (Example : 05, PM)
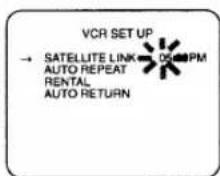
text_image
VCR SET UP → SATELLITE LINK AUTO REPEAT RENTAL AUTO RETURNThen, press the F.FWD▶ button.
6 Set the start minute
Press the PLAY/▲ or STOP/▼ button until the desired minute appears. (Example : 30)
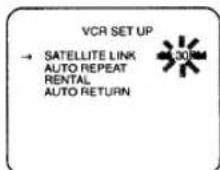
NOTE: Press the REW/◄ button to go back one step from the current step.
7 Finish setting the program
Press the F.FWD/▶ button.
After a few seconds, the VCR turns off and the "☒" indicator on the VCR will come on.
- To exit a stand-by mode of the Auto Satellite Link, press the POWER button to turn on the VCR. In this case, the Auto Satellite Link setting will be cancelled automatically.
- When stopping a recording of the Auto Satellite Link while in progress, press the STOP/EJECT button on the VCR. In this case, the Auto Satellite Link setting will be cancelled automatically.
- There is a chance that a recording will not be performed correctly when another timer recording overlaps. If the start time for an Auto Satellite Link comes up during a timer recording, the timer recording has priority.
You can make copies of video tapes made by friends or relatives for your enjoyment.
Warning: Unauthorized recordings of copyrighted video tapes may be an infringement of copyright laws.
Connect the editing (recording) VCR(this unit), source (playing) VCR(another VCR) and your TV using the following diagram.
NOTE:
You can use the audio and video input jacks on the front panel of the editing (recording) VCR instead of using the jacks on the back.
Fig.9:
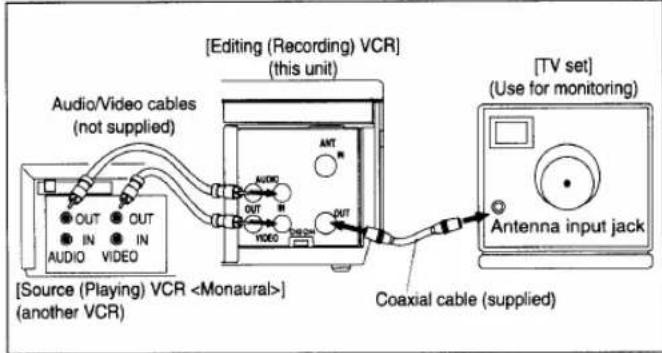
text_image
[Source (Playing) VCR1) Insert a pre-recorded video cassette into the source (playing) VCR.
2) Insert a blank video cassette, or one you want to record over, into the editing (recording) VCR cassette compartment.
3) Press the TAPE SPEED button on the editing (recording) VCR to select the desired recording speed (SP/SLP).
4) Select the "L1" or "L2" position on the editing (recording) VCR. See page 13, under "Connecting to input jacks".
5) Press the REC button on the editing (recording) VCR.
6) Begin playback of the tape in the source (playing) VCR.
- For best results during dubbing, use the VCR's front panel controls whenever possible. The remote control might affect the playback VCR's operation.
● Always use video-quality shielded cables with RCA-type connectors. Standard audio cables are not recommended. - You can use a video disc player, satellite receiver, or other audio/video component with A/V outputs in place of the playback VCR.
- If video or color fades in and out, you may be copying a copy guarded video tape.
TO MONITOR THE RECORDING
1) Turn on the TV and set the TV to channel 3 or 4. Now set the CH3/CH4 switch on the back of the VCR to match the channel selected on the TV.
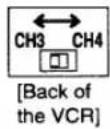
2) Press the VCR/TV button on the editing (recording) VCR so that the "VCR" indicator on the display comes on.
ON SCREEN DISPLAY
- To check the Count, Clock and Channel number, press the DISPLAY button on the remote control. Each time you press the DISPLAY button, TV screen will change as shown.
- It is normal for the status display (STOP, PLAY etc.) and the tape speed display (SP, LP (playback only), or SLP) to disappear after 5 seconds.
NOTE: VCR power and the "VCR" indicator must be turned on.
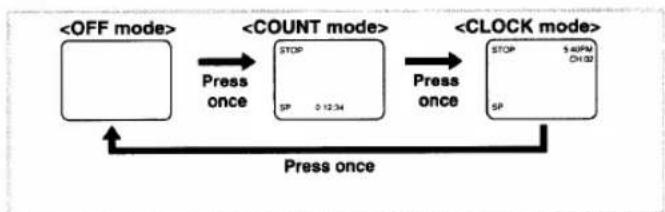
flowchart
graph LR
    A["<<OFF mode>"] -->|Press once| B["<<COUNT mode>"]
    B -->|Press once| C["<<CLOCK mode>"]
    C -->|Press once| A
    B --> D["STOP SP 3:12:34"]
    C --> E["STOP SP $40PM CH:32"]
- PWR. (power) indicator—Lights up when the power is turned on.
- ☑ indicator—Lights up when a timer recording or an OTR recording has been set. Flashes if a tape is not inserted in the VCR even if you set a timer.
- Cassette indicator—Lights up when there is a tape in the VCR.
- VCR indicator- Indicates that the VCR is in the VCR position.
- REC indicator—Lights up when the VCR is in the Recording mode. Flashes when a recording has been paused.
- Clock/Feature/Channel indicator- Indicates the current time (when the clock is set), and briefly displays which feature the VCR is currently performing as the illustration. Indicates the channel number (when it is set).
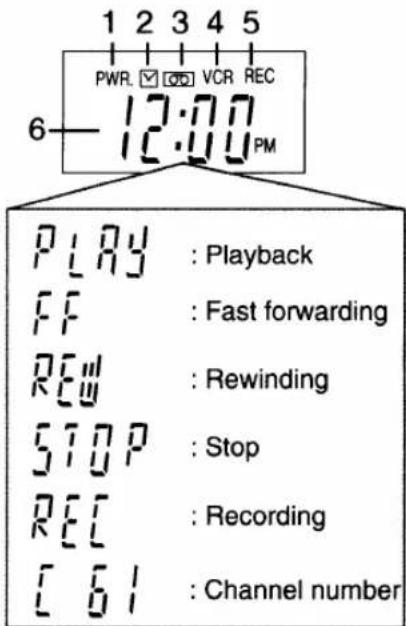
text_image
1 2 3 4 5 PWR. VCR REC 6 12:00 PM PLAY : Playback FF : Fast forwarding REW : Rewinding STOP : Stop REC : Recording [6] : Channel numberSPECIAL FEATURES
REAL TIME TAPE COUNTER
- This shows the elapsed recording or playback time in hours, minutes, and seconds. (The displayed time will not change during blank portions on the tape.)
- The "-" indication will appear when the tape is rewound further than "0:00:00" on the tape counter.
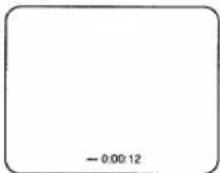
AUTO REWIND
When the end of a tape is reached during recording, playback, or fast-forward, the tape will automatically rewind to the beginning. After rewinding finishes, the VCR will eject the tape and turn itself to off.
- The tape will not auto-rewind during timer recording or One Touch Recording.
- When the Counter Memory is activated, the tape will rewind to the M0:00:00 and the VCR will go into the Stop mode.
Your VCR remote control may operate your TV or cable converter.
REMOTE CONTROL OF THE TV
PROGRAMMING THE REMOTE CONTROL TO OPERATE YOUR TV
Make sure ...
- Turn on the TV (any channel is OK).
1) Press the VOLUME ▼ button on the remote control.
2) Press the TV button (not the VCR/TV button) on the remote control.
3) Press the number corresponding to the brand of your TV as shown in the chart below. Then, press the ENTER button.
For example; If you have an RCA TV, press 0, then the 8 button. Then, press the ENTER button.
| TV Brand Codes | |||
| FISHER | 09 | PHILIPS | 02 |
| FUNAI | 01 | QUASER | 07 |
| GE | 08 | RCA | 08 |
| GOLDSTAR | 10 | SAMSUNG | 11 |
| HITACHI | 03 | SANYO | 09 |
| MAGNAVOX | 02 | SHARP | 06 |
| PANASONIC | 07 | SONY | 05 |
| PANASONIC-GAOO | 07 | SYMPHONIC | 01 |
| PHILCO | 02 | TOSHIBA | 04 |
4) Aim the remote control at your TV, then press the CHANNEL ▲ button. If the channel changes on the TV, you are finished.
NOTE:
- If the TV channel still doesn't change after going through all the TV brand codes listed above, it is likely that you will not be able to program this remote control for your TV.
There is no guarantee that the VCR remote control will handle your TV perfectly.
Once you have programmed the remote control, you will have to do it again whenever you change the batteries.
CONTROLLING THE TV
1 Select the TV function mode
Press the TV button. Then press a button for the TV function that you want.
(Example: press the TV button then the CHANNEL ▲ button, the next higher station will appear.)
NOTE: Also, you may change the channels at the TV by using the number buttons. If you can not change the channels at the TV by using the number buttons, press the ENTER button after you press the number buttons. It may change channels at the TV.
2 Return to the VCR function mode
Press the VCR button to operate your VCR with the remote control again.
REMOTE CONTROL OF THE CABLE CONVERTER
If you have a cable converter, you will probably want to program your VCR's remote control so you can easily change channels. The process is the same as for programming the remote to operate your TV.
PROGRAMMING THE REMOTE CONTROL TO OPERATE YOUR CABLE CONVERTER
Make sure ...
- Turn on the cable converter (any channel is OK).
1) Press the VOLUME ▼ button on the remote control.
2) Press the CABLE button on the remote control.
3) Press the number corresponding to the brand of your cable converter as shown in the chart below. Then, press the ENTER button.
For example; If you have a HAMLIN cable converter, press 0, then the 6 button. Then, press the ENTER button.
| Cable Converter Brand Codes | |
| HAMLIN | 06 |
| JERROLD | 01, 02, 03 |
| OAK | 08 |
| PANASONIC | 05 |
| SCIENTIFIC ATLANTA | 04 |
| TOCOM | 07 |
4) Aim the remote control at your cable converter, then press the CHANNEL ▲ button. If the channel changes on the cable converter, you are finished.
NOTE:
- If the cable converter channel still doesn't change after going through all the cable converter brand codes listed above, it is likely that you will not be able to program this remote control for your cable converter.
There is no guarantee that the VCR remote control will handle your cable converter perfectly.
Once you have programmed the remote control, you will have to do it again whenever you change the batteries.
CONTROLLING THE CABLE CONVERTER
1 Select the CABLE function mode
Press the CABLE button. Then press a button for the CABLE function that you want.
(Example: press the CABLE button then the CHANNEL ▲ button, the next higher station will appear.)
NOTE: Also, you may change the channels at the cable converter by using the number buttons. If you can not change the channels at the cable converter by using the number buttons, press the ENTER button after you press the number buttons. It may change channels at the cable converter.
2 Return to the VCR function mode
Press the VCR button to operate your VCR with the remote control again.
If you have followed the instructions contained in this manual and have difficulty in operating your VCR, locate the PROBLEM in the left column below. Check the corresponding CORRECTIVE ACTION column to remedy the problem.
| PROBLEM | CORRECTIVE ACTION |
| No power. | Make sure the AC cord is connected to an AC outlet.Make sure the power is turned on. |
| Timer recording is not possible. | Make sure the timer recording is set correctly.Make sure the power is off.Make sure the VCR clock is set correctly. |
| Cannot go into Record mode. | Make sure the tape has an erase-prevention tab. If needed, cover the hole with plastic tape. |
| Playback picture is partially noisy. | Adjust tracking control for a better picture by using the CHANNEL ▲ or▼ button on the VCR. |
| No picture but the audio is OK in playback. | Head cleaning may be necessary. Refer to "AUTO HEAD CLEANING" below. |
| No picture or poor picture on playback. | Set your TV to the VCR mode and/or press the VCR/TV button so that the "VCR" indicator on the display comes on.Fine tune your TV. |
| On-the-air TV programs cannot be seen. | Re-check the ANT. IN and ANT. OUT connections. See page 10.Set your TV to the TV mode and/or press the VCR/TV button so that the "VCR" indicator on the display disappears. |
| No operation from the infrared Remote Control. | Make sure the AC cord is connected to an AC outlet.Check batteries in remote control.Press the VCR button on the remote control, then try again. |
| Video or color fades in and out when making a copy of a video tape. | You cannot copy a copyrighted video tape. You are experiencing copy guard protection. |
| The buttons on the VCR and the remote control do not function after setting up a recording with a satellite tuner. | Disconnect the VCR power cord from the power outlet for a few seconds, then reconnect the cord to the power outlet. The recording you set up at the satellite tuner should take place as scheduled. Leave the VCR off for the recording. |
MAINTENANCE
SERVICING
Should your VCR become inoperative, do not try to correct the problem by yourself. There are no user-service-able parts inside. Turn off, unplug the power cord, and please call our help line at 1-800-968-3429, to locate an Authorized Service Center.
CABINET CLEANING
- Wipe the front panel and other exterior surfaces of the VCR with a soft cloth immersed in lukewarm water and wrung dry.
- Never use a solvent or alcohol. Do not spray insecticide liquid near the VCR. Such chemicals may cause damage and discoloration to the exposed surfaces.
AUTO HEAD CLEANING
- Automatically cleans video heads as you insert or remove a cassette, so you can see a clear picture.
-
Playback picture may become blurred or interrupted while the TV program reception is clear. Dirt accumulated on the video heads after long periods of use, or the usage of rental or worn tapes can cause this problem. If a streaky or snowy picture appears during playback, the video heads in your VCR may need to be cleaned.
-
Please visit your local Audio/Video store and purchase a good quality VHS Video Head Cleaner.
- If a Video Head Cleaner does not solve the problem, please call our help line at 1-800-968-3429, to locate an Authorized Service Center.
NOTES:
- Remember to read the instructions included with the video head cleaner before use.
- Clean video heads only when problems occur.
GENERAL SPECIFICATIONS
| Television system : | NTSC, TV standard |
| Video heads : | Rotary four-head |
| Tape width : | 1/2inch (12.65mm) |
| Tape speed | |
| SP : | 33.35mm/sec. |
| LP : | 16.67mm/sec. |
| SLP : | 11.12mm/sec. |
| Tuner channel | |
| VHF : | #2~#13 |
| UHF : | #14~#69 |
| Cable channel : | 5A, A-5 ~ A-1, A ~ W+84 |
| RF converter : | Built-in VHF converter |
| Converter output : | VHF Channel 3 or 4. |
| Timer indication : | AM/PM 12-hour system |
| Operating temperature : | 5^ 40^ ( 41^ 104^ ) |
| Terminals | |
| Antenna input : | F type connector x 1 |
| Antenna output : | F type connector x 1 |
| Video input/output : | RCA connector x 3 |
| Audio input/output : | RCA connector x 3 |
ELECTRICAL SPECIFICATIONS
| Video output level : | 1Vp-p |
| Video output impedance : | 75Ω |
| Audio output level : | -6dBv (1KHz) |
| Video input level : | 0.5~2.0Vp-p |
| Audio input level : | -10dBv |
| Video S/N ratio | |
| SP: | More than 45dB |
| Audio S/N ratio | |
| SP: | More than 38dB |
OTHER SPECIFICATIONS
| Power requirement : | 120V, 60Hz |
| Power consumption : | 14 Watts |
| Dimensions : | W 14-1/4" (360mm)H 3-5/8" (92mm)D 9-1/16" (230mm) |
| Weight : | 5.51 lbs. (2.5 Kg.) (approx.) |
- Designs and specifications are subject to change without notice and without legal obligation.
- If there is a discrepancy between languages, the default language will be English.
CABLE CHANNEL DESIGNATIONS
If you subscribe to cable TV, the channels are displayed as 1-125.
Cable companies often designate channels with letters or letter-number combinations. Please check with your local cable company. The following is a chart of common cable channel designations.
| CATV channel | 5A | 2 | 3 | 4 | 5 | 6 | 7 | 8 | 9 | 10 | 11 | 12 | 13 | A | B |
| VCR Display | 1 | 2 | 3 | 4 | 5 | 6 | 7 | 8 | 9 | 10 | 11 | 12 | 13 | 14 | 15 |
| CATV channel | C | D | E | F | G | H | I | J | K | L | M | N | O | P | Q |
| VCR Display | 16 | 17 | 18 | 19 | 20 | 21 | 22 | 23 | 24 | 25 | 26 | 27 | 28 | 29 | 30 |
| CATV channel | R | S | T | U | V | W | W+1 | W+2 | W+3 | W+4 | W+5 | W+6 | W+7 | W+8 | W+9 |
| VCR Display | 31 | 32 | 33 | 34 | 35 | 36 | 37 | 38 | 39 | 40 | 41 | 42 | 43 | 44 | 45 |
| CATV channel | W+10 | W+11 | W+12 | W+13 | W+14 | W+15 | W+16 | W+17 | W+18 | W+19 | W+20 | W+21 | W+22 | W+23 | W+24 |
| VCR Display | 46 | 47 | 48 | 49 | 50 | 51 | 52 | 53 | 54 | 55 | 56 | 57 | 58 | 59 | 60 |
| CATV channel | W+25 | W+26 | W+27 | W+28 | W+29 | W+30 | W+31 | W+32 | W+33 | W+34 | W+35 | W+36 | W+37 | W+38 | W+39 |
| VCR Display | 61 | 62 | 63 | 64 | 65 | 66 | 67 | 68 | 69 | 70 | 71 | 72 | 73 | 74 | 75 |
| CATV channel | W+40 | W+41 | W+42 | W+43 | W+44 | W+45 | W+46 | W+47 | W+48 | W+49 | W+50 | W+51 | W+52 | W+53 | W+54 |
| VCR Display | 76 | 77 | 78 | 79 | 80 | 81 | 82 | 83 | 84 | 85 | 86 | 87 | 88 | 89 | 90 |
| CATV channel | W+55 | W+56 | W+57 | W+58 | A-5 | A-4 | A-3 | A-2 | A-1 | W+59 | W+60 | W+61 | W+62 | W+63 | W+64 |
| VCR Display | 91 | 92 | 93 | 94 | 95 | 96 | 97 | 98 | 99 | 100 | 101 | 102 | 103 | 104 | 105 |
| CATV channel | W+65 | W+66 | W+67 | W+68 | W+69 | W+70 | W+71 | W+72 | W+73 | W+74 | W+75 | W+76 | W+77 | W+78 | W+79 |
| VCR Display | 106 | 107 | 108 | 109 | 110 | 111 | 112 | 113 | 114 | 115 | 116 | 117 | 118 | 119 | 120 |
| CATV channel | W+80 | W+81 | W+82 | W+83 | W+84 | ||||||||||
| VCR Display | 121 | 122 | 123 | 124 | 125 | ||||||||||
ADVERTENCIA:
PARA REDUCIR EL RIESGO DE INCENDIO O DE SHOCK ELÉCTRICO, NO EXPONGA ESTE ARTEFACTO A LA LLUVIA O LA HUMEDAD.

PRECAUCIÓN
RIESGO DE SHOCK ELECTRICO NO ABRIR

PRECAUCIÓN: PARA REDUCIR EL RIESGO DE SHOCK ELÉCTRICO, NO QUITE LA CUBIERTA (O LA TAPA POSTERIOR). EL APARATO NO TIENE ADENTRO PIEZAS QUE PUEDAN REPARARSE. DEJE LA REPARACIÓN AL PERSONAL DE SERVICIO CALIFICADO.

ESTE SÍMBOLO INDICA QUE EN ESTA UNIDAD HAY VOLTAJE PELIGROSO LO CUAL CONSTITUYE UN RIESGO DE SHOCK ELÉCTRICO.

ESTE SÍMBOLO INDICA QUE HAY INSTRUCCIONES IMPORTANTES DE MANTENIMIENTO Y OPERACIÓN EN LA LITERATURA QUE ACOMPAÑA A ESTE ARTEFACTO.
La nota importante está colocada en la parte trasera del gabinete.
IMPORTANTE PARA SU SEGURIDAD
- Lea las instrucciones -- Lea detenidamente todas las instrucciones de seguridad y operación antes de usar el aparato.
- Conserve las instrucciones -- Conserve las instrucciones de seguridad y operación para consultas futuras.
- Respete las advertencias -- Observe estrictamente todas las advertencias impresas en el aparato y las incluidas en el manual de instrucciones.
- Siga las instrucciones -- Siga todas las instrucciones de operación.
- Limpieza -- Desconecte el grabador de videocassettes del tomacorriente mural antes de limpiarlo. No use limpiadores líquidos ni aerosol. Use un paño húmedo para la limpieza del aparato.
EXCEPCION: Un producto diseñado para servicio ininterrumpido y que por alguna razón, como será la posibilidad de pérdida del código de autorización para un convertidor CATV, no debe ser desconectado por el usuario para limpieza u otro propósito, puede no incluir la advertencia en cuanto a no desconectar el aparato, en la descripción del procedimiento de limpieza (5).
- Enchufes -- No use enchufes no recomendados por el fabricante del grabador de videocassettes, ya que podría ser peligroso.
- Agua y humedad -- No use este grabador de videocassettes cerca del agua, por ejemplo, cerca de una bañera o lavamanos, cerca del fregadero de la cocina o lavandería, en un piso mojado, cerca de una piscina, etc.
- Accesorios -- No instale este grabador de videocassettes en un carro, soporte, trípode o mesa inestables. El grabador de videocassettes podría caerse, causando serias lesiones a un niño o adulto, resultando también severamente dañado. Uselo sólo el un carro, soporte, trípode o mesa recomendados por el fabricante, o vendidos con el
grabador de videocassettes. Toda instalación del aparato deberán hacerse de acuerdo a las instrucciones del fabricante, empleando los accesorios de instalación recomendados por el mismo. La combinación de aparato y carro debe ser movida con cuidado. Las detenciones bruscas, la fuerza excesiva y las superficies disparejas podrán hacer que el aparato y el carro se vuelquen
ADVERTENCIA DE CARRETA PORTATIL (SIMBOLO PROPORCIONADO POR RETAC)

- Ventilación -- El gabinete del aparato tiene ranuras y aberturas de ventilación que garantizan el funcionamiento confiable del grabador de videocassettes, evitando que se recaliente. Estas aberturas no deberán ser bloqueadas ni cubiertas. Para evitar bloquear las aberturas, nunca sitúe el grabador de videocassettes
encima de una cama, sofá, alfombra u otra superficie similar. El grabador de videocassettes no debe ser instalado en un mueble empotrado, como una repisa para libros o bastidor, a menos que se pueda garantizar una ventilación adecuada, o cuando las instrucciones del fabricante así lo especifiquen.
- Alimentación -- Este grabador de videocassettes sólo debe ser operado mediante el tipo de fuente de alimentación especificado en la etiqueta indicadora. Si no esta seguro del tipo de fuente de alimentación que tiene en su casa, consulte a su distribuidor o a la compañía de electricidad local. En el caso de grabadores de diseñados para funcionar a pilas o con otras fuentes de alimentación, consulte el manual de instrucciones respectivo.
- Conexión a tierra o polarización -- Este grabador de videocassettes está equipado con una clavija polarizada de corriente alterna (una clavija que tiene una espiga más ancha que la otra). Esta clavija solamente podrá ser insertada en el tomacorriente en una sola dirección. Esta es una medida de seguridad. Si no pudiera insertar completamente la clavija en el tomacorriente, vuelva a intentarlo invirtiendo la clavija. Si aún no fuera posible insertar la clavija, tome contacto con un electricista para que repare su tomacorriente obsoleto. No modifique las características de seguridad de la clavija polarizada.
- Protección del cable de alimentación -- Los cables de alimentación deberán ser tendidos de manera tal que la probabilidad de que sean pisados o aplastados por otros objetos sea mínima. Preste especial atención a las clavijas de los cables, a los receptáculos, y al punto por donde salen del aparato.
- Conexión a tierra de la antena exterior -- Si conecta una antena exterior o sistema de cable al grabador de videocassettes, asegúrese de conectar a tierra la antena o el sistema de cable para tener una cierta protección contra alzas repentinas de tensión y cargas de electricidad estática. El Artículo 810 del Código Nacional de Electricidad, ANSI/NFPA, núm. 70, entrega información acerca de la manera correcta de conectar a tierra el mástil y la estructura soportante, tamaño de los conductores de puesta a tierra, ubicación de la unidad de descarga de la antena, conexión a los electrodos de tierra, y requisitos para el electrodo de tierra. (Fig. A)
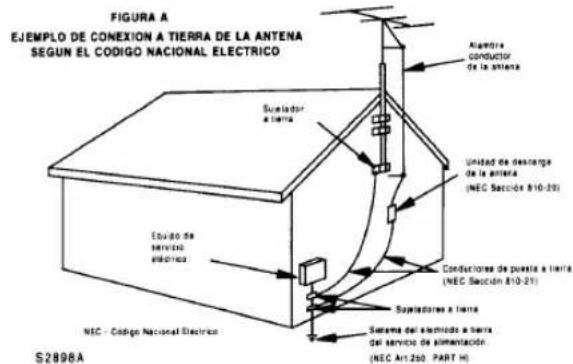
text_image
FIGURA A EJEMPLO DE CONEXION A TIERRA DE LA ANTENA SEGUN EL CÓDIGO NACIONAL ELECTRICO Sustidor a Tierra Equipo de servicio electrica NEC - Código Nacional Electrico Alambre conductor de la antera Unidad de desarge de la antera (NEC Sacción 810-29) Conductores de puesta a Tierra (NEC Sacción 810-29) Supistores a Tierra Sistema del electrico a Tierra del servicio de alimentación (NEC Art.250, PART H) S2898A-
Tormentas eléctricas -- Como medida adicional de protección durante tormentas eléctricas, o cuando el grabador de videocassettes permanezca sin uso durante períodos prolongados de tiempo, desconéctelo del tomacorriente mural y desconecte la antena o sistema de cable. Esto evitará que el grabador de videocassettes resulte dañado por tormentas eléctricas o sobretensiones en la línea de alimentación.
-
Líneas de alimentación -- Un antena exterior no debe ser instalada en la cercanía de líneas de alimentación aéreas ni de otros circuitos de potencia para iluminación eléctrica, o donde pueda caerse y hacer contacto con tales líneas o circuitos. Al instalar un sistema de antena exterior, tenga mucho cuidado de no tocar tales líneas o circuitos de alimentación, ya que el contacto con ellos podría será fatal.
-
Sobrecarga -- No sobrecargue los tomacorrientes murales ni los cables de extensión, ya que esto podría causar incendios o descargas eléctricas.
-
Entrada de objetos y líquidos -- Nunca introduzca objetos de ningún tipo por las aberturas de este grabador de videocassettes, ya que podría tocar peligrosos puntos de alta tensión o cortocircuitar partes, provocando incendios o descargas eléctricas. Nunca derrame ningún tipo de líquido sobre el grabador de videocassettes.
-
Servicio -- No intente reparar el grabador de videocassettes usted mismo; al abrir o desmontar las cubiertas usted se expondrá a alta tensión y a otros peligros. Solicite todo servicio a personal calificado.
-
Daños que requieran reparación -- En los siguientes casos, desconecte el grabador de videocassettes del tomacorriente mural y llame a un técnico de servicio calificado:
a. Cuando el cable de alimentación o la clavija estén dañados.
b. Si se ha derramado líquido sobre la unidad, o si algún objeto ha caído dentro del grabador de videocassettes.
c. Si el grabador de videocassettes ha sido expuesto a la lluvia o al agua.
d. Cuando a pesar de haber seguido las instrucciones de operación, el grabador de videocassettes no funcione normalmente. Ajuste solamente los controles mencionados en el manual de instrucciones; el ajuste incorrecto de otros controles podrá causar daños a la unidad, la que por lo general requerirá de un prolongado trabajo de reparación (por un técnico calificado) para que sus condiciones normales de operación puedan ser restablecidas.
e. Si el grabador de videocassettes se ha caído o si el gabinete se ha dañado.
f. Cuando el grabador de videocassettes muestre un cambio notorio en su rendimiento.
20. Piezas de repuesto -- Cuando sea necesario reemplazar piezas, asegúrese de que el técnico de servicio emplee las piezas de repuesto especificadas por el fabricante, o piezas que tengan las mismas características que las piezas originales. Las sustituciones no autorizadas podrán causar incendios, descargas eléctricas y otros problemas.
21. Revisión de seguridad -- Al finalizar cualquier servicio de mantenimiento o reparación de este grabador de videocassettes, solicítele al técnico que efectúe comprobaciones de seguridad para determinar si el grabador de videocassettes se encuentra o no en condiciones óptimas de operación.
22. Calor -- Este producto vídeo debe colocarse fuera del alcance de fuentes de calor tales como radiadores, rejillas de calefacción, estufas o cualquier otro aparato destinado a producir calor, incluyendo los amplificadores.
PRECAUCIONES
UBICACIÓN
Para que su videograbadora realice una operación segura y su rendimiento sea óptimo, tenga en cuenta los puntos siguientes cuando elija un lugar para su instalación:
- Protéjala de la luz solar directa y aléjela de fuentes de calor intenso.
- Evite los lugares polvorientos o húmedos.
- Evite los lugares cuya ventilación no sea suficiente para que pueda disiparse adecuadamente el calor. No tape los agujeros de ventilación de los lados de la videograbadora.
- Instale la unidad en una posición horizontal.
- Evite los lugares sometidos a vibraciones intensas.
- No ponga la videograbadora cerca de campos magnéticos intensos.
- Evite trasladar la videograbadora a lugares donde las diferencias de temperatura sea extremas.
- No ponga directamente videograbadora encima de un televisor.
EVITE LOS PELIGROS DE DESCARGAS ELÉCTRICAS E INCENDIOS
- No maneje el cable de alimentación con las manos mojadas.
- No tire del cable de alimentación para desconectarlo de la toma de CA. Sujételo siempre por la clavija y tire de ella.
- Si, por accidente, se derrama agua en su videograbadora, desenchufe inmediatamente el cable de alimentación y lleve la unidad a nuestro centro de servicio autorizado para que se la reparen.
- No meta sus dedos ni otros objetos en el portavideocasete de la videograbadora.
- No ponga nada directamente encima de la videograbadora.
ADVERTENCIA
En el interior de la unidad puede formarse condensación cuando ésta se traslada de un lugar frío a otro caliente, después de calentar una habitación fría o bajo condiciones de alta humedad. En estos casos, no utilice la videograbadora durante unas 2 horas como mínimo, hasta que su interior esté seco.
ADVERTENCIA DE LA FCC - Este equipo puede generar o utilizar energía de radiofrecuencia. Los cambios o modificaciones del equipo pueden causar serias interferencias si dichos cambios o modificaciones no han sido expresamente aprobados en el manual de instrucciones. El usuario podrá perder la autoridad para operar este equipo si efectúa una modificación o cambio no autorizado.
INFORMACIÓN IMPORTANTE SOBREDERECHOS DE AUTOR
La grabación no autorizada o el empleo de teledifusiones, cintas de video, películas u otro material con derechos de autor puede violar las leyes sobre derechos de autor. No asumimos ninguna responsabilidad por la duplicación ni empleo inadecuados ni otros actos que infringen los derechos de los propietarios de derechos de autor.
NOTA ACERCA DEL RECICLAJE
Los materiales del embalaje de este producto son reciclables y pueden volver a ser utilizados. Disponga de cualquiera ellos según las normas de reciclaje de su localidad. Las pilas nunca deberán tirarse ni incinerarse sino que deberán tratarse según las normas locales relacionadas con desperdicios químicos.
El número de serie de este producto se encuentra en la parte posterior del grabador de videocassettes. Ningún otro grabador de videocassettes tiene el mismo número de serie que el suyo. Anote el número de serie y otra información vital aquí, y conserve este manual como un registro permanente de su compra, a fin de facilitar la identificación de la unidad en caso de robo. Los números de serie no se guardan en archivos.
| Fecha de compra | |
| Distribuidor donde se compró | |
| Dirección del distribuidor | |
| N° de teléfono del distribuidor | |
| N° de modelo | |
| N° de serie |
INDICE
■ IMPORTANTE PARA SU SEGURIDAD 36
PRECAUCIONES 37
UBICACIÓN 37
EVITE LOS PELIGROS DE DESCARGAS ELÉCTRICAS E
INCENDIOS 37
ADVERTENCIA 37
■ ACCESORIOS SUMINISTRADOS.... 38
INFORMACIÓN ACERCA DE LAS CINTAS DE VIDEOCASETE. 38
■ CONTROLES DE OPERACIÓN Y SUS FUNCIONES...... 38
PREPARACIÓN PARA LA UTILIZACIÓN.... 40
CONEXIONES DE ANTENA/CABLE 40
AJUSTE DEL CONMUTADOR CH3/CH4 41
TERMINALES A/V 41
INSTALACIÓN DE LAS PILAS 41
PREPARACIÓN PARA LA UTILIZACIÓN.... 41
PREPARACIÓN DE CANALES (Automática).... 41
PUESTA EN HORA DEL RELOJ....42
PARA BORRAR O AÑADIR CANALES 42
REPETICIÓN DE PREPARACIÓN DE CANALES 42
SELECCIÓN DEL IDIOMA 42
■ REPRODUCCIÓN 43
REPRODUCCIÓN NORMAL 43
BÚSQUEDA DE IMAGEN 43
IMAGEN FIJA 43
CONTROL DE RETENCIÓN VERTICAL....43
AJUSTE DE SEGUIMIENTO 43
CÁMARA LENTA....43
MEMORIA DEL CONTADOR 43
■ REPRODUCCIÓN ESPECIAL 44
REPETICIÓN AUTOMÁTICA DE LA REPRODUCCIÓN ..... 44
REPRODUCCIÓN DE VIDEOCASETES DE ALQUILER.... 44
BÚSQUEDA CON ÍNDICE.... 44
BÚSQUEDA RÁPIDA 44
BÚSQUEDA CON TIEMPO 45
■ GRABACIÓN.... 45
VISIÓN Y GRABACIÓN DEL MISMO PROGRAMA 45
SALTO DE ESCENAS NO DESEADAS
DURANTE LA GRABACIÓN 45
GRABACIÓN DE UN PROGRAMA MIENTRAS SE VE OTRO ..... 45
PARA COMPROBAR EL PROGRESO DE SU GRABACIÓN..... 45
OTR (Grabación de un toque) 45
■ GRABACIÓN CON TEMPORIZADOR.... 46
GRABACIÓN AUTOMÁTICA CON TEMPORIZADOR.... 46
GRABACIÓN CON TEMPORIZADOR DEL MISMO DÍA ..... 46
EXTENSIÓN DE PROGRAMAS DE TEMPORIZADOR.... 47
CONSEJOS PARA LA GRABACIÓN CON TEMPORIZADOR ..... 47
RETORNO AUTOMÁTICO 48
ENLACE AUTOMÁTICO CON SATÉLITE UTILIZANDO
SINTONIZADOR DE SATÉLITE (No suministrado) 48
COPIADO DE UNA VIDEOCINTA 48
■ VISUALIZACIÓN EN PANTALLA 49
■ VISUALIZADOR DIGITAL 49
■ FUNCIONES ESPECIALES.... 49
CONTADOR DE CINTA DE TIEMPO REAL.... 49
REBOBINADO AUTOMÁTICO 49
■ CONTROL DE SU TELEVISOR O CONVERTIDOR DE
TELEVISIÓN POR CABLE CON EL MANDO A DISTANCIA DE LA
VIDEOGRABADORA 50
MANDO A DISTANCIA DEL TELEVISOR 50
MANDO A DISTANCIA DEL CONVERTIDOR DE TELEVISIÓN
POR CABLE 50
GUÍA PARA LOCALIZACIÓN Y SOLUCIÓN DE PROBLEMAS.... 51
■ MANTENIMIENTO....51
ACCESORIOS SUMINISTRADOS
| Cable coaxial | WPZ0102LG006/5750398/WPZ0102BB001 |
| Mando a distancia | N9393UD |
| Pilas | AA x 2 |
- Si necesita reemplazar estos accesorios, consulte el N.° DE PARTE, y llame al 1-800-968-3429.
- Dependiendo de su sistema de antena, tal vez necesite diferentes tipos de combinadores (mezcladores) o separadores (divisores). Póngase en contacto con su tienda de productos electrónicos para obtener estos artículos.
- No recomendamos utilizar mandos a distancia universales. No todas las funciones pueden ser controladas mediante un mando a distancia universal. Si decide utilizar un mando a distancia universal con esta unidad, tenga en cuenta que con el número de código dado tal vez no se pueda controlar la unidad. En este caso, póngase en contacto con el fabricante del mando a distancia universal.
INFORMACIÓN ACERCA DE LAS CINTAS DE VIDEOCASETE
Esta videograbadora puede funcionar con casi todos los videocasetes que tengan la marca VHS. Para obtener los mejores resultados le recomendamos utilizar cintas de alta calidad. No utilice cintas de mala calidad o que estén estropeadas.
PRECAUCIONES
- Evite la humedad. La condensación de humedad puede producirse en la cinta si ésta se traslada de un lugar frío a uno caliente o viceversa. Antes de utilizar una cinta en estas condiciones, y para evitar que ésta o su videograbadora se estropee, espere hasta que la cinta se haya calentado a la temperatura de la habitación y la humedad se haya evaporado.
- Evite el calor excesivo, la alta humedad y los campos magnéticos.
- No manipule el mecanismo del videocasete.
- No toque la cinta con sus dedos.
TRES VELOCIDADES DE CINTA DIFERENTES
Antes de grabar, seleccione la velocidad de la cinta: modo SP (reproducción estándar) o modo SLP (reproducción superlarga).
Nota: Podrá reproducir una cinta que se graba en el modo LP (larga duración).
INSERCIÓN DE UN VIDEOCASETE
Inserte el videocasete en el sentido mostrado. Empújelo suavemente, pero continuamente, por la parte central hasta que sea introducido en la videograbadora. La videograbadora se encenderá automáticamente.
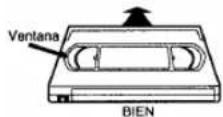
PREVENCIÓN DE BORRADO
Rompiendo la lengüeta del borde trasero del videocasete, usted podrá impedir el borrado accidental de una grabación.
Si decide volver a grabar en esa cinta, tape el agujero con cinta adhesiva.
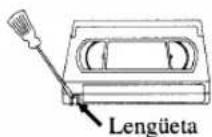
CONTROLES DE OPERACIÓN Y SUS FUNCIONES
NOTA:
- No recomendamos utilizar mandos a distancia universales. No todas las funciones pueden ser controladas mediante un mando a distancia universal. Si decide utilizar un mando a distancia universal con esta unidad, tenga en cuenta que con el número de código dado tal vez no se pueda controlar la unidad. En este caso, póngase en contacto con el fabricante del mando a distancia universal.
[Consulte las ilustraciones de las páginas 8 \~ 9.]
-
Compartimiento del videocasete
-
Botón de expulsión (EJECT) - Púlselo para sacar el videocasete de la videograbadora. (Sólo en la videograbadora)
Botón de parada (STOP) - Púlselo para detener la cinta.
Botón ▼ - Púlselo para introducir los dígitos cuando establezca programas (por ejemplo: puesta en hora del reloj o un programa de temporizador). Púlselo para seleccionar los modos de ajuste en el menú en pantalla. (Sólo en el mando a distancia)
- Botón de rebobinado (REW) - Púlselo para rebobinar la cinta, o para ver rápidamente la imagen en retroceso durante el modo de reproducción. (Búsqueda con rebobinado)
Botón ◀ - Púlselo para cancelar un ajuste de programa de temporizador. Púlselo para corregir dígitos al programar (por ejemplo: puesta en hora del reloj o un programa de temporizador). Púlselo para añadir o borrar números de canales durante el preajuste de canales. (Sólo en el mando a distancia)
-
Botón de reproducción (PLAY) - Púlselo para iniciar la reproducción. Botón ▲ - Púlselo para introducir dígitos cuando se establece un programa (por ejemplo: puesta en hora del reloj o un programa de temporizador). Púlselo para seleccionar los modos de ajuste en el menú en pantalla. (Sólo en el mando a distancia)
-
Botón de avance rápido (F.FWD) - Púlselo para avanzar rápidamente la cinta o para ver rápidamente la imagen en avance durante la reproducción. (Búsqueda en avance)
Botón ▶ - Cuando establezca un programa (por ejemplo: puesta en hora del reloj o un programa de temporizador), púlselo para determinar su selección y proseguir con el siguiente paso que desee introducir. Púlselo para determinar los modos de ajuste del menú en pantalla. Púlselo para añadir o borrar números de canales durante el preajuste de canales. (Sólo en el mando a distancia)
- Botón de pausa/Imagen fija (PAUSE/STILL) - Púlselo para detener temporalmente la cinta durante la grabación o para ver una imagen fija durante la reproducción.
Función de avance de cuadro - Púlselo para avanzar la imagen cuadro a cuadro durante el modo de imagen fija.
-
Botón de la alimentación (POWER) - Púlselo para encender y apagar la videograbadora. Púlselo para activar la grabación con temporizador.
-
Botón de videograbadora/televisor (VCR/TV) - Púlselo para seleccionar el modo de videograbadora (VCR) o televisor (TV).
Posición VCR: para ver la reproducción, comprobar las grabaciones de vídeo o ver programas de TV utilizando el sintonizador de la videograbadora.
Posición TV: para ver programas de TV o para ver un programa mientras se graba otro.
-
Ventanilla sensora del mando a distancia - Recibe las señales infrarrojas procedentes del mando a distancia.
-
Visualizador digital - Consulte la página 49.
-
Botón de velocidad de cinta (TAPE SPEED) - Púlselo para elegir la velocidad de grabación deseada: SP/SLP. (Sólo en la videograbadora)
-
Botones de canales (CHANNEL) - Púlselos para seleccionar los canales deseados para ver o grabar.
Función de seguimiento - Pulse los botones para minimizar el "ruido" de vídeo (líneas o puntos en la pantalla) durante la reproducción o en el modo de cámara lenta.
Púlselo para estabilizar la imagen en el modo de imagen fija, cuando ésta empiece a vibrar verticalmente.
- Botón de grabación (RECORD) - Púlselo para realizar la grabación manual.
Botón de grabación con un toque (OTR) - Activa la grabación con un toque. (Sólo en la videograbadora)
- Botón de grabación con temporizador del mismo día (TODAY TIMER REC) -Púlselo para establecer un programa de temporizador del mismo día. (Sólo en la videograbadora)
Botón de inicio (START) - Púlselo para introducir la hora de inicio deseada durante el ajuste del temporizador del mismo día. (Sólo en la videograbadora)
Botón de finalización (END) - Púlselo para introducir la hora de finalización deseada durante el ajuste del temporizador del mismo día. (Sólo en la videograbadora)
-
Botón de retorno automático (AUTO RETURN) - Rebobina la cinta hasta el comienzo de la grabación con temporizador.
-
Botones numerados (NUMBER) - Púlselos para seleccionar los canales deseados para ver o grabar. Para seleccionar canales del 1 al 9, pulse primero el botón "0" y luego el botón 1 a 9. (Sólo en el mando a distancia)
Botón +100 - Cuando seleccione canales de TV por cable cuyo número sea superior al 99, pulse primero este botón, y luego pulse los dos últimos dígitos. (Para seleccionar el canal 125, pulse primero el botón "+100" y luego el "2" y el "5".) (Sólo en el mando a distancia)
Botón de Introducción (ENTER) - Para tener detalles, consulte la página 50. (sólo en el mando a distancia)
-
Botón de menús (MENU) - Púlselo para visualizar los menús en la pantalla del televisor. Púlselo de nuevo para salir de los menús de la pantalla del televisor. (Sólo en el mando a distancia)
-
Botón del visualizador (DISPLAY) - Visualiza el contador o el número del canal actual y la hora actual en la pantalla del televisor. (Sólo en el mando a distancia)
-
Botón de cámara lenta (SLOW) - Púlselo para iniciar la reproducción a cámara lenta. La velocidad a cámara lenta se puede controlar pulsando el botón F.FWD (más rápida) o el botón REW (más lenta). (Sólo en el mando a distancia)
-
Botón de localización rápida (QUICK-FIND) - Modo de localización rápida. Para obtener más información, lea la página 44. (Sólo en el mando a distancia)
-
Botón de reposición del contador (COUNTER RESET) - Púlselo para reponer el contador a 0:00:00. (Sólo en el mando a distancia) Botón de salida (EXIT) - Púlselo para salir de los menús en pantalla. (Sólo en el mando a distancia)
-
Memoria del contador (COUNTER MEMORY) - Púlselo para activar y desactivar la memoria del contador. (Sólo en el mando a distancia)
-
Botones de búsqueda (SEARCH)
Botón de búsqueda con tiempo (TIME SEARCH) - El modo de búsqueda con tiempo. Para más información, lea la página 45. (Sólo en el mando a distancia)
Botón de búsqueda con índice (INDEX SEARCH) - Modo de búsqueda con índice. Para más información, lea la página 44. (Sólo en el mando a distancia)
-
Botón de silenciamiento (MUTE) -Púlselo para silenciar el sonido del televisor. Púlselo de nuevo para recuperar el sonido. (sólo en el mando a distancia)
-
Botones de volumen (VOLUME) -Púlselo para ajustar el volumen deseado del televisor utilizando ▲ o ▼. (sólo en el mando a distancia)
-
Botones de videograbadora/televisor/television por cable (VCR/TV/CABLE) -Para tener detalles, consulte la página 50. (sólo en el mando a distancia)
-
Cable de alimentación - Conéctelo a una toma de CA estándar (120 V/60 Hz).
-
Toma de salida de audio (AUDIO OUT) -Conéctela a la toma de entrada de audio de su equipo de audio o de otra videograbadora.
-
Toma de entrada de audio (AUDIO IN) - Conéctela a la toma de salida de audio de su equipo de audio o de otra videograbadora.
-
Terminal de entrada de antena (ANT. IN) - Se conecta a una antena, sistema de televisión por cable o sistema de emisiones vía satélite.
-
Toma de salida de vídeo (VIDEO OUT) - Conéctela a la toma de entrada de vídeo de su videocámara o de otra videograbadora.
-
Toma de entrada de vídeo (VIDEO IN) - Conéctela a la toma de salida de vídeo de su videocámara o de otra videograbadora.
- Conmutador selector de canales 3/4 (CH3/CH4) - Se utiliza para seleccionar un canal de salida de vídeo (3 ó 4) para la reproducción de la videograbadora.
- Terminal de salida de antena (ANT. OUT) - Conéctelo al terminal de entrada de antena de su televisor.
PREPARACIÓN PARA LA UTILIZACIÓN
CONEXIONES DE ANTENA/CABLE
Para algunos de los tipos de conexión más comunes, siga las indicaciones de abajo. Utilice una conexión solamente. Para hacer conexiones más complejas, póngase en contacto con su concesionario local u otra persona cualificada. (Tal vez necesite accesorios adicionales que no han sido suministrados.)
1) Desconecte la antena o el cable de su televisor.
2) Conecte la antena o el cable a la toma ANT.IN (toma superior) de su videograbadora.
3) Conecte un extremo del cable coaxial (suministrado) a la toma ANT.OUT (toma inferior) de su videograbadora.
4) Conecte el otro extremo del cable coaxial (suministrado) a la toma de antena UHF/VHF de su televisor.
Consulte la figura 1 (antena interior) de la página 10.
Podrá grabar un canal mientras ve otro. Se puede hacer lo mismo en la grabación automática con temporizador y en la grabación con un toque. Para tener detalles, consulte "Grabación" en la página 45.
Nota: La conexión de una antena interior a una videograbadora no supone siempre una recepción de TV aceptable.
Consulte la figura 2 (antena combinada de VHF/UHF o cable de la compañía de TV por cable) de la página 10.
Podrá grabar un canal mientras ve otro. Se puede hacer lo mismo en la grabación automática con temporizador y en la grabación con un toque. Para tener detalles, consulte "Grabación" en la página 45.
Consulte la figura 3 (antena separada de VHF/UHF) de la página 11.
Podrá grabar un canal mientras ve otro. Se puede hacer lo mismo en la grabación automática con temporizador y en la grabación con un toque. Para tener detalles, consulte "Grabación" en la página 45.
Consulte la figura 4 (sintonizador de TV por cable y receptor de emisiones vía satélite) de la página 11.
SÓLO podrá grabar y ver el MISMO canal cuando utilice esta conexión. No existen excepciones. Los mismo sucede con la grabación automática con temporizador y la grabación con un toque.
Nota: La programación de la memoria de canales NO es necesaria cuando se utiliza esta conexión.
CONSEJOS PARA GRABAR
1) Asegúrese de que los indicadores "PWR." y "VCR" estén encendidos.
2) Encienda el televisor y el sintonizador de TV por cable.
3) Seleccione el canal que va a grabar en el sintonizador de TV por cable.
4) Seleccione el canal 3 ó 4 en el televisor y en la videograbadora.
5) Ponga el conmutador CH3/CH4 del panel trasero de la videograbadora según el canal seleccionado en el televisor y en la videograbadora.
6) Pulse el botón RECORD. Para la GRABACIÓN AUTOMÁTICA CON TEMPORIZADOR, en la videograbadora debe permanecer seleccionado el canal 3 ó 4 en el paso [9] de la página 46.
Algunos clientes con sintonizadores de TV por cable podrán grabar un canal y ver otro con una de las conexiones de abajo.
Sistemas de satélite: Ninguna de estas dos conexiones funcionará. Para el propietario de un receptor de emisiones vía satélite que desee ver un canal y grabar otro, póngase en contacto con el fabricante de su sistema de receptor vía satélite.
Consulte la figura 5 de la página 12.
Podrá grabar un canal codificado mientras ve otro.
CONSEJOS PARA GRABAR
1) Asegúrese de que los indicadores "PWR." y "VCR" estén encendidos.
2) Encienda el televisor y el sintonizador de TV por cable.
3) Seleccione el canal que va a grabar en el sintonizador de TV por cable.
4) Seleccione el canal 3 ó 4 en el televisor y en la videograbadora.
5) Ponga el conmutador CH3/CH4 del panel trasero de la videograbadora según el canal seleccionado en el televisor y en la videograbadora.
6) Pulse el botón RECORD. Para la GRABACIÓN AUTOMÁTICA CON TEMPORIZADOR, en la videograbadora debe permanecer seleccionado el canal 3 ó 4 en el paso [9] de la página 46.
7) Ponga el conmutador A-B en el otro lado. Para la GRABACIÓN AUTOMÁTICA CON TEMPORIZADOR, ponga el conmutador A-B en el otro lado después del paso [12] de la página 46.
8) Seleccione el canal que vaya a ver en el televisor.
Nota: Si desea ver el menú de la videograbadora, ver lo que está grabando o reproducir una cinta con esta conexión, asegúrese de que el conmutador A-B esté en la posición correcta.
Consulte la figura 6 de la página 12.
Esta conexión sólo sirve si uno de sus canales está codificado.
Podrá ver un canal mientras graba otro. Los canales codificados no pueden ser grabados con esta conexión.
CONSEJOS PARA GRABAR
1) Asegúrese de que los indicadores "PWR." y "VCR" estén encendidos.
2) Encienda el televisor y el sintonizador de TV por cable.
3) Seleccione el canal que va a grabar en la videograbadora.
4) Seleccione el canal 3 6 4 en el televisor y en el sintonizador de TV por cable.
5) Ponga el conmutador CH3/CH4 del panel trasero de la videograbadora según el canal seleccionado en el televisor.
6) Para ver UN canal mientras graba OTRO, el indicador "VCR" deberá estar apagado.
Para la GRABACIÓN AUTOMÁTICA CON TEMPORIZADOR, el indicador "VCR" debe estar apagado después del paso [11] de la página 46.
7) Seleccione el canal que vaya a ver en el sintonizador de TV por cable.
Nota: Si desea ver el menú de la videograbadora, ver lo que está grabando o reproducir una cinta con esta conexión, el indicador "VCR" deberá estar encendido y el canal del sintonizador de TV por cable deberá ser el mismo que el que haya sido seleccionado en la parte posterior de la videograbadora. (CH3 ó 4)
Nota para la persona que instale el sistema CATV
Este recordatorio se agrega para llamar la atención de quien instale el sistema CATV, con respecto al Artículo 820-40 de la NEC que provee directivas guía para realizar una conexión adecuada a tierra y, en particular, especifica que el cable de puesta a tierra debe ser conectado al sistema de terminal a tierra del edificio lo más cercano al punto de entrada del cable como sea posible.
AJUSTE DEL CONMUTADOR CH3/CH4
Si su televisor no tiene terminales A/V:
Cuando la videograbadora esté en el modo de reproducción o el botón VCR/TV esté en la posición VCR, su televisor recibirá señales de la videograbadora en el canal 3 ó 4.
Para utilizar la videograbadora con su televisor, ponga el conmutador selector (en el panel trasero de su videograbadora) en CH3 ó CH4, en el canal que no se utilice para las emisiones normales de su zona. Y luego seleccione el mismo canal en el televisor. [Lado trasero de la videograbadora]
TERMINALES A/V
CONEXIÓN A LAS TOMAS DE ENTRADA
Cuando copie una videocinta o vea un programa grabado en otra fuente, utilice las tomas de entrada de audio/vídeo.
UTILIZANDO LAS TOMAS TRASERAS:
Consulte la figura 7 de la página 13.
UTILIZANDO LAS TOMAS FRONTALES
Puede utilizar las tomas de entrada de audio y vídeo del panel frontal de la videograbadora en lugar de utilizar las tomas del panel trasero.
SELECCIÓN DE ENTRADA EN EL PANEL FRONTAL O TRASERO
Para utilizar las tomas de entrada de audio/vídeo, seleccione la posición "L1" o "L2".
1) Asegúrese de que los indicadores "PWR." y "VCR" estén encendidos.
2) Encienda el televisor y seleccione el canal 3 ó 4. Ahora ponga el conmutador CH3/CH4 del panel trasero de la videograbadora en la posición que concuerde con el canal seleccionado en el televisor.
3) Conecte los cables de audio/vídeo a las tomas de entrada de audio/vídeo del panel trasero de la videograbadora. Ahora, conecte el otro extremo de los cables a las tomas de salida de audio/vídeo de la fuente.
4)
- Si usted utiliza las tomas de entrada de audio y vídeo del panel trasero de la unidad, pulse 0, 0, 1 en el mando a distancia para seleccionar la posición "L1".
- Si usted utiliza las tomas de entrada de audio y vídeo del panel frontal de la unidad, pulse 0, 0, 2 en el mando a distancia para seleccionar la posición "L2".
También podrá seleccionar "L1" o "L2" pulsando el botón CHANNEL ▲ o ▼.
Nota: "L1" o "L2" se encuentra antes del canal inferior memorizado. (Ejemplo: CH2)
CONEXIÓN A LAS TOMAS DE SALIDA
Si su televisor tiene tomas de entrada A/V,
Usted podrá conectar las tomas AUDIO/VIDEO OUTPUT de su videograbadora a las tomas de entrada de audio/vídeo del panel trasero de su televisor.
Las conexiones directas de audio/vídeo proporcionan generalmente una imagen mejor y un sonido de calidad para la reproducción de las cintas. Consulte el manual de instrucciones de su televisor para conocer las conexiones de entrada A/V.
Consulte la figura 8 de la página 13.
INSTALACIÓN DE LAS PILAS
1) Abra la tapa del compartimiento de las pilas del mando a distancia presionándola en el sentido de la flecha.
2) Inserte 2 pilas tamaño "AA" en el compartimiento de las pilas, en el sentido indicado por las marcas de polaridad (+/-).
3) Vuelva a poner la tapa.
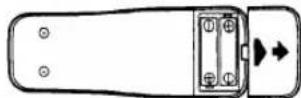
PREPARACIÓN PARA LA UTILIZACIÓN
Podrá programar el sintonizador para que explore solamente los canales que puedan recibirse en su zona. Para este procedimiento deberá utilizar el mando a distancia.
NOTAS:
- La programación de la memoria de canales NO es necesaria cuando se hace la conexión a un sintonizador de TV por cable o a un receptor de emisiones vía satélite como se muestra en la figura 4 de la página 40 o en la figura 5 de la página 40. En este caso, con su mando a distancia, seleccione en la videograbadora el canal 3 ó 4, el mismo que ha sido seleccionado con el conmutador del panel trasero de la videograbadora (CH3 o CH4). Luego, el canal que desee grabar o ver podrá ser seleccionado en el sintonizador de TV por cable o en el receptor de emisiones vía satélite.
- Siga una vez los pasos de abajo. Repítalos si se produce una interrupción en la alimentación o si la videograbadora está desenchufada durante más de 30 segundos. (En estos casos, los canales programados se borrarán.)
- Deberá seguir los pasos de abajo antes de intentar reproducir o grabar una videocinta. Si usted desea reproducir o grabar una cinta de vídeo ANTES de programar el sintonizador, usted podrá cancelarlo pulsando el botón RESET/EXIT. Para programar de nuevo el sintonizador, consulte "REPETICIÓN DE PREPARACIÓN DE CANALES" en la página 42.
PREPARACIÓN DE CANALES (Automática)
1) Enchufe el cable de alimentación de la videograbadora en una toma de CA estándar. El indicador "--:" parpadeará en el visualizador.
Recuerde:
Si su sintonizador de TV por cable o receptor de emisiones vía satélite está conectado como en la figura 4 de la página 40 o como en la figura 5 de la página 40, NO tendrá que preparar los canales. Seleccione simplemente el canal 3 o el 4 en el televisor y en la videograbadora y ponga el conmutador CH3/CH4 del panel trasero de la videograbadora en la posición correspondiente al canal seleccionado (CH 3 o CH 4). Ahora seleccione el canal que desee ver o grabar en el sintonizador o receptor.
2) Encienda el televisor y seleccione el canal 3 ó 4 en el televisor. Ahora ponga el conmutador CH3/CH4 del panel trasero de la videograbadora en la posición correspondiente al canal seleccionado en el televisor.
3) Pulse el botón POWER para encender la videograbadora. El indicador "PWR." y el indicador "VCR" se iluminan en el visualizador.
- Utilice el mando a distancia para este procedimiento.
4) Seleccione "ENGLISH" o "ESPAÑOL" con el botón PLAY/▲ o STOP/▼. Luego, pulse el botón F.FWD/►.
Nota: Esta función es efectiva solamente para el idioma en el menú de la pantalla, pero no para el origen audio.
5) Pulse una vez el botón F.FWD/►. El sintonizador explora y memoriza todos los canales activos de su zona.
- La videograbadora distingue entre los canales de TV estándar y los canales de TV por cable.
6) Después de la exploración, el sintonizador se para en el canal memorizado más bajo. La pantalla del televisor vuelve al modo del televisor.
- Si vuelve a aparecer "AJUSTAR SINTONIZADOR" en la pantalla del televisor, compruebe las conexiones de los cables. Pulse una vez más el botón F.FWD/▶ y la videograbadora iniciará de nuevo el preajuste.
PARA SELECCIONAR UN CANAL DESEADO
Podrá seleccionar el canal deseado utilizando el botón CHANNEL ▲ o ▼ o pulsando directamente los botones numerados del mando a distancia.
Nota para utilizar los botones numerados:
- Cuando seleccione canales de TV por cable superiores al 99, pulse primero el botón +100 y luego pulse los dos últimos dígitos. (Ejemplo: para seleccionar el canal 125, pulse primero el botón +100 y luego los botones "2" y "5".)
- Los números de canales de un solo dígito deberán ir precedidos de un cero (por ejemplo: 02, 03, 04, etc.)
PUESTA EN HORA DEL RELOJ
Ponga la hora exacta para realizar grabaciones automáticas con temporizador de forma correcta. Le recomendamos utilizar una emisora de TV o radio como fuente de la hora.
- Utilice el mando a distancia para este procedimiento.
- Mientras la videograbadora está en el modo de menú, sólo funcionan los botones siguientes: PLAY/▲, F.FWD/▶, REW/◀, STOP/▼, RESET/EXIT, POWER y MENU.
- Asegúrese de que los indicadores "PWR." y "VCR" estén encendidos.
- Encienda el televisor y seleccione en él el canal 3 o el 4. Ahora ponga el conmutador CH3/CH4 del panel trasero de la videograbadora en la posición correspondiente al canal seleccionado en el televisor.
1) Pulse el botón MENU. El menú AJUSTE RELOJ aparece.
- Los botones numerados del mando a distancia no funcionan en este modo de menú.
- Podrá pasar al paso siguiente pulsando el botón F.FWD/► en los pasos [2] a [6].
- Podrá pasar al paso anterior pulsando el botón REW/◀ en los pasos [3] a [7].
2) Pulse el botón PLAY/▲ o STOP/▼ hasta que aparezca el mes deseado. (Por ejemplo: marzo -- 03) A continuación, pulse el botón F.FWD/►.
3) Pulse el botón PLAY/▲ o STOP/▼ hasta que aparezca el día deseado. (Por ejemplo: primero -- 01) A continuación, pulse el botón F.FWD/►.
4) Pulse el botón PLAY/▲ o STOP/▼ hasta que aparezca el año deseado. (Por ejemplo: 1999) A continuación, pulse el botón F.FWD/►.
5) Pulse el botón PLAY/▲ o STOP/▼ hasta que aparezca la hora deseada. (Por ejemplo: 05) A continuación, pulse el botón F.FWD/►.
6) Pulse el botón PLAY/▲ o STOP/▼ hasta que aparezca el minuto deseado. (Por ejemplo: 40) A continuación, pulse el botón F.FWD/►.
7) Pulse el botón PLAY/▲ o STOP/▼ para indicar "AM" o "PM". (Por ejemplo: PM)
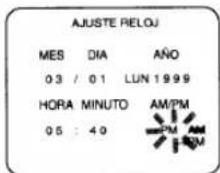
8) Pulse el botón RESET/EXIT o F.FWD/▶. Aunque los segundos no se visualizan, éstos empiezan a contarse desde 00 cuado se pulsa el botón RESET/EXIT o F.FWD/▶. Utilice esta función para sincronizar el reloj con la hora correcta.
- Cuando se desenchufe el cable de alimentación de CA o se produzca una interrupción en la alimentación de más de 30 segundos, tal vez tenga que volver a poner en hora el reloj.
- Si el visualizador muestra una indicación anormal o nada en absoluto, desenchufe el cable de alimentación durante más de 30 segundos. Luego veulva a conectarlo y ponga en hora el reloj.
PARA CAMBIAR EL AJUSTE DEL RELOJ
1) Pulse el botón MENU hasta que aparezca el menú PARA INICIAR.
2) Pulse el botón PLAY/▲ o STOP/▼ para indicar "AJUSTE RELOJ". Y luego pulse el botón F.FWD/►.
3) Siga los pasos [2] a [8] de "PUESTA EN HORA DEL RELOJ".
PARA BORRAR O AÑADIR CANALES
Los canales que ya no reciba o que vea de vez en cuando podrán ser borrados de la memoria. (Por supuesto, los canales borrados podrán volver a ser memorizados.)
- Utilice el mando a distancia para este procedimiento.
- Asegúrese de que los indicadores "PWR." y "VCR" estén encendidos.
- Encienda el televisor y seleccione en él el canal 3 o el 4. Ahora ponga el conmutador CH3/CH4 del panel trasero de la videograbadora en la posición correspondiente al canal seleccionado en el televisor.
1) Pulse el botón MENU hasta que aparezca el menú PARA INICIAR.
2) Confirme que se indique "AJUSTE CANAL" y luego pulse el botón F.FWD/▶.
3) Pulse el botón PLAY/▲ o STOP/▼ para indicar "AGREGAR/BORRAR". Luego, pulse el botón F.FWD/►.
4) Pulse los botones numerados o el botón PLAY/▲ o STOP/▼ hasta que aparezca el número del canal deseado.
5) Pulse el botón F.FWD/▶ o REW/◀ para que parpadee "BORRAR" en la pantalla del televisor.
1) Pulse el botón MENU hasta que aparezca el menú PARA INICIAR. 2) Confirme que se indique "AJUSTE CANAL" y luego pulse el botón F.FWD/▶. 3) Pulse el botón PLAY/▲ o STOP/▼ para indicar "AGREGAR/BORRAR". Luego, pulse el botón F.FWD/▶. 4) Pulse los botones numerados o el botón PLAY/▲ o STOP/▼ hasta que aparezca el número del canal deseado. 5) Pulse el botón F.FWD/▶ o REW/◀ para que parpadee "BORRAR" en la pantalla del televisor.
- Para borrar otro canal, repita los pasos [4] y [5].
- Si pulsa de nuevo el botón F.FWD/▶ o REW/◀, el canal se memorizará otra vez.
6) Pulse el botón RESET/EXIT para volver al modo del televisor.
NOTA:
Para confirmar que el(los) canal(es) ha(n) sido borrado(s), pulse el botón CHANNEL ▲ o ▼.
REPETICIÓN DE PREPARACIÓN DE CANALES
Recuerde:
Si su sintonizador de TV por cable o receptor de emisiones vía satélite está conectado como en la figura 4 de la página 40 o como en la figura 5 de la página 40, NO tendrá que preparar los canales. Seleccione simplemente el canal 3 o el 4 en el televisor y en la videograbadora y ponga el conmutador CH3/CH4 del panel trasero de la videograbadora en la posición correspondiente al canal seleccionado (CH 3 o CH 4). Ahora seleccione el canal que desee ver o grabar en el sintonizador o receptor.
- Utilice el mando a distancia para este procedimiento.
1) Pulse el botón MENU hasta que aparezca el menú PARA INICIAR.
2) Confirme que se indique "AJUSTE CANAL" y luego pulse el botón F.FWD.
3) Confirme que se indique "SINTONIA AUTOM." y luego pulse el botón F.FWD/▶. Después de la exploración, el sintonizador se para en el canal memorizado más bajo.
- La videograbadora distingue entre los canales de TV estándar y los canales de TV por cable.
SELECCIÓN DEL IDIOMA
Si desea cambiar el idioma de la pantalla del televisor, siga los pasos siguientes:
Nota: Esta función es efectiva solamente para el idioma en el menú de la pantalla, pero no para el origen audio.
- Utilice el mando a distancia para este procedimiento.
1) Pulse el botón MENU hasta que aparezca el menú PARA INICIAR.
2) Pulse PLAY/▲ o STOP/▼ para indicar "SELEC. IDIOMA". Luego pulse el botón F.FWD/►.
3) Seleccione "ENGLISH" o "ESPAÑOL" con el botón PLAY/▲ o STOP/▼.
4) Pulse el botón RESET/EXIT para volver al modo del televisor.
NOTA: Si por alguna razón el menú está en inglés, pulse el botón MENU hasta que aparezca el menú "INITIALIZE", pulse el botón PLAY/▲ para indicar "LANGUAGE SELECT", pulse el botón F.FWD/▶, pulse el botón STOP/▼ para indicar "ESPAÑOL", y luego pulse el botón RESET/EXIT.
REPRODUCCIÓN
REPRODUCCIÓN NORMAL
- Asegúrese de que los indicadores "PWR." y "VCR" estén encendidos.
- Encienda el televisor y seleccione en él el canal 3 o el 4. Ahora ponga el conmutador CH3/CH4 del panel trasero de la videograbadora en la posición correspondiente al canal seleccionado en el televisor.
1) Inserte una cinta grabada. El modo del contador se activa y aparece 0:00:00 en la pantalla del televisor. Si la lengüeta de protección contra el borrado ha sido quitada, la videograbadora iniciará la reproducción automáticamente.
2) Pulse el botón PLAY para iniciar la reproducción.
NOTA: El botón PLAY del mando a distancia no funcionará si se encuentra activado algún menú en la pantalla del televisor. Pulse el botón RESET/EXIT para borrar el menú. Luego, pulse el botón PLAY.
Si ya hay un videocasete en la videograbadora con la alimentación desconectada
2.0 Utilizando botones de la videograbadora
Pulse simplemente el botón PLAY de la videograbadora. La alimentación se conectará automáticamente y la reproducción empezará. (Operación directa pulsando un botón)
201 Utilizando botones del mando a distancia
Pulse el botón POWER de la videograbadora y luego pulse el botón PLAY del mando a distancia.
3) Pulse el botón STOP para detener la reproducción.
BÚSQUEDA DE IMAGEN
Esta función es muy útil para encontrar o saltar una escena particular de una cinta. En este modo, el sonido se silenciará.
1) Pulsando el botón F.FWD o REW podrá ver una videocinta a alta velocidad en el sentido de avance o de retroceso. (En los modos SP/LP/SLP)
2) Púlselo de nuevo y la videograbadora buscará ahora en el modo de velocidad superalta. (En los modos LP/SLP solamente)
3) Pulse el botón PLAY para volver a la velocidad normal.
IMAGEN FIJA
Podrá ver una imagen fija en la pantalla del televisor durante la reproducción (modo de imagen fija). Pulse el botón PAUSE/STILL durante la reproducción. Pulse el botón PLAY para volver a la reproducción.
- Podrá avanzar la imagen un cuadro cada vez pulsando el botón PAUSE/STILL durante el modo de imagen fija.
- Si se deja más de cinco minutos en el modo de imagen fija, la videograbadora se podrá automáticamente en el modo de parada.
CONTROL DE RETENCIÓN VERTICAL
En el modo de pausa/imagen fija solamente, cuando la imagen empiece a vibrar verticalmente, estabilícela pulsando el botón CHANNEL
▲0▼
NOTAS:
- Si la imagen está distorsionada o desfile en sentido vertical, ajuste el control de retención vertical en su televisor, si equipado.
- La mayoría de los televisores no tienen control de retención vertical ajustable por el usuario.
AJUSTE DE SEGUIMIENTO
- El ajuste de seguimiento se hará automáticamente (función de seguimiento digital) cuando se inicie la reproducción.
Sin embargo, cuando reproduzca cintas pregrabadas o cintas grabadas en otras unidades que no sean la suya propia, las líneas de ruido (franjas blancas y negras) pueden aparecer en la imagen de reproducción. En este caso, podrá ajustar manualmente el seguimiento pulsando el botón CHANNEL ▲ o ▼ de la videograbadora hasta que desaparezcan las franjas.
Para volver a la función de seguimiento digital, pare una vez la cinta e inicie de nuevo la reproducción. - Usted también puede reducir las líneas de ruido pulsando el botón CHANNEL ▲ o ▼ en el modo de cámara lenta. El ajuste de seguimiento lento no se establecerá automáticamente.
NOTA: En el modo de imagen fija, pulse el botón SLOW y el botón CHANNEL ▲ o ▼ hasta que desaparezcan las franjas. Para volver al modo de imagen fija, pulse de nuevo el botón PAUSE/STILL.
CÁMARA LENTA
Pulse el botón SLOW para reducir la velocidad de reproducción. La videograbadora silenciará el sonido durante la reproducción a cámara lenta. Usted podrá controlar la velocidad pulsando el botón F.FWD (más rápida) o REW (más lenta).
Pulse el botón PLAY para volver a la reproducción normal.
NOTA: Si se deja en el modo de cámara lenta durante más de cinco minutos, la videograbadora se cambiará automáticamente en el modo de parada.
MEMORIA DEL CONTADOR
Utilice esta función para memorizar el punto inicial al que usted desea volver. Y podrá buscarlo fácilmente mediante el rebobinado o el avance rápido.
- Utilice el mando a distancia para este procedimiento.
- Asegúrese de que los indicadores "PWR." y "VCR" estén encendidos.
- Encienda el televisor y seleccione en él el canal 3 o el 4. Ahora ponga el conmutador CH3/CH4 del panel trasero de la videograbadora en la posición correspondiente al canal seleccionado en el televisor.
- Esta función sólo se activa con una cinta pregrabada.
1) Inserte una cinta pregrabada. Rebobínela o aváncela rápidamente hasta el punto inicial que desee marcar.
2) Pulse el botón COUNTER RESET del mando a distancia para reponer el contador a 0:00:00. Si es necesario, pulse de nuevo el botón COUNTER RESET para reponer el contador a 0:00:00.
3) Pulse el botón COUNTER MEMORY del mando a distancia para que "M" aparezca en la pantalla del televisor.
- El botón COUNTER MEMORY no funciona si el modo de repetición automática está activado [ON]. En este caso, desactive [OFF] el modo de repetición automática.
4) Pulse el botón RECORD o PLAY para iniciar la grabación o la reproducción. Pulse el botón STOP cuando termine la grabación o la reproducción.
5) Pulse el botón REW (o F.FWD), la videograbadora se detendrá automáticamente cuando el contador retorne a 0:00:00 aproximadamente.
NOTA: El tiempo visualizado no cambiará durante las partes en blanco de la cinta.
PARA SALIR DE LA MEMORIA DEL CONTADOR
Pulse el botón COUNTER MEMORY del mando a distancia para que "M" desaparezca de la pantalla del televisor.
Para obtener más información relacionada con la visualización, consulte la página 49.
REPRODUCCIÓN ESPECIAL
- Utilice el mando a distancia para el procedimiento siguiente.
- Asegúrese de que los indicadores "PWR." y "VCR" estén encendidos.
- Encienda el televisor y seleccione en él el canal 3 o el 4. Ahora ponga el conmutador CH3/CH4 del panel trasero de la videograbadora en la posición correspondiente al canal seleccionado en el televisor.
REPETICIÓN AUTOMÁTICA DE LA REPRODUCCIÓN
La videograbadora tiene la función de repetición automática que le permite repetir una cinta indefinidamente sin pulsar el botón PLAY. Asegúrese de insertar una cinta pregrabada.
1) Pulse el botón MENU hasta que aparezca el menú AJUSTE VCR.
2) Pluse el botón PLAY/▲ o STOP/▼ para indicar "AUTOREPE-TIR".
3) Pulse el botón F.FWD/▶ para que [ON] aparezca a continuación de "AUTOREPETIR" en la pantalla del televisor.
En el modo de parada, el modo de repetición de reproducción se iniciará automáticamente. Si el menú en pantalla permanece todavía, pulse el botón RESET/EXIT para salir del menú.
- Una vez seleccionado el modo de repetición automática de la reproducción, éste permanecerá ajustado incluso después de apagar la videograbadora.
- El botón COUNTER MEMORY no funcionará si el modo de repetición automática de la reproducción está en [ON]. En este caso, ponga el modo de repetición automática de la reproducción en [OFF].
- Para detener la reproducción, pulse el botón STOP.
PARA SALIR DEL MODO DE REPETICIÓN AUTOMÁTICA
Repita los pasos [1] y [2], y pulse el botón F.FWD/▶. [ON] desaparecerá del menú. Luego, pulse el botón RESET/EXIT para volver al modo del televisor.
Interrupción en la alimentación:
Si hay una interrupción en la alimentación de más de 30 segundos, la repetición automática de la reproducción se desactivará.
REPRODUCCIÓN DE VIDEOCASETES DE ALQUILER
Esta función le permitirá mejorar la calidad de la imagen cuando reproduzca videocasetes gastados como, por ejemplo, los de alquiler.
- La selección ON u OFF deberá realizarse durante la reproducción.
1) Inicie la reproducción.
2) Pulse el botón MENU hasta que aparezca el menú AJUSTE VCR.
3) Pulse el botón PLAY/▲ o STOP/▼ para indicar "CINTAS".
4) Pulse el botón F.FWD/▶ para que aparezca "CINTAS ON". - Una vez seleccionado el modo de videocasetes de alquiler, éste permanecerá ajustado incluso después de apagar la videograbadora.
- Para detener la reproducción, pulse el botón STOP.
PARA SALIR DEL MODO DE REPRODUCCIÓN DE VIDEOCASETES DE ALQUILER
Repita los pasos [1] a [3], y pulse el botón F.FWD/▶ para que aparezca "CINTAS OFF".
Interrupción en la alimentación:
Si hay una interrupción en la alimentación de más de 30 segundos, la reproducción de videocasetes de alquiler se desactivará.
BÚSQUEDA CON ÍNDICE
Esta característica proporciona un método de indización del punto de inicio, para volver a él fácilmente tanto en el modo de avance rápido como en el de rebobinado.
- La marca índice se hará automáticamente cuando se pulse el botón REC. También se marcará en el punto de inicio de una grabación con temporizador, OTR y grabación mediante enlace automático con satélite.
- La marca índice no se grabará si se pulsa el botón PAUSE/STILL y luego se suelta durante la grabación.
- El tiempo entre marcas indices en la cinta deberá ser superior a 1 minuto para la grabación SP y 3 minutos para la grabación SLP.
Ejemplo:
Usted está viendo el programa número 4 y desea avanzar rápidamente al programa número 7. Usted debe saltarse tres programas.
- Usted puede elegir el modo de búsqueda de índice pulsando el botón INDEX SEARCH del mando a distancia. Luego continúe con el paso [3].
1) Pulse el botón MENU hasta que aparezca el menú BUSCAR.
2) Pulse el botón PLAY/▲ o STOP/▼ para indicar a "BUSCA HACIA INDICE". Luego, pulse el botón F.FWD/►.
3) Pulse el botón PLAY/▲ o STOP/▼ hasta que aparezca el número de programa que desee omitir. (Ejemplo: "03" para 3 programas) - El modo de búsqueda con índice se cancelará si los procedimientos no se activan en 30 segundos.
4) Pulse el botón REW o F.FWD. La videograbadora empieza a rebobinar o avanzar rápidamente la cinta hasta el comienzo del programa deseado. NOTA: Cada vez que se omita una señal índice, el número del indicador de programas disminuirá en uno.
5) Cuando se alcance el programa preajustado, la videograbadora iniciará la reproducción automáticamente. - Para que esta función se active es necesario que haya un videocasete introducido en la videograbadora.
- El número de búsqueda con índice puede ajustarse a un máximo de 20.
- Esta función no se activará en el modo de grabación.
- Cuando desee cancelar la búsqueda con índice mientras se realiza ésta, pulse el botón STOP.
BÚSQUEDA RÁPIDA
Esta función le permite buscar y confirmar el contenido del(de los) programas grabados usando las marcas índice.
La videograbadora inicia el avance rápido seleccionando esta función. Cuando la videograbadora encuentre el comienzo del programa (la marca índice), la videograbadora empezará a reproducir la cinta de vídeo a alta velocidad durante 30 segundos. Luego, volverá al modo de avance rápido hasta llegar al comienzo del siguiente programa. La videograbadora repite esta operación hasta el final de la cinta.
En cuanto a la marca índice, consulte la sección "BÚSQUEDA CON ÍNDICE".
- La cinta debe bobinarse completamente.
- Usted puede iniciar la búsqueda rápida pulsando el botón QUICK-FIND del mando a distancia. También podrá iniciar la búsqueda rápida con el procedimiento siguiente:
1) Pulse el botón MENU hasta que aparezca el menú BUSCAR.
2) Confirme que se señale "BUSQUEDA RAPIDA" y luego pulse el botón F.FWD/▶. La videograbadora iniciará la búsqueda rápida.
PARA SALTAR AL COMIENZO DEL SIGUIENTE PROGRAMA
Pulse el botón QUICK-FIND del mando a distancia.
PARA VER A LA VELOCIDAD NORMAL
Pulse el botón PLAY. La búsqueda rápida se cancelará.
- Para que esta función se active es necesario que haya un videocasete introducido en la videograbadora.
- Esta función no se activará en el modo de grabación.
- Cuando desee cancelar la búsqueda rápida mientras se realiza ésta, pulse el botón STOP.
- Cuando se llegue al final de la cinta durante la búsqueda rápida, la cinta se rebobinará automáticamente hasta el principio. Después de terminado el rebobinado, la videograbadora expulsará la cinta y se apagará a sí misma.
BÚSQUEDA CON TIEMPO
La función de búsqueda con tiempo permite avanzar rápidamente la cinta hasta la posición deseada introduciendo simplemente el tiempo de reproducción exacto que usted desea omitir.
Ejemplo: Para ver un programa ubicado a 2 horas y 50 minutos de la posición actual, en ambos sentidos.
- Usted puede elegir el modo de búsqueda con tiempo pulsando el botón TIME SEARCH del mando a distancia. Luego continúe con el paso [3].
1) Pulse el botón MENU hasta que aparezca el menú BUSCAR.
2) Pulse el botón PLAY/▲ o STOP/▼ para indicar "BUSCA HACIA HORA". Luego, pulse el botón F.FWD/►.
3) Pulse el botón PLAY/▲ o STOP/▼ hasta que aparezca el tiempo deseado. ("2:50" significa 2 horas y 50 minutos)
- El modo de búsqueda de tiempo se cancelará si los procedimientos no se activan en 30 segundos.
4) Pulsando el botón REW o F.FWD, la videograbadora rebobinará o avanzará rápidamente la cinta hasta el punto especificado. El tiempo se va reduciendo según se realiza la búsqueda.
5) La reproducción empieza automáticamente cuando se llega a 0:00.
- Para que esta función se active es necesario que haya un videocasete introducido en la videograbadora.
- La búsqueda con tiempo puede ajustarse a un máximo de 9 horas y 59 minutos (9:59).
- Esta función no se activará en el modo de grabación.
- Cuando desee cancelar la búsqueda con tiempo mientras se realiza ésta, pulse el botón STOP.
GRABACIÓN
- Consulte las conexiones que está utilizando, en la página 40 de "CO-NEXIONES DE ANTENA/CABLE" antes de continuar.
- Asegúrese de que los indicadores "PWR." y "VCR" estén encendidos.
- Encienda el televisor y seleccione en él el canal 3 o el 4. Ahora ponga el conmutador CH3/CH4 del panel trasero de la videograbadora en la posición correspondiente al canal seleccionado en el televisor.
- Inserte un videocasete con su lengüeta de prevención de borrado en su lugar. (Si es necesario, rebobine o avance rápidamente la cinta hasta el punto donde desee iniciar la grabación.)
VISIÓN Y GRABACIÓN DEL MISMO PROGRAMA
1) Pulse los botones numerados del mando a distancia o el botón CHANNEL ▲ o ▼ para seleccionar el canal que vaya a grabar.
NOTA:
Si tiene un sintonizador de TV por cable o un receptor de emisiones vía satélite conectado a esta videograbadora, consulte "CONEXIONES DE ANTENA/CABLE" en la página 40 antes de pasar al paso siguiente.
2) Pulse el botón TAPE SPEED de la videograbadora para seleccionar la velocidad deseada (SP/SLP).
3) Pulse el botón RECORD para iniciar la grabación. El indicador "REC" aparecerá en el visualizador.
El botón RECORD del mando a distancia no funcionará si se encuentra activado cualquier menú en la pantalla del televisor. Pulse el botón RESET/EXIT para cancelar el menú. Luego, pulse el botón RECORD.
4) Pulse el botón STOP cuando termine la grabación.
NOTA:
SALTO DE ESCENAS NO DESEADAS DURANTE LA GRABACIÓN
Pulse el botón PAUSE/STILL para detener temporalmente la grabación. Pulse el botón PAUSE/STILL o el botón RECORD para reanudar la grabación.
NOTA:
Cuando la videograbadora esté en el modo de pausa fija, usted podrá ver el tiempo restante mediante las marcas ■ de la pantalla del televisor. Cada marca ■ representa un minuto. Después de cinco minutos, la videograbadora se pondrá automáticamente en el modo de parada para impedir que se estropee la cinta. Cuando sólo quede 1 minuto parpadeará una marca ■.
GRABACIÓN DE UN PROGRAMA MIENTRAS SE VE OTRO
Podrá grabar un programa mientras ve otro. Para iniciar la grabación, siga los pasos [1] a [3] de "VISIÓN Y GRABACIÓN DEL MISMO PROGRAMA".
Para seleccionar el canal que desee ver en el televisor, siga los pasos de abajo.
NOTA:
Si tiene un sintonizador de TV por cable o un receptor de emisiones vía satélite conectado a esta videograbadora, consulte "CONEXIONES DE ANTENA/CABLE" en la página 40 antes de pasar al paso siguiente.
4) Pulse el botón VCR/TV para que desaparezca el indicador "VCR" del visualizador digital de la videograbadora.
5) Seleccione en el televisor el canal que desee ver.
PARA COMPROBAR EL PROGRESO DE SU GRABACIÓN
1) Pulse el botón VCR/TV para que aparezca el indicador "VCR" en el visualizador.
2) Encienda el televisor y seleccione en él el canal 3 o el 4. Ahora ponga el conmutador CH3/CH4 del panel trasero de la videograbadora en la posición correspondiente al canal seleccionado en el televisor.
OTR (Grabación de un toque)
Esta función le permite establecer la duración de la grabación pulsando simplemente el botón REC/OTR de la videograbadora.
- Consulte las conexiones que está utilizando, en la página 40 de "CO-NEXIONES DE ANTENA/CABLE" antes de continuar.
- No se puede utilizar el mando a distancia para esta función.
- Asegúrese de que los indicadores "PWR." y "VCR" estén encendidos.
- Encienda el televisor y seleccione en él el canalencendidos. 3 o el 4. Ahora ponga el conmutador CH3/CH4 del panel trasero de la videograbadora en la posición correspondiente al canal seleccionado en el televisor.
- Inserte un videocasete con su lengüeta de prevención de borrado en su lugar. (Si es necesario, rebobine o avance rápidamente la cinta hasta el punto donde desee iniciar la grabación.)
NOTA:
Si tiene un sintonizador de TV por cable o un receptor de emisiones vía satélite conectado a esta videograbadora, consulte "CONEXIONES DE ANTENA/CABLE" en la página 40 antes de pasar al paso siguiente.
1) Pulse los botones numerados del mando a distancia o el botón CHANNEL ▲ o ▼ para seleccionar el canal que vaya a grabar.
2) Pulse el botón TAPE SPEED para seleccionar la velocidad deseada de la cinta (SP/SLP).
3) Pulse el botón REC/OTR de la videograbadora tantas veces como sea necesario.
La duración de la grabación se determinará mediante el número de veces que se pulse el botón REC/OTR.
El tiempo de grabación aumentará 30 minutos cada vez que se pulse el botón. Se puede establecer un máximo de 8 horas.
- La grabación empieza inmediatamente cuando se pulsa el botón REC/OTR, tanto si está viendo el mismo canal u otro diferente.
- Cuando el botón REC/OTR se pulse 18 veces, la videograbadora volverá al modo de grabación normal.
- Para detener la operación OTR, pulse el botón STOP de la videograbadora o del mando a distancia.
- Para mostrar el tiempo restante, pulse el botón DISPLAY del mando a distancia para que "OTR" aparezca en la pantalla del televisor. (Se mostrará momentáneamente y luego desaparecerá.)
- La grabación cesa cuando se alcanza 0:00.
- Tenga en cuenta que en el modo SLP, el tiempo máximo de grabación, suponiendo que la cinta empieza al principio, es de 8 horas cuando se utiliza una cinta T-160 (o 6 horas cuando se utiliza una cinta T-120).
- El televisor conectado a su videograbadora puede estar encendido o apagado durante la OTR.
- Si se termina la cinta antes del tiempo ajustado para la finalización, la videograbadora se pondrá inmediatamente en el modo de parada, expulsará el videocasete y desconectará la alimentación.
GRABACIÓN CON TEMPORIZADOR
GRABACIÓN AUTOMÁTICA CON TEMPORIZADOR
Podrá ajustar la videograbadora para que inicie y finalice la grabación mientras usted esté ausente.
Podrá establecer ocho programas para grabarlos en días específicos, diaria o semanalmente, dentro de un periodo de 1 año.
- Consulte las conexiones que está utilizando, en la página 40 de "CONEXIONES DE ANTENA/CABLE" antes de continuar.
- Utilice el mando a distancia para este procedimiento.
- Asegúrese de que los indicadores "PWR." y "VCR" estén encendidos para programarla.
- Encienda el televisor y seleccione en él el canal 3 o el 4. Ahora ponga el conmutador CH3/CH4 del panel trasero de la videograbadora en la posición correspondiente al canal seleccionado en el televisor.
- El reloj debe marcar la hora y la fecha correctas antes de ajustar el temporizador.
- Inserte un videocasete con su lengüeta de prevención de borrado en su lugar. (Si es necesario, rebobine o avance rápidamente la cinta hasta el punto donde desee iniciar la grabación.)
Evite la superposición de programas...
Puede darse el caso de que no sea ejecutado un programa. Cuando se superpongan programas:
- El programa que empieza más temprano tiene prioridad.
- Una vez terminado el programa temprano, los programas posteriores empezarán a ser grabados en orden.
1) Pulse el botón MENU para que aparezca el menú PROGRAMAR.
NOTA:
Si no ha ajustado el reloj todavía aparecerá "AJUSTE RELOJ". En este caso, siga los pasos [2] a [8] de "PUESTA EN HORA DEL RELOJ" de la página 42. Luego, prepare la grabación con temporizador.
2) El número de programa no establecido parpadea.
Pulse el botón PLAY/▲ o STOP/▼ hasta que aparezca el número del programa deseado. (Ejemplo: 1)
Luego, pulse el botón F.FWD/▶.
NOTA:
El número de programa 8 se utiliza para ajustar la grabación con temporizador del mismo día solamente. No puede seleccionar el
número 8 en el procedimiento de grabación automática con temporizador.
3) Para una grabación:
Confirme que se indique "NORMAL" y luego pulse el botón F.FWD/▶.
Para la grabación diaria:
Para grabar un programa de TV a la misma hora y en el mismo canal desde el lunes hasta el viernes.
Pulse el botón PLAY/▲ o STOP/▼ para indicar "DIARIO", y luego pulse el botón F.FWD/►.
Para la grabación semanal:
Para grabar un programa de TV a la misma hora y en el mismo canal todas las semanas.(Ejemplo: cada lunes en el canal 7 a las 5:00 PM) Pulse el botón PLAY/▲ o STOP/▼ para indicar "SEMANAL", y luego pulse el botón F.FWD/►.
- Podrá pasar al paso siguiente pulsando el botón F.FWD/► en los pasos [4] a [10].
- Podrá pasar al paso anterior pulsando el botón REW/◀ en los pasos [2] a [10].
4) Primero, pulse el botón PLAY/▲ o STOP/▼ hasta que aparezca el mes deseado.
(Por ejemplo: "05" para marzo)
A continuación, pulse el botón F.FWD/▶
Luego, pulse el botón PLAY/▲ o STOP/▼ hasta que aparezca el día deseado, y luego pulse el botón F.FWD/►. (Por ejemplo: "06" para sexto)
5) Pulse el botón PLAY/▲ o STOP/▼ hasta que aparezca la hora deseada. (Por ejemplo: 07)
A continuación, pulse el botón F.FWD/▶.
6) Pulse el botón PLAY/▲ o STOP/▼ hasta que aparezca el minuto deseado. (Por ejemplo: 30)
A continuación, pulse el botón F.FWD/▶
Luego, pulse el botón PLAY/▲ o STOP/▼ para indicar "AM" o "PM". (Por ejemplo: PM) Luego pulse el botón F.FWD/►.
7) Pulse el botón PLAY/▲ o STOP/▼ hasta que aparezca la hora deseada. (Por ejemplo: 08)
A continuación, pulse el botón F.FWD/▶.
8) Pulse el botón PLAY/▲ o STOP/▼ hasta que aparezca el minuto deseado. (Por ejemplo: 30)
A continuación, pulse el botón F.FWD/▶
Luego, pulse el botón PLAY/▲ o STOP/▼ para indicar "AM" o
"PM". (Por ejemplo: PM) Luego pulse el botón F.FWD/▶.
9) Pulse el botón PLAY/▲ o STOP/▼ hasta que aparezca el número de canal deseado. (Por ejemplo: 16)
A continuación, pulse el botón F.FWD▶.
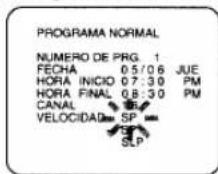
- Antes de introducir el número de canal, consulte "CONEXIONES DE ANTENA/CABLE" en la página 40 si tiene un sintonizador de TV por cable o un receptor de emisiones vía satélite.
10) Pulse el botón PLAY/▲ o STOP/▼ hasta que aparezca la velocidad de la cinta deseada. (Por ejemplo: SP)
11) Pulse el botón F.FWD/►. El programa 1 queda ahora completado.
- Para establecer otro programa, repita los pasos [2] a [11].
- Pulse el botón RESET/EXIT para volver al modo original.
12) Pulse el botón POWER para desconectar la alimentación. El indicador "☑" aparecerá en el visualizador digital de la videograbadora.
- Consulte "CONSEJOS PAPA LA GRABACIÓN CON TEMPO-RIZADOR" en la página 47 para obtener más información.
GRABACIÓN CON TEMPORIZADOR DEL MISMO DÍA
Usted podrá preparar la videograbadora para que inicie y finalice la grabación de un programa dentro de un periodo de 24 horas pulsando
simplemente los botones TODAY TIMER REC, START y END de la videograbadora.
- Esta función no puede realizarse con el mando a distancia.
- La alimentación de la videograbadora debe estar conectada para programarla.
- Conecte la alimentación del televisor y ajuste el canal del televisor al mismo canal de salida de vídeo establecido en el panel trasero de la videograbadora. (CH3 ó 4).
- Pulse el botón VCR/TV para que el indicador "VCR" se ilumina en el visualizador.
- El reloj debe mostrar la hora y la fecha correctas antes de ajustar el temporizador.
- Inserte una cinta de videocasete con la lengüeta de prevención de borrado en su lugar. (Si es necesario, rebobine o avance rápidamente la cinta hasta el punto donde desee iniciar la grabación.)
- La grabación con temporizador del mismo día controla el número de programa 8.
Evite que se superpongan los programas...
Cuando se superpongan programas se dará el caso de que uno de ellos se grabe parcialmente o tal vez no se grabe.
- El programa que empieza primero tiene prioridad. Una vez que termine el primer programa, los programas que se superpongan se irán grabando en secuencia.
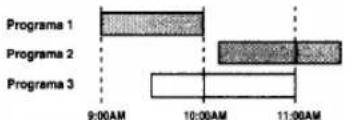
bar
| Program | Duration (AM) | |---|---| | Program 1 | 9:00 | | Program 2 | 10:00 | | Program 3 | 11:00 |- En el caso de que se ajuste la grabación con temporizador del mismo día, esta grabación tendrá prioridad sobre todas las demás, como se indica en la ilustración.
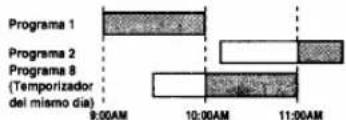
text_image
Programa 1 Programa 2 Programa 8 (Temporizador del mismo dia) 9:00AM 10:00AM 11:00AM1) Pulse el botón TODAY TIMER REC de la videograbadora.
2) Pulse el botón START de la videograbadora para poner la hora de inicio deseada.
3) Pulse el botón END de la videograbadora para poner la hora de finalización deseada.
4) Pulse el botón CHANNEL ▲ o ▼ de la videograbadora para poner el número del canal deseado.
- Consulte "CONEXIONES DE ANTENA/CABLE en la página 40 si usted dispone de un caja de televisión por cable o una caja de emisiones vías satélite antes de ajustar el número del canal.
5) Pulse el botón TAPE SPEED de la videograbadora para seleccionar la velocidad de cinta deseada (SP/SLP).
6) Pulse el botón TODAY TIMER REC para volver al modo original.
7) Pulse el botón POWER para apagar la videograbadora. El indicador "☑" se visualizará con la hora actual.
PARA CANCELAR UN PROGRAMA DE TEMPORIZADOR DEL MISMO DIA
- Mientras se ajuste un programa: pulse el botón STOP/EJECT de la videograbadora. Esta función no puede realizarse con el mando a distancia.
- Después de ajustarse un programa (la alimentación debe estar conectada): primero pulse el botón TODAY TIMER REC. Luego, pulse el botón STOP/EJECT de la videograbadora. Esta función no puede activarse con el mando a distancia.
- Mientras se está grabando: pulse el botón STOP/EJECT de la videograbadora. Esta función no puede activarse con el mando a distancia.
PARA COMPROBAR LA HORA DE INICIO/FINALIZACIÓN
1) Pulse el botón POWER para que aparezca el indicador "☑".
2) Pulse una vez el botón TODAY TIMER REC. La hora de inicio, la hora de finalización, el número del canal y la velocidad de la cinta aparecerán durante 2 segundos cada uno, y el aparato volverá al modo de espera del temporizador.
EXTENSIÓN DE PROGRAMAS DE TEMPORIZADOR
Para cambiar el horario de un programa de temporizador.
1) Conecte la alimentación. Luego, pulse el botón MENU.
2) Seleccione un número de programa que desee avanzar utilizando el botón PLAY/▲ o STOP/▼. Los detalles del programa seleccionado aparecen en la pantalla del televisor.
3) Pulse el botón RECORD del mando a distancia mientras un número de programa está parpadeando.
Cada vez que se pulse este botón, el tiempo de iniciar/finalizar la grabación avanzará por 10 minutos. Se puede establecer un máximo de 24 horas.
Cuando la grabación ya está en curso, el tiempo de finalizar la grabación avanzará por 10 minutos cada vez que se pulse el botón. Se puede establecer un máximo de 23 horas y 50 minutos a partir de la hora de inicio. En ese caso, la velocidad de grabación se fijará al modo SLP.
Si desea cancelar durante el ajuste, pulse el botón PAUSE/STILL del mando a distancia. El tiempo de grabación vuelve al modo original.
4) Pulse el botón RESET/EXIT para salir del menú de ajuste.
NOTAS:
- Se puede cambiar sólo el horario de un programa de temporizador.
- Cuando se pulse el botón PAUSE/STILL para cancelar el ajuste mientras la grabación ya está en curso, la grabación se realiza en el modo SLP.
CONSEJOS PARA LA GRABACIÓN CON TEMPORIZADOR
- Si hay una interrupción en la alimentación o la videograbadora se desenchufa durante más de 30 segundos, el ajuste del reloj y todos los ajustes del temporizador se perderán.
- Si se termina la cinta antes de la hora ajustada para la finalización, la videograbadora se pondrá inmediatamente en el modo de parada, expulsará el videocasete y desconectará la alimentación. El indicador "☑" parpadeará.
- Si no hay una cinta en la videograbadora o la lengüeta de protección contra el borrado ha sido quitada, el indicador "☑" parpadeará y la grabación con temporizador no se podrá hacer. Inserte una cinta grabada.
- El televisor que esté conectado a su videograbadora podrá encenderse o apagarse cuando la videograbadora esté en el modo de grabación con temporizador.
PARA CORREGIR UN PROGRAMA DE TEMPORIZADOR AUTOMÁTICO
1) Conecte la alimentación.
2) Repita los pasos [1] a [3] de la página 46.
3) Vaya al dígito que desee cambiar utilizando el botón F.FWD/▶ o REW/◀.
4) Introduzca los números correctos utilizando el botón PLAY/▲ o STOP/▼.
5) Pulse el botón RESET/EXIT para volver al modo original.
6) Pulse el botón POWER para volver al modo de espera del temporizador.
PARA PARAR UN PROGRAMA DE TEMPORIZADOR AUTOMÁTICO INICIADO
Pulse el botón STOP/EJECT de la videograbadora.
NOTA: El botón STOP del mando a distancia no funcionará en el modo de grabación automática con temporizador.
PARA CANCELAR O COMPROBAR LA HORA DE INICIO/FINALIZACIÓN
1) Conecte la alimentación. Luego, pulse el botón MENU.
2) Seleccione el número de programa que desee comprobar utilizando el botón PLAY/▲ o STOP/▼. Los detalles del programa seleccionado aparecen en la pantalla del televisor.
Podrá cancelar todo el programa pulsando el botón REW/◄.
3) Pulse el botón RESET/EXIT para volver al modo original.
RETORNO AUTOMÁTICO
Cuando terminen todas las grabaciones con temporizador (el indicador "☑" de la videograbadora parpadea), la videograbadora rebobinará la cinta automáticamente hasta el comienzo del (de los) programa(s) grabado(s).
OPERACIÓN MANUAL
Cuando terminen todas las grabaciones con temporizador, pulse primero el botón AUTO RETURN de la videograbadora. La videograbadora se encenderá y rebobinará la cinta.
- Si pulsa cualquier botón de la función de cinta antes de pulsar el botón AUTO RETURN, el retorno automático no se llevará a cabo. OPERACIÓN AUTOMÁTICA (del menú)
1) Pulse el botón POWER para encender la videograbadora.
2) Pulse repetidamente el botón MENU para que aparezca el menú AJUSTE VCR.
3) Pulse el botón PLAY/▲ o STOP/▼ para indicar "REBOB AUT".
4) Pulse el botón F.FWD/▶ para que [AUTO.] aparezca al lado de "REBOB AUT". Para salir de la programación de retorno automático, pulse el botón F.FWD/▶ para que [AUTO.] desaparezca del menú.
5) Pulse el botón RESET/EXIT para volver al modo original.
NOTA: Si queda algún programa de temporizador para una grabación, grabación diaria o grabación semanal, o después de la grabación mediante enlace automático con satélite, esta función no se activará.
Si programa varias grabaciones de temporizador pero desea activar el retorno automático cuando sólo algunas de las grabaciones han terminado, pulse primero el botón POWER para encender la videograbadora y luego pulse el botón AUTO RETURN. La videograbadora rebobinará la cinta hasta el principio de los programas.
PARA VER EL PROGRAMA GRABADO
Pulse el botón POWER para encender la videograbadora. Luego, pulse el botón PLAY.
ENLACE AUTOMÁTICO CON SATÉLITE UTILIZANDO SINTONIZADOR DE SATÉLITE (No suministrado)
Cuando la videograbadora reciba las señales procedentes de su sintonizador de emisiones vía satélite utilizando las tomas de entrada de audio/vídeo de su panel trasero, la videograbadora se encenderá ella misma y grabará. Luego, cuando no haya señales, la videograbadora se parará y se apagará ella misma automáticamente. Si su sintonizador de emisiones vía satélite tiene la EPG (guía electrónica de programas), usted podrá hacer grabaciones de temporizador con ella. Para conocer detalles, consulte el manual de instrucciones de su sintonizador de emisiones vía satélite. Además, necesitará seguir los pasos de abajo para la videograbadora.
- Conecte las tomas de entrada de audio/vídeo del panel trasero de la videograbadora a las tomas de salida de audio/vídeo del sintonizador de emisiones vía satélite.
- Pulse el botón TAPE SPEED de la videograbadora para seleccionar la velocidad de cinta deseada (SP/SLP).
- El reloj debe marcar la hora y la fecha correctas antes de ajustar el temporizador.
Notas para ver o grabar un programa usando su sintonizador de emisiones vía satélite conectado a la videograbadora:
- Si el programa de emisión tiene la protección contra copiado, usted tal vez no pueda grabar claramente.
- Cuando grabe un programa utilizando la característica de enlace automático con satélite, el comienzo (unos pocos segundos) de un programa tal vez no se grabe.
1) Inserte una videocinta con su lengüeta de protección contra el borrado en su lugar. Si es necesario, rebobine o avance rápidamente la cinta hasta el punto donde desee iniciar la grabación.
2) Ponga el programa que va a grabar en el sintonizador de emisiones vía satélite. Consulte el manual de instrucciones de su sintonizador de emisiones vía satélite.
3) Pulse el botón MENU hasta que aparezca el menú AJUSTE VCR.
4) Confirme que se señale a "ENLACE SAT.". Luego pulse el botón F.FWD/▶. La hora actual aparece al lado de "ENLACE SAT." en la pantalla del televisor.
- Si usted ponga la videograbadora inmediatamente en un modo de espera del enlace automático con satélite, pulse el botón F.FWD/▶ de nuevo, luego pase al paso 7.
- Si usted vea el programa del sintonizador de emisiones vía satélite hasta el tiempo de inicio para el enlace automático con satélite, pase al paso 5.
- Si usted no haya puesto todavía en hora el reloj, "AJUSTE RELOJ" aparece. En este caso, siga los pasos [2] a [8] de la página 42. Luego establezca la grabación con temporizador.
5) Pulse el botón PLAY/▲ o STOP/▼ hasta que aparezca la hora deseada (AM o PM). A continuación, pulse el botón F.FWD/►.
6) Pulse el botón PLAY/▲ o STOP/▼ hasta que aparezca el minuto deseado.
NOTA: Podrá pasar al paso anterior pulsando el botón REW/◄. 7) Pulse el botón F.FWD/►.
Después de algunos segundos, la videograbadora se apagará y el indicador "☑" de la videograbadora se encenderá.
- Para salir de un modo de espera del enlace automático con satélite, pulse el botón POWER para encender la videograbadora. En este caso, el ajuste del enlace automático con satélite se cancelará automáticamente.
- Cuando detenga una grabación del enlace automático con satélite mientras ésta se está realizando, pulse el botón STOP/EJECT de la videograbadora. En este caso, el ajuste del enlace automático con satélite se cancelará automáticamente.
- Existe la posibilidad de que no se realice correctamente una grabación cuando se superponga otra grabación con temporizador. Si el tiempo de inicio para el enlace automático con satélite coincide con una grabación con temporizador, la grabación con temporizador tendrá prioridad.
COPIADO DE UNA VIDEOCINTA
Podrá hacer copias de videocintas grabadas por amigos o familiares y disfrutar de ellas.
Advertencia: La grabación sin autorización de videocintas protegidas por derechos de autor puede infringir las leyes relacionadas con tales derechos.
Conecte la videograbadora(esta unidad) de edición (grabación), otra videograbadora fuente (reproducción) y su televisor utilizando el diagrama siguiente.
NOTA: Podrá utilizar las tomas de entrada de audio y vídeo del panel frontal de la grabadora de edición (grabación) en lugar de utilizar las tomas del panel trasero.
Consulte la figura 9 de la página 30.
1) Inserte una videocinta grabada en la videograbadora fuente (reproducción).
2) Inserte una videocinta virgen, o una sobre la que desee grabar, en la videograbadora de edición (grabación).
3) Pulse el botón TAPE SPEED de la videograbadora de edición (grabación) para seleccionar la velocidad de grabación deseada (SP/SLP).
4) Seleccione la posición "L1" o "L2" en la videograbadora de edición (grabación). Consulte la página 41, "Conexión a las tomas de entrada".
5) Pulse el botón REC de la videograbadora de edición (grabación).
6) Empiece a reproducir la cinta de la videograbadora fuente (reproducción).
- Para obtener los mejores resultados del copiado, utilice los controles del panel frontal de la videograbadora siempre que sea posible. El mando a distancia puede afectar a la operación de la videograbadora de reproducción.
- Utilice siempre cables de vídeo apantallados de alta calidad con conectores tipo RCA. Los cables de audio estándar no son recomendados.
- Podrá utilizar un reproductor de discos de vídeo, un receptor de emisiones vía satélite u otro componente de audio/vídeo con salidas A/V en lugar de la videograbadora de reproducción.
- Si la imagen y el color aparecen y desaparecen, puede que usted esté copiando una cinta de vídeo protegida contra el copiado.
PARA COMPROBAR LA GRABACIÓN
1) Encienda el televisor y seleccione en él el canal 3 o el 4. Ahora ponga el conmutador CH3/CH4 del panel trasero de la videograbadora en la posición correspondiente al canal seleccionado en el televisor.
2) Pulse el botón VCR/TV de la videograbadora de edición (grabación) para que el indicador "VCR" aparezca en el visualizador digital de la videograbadora.
VISUALIZACIÓN EN PANTALLA
NOTA: El indicador "VCR" de la videograbadora deberá estar encendido.
- Para comprobar el número del contador, la indicación del reloj y el número del canal, pulse el botón DISPLAY del mando a distancia. Cada vez que pulse el botón DISPLAY, la pantalla del televisor cambiará.
- Es normal que la visualización de estado (STOP, PLAY, etc.) y la visualización de velocidad de cinta (SP, LP (sólo reproducción) o SLP) desaparezcan después de 5 segundos.
VISUALIZADOR DIGITAL
Indicador PWR. (alimentación) - Se enciende cuando se conecta la alimentación.
Indicador ☑ - Se enciende cuando ha sido ajustada una grabación con temporizador o una grabación OTR. Parpadea si no hay una cinta insertada en la videograbadora aunque el temporizador esté ajustado.
Indicador de videocasete - Se enciende cuando hay un videocasete en la videograbadora.
Indicador VCR - Indica que la videograbadora está en la posición VCR.
Indicador REC - Se enciende cuando la videograbadora está en el modo de grabación. Parpadea cuando la grabación ha hecho una pausa.
Indicador de reloj/función/canal - Indica la hora actual (cuando el reloj está ajustado), y visualiza brevemente qué función de la videograbadora está siendo ejecutada. Indica el número de canal (cuando éste está ajustado).
FUNCIONES ESPECIALES
CONTADOR DE CINTA DE TIEMPO REAL
- El contador muestra el tiempo de grabación o reproducción transcurrido en horas, minutos y segundos. (El tiempo visualizado no cambiará durante las partes en blanco de la cinta.)
- La indicación "-" aparecerá cuando la cinta se rebobine más allá de "0:00:00" en el contador de cinta.
REBOBINADO AUTOMÁTICO
Cuando llegue el final de una cinta durante la grabación, la reproducción o el avance rápido, la cinta se rebobinará automáticamente hasta el principio. Después de terminar de rebobinarse la cinta, la videograbadora expulsará la cinta y se apagará automáticamente.
- La cinta no se rebobinará automáticamente durante la grabación con temporizador o la grabación de un toque.
- Cuando se active la memoria del contador, la cinta se rebobinará hasta M0:00:00 y la videograbadora se pondrá en el modo de parada.
CONTROL DE SU TELEVISOR O CONVERTIDOR DE TELEVISIÓN POR CABLE CON EL MANDO A DIS- TANCIA DE LA VIDEOGRABADORA
Su mando a distancia de la videograbadora debe poder controlar su televisor o convertidor de televisión por cable.
MANDO A DISTANCIA DEL TELEVISOR
PROGRAMACIÓN DEL MANDO A DISTANCIA PARA CONTROLAR SU TELEVISOR
Cerciórese...
- Encienda el televisor (cualquier canal está bien).
1) Pulse el botón VOLUME ▼ del mando a distancia.
2) Pulse el botón TV (no el botón VCR/TV) del mando a distancia.
3) Pulse el número correspondiente a la marca de su televisor mostrado en la tabla de abajo. Luego, pulse el botón ENTER.
Por ejemplo, si tiene una televisor RCA, pulse 0 y luego el botón 8. Luego, pulse el botón ENTER.
| Códigos de marcas de TV | |||
| FISHER | 09 | PHILIPS | 02 |
| FUNAI | 01 | QUASER | 07 |
| GE | 08 | RCA | 08 |
| GOLDSTAR | 10 | SAMSUNG | 11 |
| HITACHI | 03 | SANYO | 09 |
| MAGNAVOX | 02 | SHARP | 06 |
| PANASONIC | 07 | SONY | 05 |
| PANASONIC-GAOO | 07 | SYMPHONIC | 01 |
| PHILCO | 02 | TOSHIBA | 04 |
4) Apunte el mando a distancia a su televisor, luego pulse el botón CHANNEL ▲. Si el canal cambia en el televisor, usted habrá terminado.
NOTA:
- Si el canal del televisor no cambia todavía después de haber probado con todos los códigos de marcas de televisión listados arriba, existe la posibilidad de que usted no pueda programar este mando a distancia para que controle su televisor.
No existe ninguna garantía de que el mando a distancia de la videograbadora pueda controlar perfectamente su televisor.
Una vez programado el mando a distancia, tendrá que volver a programarlo cada vez que se agoten las pilas.
CONTROL DEL TELEVISOR
1) Pulse el botón TV. Luego pulse un botón para la función del tele- visor que usted desee.
(Ejemplo: pulse el botón TV y luego el botón CHANNEL ▲, la próxima emisora más alta aparecerá.)
Nota: Además, usted podrá cambiar también los canales en el televisor utilizando los botones de números. Si no puede cambiar los canales en el televisor utilizando los botones de números, pulse el botón ENTER después de haber pulsado los botones de números. Esto puede hacer que cambien los canales en el televisor.
2) Pulse el botón VCR para volver a operar su videograbadora con el mando a distancia.
MANDO A DISTANCIA DEL CONVERT- IDOR DE TELEVISIÓN POR CABLE
Si usted tiene un convertidor de televisión por cable, probablemente deseará programar el mando a distancia de su videograbadora para cambiar fácilmente los canales. El proceso es el mismo que para programar el mando a distancia para controlar su televisor.
PROGRAMACIÓN DEL MANDO A DISTANCIA PARA QUE, CONTROLE SU CONVERTIDOR DE TELEVISION POR CABLE
Cerciórese...
- Encienda el convertidor de televisión por cable. (cualquier canal está bien)
1) Pulse el botón VOLUME ▼ del mando a distancia.
2) Pulse el botón CABLE del mando a distancia.
3) Pulse el número correspondiente a la marca de su convertidor de televisión por cable mostrado en la tabla de abajo. Luego, pulse el botón ENTER.
Por ejemplo, si tiene un convertidor de televisión por cable HAMLIN, pulse 0 y luego el botón 6. Luego, pulse el botón ENTER.
| Códigos de marcas de convertidor de televisión por cable | |
| HAMLIN | 06 |
| JERROLD | 01, 02, 03 |
| OAK | 08 |
| PANASONIC | 05 |
| SCIENTIFIC ATLANTA | 04 |
| TOCOM | 07 |
4) Apunte el mando a distancia a su convertidor de televisión por cable, y luego pulse el botón CHANNEL ▲. Si el canal cambia en el convertidor de televisión por cable, usted habrá terminado.
NOTA:
- Si el canal del convertidor de televisión por cable no cambia todavía después de haber probado con todos los códigos de marcas de convertidor de televisión por cable listados arriba, existe la posibilidad de que usted no pueda programar este mando a distancia para que controle su convertidor de televisión por cable.
No existe ninguna garantía de que el mando a distancia de la videograbadora pueda controlar perfectamente su convertidor de televisión por cable.
Una vez programado el mando a distancia, tendrá que volver a programarlo cada vez que se agoten las pilas.
CONTROL DEL CONVERTIDOR DE TELEVISIÓN POR CABLE
1) Pulse el botón CABLE. Luego pulse un botón para la función de televisión por cable que usted desee.
(Ejemplo: pulse el botón CABLE y luego el botón CHANNEL ▲, la próxima emisora más alta aparecerá.)
Nota: Además, usted podrá cambiar también los canales en el convertidor de televisión por cable utilizando los botones de números. Si no puede cambiar los canales en el convertidor de televisión por cable utilizando los botones de números, pulse el botón ENTER después de haber pulsado los botones de números. Esto puede hacer que cambien los canales en el convertidor de televisión por cable.
2) Pulse el botón VCR para volver a operar su videograbadora con el mando a distancia.
GUÍA PARA LOCALIZACIÓN Y SOLUCIÓN DE PROBLEMAS
Si ha seguido las instrucciones de este manual y tiene dificultades al utilizar su videograbadora, localice el PROBLEMA en la columna de la izquierda de la tabla de abajo. Consulte la columna MEDIDA CORRECTIVA correspondiente para solucionar el problema.
| PROBLEMA | MEDIDA CORRECTIVA |
| No se enciende la unidad. | Asegúrese de que el cable de alimentación esté conectado a una toma de CA.Asegúrese de que la alimentación esté conectada. |
| No se puede grabar con temporizador. | Asegúrese de que la grabación con temporizador esté correctamente establecida.Asegúrese de que la alimentación esté desconectada.Asegúrese de que el reloj de la videograbadora esté bien ajustado. |
| No se puede activar el modo de grabación. | Asegúrese de que el videocasete tenga una lengüeta de prevención de borrado. En caso de ser necesario, tape el agujero con cinta adhesiva. |
| La imagen de reproducción tiene ruido. | Ajuste el control de seguimiento para obtener una imagen mejor utilizando el botón CHANNEL ▲ o ▼ de la videograbadora. |
| No hay imagen de reproducción, pero el sonido está bien. | Es necesario limpiar las cabezas. Consulte "LIMPIEZA AUTOMÁTICA DE LAS CABEZAS" abajo. |
| No hay imagen o ésta es de mala calidad durante la reproducción. | Ponga su televisor en el modo de la videograbadora y/o pulse el botón VCR/TV para que el indicador "VCR" aparezca en el visualizador.Haga la sintonización fina en su televisor. |
| No pueden verse los programas de TV. | Vuelva a comprobar las conexiones ANT. IN y ANT. OUT. Consulte la página 40.Ponga su televisor en el modo del televisor y/o pulse el botón VCR/TV para que el indicador "VCR" desaparezca del visualizador. |
| El mando a distancia por infrarrojos no controla la unidad. | Asegúrese de que el cable de alimentación de CA esté conectado a una toma de CA.Compruebe las pilas del mando a distancia.Pulse el botón VCR del mando a distancia y luego pruebeotra. |
| La imagen o el color aparecen y desaparecen gradualmente al copiar una videocinta. | Usted no puede copiar una videocinta con derechos de autor. Se ahora encuentra con la protección contra el copiado. |
| Los botones de la videograbadora y del mando a distancia no funcionan después de ajustar una grabación utilizando un sintonizador de satélite. | Desenchufe el cable de alimentación de la videograbadora durante unos segundos, y entonces enchufe el cable de alimentación de nuevo. La grabación que se ha ajustado con el sintonizador de satélite se hará como previsto. Tenga la videograbadora apagada para la grabación. |
MANTENIMIENTO
SERVICIO
Si no funciona su videograbadora, no intente corregir el problema usted mismo. No hay partes en el interior de unidad que el usuario deba reparar. Apague la videograbadora, desenchufe el cable de alimentación y llame nuestra línea de ayuda al 1-800-968-3429 para localizar un centro de servicio autorizado.
LIMPIEZA DEL EXTERIOR
- Limpie el panel frontal y otras superficies exteriores de la videograbadora con un paño suave humedecido en agua templada y bien escurrido.
- Nunca utilice un disolvente o alcohol. No rocíe líquido insecticida cerca de la videograbadora. Tales productos químicos pueden estropear y descolorar las superficies expuestas.
LIMPIEZA AUTOMÁTICA DE LAS CABEZAS
- Las cabezas se limpian automáticamente, para que usted pueda disfrutar de una imagen clara, al insertar o extraer un videocasete.
- La imagen de reproducción puede emborronarse o interrumpirse mientras que la recepción de un programa de TV es clara. La suciedad acumulada en las cabezas de vídeo después de largos periodos de utilización o las videocintas de alquiler o desgastadas pueden causar este problema.
Si aparece una imagen con franjas o efecto de nieve durante la reproducción, las cabezas de su videograbadora tal vez necesiten ser limpiadas.
- Acuda a su tienda de productos de audio/vídeo y adquiera un limpiador de cabezas de vídeo VHS de buena calidad.
- Si el limpiador de cabezas de vídeo no soluciona el problema, llame nuestra línea de ayuda al 1-800-968-3429 para localizar un centro de servicio autorizado.
NOTAS:
- Recuerde leer las instrucciones del limpiador de cabezas antes de utilizarlo.
- Limpie solamente las cabezas cuando se produzca algún problema.
- Diseños y especificaciones están sujetos a cambios sin previo aviso y sin obligación legal de nuestra parte.
- Si hay cualquiera diferencia entre los idiomas, el idioma implícito es inglés.
SYLVANIA
LIMITED WARRANTY
Funai Corporation will exchange or repair this product, at its option, in the event of defect in materials or workmanship as follows:
EXCHANGE DURATION:
1-90 DAYS: FUNAI CORPORATION will exchange for a new unit without change for a period of ninety (90) days from the date of original retail purchase.
91-365 DAYS: FUNAI CORPORATION will exchange for a factory-service-to-new-condition unit for a charge of \$49.00 for the period of ninety one (91) days to three hundred sixty five (365) days from the date of original retail purchase.
REPAIR DURATION:
LABOR: FUNAI CORPORATION will provide the labor without charge for a period of ninety (90) days from the date of original retail purchase.
PARTS: FUNAI CORPORATION will provide parts to replace defective parts without charge for a period of one (1) year from the date of original retail purchase. Two (2) years for Picture Tube. Certain parts are excluded from this warranty.
LIMITS AND EXCLUSIONS:
This warranty is extended only to the original retail purchaser. A purchase receipt or other proof of original retail purchase will be required together with the product to obtain exchange or service under this warranty.
This warranty shall not be extended to any other person or transferee.
This warranty is void and of no effect if any serial numbers on the product are altered, replaced, defaced or missing. This SYLVANIA Limited warranty applies only to product purchased and used in the United States.
This warranty only covers failures due to defects in material or workmanship, which occur during normal use. It does not cover damage which occurs in shipment, or failures which are caused by repairs, alterations, or parts not supplied by FUNAI CORPORATION, or damage which results from accident, misuse, abuse, mishandling, misapplication, alteration, faulty installation, improper maintenance, commercial use such as hotel, rental or office use of this product, or damage which results from fire, flood, lightning or other acts of God.
THIS WARRANTY DOES NOT COVER PACKING MATERIALS, ANY ACCESSORIES (EXCEPT REMOTE CONTROL UNITS), ANY COSMETIC PARTS, COMPLETE ASSEMBLY PARTS, DEMONSTRATION OR FLOOR MODELS.
FUNAI CORPORATION AND ITS REPRESENTATIVES OR AGENTS SHALL IN NO EVENT BE LIABLE FOR ANY GENERAL, INDIRECT OR CONSEQUENTIAL DAMAGES ARISING OUT OF OR OCCASIONED BY THE USE OF OR THE INABILITY TO USE THIS PRODUCT. THIS WARRANTY IS MADE IN LIEU OF ALL OTHER WARRANTIES INCLUDING THE WARRANTY OF MERCHANTABILITY, AND FITNESS FOR A PARTICULAR PURPOSE, THAT ARE HEREBY DISCLAIMED BY FUNAI CORPORATION AND ITS REPRESENTATIVES OR AGENTS IN THE UNITED STATES.
ALL WARRANTY INSPECTIONS AND REPAIRS MUST BE PERFORMED BY A FUNAI AUTHORIZED CENTER. THIS WARRANTY IS VALID WHEN THE PRODUCT IS DELIVERED PREPAID TO A FUNAI AUTHORIZED SERVICE FACILITY.
PRIOR TO RETURNING THIS PRODUCT TO THE FACTORY SERVICE CENTER FOR REPAIR, CONTACT THE FUNAI SERVICE DEPARTMENT TO RECEIVE A RETURN FOR REPAIR AUTHORIZATION. ANY POSTAGE, INSURANCE, AND SHIPPING COSTS INCURRED IN PRESENTING PRODUCT FOR REPAIR ARE THE SHIPPER'S RESPONSIBILITIES.
CAREFULLY PACK WITH PROPER PACKING MATERIALS. PREFERABLY IN THE ORIGINAL CARTON OR PACKING MATERIALS AND CARTON OBTAINED FROM FUNAI CORPORATION.
ENCLOSE WRITTEN DOCUMENTATION DETAILING THE COMPLAINT. PLACE INSIDE THE CARTON OR IN A PACKING SLIP ENVELOPE ON THE OUTSIDE OF THE CARTON.
A COPY OF THE ORIGINAL RETAIL PURCHASE RECEIPT MUST ACCOMPANY THE PRODUCT. IF NO PROOF OF PURCHASE IS INCLUDED, THE WARRANTY WILL NOT BE HONORED.
IMPORTANT:
THIS LIMITED WARRANTY GIVES YOU SPECIFIC LEGAL RIGHTS, YOU MAY HAVE OTHER RIGHTS THAT VARY FROM STATE TO STATE, IF AT ANY TIME DURING THE WARRANTY PERIOD YOU ARE UNABLE TO OBTAIN SATISFACTION WITH THE EXCHANGE OR REPAIR OF THIS PRODUCT, PLEASE CONTACT FUNAI CORPORATION.
ATTENTION:
FUNAI CORPORATION RESERVES THE RIGHT TO MODIFY ANY DESIGN OF THIS PRODUCT WITHOUT PRIOR NOTICE.
For information about your product, or for information on how to exchange or repair your product, telephone or write to the following:
FUNAI CORPORATION
Customer Service
100 North Street; Teterboro, NJ 07608
Telephone (800)968-3429