
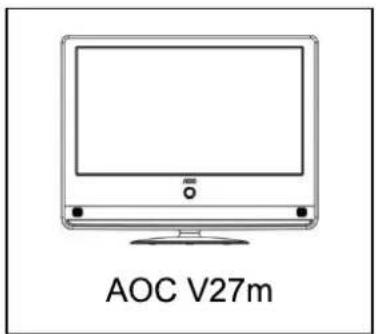
V27m - TV AOC - Gratis bruksanvisning och manual
Hitta enhetens manual gratis V27m AOC i PDF-format.

Användarfrågor om V27m AOC
0 fråga om denna apparat. Svara på dem du kan eller ställ din egen.
Ställ en ny fråga om denna apparat
Ladda ner instruktionerna för din TV i PDF-format gratis! Hitta din manual V27m - AOC och ta tillbaka ditt elektroniska enhet i hand. På denna sida publiceras alla dokument som behövs för att använda din enhet. V27m av märket AOC.
BRUKSANVISNING V27m AOC
V27m
27" Multimedia Function Display Operating Instructions
natural_image
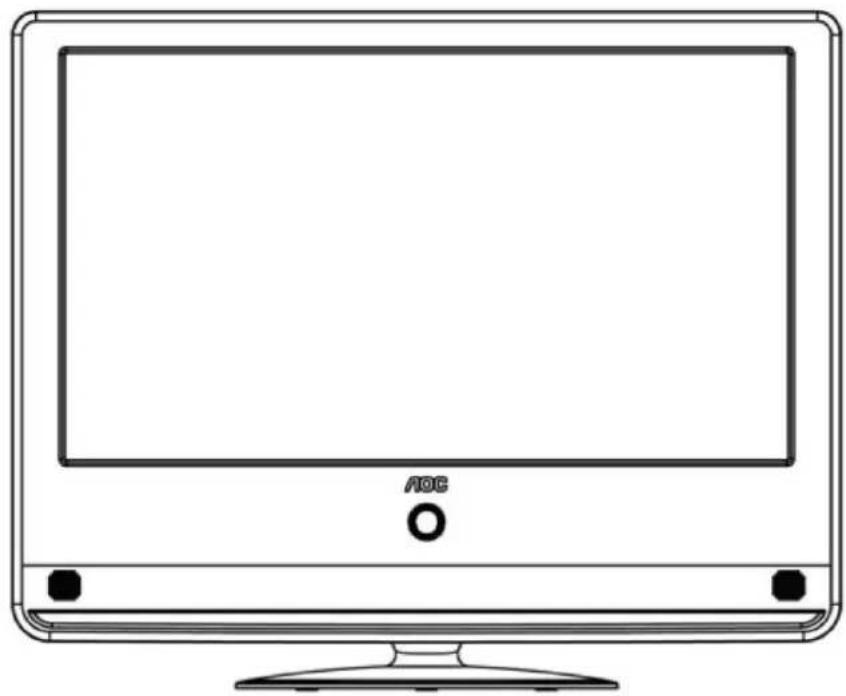
Line drawing of a flat-screen monitor with AOC logo and mounting base (no text or symbols on screen)Thank you for choosing an AOC LCD Monitor.
It is recommended that you read the contents of this manual carefully before installing and turning on the monitor. Please keep this manual for future reference.
Note: Our products are under continuous development and are subject to change without notice.
* The monitor may not be an exact match to the illustrations in this manual. But the monitor is the standard.
Operating Instructions
Content
Important safety notes ....5
Read these notes before operating the device. 5
Connection and preparation of the monitor....7
Parts list....7
Installation of the base....8
Disassembly of the base....8
Stand the monitor on a stable surface....9
Installing the monitor on the wall 10
Power connection....10
Turning the LCD Monitor On or Off....11
Control Panel and Interface 12
Side panel....12
Source Interface 13
Video/S-Video Input:....14
Auxiliary Component Input:....15
HDMI Input: 15
PC Signal and PC Audio Input: 16
Earphone Jack:....16
Using the Menu....17
Source Menu 17
Video Settings 18
Audio Settings (applicable to all modes)....19
Function settings 20
Tips....21
Product Specifications ....22
Supported Resolution ......23
Troubleshooting....25
Glossary 26
China RoHS Regulation Marking Requirements....27
Important safety notes
Read these notes before operating the device.
-
Read these notes.
-
Follow these notes.
-
Heed all warnings.
-
Operate as per instructions.
-
Do not use this apparatus near water (for example, near the bathtub, kitchen sink, washbasin, washing machine, in a humid basement, or near the swimming pool). If the unit is accidentally splashed, please disconnect the power plug immediately and contact the authorized distributor.
-
Only use a dry cloth for cleaning. Always unplug the monitor power cable before cleaning.
-
Do not allow any hard object to touch the screen as this may cause permanent damage.
-
Do not obstruct the vents and install the device in accordance with the manufacturer's instructions.
-
Do not install the device near heat sources such as electric heaters, radiators, ovens or any other heat source including amplifiers.
-
Always use a polarized plug, or a plug with a ground connection. Polarized plugs have one wide and one narrow flat pin. Grounded plugs have two flat pins and one round grounding pin. The wider flat pin and round grounding pin are designed for safety. If the provided plug does not fit your outlet socket, consult an electrician for a replacement of the obsolete socket.
-
Protect the power cord from being trodden upon or pinched, particularly near the plug and the point where it exits the apparatus.
-
Only use accessories specified by the manufacturer.
-
Use only with a cart, stand, tripod, bracket, or table specified by the manufacturer, or supplied with the apparatus. When a cart is used, use caution when moving the cart/apparatus combination to avoid the device being tipped over.

-
Use the correct power source as indicated on the label. Consult the distributor or the local power company if you are not sure about the power provided to your home.
-
Unplug the monitor during thunderstorms or if it will not be used for a long time.
-
All servicing must be carried out by professional service personnel. Servicing is required if the device does not work normally, or has been damaged in some way. For example, if the power cord has been damaged, if liquid has been spilled on it, it has been exposed to rain or moisture, or it has been dropped.
-
The product may contain lead or mercury. Environmental factors should be taken into account when you dispose these materials. For disposal or recycling information, contact the local authority or Electronic Industries Alliance: www.eiae.org.
-
Damage requiring servicing: Consult a professional service technician under any of the following circumstances:
A. The power cord or plug has been damaged.
B. Foreign objects or liquid have entered the monitor.
C. The monitor has been rained on.
D. Operation seems to be abnormal or has changed significantly.
E. The monitor has been dropped or its casing has been damaged.
-
Dimensions/stability: All monitors must conform to recommended international standards in terms of casing design dimensions and stability. Do not push the monitor on the front of the casing or at the top, it may overturn and be damaged. Do not put electronic devices or toys on the casing, these may fall and be damaged, or cause personal injury.
-
Foreign articles and liquid: Do not allow foreign articles or liquid to enter the casing through the ventilation slots.
Connection and preparation of the monitor
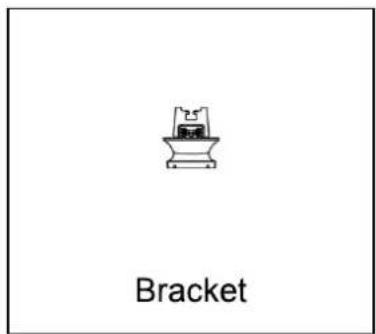
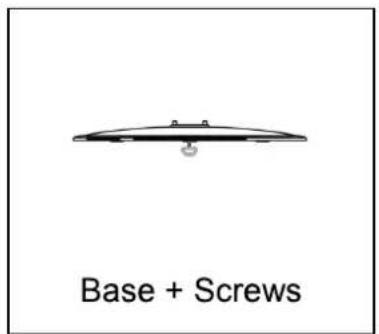
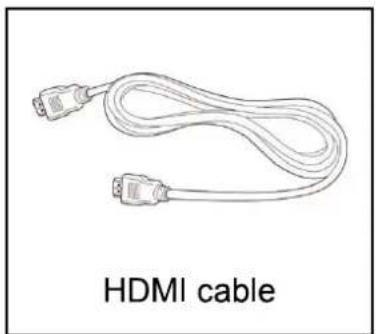
Parts list
natural_image
Line drawing of a power cord with two connectors and a terminal plug (no text or symbols)
natural_image
Line drawing of a VGA cable with two connectors and connecting wires (no text or symbols on the diagram itself)

natural_image
Line drawing of a HDMI cable with two connectors (no text or symbols on the cable itself)
natural_image
Line drawing of a audio cable with two leads (no text or symbols on the cable itself)
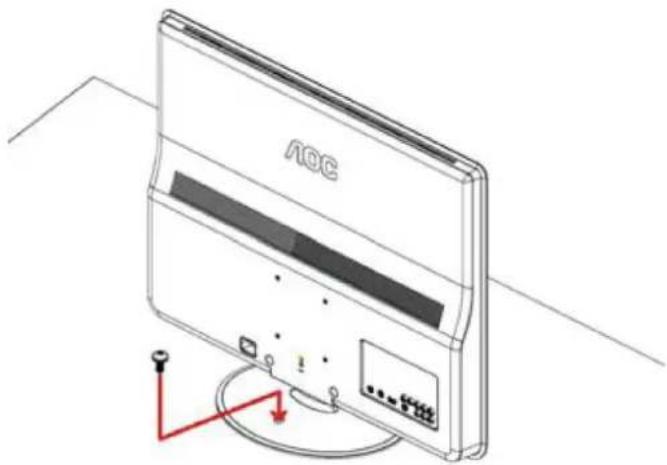
Connection and preparation of the monitor Installation of the base
Take the monitor and the base out of the carton and assemble them, as shown in the figure below:
- Place the monitor face down on a soft cloth or pad on the table. Tighten the screws in the base to secure the base and bracket.
- Inset the base into the hole on the bottom of the monitor.
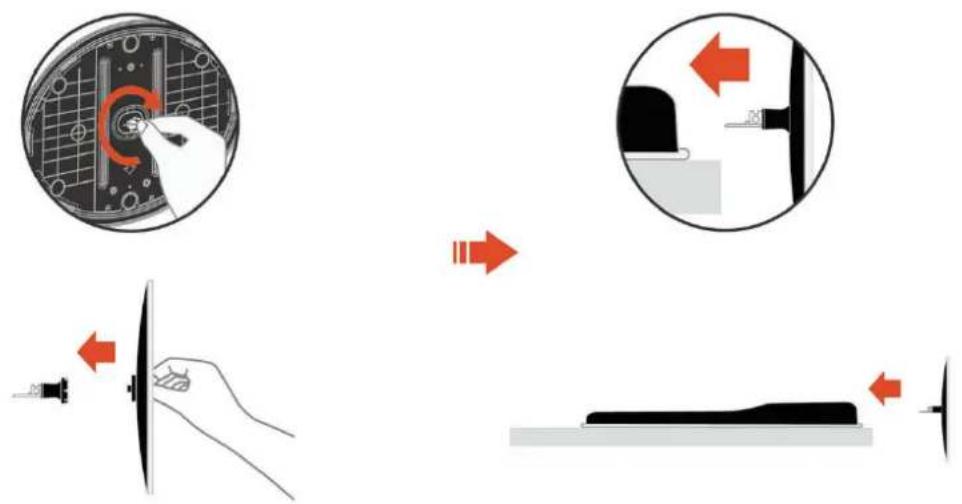
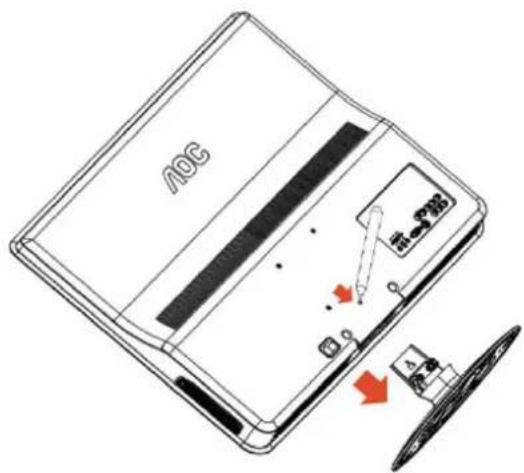
Disassembly of the base
Inset a screw driver into the base mounting hole, press it downwards, and pull out the base.
Connection and preparation of the monitor
Stand the monitor on a stable surface.
- Choose a position for the monitor that has good ventilation and make sure the ventilation holes on the cover are clear of obstruction.
- Ensure the LCD monitor has 15cm of clearance on all sides to provide proper ventilation.
- Do not place the LCD monitor near a radiator or other powered devices.
- Do not use open flames, such as candles, near the monitor to prevent accidents.
- Keep the monitor away from high temperatures, direct sunlight, rain or moisture.
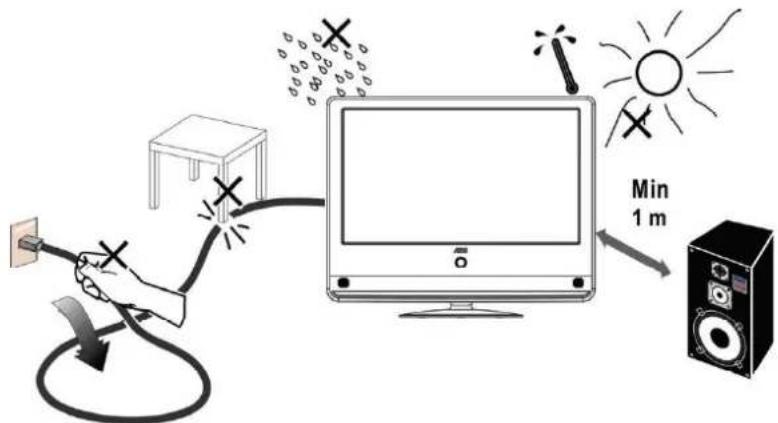
- To prevent the monitor from tipping over secure it to the table as shown below.
natural_image
Isometric line drawing of a wall-mounted air conditioner unit with a red indicator lights and a label 'AOC' on the cover (no text beyond branding)Connection and preparation of the monitor Installing the monitor on the wall
The monitor conforms to the wall-mounted VESA standard. Please refer to the instructions for product specifications and details.
To ensure your own safety and that of the monitor, use only the specified wall-mounting bracket. Please note that wall mounting must be done by a professional technician.
When the monitor is mounted on a wall it must be possible to access the connectors at the back. At least 6cm of clearance will be needed between the monitor and the wall to ensure that there is enough space to insert the connection cables.
It is important that air should flow freely through the ventilation slots wherever the monitor is installed.
Do not install the monitor in a confined space.
Power connection
Insert one end of the power cord into the "Power Input" socket on the back and plug the other end into a 220V power socket.
The monitor consumes a small amount of power in standby mode.
But it should be unplugged from the power socket if it is not to be used for some time.
Turning the LCD Monitor On or Off
1. To turn on:
Connect the AC power to the monitor. Press the power button on the control panel, and the indicator light will turn blue. After a few seconds the monitor will be operating normally.
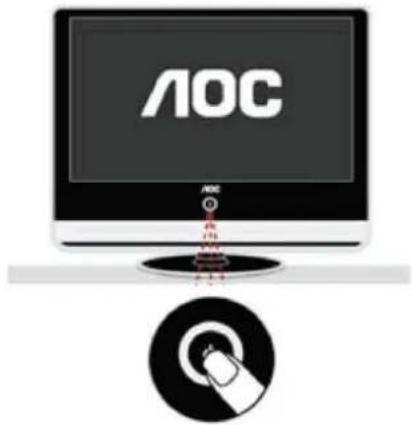
2. To turn off:
Press the power button on the control panel, to turn the monitor off.
3. Indicator status:
①. In normal operating mode, the monitor indicator light will be blue.
②. In standby mode, the light will be orange.
③. In power-off mode, the monitor indicator light will flash blue three times and then go off.
Control Panel and Interface
Side panel

Signal Source: Press button to enter the interface of signal source selections and press again to select the source needed. when menu is unavailable on display.Once menu occur, this key is used for confirmation purpose and select to confirm target you needed.
Menu: Press to enter or exit the menu.
▲ ▼:
When the menu appears on the screen, use these two buttons to select the desired option.
Volume:
With the menu displayed on the screen, press these two buttons to select the desired option. When no OSD menu is displayed on the screen, the controls will adjust sound volume.
Source Interface
A device with multiple sources can be connected to your monitor. The figure below shows how to connect.
Tip: If you want to wall mount your monitor, all cables must be connected to the monitor connectors first.
Whenever an external device is connected to your monitor, please make sure the monitor is turned off.
When connecting an external device, connect the cable to the connector with the same color.
Source Interface
Video/S-Video Input:
Connect the Video or S-Video cable to the DVD player, CD player, Video Recorder, or Camcorder, etc.
Audio Input: Connect the audio sources (e.g., computer, DVD player, CD player, Video Recorder, or Camcorder) to the Audio Input connector.
Tip: Audio is shared between S-Video and Video.

flowchart
graph TD
    A["AV"] --> B["Video - L - R"]
    B --> C["Analog/Analog Link"]
    C --> D["Video - L - R"]
    D --> E["Analog/Analog Link"]
    E --> F["Video - L - R"]
    F --> G["Analog/Analog Link"]
    G --> H["Video - L - R"]
    H --> I["Analog/Analog Link"]
    I --> J["Video - L - R"]
    J --> K["Analog/Analog Link"]
    K --> L["Video - L - R"]
    L --> M["Analog/Analog Link"]
    M --> N["Video - L - R"]
    N --> O["Analog/Analog Link"]
    O --> P["Video - L - R"]
    P --> Q["Analog/Analog Link"]
    Q --> R["Video - L - R"]
    R --> S["Analog/Analog Link"]
    S --> T["Video - L - R"]
    T --> U["Analog/Analog Link"]
    U --> V["Video - L - R"]
    V --> W["Analog/Analog Link"]
    W --> X["Video - L - R"]
    X --> Y["Analog/Analog Link"]
    Y --> Z["Video - L - R"]
    Z --> AA["Analog/Analog Link"]
    AA --> AB["Video - L - R"]
    AB --> AC["Analog/Analog Link"]
    AC --> AD["Video - L - R"]
    AD --> AE["Analog/Analog Link"]
    AE --> AF["Video - L - R"]
    AF --> AG["Analog/Analog Link"]
    AG --> AH["Video - L - R"]
    AH --> AI["Analog/Analog Link"]
    AI --> AJ["Video - L - R"]
    AJ --> AK["Analog/Analog Link"]
    AK --> AL["Video - L - R"]
    AL --> AM["Analog/Analog Link"]
    AM --> AN["Video - L - R"]
    AN --> AO["Analog/Analog Link"]
    AO --> AP["Video - L - R"]
    AP --> AQ["Analog/Analog Link"]
    AQ --> AR["Video - L - R"]
    AR --> AS["Analog/Analog Link"]
    AS --> AT["Video - L - R"]
    AT --> AU["Analog/Analog Link"]
    AU --> AV["Video - L - R"]
    AV --> AW["Analog/Analog Link"]
    AW --> AX["Video - L - R"]
    AX --> AY["Analog/Analog Link"]
    AY --> AZ["Video - L - R"]
    AZ --> BA["Analog/Analog Link"]
    BA --> BB["Video - L - R"]
    BB --> BC["Analog/Analog Link"]
    BC --> BD["Video - L - R"]
    BD --> BE["Analog/Analog Link"]
    BE --> BF["Video - L - R"]
    BF --> BG["Analog/Analog Link"]
    BG --> BH["Video - L - R"]
    BH --> BI["Analog/Analog Link"]
    BI --> BJ["Video - L - R"]
    BJ --> BK["Analog/Analog Link"]
    BK --> BL["Video - L - R"]
    BL --> BM["Analog/Analog Link"]
    BM --> BN["Video - L - R"]
Source Interface
Auxiliary Component Input:
Connect the auxiliary source audio and video (e.g., computer, DVD player, CD player, Video Recorder, or Camcorder) to the Component Input connector.
flowchart
graph LR
    A["Input Image: Y Pb Pr Component Video Input"] --> B["Component Video Input"]
    B --> C["Output Audio"]
    C --> D["Output Audio"]
HDMI Input:
Connect the HDMI source (e.g., computer, DVD player, CD player, Video Recorder, or Camcorder) to the HDMI Input connector.
flowchart
graph LR
    A["HDMI"] --> B["HD Multimedia Interface"]
    B --> C["Server"]
    C --> D["HDMI"]
    C --> E["HDMI"]
Source Interface
PC Signal and PC Audio Input:
Connect the PC to the PC input connector on the back of the monitor with a VGA cable. Also connect the audio cable between PC Audio Input of the monitor and the PC audio connector.
Earphone Jack:
Earphones can be connected to the Earphone jack.
flowchart
graph LR
    A["PC"] --> B["D-SUB"]
    B --> C["Interface Interface"]
    C --> D["Device 1"]
    C --> E["Device 2"]
    C --> F["Device 3"]
    D --> G["User Interface"]
    E --> H["User Interface"]
    F --> I["User Interface"]
Using the Menu
- Press the Menu button to display the menu.
- Select the menu option to be adjusted using the Up or Down key.
- Enter the submenu by pressing the VOL Up key. Enable or adjust the function selected by pressing the VOL Up and Down key. The selected option will be highlighted.
- Press the Menu button again to exit the menu.
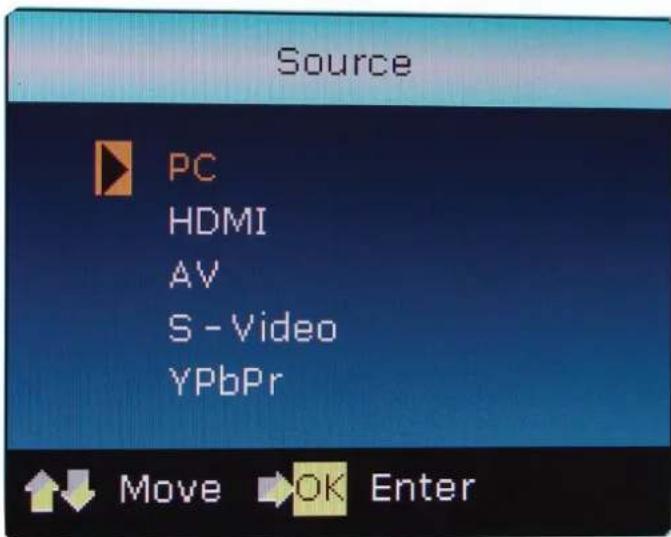
Source Menu
Press Source button to enter the Source menu, including PC, HDMI, Video, S-video, Component.
Using the Menu
Video Settings
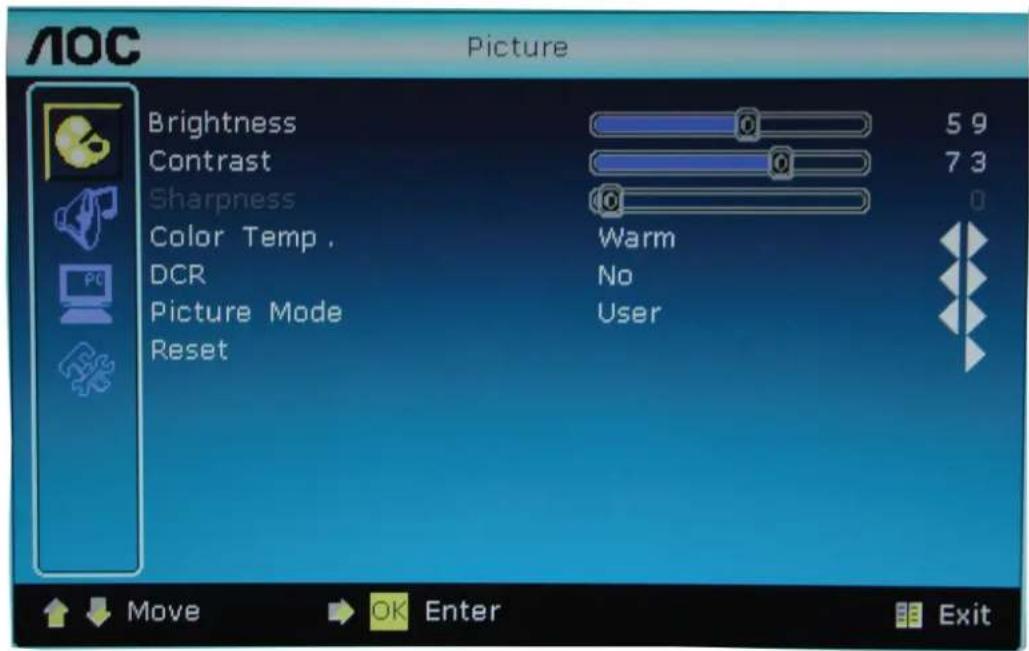
| Brightness | This adjusts the brightness of the screen backlight. The adjustment range is between 0 and 100. |
| Contrast | This adjusts the screen contrast. The adjustment range is between 0 and 100. |
| Color Saturation | This adjusts the screen color intensity. The adjustment range is between 0 and 100. This control is not available in PC and Component modes. |
| Sharpness | This adjusts the sharpness of the picture. The adjustment range is between 0 and 100. |
| Color | This option provides four color temperature settings: Normal, Warm, Cold, and User Setting. |
| Temperature | |
| DNR | This control is not available in PC mode. |
| Image Mode | This option provides four settings: Soft, Standard, Vivid, and User Setting. |
| DCR | Enable/disable Dynamic Contrast Ratio. |
| Reset | Restore the video settings to factory mode. |
Using the Menu
Audio Settings (applicable to all modes)
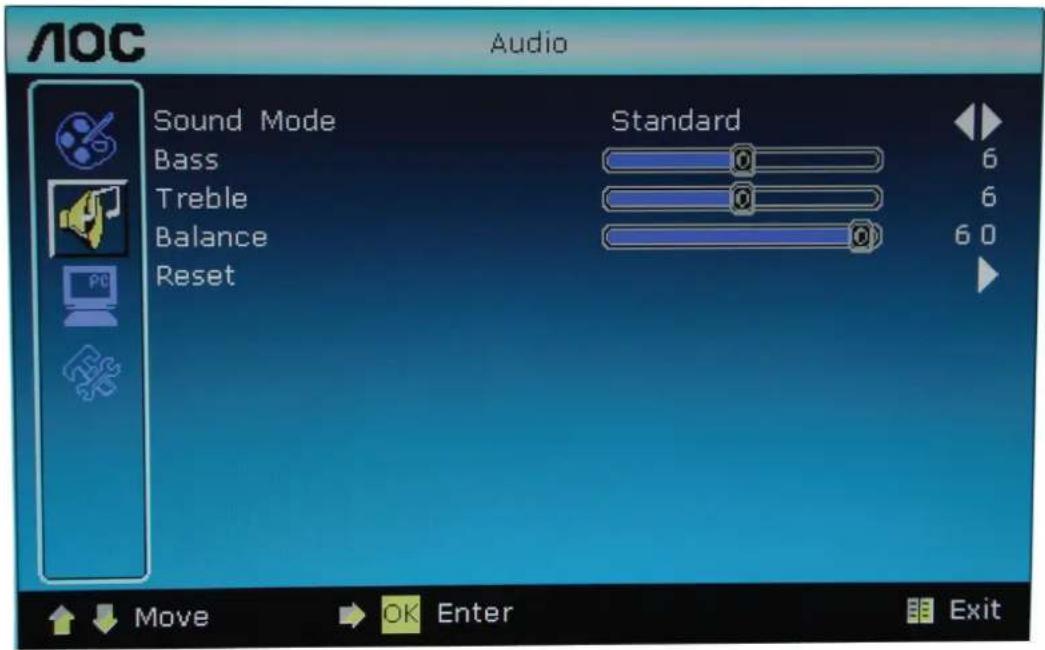
Sound Quality Switches between the five audio modes.
Bass This is used to adjust the bass strength.
Treble This is used to adjust the treble strength.
Equalizer The sound adjustment range is 0 to 60. During adjustment from 30 to 0, the sound from the right channel will gradually decrease until it disappears. During adjustment from 30 to 60, the sound from the left channel will gradually decrease until it disappears.
Reset Restore the audio settings to factory mode.
Using the Menu
Function settings
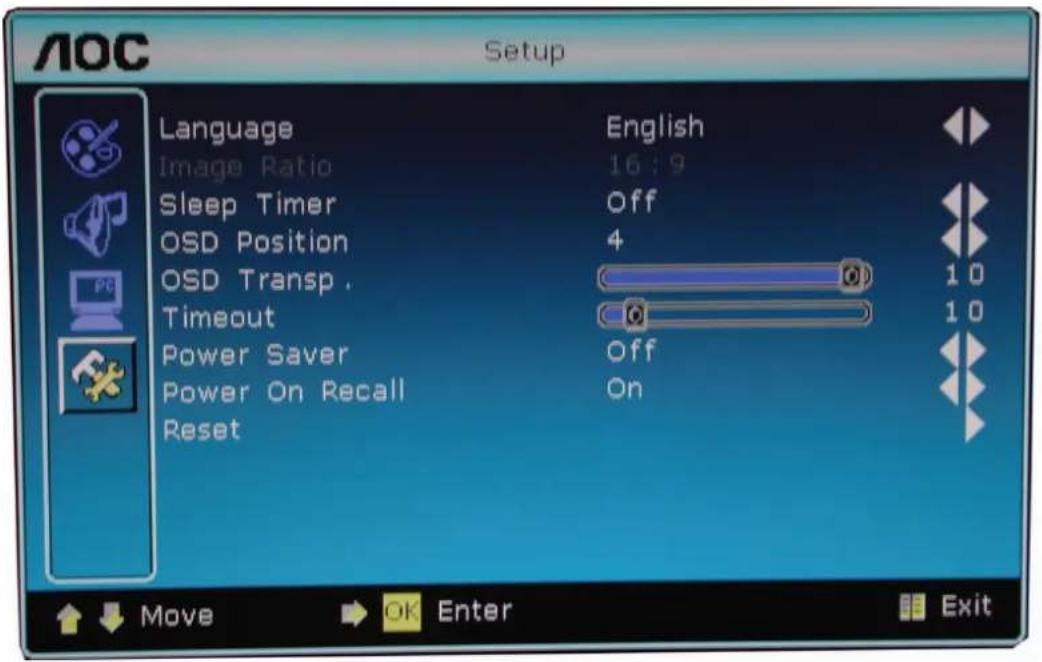
| Menu Language | This sets the language used for the OSD. There are 24 available languages including English and Simplified Chinese. |
| Aspect Ratio | 4:316:9Movie (This control is not available in PC mode.)Panorama (This control is not available in PC mode.) |
| Sleep Timer | This sets the interval before your monitor will automatically enter standby mode. |
| OSD Position | This changes the OSD menu display position with 9 options available. |
| OSD Transparency | This adjusts the transparency of the OSD menu. The adjustment range is between 0 and 100. |
| Display Time | This adjusts the display time (in seconds) of the OSD menu.The adjustment range is between 0 and 60. |
| Power Saving | Enable/disable Power Saving. |
| Power-On Recall: | Enable/disable Power-On Recall. |
| Reset | Restores function settings to the factory default. |
Tips
Do not use any hard object to wipe the screen as this may cause permanent damage.
Unplug the monitor before cleaning the screen. Clean the screen and casing with a clean soft cloth to remove dust. Do not use liquid cleaning agents or aerosols.
Do not allow liquids to enter the LCD display as this may cause damage to its internal parts.
Mobile phones
Keep all mobile phones away from the monitor. The radio signals from the phone may cause image deformation and distort the sound. The monitor may behave abnormally or it may even be damaged.
Waste disposal instructions
We attach great importance to environmental protection. This monitor contains recoverable and reusable materials.
There are professional companies that dismantle discarded electronic equipment to recover recyclable material. This minimizes waste and also the amount of material that needs final disposal. The lamp tubes of this product contain mercury. Please dispose of this product in accordance with local laws and regulations.
Product Specifications
| Model | V27m |
| Panel Size (Diagonal) | 686mm (27") |
| Native Resolution | 1920 x 1080 |
| Viewing Angle | Horizontal 170° / Vertical 160° (Typ.) |
| Brightness | 300cd/m2 |
| Contrast Ratio | 60000:1 |
| Speaker Output | 3W x 2 |
| Available Voltage Range | AC100~240V 50/60Hz |
| Power Consumption (Load) | ≤60W |
| Power Consumption (Idle) | ≤1W |
| Dimension (W x H x D)(with base and bracket) | 680 x 546 x 262mm |
| Wall-mount Accessories | Not included |
| Wall-mount Dimension | 100 x 100mmM4 x 4 pcs (screws) |
| Environmental Requirements | |
| Operating Temperature | 0°C ~ 35°C |
| Humidity | 20% ~ 80% |
| Storage Temperature | -20°C ~ 50°C |
| Humidity | 10% ~ 90% |
Supported Resolution
| Default PC Mode | |||
| Standard | Resolution | H. Frequency(kHz) | V. Frequency(kHz) |
| VGA | 640×480 @60Hz DMT | 31.469 | 59.940 |
| VGA | 640×480 @67Hz MAC | 35.000 | 66.667 |
| VGA | 640×480 @72Hz DMT | 37.861 | 72.809 |
| VGA | 640×480 @75Hz DMT | 37.500 | 75.000 |
| Dos-mode | 720×400 @70Hz DOS | 31.469 | 70.087 |
| SVGA | 800×600 @56Hz DMT | 35.156 | 56.250 |
| SVGA | 800×600 @60Hz DMT | 37.879 | 60.317 |
| SVGA | 800×600 @72Hz DMT | 48.077 | 72.188 |
| SVGA | 800×600 @75Hz DMT | 46.875 | 75.000 |
| SVGA | 832×624 @75Hz | 49.725 | 74.500 |
| XGA | 1024×768 @60Hz DMT | 48.363 | 60.004 |
| XGA | 1024×768 @70Hz DMT | 56.476 | 70.069 |
| XGA | 1024×768 @75Hz DMT | 60.023 | 75.029 |
| XGA | 1024×768 @75Hz MAC | 60.241 | 74.927 |
| *** | 1152×864 @75Hz DMT | 67.500 | 75.000 |
| *** | 1280×960 @60Hz DMT | 60.000 | 60.000 |
| SXGA | 1280×1024 @60Hz DMT | 63.981 | 60.02 |
| SXGA | 1280×1024 @75Hz DMT | 79.976 | 75.025 |
| WXGA+ | 1440×900 @60Hz CVT16:10 | 55.935 | 59.887 |
| WXGA+ | 1440×900 @60Hz RB CVT16:10 | 55.469 | 59.901 |
Supported Resolution
| Standard | Resolution | H. Frequency(kHz) | V. Frequency(kHz) |
| WSXGA | 1680X1050 @60Hz CVT16:10 | 65.290 | 59.954 |
| WSXGA | 1680X1050 @60Hz RB CVT16:10 | 64.674 | 59.883 |
| HD | 1920×1080@60Hz | 67.500 | 60.000 |
| SD | 480P@60Hz for SDTV Digital only | 31.469 | 59.94 |
| SD | 576P@50Hz for SDTV Digital only | 31.250 | 50.000 |
| HD | 720P@60Hz for HDTV Digital only | 45.000 | 60.000 |
| HD | 720P@50Hz for HDTV Digital only | 37.500 | 50.000 |
| HD | 1080i@60Hz for HDTV Digital only | 33.750 | 60.000 |
| HD | 1080i@50Hz for HDTV Digital only | 28.125 | 50.000 |
| HD | 1080P@60Hz for HDTV Digital only | 67.500 | 60.000 |
| HD | 1080P@50Hz for HDTV Digital only | 56.250 | 50.000 |
Troubleshooting
Before calling our Customer Service, check this troubleshooting list to understand the symptoms and solutions to your problems.
| Symptoms | Items to be inspected and measures to be taken |
| No power | Check whether the power cord of the monitor is plugged into the outlet.Unplug the monitor from the mains, wait for 60 seconds, plug it into the outlet again and turn it on. |
| A static colored spot appears on your TV screen. | There is no need to take any action because the LCD panel is manufactured using high technology to display the refined picture details. Sometimes an inactive pixel can be displayed as a static red, blue, green or black spot on the screen. This will not affect monitor performance. |
| No image | Adjust the contrast and brightness settings. |
| Normal image but no sound | Turn up the volumeCheck that a proper source is selected. |
| Normal sound but poor color | Adjust the contrast, saturation and brightness settings. |
| Poor image quality | When an external device (such as S-VHS video recorder or camcorder) is connected, the image quality may be poor.Turn off other external devices for the time being. |
| Horizontal dotted line | This may be caused by electronic interference such as a hair dryer or nearby fluorescent tube. Turn off the device. |
| VGA mode does not work | Check that the VGA connection is secure.Check that a proper signal source is selected.Check if you have selected the correct resolution for the PC.Check the video card settings of the PC. |
| In VGA mode, black bars appear on the top and bottom of the VGA display | Set the PC refresh rate to 60Hz. |
Glossary
Audio/video input
These connectors (RCA-type plug) are located on the back of the monitor. It is specially designed to be used with a video recorder (or other accessories) to receive higher image resolution and sound.
S-Video input
Connects directly to high resolution video sources, such as a Super VHS recorder, disc player etc. and provides better image resolution and definition.
Component signal input
Allows the monitor to connect directly to high resolution video sources, such as the component signal input of a DVD player and digital television. It provides better image resolution and definition.
Menu
This is the function control list displayed on the monitor and used for adjustments.
Sleep timer
The monitor can be set to turn off after a fixed amount of time using this feature.
China RoHS Regulation Marking Requirements
According to China's "Management Methods for Controlling Pollution by Electronic Information Products" or commonly referred to as China RoHS, the following lists the names and content of the toxic or hazardous substances or elements that may be contained in this product.
Products applicable to this table
Display (LCD or CRT), flat panel TV (LCD and Plasma), and monitor
Toxic and Hazardous Substances or Elements
| Part Name | Toxic and Hazardous Substances or Elements | |||||
| Lead (Pb) | Mercury (Hg) | Cadmium (Cd) | Hexavalent Chromium ( Cr^6+ ) | Polybro-minated biphenyls (PBB) | Polybro-minated diphenyl ethers (PBDE) | |
| Casing | O | O | O | O | O | O |
| CRR Display | X | O | O | O | O | O |
| LCD Display/ Lamp Tube | X | X | O | O | O | O |
| Plasma Display | X | O | O | O | O | O |
| Circuit Board Assembly* | X | O | O | O | O | O |
| Power Adapter | X | O | O | O | O | O |
| Power Cord/Cable | X | O | O | O | O | O |
| Remote Control | O | O | O | O | O | O |
| * The circuit board assembly includes the printed circuit board and its components, such as resistors, capacitors, integrated circuits, connectors, etc.O: Indicates that the toxic and hazardous substances contained in all of the homogeneous material for this part is below the “Limit Requirements Standard for the Toxic and Hazardous Substances in Electronic Information Products.”.X: Indicates that this toxic and hazardous substance contained in at least one of the homogeneous materials used for this part is above the “Limit Requirements Standard for the Toxic and Hazardous Substances in Electronic Information Products;” however, the part marked with “X” complies with the EU RoHS Regulations (exempted). | ||||||

This mark indicates the period (10 Years) that the toxic and hazardous substances or elements contained in this electronic information product will not leak or change under normal operating conditions. No serious damage to persons, property, or environment will occur when this product is used.

- V27m
- Operating Instructions
- Content
- Important safety notes
- Read these notes before operating the device.
- Connection and preparation of the monitor
- Parts list
- Connection and preparation of the monitor Installation of the base
- Disassembly of the base
- Stand the monitor on a stable surface.
- Connection and preparation of the monitor Installing the monitor on the wall
- Power connection
- Turning the LCD Monitor On or Off
- To turn on:
- To turn off:
- Indicator status:
- Control Panel and Interface
- Side panel
- Source Interface
- Video/S-Video Input:
- Auxiliary Component Input:
- HDMI Input:
- PC Signal and PC Audio Input:
- Earphone Jack:
- Using the Menu
- Source Menu
- Video Settings
- Audio Settings (applicable to all modes)
- Function settings
- Tips
- Mobile phones
- Waste disposal instructions
- Troubleshooting
- Glossary
- Audio/video input
- S-Video input
- Component signal input
- Menu
- Sleep timer
- China RoHS Regulation Marking Requirements
- Products applicable to this table
Märke : AOC
Modell : V27m
Kategori : TV